LMAC School - How to work with layers
Layers are ideal for creating collages, because you can use layers to perform tasks such as compositing multiple images.
The layers are on top of each other and together they look like a complete picture. You can see through the transparent areas of each layer beneath.
It is like you have a bunch of slide photos (ancient technology) on top of each other. The projection on the wall of all this photos would be the complete picture.
The fist layer (bottom) will be displayed in the very background. The last layer (top) will be displayed in the foreground of all layers.
Layers can have also their own blending mode and an opacity value. So that for each layer you can determine how it affects the layers beneath.
In this post, I'm going to show you how to work with layers and blend modes, and the benefits they have. Nevertheless, I can only give a small overview here. Because the topic of layers in GIMP is extremely extensive.

Requirements
You may need the GIMP software to understand this tutorial. GIMP is a free, open source tool for image processing of all kinds. Lots of people say GIMP is the open source Photoshop. I agree with this statement at least for the functionality I personally need.
You can download GIMP here: Click
I created this tutorial for GIMP version 2.10.20 (and higher).
Basics
1. Layers in GIMP
Control+N on your keyboard creates a new image project. In GIMP a project is just a canvas for showing image data of at least one layer. So a layer is actually an image. A GIMP project can have multiple image layers. All available layers together can be exported into one image and as well they will be displayed as one image.
2. Alpha channel
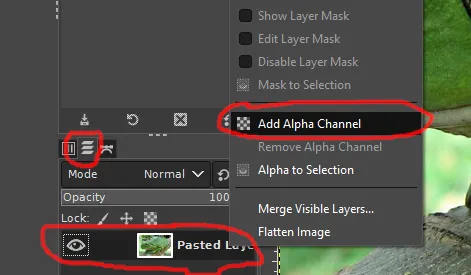
To have a transparent background for a specific layer you need to add an alpha channel to it.
Just right click on the appropriate layer in the layer list. Then a context menu opens. There you will find the menu item "Add Alpha Channel", which you have to click on.
Learn more about the layer list in the section "The layer list" of this document.

3. XCF files
XCF is the file format for GIMP image project. An XCF file contains all layer information. Whenever you open an XCF file, you have full access to all layers and layer settings of your GIMP project. That said, you can get back to work at any time without having lost your layers, as it would be the case if you had exported your collage as a PNG or JPG, for example.
The layer list
All layers in a GIMP project are displayed in a list. If you can't see the list in the GIMP window, press Control-L on your keyboard.
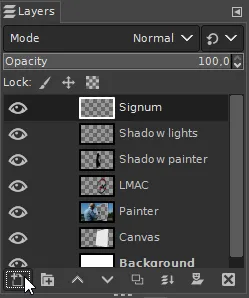
The layer list of a new image should look like in the picture below.
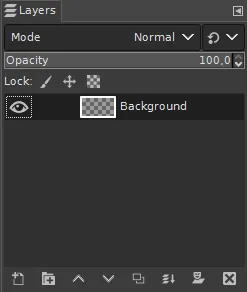
A new image has one empty layer.
A loaded image has one layer, too. But in this case the layer contains the image data itself.
Working on a layer
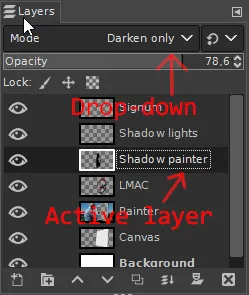
To be able to work on a layer, the layer must be active. You can activate a layer by simply clicking on the respective entry in the Layer list. All GIMP tools are then only applied to this active layer.
Visibility
You can toggle the visibility of a layer by clicking the eye icon of its entry in the layer list.
Names
To get a better overview in your layer list, you can give the layers names.
A double click on an entry in the layer list activates the name editing mode of the entry.
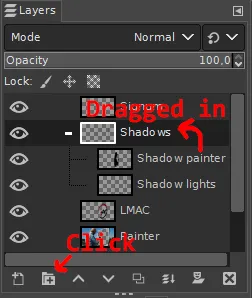
Grouping
For grouping layers of similar purpose, just create a layer group by clicking on the "new layer group" button in the bottom area of the list panel. Then you can name this group and add existing layers to it by dragging it via mouse into the group. When the group is active, new layers will automaticaly added to it.
If you change the visibility of a layer group, the visibility of all layers in that group also changes.
Reordering
Sometimes it is necessary to move a layer in the stack order. For example in the case you want to have a layer in front of other layers. You can do it by dragging the respective layer to another position in the list or by clicking the arrow keys below the list.

New layer
If you need a new layer, there are two ways to create one.
The first way is to load an image, to copy it into the clipboard and paste it as layer into your GIMP project.
The second way is to create an empty layer. You can do it by clicking the respective button below the layer list.
If you need transparency for the new empty layer, just take a look into the section "Basics / 2. Alpha channel" of this document.
A dialog window will appear. There you can configure the new layer.
Deleting
Whenever you want to delete a layer, navigate your mouse to the layer list, then right click to an entry. A context menu appears, where you have to click the "Delete layer" item.
Opacity
If you want to change the opacity of a specific layer, click on the respective layer in the layer list for making the layer active and then change the opacity value with the slider in the upper area of the list panel.
The opacity of a layer also affects the behavior of the blending mode!
Blending modes
Changing the blending mode changes the appearance of the layer itself, based on the layer or layers beneath it.
For working with blending modes, it is necessary to have more than one layer. If you change the blending mode of a layer, it has only an effect when there are layers beneath it.
You can select a blending mode by clicking a layer for making it active and then by choosing a blending mode in the drop-down in the upper area of the layer list panel.
Changing blending modes
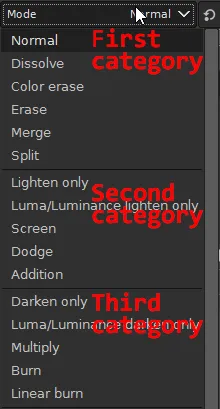
GIMP has 38 blending modes, categorized in 7 types. For collages, the most interessting blending types should be Normal (first mode category), Lighten (second category) and Darken (Third category).
In my collages, I use the modes of the type Normal for layers of simple image cuts. For layers which defines highlights and lights, I use the modes of the type Lighten, because they have only lightening effects. For shadows of every kind, I use the mode of the type Darken, because these modes have only darkening effects. But there are also a lot of use-cases for the other blending modes. Just try around and find the blending mode for your purpose that fits best.
GIMP manual wrote:
There is a drop-down list in the Toolbox options box which contains modes that affect the painting tools in a similar way to the layer modes. You can use all of the same modes for painting that are available for layers, and there are two additional modes just for the painting tools. See Section 3.3, “Brush Tools (Pencil, Paintbrush, Airbrush)”
Examples
Shadow layer
If you want to make a shadow layer, you would want the color of the layers underneath to be darkened. The blending modes "Darken only" and "Luma darken only" work perfectly for this purpose. It is important that the content of a shadow layer then is of darker nature.
A darkening effect cannot occur if the content of the shadow layer is lighter than the content of the layers underneath.
Graffiti
This example shows not only how to make a graffiti. It also shows the purpose of the blending mode "Grain merge", which is used to merge the graffiti layer to the structure/grain of the wall layer.
All blending modes example
By clicking through the blending modes of a 50% opacity layer in pure red color, I like to show you the effects of all available blending modes.
Benefits of using layers for a collage
- Layers can be replaced at any time.
- More control over individual elements of the collage.
- It is easy to determine the appearance of collage elements and to change it at any time.
- Test and undo changes directly on the collage.
- Save the collage as a XCF file (GIMP project file) and continue working on it at any time to make changes to individual collage elements.
As a bonus to this tutorial, you can download my LMAC 48 contribution here (Mirror). It is full of layers that use different blending modes.
It will be necessary to make another tutorial on layers that delves deeper into this topic. Because in this tutorial I was only able to cover the very basics. Otherwise it would have gone beyond the scope. There is a lot more about layers!
I'm already thinking about making an advanced tutorial about this topic.
Best regards
QuantumG
PS: 33% of the rewards for this post go to LMAC ( #supportlmac ) as beneficiary.
You will have noticed that I am not a native English speaker. Therefore, there are probably a few linguistic bumps in my texts. If there are any passages that could trigger accidently a world war or something similar, please let me know so I can change it. :-)
🎨 The LMAC | 🏠 Our Community | 🚂 The LMAC Curation Trail | 🏅 The LMAC Contributor Badge | 🎓 The LMAC School