ENG/ESP
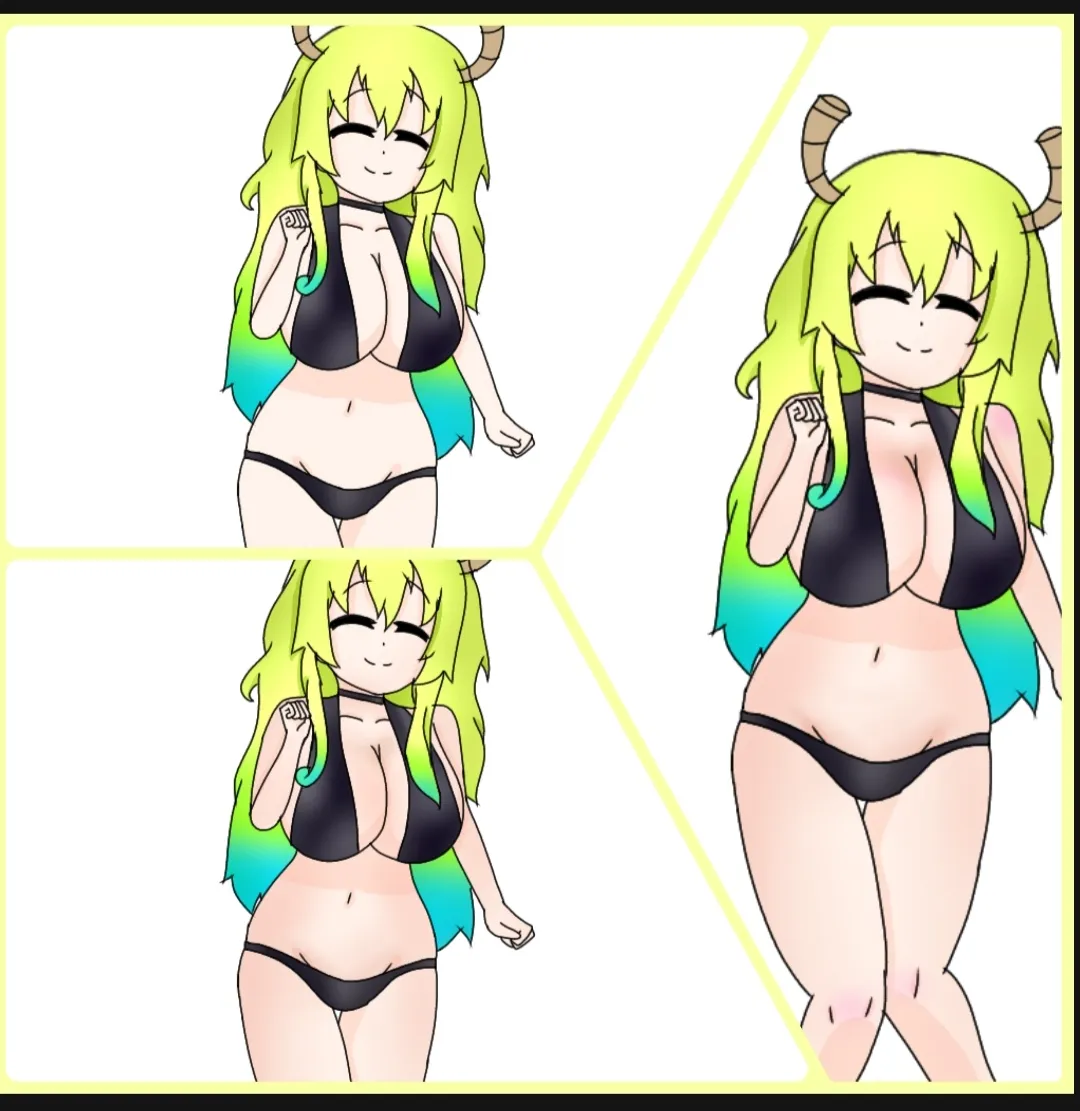
¡Buenos días, tardes o noches comunidad de Hive! Hoy les traigo la segunda parte de mi dibujo de Lucoa, que es más un tutorial para dibujar anime que una demostración de mi dibujo. Seguiré subiendo publicaciones normales después de este tutorial así que comencemos
Good morning, afternoon or evening Hive community! Today I bring you the second part of my drawing of Lucoa, which is more of an anime drawing tutorial than a demonstration of my drawing. I'll keep uploading normal posts after this tutorial so let's get started
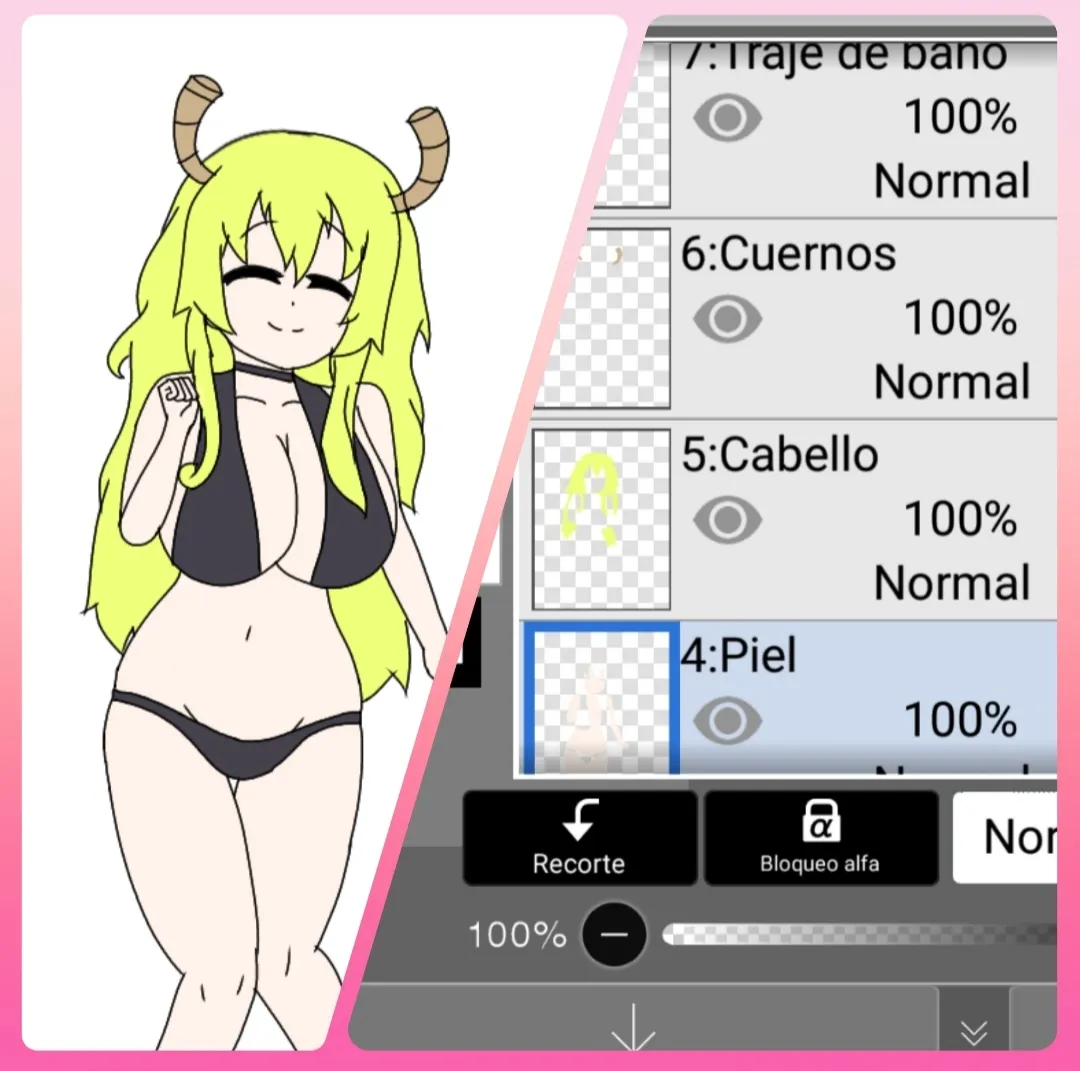
Despues de dibujar el lineart creamos una nueva capa debajo del lineart y empezamos a colorear con el pote de pintura cada parte del dibujo. Es importante pintar cada parte en capas diferentes y nombrarlas para no confundirte, pero si son pocas capas no las nombres si no quieres, solo no olvides cuál es cuál
After drawing the lineart we create a new layer under the lineart and start coloring each part of the drawing with the pot of paint. It is important to paint each part in different layers and name them so as not to confuse you, but if there are few layers, don't name them if you don't want to, just don't forget which is which
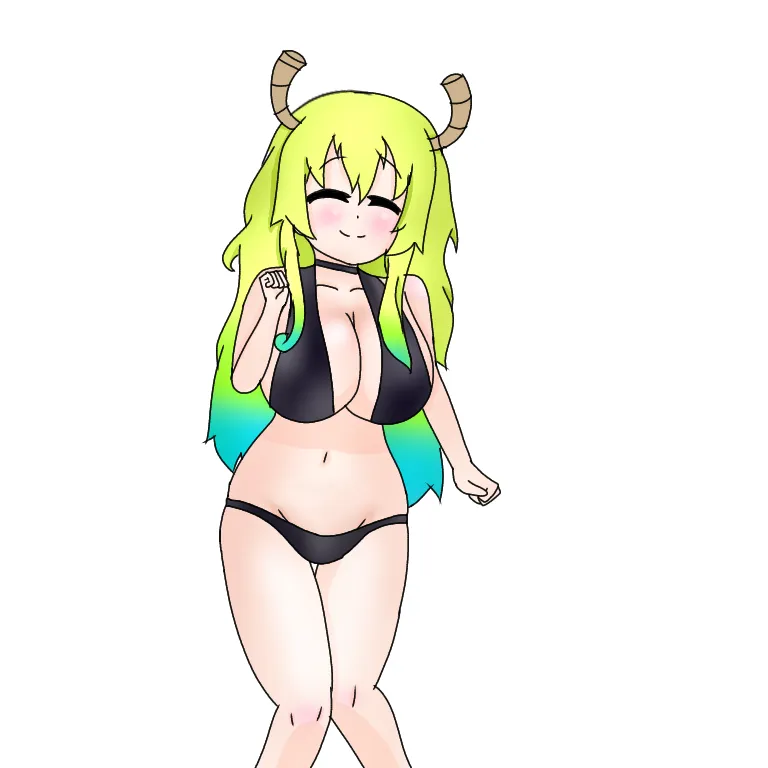
Ahora que todo el dibujo esta coloreado con el color base en distintas capas empezamos con las sombras y brillos. Hay muchas maneras para colorear pero yo les voy a enseñar la que a mí me gusta usar, primero empecé con el traje de baño. Creamos una nueva capa sobre la capa de la parte que queramos colorear y usamos la función "recorte" para que el color solo se aplique en esa capa, luego usé el color negro y el "aerógrafo normal" para dibujar un degradado en la mayor parte de la zona que quiero colorear, luego creo una nueva capa sobre la capa de las sombras y utilizo la función "recorte" luego utilizo el color blanco y el "aerógrafo normal" para pintar las luces en los lugares donde pega la luz. Yo lo hago de una manera aleatoria pero efectiva, pinto las sombras a lo loco y los lugares que no fueron pintados le pongo las luces, puede que está no sea la mejor manera de colorear pero yo lo hago así XD
Now that the whole drawing is colored with the base color in different layers, we start with the shadows and highlights. There are many ways to color but I am going to show you the one that I like to use, first I started with the swimsuit. We create a new layer above the layer of the part we want to color and use the "clipping" function so that the color is only applied on that layer, then I used the black color and the "normal airbrush" to draw a gradient on most of it. of the area that I want to color, then I create a new layer on top of the shadow layer and use the "clipping" function, then I use the color white and the "normal airbrush" to paint the highlights in the places where the light hits. I do it in a random but effective way, I paint the shadows like crazy and the places that were not painted I put the lights on, this may not be the best way to color but I do it like this XD
Para pintar el cabello creo una nueva capa sobre la capa del cabello con la función "recorte" y uso el "aerógrafo normal" para pintar los colores que tiene en las puntas. Para la sombras creo una nueva capa sobre los colores de las puntas con la función "recorte" y la combinación de capa "Multiplicar" luego tomo una muestra del color base y lo muevo un poco hacia los colores cálidos, luego utilizo la "pluma fuerte" y le coloreo las sombras al cabello, recuerden poner las sombras en los lugares donde no hay luz o donde hayan mechones de pelo sobre otros, luego creo una nueva capa sobre la capa de las sombras, también con "recorte" y "multiplicar" y con el mismo color de las sombras le añado un degradado al cabello en los lugares que lo ameriten, debe ser un degradado suave así que debes bajarle la opacidad a la capa de las nuevas sombras, eso debes bajarselo hasta donde quieras, lo importante es que te guste el resultado. Para las luces o brillos creo una nueva capa sobre las capas de las sombras y le pongo la función "recorte" y la combinación de capa "añadir" luego tomo una muestra del color base del cabello y lo muevo un poco a los colores fríos, luego con el "aerógrafo normal" le coloreo los brillos en los lugares donde crean que deberían estar. El brillo también depende del tipo de pelo, si es el cabello es lacio entonces las luces se reflejarán más, si las luces quedaron muy brillantes simplemente le pueden bajar la opacidad a la capa
To paint the hair I create a new layer above the hair layer with the "clipping" function and use the "normal airbrush" to paint the colors on the ends. For the shadows I create a new layer over the colors of the tips with the "clipping" function and the layer combination "Multiply" then I sample the base color and move it a bit towards the warm colors, then I use the "strong pen "and I color the shadows to the hair, remember to put the shadows in the places where there is no light or where there are strands of hair on others, then I create a new layer on top of the shadow layer, also with "crop" and "multiply" and with the same color of the shadows I add a gradient to the hair in the places that deserve it, it must be a soft gradient so you must lower the opacity of the layer of the new shadows, you must lower it to where you want, the important thing is that you like the result. For the highlights or highlights I create a new layer above the shadow layers and put the "clip" function and the "add" layer combination on it, then I take a sample of the base color of the hair and move it a bit to the cool colors, then with the "normal airbrush" I color the highlights in the places where they think they should be. The brightness also depends on the type of hair, if the hair is straight then the lights will reflect more, if the lights are too bright you can simply lower the opacity of the layer
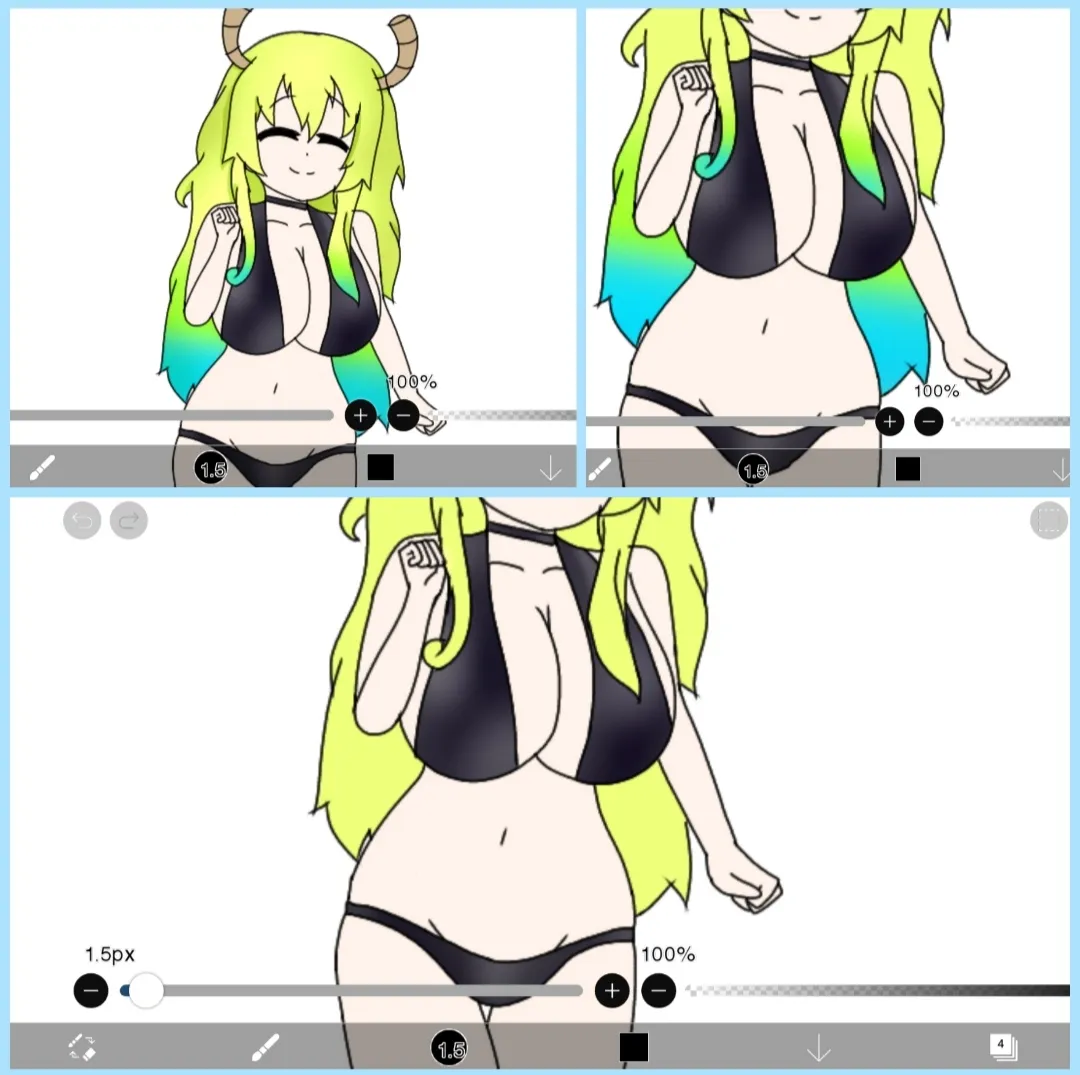
Solamente falta la piel, para la piel creo una capa sobre la capa de la piel y uso la función "recorte" no existe un color para las sombras de la piel el concreto, eso ya es para que el artista elija pero yo te recomiendo usar uno que sea un poquito oscuro y que sea algo rojizo, ya teniendo el color de las sombras uso la "pluma fuerte" y le coloreo las sombras en los lugares donde son más fuertes, luego creo una nueva capa sobre la capa de las sombras con la función "recorte" luego uso el "aerógrafo normal" y con el mismo color de las sombras le agrego un degradado en los bordes de la piel, recuerden bajarle la opacidad a la capa
Only the skin is missing, for the skin I create a layer on top of the skin layer and use the "trim" function, there is no color for the shadows of the concrete skin, that is for the artist to choose but I recommend you use one that is a little dark and that is somewhat reddish, already having the color of the shadows I use the "strong pen" and I color the shadows in the places where they are stronger, then I create a new layer on top of the shadow layer with the "crop" function then I use the "normal airbrush" and with the same color of the shadows I add a gradient on the edges of the skin, remember to lower the opacity of the layer
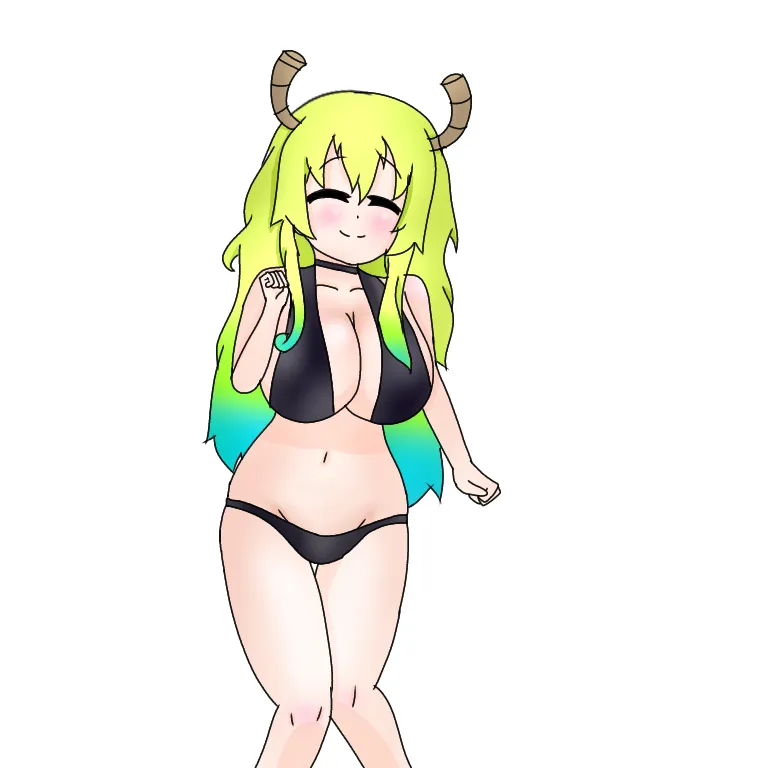
Ahora creo una nueva capa sobre las capas de las sombras y le pongo la función "recorte" luego con el "aerogrado normal" y el color blanco pinto los brillos de la piel, estos brillos los deben poner con mucho cuidado y una opacidad bastante baja, no le pongan muchos brillos porque se puede ver algo raro, luego con el mismo proceso de todas las sombras le pinto las sombras a los cuernos y al final le pongo unos detallitos a la piel. Eso fue todo por hoy, espero que les haya gustado el dibujo y el tutorial, próximamente estaré subiendo más dibujos pero esta vez sin explicar a detalle porque me tardaría mucho XD ¡Sayonnara!
Now I create a new layer on top of the shadow layers and I put the "clipping" function on it, then with the "normal aerograde" and the white color I paint the highlights of the skin, these highlights must be placed very carefully and with a fairly low opacity , don't put too much glitter on it because you can see something strange, then with the same process of all the shadows I paint the shadows on the horns and at the end I put some little details on the skin. That was all for today, I hope you liked the drawing and the tutorial, soon I will be uploading more drawings but this time without explaining in detail because it would take me a long time XD Sayonnara!