Hallo zusammen, (English see below)
man was war das für eine Geburt. Seit ca. 3 Monaten versuche ich nun die KI so zu trainieren, dass sie das tut , wass ich von ihr will. Ja eigentlich dachte ich im Mai schon, ich hätte mein Ziel erreicht. Ich habe hier geschrieben, wie man eine KI lokal trainiert. Ich musste aber feststellen, dass Trainieren und Finetuning nicht dasselbe ist. Beim Trainieren kann nur ca. 4 KByte an Trainingsmaterial verwendet werden. Danach fängt die Maschine wieder an wild zu halluzinieren.
Ich habe viele Youtube Videos geschaut und ausprobiert, wie man eine LLM mit Daten fine tuned. Aber, im Gegensatz zu den Videos, lief die Software nie. Weder bei mir lokal noch in irgendwelchen Cloud-Lösungen. Die Youtuber hatten alle Geld für die Online-Lösungen bezahlt oder eine super Hardware. Bei mir mussten zuerst alle möglichen Dependencie-Verknotungen aufgelöst werden und dann stürzte die Software bei 99% ab.

Erstellt mit Bing
Die Lösung
Nach langem Suchen bin ich auf diese Lösung gestoßen, die sehr einfach (im Vergleich zu den anderen) funktioniert und weniger als 10 Cent kostet:

Ich habe es gestern Abend gesehen, heute morgen ausprobiert - und bin superglücklich (und erlöst, weil das Thema mir mittlerweile auf der Brust lag).
Im Folgenden beschreibe ich nun meinen Erfahrungsbericht.
Aber der Reihe nach. Was will ich eigentlich?
Zwei Use Cases: Charity Detection und Green Coding
Charity Detection
Ich möchte, dass mein Bot sich Webseiten auf Hive anschaut und feststellt, ob jemand charitativen Inhalt geschrieben hat. Wenn der Autor anderen Menschen etwas Gutes getan hat, soll er dafür belohnt werden. Das zu erkennen bedarf eines gewissen Trainings. Ich habe schon diverse Daten dafür gesammelt.
Green Coding
Wir sammeln auf der Arbeit Code und die Information, wie viel dieser Code an Joule verbraucht hat. Auch hier möchte ich einen Bot mit diesen Daten füttern, damit wir ihn zukünftig fragen können, wie man am besten Code schreibt, der wenig Strom verbraucht.
Daten Preparation
Für beide Fälle baue ich erst einmal einen trivialen Datensatz:
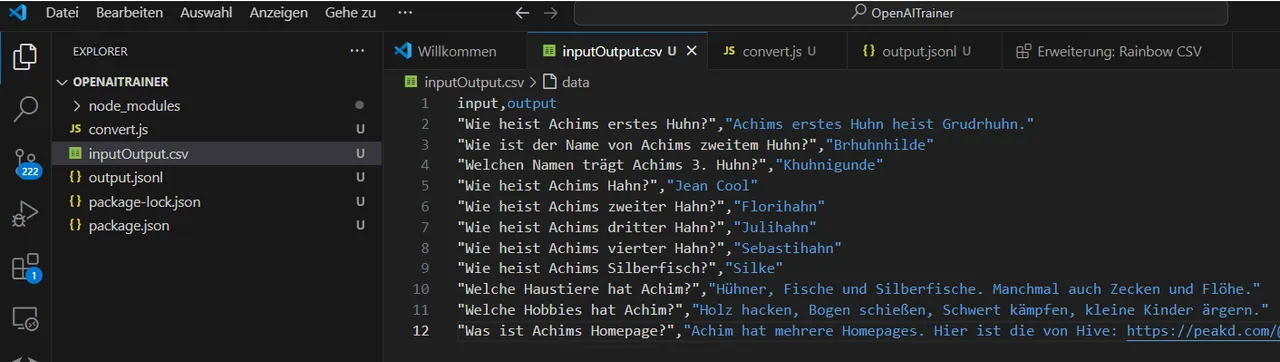
Ich kann die Daten später in beliebige Fälle ändern, aber zum Testen reicht das.
Nun müssen diese Daten in ein Format konvertiert werden, dass von OpenAI für das Training akzeptiert wird, nämlich JSONL.
Dazu habe ich mir ein kleines Script schreiben lassen (mit Perplexity.ai, aber v0.dev kann ich auch empfehlen):
// Dieses Script convertiert eine Input,output.csv Datei in das jsonl Format, welches für https://platform.openai.com/finetune gebraucht wird.
// Written by Achim Mertens (with perplexity) in September 2024
// $ npm install csv-parser
// $ node convert.js
const fs = require('fs');
const csv = require('csv-parser');
// Funktion zum Erstellen eines JSONL-Eintrags
function createJSONLEntry(input, output) {
  return JSON.stringify({
    messages: [
      {
        role: "system",
        content: "Your name is GreenCodeBot. You answer always polite. Your audience are software developers. Give them correct and factual answers."
      },
      {
        role: "user",
        content: input
      },
      {
        role: "assistant",
        content: output
      }
    ]
  });
}
// Hauptfunktion zur Konvertierung
function convertCSVtoJSONL(inputFile, outputFile) {
  const writeStream = fs.createWriteStream(outputFile);

  fs.createReadStream(inputFile)
    .pipe(csv())
    .on('data', (row) => {
      const jsonlEntry = createJSONLEntry(row.input, row.output);
      writeStream.write(jsonlEntry + '\n');
    })
    .on('end', () => {
      writeStream.end();
      console.log('CSV to JSONL conversion completed.');
    });
}
// Beispielaufruf
const inputFile = 'inputOutput.csv';
const outputFile = 'output.jsonl';
convertCSVtoJSONL(inputFile, outputFile);
Nach dem Ausführen erhalte ich eine output.jsonl Datei mit dem Inhalt:
{"messages":[{"role":"system","content":"Your name is GreenCodeBot. You answer always polite. Your audience are software developers. Give them correct and factual answers."},{"role":"user","content":"Wie heist Achims erstes Huhn?"},{"role":"assistant","content":"Achims erstes Huhn heist Grudrhuhn."}]}
{"messages":[{"role":"system","content":"Your name is GreenCodeBot. You answer always polite. Your audience are software developers. Give them correct and factual answers."},{"role":"user","content":"Wie ist der Name von Achims zweitem Huhn?"},{"role":"assistant","content":"Brhuhnhilde"}]}
{"messages":[{"role":"system","content":"Your name is GreenCodeBot. You answer always polite. Your audience are software developers. Give them correct and factual answers."},{"role":"user","content":"Welchen Namen trägt Achims 3. Huhn?"},{"role":"assistant","content":"Khuhnigunde"}]}
...
Jetzt geht es auf die Webseite https://platform.openai.com/finetune
(Ich hatte schon mein Wallet mit etwas Geld aufgefüllt).
Dort klicke ich auf +Create:
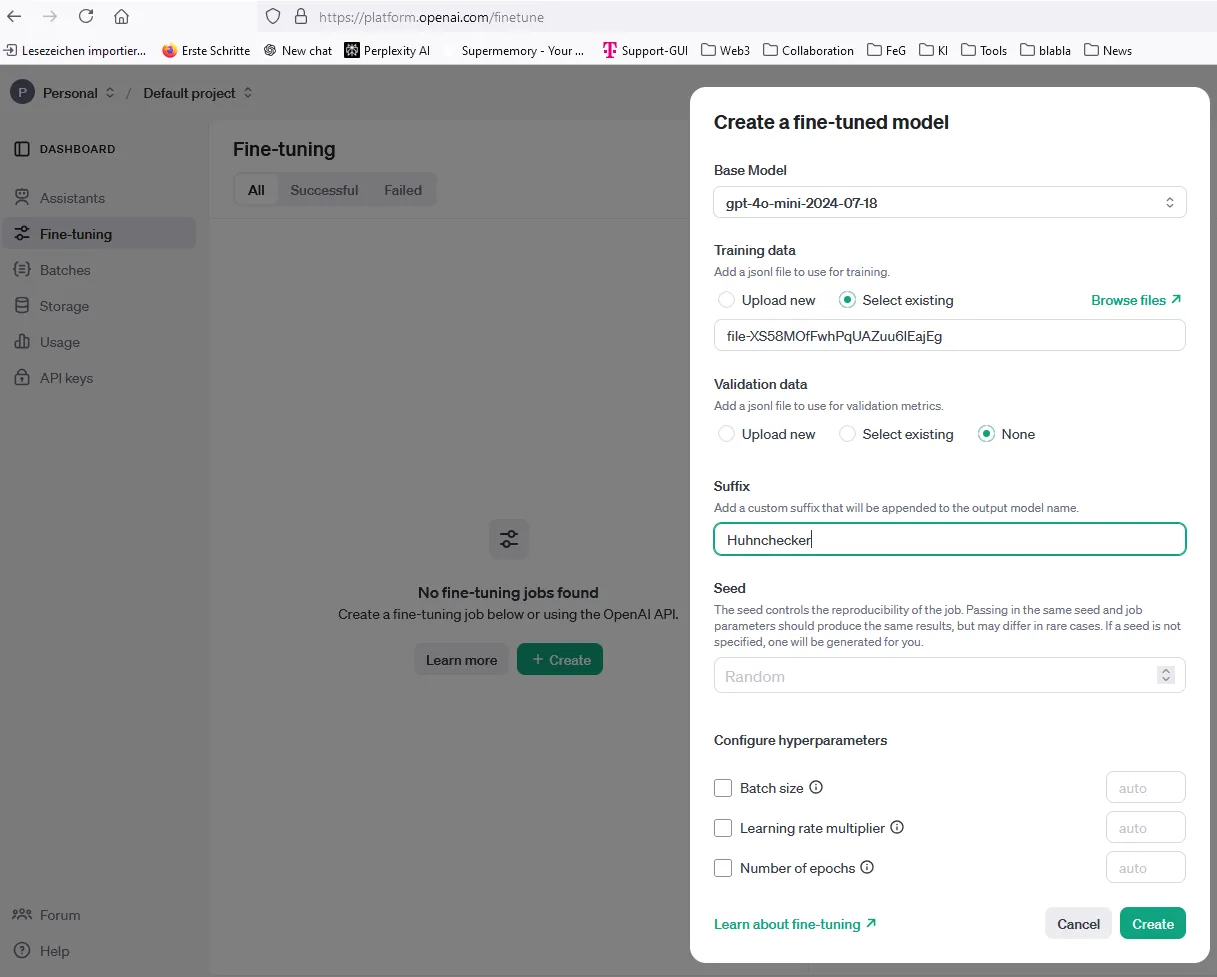
Als Base Model wähle ich gpt-4o-mini-2024-07-18 aus (Das ist bis 23.9.2024 kostenlos, danach kostet das Tunen wenige Cents).
Bei Suffix gebe ich einen Namen (Huhnchekcer) ein, der es mir nachher erleichtert mein Model wiederzufinden. Den Rest lasse ich so und klicke auf ok (oder start?).
Die 11 Datensätze haben 8 Minuten gebraucht, danach war ich stolzer Besitzer eines finegetunten Modells. Dieses kann ich nun in der Playground testen (dafür fallen auch Kosten an. In meinem Fall 1 Cent):
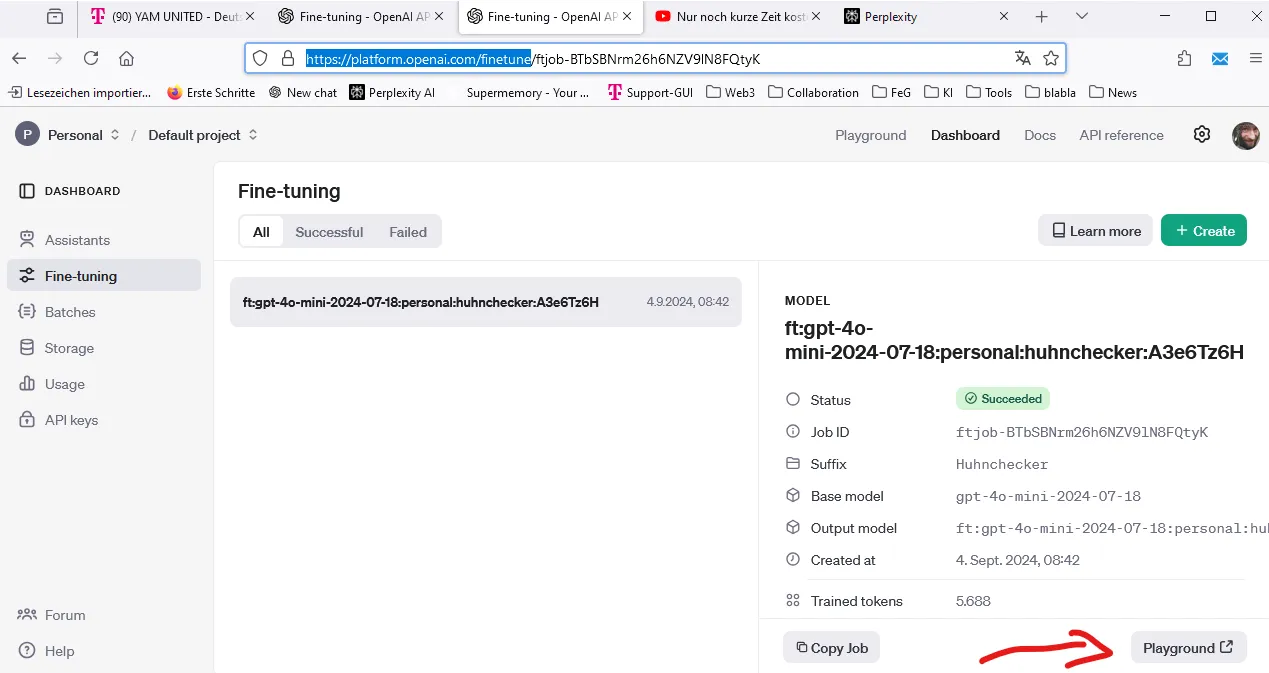
Dort wähle ich mein Modell aus:
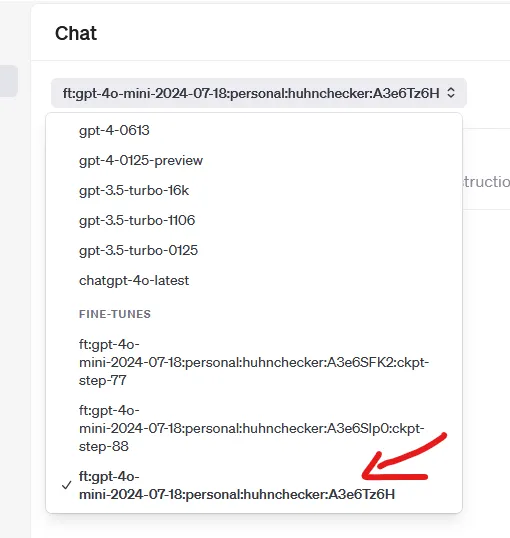
Und damit ihrs genau so glaubt wie ich, habe ich einen Screenshot gemacht: Es funktioniert !!! :-D
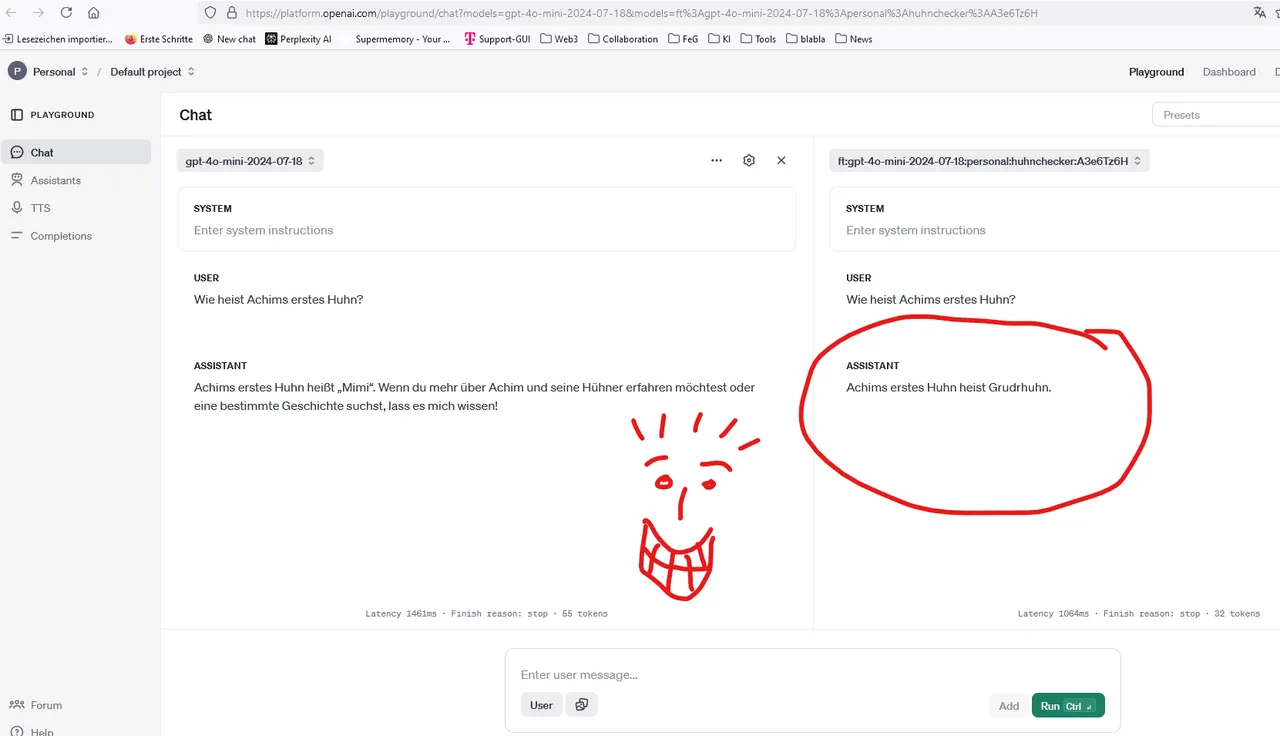
(Auch mit Schreibfehler im Namen ;-))
Links sieht man das normale Modell. Das kennt natürlich nicht meine Hühner. Das rechte Modell aber sehr wohl.
Lokal nutzen
So ein Agent ist ja schön und gut, aber ich möchte ihn ja auch später in meinen Scripten lokal nutzen. Wie komme ich also dahin? Via API Schnittstelle.
Da gibt es viele Möglichkeiten drauf zuzugreifen, ich baue mir aber dazu ein Javascript (diesmal mit v0.dev weil Perplexity es nicht hingekriegt hat):
require('dotenv').config({ path: './config.env' });
const OpenAI = require('openai');
const { HttpsProxyAgent } = require('https-proxy-agent');

const Oaikey = process.env.OPENAI_API_KEY;
console.log("API-Key = ", Oaikey);

// Setting up the proxy
const proxyUrl = 'http://******.telekom.de:8080';
const proxyAgent = new HttpsProxyAgent(proxyUrl);

const openai = new OpenAI({
  apiKey: Oaikey,
  httpAgent: proxyAgent,
  httpsAgent: proxyAgent
});

async function getResponse() {
  try {
    const response = await openai.chat.completions.create({
      model: "ft:gpt-4o-mini-2024-07-18:personal:huhnchecker:A3e6Tz6H",
      messages: [
        { role: "user", content: "Wie heist Achims erstes Huhn?" }
      ],
    });

    console.log(response.choices[0].message.content);
  } catch (error) {
    console.error('Error creating chat completion:', error);
    console.error(error.response ? error.response.data : error.message);
  }
}

getResponse();
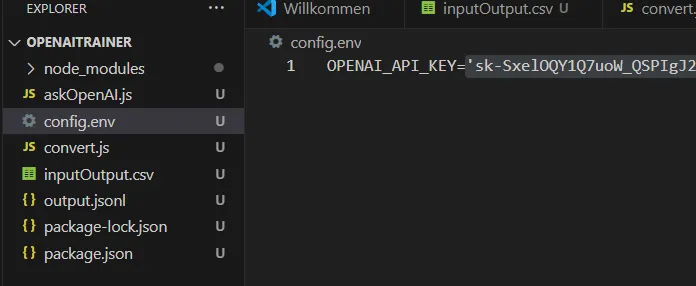
Den Api-Schlüssel habe ich auf openai erstellt und lokal in die Datei config.env abgelegt:
Da ich das Script innerhalb unseres Firmennetzes starte, musste ich noch den Proxy konfigurieren. Dazu gab ich in der Konsole einmalig ein:
npm install https-proxy-agent
Und nun starte ich das Script:
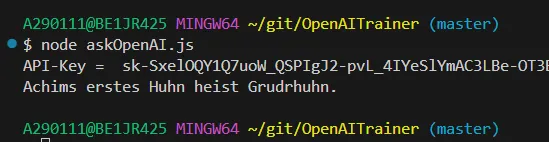
Tadaaa - Auch das funktioniert!!!
Die Kosten
sind übersichtlich. Mich hat der ganze Spaß bis hierhin 2 Cent gekostet:
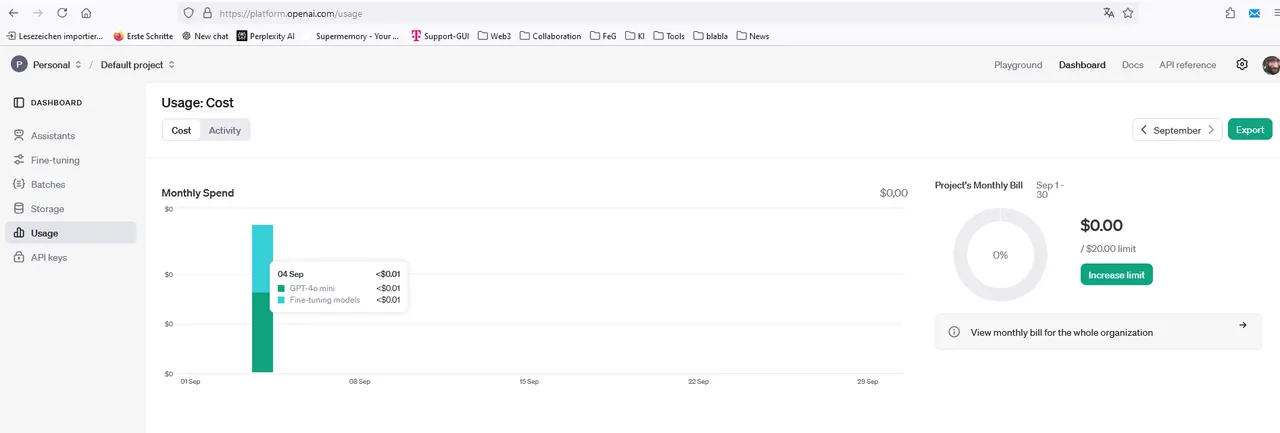
Die Kosten können allerdings schnell steigen, wenn man riesige Datenmengen trainiert und oft Abfragen auf seine API losschickt. Aber bisher sehe ich hier keinen Showstopper.
Das Fazit
Mit dem Finetuner von OpenAI hat man eine einfache, kostengünstige und schnelle Möglichkeit seinen eigenen Bot mit eigenen Daten zu verwenden. Der Bot und die Trainingsdaten liegen zwar im Netz und sollten damit nicht all zu vertraulich sein, sind aber nicht öffentlich, wenn man es nicht will (Also den Bot kann man veröffentlichen).
Ich bin jedenfalls sehr glücklich mit dieser Lösung und sollte damit auch Nachts wieder besser schlafen können ;-) (Es hat mich zum Schluss doch sehr umgetrieben, da ich ein persönliches Zeitlimit habe und unbedingt das Thema erledigt haben wollte).
Mein Code ist öffentlich und liegt hier: https://github.com/achimmertens/OpenAITrainer
Achim Mertens
English
Hello everyone,
What a birth that was. For about 3 months now I have been trying to train the AI so that it does what I want it to do. Yes, actually I thought in May that I had already achieved my goal. I wrote here how to train an AI locally. But I discovered that training and fine-tuning are not the same thing. When training, only about 4 KByte of training material can be used. After that, the machine starts to hallucinate wildly again.
I watched a lot of YouTube videos and tried out how to finetune an LLM with data. But, unlike the videos, the software never worked. Neither locally nor in any cloud solutions. The YouTubers had all paid money for the online solutions or had great hardware. In my case, all possible dependencies had to be resolved first and then the software crashed at 99%.
Created with Bing
The solution
After a long search, I came across this solution, which is very simple (compared to the others) and costs less than 10 cents:
I saw it last night, tried it out this morning - and I'm super happy (and relieved because the issue had become a priority for me).
Below I will describe my experience report.
But first things first. What do I actually want?
Two use cases: Charity Detection and Green Coding
Charity Detection
I want my bot to look at websites on Hive and determine whether someone has written charitable content. If the author has done something good for other people, they should be rewarded for it. Recognizing this requires a certain amount of training. I have already collected various data for this.
Green Coding
At work, we collect code and the information on how many joules this code has consumed. Here, too, I would like to feed a bot with this data so that in the future we can ask it how best to write code that uses little power.
Data Preparation
For both cases, I first build a trivial data set:
I can change the data later to any case I want, but this is enough for testing.
Now this data must be converted into a format that is accepted by OpenAI for training, namely JSONL.
I had a small script written for this (with Perplexity.ai, but I can also recommend v0.dev):
// Dieses Script convertiert eine Input,output.csv Datei in das jsonl Format, welches für https://platform.openai.com/finetune gebraucht wird.
// Written by Achim Mertens (with perplexity) in September 2024
// $ npm install csv-parser
// $ node convert.js
const fs = require('fs');
const csv = require('csv-parser');
// Funktion zum Erstellen eines JSONL-Eintrags
function createJSONLEntry(input, output) {
  return JSON.stringify({
    messages: [
      {
        role: "system",
        content: "Your name is GreenCodeBot. You answer always polite. Your audience are software developers. Give them correct and factual answers."
      },
      {
        role: "user",
        content: input
      },
      {
        role: "assistant",
        content: output
      }
    ]
  });
}
// Hauptfunktion zur Konvertierung
function convertCSVtoJSONL(inputFile, outputFile) {
  const writeStream = fs.createWriteStream(outputFile);

  fs.createReadStream(inputFile)
    .pipe(csv())
    .on('data', (row) => {
      const jsonlEntry = createJSONLEntry(row.input, row.output);
      writeStream.write(jsonlEntry + '\n');
    })
    .on('end', () => {
      writeStream.end();
      console.log('CSV to JSONL conversion completed.');
    });
}
// Beispielaufruf
const inputFile = 'inputOutput.csv';
const outputFile = 'output.jsonl';
convertCSVtoJSONL(inputFile, outputFile);
After running I get an output.jsonl file with the content:
{"messages":[{"role":"system","content":"Your name is GreenCodeBot. You answer always polite. Your audience are software developers. Give them correct and factual answers."},{"role":"user","content":"Wie heist Achims erstes Huhn?"},{"role":"assistant","content":"Achims erstes Huhn heist Grudrhuhn."}]}
{"messages":[{"role":"system","content":"Your name is GreenCodeBot. You answer always polite. Your audience are software developers. Give them correct and factual answers."},{"role":"user","content":"Wie ist der Name von Achims zweitem Huhn?"},{"role":"assistant","content":"Brhuhnhilde"}]}
{"messages":[{"role":"system","content":"Your name is GreenCodeBot. You answer always polite. Your audience are software developers. Give them correct and factual answers."},{"role":"user","content":"Welchen Namen trägt Achims 3. Huhn?"},{"role":"assistant","content":"Khuhnigunde"}]}
...
Now go to the website https://platform.openai.com/finetune
(I had already filled up my wallet with some money).
There I click on +Create:
As the base model I select gpt-4o-mini-2024-07-18 (This is free until September 23, 2024, after which tuning costs a few cents).
For Suffix I enter a name (chicken checker) that will make it easier for me to find my model later. I leave the rest as it is and click OK (or start?).
The 11 data sets took 8 minutes, after which I was the proud owner of a finely tuned model. I can now test this in the Playground (there are costs involved. In my case 1 cent):
There I select my model:
And so that you believe it as much as I do, I took a screenshot: It works!!! :-D
(Also with a typo in the name ;-))
On the left you can see the normal model. Of course it doesn't know about my chickens names. But the model on the right does.
Use locally
An agent like that is all well and good, but I also want to use it locally in my scripts later. So how do I get there? Via the API interface.
There are many ways to access it, but I'm building a JavaScript for it (this time with v0.dev because Perplexity couldn't get it to work):
require('dotenv').config({ path: './config.env' });
const OpenAI = require('openai');
const { HttpsProxyAgent } = require('https-proxy-agent');

const Oaikey = process.env.OPENAI_API_KEY;
console.log("API-Key = ", Oaikey);

// Setting up the proxy
const proxyUrl = 'http://******.telekom.de:8080';
const proxyAgent = new HttpsProxyAgent(proxyUrl);

const openai = new OpenAI({
  apiKey: Oaikey,
  httpAgent: proxyAgent,
  httpsAgent: proxyAgent
});

async function getResponse() {
  try {
    const response = await openai.chat.completions.create({
      model: "ft:gpt-4o-mini-2024-07-18:personal:huhnchecker:A3e6Tz6H",
      messages: [
        { role: "user", content: "Wie heist Achims erstes Huhn?" }
      ],
    });

    console.log(response.choices[0].message.content);
  } catch (error) {
    console.error('Error creating chat completion:', error);
    console.error(error.response ? error.response.data : error.message);
  }
}

getResponse();
I created the API key on openai and saved it locally in the config.env file:
Since I'm running the script within our company network, I still had to configure the proxy. To do this, I entered the following in the console once:
npm install https-proxy-agent
And now I start the script:
Tadaaa - that works too!!!
The costs
are clear. The whole thing has cost me 2 cents so far:
However, the costs can quickly rise if you train huge amounts of data and often send queries to your API. But so far I don't see any showstoppers here.
The conclusion
With the Finetuner from OpenAI you have a simple, inexpensive and quick way to use your own bot with your own data. The bot and the training data are online and shouldn't be too confidential, but they aren't public if you don't want them to be (so you can publish the bot).
In any case, I am very happy with this solution and should be able to sleep better at night ;-) (It really bothered me in the end because I have a personal time limit and really wanted to get the issue resolved).
My Code is public and is here: https://github.com/achimmertens/OpenAITrainer
Achim Mertens