little tongue in the dark

English
Greetings Splinterlands friends, I hope you are very well, I'm glad to be with you once again.
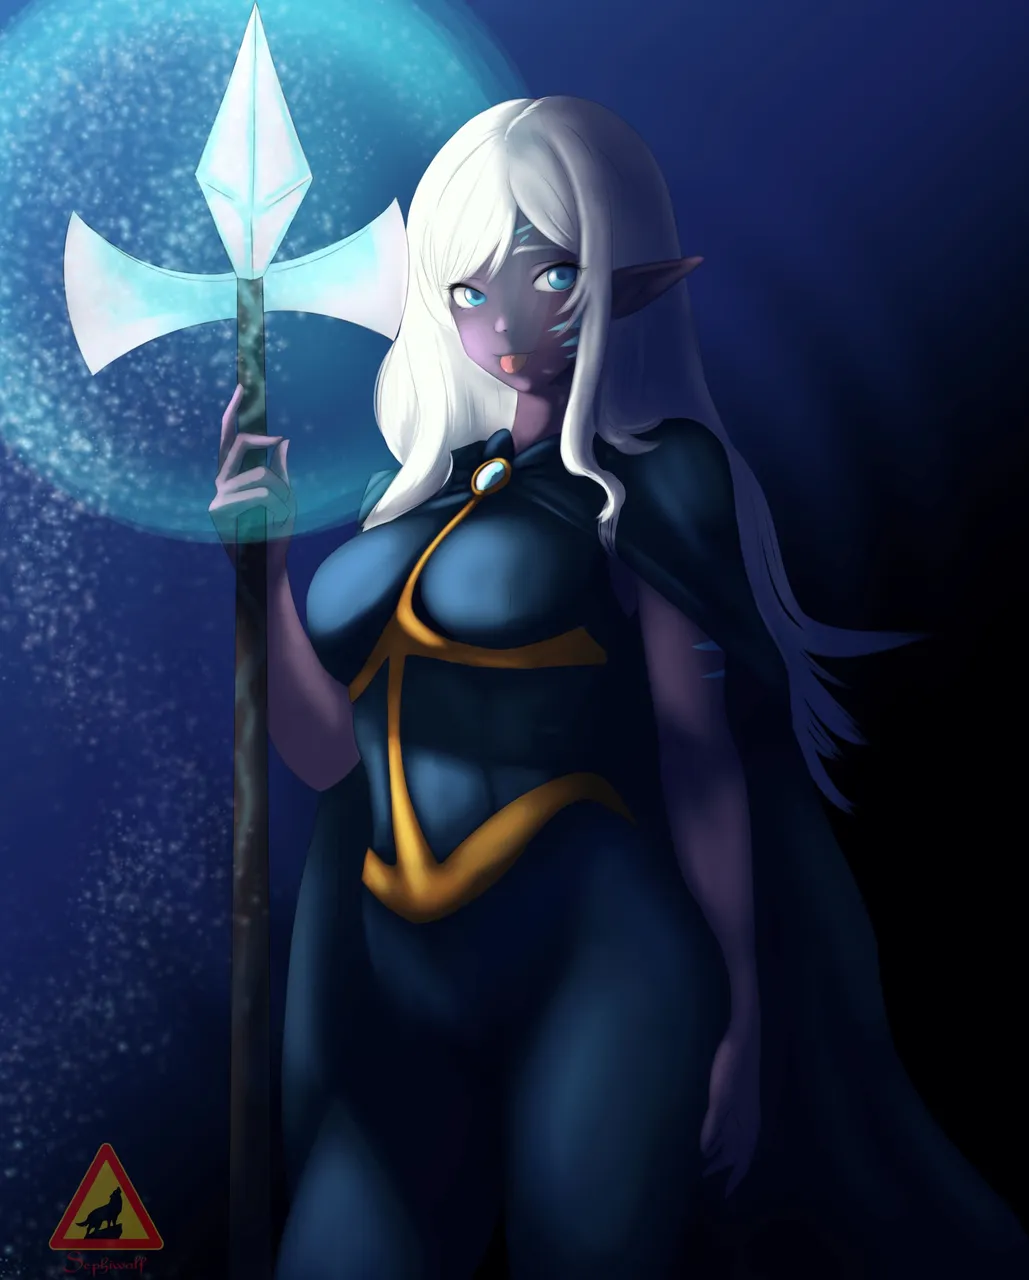
For those who follow me maybe “maybe” remember that a little more than a year ago I drew this character, or was it 2 years, wow how time goes by.
In that opportunity I drew the character in a jocular way with his little tongue out, in this new version I wanted to pay tribute to that old drawing, also experiment with a different way of applying shadows, since the character is in the dark I think it is a good opportunity to play with this.
I will try to explain the best I can the idea, corrections and everything I learned in the creation of this work for the weekly art contest.
well friends let's start!
Español
Saludos amigos de Splinterlands, espero estén muy bien, me alegra estar con ustedes una vez mas.
Para los que me siguen tal vez "tal vez" recuerden que hace poco mas de un año dibuje este personaje, o fueron 2 años, vaya como pasa el tiempo.
en esa oportunidad dibuje el personaje de forma jocosa con su lenguita fuera, en esta nueva versión quise hacerle tributo a ese viejo dibujo, tambien experimentar con una forma diferente de aplicar sombras, ya que el personaje esta en la oscuridad creo que es una buena oportunidad para jugar con esto.
tratare de explicar lo mejor que pueda la idea, correcciones y todo lo aprendido en la creación de esta obra para el concurso de arte semanal.
bien amigos empecemos!
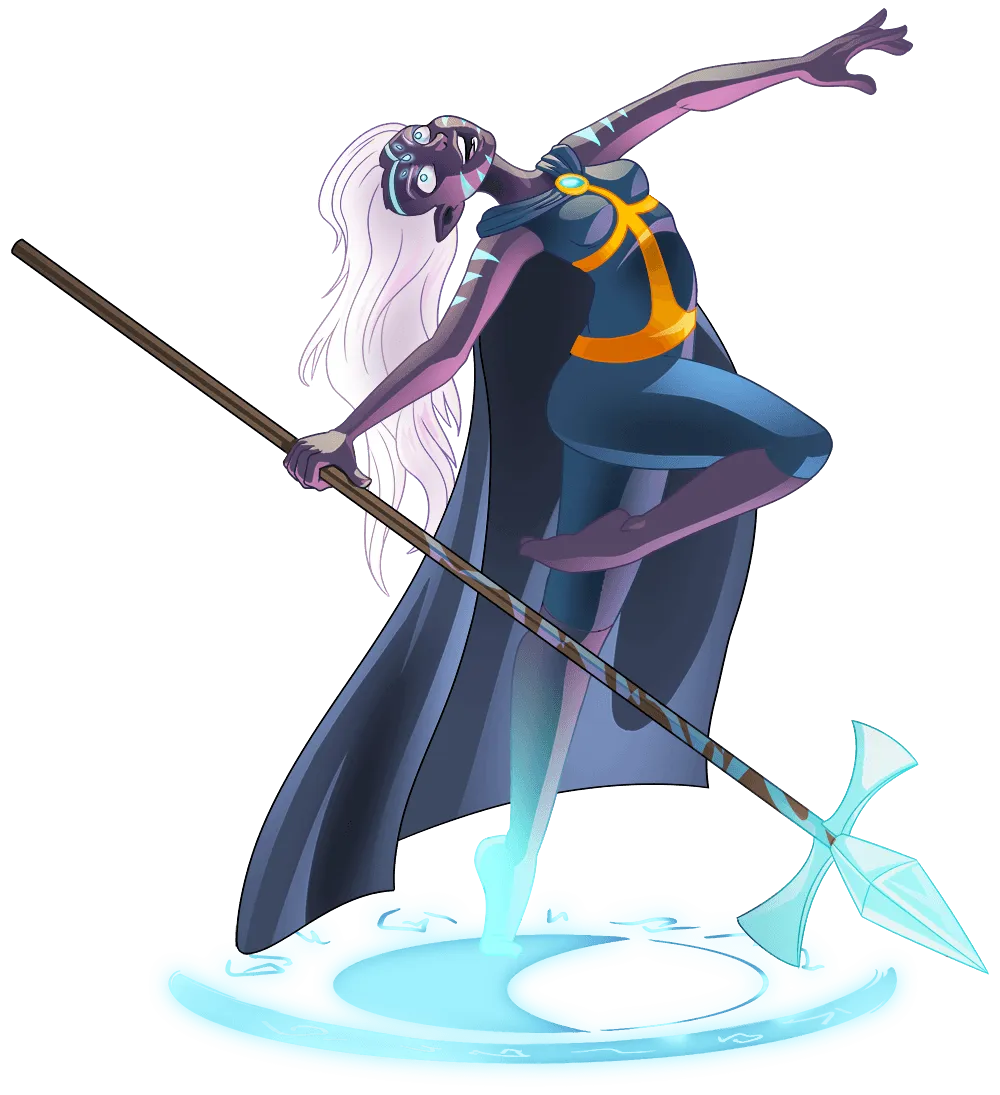
Reference
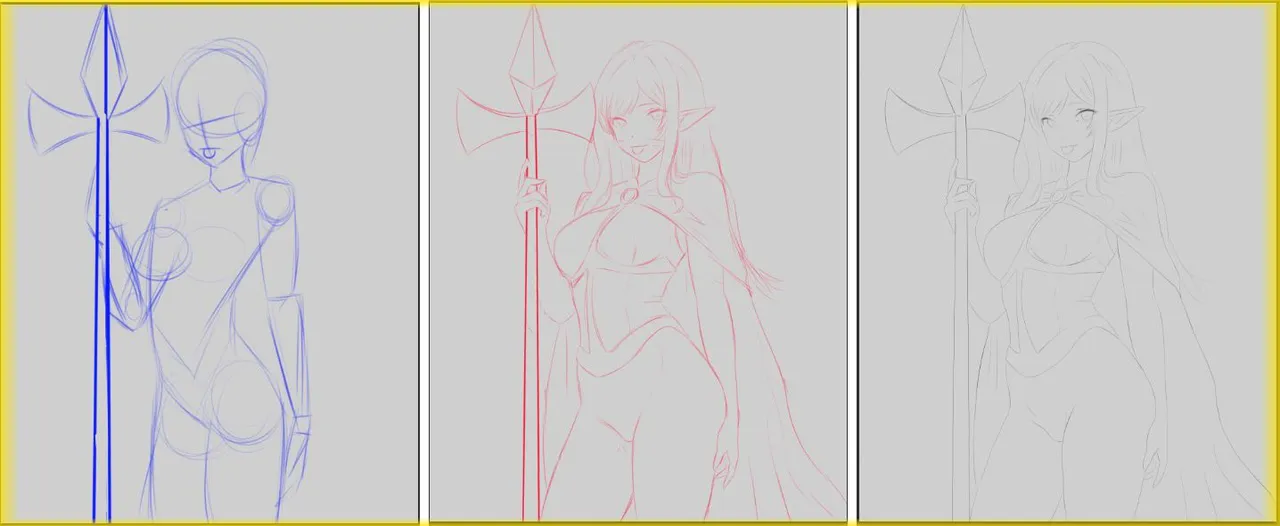
Process/Proceso
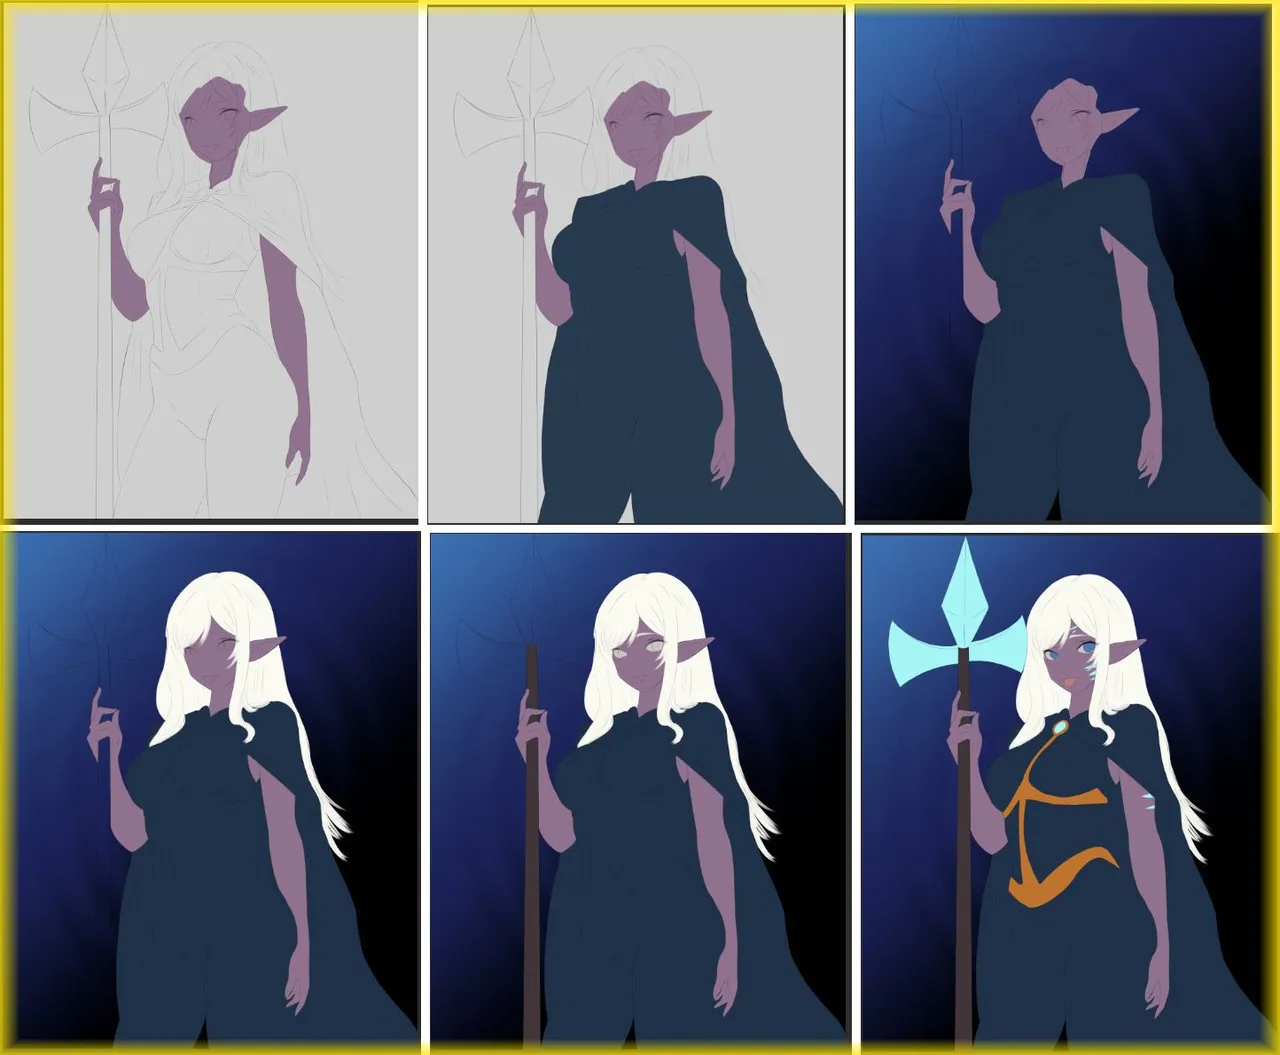
We start the sketch in a normal way starting with the basic shapes in blue color.
After this we make the final sketch using red color, once we correct everything we create the lineart using one of the new brushes that I am testing, this one doesn't have as much texture as the froggy one and I think it looks good for this kind of illustrations.
Iniciamos el boceto de forma normal empezando por las formas básicas en color azul.
Seguido de esto hacemos el boceto final usando color rojo, una vez corregimos todo creamos el lineart usando uno de los nuevos pincele que estoy probando, este no tiene tanta textura como el froggy y creo que se ve bien para este tipo de ilustraciones.
We apply the base color, for this we use the filler bucket, this type of lineart lets us do this up to a certain point, but we must retouch some areas when we finish.
Before finishing the base color we apply a background and a wave effect that goes with the theme of the illustration and the darkness of it.
aplicamos el color base, para esto nos ayudamos de la cubeta de relleno, este tipo de lineart deja hacer esto hasta cierto punto, pero debemos retocar algunas zonas al terminar.
antes de terminar el color base aplicamos un fondo y un efecto de ondas que vaya con el tema de la ilustración y la oscuridad de ella.
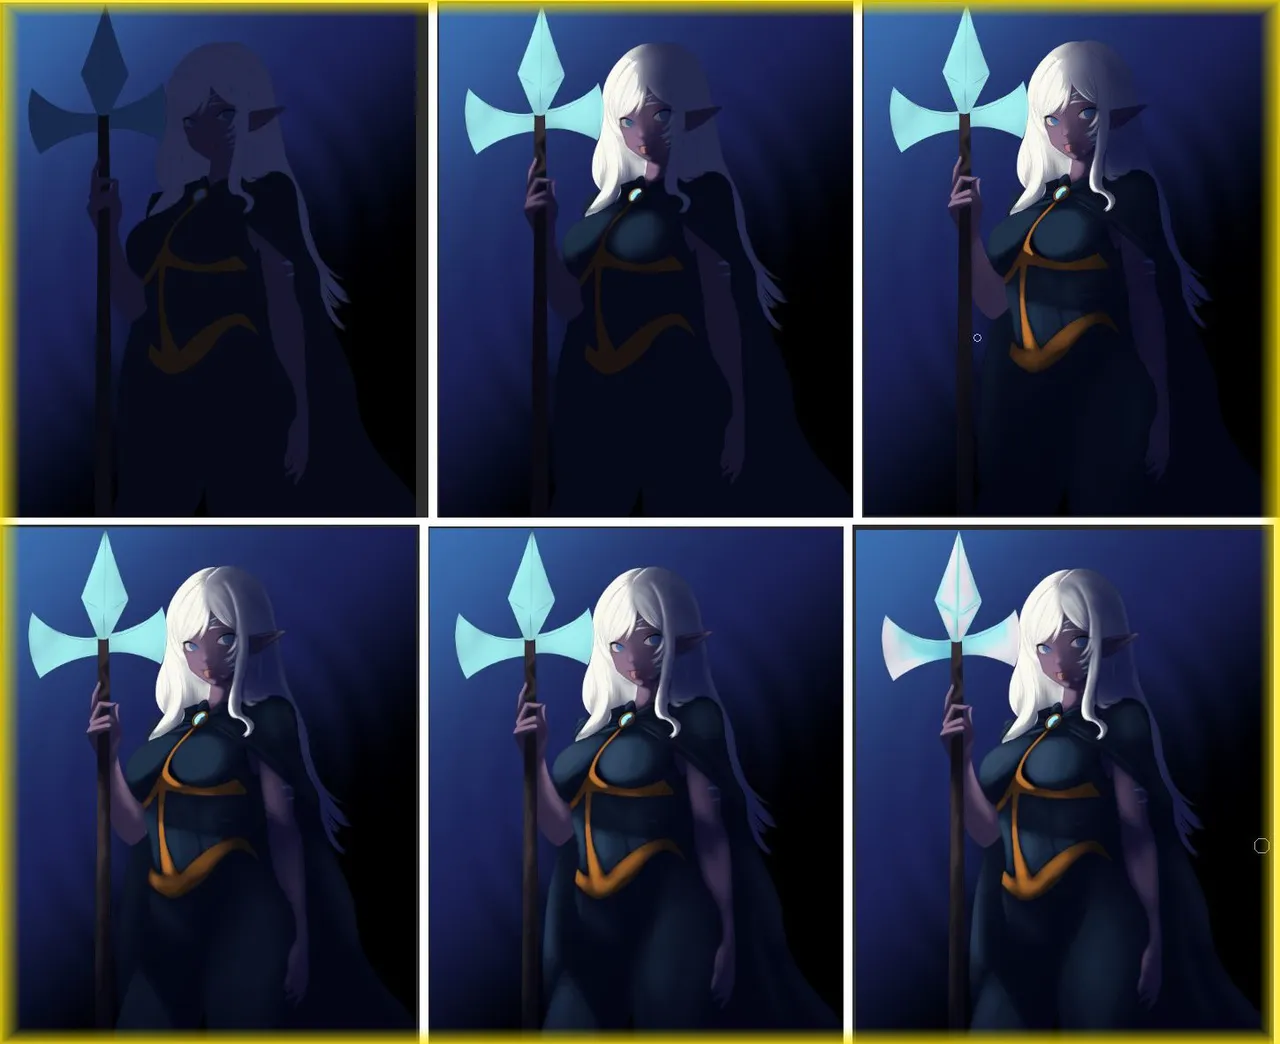
Well we got to the “trust the process” stage, the experimental part of the illustration.
Well, I wanted cold shadows, this was already very clear, we create a new layer and with the group cut out effect we fill the whole shape of the character, then we apply the multiply effect.
well here is when it gets interesting, we erase little by little the zones with more light of the character creating this effect, in some zones we must reinforce the dark tone and a stronger erasing.
this whole stage was a trial and error because it is the first time I do it that way.
in the area of the spear at least in all the tip we remove this shadow because this will be our source of light.
Bien llegamos a la etapa de " confía en el procesó" la parte experimental de la ilustración.
bueno quería sombras frías esto ya lo tenia muy claro, creamos una nueva capa y con el efecto recorté en grupo rellenamos quedando toda la forma del personaje, luego aplicamos el efecto multiplicar.
bien aqui es cuando se pone interesante, vamos borrando poco a poco las zonas con mayor luz de personaje creando este efecto, en algunas zonas debemos reforzar el tono oscuro y un borrado mas fuerte.
toda esta etapa era de fallo y error pues es primera vez que lo hago de esa forma.
en la zona de la lanza al menos en toda la punta quitamos esta sombra pues esta sera nuestra fuente de luz.
It is time to add more defined details. To do this, we apply these shadows and strong lights on the base colors. In other words, each base color has its own variation and on top of all these layers is the shadow that we created a little while ago.
Es momento de hacer detalles mas definidos, para esto aplicamos estas sobras y luces fuertes sobre los colores base, es decir cada color base tiene su variante y sobre todas estas capas está la sombra que creamos hace poco.
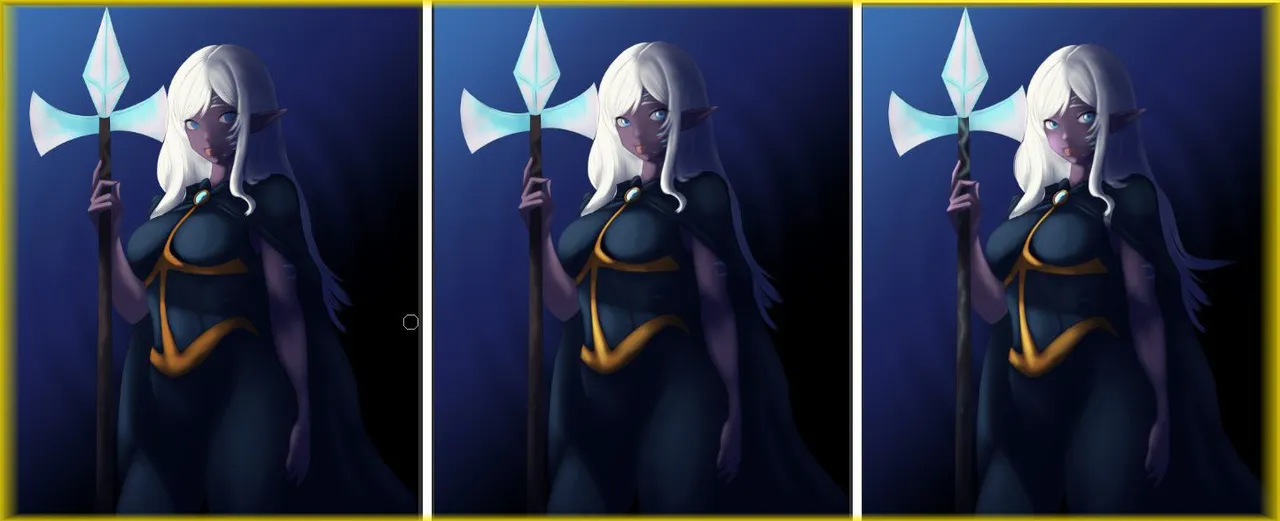
To finish we will apply more light effects, this time on all the layers.
I made the halo effect with a large brush and then erased the center and other areas until I achieved that result.
once the whole work was done
Para terminar aplicaremos mas efectos de luz esta vez sobre todas las capas.
El efecto de halo de luz lo hice con un pincel grande y luego borrando el centro y otras zonas hasta lograr ese resultado.
una vez lista toda la obra corregimos los colores y listo.
If you don't play splinterlands yet you can join here!
Si aún no juegas splinterlands puedes unirte aquí!
Join here // Unete aqui
Friends, we have reached the end. I hope you liked it. The shadow part was a completely experimental process, but I still think it turned out well.
I would like to know what you think about the result. I will be reading them in the comments box!
Until next time, see you Cowboys!
Amigos llegamos al final, espero les haya gustado, la parte de la sombra fue un proceso completamente experimental, aun asi creo que quedo bien.
me gustaría saber que opinan del resultado los estaré leyendo en la caja de comentarios!
hasta una nueva oportunidad, Nos vemos Vaqueros!
Tools:
- CLIP STUDIO
- Inspiroy H640 Pen Tablets
- Corel PHOTO-PAINT 2019
- www.deepl.com/translator