Hola mis amigos creativos en hive! Espero estén muy bien y feliz jueves, he estado un poco cansada y en esta ocasión no quise dibujar un retrato como normalmente hago y quise practicar mi coloreado y también quise darle una oportunidad a dibujar comida que siempre lo he querido hacer pero nunca me había atrevido y hoy realice este dibujo de un cupcake que el proceso fue muy satisfactorio de hacer y de ver ,espero les guste y los invito a leerme! 🧁✨
Hello my creative friends at hive! I hope you are very well and happy Thursday, I have been a little tired and this time I didn't want to draw a portrait as I usually do and I wanted to practice my coloring and I also wanted to give a chance to draw food that I have always wanted to do but I had never dared and today I made this drawing of a cupcake that the process was very satisfying to do and to see, I hope you like it and I invite you to read me! 🧁✨

- Lo que utilice para realizar el dibujo en tradicional en una hoja tipo cartulina tamaño 35 x 28 cm, un lápiz de grafito 2 HB y un borrador (corté mi borrador haciendo que las esquinas quedarán en punta así será más fácil borrar espacios pequeños), mis colores, un marcador marrón y rosa y un corrector líquido blanco.
- What I used to make the drawing in traditional on a cardboard type sheet size 35 x 28 cm, a graphite pencil 2 HB and an eraser (I cut my eraser making the corners to be pointed so it will be easier to erase small spaces), a brown and pink marker, my colors and a white liquid corrector.

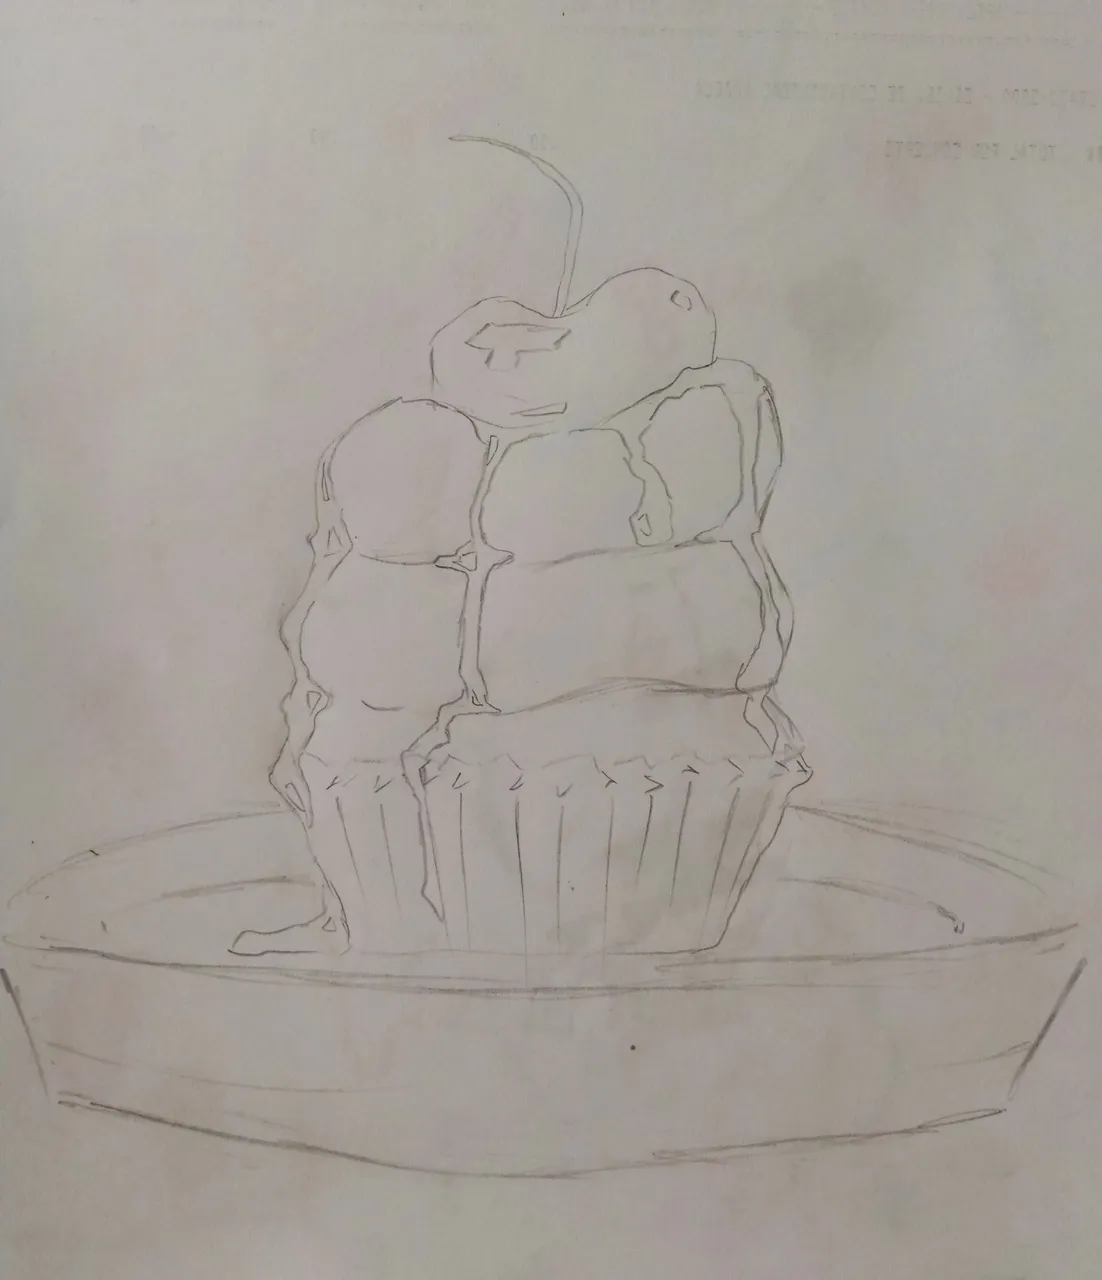
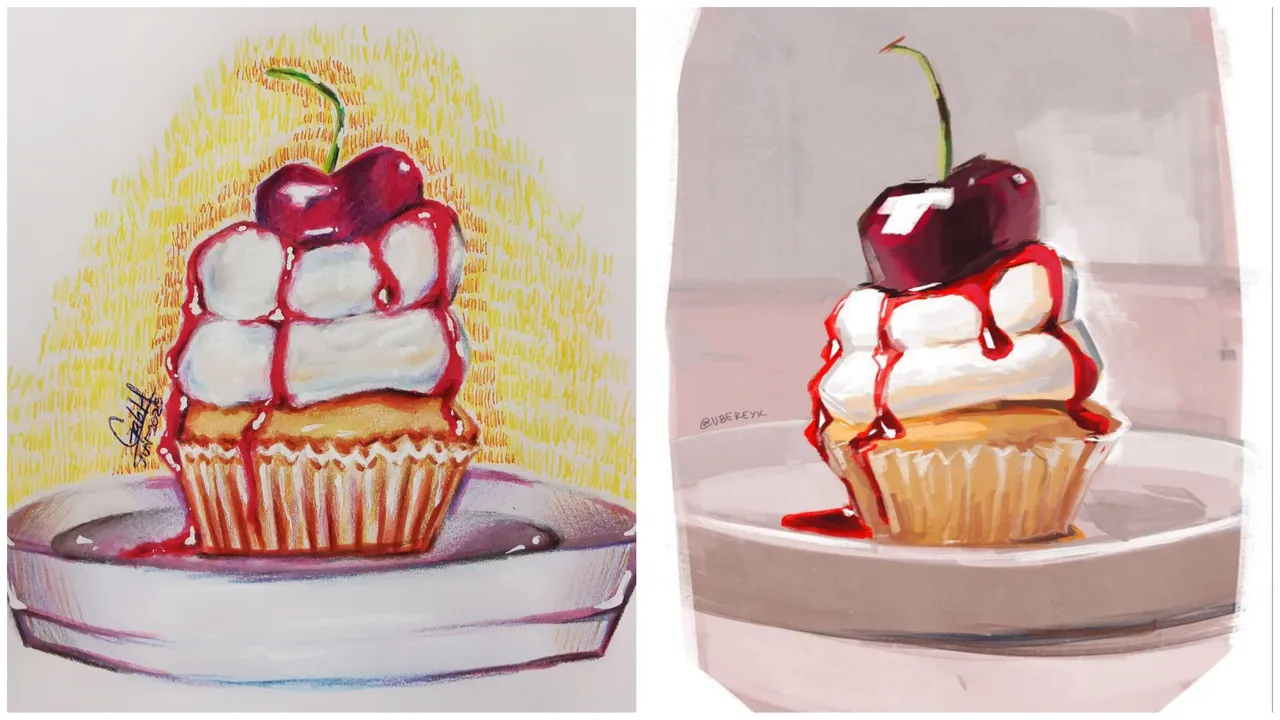
Comencé haciendo el boceto a lapiz tomando de referencia una imagen de un dibujo de un cupcake hecho en digital, quise tomar está referencia y no una imagen real ya que quería comenzar por un punto dónde pudiera reconocer más fácilmente la forma y así poder hacerlo en el papel. Realice todo el boceto empezando haciendo la forma completa del cupcake y luego agregando los demás detalles con lapiz para poder guiarme mejor a la hora de colorear.
I started making the pencil sketch taking as a reference an image of a drawing of a cupcake made in digital, I wanted to take this reference and not a real image because I wanted to start at a point where I could more easily recognize the shape and thus be able to do it on paper. I made the whole sketch starting with the complete shape of the cupcake and then adding the rest of the details with pencil to be able to guide me better when coloring.
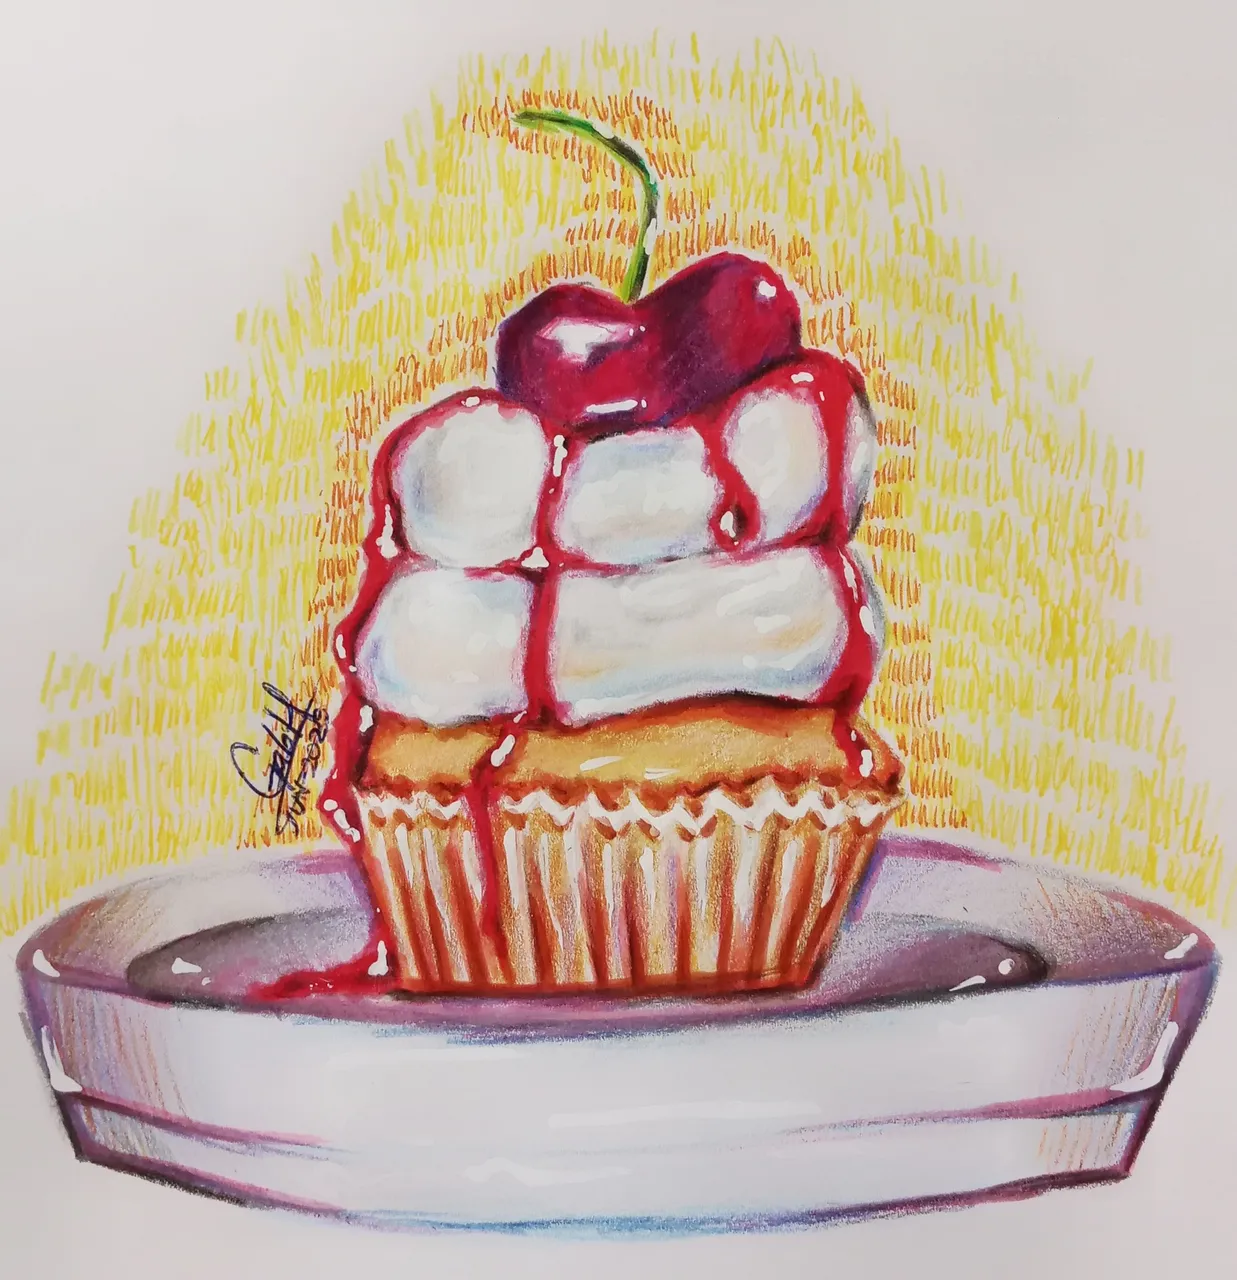
Comencé desde la cereza, hice las sombras y ese tono oscuro en ella mezclando morado oscuro y azul oscuro y luego agregué un color ciruela para combinar los colores, por último usé rojo para toda la cereza para unir aún más todos los tonos, para la rama de la cereza mezcle varios tonos de verde, desde verde manzana hasta verde oscuro tipo militar. Fui bajando y continúe pintando la crema haciendo sombras con color azul, gris y amarillo claro con color durazno, ya que aunque la crema se vea blanca ésta no es totalmente blanca y tiene sus sombras, para la salsa de la cereza que va cayendo use marrón para las partes más oscuras como en los pliegues de la crema dónde se mete la salsa, luego use un naranja un tanto rojizo y por último mezcle dos tonos de rojo, rojo cereza y un rojo manzana. Continuando baje hasta el ponqué del cupcake el cual pinte mezclado varios tonos de naranja y amarillo además de marrón para darle ese toque tostado, para la envoltura del cupcake usé los mismos tonos del cupcake solo que dejando espacios en blanco por el papel de este, para el plato solo fui haciendo sombras con azul y gris. Ya teniendolo listo quise agregarle más color y más tonalidades así que fui jugando un poco agregando un sombreado rojo con un marcador rojo que pinta rosa porque le falta tinta, algunas sombras con color negro en pliegues y debajo del cupcake además de la cereza, para agregarle más color al plato agregué los colores que más usé en el dibujo azul, morado, rojo y naranja.
I started from the cherry, I made the shadows and that dark tone on it mixing dark purple and dark blue and then I added a plum color to combine the colors, finally I used red for the whole cherry to unite even more all the tones, for the branch of the cherry I mixed several shades of green, from apple green to dark green military type. I went down and continued painting the cream making shadows with blue, gray and light yellow with peach color, because although the cream looks white it is not totally white and has its shadows, for the cherry sauce that is falling I used brown for the darkest parts as in the folds of the cream where the sauce gets in, then I used a somewhat reddish orange and finally I mixed two shades of red, cherry red and apple red. Continuing down to the cupcake cake which I painted mixed several shades of orange and yellow plus brown to give it that toasted touch, for the cupcake wrapper I used the same tones of the cupcake only leaving white spaces for the paper of this, for the plate I was only making shadows with blue and gray. Once I had it ready I wanted to add more color and more shades so I was playing a little adding a red shading with a red marker that paints pink because it lacks ink, some shadows with black color in folds and under the cupcake in addition to the cherry, to add more color to the plate I added the colors I used the most in the drawing blue, purple, red and orange.
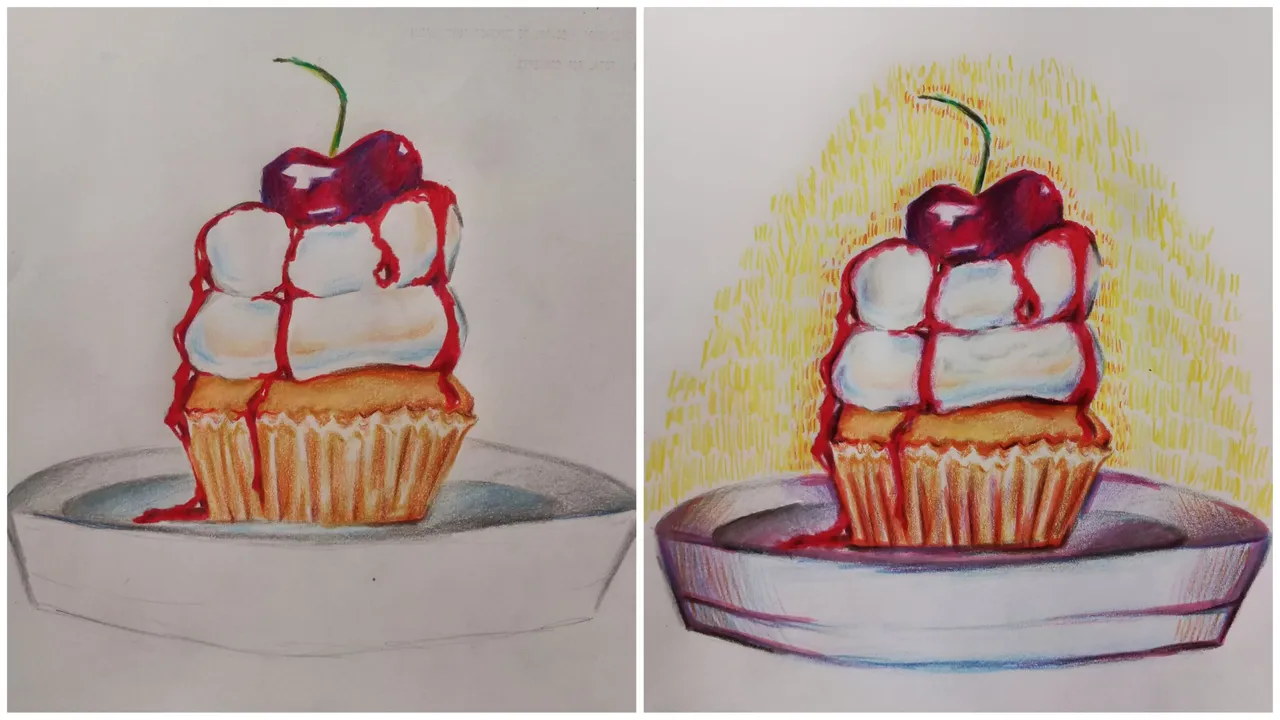
Este es el resultado del dibujo, agregué unas cuantas líneas a su alrededor con color amarillo y naranja y al terminarlas use marcador amarillo y naranja para realizarlas, combine los colores de las sombras de la crema con color blanco y pinte los espacios en blanco de la salsa de cereza igualmente con color blanco para unir los colores, ya para terminar use un corrector líquido blanco para hacer unos pequeños brillos en la salsa de cereza, en la cereza, en la crema y en el plato. El agregarle los brillos blancos con el corrector hizo que la crema se viera más realista y tuviera más aspecto a crema batida, igualmente con la salsa de cereza que se ve súper increíble. La otra razón por la cuál escogí de referencia una imagen de un dibujo digital era para comprender mejor las sombras ya que así podría ubicarlas mejor sobre mi dibujo como en las partes sombreadas de la crema y en el plato. Fue demasiado divertido hacer este dibujo ya que sentía que jugaba con los colores y no tenía que hacer todo metódicamente como normalmente lo hago con mis retratos, aún así fue una gran práctica y ya que me gustó tanto volver a hacer más dulces y comidas. 🧁✨
This is the result of the drawing, I added a few lines around it with yellow and orange color and when finished I used yellow and orange marker to make them, combine the colors of the shadows of the cream with white color and paint the white spaces of the cherry sauce also with white color to unite the colors, and to finish I used a white liquid concealer to make some small glitters in the cherry sauce, in the cherry, in the cream and in the plate. Adding the white shimmer with the concealer made the cream look more realistic and whipped cream-like, and the cherry sauce looks super awesome. The other reason I chose an image from a digital drawing as a reference was to better understand the shadows so I could better place them on my drawing as in the shaded parts of the cream and on the plate. It was too much fun to do this drawing as I felt like I was playing with the colors and didn't have to do everything methodically like I normally do with my portraits, still it was great practice and since I loved it so much going back to do more sweets and meals. 🧁✨

Espero que les haya gustado y gracias por apoyarme siempre! Nos vemos pronto y sigan creando.❤️
I hope you liked it and thanks for always supporting me! See you soon and keep creating! ❤️
Realicé la traducción en
https://www.deepl.com/es/translator
Todas las imágenes son de mi autoría | All the photos are my property
Imágenes editadas con PicsArt y Snapseed | Images edited with PicsArt and Snapseed