Spanish
Estaba pensando en de qué manera podría expresar mi arte. De la nada, se me iluminó la idea de hacerlo a través de la programación. Al principio, pensé que no podría expresarme de esta manera, pero a medida que investigaba, me gustó la idea y decidí llevarla a cabo. Fui revisando librerías para facilitar el trabajo y encontré una llamada "particles.js". Ahora solo quedaba que mi imaginación volara.
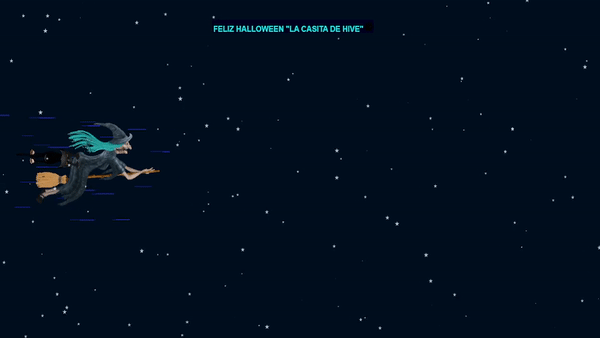
Con las partículas, probé varias formas y me gustó más la forma de una estrella. Luego, busqué una tonalidad que se adaptara a una noche tenebrosa, y me incliné por un color oscuro.
Le agregué una bruja volando para que al verla, parezca que está volando sobre el gran cielo sin fin en busca de su próxima aventura.
Así fue como, conforme iba pensando para llegar a este punto, les explicaré cómo es el proceso de codificación:
Les mostraré el proceso:
Tecnologías para su desarrollo:
- HTML5
- CSS
- JS
- ParticlesJS
Primero, comenzamos con la construcción de la plantilla base en HTML:
Luego, llamamos a la librería de Particles.js:

Después, seguimos construyendo el resto del HTML. En primer lugar, colocamos las felicitaciones y, al final, una imagen relacionada con Hive:

Como estamos utilizando una librería para lograr este efecto, en el HTML creamos un div con un id que tiene el valor "particles-js", al cual haremos referencia para aplicar el efecto de las partículas. Para mayor comodidad, a continuación les mostrare el código JavaScript:
particlesJS("particles-js", {
        "particles": {
            "number": {"value": 150, "density": {"enable": false, "value_area": 800}},
            "color": {"value": "#ffffff"},
            "shape": {
                "type": "star",
                "stroke": {"width": 0, "color": "#000000"},
                "polygon": {"nb_sides": 5},
            },
            "opacity": {
                "value": 0.5,
                "random": false,
                "anim": {"enable": false, "speed": 1, "opacity_min": 0.1, "sync": false}
            },
            "size": {
                "value": 4,
                "random": true,
                "anim": {"enable": false, "speed": 40, "size_min": 0.1, "sync": false}
            },
            "line_linked": {"enable": false, "distance": 150, "color": "#ffffff", "opacity": 0.4, "width": 1},
            "move": {
                "enable": true,
                "speed": 14,
                "direction": "left",
                "random": false,
                "straight": true,
                "out_mode": "out",
                "bounce": false,
                "attract": {"enable": false, "rotateX": 600, "rotateY": 1200}
            }
        },
        "interactivity": {
            "detect_on": "canvas",
            "events": {
                "onhover": {"enable": false, "mode": "grab"},
                "onclick": {"enable": true, "mode": "repulse"},
                "resize": true
            },
            "modes": {
                "grab": {"distance": 200, "line_linked": {"opacity": 1}},
                "bubble": {"distance": 400, "size": 40, "duration": 2, "opacity": 8, "speed": 3},
                "repulse": {"distance": 200, "duration": 0.4},
                "push": {"particles_nb": 4},
                "remove": {"particles_nb": 2}
            }
        },
        "retina_detect": true
    });
A continuación, desglosaré las principales secciones del código:
particlesJS("particles-js", { ... });:
Esto inicia la configuración de particles.js y le proporciona un nombre de elemento HTML como destino. En este caso, se usa un elemento con el id "particles-js".
"particles": { ... }:
En esta sección, se definen las propiedades de las partículas en el efecto.
number: controla la cantidad y densidad de partículas en el área especificada.
color: establece el color de las partículas.
shape: define la forma de las partículas. En este caso, se utiliza una estrella con 5 lados.
opacity: controla la opacidad de las partículas.
size: establece el tamaño de las partículas.
line_linked: configura las conexiones entre partículas.
move: controla el movimiento de las partículas, incluyendo su velocidad y dirección.
"interactivity": { ... } : Esta sección gestiona la interacción del usuario con las partículas.
detect_on: especifica la zona de detección de interacción (en este caso, el lienzo).
events: controla los eventos de interacción, como hacer clic o pasar el cursor sobre las partículas.
modes: define cómo se comportan las partículas en respuesta a eventos de interacción específicos, como "grab" (agarrar), "repulse" (repeler), etc.
resize: permite que las partículas se reajusten cuando cambia el tamaño de la ventana del navegador.
retina_detect: Esta propiedad detecta si el dispositivo del usuario es de alta resolución (pantalla retina) y ajusta la visualización de las partículas en consecuencia.
Para darle más estilo, utilizamos el siguiente código CSS:
body {
margin: 0;
font: normal 75% Arial, Helvetica, sans-serif;
}
canvas {
display: block;
vertical-align: bottom;
}
#particles-js {
position: absolute;
width: 100%;
height: 100%;
background-color: #000f1e;
background-image: url(" );
background-repeat: no-repeat;
background-size: 30%;
background-position: 0 50%;
}
.count-particles {
background: #000022;
position: absolute;
top: 48px;
left: 35%;
color: #13E8E9;
font-size: 1.8em;
text-align: left;
text-indent: 4px;
line-height: 14px;
padding-bottom: 2px;
font-family: Helvetica, Arial, sans-serif;
font-weight: bold;
}
.count-particles {
border-radius: 0 0 3px 3px;
}
);
background-repeat: no-repeat;
background-size: 30%;
background-position: 0 50%;
}
.count-particles {
background: #000022;
position: absolute;
top: 48px;
left: 35%;
color: #13E8E9;
font-size: 1.8em;
text-align: left;
text-indent: 4px;
line-height: 14px;
padding-bottom: 2px;
font-family: Helvetica, Arial, sans-serif;
font-weight: bold;
}
.count-particles {
border-radius: 0 0 3px 3px;
}
Este fragmento de código se utiliza para definir el estilo y la apariencia de elementos en una página web que utiliza la librería particles.js para crear un efecto de partículas animadas. Aquí está la explicación de las secciones clave:
Estilos generales del cuerpo (body):
margin: 0;: Esto elimina cualquier margen predeterminado alrededor del cuerpo de la página, lo que significa que el contenido comenzará en el borde superior izquierdo de la ventana del navegador.Estilos para el elemento canvas:
display: block;: Esto configura el elemento canvas para que sea un bloque en línea, lo que asegura que ocupe todo el ancho disponible.
vertical-align: bottom;: Alinea verticalmente el elemento canvas en la parte inferior, lo que es útil para el efecto de partículas.Estilos para el elemento con el id "particles-js":
position: absolute;: Este elemento se posiciona de manera absoluta, ocupando todo el espacio disponible en la ventana del navegador.
width: 100%; height: 100%;: Establece que el elemento ocupará el 100% del ancho y alto de la ventana del navegador.
background-color: #000f1e;: Establece el color de fondo del elemento como un azul oscuro.
background-image: url("https://cdn.pixabay.com/animation/2023/08/10/21/14/21-14-12-148_512.gif");: Define una imagen de fondo para el elemento canvas. En este caso, se utiliza una URL de una imagen.
background-repeat: no-repeat;: Evita que la imagen de fondo se repita.
background-size: 30%;: Ajusta el tamaño de la imagen de fondo al 30% del elemento.
background-position: 0 50%;: Establece la posición de la imagen de fondo.Estilos para el elemento con la clase "count-particles":
background: #000022;: Establece el fondo de este elemento en un tono de azul oscuro.
position: absolute;: Lo posiciona de manera absoluta en relación con su contenedor.
top: 48px; left: 35%;: Define la posición superior y izquierda del elemento.
color: #13E8E9;: Establece el color del texto dentro del elemento.
font-size: 1.8em;: Configura el tamaño del texto.
text-align: left; text-indent: 4px; line-height: 14px; padding-bottom: 2px;: Establece varios atributos relacionados con la alineación y el espaciado del texto.
font-family: Helvetica, Arial, sans-serif; font-weight: bold;: Define la fuente y el peso de la fuente utilizada para el texto.Estilos adicionales para el elemento con la clase "count-particles":
border-radius: 0 0 3px 3px;: Aplica bordes redondeados solo en la parte inferior del elemento, lo que crea una apariencia estilizada.
Les dejo el código completo y el resultado final. Si hacemos clic en las partículas, estas explotarán, gracias por leer a su amigo vtuber
English
I was thinking about how I could express my art. Out of nowhere, the idea of doing it through programming came to me. At first, I thought I couldn't express myself this way, but as I researched, I liked the idea and decided to pursue it. I was checking libraries to make the work easier and I found one called "particles.js". Now all that was left was for my imagination to fly.
With the particles, I tried various shapes and liked the star shape the best. Then, I looked for a shade that would suit a spooky night, and I leaned toward a dark color.
I added a flying witch so that when you see her, it looks like she is flying over the big endless sky in search of her next adventure.
This is how, as I was thinking to get to this point, I will explain to you what the coding process is like:
I will show you the process:
Technologies for its development:
- HTML5
- CSS
- JS
- ParticlesJS
First, we start by building the base template in HTML:
Next, we call the Particles.js library:
Afterwards, we continue building the rest of the HTML. First of all, we place the congratulations and, at the end, an image related to Hive:
Since we are using a library to achieve this effect, in the HTML we create a div with an id that has the value "particles-js", which we will reference to apply the particle effect. For convenience, below I will show you the JavaScript code:
particlesJS("particles-js", {
"particles": {
"number": {"value": 150, "density": {"enable": false, "value_area": 800}},
"color": {"value": "#ffffff"},
"shape": {
"type": "star",
"stroke": {"width": 0, "color": "#000000"},
"polygon": {"nb_sides": 5},
},
"opacity": {
"value": 0.5,
"random": false,
"anim": {"enable": false, "speed": 1, "opacity_min": 0.1, "sync": false}
},
"size": {
"value": 4,
"random": true,
"anim": {"enable": false, "speed": 40, "size_min": 0.1, "sync": false}
},
"line_linked": {"enable": false, "distance": 150, "color": "#ffffff", "opacity": 0.4, "width": 1},
"move": {
"enable": true,
"speed": 14,
"direction": "left",
"random": false,
"straight": true,
"out_mode": "out",
"bounce": false,
"attract": {"enable": false, "rotateX": 600, "rotateY": 1200}
}
},
"interactivity": {
"detect_on": "canvas",
"events": {
"onhover": {"enable": false, "mode": "grab"},
"onclick": {"enable": true, "mode": "repulse"},
"resize": true
},
"modes": {
"grab": {"distance": 200, "line_linked": {"opacity": 1}},
"bubble": {"distance": 400, "size": 40, "duration": 2, "opacity": 8, "speed": 3},
"repulse": {"distance": 200, "duration": 0.4},
"push": {"particles_nb": 4},
"remove": {"particles_nb": 2}
}
},
"retina_detect": true
});
Below I will break down the main sections of the code:
particlesJS("particles-js", { ... });:
This starts the configuration of particles.js and gives it an HTML element name as a target. In this case, an element with the id "particles-js" is used.
"particles": { ... }:
In this section, the properties of the particles in the effect are defined.
number: controls the number and density of particles in the specified area.
color: sets the color of the particles.
shape: defines the shape of the particles. In this case, a star with 5 sides is used.
opacity: controls the opacity of the particles.
size: sets the size of the particles.
line_linked: Sets connections between particles.
move: controls the movement of particles, including their speed and direction.
"interactivity": { ... }: This section manages the user's interaction with the particles.
detect_on: Specifies the interaction detection zone (in this case, the canvas).
events: Controls interaction events, such as clicking or hovering over particles.
modes: Defines how particles behave in response to specific interaction events, such as "grab", "repulse", etc.
resize: Allows particles to be resized when the browser window size changes.
retina_detect: This property detects whether the user's device is a high resolution (retina display) and adjusts the particle display accordingly.
To give it more style, we use the following CSS code:
        body {
            margin: 0;
            font: normal 75% Arial, Helvetica, sans-serif;
        }

        canvas {
            display: block;
            vertical-align: bottom;
        }


        #particles-js {
            position: absolute;
            width: 100%;
            height: 100%;
            background-color: #000f1e;
            background-image: url(");
            background-repeat: no-repeat;
            background-size: 30%;
            background-position: 0 50%;
        }


        .count-particles {
            background: #000022;
            position: absolute;
            top: 48px;
            left: 35%;
            color: #13E8E9;
            font-size: 1.8em;
            text-align: left;
            text-indent: 4px;
            line-height: 14px;
            padding-bottom: 2px;
            font-family: Helvetica, Arial, sans-serif;
            font-weight: bold;
        }


        .count-particles {
            border-radius: 0 0 3px 3px;
        }
This code snippet is used to define the style and appearance of elements on a web page that uses the particles.js library to create an animated particle effect. Here is the explanation of the key sections:
General body styles:
margin: 0;: This removes any default margin around the body of the page, meaning the content will start at the top left edge of the browser window.Styles for the canvas element:
display: block;: This sets the canvas element to be an inline block, ensuring that it takes up all available width.
vertical-align: bottom;: Vertically aligns the canvas element at the bottom, which is useful for the particle effect.Styles for the element with id "particles-js":
position: absolute;: This element is positioned absolutely, taking up all the available space in the browser window.
width: 100%; height: 100%;: Sets that the element will occupy 100% of the width and height of the browser window.
background-color: #000f1e;: Sets the background color of the element to a dark blue.
background-image: url("https://cdn.pixabay.com/animation/2023/08/10/21/14/21-14-12-148_512.gif");: Defines an image background for the canvas element. In this case, an image URL is used.
background-repeat: no-repeat;: Prevent the background image from repeating.
background-size: 30%;: Sets the size of the background image to 30% of the element.
background-position: 0 50%;: Sets the position of the background image.Styles for the element with class "count-particles":
background: #000022;: Sets the background of this element to a shade of dark blue.
position: absolute;: Positions it absolutely relative to its container.
top: 48px; left: 35%;: Defines the top and left position of the element.
color: #13E8E9;: Sets the color of the text within the element.
font-size: 1.8em;: Set the text size.
text-align: left; text-indent: 4px; line-height: 14px; padding-bottom: 2px;: Sets various attributes related to text alignment and spacing.
font-family: Helvetica, Arial, sans-serif; font-weight: bold;: Defines the font and font weight used for the text.Additional styles for the element with class "count-particles":
border-radius: 0 0 3px 3px;: Applies rounded borders only to the bottom of the element, creating a stylized look.
I leave you the complete code and the final result. If we click on the particles, they will explode, thanks for reading your vtuber friend
<!DOCTYPE html>
<html lang="en">
<head>
<meta charset="UTF-8">
<meta name="viewport" content="width=device-width, initial-scale=1.0">
<title>Document</title>
<style>
/* ---- reset ---- */
body {
margin: 0;
font: normal 75% Arial, Helvetica, sans-serif;
}
canvas {
display: block;
vertical-align: bottom;
}
/* ---- particles.js container ---- */
#particles-js {
position: absolute;
width: 100%;
height: 100%;
background-color: #000f1e;
background-image: url(");
background-repeat: no-repeat;
background-size: 30%;
background-position: 0 50%;
}
/* ---- stats.js ---- */
.count-particles {
background: #000022;
position: absolute;
top: 48px;
left: 35%;
color: #13E8E9;
font-size: 1.8em;
text-align: left;
text-indent: 4px;
line-height: 14px;
padding-bottom: 2px;
font-family: Helvetica, Arial, sans-serif;
font-weight: bold;
}
.count-particles {
border-radius: 0 0 3px 3px;
}
</style>
</head>
<body>
<div id="particles-js"></div>
<div class="count-particles">FELIZ HALLOWEEN "LA CASITA DE HIVE"<img src=" width="30" style="margin-top: 5px" alt=""></div>
<script src="http://cdn.jsdelivr.net/particles.js/2.0.0/particles.min.js"></script>
<script src="http://threejs.org/examples/js/libs/stats.min.js"></script>
<script>
particlesJS("particles-js", {
        "particles": {
            "number": {"value": 150, "density": {"enable": false, "value_area": 800}},
            "color": {"value": "#ffffff"},
            "shape": {
                "type": "star",
                "stroke": {"width": 0, "color": "#000000"},
                "polygon": {"nb_sides": 5},
            },
            "opacity": {
                "value": 0.5,
                "random": false,
                "anim": {"enable": false, "speed": 1, "opacity_min": 0.1, "sync": false}
            },
            "size": {
                "value": 4,
                "random": true,
                "anim": {"enable": false, "speed": 40, "size_min": 0.1, "sync": false}
            },
            "line_linked": {"enable": false, "distance": 150, "color": "#ffffff", "opacity": 0.4, "width": 1},
            "move": {
                "enable": true,
                "speed": 14,
                "direction": "left",
                "random": false,
                "straight": true,
                "out_mode": "out",
                "bounce": false,
                "attract": {"enable": false, "rotateX": 600, "rotateY": 1200}
            }
        },
        "interactivity": {
            "detect_on": "canvas",
            "events": {
                "onhover": {"enable": false, "mode": "grab"},
                "onclick": {"enable": true, "mode": "repulse"},
                "resize": true
            },
            "modes": {
                "grab": {"distance": 200, "line_linked": {"opacity": 1}},
                "bubble": {"distance": 400, "size": 40, "duration": 2, "opacity": 8, "speed": 3},
                "repulse": {"distance": 200, "duration": 0.4},
                "push": {"particles_nb": 4},
                "remove": {"particles_nb": 2}
            }
        },
        "retina_detect": true
    });
</script>
</body>
</html>
width="30" style="margin-top: 5px" alt=""></div>
<script src="http://cdn.jsdelivr.net/particles.js/2.0.0/particles.min.js"></script>
<script src="http://threejs.org/examples/js/libs/stats.min.js"></script>
<script>
particlesJS("particles-js", {
"particles": {
"number": {"value": 150, "density": {"enable": false, "value_area": 800}},
"color": {"value": "#ffffff"},
"shape": {
"type": "star",
"stroke": {"width": 0, "color": "#000000"},
"polygon": {"nb_sides": 5},
},
"opacity": {
"value": 0.5,
"random": false,
"anim": {"enable": false, "speed": 1, "opacity_min": 0.1, "sync": false}
},
"size": {
"value": 4,
"random": true,
"anim": {"enable": false, "speed": 40, "size_min": 0.1, "sync": false}
},
"line_linked": {"enable": false, "distance": 150, "color": "#ffffff", "opacity": 0.4, "width": 1},
"move": {
"enable": true,
"speed": 14,
"direction": "left",
"random": false,
"straight": true,
"out_mode": "out",
"bounce": false,
"attract": {"enable": false, "rotateX": 600, "rotateY": 1200}
}
},
"interactivity": {
"detect_on": "canvas",
"events": {
"onhover": {"enable": false, "mode": "grab"},
"onclick": {"enable": true, "mode": "repulse"},
"resize": true
},
"modes": {
"grab": {"distance": 200, "line_linked": {"opacity": 1}},
"bubble": {"distance": 400, "size": 40, "duration": 2, "opacity": 8, "speed": 3},
"repulse": {"distance": 200, "duration": 0.4},
"push": {"particles_nb": 4},
"remove": {"particles_nb": 2}
}
},
"retina_detect": true
});
</script>
</body>
</html>
La imágenes fue tomada desde la fuentes de:
The images were taken from the sources of:
upload.wikimedia.org
pixabay.com