What is it?
Supabase is an open source Firebase alternative. Start your project with a Postgres Database, Authentication, instant APIs, Realtime subscriptions and Storage.
Source
Why Supbase?
Mainly because it is open source, you can be in control of your data and it gives you a set of tools with great functionality similar to Firebase.
In this article, will explain how to use Supabase to create a chat with Vuejs using the Vuetify framework in VsCode.
It is very practical and allows you to create an amazing application in a very short time.
Explaining the functionality:
Before starting with the code, will tell you a little about the tools used and how the chat works.
Generally, to create an application, two things are needed: the frontend and the backend. The frontend is simply the user interface, in the case of chat the interface will contain an input form and a list of posted messages. For the backend, only a database will be required to store users, messages and the time of the messages.
For this tutorial, the real-time chat app will work with Vue 3 and Vuetify, which will allow users to post short text messages. To make this example simple, users will be randomly generated via IDs stored in localStorage sessions.
On the backend side it will be handled with Supabase. You can install it on your own computer, however they offer a free plan which is more than enough for this example. All you have to do is create an account and set up a Supabase project.
Steps to create the Chat application, initial setup:
From the console we install Vuejs
yarn global add @vue/cli@next
This will install the vuejs modules globally.
Next we create the vuejs project
vue create chat-realtime
When prompted, select the Vue 3 Preview preset:
? Please pick a preset:

Default ([Vue 2] babel, eslint)

❯ Default (Vue 3 Preview) ([Vue 3] babel, eslint)

Manually select features
We go to the folder
cd chat-realtime
And we will add the vuetify framework
vue add vuetify
Once prompted, choose Vuetify 3 Preview:
? Choose a preset:

Vuetify 2 - Configure Vue CLI (advanced)

Vuetify 2 - Vue CLI (recommended)

Vuetify 2 - Prototype (rapid development)

Vuetify 3 - Vite (preview)

❯ Vuetify 3 - Vue CLI (preview 3)
We will have the following structure in our directory
We add the Supabase library:
yarn add @supabase/supabase-js
Project configuration in Supabase
Having the skeleton of our frontend, we can now go to Supabase to configure the backend of your application.
Login to your Supabase account and create a new project:
Now inside the project, you will need to create a table in the database where all your chat messages will be stored. To do that, you can do it from the following SQL query:
CREATE TABLE messages (
  id bigint GENERATED BY DEFAULT AS IDENTITY PRIMARY KEY,
  text TEXT NOT NULL,
  username TEXT NOT NULL,
  timestamp timestamp default now() NOT NULL
);
You can run it from the Supabase SQL Editor:
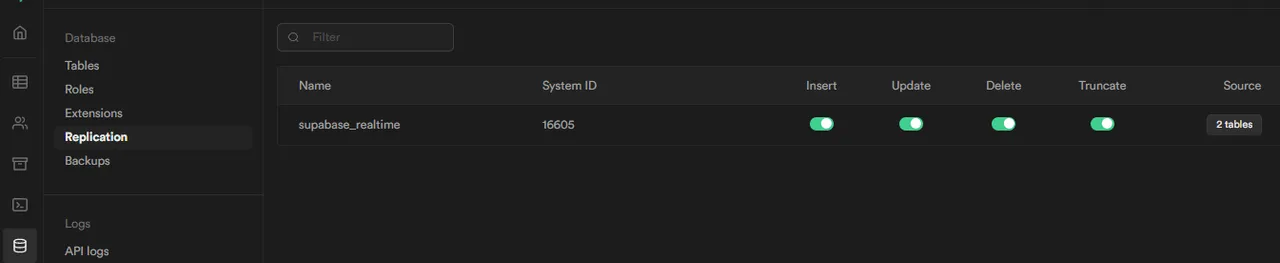
Finally, you must enable real-time events on the table from the Database -> Replication option and clicking the tables button in Source .

Connection with the Supabase API
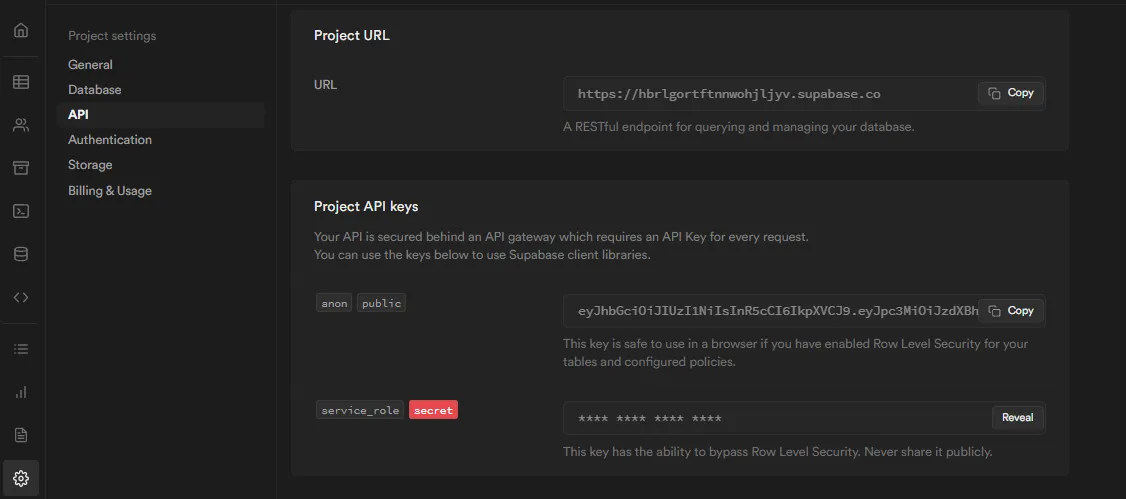
Having configured both parts of your application. All you have to do is connect them both, you will need the public API key and the database endpoint of your Supabase project. You can find them in the Settings > API menu:
The connection to the Supabase api can be done with its client library. All you need are the above credentials and the createClient function.
To tidy up a bit, first we create the api folder and inside it the index.js file
// api/index.js
import { createClient } from "@supabase/supabase-js";
import { ref } from "vue";

const supabase = createClient("URL_ENDPOINT", "PUBLIC_KEY");
///
The client instance will serve as the basis for a simple composable function based on Composition API Vue. Which will control all actions related to messages, such as sending, uploading and listening to new messages.
To implement it, start by creating the functions:
const getUsername = () => {
    const previousUsername = localStorage.getItem("username");
    // Validate if exists username
    if (previousUsername) {
      return previousUsername;
    } else {
      const username = `person_${Math.random().toString(36).substring(2, 6)}`;
      localStorage.setItem("username", username);
      return username;
    }
  };
  const getMessages = async (from, to) => {
    const { data } = await supabase
      .from("messages")
      .select()
      .range(from, to)
      .order("timestamp", { ascending: false });

    return data;
  };
  const onNewMessage = (handler) => {
    supabase
      .from("messages")
      .on("INSERT", (payload) => {
        handler(payload.new);
      })
      .subscribe();
  };
  const createNewMessage = async (username, text) => {
      const { data } = await supabase
      .from("messages")
      .insert({ username, text });

      return data;
  }

const useMessages = () => {
    const username = getUsername();
    const messages = ref([]);
    const messagesCount = ref(0);
    const maxMessagesPerRequest = 50;
    const loadMessagesBatch = async () => {
      const loadedMessages = await getMessages(
        messagesCount.value,
        maxMessagesPerRequest - 1
      );

      messages.value = [...loadedMessages, ...messages.value];
      messagesCount.value += loadedMessages.length;
    };

    loadMessagesBatch();
    onNewMessage((newMessage) => {
      messages.value = [newMessage, ...messages.value];
      messagesCount.value += 1;
    });

    return {
      username,
      messages,
      async send(text) {
        if (text) {
          await createNewMessage(username, text);
        }
      },
      loadOlder() {
        return loadMessagesBatch();
      },
    };
  };

  export { useMessages };
Explaining the above code a bit, it contains the following functions:
getUsername: takes care of generating a random username and saves it persistently in localStorage. The username is simply used to identify messages sent by the current user.
getMessages, uses the Supabase library to get messages from the given range. They are selected from the messages table and arranged in descending order by time stamp.
onNewMessage: is a method based on Supabase's real-time system to listen to INSERTs in the messages table. The created messages are passed to the provided handler.
createNewMessage, It is responsible for adding a new message in the Supabase database with the username and the text.
All those methods are used in the useMessages function that is used as a wrapper for the Vuejs API and create the necessary references, then configure the new message listener and load the batch of messages.
The returned object contains values necessary for the chat interface.
- username
- messages
- send()
- loadOlder()
Designing the FrontEnd:
With the API connection ready, it's time to tidy up the UI a bit.
We will mainly edit the src/App.vue file
to include the chat container and the rest of the template:
<template>
  <v-app>
    <v-main>
      <Chat/>
    </v-main>
  </v-app>
</template>

<script>
import Chat from './components/Chat.vue'
import { defineComponent } from "vue";

export default defineComponent({
  components: { Chat }
});

</script>
As we see in the App.vue, we add the component which is in charge of adding the form and the message list, we create the src/components/Chat.vue file:
<template>
  <v-layout>
    <v-navigation-drawer width="72" permanent  elevation="2">
      <v-btn icon v-bind="props">
            <v-avatar color="blue" size="large">
              <span class="white--text text-h5">RM</span>
            </v-avatar>
          </v-btn>
    </v-navigation-drawer>
    <v-navigation-drawer width="150" permanent elevation="2">
      <v-card class="mx-auto" max-width="300">
    <v-list :items="items"></v-list>
  </v-card>
    </v-navigation-drawer>
    <v-app-bar location="bottom" height="48" color="grey-lighten-2" elevation="0">
    <v-text-field
      placeholder="Message"
      v-model="input"
      @keydown="handleSend"
    ></v-text-field>
    <v-btn
      :disabled="!input"
      @click="handleSend"
    >
      Send
    </v-btn>
    </v-app-bar>
    <v-main>
  <v-card
    class="max-w-screen-sm relative overflow-y-auto"
    max-width="100%"
    height="560px"
  >
    <ul
    class="flex flex-col-reverse flex-1"
    @scroll="handleScroll">
    <Message
      v-for="message in messages.slice().reverse()"
      :username="message.username"
      :personal="message.username === username"
      :timestamp="message.timestamp"
      :text="message.text"
      ></Message>
    </ul>
  </v-card>
    </v-main>
  </v-layout>
</template>

<script>

import Message from "./Message.vue";
import { defineComponent, ref } from "vue";
import { useMessages } from "../api/index.js";

export default defineComponent({
  components: { Message },
  setup() {
    const { username, messages, send, loadOlder } = useMessages();
    const input = ref();
    console.log((messages))
    const handleScroll = (event) => {
      if (event.target.scrollTop === 0) {
        loadOlder();
      }
    };
    const handleSend = (event) => {
      if (!event.key || event.key === "Enter") {
        send(input.value);
        input.value = "";
      }
    };

    return {
      input,
      username,
      messages,
      handleScroll,
      handleSend,
    };
  },
});
</script>
Inside the Chat.vue component we add which is used to properly display each chat message. The file is located in src/components/Message.vue
<template>
  <div class="flex" :class="personal ? 'd-flex flex-row-reverse' : 'flex-row'">
    <v-chip
    style="height:auto"
    >
      <v-list-item
        :color="!personal ? 'green' : 'primary'"
        class="pa-4 mb-2 flex-1">
        <strong>
          <span
          v-if="!personal"
          v-text="username"
          ></span>
        </strong>
        <div v-text="text"></div>
        <div
          :class="personal ? 'd-flex flex-row-reverse' : 'flex-row'"
          style="font-size: 0.5rem;"
        >{{ messageHour }}</div>
      </v-list-item>
    </v-chip>
  </div>
</template>
<script>
import { defineComponent } from "vue";

export default defineComponent({
  data() {
    return {
      messageHour:''
    }
  },
  props: {
    personal: Boolean,
    username: String,
    text: String,
    timestamp: String
  },
  computed: {
    messageHour() {
      return this.messageHour;
    }
  },
  mounted(){
    this.messageHour = new Date(this.timestamp).toLocaleTimeString('en-US', {
    hour: '2-digit',
    minute: '2-digit',
  });
  }
});

</script>
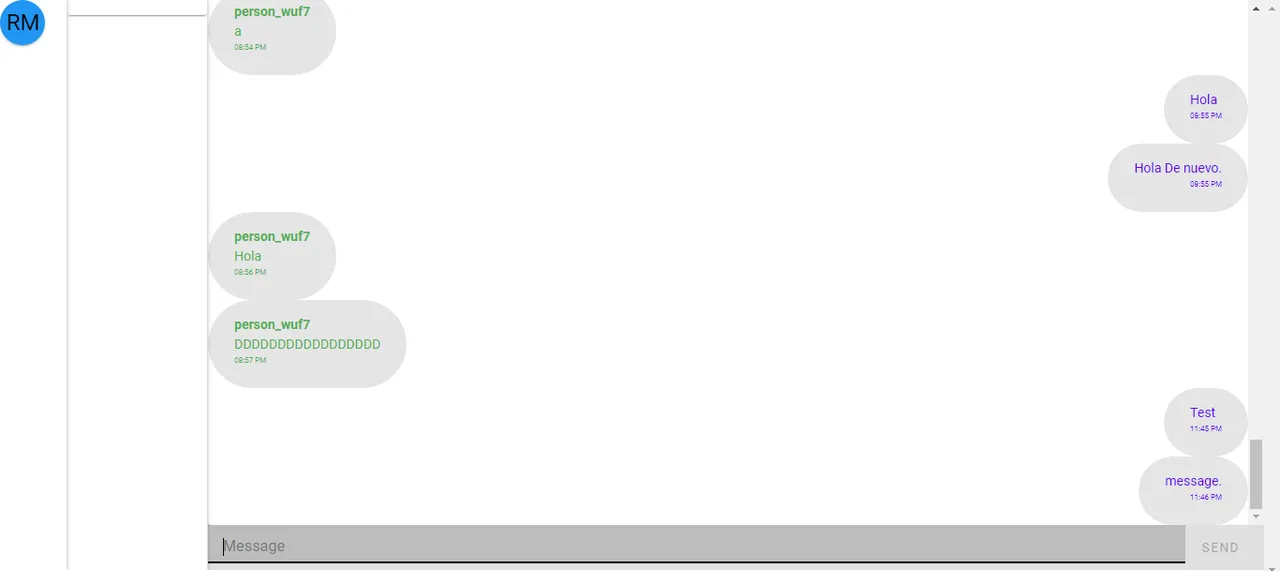
Finally the chat is ready, you can send some messages from the form and check its functionality, from its interface as well as from the Supabase application.
Conclusion:
This was a little tutorial of what can be done with supabase, you can add more complexity using Auth to support user authentication. Any questions you can leave your comment.
Versión Español:
¿Qué es?
Supabase es una alternativa de Firebase de código abierto. Inicie su proyecto con una base de datos de Postgres, autenticación, API instantáneas, suscripciones en tiempo real y almacenamiento.
Fuente
¿Por qué Supabase?
Principalmente porque es open source, puedes tener el control de tus datos y te brinda un conjunto de herramientas con grandes funcionalidades similares a Firebase.
En este artículo, les explicaré como usar Supabase para crear un chat con Vuejs usando el framework Vuetify en VsCode.
Es muy práctico y permite crear una aplicación increíble en muy poco tiempo.
Explicando la funcionalidad:
Antes de comenzar con el código, les comentaré un poco sobre las herramientas usadas y como funciona el chat.
Generalmente para crear una aplicación, se necesitan dos cosas: el frontend y el backend. El frontend es simplemente la interfaz de usuario, para el caso del chat la interfaz va a contener un formulario de entrada y una lista de mensajes publicados. Para el backend solo se va a requerir una base de datos para almacenar usuarios, mensajes y la hora de los mensajes.
Para este tutorial, la aplicación de chat en tiempo real funcionará con Vue 3 y Vuetify, el cual permitirá a los usuarios publicar mensajes de texto cortos. Para hacer este ejemplo sencillo, los usuarios serán generados de manera aleatoria a través de ID almacenados en sesiones de localStorage.
Del lado del backend se manejará con Supabase. Puedes hacer la instalación del mismo en tu propio equipo, sin embargo ofrecen un plan gratuito que es más que suficiente para este ejemplo. Lo que se tiene que hacer es crear una cuenta y configurar un proyecto Supabase.
Pasos para crear la aplicación de Chat:
Configuración Inicial:
Desde la consola instalamos Vuejs
yarn global add @vue/cli@next
Esto nos instalará los modulos de vuejs de forma global.
Seguidamente creamos el proyecto de vuejs
vue create chat-realtime
When prompted, select the Vue 3 Preview preset:
? Please pick a preset:

Default ([Vue 2] babel, eslint)

❯ Default (Vue 3 Preview) ([Vue 3] babel, eslint)

Manually select features
Ingresamos a la carpeta
cd chat-realtime
Y agregaremos el framework de vuetify
vue add vuetify
Once prompted, choose Vuetify 3 Preview:
? Choose a preset:

Vuetify 2 - Configure Vue CLI (advanced)

Vuetify 2 - Vue CLI (recommended)

Vuetify 2 - Prototype (rapid development)

Vuetify 3 - Vite (preview)

❯ Vuetify 3 - Vue CLI (preview 3)
Tendremos la siguiente estructura en nuestro directorio
Agregamos la libreria de Supabase:
yarn add @supabase/supabase-js
Configuración del proyecto en Supabase
Teniendo ya el esqueleto de nuestro frontend, ahora podemos ir a Supabase para configurar el backend de su aplicación.
Inicie sesión en su cuenta de Supabase y cree un nuevo proyecto:
Ahora dentro del proyecto, se deberá crear una tabla en la base de datos donde se almacenaran todos sus mensajes de chat. Para hacer eso, lo puede hacer desde la siguiente consulta SQL:
CREATE TABLE messages (
  id bigint GENERATED BY DEFAULT AS IDENTITY PRIMARY KEY,
  text TEXT NOT NULL,
  username TEXT NOT NULL,
  timestamp timestamp default now() NOT NULL
);
Lo puede ejecutar desde el Editor de SQL de Supabase:
Finalmente, se debe habilitar los eventos en tiempo real en la tabla desde la opción Base de datos -> Replicación y haciendo clic en el botón tablas en Source .
Conexión con el Api de Supabase
Teniendo configurado ambas parte de su aplicación. Solo falta conectar a ambos, se necesitará la clave API pública y el punto final de la base de datos de su proyecto Supabase. Puede encontrarlos en el menú Configuración > API :
La conexión con el api de Supabase se puede hacer con su biblioteca cliente. Todo lo que necesita son las credenciales anteriores y la createClient función.
Para ordenar un poco, primero creamos la carpeta api y dentro de ella el archivo index.js
// api/index.js
import { createClient } from "@supabase/supabase-js";
import { ref } from "vue";

const supabase = createClient("URL_ENDPOINT", "PUBLIC_KEY");
///
La instancia del cliente servirá como base para una función componible simple basada en Composition API Vue. El cual va a controlar todas las acciones relacionadas con los mensajes, como enviar, cargar y escuchar nuevos mensajes.
Para implementarlo, comience creando las funciones:
const getUsername = () => {
    const previousUsername = localStorage.getItem("username");
    // Validate if exists username
    if (previousUsername) {
      return previousUsername;
    } else {
      const username = `person_${Math.random().toString(36).substring(2, 6)}`;

      localStorage.setItem("username", username);

      return username;
    }
  };
  const getMessages = async (from, to) => {
    const { data } = await supabase
      .from("messages")
      .select()
      .range(from, to)
      .order("timestamp", { ascending: false });

    return data;
  };
  const onNewMessage = (handler) => {
    supabase
      .from("messages")
      .on("INSERT", (payload) => {
        handler(payload.new);
      })
      .subscribe();
  };
  const createNewMessage = async (username, text) => {
      const { data } = await supabase.from("messages").insert({ username, text });

      return data;
  }

const useMessages = () => {
    const username = getUsername();
    const messages = ref([]);
    const messagesCount = ref(0);
    const maxMessagesPerRequest = 50;
    const loadMessagesBatch = async () => {
      const loadedMessages = await getMessages(
        messagesCount.value,
        maxMessagesPerRequest - 1
      );

      messages.value = [...loadedMessages, ...messages.value];
      messagesCount.value += loadedMessages.length;
    };

    loadMessagesBatch();
    onNewMessage((newMessage) => {
      messages.value = [newMessage, ...messages.value];
      messagesCount.value += 1;
    });
    return {
      username,
      messages,
      async send(text) {
        if (text) {
          await createNewMessage(username, text);
        }
      },
      loadOlder() {
        return loadMessagesBatch();
      },
    };
  };

  export { useMessages };
Explicando un poco el código anterior, contiene las siguientes funciones:
getUsername: se encarga de generar un nombre de usuario aleatorio y lo guarda de forma persistente en localStorage. El nombre de usuario simplemente se utiliza para identificar los mensajes que envía el usuario actual.
getMessages, usa la libreria de Supabase para obtener mensajes del rango dado. Se seleccionan de la tabla messages y se organizan en orden descendente por registro de tiempo.
onNewMessage: es un metodo basado en el sistema de tiempo real de Supabase para escuchar los INSERT en la tabla messages. Los mensajes creados se pasan al controlador proporcionado.
createNewMessage, Se encarga de agregar un nuevo mensaje en la base de datos de Supabase con el nombre de usuario y el texto.
Todos esos metodos son usados en la función useMessages que se usa como wrapper para el Api de Vuejs y crear las referencias necesarias, luego se configura el nuevo escuchador de mensajes y carga el lote de mensajes.
El objeto que retorna contiene valores necesarios para la interfaz del chat.
- username
- messages
- send()
- loadOlder()
Diseñando el FrontEnd:
Teniendo la conexión del API listo, es hora de ordenar un poco la interfaz de usuario.
Principalmente editaremos el archivo src/App.vue
para incluir el contenedor de chat y el resto de la plantilla:
<template>
  <v-app>
    <v-main>
      <Chat/>
    </v-main>
  </v-app>
</template>

<script>
import Chat from './components/Chat.vue'
import { defineComponent } from "vue";

export default defineComponent({
  components: { Chat }
});

</script>
Como vemos en el App.vue, agregamos el componente que es el encargado de agregar el formulario y la lista de mensaje, creamos el archivo src/components/Chat.vue:
<template>
  <v-layout>
    <v-navigation-drawer width="72" permanent  elevation="2">
      <v-btn icon v-bind="props">
            <v-avatar color="blue" size="large">
              <span class="white--text text-h5">RM</span>
            </v-avatar>
          </v-btn>
    </v-navigation-drawer>
    <v-navigation-drawer width="150" permanent elevation="2">
      <v-card class="mx-auto" max-width="300">
    <v-list :items="items"></v-list>
  </v-card>
    </v-navigation-drawer>
    <v-app-bar location="bottom" height="48" color="grey-lighten-2" elevation="0">
    <v-text-field
      placeholder="Message"
      v-model="input"
      @keydown="handleSend"
    ></v-text-field>
    <v-btn
      :disabled="!input"
      @click="handleSend"
    >
      Send
    </v-btn>
    </v-app-bar>
    <v-main>
  <v-card
    class="max-w-screen-sm relative overflow-y-auto"
    max-width="100%"
    height="560px"
  >
    <ul
    class="flex flex-col-reverse flex-1"
    @scroll="handleScroll">
    <Message
      v-for="message in messages.slice().reverse()"
      :username="message.username"
      :personal="message.username === username"
      :timestamp="message.timestamp"
      :text="message.text"
      ></Message>
    </ul>
  </v-card>
    </v-main>
  </v-layout>
</template>

<script>

import Message from "./Message.vue";
import { defineComponent, ref } from "vue";
import { useMessages } from "../api/index.js";

export default defineComponent({
  components: { Message },
  setup() {
    const { username, messages, send, loadOlder } = useMessages();
    const input = ref();
    console.log((messages))
    const handleScroll = (event) => {
      if (event.target.scrollTop === 0) {
        loadOlder();
      }
    };
    const handleSend = (event) => {
      if (!event.key || event.key === "Enter") {
        send(input.value);
        input.value = "";
      }
    };

    return {
      input,
      username,
      messages,
      handleScroll,
      handleSend,
    };
  },
});
</script>
Dentro del componente Chat.vue agregamos se usa para mostrar adecuadamente cada mensaje de chat. El archivo se encuentra en el src/components/Message.vue
<template>
  <div class="flex" :class="personal ? 'd-flex flex-row-reverse' : 'flex-row'">
    <v-chip
    style="height:auto"
    >
      <v-list-item
        :color="!personal ? 'green' : 'primary'"
        class="pa-4 mb-2 flex-1">
        <strong>
          <span
          v-if="!personal"
          v-text="username"
          ></span>
        </strong>
        <div v-text="text"></div>
        <div
          :class="personal ? 'd-flex flex-row-reverse' : 'flex-row'"
          style="font-size: 0.5rem;"
        >{{ messageHour }}</div>
      </v-list-item>
    </v-chip>
  </div>
</template>
<script>
import { defineComponent } from "vue";

export default defineComponent({
  data() {
    return {
      messageHour:''
    }
  },
  props: {
    personal: Boolean,
    username: String,
    text: String,
    timestamp: String
  },
  computed: {
    messageHour() {
      return this.messageHour;
    }
  },
  mounted(){
    this.messageHour = new Date(this.timestamp).toLocaleTimeString('en-US', {
    hour: '2-digit',
    minute: '2-digit',
  });
  }
});

</script>
Finalmente el chat se encuentra listo, puede enviar algunos mensajes desde el formulario y comprobar su funcionalidad, desde su interfaz como desde la aplicación de Supabase.
Conclusión:
Este fue un pequeño tutorial de lo que se puede hacer con supabase, se le puede agregar más complejidad usando el Auth para asi darle soporte a la autenticación de usuario. Cualquier duda puedes dejar tu comentario.