Read this post in English by clicking here
Olá Splintermaníacos, bem vindos de volta!

Hoje eu gostaria de trazer uma das batalhas mais legais que já fiz em Splinterlands. Antes de mais nada, gostaria de parabenizar meu adversário pela sua ótima estratégia, mais um aprendizado eu levo depois dessa incrível batalha, foi demais!
Talvez essa seja uma das temporadas mais difíceis que joguei, está muito competitivo no modo Wild, logo na Liga Gold 2 e até mesmo no Gold 3 os adversários estão muito fortes. Durante essa temporada eu até consegui ficar algumas batalhas no diamante, mas realmente não dá, ta muito difícil.
Mas bem, a parte boa é que nessa competitividade toda encontramos adversários fortes que podem os dar algum lição de aprendizado e vou falar sobre isso a seguir.


A primeira coisa que você precisa observar nessa batalha, é o aumento de possibilidades que as regras vão proporcionar. Monstros melee vão atacar da linha de trás, os outros tipos de ataque vão mirar no primeiro monstro não melee da linha de trás. E Blast vai adcionar mais danos a essa batalha. A quantidade de mana é generosa, 51, um montante bom para escolher monstros adequados.
Antes de mais nada, assista a batalha clicando aqui

Hoje não vamos falar sobre a estratégia que eu escolhi, se você me acompanha, sabe que essa equipe que estou usando é uma de minhas preferidas, com apenas algumas alterações.
Vamos falar sobre a estratégia de meu adversário, que apesar de não ter ganhado, me ensinou mais algumas artimanhas que você também poderá aprender.
Vamos separar essa estratégia que ele usou por tópicos:
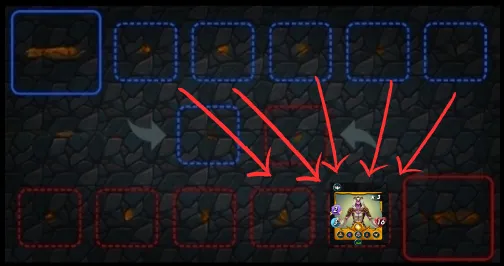
- A primeira coisa que devemos observar é que foi escolha dele onde meus monstros iriam atacar. Mesmo com regras, ele consegue direcionar meus ataques e isso facilita sua vida, pois se sabe onde vou atacar, sabe como deve se defender.
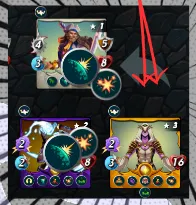
Além da alta quantidade de vida, esse monstro usado como uma espécie de tank na linha de trás, também poderia receber menos danos de monstros com ataque mágico.
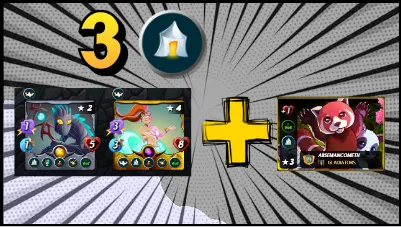
- Com um monstro para receber os danos, ele tinha a disposição 3 Triage para curar seu monstro que estava recebendo os ataques!
- Para se defender dos danos causados por Blast, ele tinha aos lados monstros com a habilidade Reflection Shield
- E se o monstro morrer, ele ainda poderia ser ressuscitado duas vezes, pois dois monstros em seu campo possuíam a habilidade Ressurect

Essa foi uma estratégia que poderia ser perfeita, se não fosse um detalhe: falta de poder ofensivo. Esse é o ponto fraco desse plano em designar ataques inimigos ao um monstros e protege-lo a todo custo. Faltou mais poder de fogo nesse time, se não fosse apenas esse detalhe, meu oponente poderia ter vencido essa batalha facilmente.
Foi uma batalha da qual adorei e tirei mais algumas estratégias para serem usados futuramente!
Obrigado por ler até aqui e passar um pouco de seu tempo com minhas palavras, até a próxima!
[EN]
( Google Translate)
Hello Splintermaniacs, welcome back!
Today I would like to bring you one of the coolest battles I've ever done in Splinterlands. First of all, I would like to congratulate my opponent for his great strategy, one more thing I learned after this incredible battle, it was great!
Maybe this is one of the hardest seasons I've played, it's very competitive in Wild mode, right in the Gold League 2 and even in Gold 3 the opponents are very strong. During this season I even managed to stay a few battles in the diamond, but I really can't, it's too difficult.
But well, the good part is that in all this competitiveness we find strong opponents that can teach us a lesson and I'll talk about that below.
The first thing you need to look out for in this battle is the increase in possibilities that the rules will provide. Melee monsters will attack from the back row, the other attack types will target the first non-melee monster from the back row. And Blast will add more damage to this battle. The amount of mana is generous, 51, a good amount to choose suitable monsters.
First of all, watch the battle by clicking here
Today we are not going to talk about the strategy I chose, if you follow me, you know that this team I am using is one of my favorites, with just a few changes.
Let's talk about my opponent's strategy, which despite not having won, taught me a few more tricks that you can also learn.
Let's separate this strategy he used by topics:
- The first thing we should note is that it was his choice where my monsters would attack. Even with rules, he manages to direct my attacks and that makes his life easier, because if he knows where I'm going to attack, he knows how to defend himself.
In addition to the high amount of health, this monster used as a kind of tank in the back row, it could also take less damage from monsters with magic attack.
- With a monster to take the damage, he had 3 Triage available to heal his monster that was taking the attacks!
- To defend against the damage caused by Blast, he had monsters with the skill Reflection Shield at his sides
- And if the monster dies, it could still be resurrected twice, as two monsters on your field had the Ressurect skill
This was a strategy that could have been perfect, if not for one detail: lack of offensive power. That's the weak point of this plan in assigning enemy attacks to a monster and protecting it at all costs. This team lacked more firepower, if it wasn't just for that detail, my opponent could have won this battle easily.
It was a battle I loved and I took some more strategies to be used in the future!
Thanks for reading this far and spending a little time with my words, until next time!
Credits:
Thumbnail background image: Source
Image editor: Canva
Screenshots taken from the game Splinterlands
Click on the image and use my referral link!