Olá Splinters, bem vindos de volta!
Read this post in English by clicking here
Batalhas em Splinterlands são cheio de desafios, se você não encontrar as melhores formações para as regras que encontrar pelo caminho, não terá grandes êxitos contra seus adversários. O que poderá influenciar diretamente nas suas escolhas, além das regras, é a quantidade de opções em monstros e summoners que você tem disponível.
As variáveis são lançadas em nossas batalhas, cada batalha é única e quase exclusiva. Então, baseado nessa dinâmica, você precisa criar estratégias e encontrar sinergia no time que vai escolher.
Hoje vamos falar sobre a regra de batalha Keep Your Distance, que elimina a utilização de monstros com ataque melee. Está preparado para o conteúdo de hoje? Continue lendo e veja algumas estratégias, dicas e claro, uma batalha no final deste post!
Já dei uma dica do que essa regra muda em nossas batalhas: monstros melee são deixados de lado. Normalmente, os monstros melee são monstros escolhidos para atuar na posição de tank. Isso se deve ao fato de em muitos casos, esse tipo de monstro possuir boa quantidade de vida, escudos ou habilidades que diminuem os danos recebidos.
Então, ao jogar com a regra Keep Your Distance, a primeira preocupação que temos de ter é encontrar um tank. Esse é um problema que vou te ajudar a solucionar agora, vamos ver quais são as melhores opções?
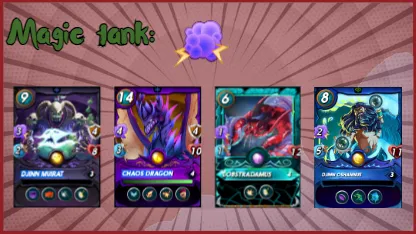
Monstro com ataque mágico:
Os monstros com ataque mágico não estão restritos nessa regra e uma das características desse tipo de monstro é que ele poderá atacar de qualquer posição, substituindo um "tank convencional". Alguns monstros com esse tipo de ataque podem ser frágeis, mas podemos encontrar algumas opções que suprem a necessidade de um monstro robusto na primeira posição, um bom exemplo para isso é o Oshannus, LOBSTRADAMUS, DJINN MUIRAT e CHAOS DRAGON:
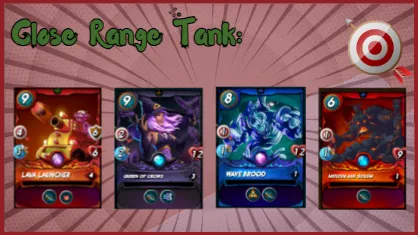
Monstros ranged tank:
Você já deve saber que monstros com ataque ranged não atacam da primeira posição, exceto se tiverem a habilidade Closed Range. Se um monstro com esse tipo de ataque possui essa característica, também poderá ser uma opção para ser um tank no seu time. Alguns exemplos para essa opção:
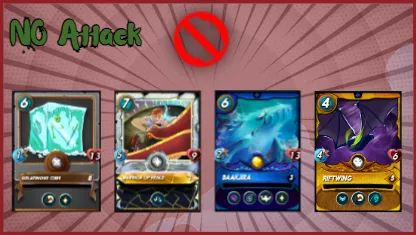
Monstros sem ataque:
Esses monstros não possuem ataque, mas podem oferecer outros recursos ao time, além de ser um tank. Alguns monstros como esses, podem ter alta capacidade de se manter em campo ou mesmo tirar algo do adversário. Opte por monstros robustos com muita vida ou escudos e que possam se curar ou causar danos indiretos ao adversário! Abaixo alguns exemplos:
Com esses monstros sem ataque, você pode optar por monstros com a habilidade Weapons Training:

| Monstros adjacentes ao monstro com essa habilidade ganham metade do ataque se ele não possuir nenhum ataque. |
Bem, agora você já sabe quais monstros poderá escolher para ser o tank do seu time e o que você deveria priorizar nas suas escolhas. E para linha de trás, o que eu deveria escolher?
Bem, não conseguiria te dar uma resposta certa para isso, pois suas escolhas devem se basear em quais regras estão ativas, monstros disponíveis, quantidade de mana disposta, elemento e etc. Mas você deveria focar em poder de fogo, suporte e sinergia de estratégia.
Vamos ver um pouco disso na batalha a seguir:


Essa é uma batalha com pouca mana disponível, cada escolha deve ser feita com eficácia dentro da estrutura da estratégia construída, assim melhores êxitos posso ter. As regras são interessantes, apenas monstros sem ataque melee em campo, monstros não erram seus ataques e monstros mágicos terão dano ao atacar.
Baseado nessas regras, eu pensei em retirar poder de fogo de monstros com ataque ranged e focar em um time com a habilidade Snipe, para derrubar monstros da linha de trás inimiga.
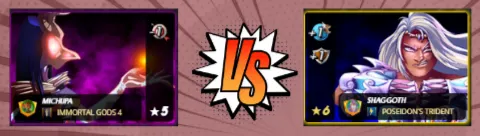
Summoner:
Baseado em minhas suposições, eu escolho um summoner que retira poder de fogo de monstros com ataque ranged. Meu oponente aposta em velocidade e uma camada de proteção com escudos.
Se tudo der certo, esses escudo serão apenas um atraso sem muita relevância sobre meu time. Saberemos disso daqui a pouco na batalha.
Meu time:
| Monstro | Objetivo |
|---|---|
 | Esse foi o monstro escolhido para a função de tank. É um monstro robusto com muita vida e com boas condições de se se curar a cada rodada. Além disso, ganharia um pouco mais de vida a cada monstro derrotado em campo. |
 | O primeiro monstro da minha estratégia em canalizar os ataques utilizando a habilidade Snipe. Esse monstro foi uma boa opção pelo seu pouco custo e bom poder ofensivo, além de ter sido posicionado na segunda posição para se esquivar de possíveis ataques Snipes inimigo, pois possui a habilidade Dodge, além de boa velocidade. |
 | Mais um monstro com ataque Snipe para fazer combo com o monstro anterior. Também possui uma boa velocidade, permitindo atacar antes de alguns monstros e derrota-los antes de atacarem, se esse for o caso. |
 | Por fim um monstro que coube no orçamento, já que restava apenas dois de mana. Mas esse monstro poderia ser útil ao quebras escudos e ainda possui um ataque razoável. |

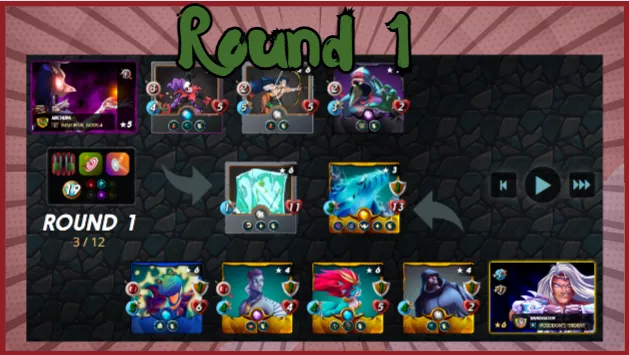
Nesse primeiro round nada de muito emocionante aconteceu. Porém, tive duas impressões:
A primeira é que fiz uma ótima escolha ao direcionar meus ataques para a linha de trás inimiga, já que seria muito difícil derrotar o tank inimigo com um suporte que ele possuia. Esse direcionamento para linha de trás me deu a oportunidade de acabar com o poder de fogo adversário e também com qualquer ajuda que ele estivesse adicionando ao time.
A segunda foi justamente ao suporte. Ele seria uma pedra no meu sapato ao restaurar vida e escudos. Por isso é muito importante canalizar poder de ataque a um ponto do campo, ataques dispersos são facilmente counterados.
Nada de emocionante até aqui. Apenas ataques adversários sendo desperdiçados no meu tank e eu derrubando o primeiro monstro da linha de trás inimiga. Que tal pular para o round que realmente foi mais relevante para essa história:
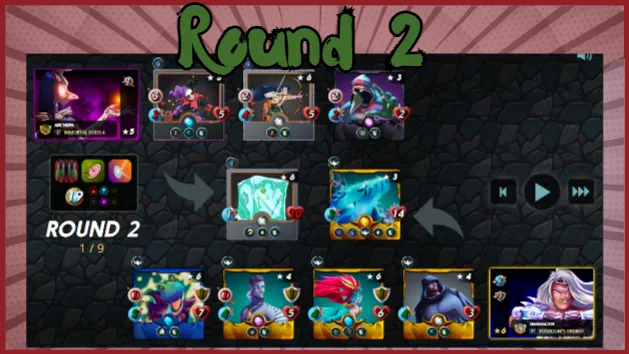
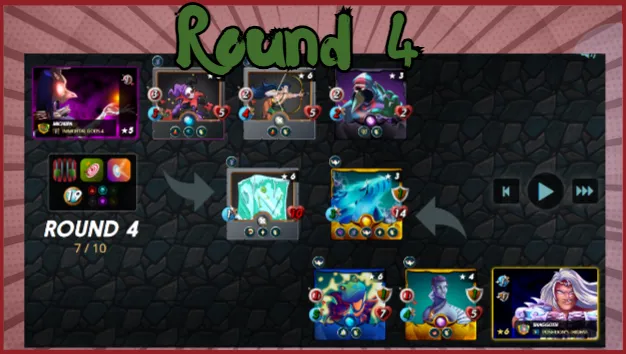
Como essa é uma batalha de paciência, pilamos para o quarto round onde finalmente consigo derrubar o monstro que restaura escudos e regenera a vida do tank. A partir de agora será mais fácil matar monstros rivais!
Pulamos o quinto round e voltamos aqui no sexto, onde outro monstro é derrotado. No round anterior esse monstro ficou sem escudo e perdeu parte da vida, que posteriormente foi restaurada pelo ultimo monstro inimigo com a habilidade Triage. Essa foi uma estratégia bem interessante de meu oponente, como podemos ver ele recheou o time com regeneração de vida e escudos.

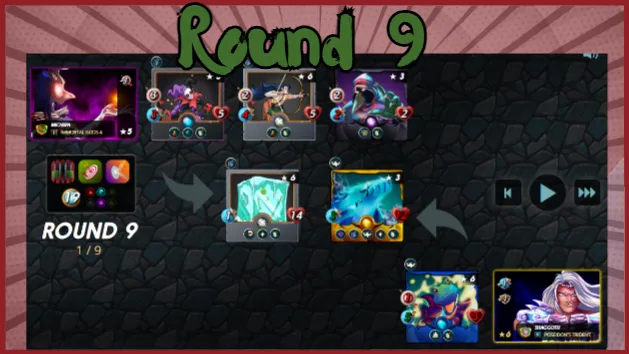
Foi apenas 3 rounds depois, no nono round, que finalmente eliminei o último monstro inimigo da linha de trás. Vou a mencionar o quanto minha estratégia foi eficaz nessa batalha e conseguiu derrubar o time adversário no único ponto fraco. Repare o quanto essa batalha demorou até aqui, mesmo eu acertando no lugar certo.
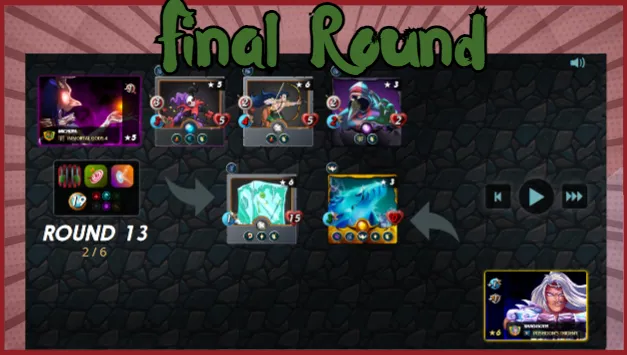
Bem, agora só falta eliminar o tank. Vamos ver quanto rounds demoraram?
13 rounds. Foram necessários mais 4 rounds como todo meu poder de fogo direcionado para o tank para finalmente derrota-lo. Isso deve ao fato que ele regenerava 4 de vida a cada round enquanto eu causava 7 de dano, no final ele sofria apenas 3 de dano.
Assista a batalha em seu mínimos detalhes clicando aqui
Bem, como você pode perceber, essa batalha foi muito interessante, apesar do tédio inicial, pois existe um aprendizado muito grande. A primeira coisa que você deve perceber foi as dicas que dei no começo desse post sendo usadas aqui nessa batalha com a regra Keep Your Distance. A segunda observação que você deve fazer é que, direcionar ataques tem uma melhor eficácia.
E por aqui encerro este post. Obrigado por passar um pouco do seu tempo com minhas palavras e pensamentos, até a próxima!
[EN]
(Google translate)
Hello Splinters, welcome back!
Battles in Splinterlands are full of challenges, if you don't find the best formations for the rules you find along the way, you won't have great successes against your opponents. What can directly influence your choices, in addition to the rules, is the amount of options in monsters and summoners that you have available.
Variables are thrown into our battles, each battle is unique and almost exclusive. So, based on this dynamic, you need to create strategies and find synergy in the team you choose.
Today we are going to talk about the Keep Your Distance battle rule, which eliminates the use of melee monsters. Are you ready for today's content? Keep reading and see some strategies, tips and of course, a battle at the end of this post!
I already hinted at what this rule changes in our battles: melee monsters are left out. Normally, melee monsters are monsters chosen to act in the tank position. This is due to the fact that in many cases, this type of monster has a good amount of life, shields or skills that reduce the damage received.
So when playing with the Keep Your Distance rule, the first concern we have to have is finding a tank. This is a problem I'm going to help you solve now, let's see what are the best options?
Monster with magic attack:
Monsters with a magic attack are not restricted by this rule and one of the characteristics of this type of monster is that it can attack from any position, replacing a "conventional tank". Some monsters with this type of attack can be fragile, but we can find some options that meet the need for a robust monster in the first position, a good example for this is Oshannus, LOBSTRADAMUS, DJINN MUIRAT and CHAOS DRAGON :
Ranged tank monsters:
You might already know that ranged attack monsters don't attack from the first position, except if they have the Closed Range ability. If a monster with this type of attack has this trait, it can also be an option to be a tank on your team. Some examples for this option:
Monsters without attack:
These monsters have no attack, but can offer other resources to the team besides being a tank. Some monsters like these can have a high capacity to stay on the field or even take something away from the opponent. Opt for robust monsters with a lot of health or shields and that can heal or indirectly damage the opponent! Below some examples:
With these monsters without attack, you can opt for monsters with the Weapons Training skill:
| Monsters adjacent to the monster with this ability gain half its ATK if it has no ATK. |
Well, now you know which monsters you can choose to be your team's tank and what you should prioritize in your choices. And for the back row, what should I choose?
Well, I couldn't give you a right answer for that, because your choices should be based on which rules are active, monsters available, amount of mana available, element and etc. But you should focus on firepower, support and strategy synergy.
Let's see some of this in the battle below:
This is a battle with little mana available, each choice must be made effectively within the structure of the built strategy, so I can have better successes. The rules are interesting, only non-melee monsters on the field, monsters don't miss their attacks and magic monsters will take damage when attacking.
Based on these rules, I thought about removing firepower from monsters with ranged attack and focusing on a team with the Snipe ability, to take down enemy backline monsters.
Summoner:
Based on my assumptions, I choose a summoner that draws firepower from monsters with ranged attack. My opponent bets on speed and a layer of protection with shields.
If all goes well, these shields will just be a delay without much relevance to my team. We'll find out about this in a little while in the battle alha.
My team:
| Monster | Purpose |
|---|---|
| This was the monster chosen for the role of tank. It is a robust monster with a lot of health and good conditions to heal itself every round. In addition, it would gain a little more life for each monster defeated on the field. |
| The first monster in my strategy to channel attacks using the Snipe skill. This monster was a good choice for its low cost and good offensive power, in addition to being positioned in second position to dodge possible enemy Snipes attacks, as it has the Dodge ability, in addition to good speed. |
| Another monster with Snipe attack to combo with the previous monster. It also has good speed, allowing it to attack before some monsters and defeat them before they attack, if that's the case. |
| Finally a monster that fit the budget, since there were only two mana left. But this monster could be useful for breaking shields and still has a reasonable attack. |
In that first round nothing very exciting happened. However, I had two impressions:
The first is that I made a great choice in directing my attacks to the enemy back line, as it would be very difficult to defeat the enemy tank with a support he had. That back-line drive gave me the opportunity to take out the opposition's firepower as well as any help he was adding to the team.
The second was precisely the support. He would be a thorn in my side when restoring health and shields. That's why it's very important to channel attack power to one point on the field, scattered attacks are easily countered.
Nothing exciting so far. Just opposing attacks being wasted on my tank and me taking down the first enemy back row monster. How about skipping to the round that was really most relevant to this story:
As this is a battle of patience, we move on to the fourth round where I finally manage to take down the monster that restores shields and regenerates the tank's health. From now on it will be easier to kill rival monsters!
We skip the fifth round and come back here for the sixth, where another monster is defeated. In the previous round, this monster had no shield and lost part of its life, which was later restored by the last enemy monster with the Triage skill. This was a very interesting strategy from my opponent, as we can see he filled the team with health regeneration and shields.
It was only 3 rounds later, in the ninth round, that I finally eliminated the last enemy monster from the back row. I'm going to mention how effective my strategy was in this battle and managed to knock the opposing team to the only weak point. Notice how long this battle took until here, even though I hit the right spot.
Well, now we just need to eliminate the tank. Let's see how many rounds took?
13 rounds. It took another 4 rounds with all my firepower directed at the tank to finally defeat him. This is due to the fact that he regenerated 4 health each round while I dealt 7 damage, in the end he only suffered 3 damage.
Watch the battle in its smallest details by clicking here
Well, as you can see, this battle was very interesting, despite the initial boredom, as there is a lot of learning involved. The first thing you should notice is the tips I gave at the beginning of this post being used here in this battle with the Keep Your Distance rule. The second note you should make is that targeting attacksn better effectiveness.
And here I end this post. Thank you for spending some of your time with my words and thoughts, until next time!
Credits:
Thumbnail background image: Source
Image editor: Canva
Screenshots taken from the game Splinterlands
Click on the image and use my referral link!