https://splinterlands.com/?p=battle&id=sl_222cade75cea024abfea40f4ad31f241

INTRODUCTION 🎮✨

Hello, Splinterlands friends and family! 👋 Today, I want to talk about the release of the two latest promo cards made by the @splinterlands team a few days ago as part of the Splinterlands Social Media Challenge.
The Splinterlands team released a post detailing the characteristics and stats of the two newest promo cards: Elanor Bravefoot and Sanctus Vicar, along with the terms of the sale. I'm not going to repeat that here since all the information is already in their post.
This post will focus more on the merits, costs, and convenience of the cards. I will also share what my strategy was for participating in this promo, and to end the post, I'm going to share a battle featuring each one of the cards. ⚔️

Let's get right into reviewing the cards:
Elanor Bravefoot 🛡️
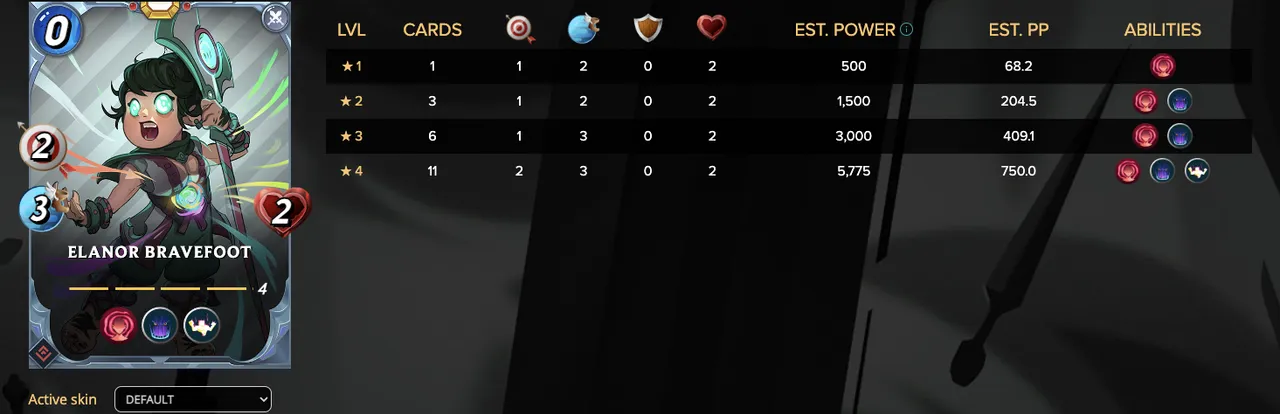
1. Blasphemy of Uul:

There has been a lot of talk about this card for various reasons. First, her main ability was reworded (or reworked) a few days ago because it was a bit confusing. The @splinterlands team changed the ability to allow future Fiend cards to be released that would make this ability work. There are no commitments or announcements about them, so we're left with a bit of uncertainty about how this ability will work in the future.
2. A 0 Mana Card:

Zero-mana cards are always interesting, to say the least. In the past, we've seen the importance of the Chicken card and later on the Fiend cards. It's important to notice that this card is the only 0 mana card of the Rebellion set, and it's a NEUTRAL card. Both aspects are really important, and that's why this card reminds me quite a lot of the old Chicken card.
I'm not 100% sure about this statement, but I think it's fair to say that this card will be the only 0 mana card for Rebellion. If that's true, this is huge. As any experienced player knows, a 0 mana card is super useful because it allows you to fill teams when you have 0 mana left, and these cards fill an important role in matches of 12-13-14 mana.
I think this reasoning is quite a safe bet. We might not even see any 0 mana cards for the next set either. The balance of the game requires that there aren't too many 0 mana cards available to play with at the same time. For example, right now, there seems to be an overabundance of 0 mana cards when you use dual summoners. But this might change for the next set.
I recommend everyone to get at least one copy of this card, just in case this will be the only 0 mana card available in the future for Modern Play. At least right now, it's the only 0 mana card usable in the "No Melee" Rulesets in Modern for example.
3. The Fight:
For this section, I chose to feature a fight against the dreaded @bjangles. I'm not going to do a deep analysis of the fight, but I will remark on how Elanor helped me achieve the win.


As always, when analyzing a Splinterlands battle, the first thing we need to look at is the ruleset and the mana cap to understand why each player chose their cards. In this case, the mana cap was 23, which is quite low, and the ruleset was only "Standard," meaning there weren't any modifications to the rules of engagement.
Bjangles' strategy was to counter Tofu. It's fair to say this was a good strategy, and he could have walked away with the win with a little more luck on his side. Either player could have taken this win, honestly. Combining Venka + Reflection Shield seems like an efficient way to deal with the Tofu + Grim combo.
As soon as the fight started, I took a lot of damage on the frontline and the backline. This is why having Elanor was so important in this fight. As you can notice, 23 mana is not a lot, so I had to build my team with low mana units and ended up using two 0 mana cards.

Elanor died on turn 2, but this meant that this 0 mana card was able to absorb 2 turns of sneak damage from the enemy team. If you think about it, that's exactly what 0 mana cards are supposed to do—they serve as fillers when we have nothing else available. That's why Elanor and 0 mana cards, in general, are so useful. Without Elanor, my Acid Shooter would have died on turn 2 or 3, and he wouldn't have been able to poison and kill Venka, leading to a lost match.

Elanor Bravefoot Wrap-up 🛡️
To sum up, Elanor Bravefoot is a card that deserves a spot in your deck, especially considering the utility of 0 mana cards. Its ability to absorb damage in low-mana matches, combined with its neutral status, makes it versatile for multiple teams. It's not just about how much damage a card can deal but also about strategically placing your cards for survival.
I highly recommend you grab at least one of these cards to help give you that edge in battles, especially when mana is tight.
Sanctus Vicar:

Cleanse Rearguard:

Sanctus Vicar brings with him another great ability that cleanses the last allied backline unit with a magic debuff.
The wording of this ability is really important because it works as a cleanse for the backline, but in a way that doesn’t just affect 1 unit — it can cleanse a different unit each turn.
This makes the ability very important for poison rulesets because it might end up cleansing your entire team. Since cleanse removes any debuff, it also has some other interesting uses that we might take a while to fully realize.
For example, this unit can work really well when combined with another unit with a dispellable "debilitation" in the backline.
Anyway, I think this is not a card you’ll want to miss out on. It's very useful now for poison rulesets and could be even more valuable in the future.
Other Stats:

The other stats of the card are also quite interesting. I've been saying for a while that Reflection Shield should probably be the most sought-after ability in the game.
Any card with this ability has the potential to be great. I think the release of Tofu proves that. We can’t really use any melee unit unless they have Reflection Shield because of how Tofu works.

Cleanse, on the other hand, is not a super strong ability by itself, but it is a useful ability to deal with Cryptic for example.
The other stats of the card — attack, life, armor, and speed — are okay. Nothing impressive, but still enough for a 6 mana card.
In my opinion, this guy will end up being a niche card, useful in very few scenarios. But it's definitely a must-have if you want to compete at the top.
3. The Fight:
For this section, I chose to feature a fight against another known player, @dstampede. I'm not going to do a deep analysis of the fight, but I will highlight how Sanctus Vicar helped secure the win.


As always, we start by analyzing the ruleset and mana. As you can imagine, these two cards are not cards you will be spamming in every game.
They only work well in certain mana limits and rulesets. I think this card works really well in poison matches from 25-40 mana, but it won't be as impressive in matches over 40 mana because better options exist to survive the poison.
No neutrals means we can’t use Grimbardun Smith, so we need a cleanse for the frontline to deal with the poison ruleset. Holy protection doesn’t really affect how we choose our teams.
As you can see, both teams have the same tank and some sort of cleanse for the frontlines. That's because, if cleansed, Baakjira can become an unkillable beast.
We both also used Angelic Mandarin, which is very useful in poison rulesets and works well with Baakjira to negate the enemy's magic attacks.
The other units are interchangeable and were not pivotal to the fight itself.

This is how the fight looks at the start of turn 2. As you can see, both my tank and backline have been cleansed of poison.
Since I have a Triage healing the backline, I am able to keep everybody alive while Sanctus Vicar cleanses a different unit each turn.

This is how the fight looks in the middle of turn 4. My team has almost been completely cleansed, while the enemy's team keeps taking poison damage every turn.
Both tanks are standing strong in the frontline because, as I mentioned before, a cleansed Baakjira can be really difficult to deal with.

By turn 6, some of my backline has already fallen due to the attacks of Pelacor Bandit, but my team still stands strong.
The enemy team, on the other hand, is slowly dying from poison damage, even with two Triages healing every round.

By turn 7, the enemy is left with virtually no damage output, while my team is still standing strong and will heal itself in the next few turns.
The enemy Baakjira is already feeling the debuff from my Merdhampir’s Cripple and will eventually die because its HP won’t be high enough to sustain the damage.
My Strategy for the Sale:

I've been talking for a while about the merits of both cards and how good they are — and how they could even be better in the future.
But, as you might have noticed, I didn’t max either of them. I wish I could because, honestly, they are both such great cards that it's going to hurt in the future if the enemy has them maxed and I don’t.
Unfortunately, my DEC reserves are not what they used to be, so I couldn’t afford to max them.
For this sale, the team decided to make the cards really expensive. It will cost you around 300k DEC to max Sanctus Vicar (assuming you sell the GFs) and around 550,000 to max Elanor. Sadly, this makes the cards really expensive and out of my reach.

Nevertheless, I still wanted to participate in the event and not miss out on these two cards, so I decided to buy them both and keep them underleveled for now.
I chose to buy enough Elanor copies to get the card to Lv 2 because that's where the card gets Blasphemy of Uul. For me, it wasn’t worth it to get the card to level 3 because it only gains 1 speed — that’s not enough to justify a 150k DEC investment.
On the other hand, for Sanctus Vicar, I decided to get the card to at least Lv 4 for now because that's the level where Sanctus Vicar gets Cleanse for the frontline.
I would have loved to take this card to Lv 8 as well, but it’s simply too expensive for now, and it doesn’t gain any extra interesting stats or abilities until Lv 8.
Therefore, I feel comfortable leaving the card at Lv 4 for now, and I’ll probably upgrade it in the future if I feel like I’m missing out.

Closing Thoughts:
As you can probably tell, I’m not super happy with the price of both cards.
I feel like they should have been cheaper and more affordable, especially Sanctus Vicar because I don’t think it’s that good.
Elanor is, of course, worth the price, but the card should’ve come with Blasphemy at Lv 1 and some sort of power spike at Lv 3.
That being said I think the team did a spectacular job with this 2 cards. Both in design and utility. At first I didn't wanted to participate at all but honestly I couldn't miss out on the sale, the fomo eventually kicked in.
I really didn't go into the leaderboard and the title I will probably get for participating but you guys should also keep that in mind when planning for the buy. Also be mindful that's there's only a week or so left for the promo so don't sleep on it if you plan to buy some.
What do you think of these two cards? Will you be buying or will you skip on the sale? Let me know in the comments!
See you guys next time!
| SPLINTERLANDS.COM - Referral Link | SPLINTERSHARDS (SPS) | BLOG | DISCORD | TELEGRAM |
#splinterlands #play2earn