🔸Sin más que añadir, a continuación los dejo con el paso a paso:
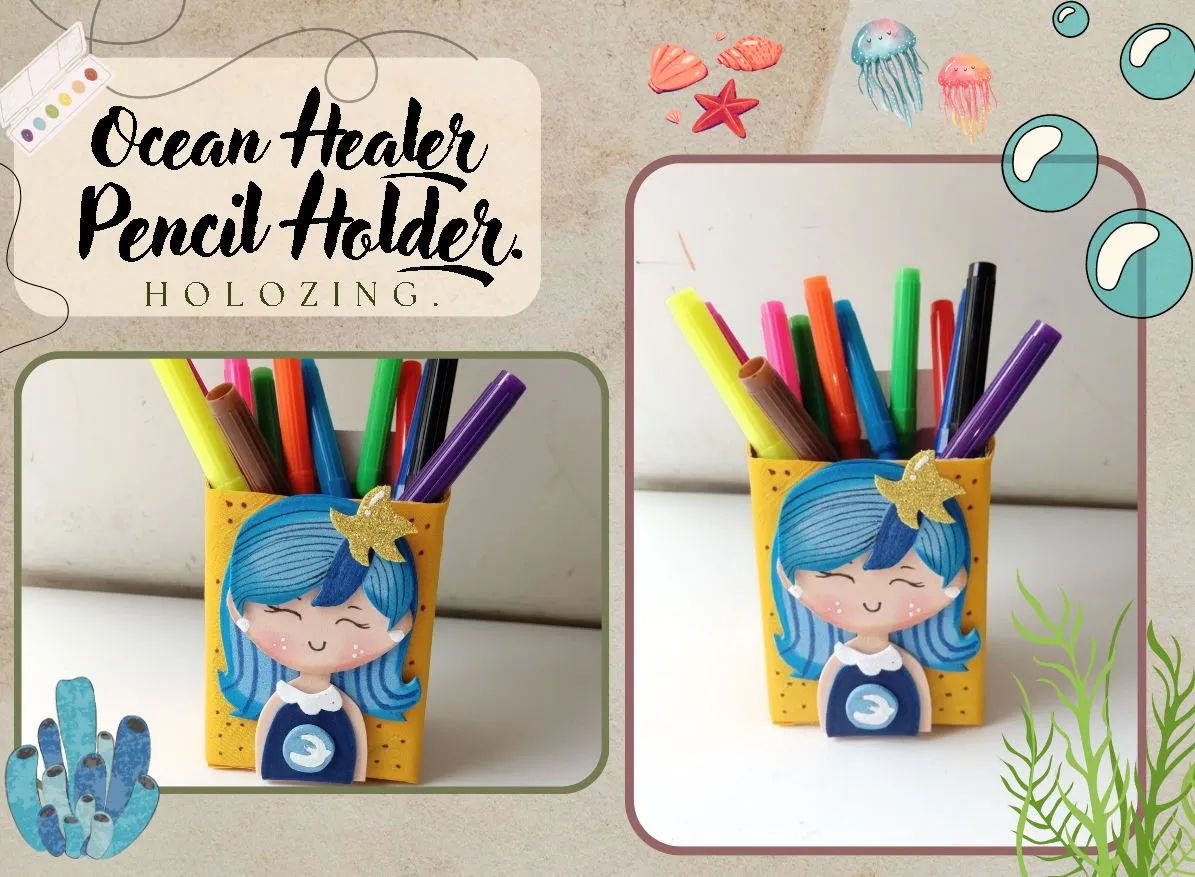
Good afternoon, holozing friends!I hope you are feeling pretty well, I am happy to stop by here again to share with you a beautiful idea for a pencil holder inspired by the healer of the ocean. I wanted to make a fairly simple pencil holder, with a different shape, but what stood out was the statement, in this case the selected character, and give some touches to the background.
I am excited to share this creation, because I always get a little doubtful when creating one of the characters, since they must be cute, in my style, but they do look like the healer and have small details that distinguish them.
🔸Without more to add, then I leave you with the step by step:
♥️ESPERO QUE TE GUSTE,
¡Empecemos!
♥️I HOPE YOU LIKE IT,
Let's start!

✂️ MATERIALES | ✂️ MATERIALS
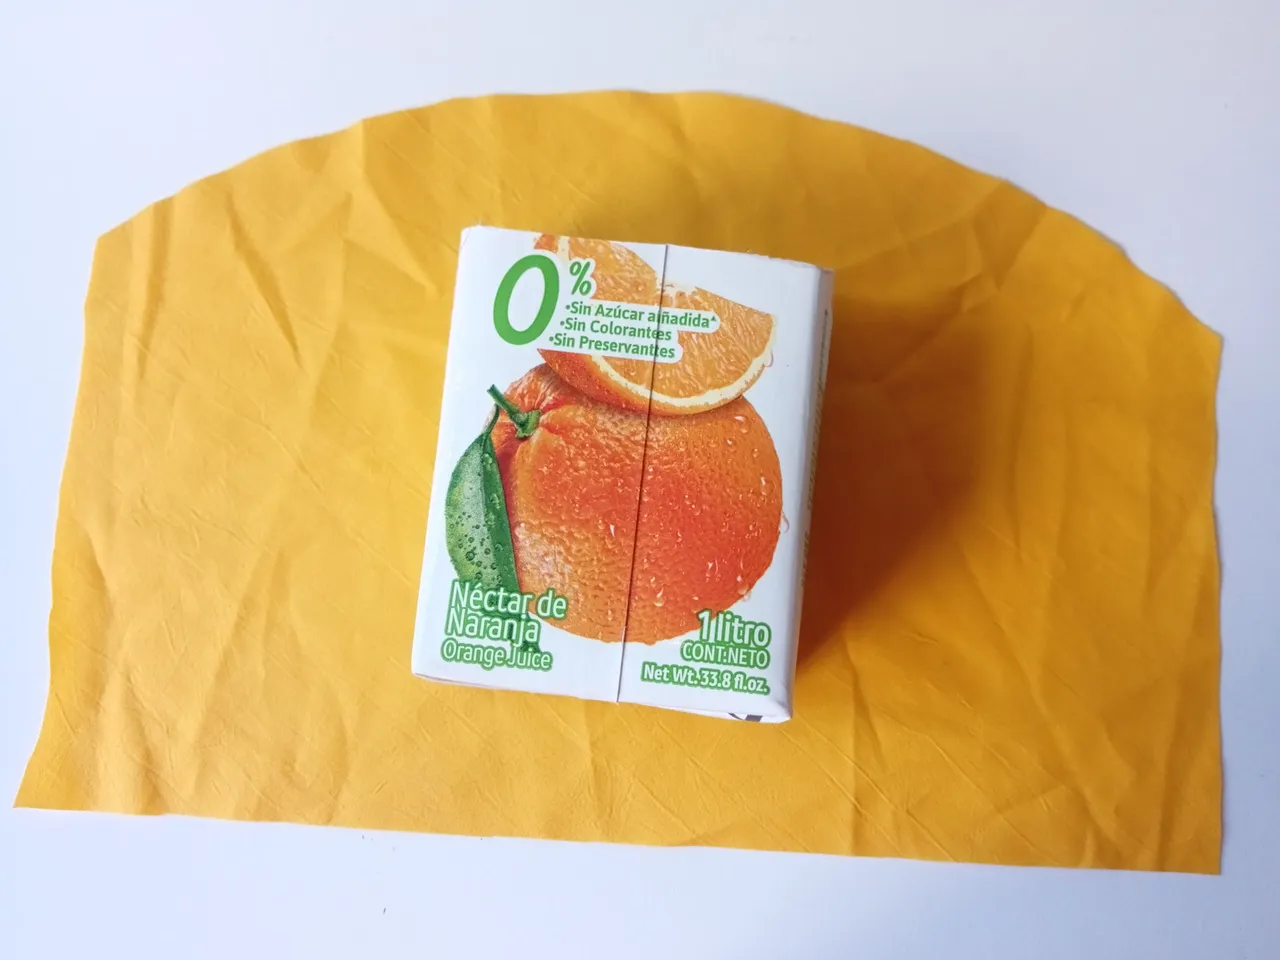
- Caja de jugo o de tu preferencia.
- Tela del color de preferencia.
- Foami escarchado dorado y blanco.
- Foami azul claro y oscuro.
- Foami color piel.
- Foami blanco.
- Marcadores.
- Pinturas.
- Pegamento.
- Hoja blanca.
- Lápiz.
- Regla.
- Juice box or your preference.
- Fabric of the preferred color.
- Gold and white frosted foam.
- Light and dark blue foami.
- Skin-colored foami.
- White foam.
- Markers.
- Paintings.
- Glue.
- White sheet.
- Pencil.
- Ruler.
✨ PROCEDIMIENTO | ✨ PROCESS
- ✨ PASO 1:
Comencé recortando el cartón para darle forma al portalápiz, como quería darle una forma diferente, decidí recortarlo más empinado en la parte trasera y más bajo en la parte de en frente. Las medidas que utilicé fueron las siguientes, la parte más alta de 12 cm y la parte más baja o de en frente de 10 cm y recorté.
- ✨ STEP 1:
I started by cutting out the cardboard to shape the pencil holder, as I wanted to give it a different shape, I decided to cut it steeper at the back and lower at the front. The measurements I used were the following, the highest part of 12 cm and the lowest or front part of 10 cm and I cut out.

- ✨ PASO 2:
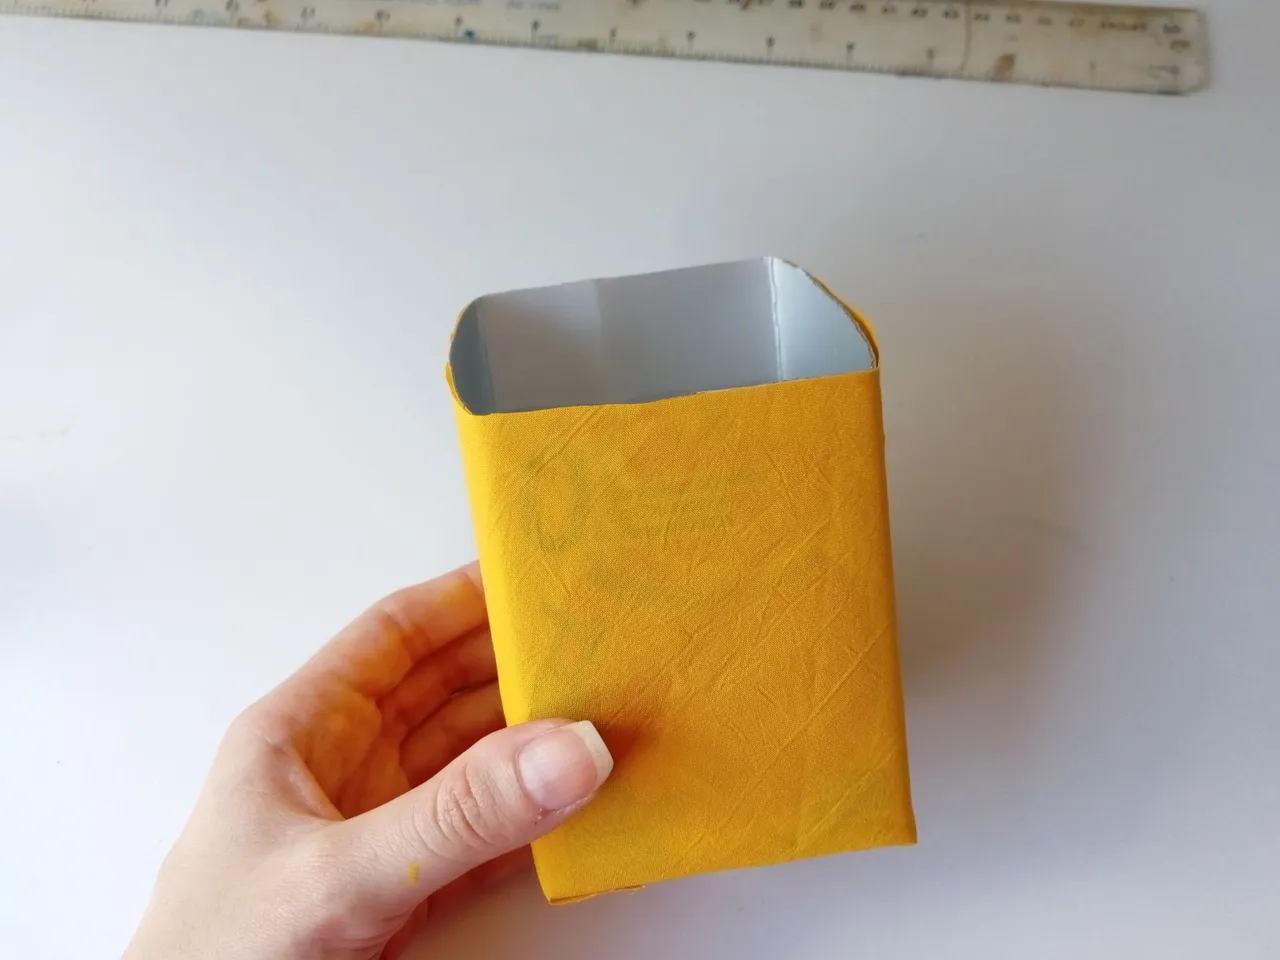
Luego, recorté un trozo de tela, lo suficientemente grande como para rodear la caja, pegué la tela desde la parte más alta, recorté el exceso de tela en el borde superior y en la base, pegué las puntas. Si desean, para que la base quede mucho más prolija, pueden pegar un trozo de tela o cartulina.
- ✨ STEP 2:
Next, I cut out a piece of fabric, large enough to go around the box, glued the fabric from the highest part, trimmed the excess fabric at the top edge and at the bottom, glued the ends. If you want, to make the base much neater, you can glue a piece of fabric or cardboard.
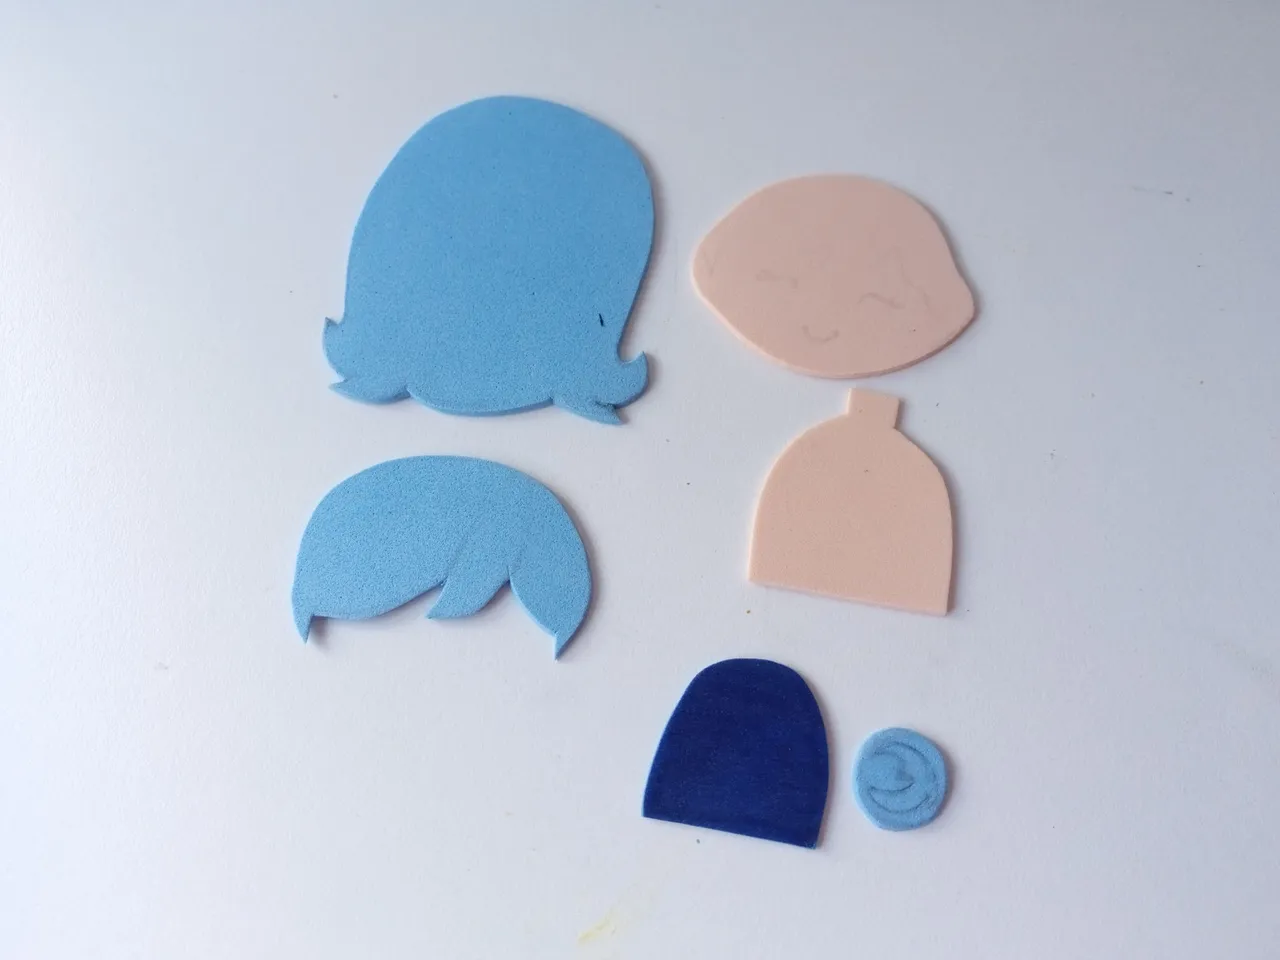
- ✨ PASO 3:
Al tener la base del portalápiz listo, comencé a elaborar el patrón de la sanadora del océano, dibujé cada una de las partes o piezas, individualmente y transferí al color correspondiente de foami de la siguiente manera: el cabello y el logo, en foami azul claro, la cabeza y cuerpo en foami color piel, la blusa en color azul oscuro y el cuello de la ropa en foami blanco.
- ✨ STEP 3:
Having the base of the pencil holder ready, I began to make the pattern of the ocean healer, I drew each of the parts or pieces, individually and transferred to the corresponding color of foam as follows: the hair and the logo, in blue foam Of course, the head and body in skin-colored foam, the blouse in dark blue and the collar of the clothing in white foam.
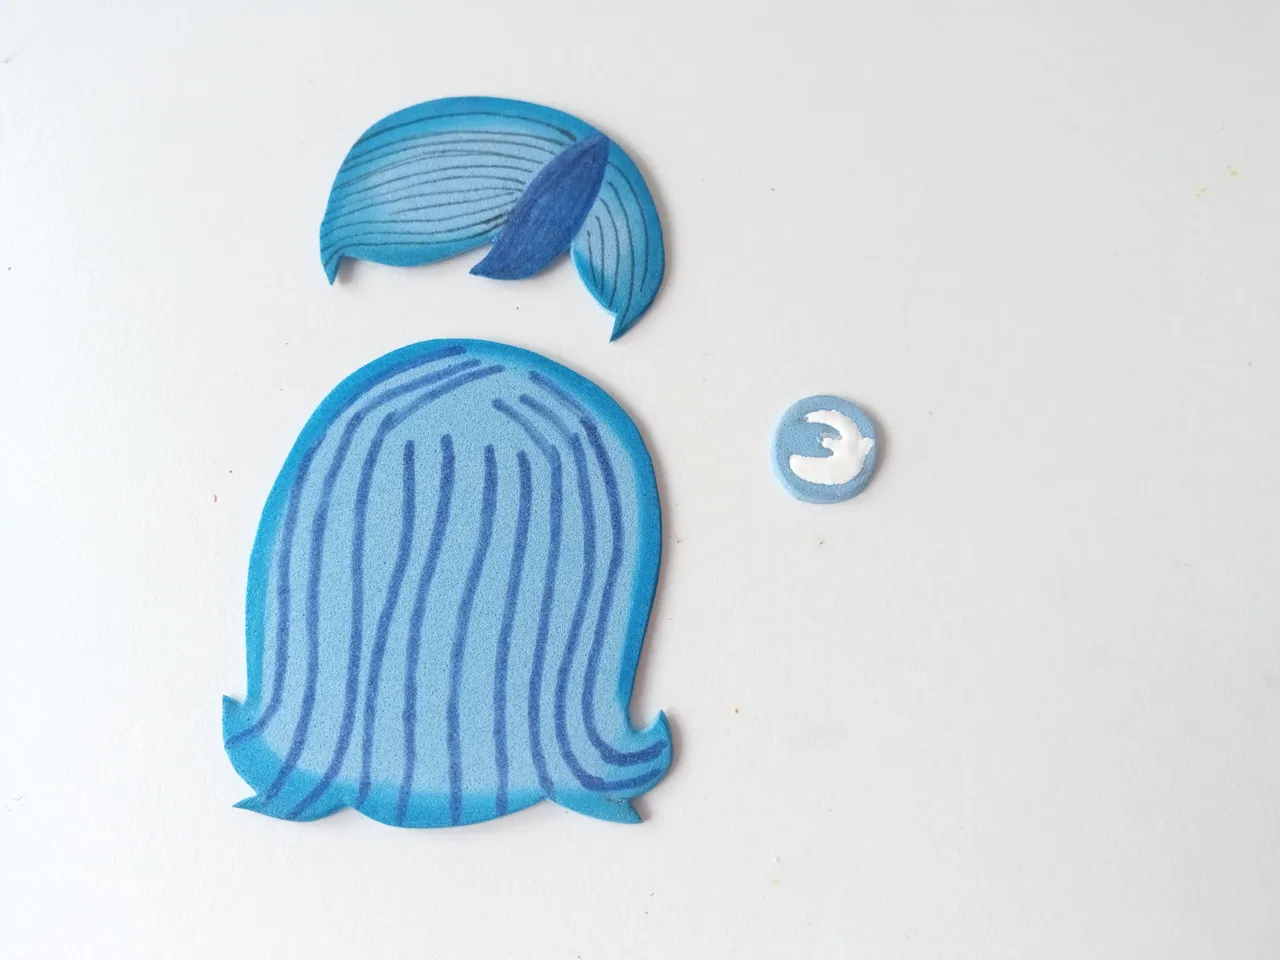
- ✨ PASO 4:
Al tener todas las piezas listas, comencé a dar detalles en el cabello, haciendo líneas para definirlo y pinté un mechón en azul oscuro, como el personaje original. También difuminé todo el borde con pinturas que contrasten con cada una de las piezas. Di detalles al rostro, dibujando los ojos, cejas y boca, al igual que di un toque de color a las mejillas con pintura rosada.
- ✨ STEP 4:
Having all the pieces ready, I began to add details to the hair, making lines to define it and painted a strand in dark blue, like the original character. I also blended the entire border with paints that contrast with each of the pieces. I gave details to the face, drawing the eyes, eyebrows and mouth, as well as giving a touch of color to the cheeks with pink paint.

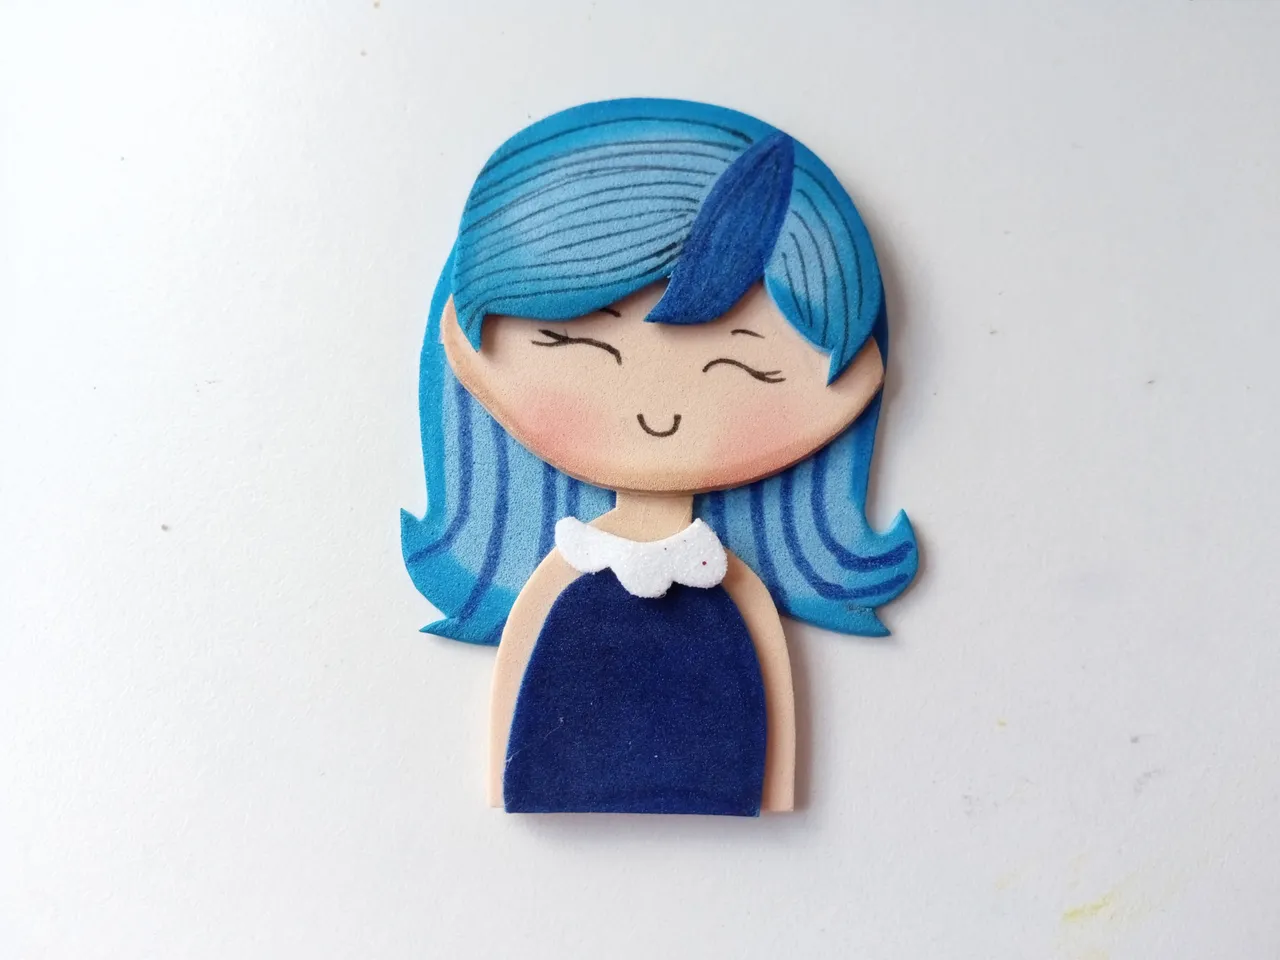
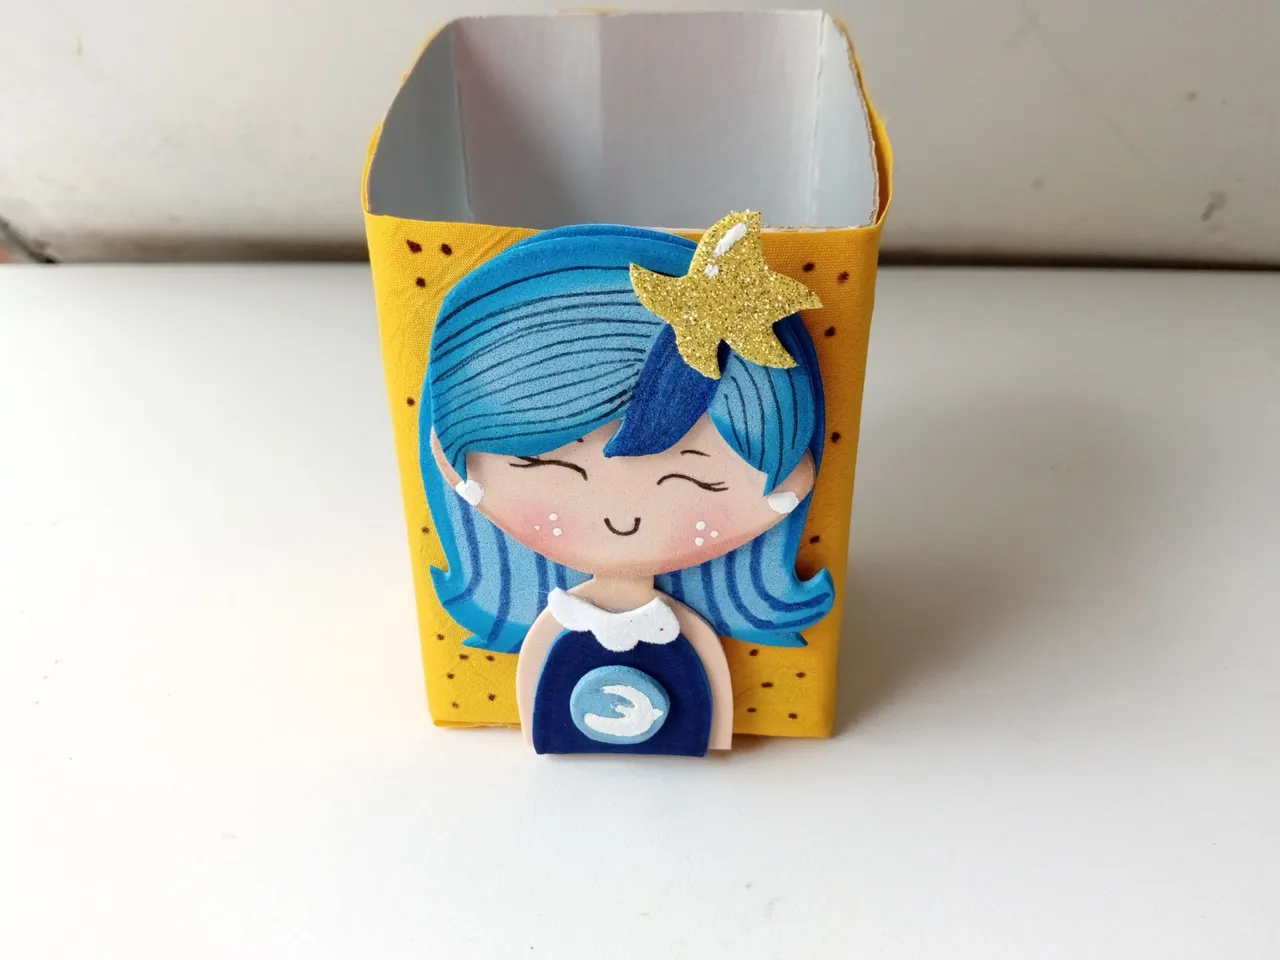
- ✨ PASO 5:
Por último, pegué todas las piezas en el orden correspondiente, pegué el logo en el centro de la ropa, dibujé y recorté una estrella de mar, la cual pegué al cabello. Por otra parte, di toques de luz en la estrella, mejillas. Finalmente, pegué al personaje en la pared más baja del portalápiz, y pinté algunos puntos con marcador, por toda la tela amarilla.
- ✨ STEP 5:
Finally, I glued all the pieces in the corresponding order, glued the logo in the center of the clothing, drew and cut out a starfish, which I glued to the hair. On the other hand, I gave highlights on the star, cheeks. Finally, I glued the character to the lowest wall of the pencil holder, and painted some dots with marker all over the yellow fabric.
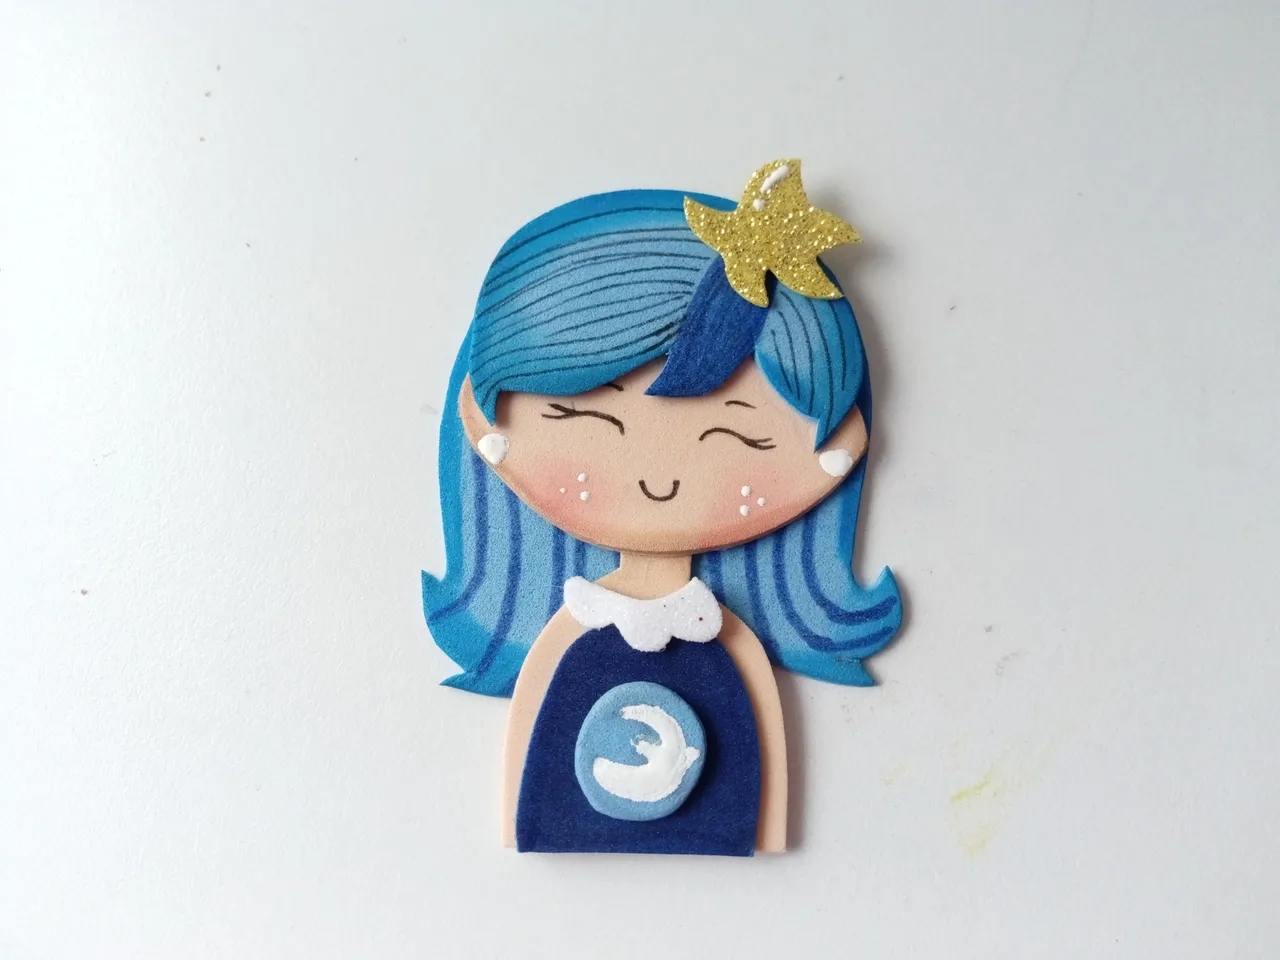
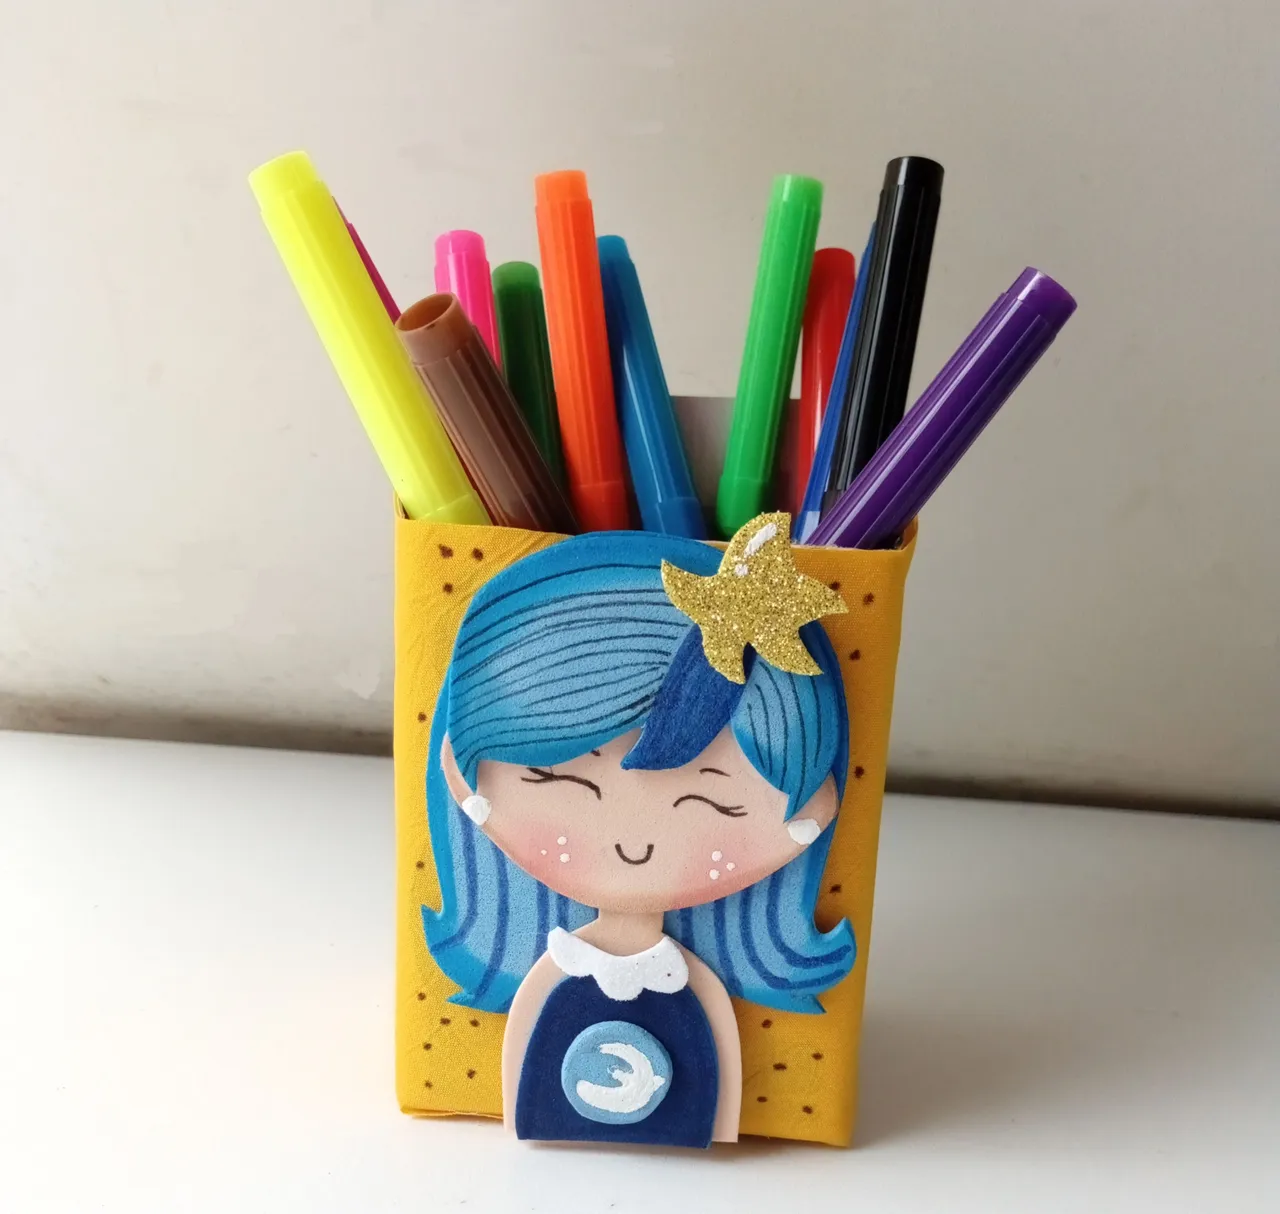
✨¡And ready!✨ This is how you can make a beautiful, easy and tender pencil holder themed or inspired by the ocean healer. I think it's a nice idea to organize the little ones' study area. I hope you liked the step by step and are encouraged to make it.
❤️Until the next post.
❤️ Hasta la próxima publicación.
❤️ Until the next post.


Todas las fotografías son de mi propiedad.
Separador y Fotos editadas en Canva
All photographs are my property.
Photos edited in Canva