Hola¡¡ Hola¡¡ Hive❤🤗
Hello Hello Hive ❤🤗

Saludos a todas las colmenas y los miembros de cada una de ellas; es grato compartir las experiencia y conocimientos a través de publicaciones. Hive a sido ese medio para poder trasmitir cada una de esas experiencias y habilidades manualidades, artesanales y de viajes que he realizado, la tecnología y aplicaciones han tenido tanto avances que Hive a creado una infraestructura de almacenamiento de datos construida sobre Hadoop para proporcionar agrupación, consulta, y análisis de datos y ha sido una excelente idea. Hoy en día hay unas cuantas comunidades🐝 y cada comunidad tiene muchos miembros🐝🐝🐝.... mi experiencia en pertenecer a esta infraestructura y a varios grupo a sido maravillosa he visto increíbles trabajos🤗🥰 y a sido un medio de enseñar mis trabajos mil gracias👏👏👏...
Greetings to all the hives and the members of each of them; It is pleasant to share experience and knowledge through publications. Hive has been that medium to be able to transmit each of those experiences and crafts, crafts and travel skills that I have made, technology and applications have had so much progress that Hive has created a data storage infrastructure built on Hadoop to provide grouping, consultation, and data analysis and it has been an excellent idea. Today there are a few communities🐝 and each community has many members🐝🐝🐝.... my experience in belonging to this infrastructure and several groups has been wonderful, I have seen incredible work🤗 it has already been a means of teaching my work, thank you very much 👏👏👏...
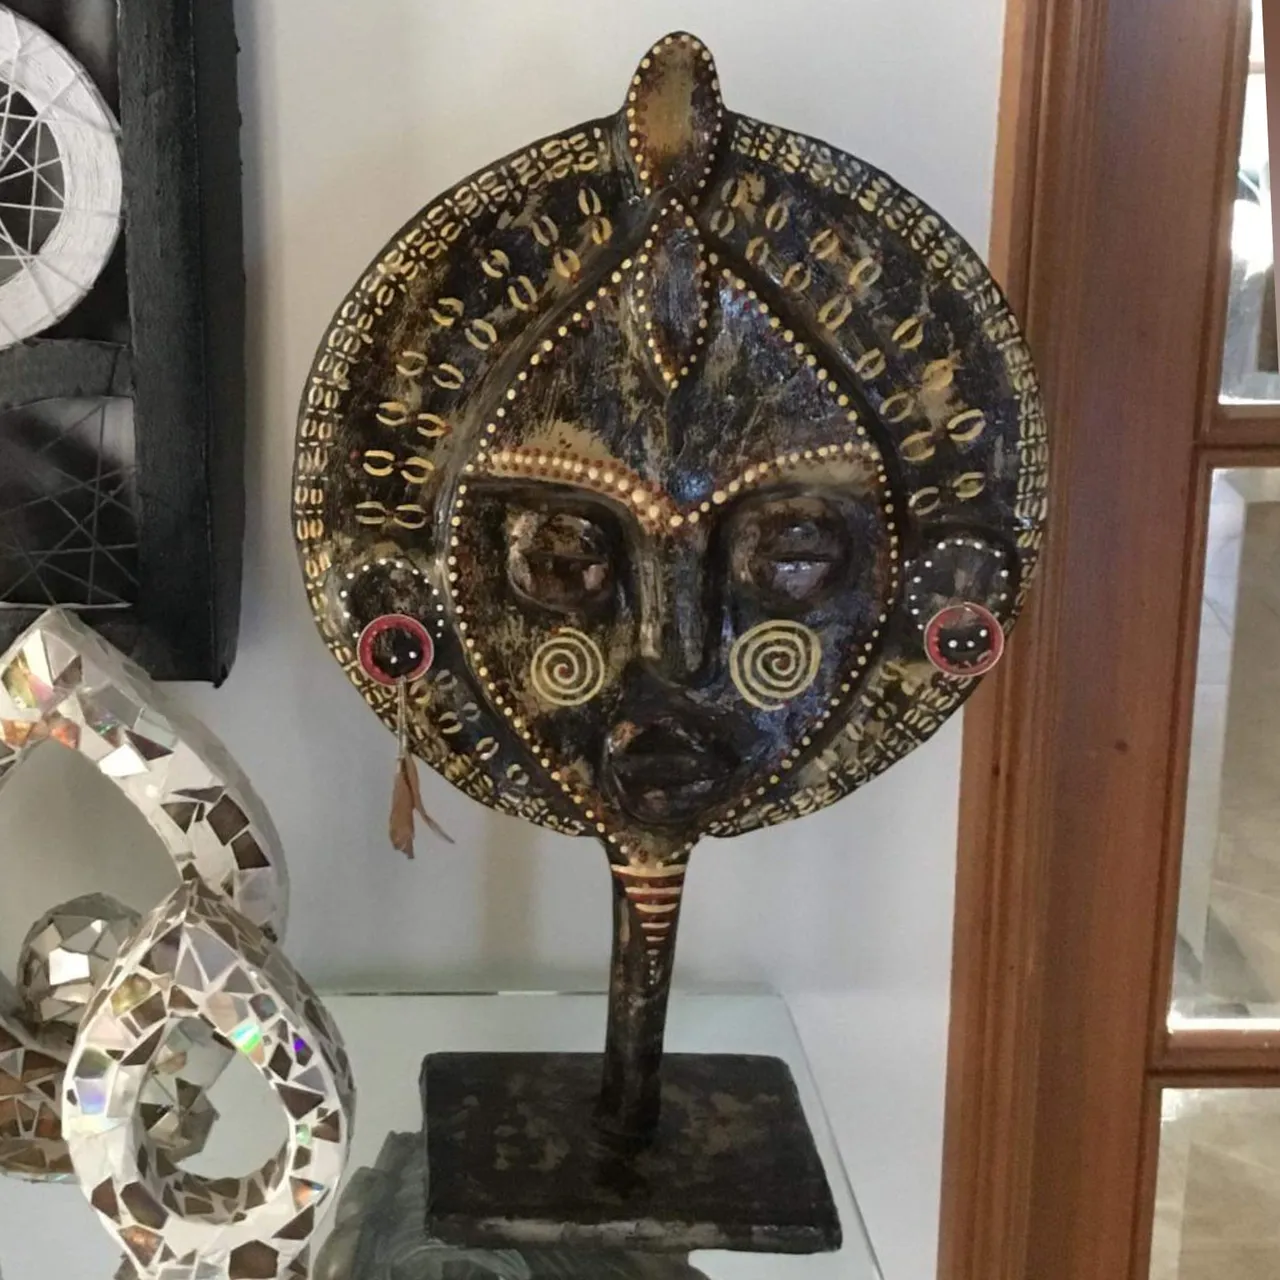
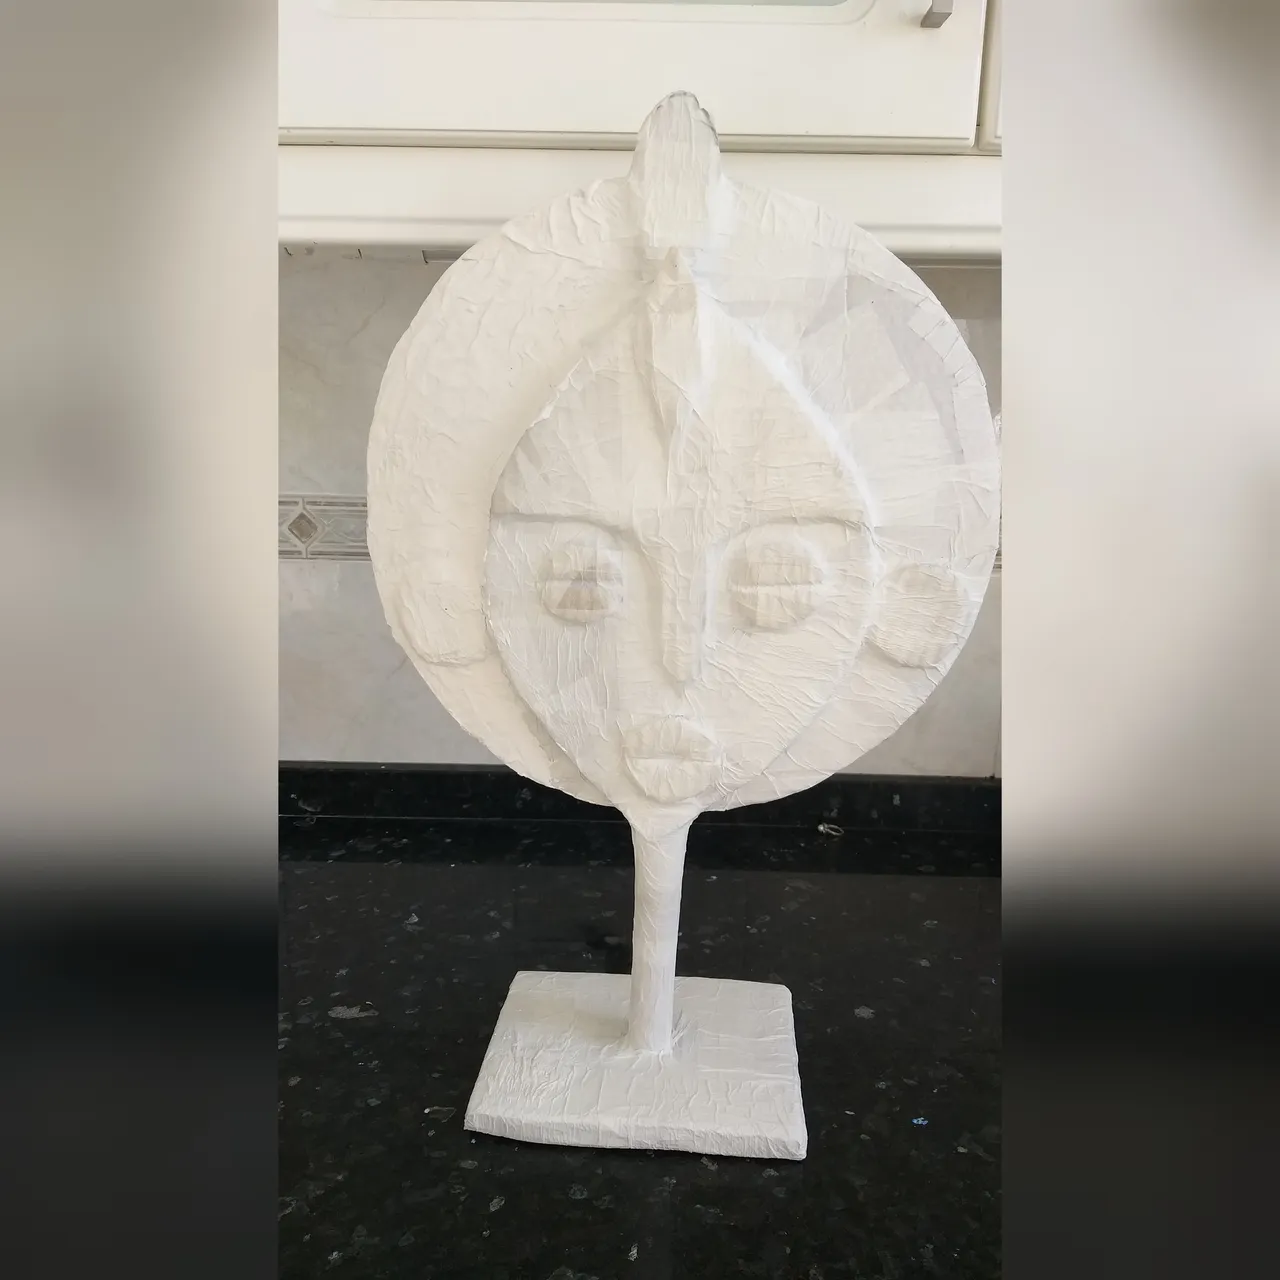
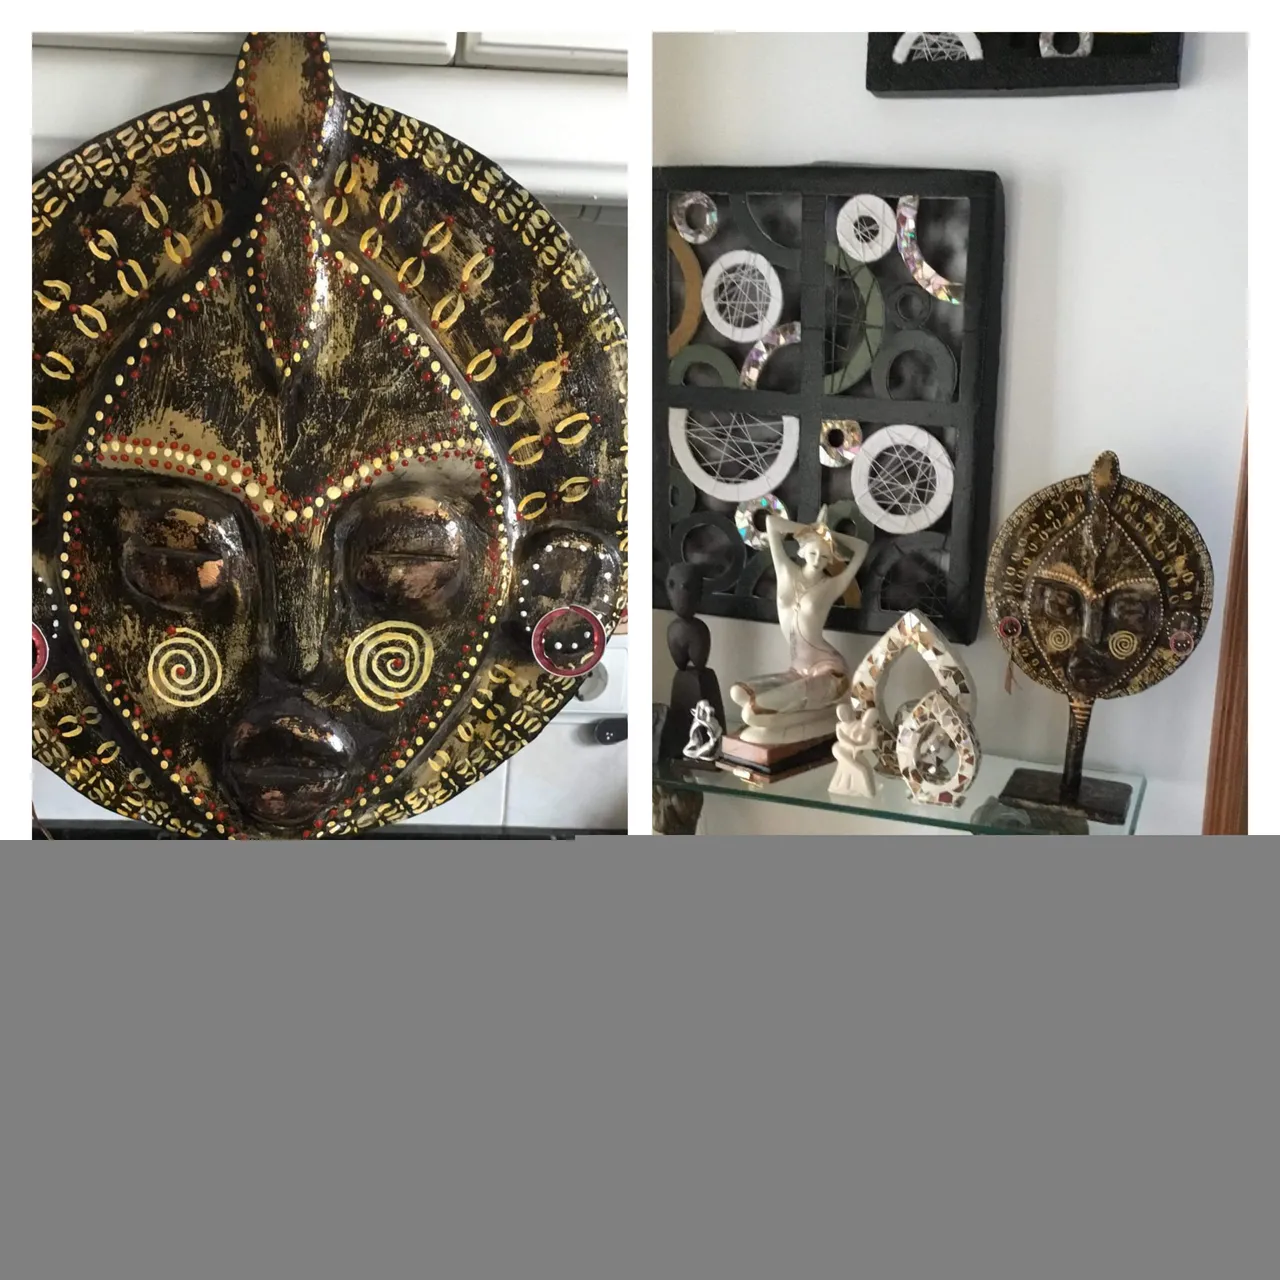
El trabajo que les compartiré hoy me encantó el resultado; después que lo culmine me decía woohoo😮eso lo hice yo¡¡ y mi marido cuando lo comencé hacer me decía ahora que vas a inventar🤭🤪🤯 cuando lo vio terminado le encanto😍 espero que a ustedes también le guste; para esta manualidad lo que debe tener es paciencia🤗 no hacer cualquier cosa por hacer y lastimosamente el resultado no es bueno😔.La manualidad que vamos hacer es con caja de cartón👀 es el material que vamos a reciclar junto con otros materiales y con el vamos a realizar una escultura de un Indígena😚😊 Les invito a que me sigan en el paso a paso👣👣.
The work that I will share with you today I loved the result; after I finished it he told me woohoo😮I did that! and when I started doing it my husband told me now that you are going to invent🤭🤪🤯 when he saw it finished he loved it😍 I hope you like it too; For this craft, what you must have is patience🤗 not doing anything to do and unfortunately the result is not good😔.The craft that we are going to do is with a cardboard box👀 it is the material that we are going to recycle together with other materials and with the We are going to make a sculpture of an Indigenous person😚😊 I invite you to follow me step by step👣👣.
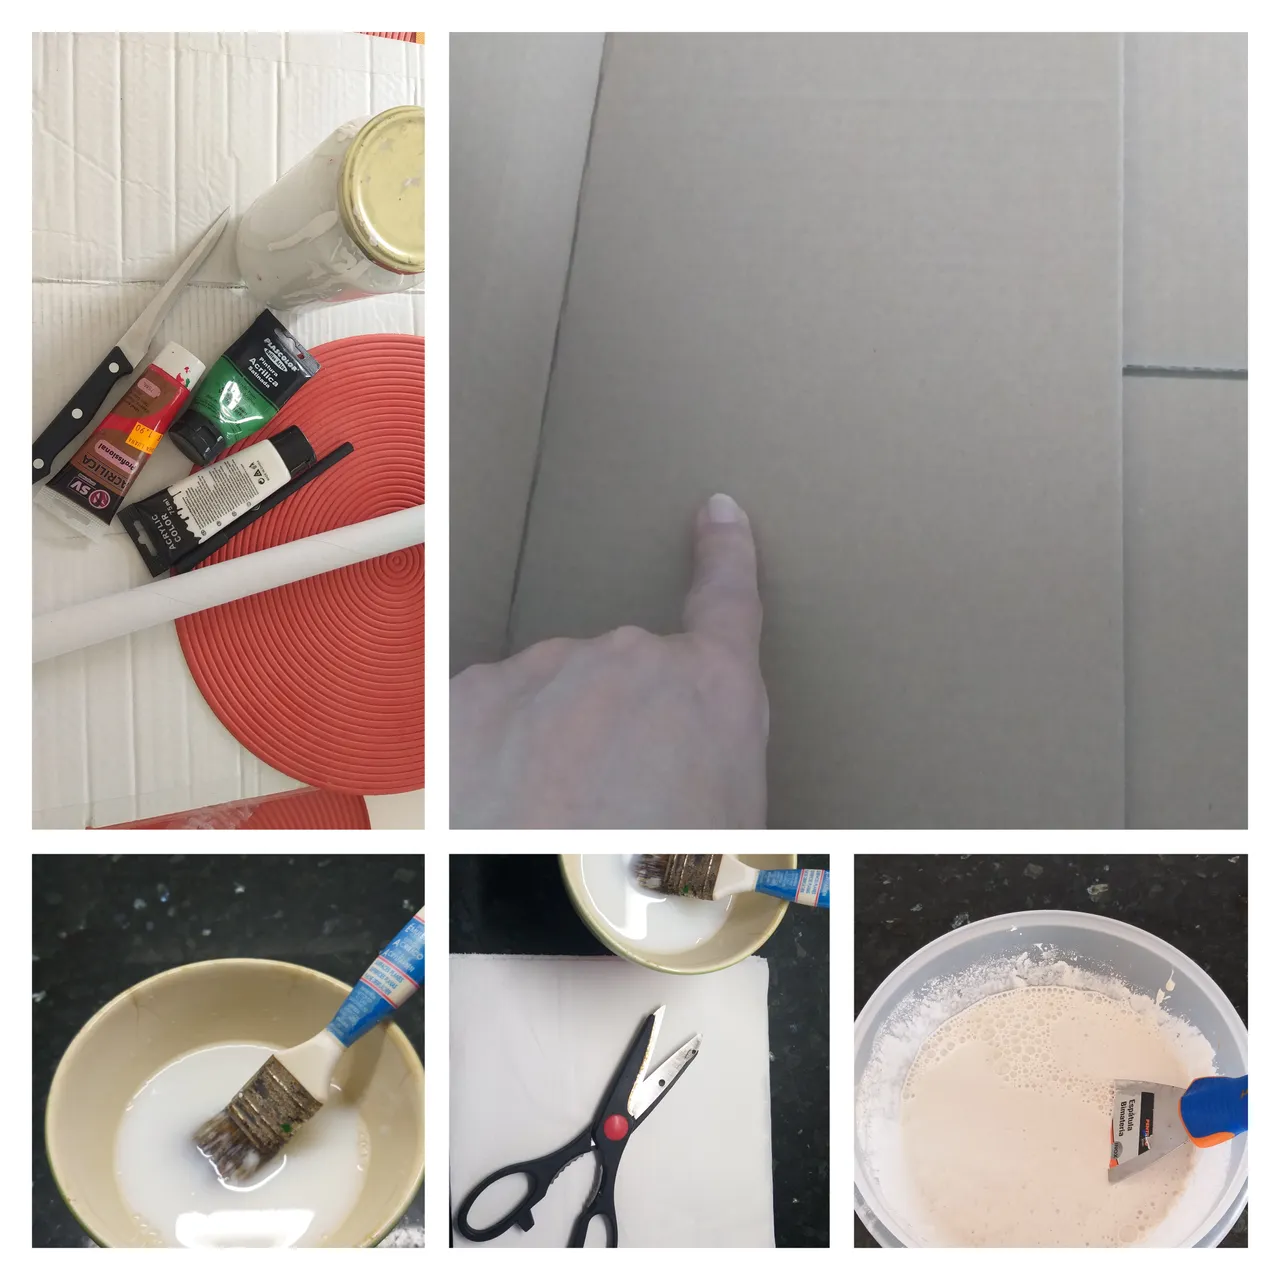
Materiales a utilizar-The materials to use
1. Caja de cartón
2. Tijera
3. Pistola de silicona y barras de silicona
4. Pintura acrílica blanca, verde, azul y roja
5. Pintura en spray dorada ,plateado y negro
6. Dos cápsulas de café Nespresso
7. Onoto y aceite para bebe
8. Cemento blanco o masa para tapar grietas
9. Espátula
10. Una brocha
11. Pegamento blanco
12. 2 plumas pequeñas
13. Servilleta de cocina
14. Una taza de plástico y agua
15. Un pedazo de algodón y alcohol
16. Un tubo de cartón de rollo de papel aluminio o vegetal.
17. Una engrapadora con grapas
18. Una regla y un bolígrafo o lápiz
19. Un cuchillo
20. 3 lijas de P 600
21. Mascarillas quirúrgicas
22. Esponja de cocina
23. Pinceles
1. Carton
2. Scissor
3. Glue gun and glue sticks
4. White, green, blue and red acrylic paint
5. Gold, silver and black spray paint
6. Two Nespresso coffee capsules
7. Onoto and baby oil
8. White cement or paste to cover cracks
9. Spatula
10. A brush
11. White glue
12. 2 small feathers
13. Kitchen napkin
14. A plastic cup and water
15. A piece of cotton and alcohol
16. A cardboard tube of foil or vegetable foil.
17. A stapler with staples
18. A ruler and a pen or pencil
19. A knife
20. 3 sandpapers of P 600
21. Surgical masks
22. Kitchen sponge
23. Brushes
Pasos a seguir-Steps to follow
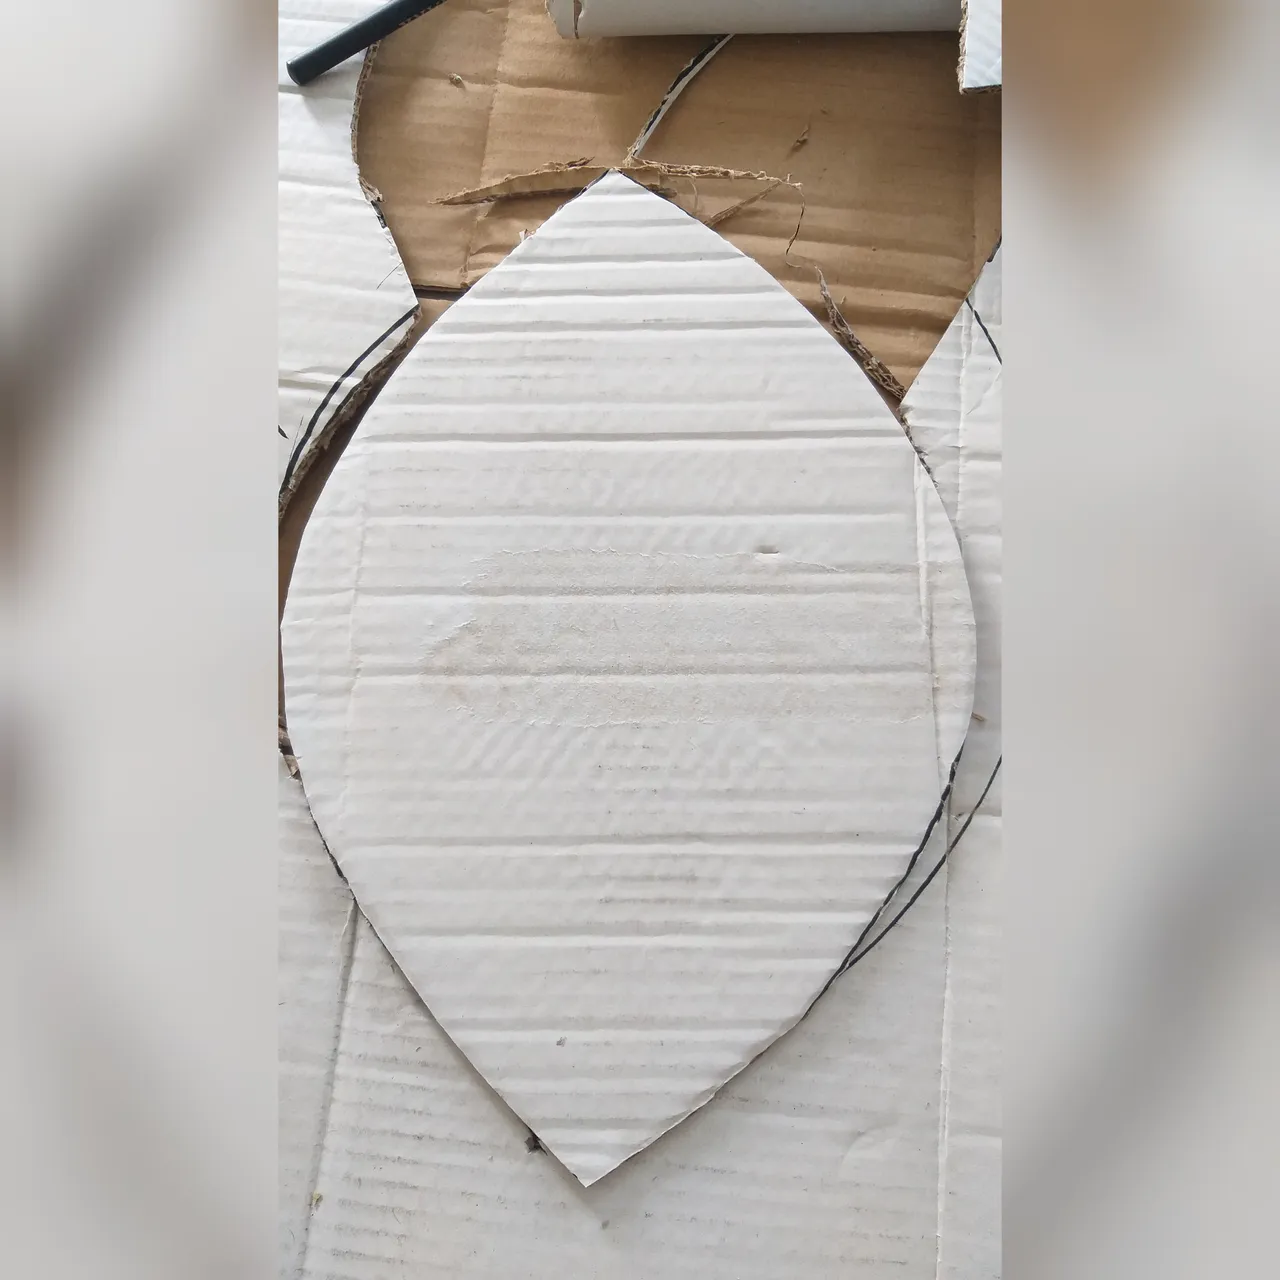
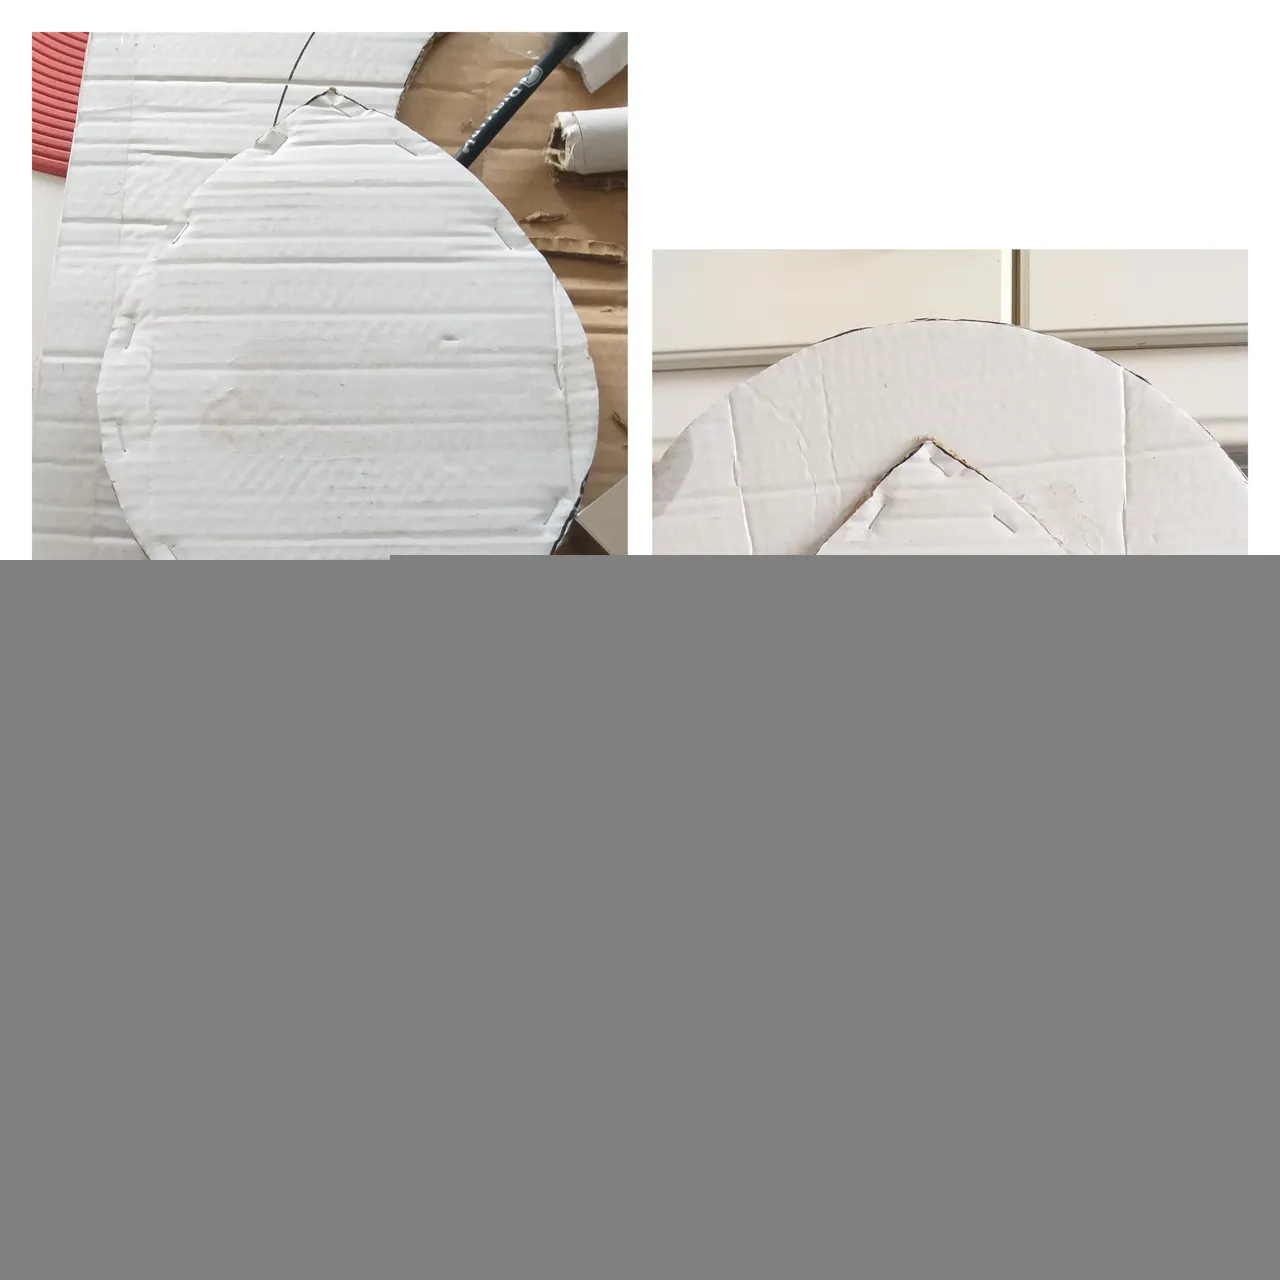
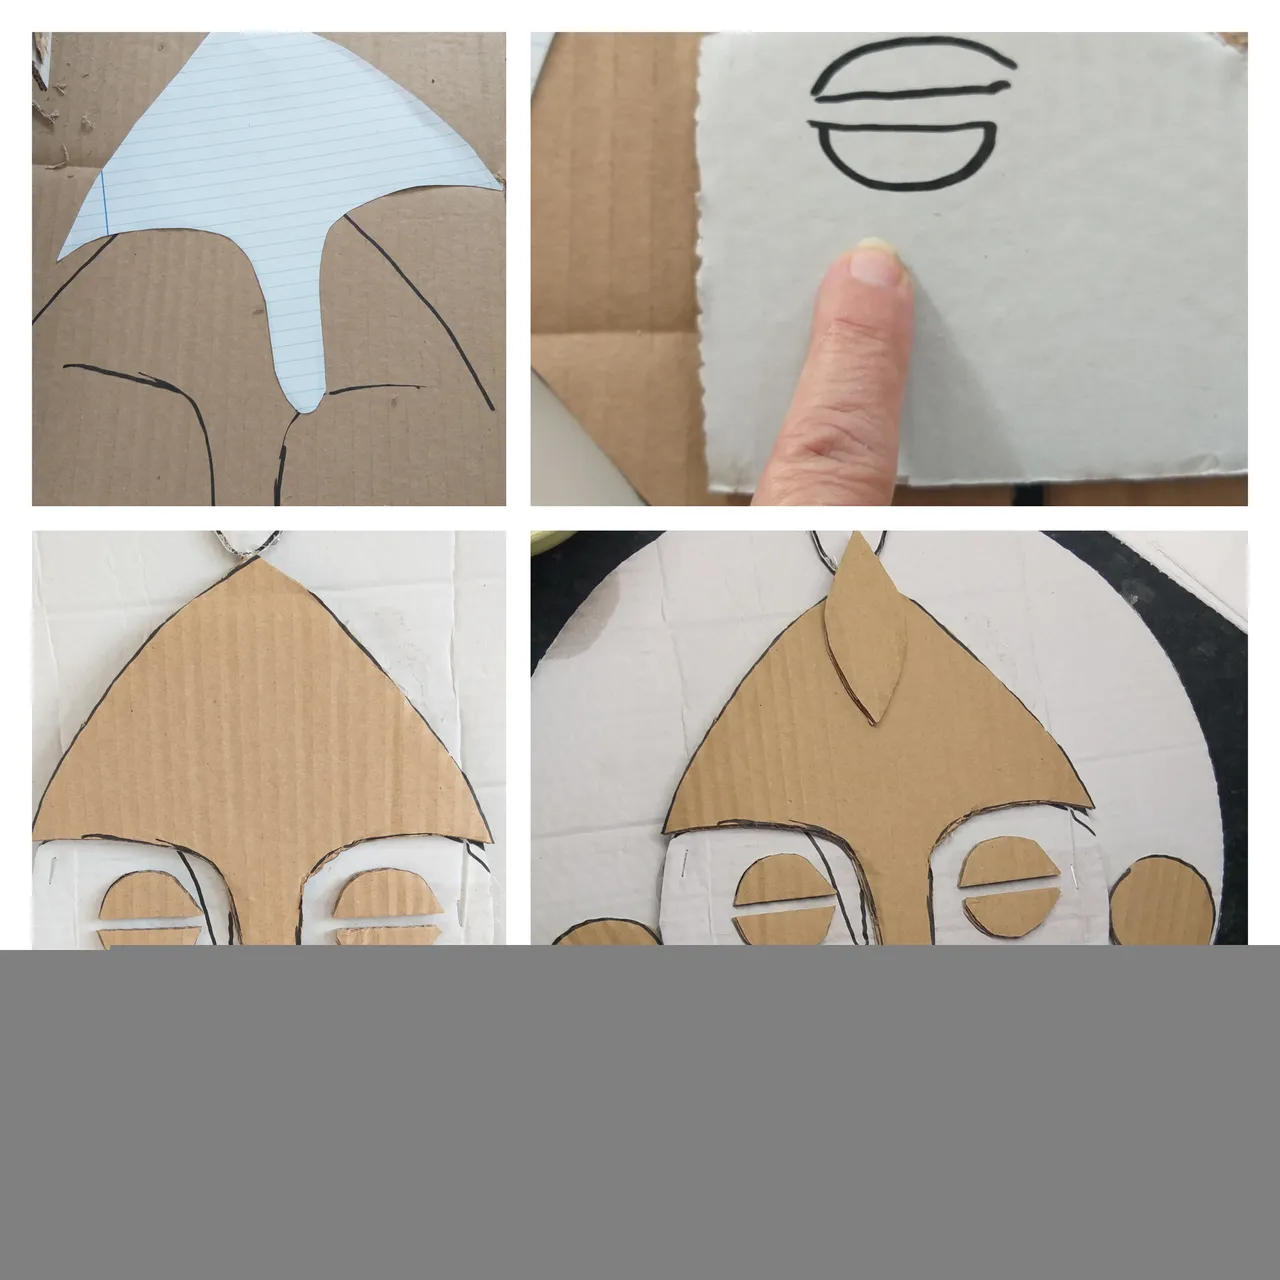
👣1. Dibujar en la caja de cartón la figura del Indígena que quiera realizar, acá yo le doy una idea. Dibuje la parte de la cara y aparte dibuje la parte que va a ir detrás de la cara en la imagen le muestro como hacerlo.De la cara y la cabeza debe hacer dos iguales.
👣1. Draw on the cardboard box the figure of the Indigenous you want to make, here I give you an idea. Draw the part of the face and apart draw the part that will go behind the face in the image I show you how to do it. From the face and the head you must make two of the same.
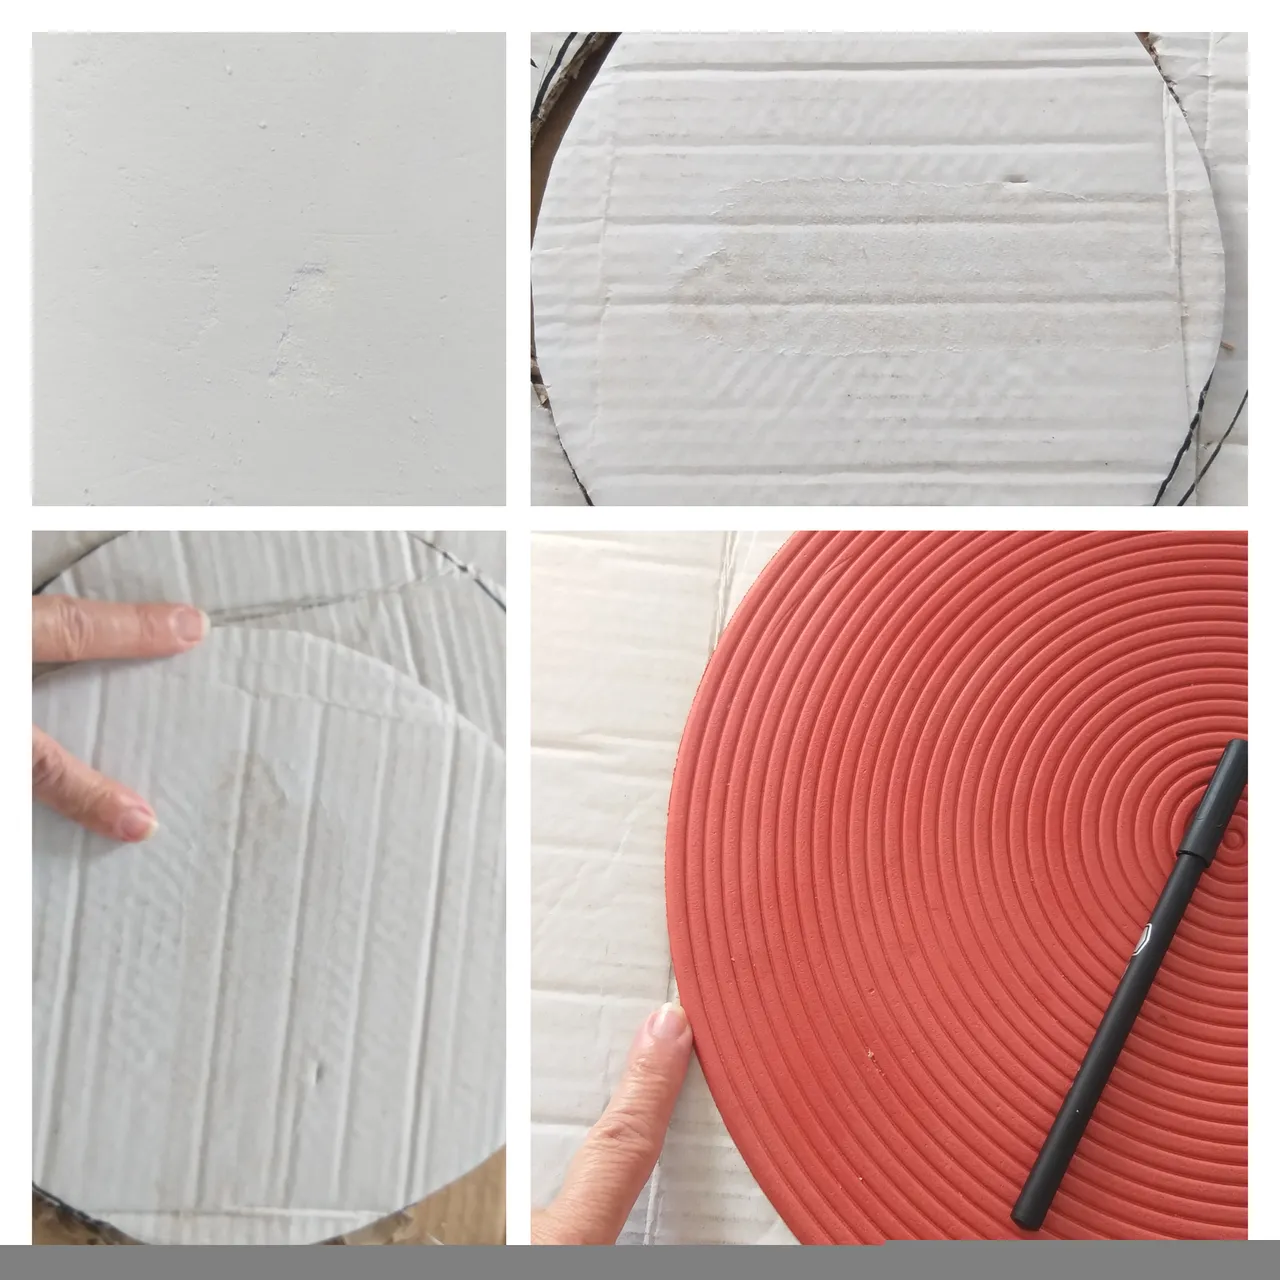
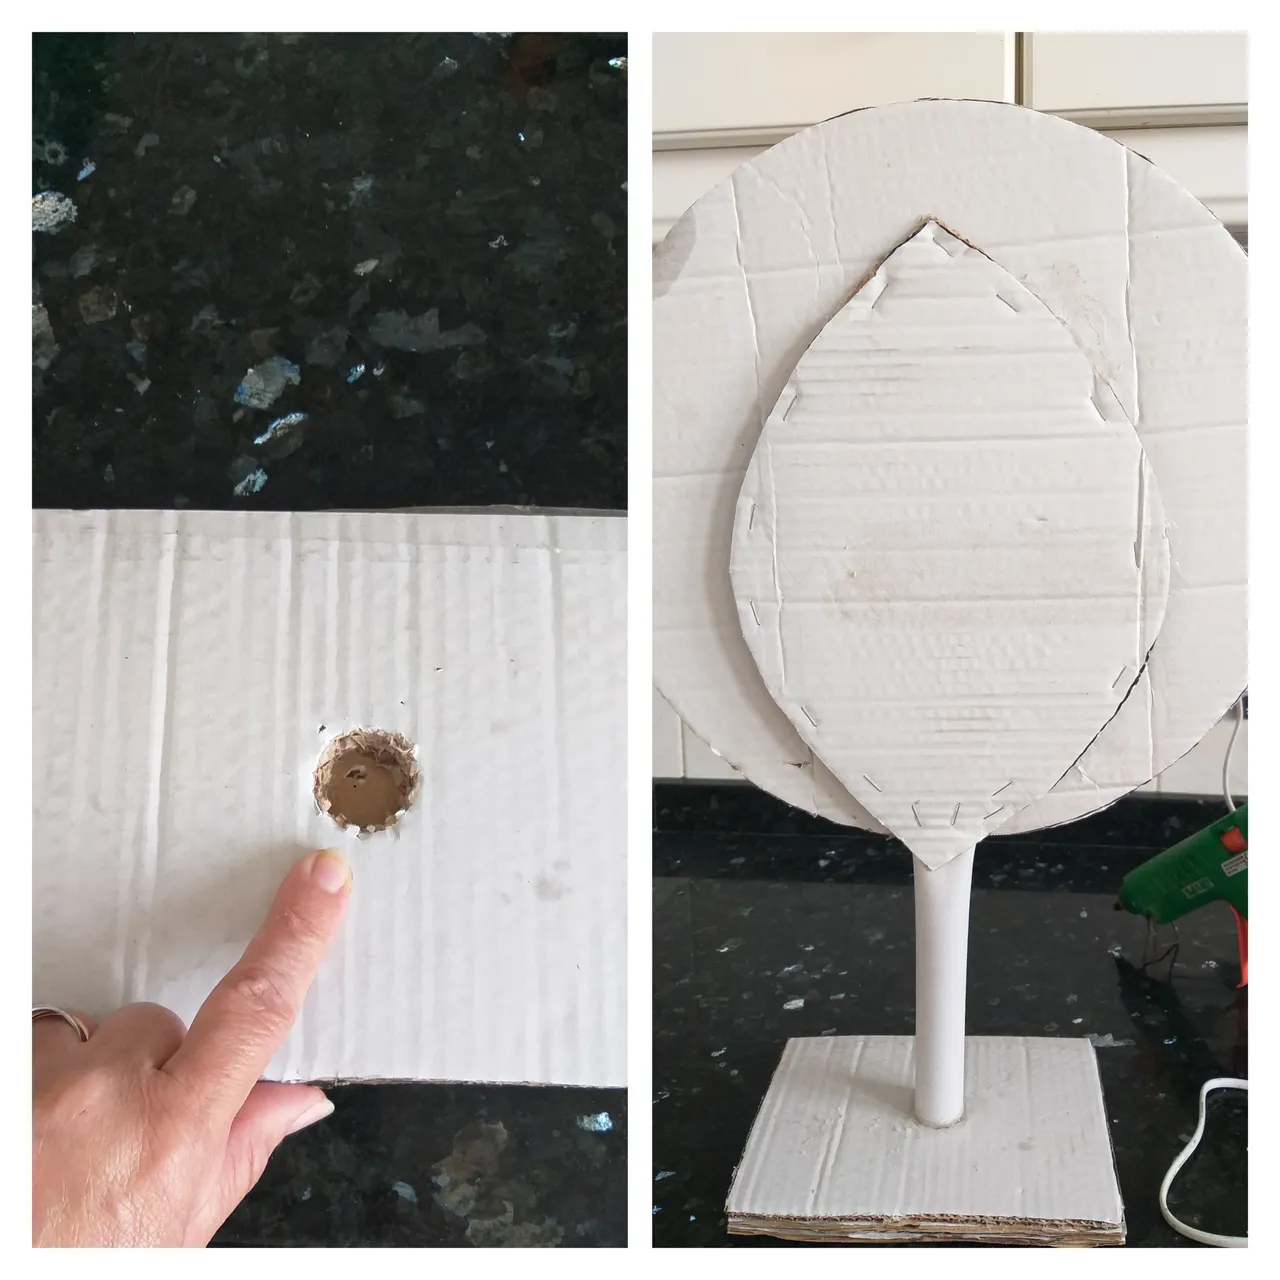
👣2. Luego con la engrapadora grape las dos caras con el tubo de cartón y las dos parte de la cabeza. En la imágenes le explico como hacerlo.Para realizar la cabeza utilicé uno de los tapetes de la mesa 🤭😊.
👣2. Then with the stapler staple the two sides with the cardboard tube and the two parts of the head. In the images I explain how to do it. To make the head I used one of the table mats 🤭😊.
👣3. Con la regla y el bolígrafo marque un cuadro con la medidas de 20cm de ancho y 15 de largo en el cartón; realizar tres piezas iguales y luego pegarlas bien con el silicon caliente.
👣3. With the ruler and the pen mark a box with the measurements of 20cm wide and 15 long on the cardboard; make three equal pieces and then stick them well with hot silicone.
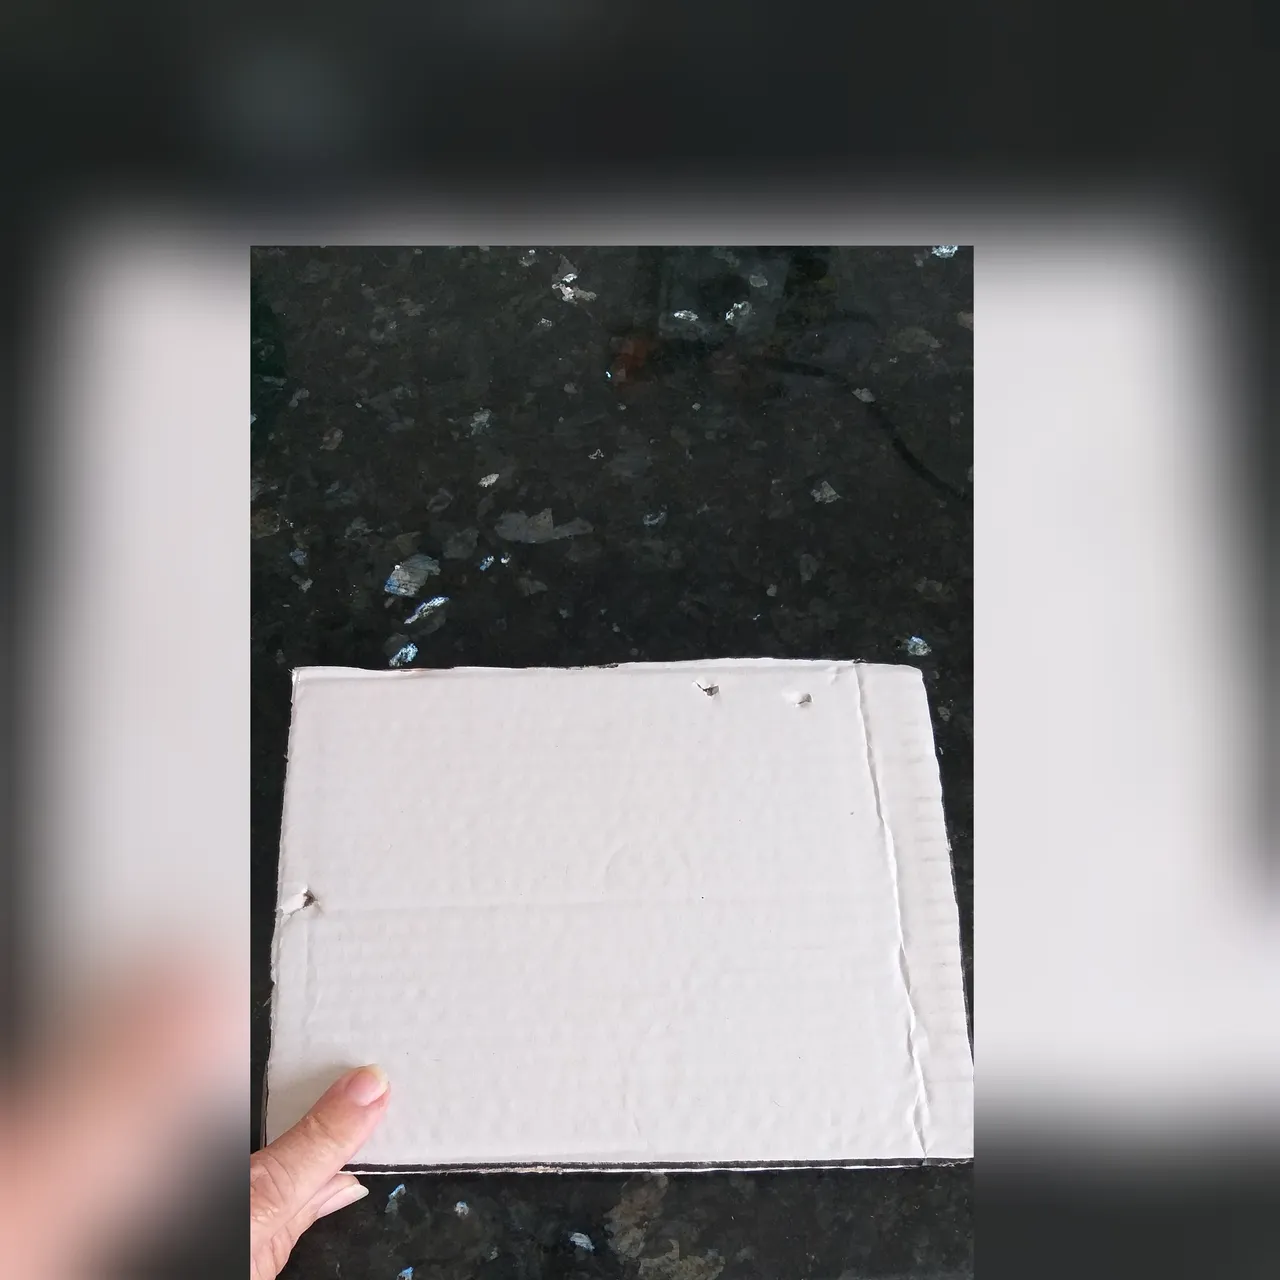
👣4. Con el tubo y el bolígrafo marcar en el medio de la pieza de cartón anterior y con el cuchillo hacer un orificio donde meterán el tubo de cartón; éste será la base. El orificio debe tener una profundidad de 3cm, luego con el silicon caliente eche en el orificio y pegue el tubo.
👣4. With the tube and the pen mark in the middle of the previous piece of cardboard and with the knife make a hole where you will insert the cardboard tube; this will be the base. The hole should have a depth of 3cm, then pour hot silicone into the hole and stick the tube.
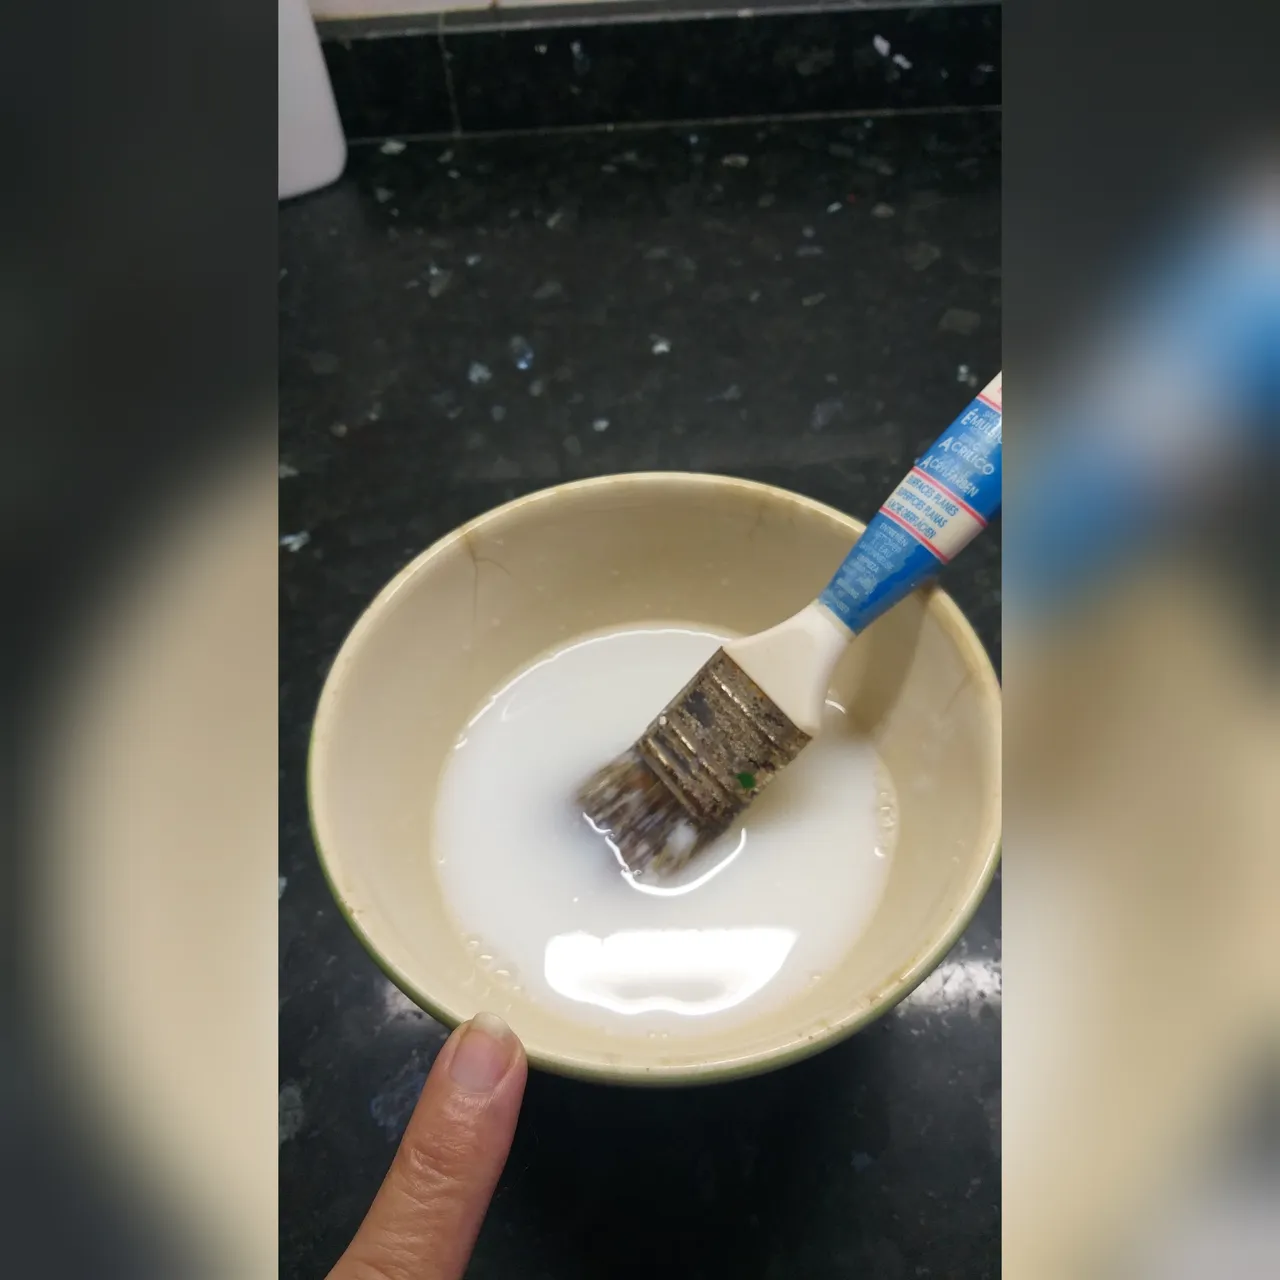
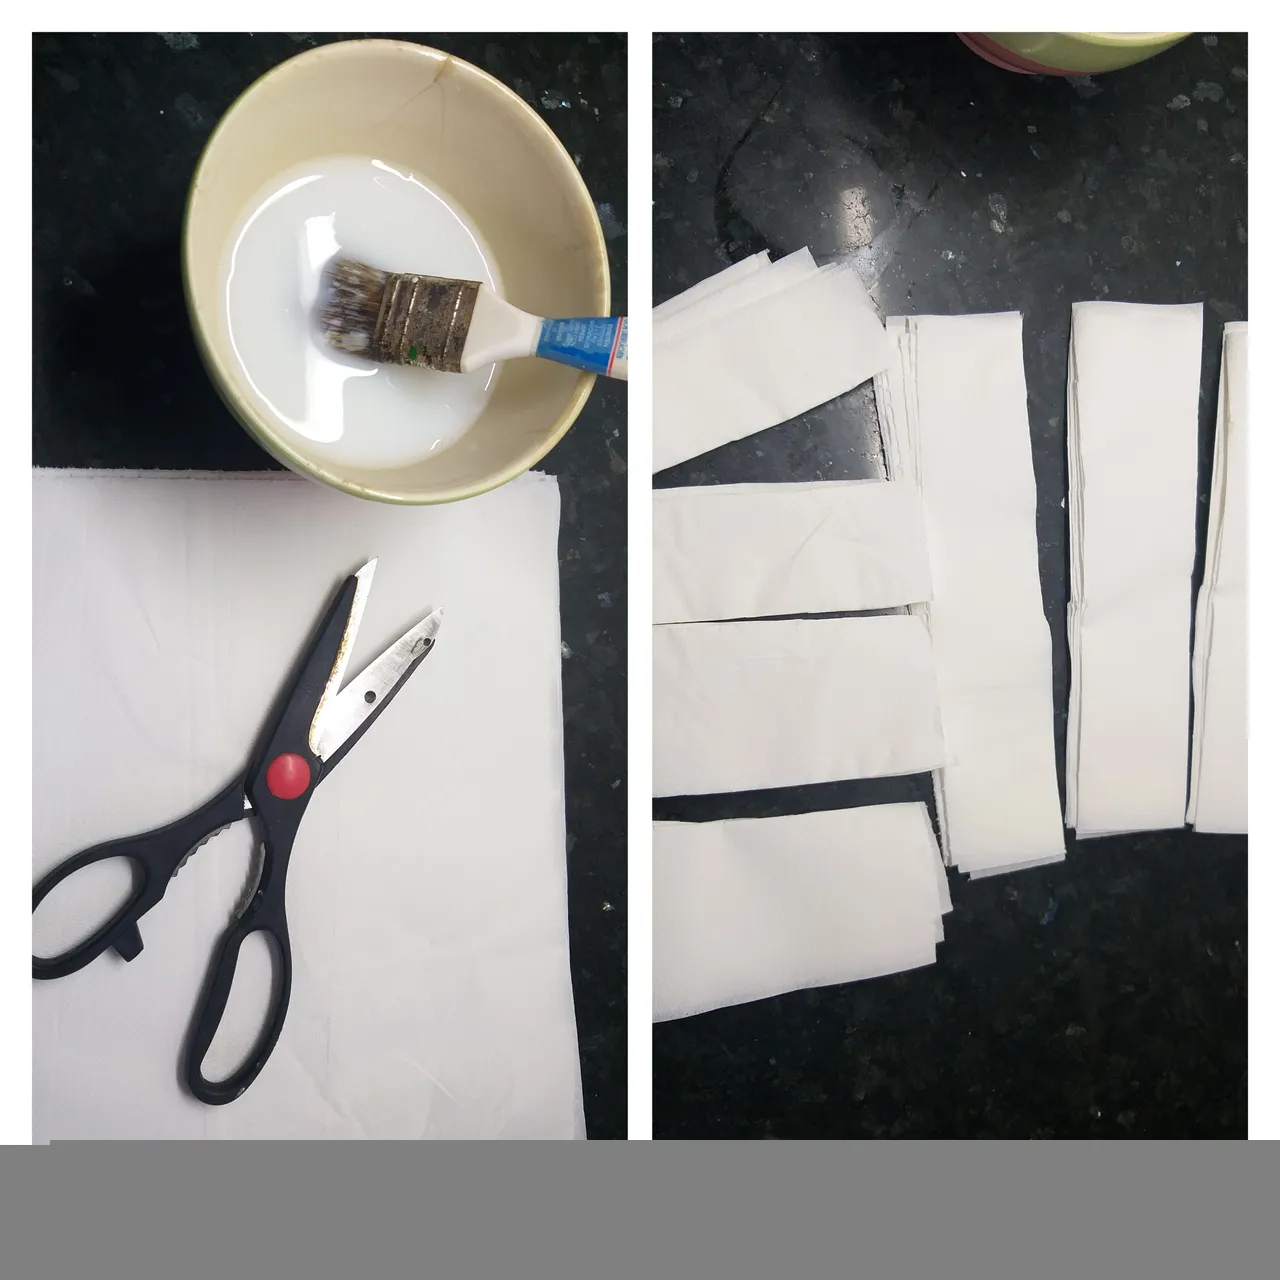
👣5. En la taza de plástico echar pegamento, agua y mezchar con la misma brocha o con ls espátula.
👣5. In the plastic cup pour glue, water and mix with the same brush or with the spatula.
👣6. Luego con la tijera recortar tiras de la servilleta de cocina, corte unas más pequeñas
👣6. Then with the scissors cut strips of the kitchen napkin, cut some smaller ones.
7👣. Dibuje con el bolígrafo o lápiz los ojos, boca orejas y las figuras que quiere colocar a la escultura puede guiarse por la imágenes.
7👣. Draw with the pen or pencil the eyes, mouth, ears and the figures that you want to place on the sculpture, you can be guided by the images.
Medidas - Measures
👄Para la boca 4cm ancho por 2 1/2 largo en dos piezas
👀Para los ojos 3cm ancho por 2 1cm largo al igual en dos piezas
👦Para la cabeza 36cm por 36cm
👨🦲Para la cara 31 de largo por 21 de ancho
👂Para las orejas 1 y 1/2 por 1 y 1/2
👄For the mouth 4cm wide by 2 1/2 long in two pieces
👀For the eyes 3cm wide by 2 1cm long in two pieces
👦For the head 36cm by 36cm
👨 For the face 31 long by 21 wide
👂For ears 1 and 1/2 by 1 and 1/2.
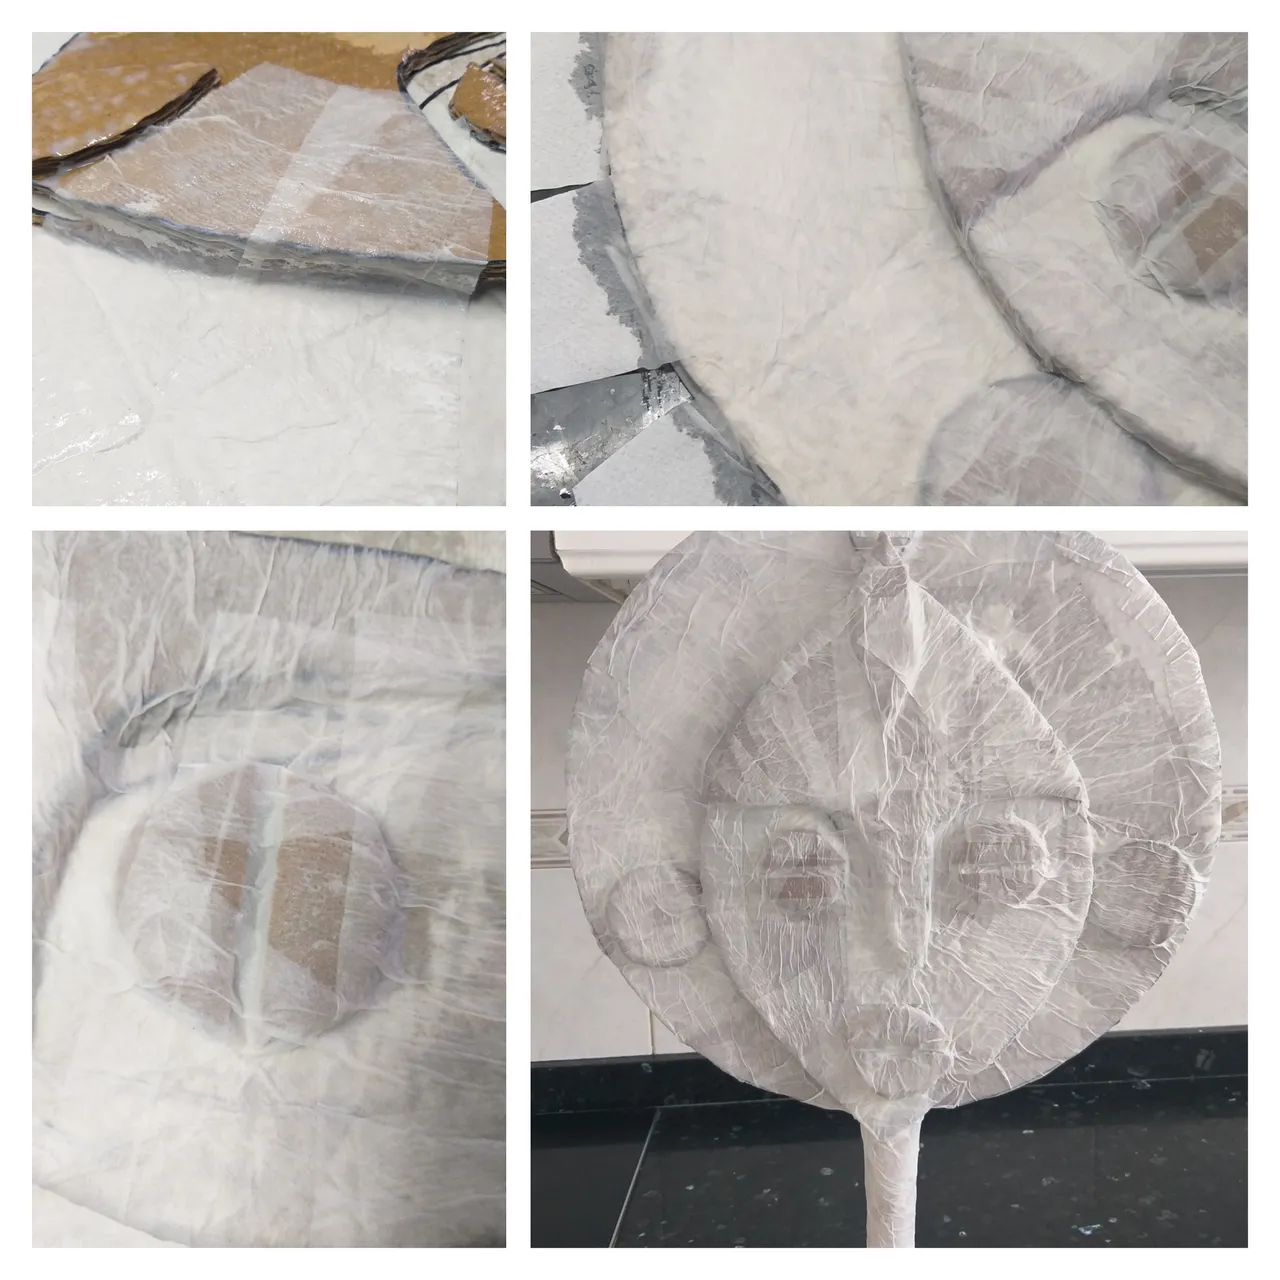
8👣. Comience a pegar las tiras de la servilleta de cocina por toda la pieza hasta estar completamente cubierta, le recomiendo darle de dos a tres manos de tiras así queda más resistente la escultura. Dejar secar bien
8👣. Start sticking the strips of the kitchen napkin all over the piece until it is completely covered, I recommend giving it two to three coats of strips so the sculpture is more resistant. let dry well.
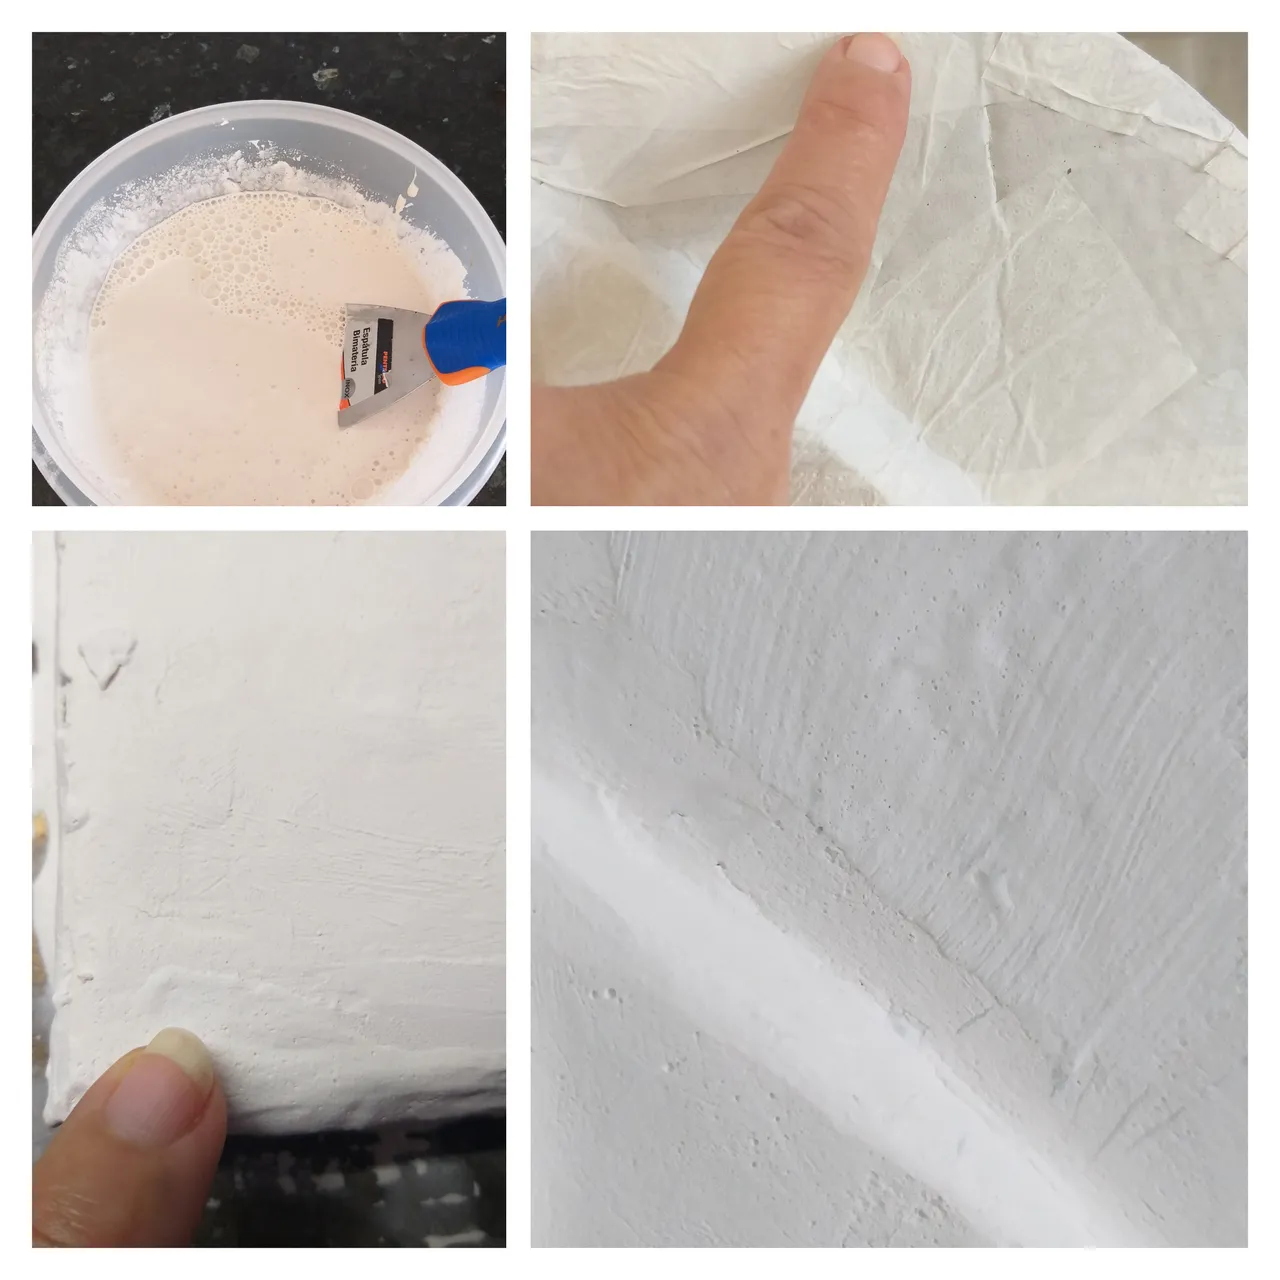
👣9. Luego de estar bien seco prepare la mezcla de cemento blanco con agua, acá se utilizo dos tazas de cemento y le va echando el agua poco a poco hasta quedar como una masa pero no muy espesa porque recuerde que el cemento seca muy rápido cuando está al aire libre. Luego con la espátula colocar por toda la pieza. Le recomiendo trabajar en dos parte primero por la base y dejar secar bien al sol y luego la cabeza y cara por ambos lados y también dejar secar muy bien al sol.
👣9.After being very dry, prepare the mixture of white cement with water, here two cups of cement are used and the water is poured little by little until it becomes like a mass but not very thick because remember that the cement dries very quickly when it is warm. fresh air. Then with the spatula place all over the piece. I recommend working in two parts first at the base and let it dry well in the sun and then the head and face on both sides and also let it dry very well in the sun.
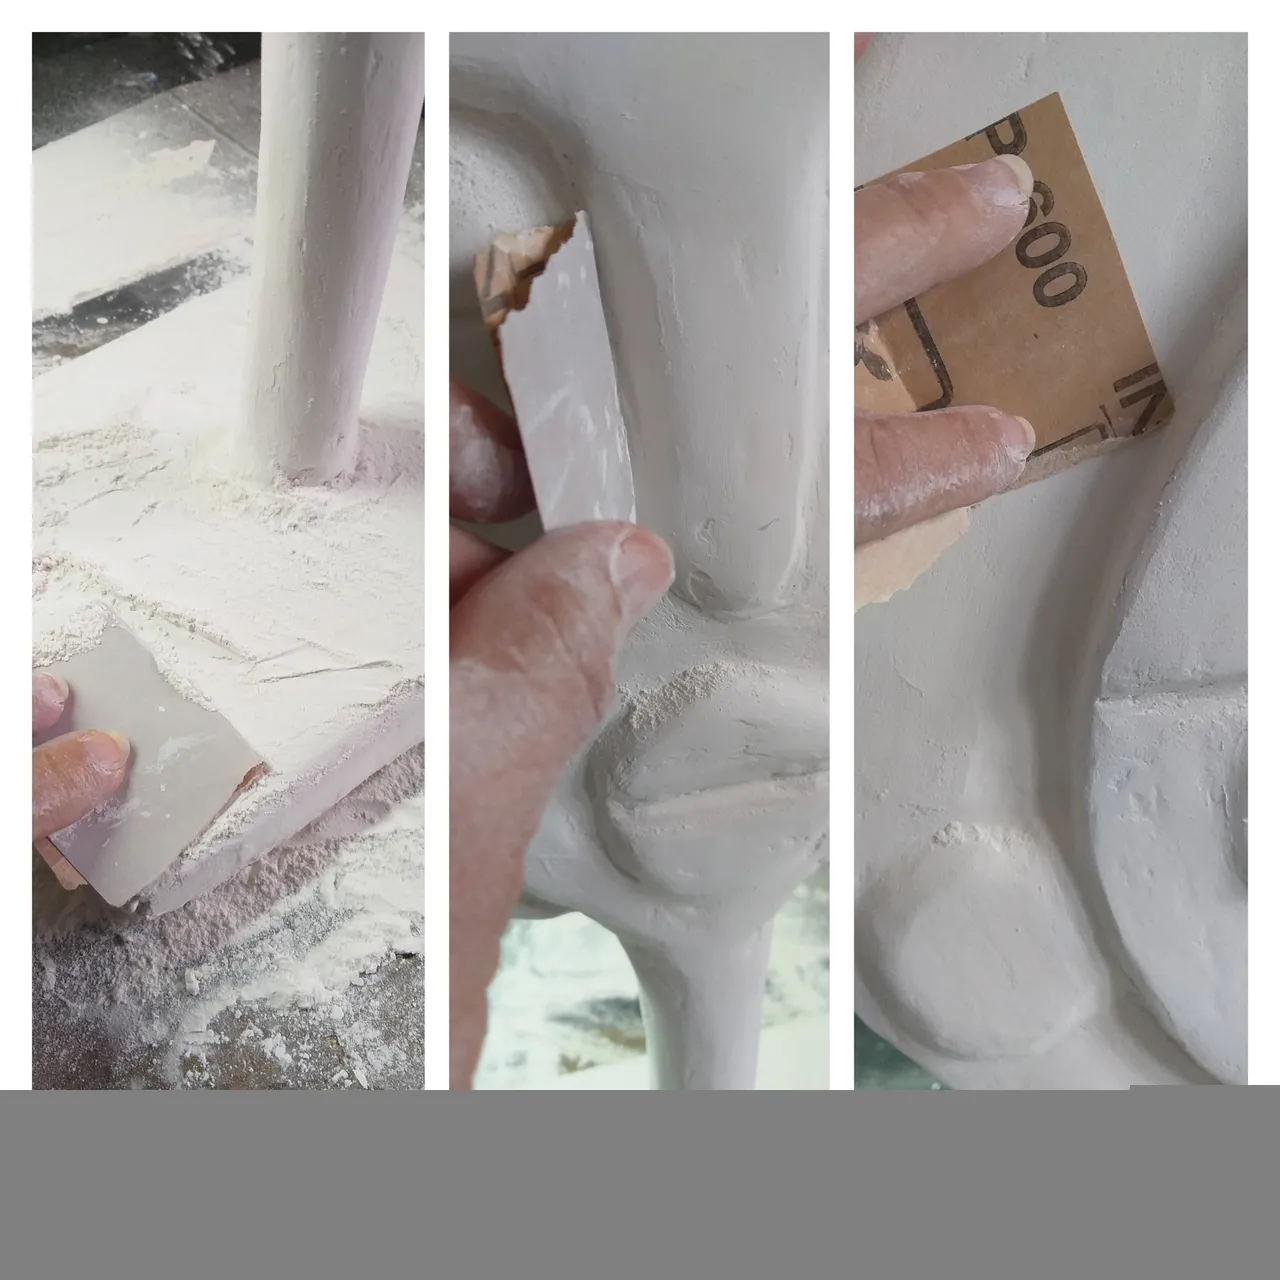
👣10. Ya estando seca la pieza al sol, vamos a lijar. 👀 No puede estar la escultura húmeda,está estuvo dos días al sol y un día antes de echarle el cemento blanco y otro día después de los detalles. Cuando lija hágalo suavemente y debe colocar la lija en posiciones diferentes dependiendo la parte que esté lijando. Coloque cartón debajo de la pieza desde el inicio para que no ensucie el lugar donde esté trabajando y póngase la mascarilla. Vea las imágenes.
👣10. Once the piece is dry in the sun, we are going to sand it. 👀 The sculpture cannot be wet, it was in the sun for two days and one day before pouring the white cement on it and another day after the details. When sanding, do it lightly and you should place the sandpaper in different positions depending on the part you are sanding. Put cardboard under the piece from the beginning so that it does not dirty the place where you are working and put on the mask. See the images.
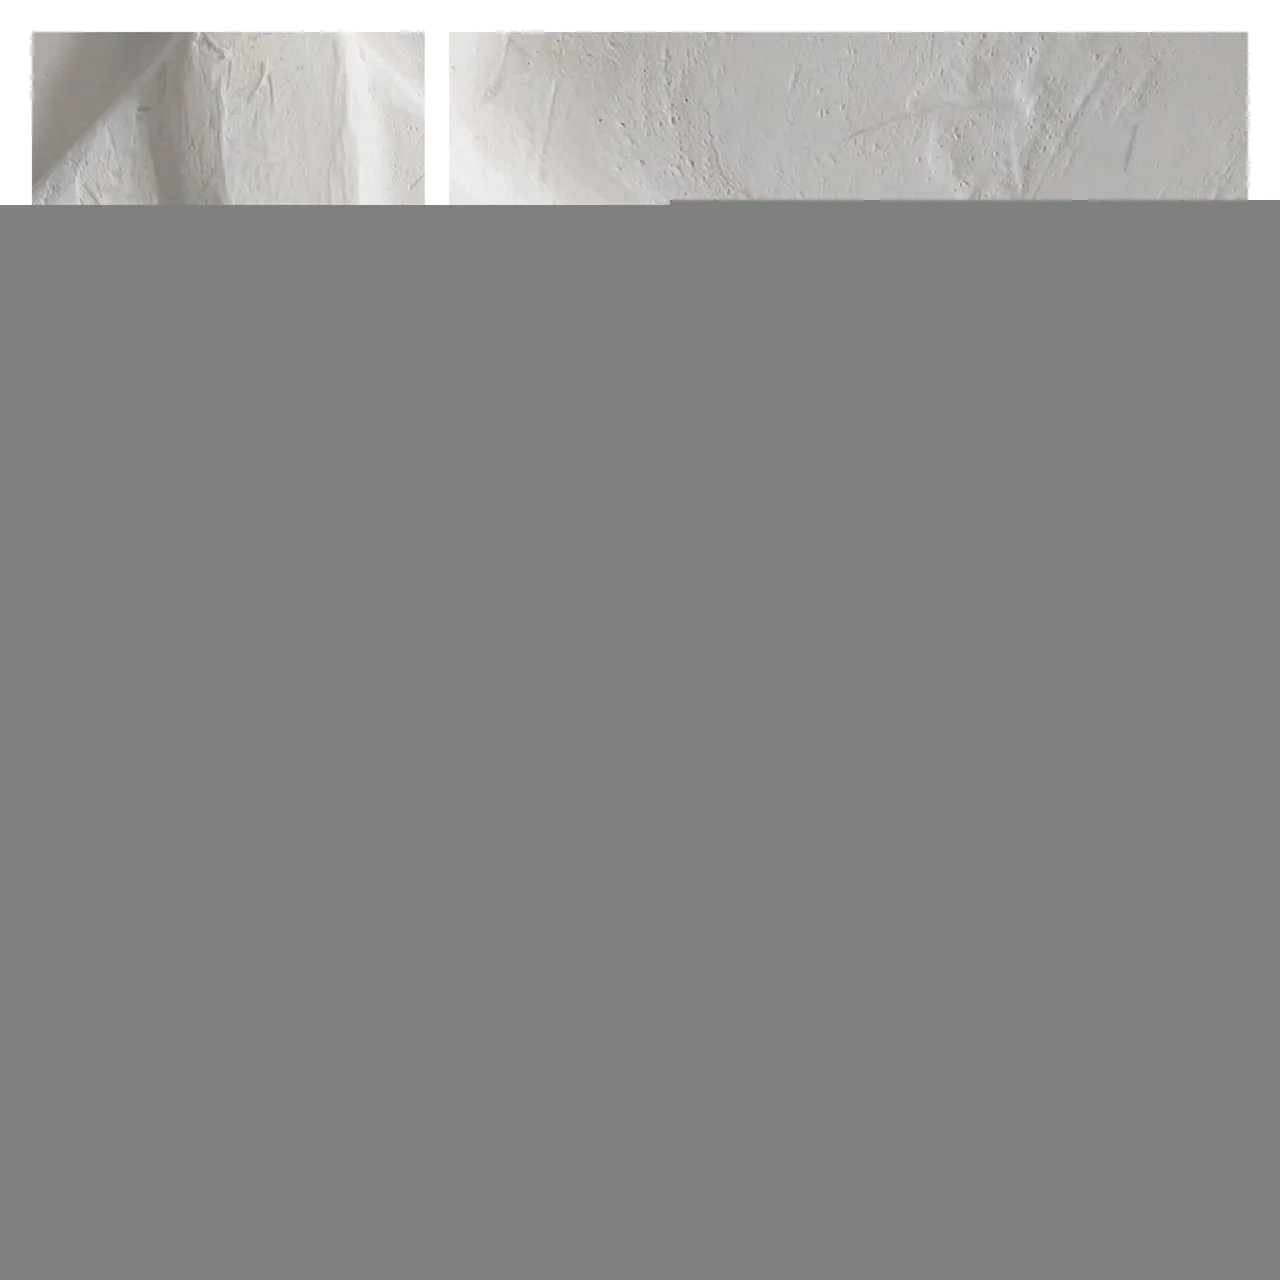
👣11. Después que esté todo bien lijado si quedan huecos coloque cemento de nuevo y deje secar. No se preocupe si quedan como rayas o algunos detalles al contrario estos le darán el efecto de antiguo yo deje algunos a propósito 🤭 después verá porque y por último con la brocha seca limpiar bien la escultura.
👣11. After everything is well sanded, if there are any gaps, place cement again and let dry. Do not worry if they are like stripes or some details, on the contrary, these will give you the effect of old and I left some on purpose 🤭 later you will see why and finally with the dry brush clean the sculpture well.
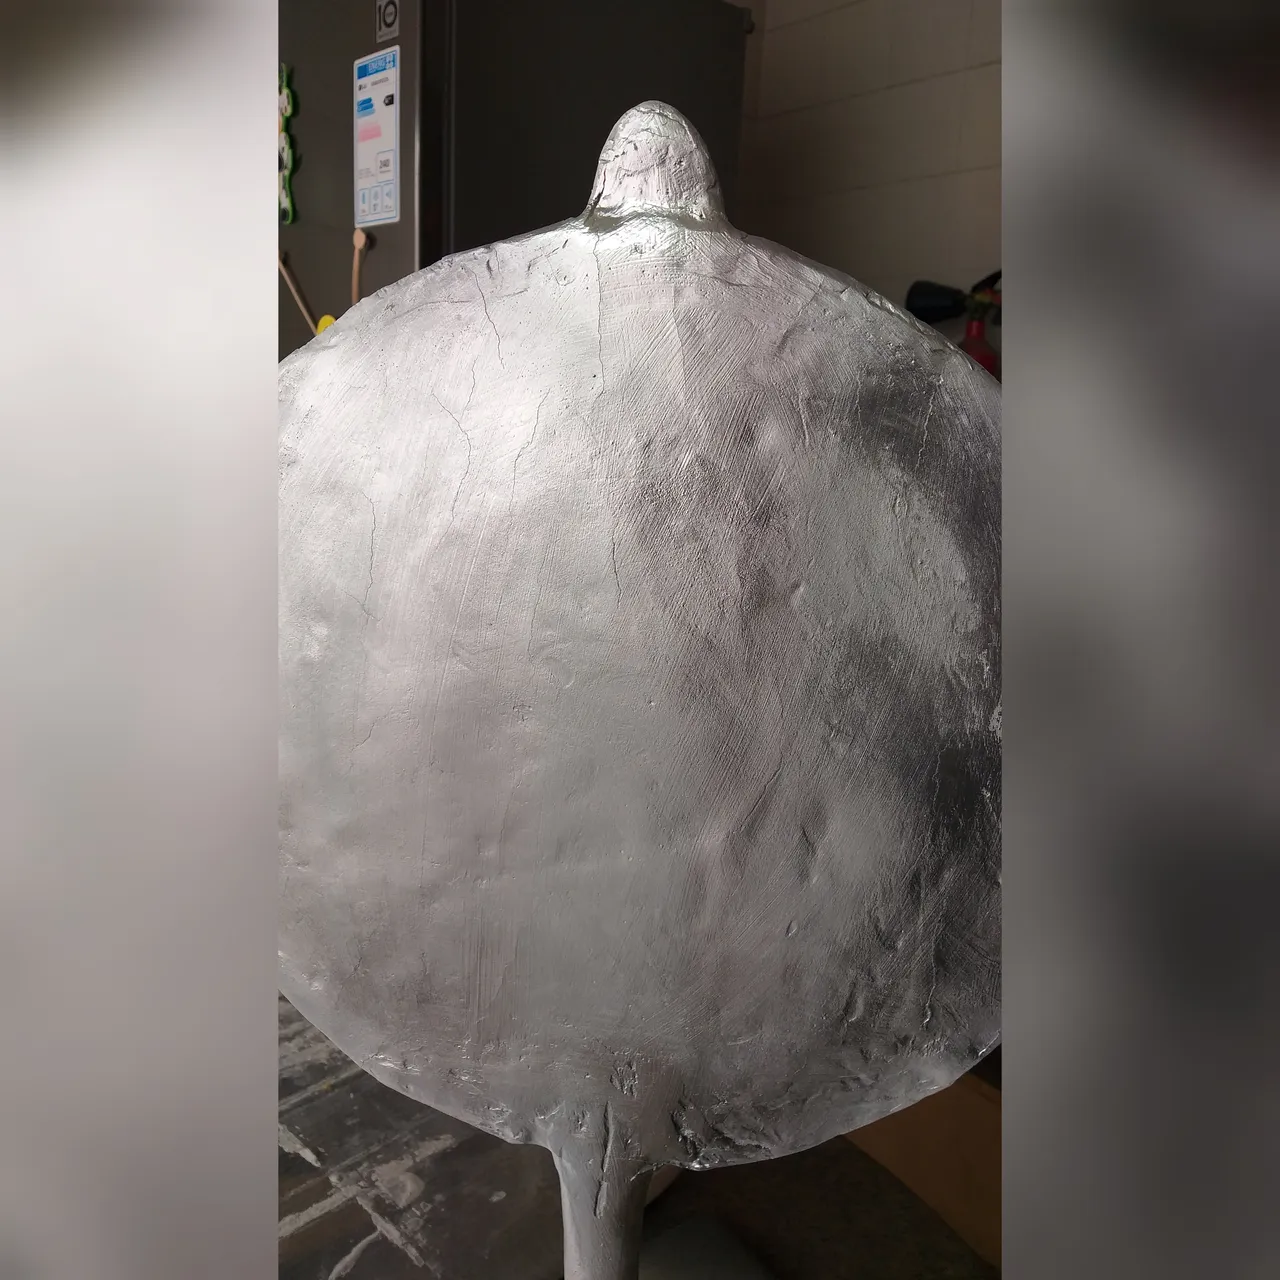
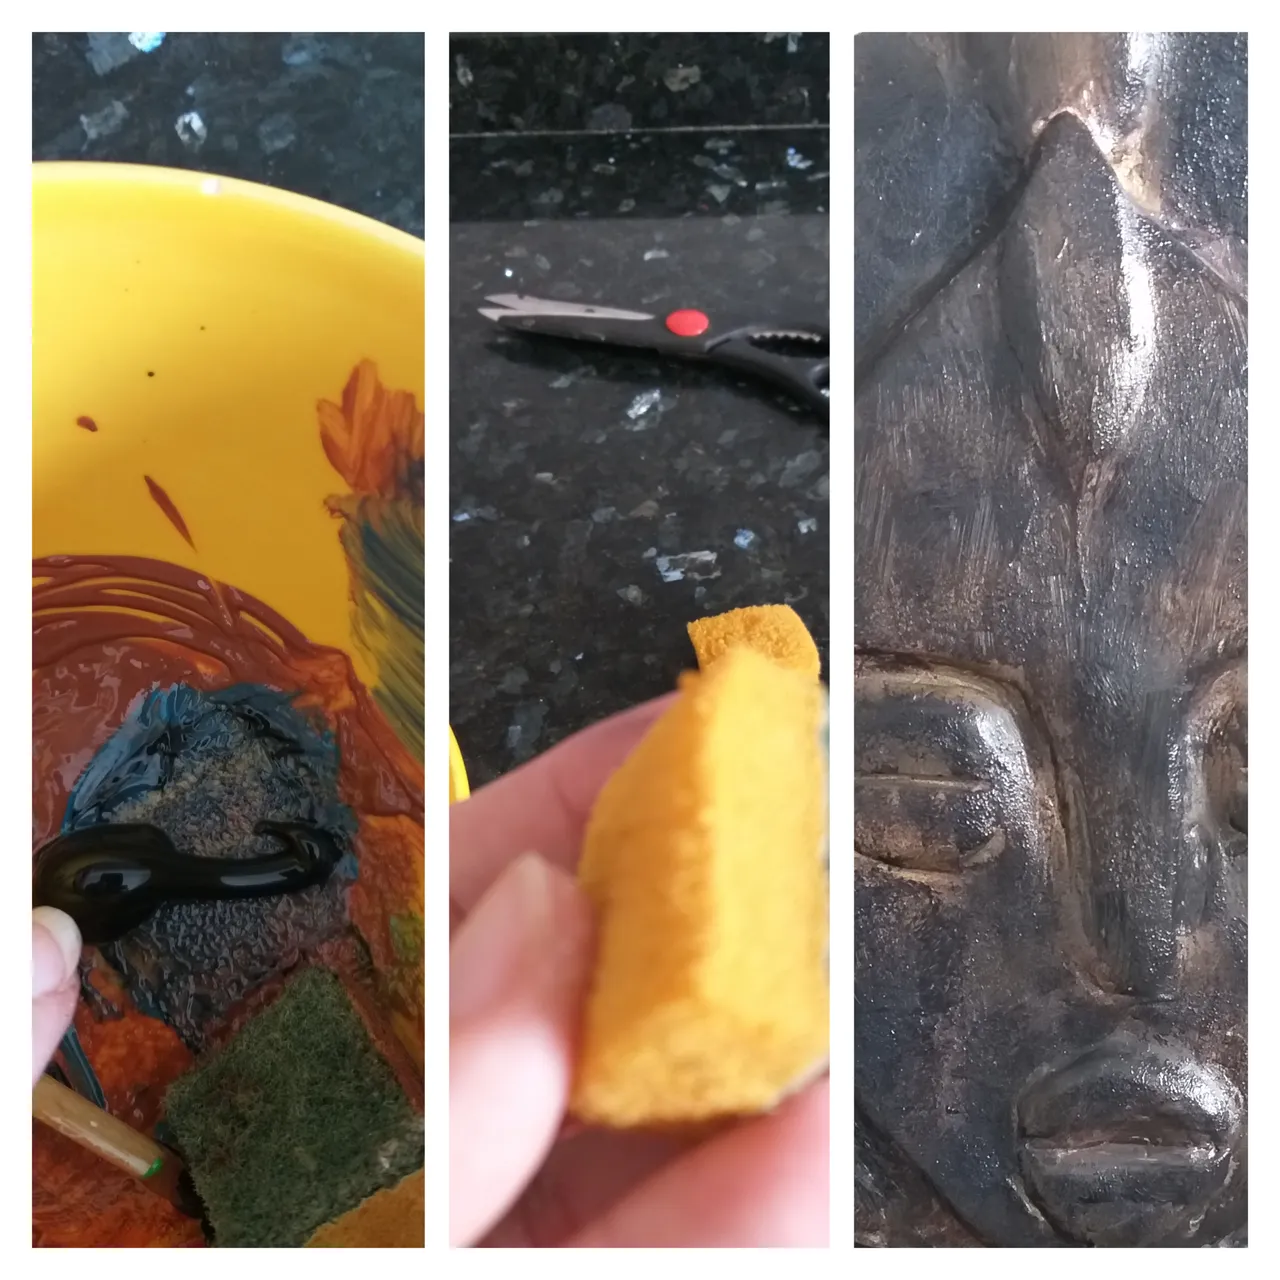
👣12. Ahora que ya limpió la escultura del polvo; vamos a pintar, acá utilicé varias técnicas hasta inventé🤭🤪🤯. Primero con el el spray de color plateado lo coloqué directo.
👣12. Now that you have cleaned the sculpture from the dust; let's paint, here I used various techniques I even invented🤭🤪🤯. First with the silver-colored spray I placed it directly.
Luego pinte del color dorado en varios lugares
Then paint the gold color in several places
Después con el color negro hice lo mismo y recuerda dejar secar cada color para poder aplicar el otro.
Then with the black color I did the same and remember to let each color dry to be able to apply the other.
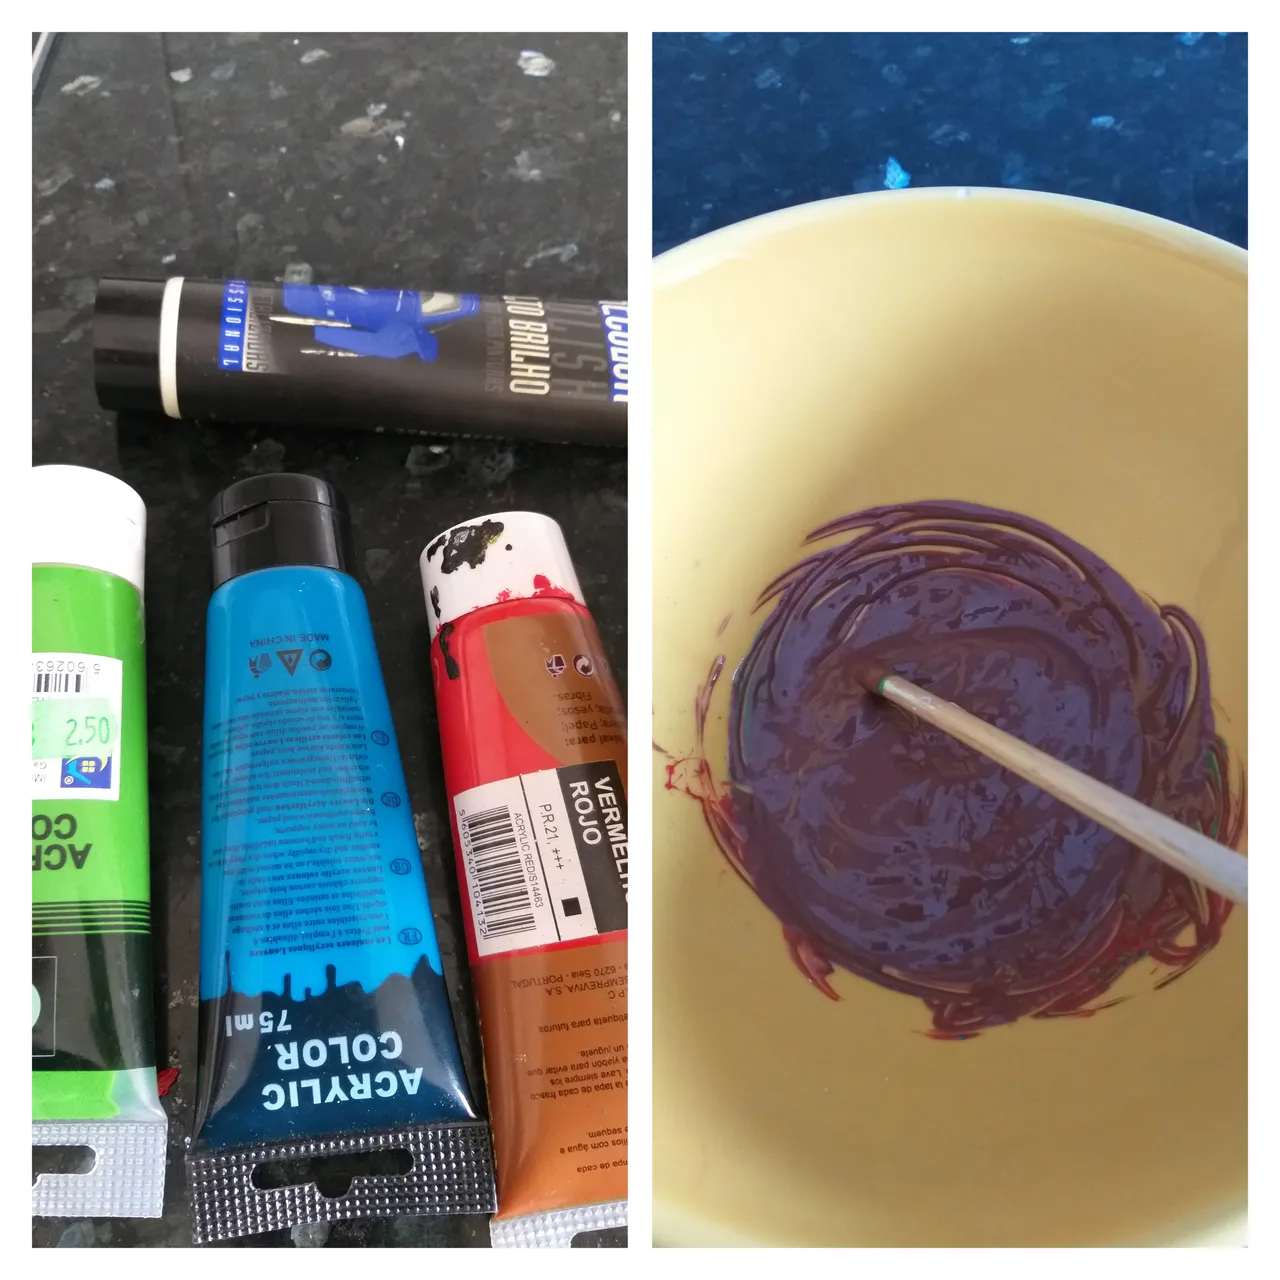
👣13. Sigamos con la pintura en la taza de plástico realicé una mezcla con los colores azul, negro, verde y marrón y lo mezclamos.
👣13. Let's continue with the paint in the plastic cup I made a mixture with the colors blue, black, green and brown and mix it.
👣14. Con un pedazo de esponja de cocina cargue y descargue la pintura y comienza a darle toques en varias partes de la escultura.
👣14. With a piece of kitchen sponge, load and unload the paint and begin to dab it on various parts of the sculpture.
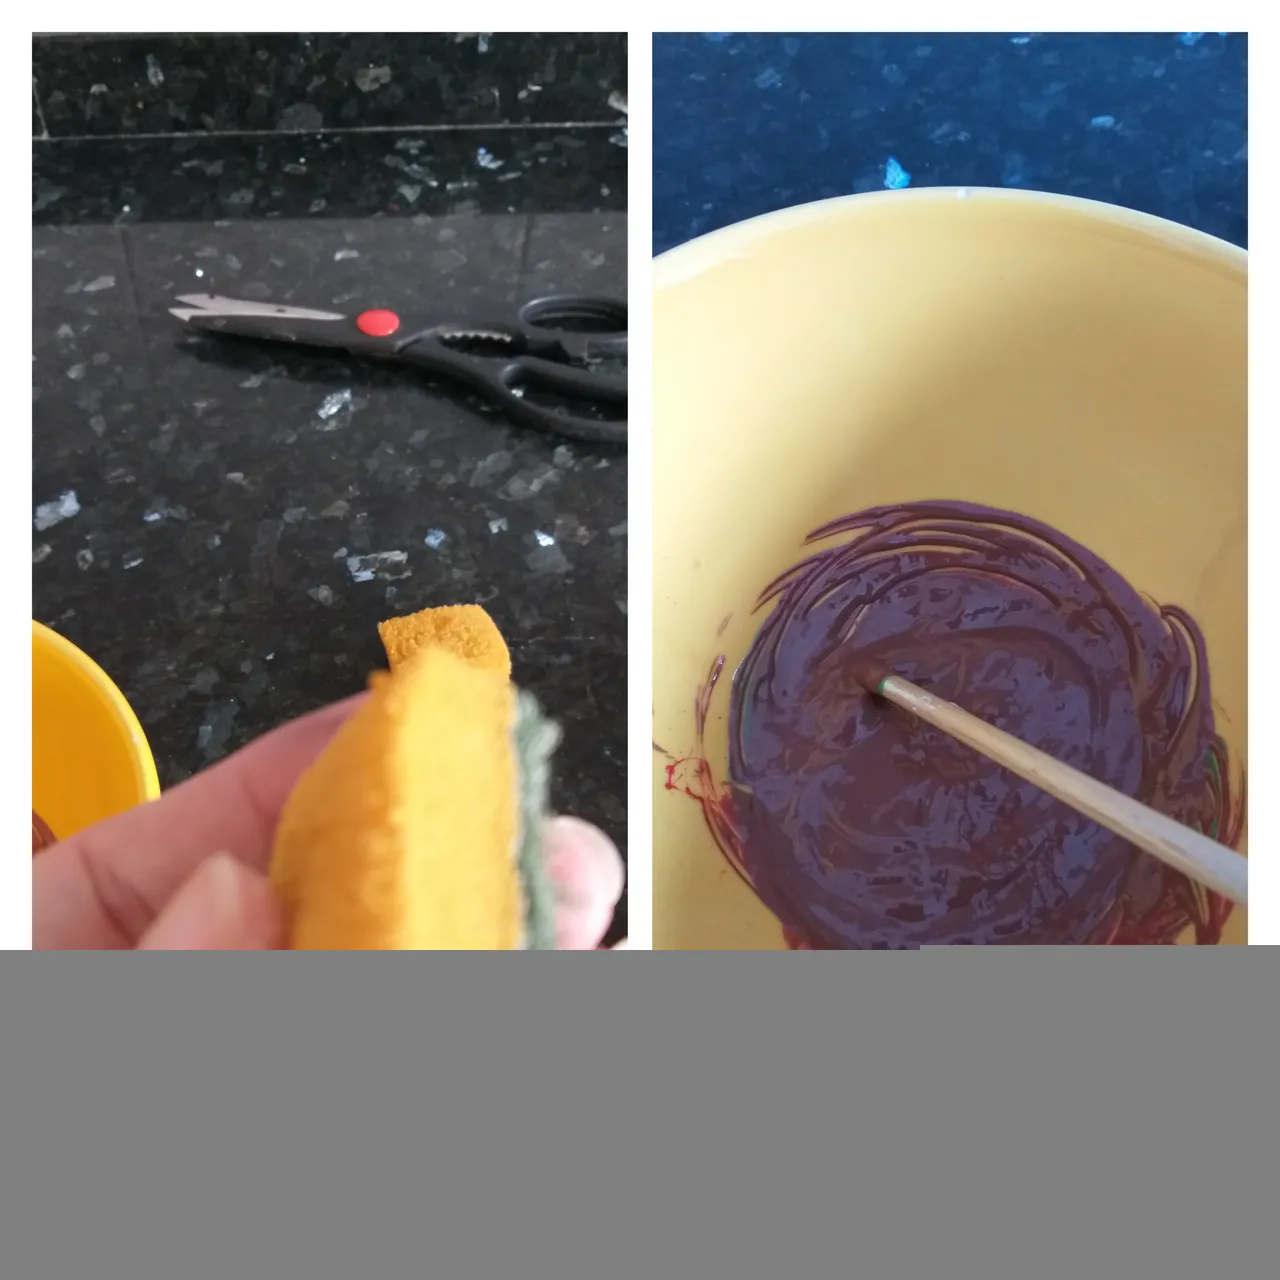
👣15. Con un poquito de pintura de color negro haga lo mismo con otro pedazo de esponja y comienza a motear esa es una tecnica ( moteado) al igual por varias partes xe la escultura. Observar como va quedando la escultura.
👣15. With a little bit of black paint, do the same with another piece of sponge and begin to mottle that is a technique (mottle) as well as for various parts of the sculpture. Observe how the sculpture is left.
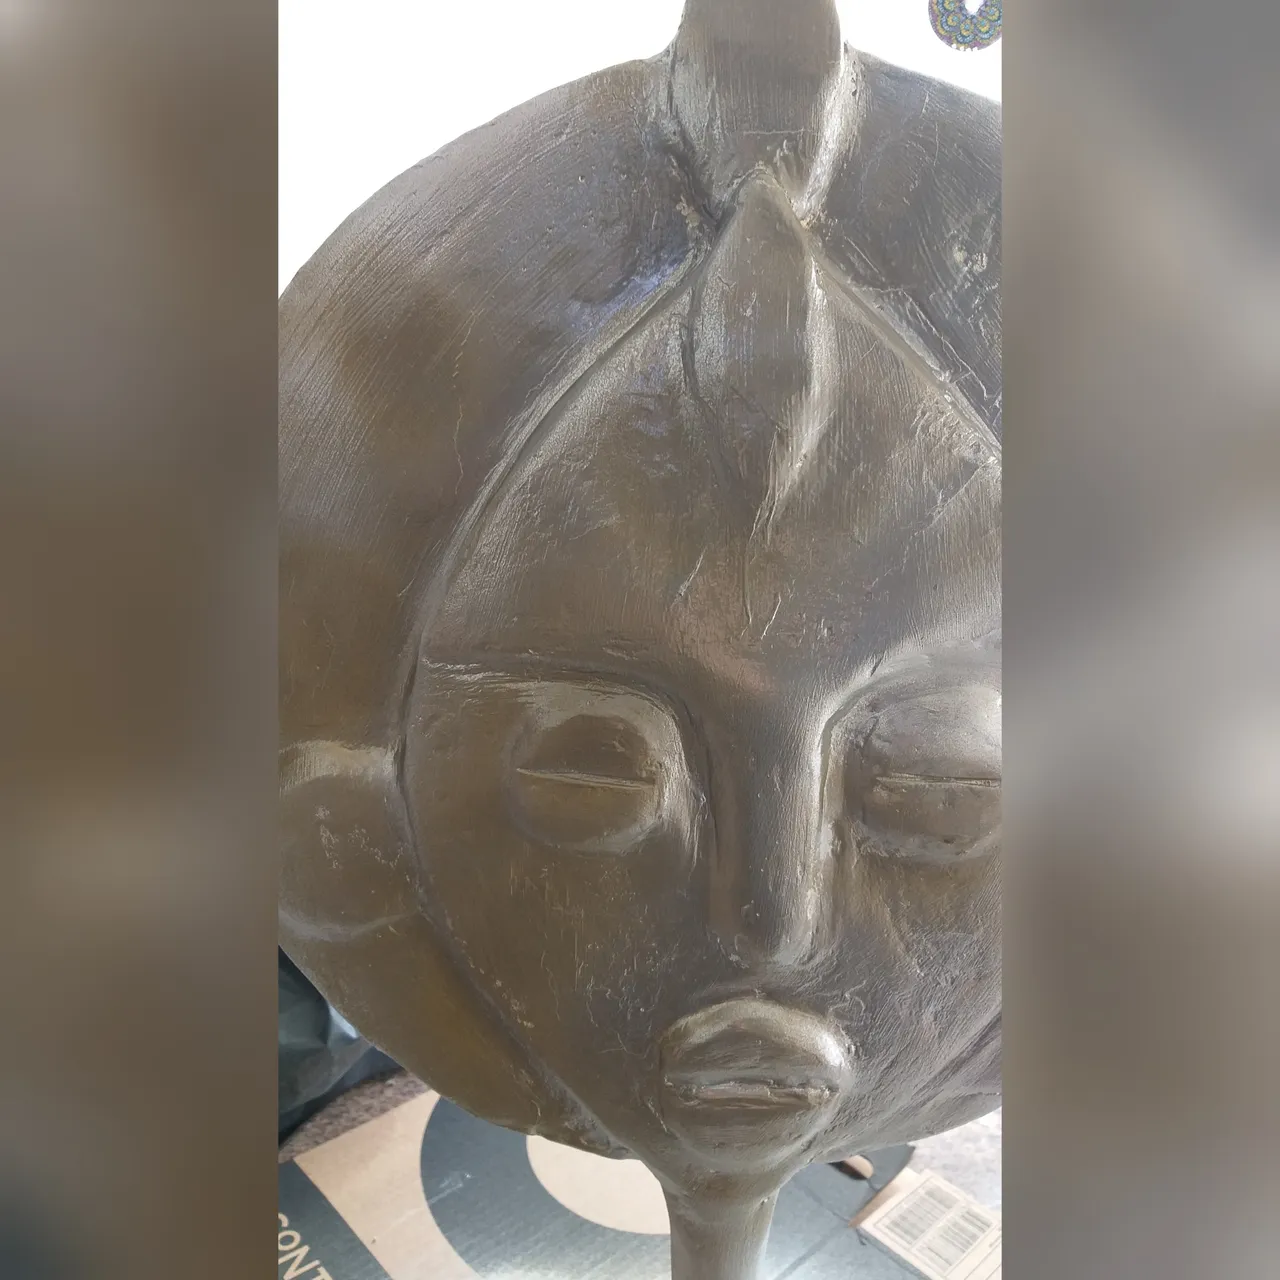
👣16. Ahora vamos a utilizar alcohol y algodón para retirar la pintura 👀😮. Ustedes se preguntarán bueno después que echo tanta pintura ahora la va a sacar☺🤪 esto es para que las pinturas que estan de fondo se puedan observar ; como el color plateado, dorado, marrón, y van a ver como un rojizo esto hace ver la pieza como si fuera una madera y hasta efecto de piedra. Recuerden que les dije que no se preocuparan por los defectos; es porque así la escultura queda como si fuera antigua 😚😊
👣16. Now we are going to use alcohol and cotton to remove the paint 👀😮. You may be wondering, well, after I've done so much painting, now he's going to take it out☺🤪 this is so that the paintings that are in the background can be seen; like silver, gold, brown, and they will look like a reddish color, this makes the piece look like wood and even stone effect. Remember I told you not to worry about flaws; it's because that way the sculpture looks like it's old 😚😊
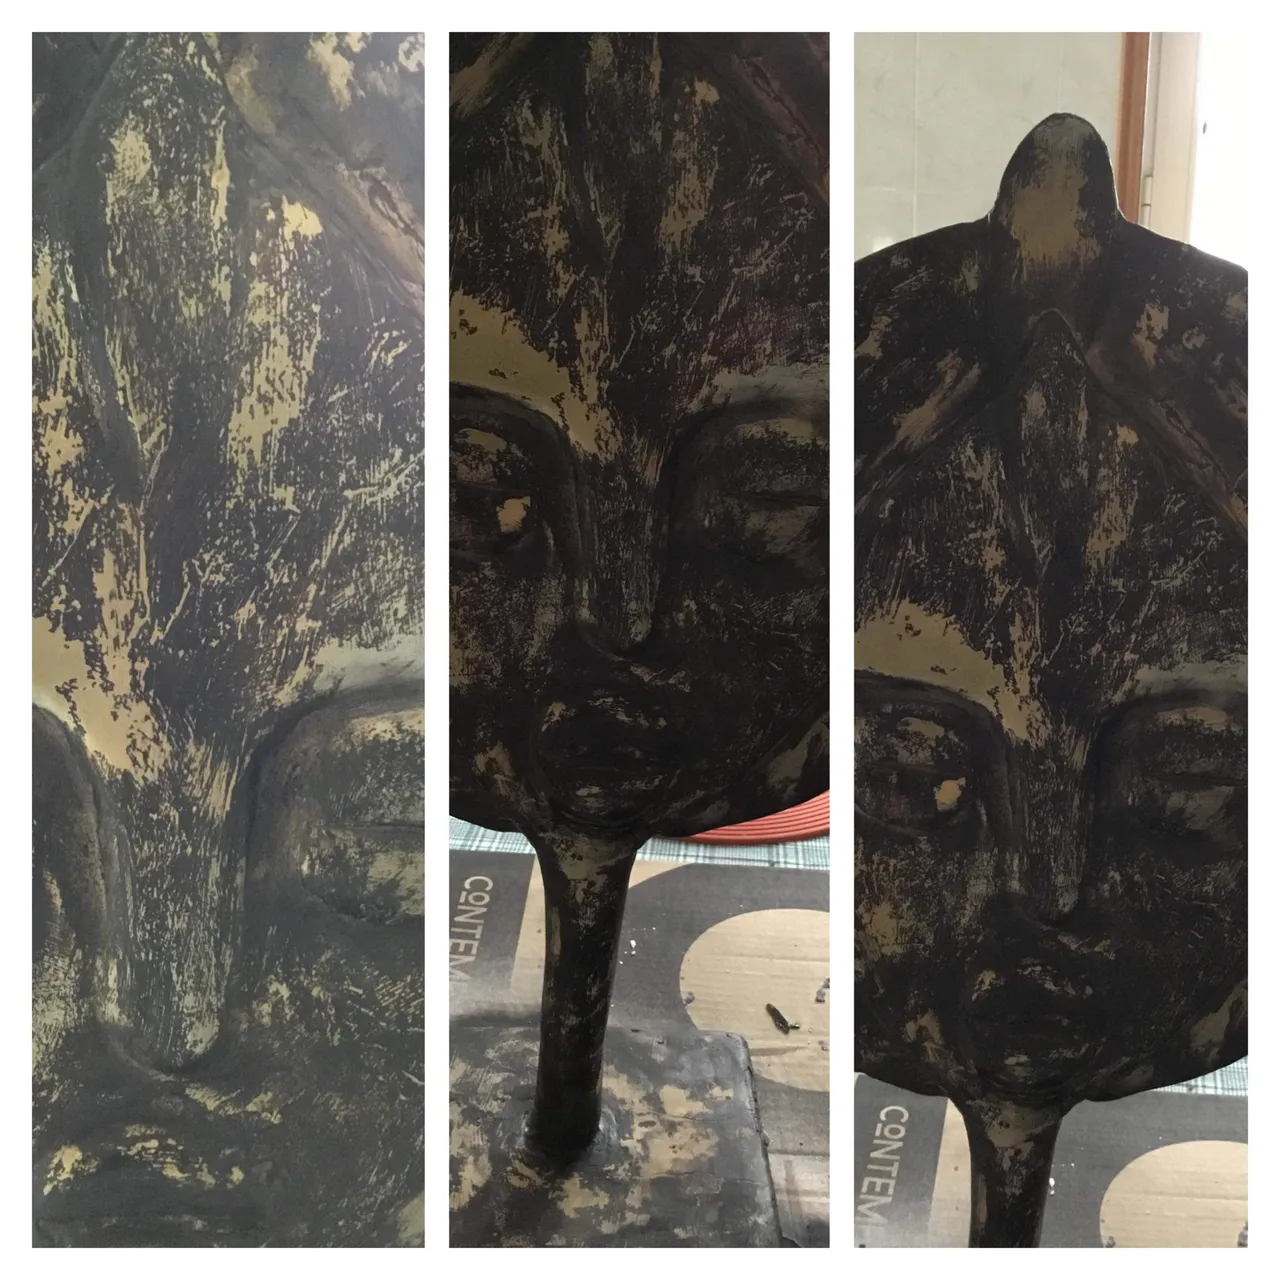
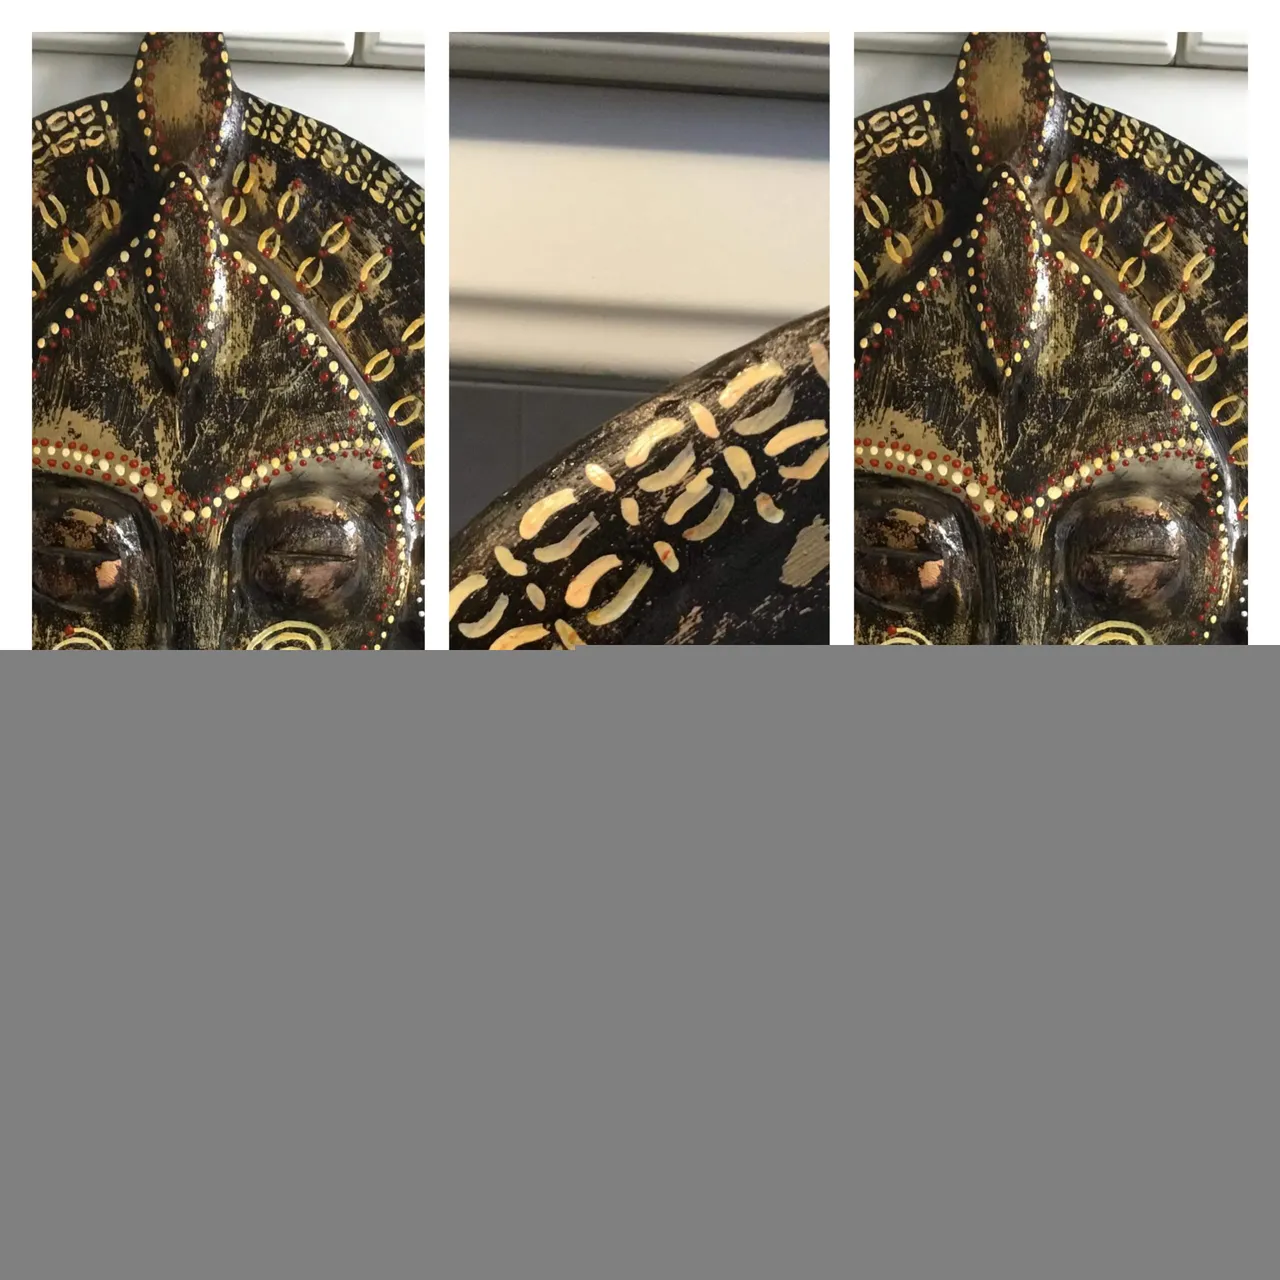
👣17. Con la pintura de color blanco y la parte de arriba del pincel realizar puntos blancoa por todo alrededor de la cara.
👣17. With the white paint and the top of the brush, make white dots all around the face.

👣18. Después de tener los puntos blanco por toda la orilla de la cara realizar unas figuras como dos paréntesis() por toda la orillas de la cabeza y tres rayas . Observar las imágenes.
👣18. After having the white dots along the entire edge of the face, make some figures such as two parentheses() along the entire edge of the head and three stripes. Look at the images
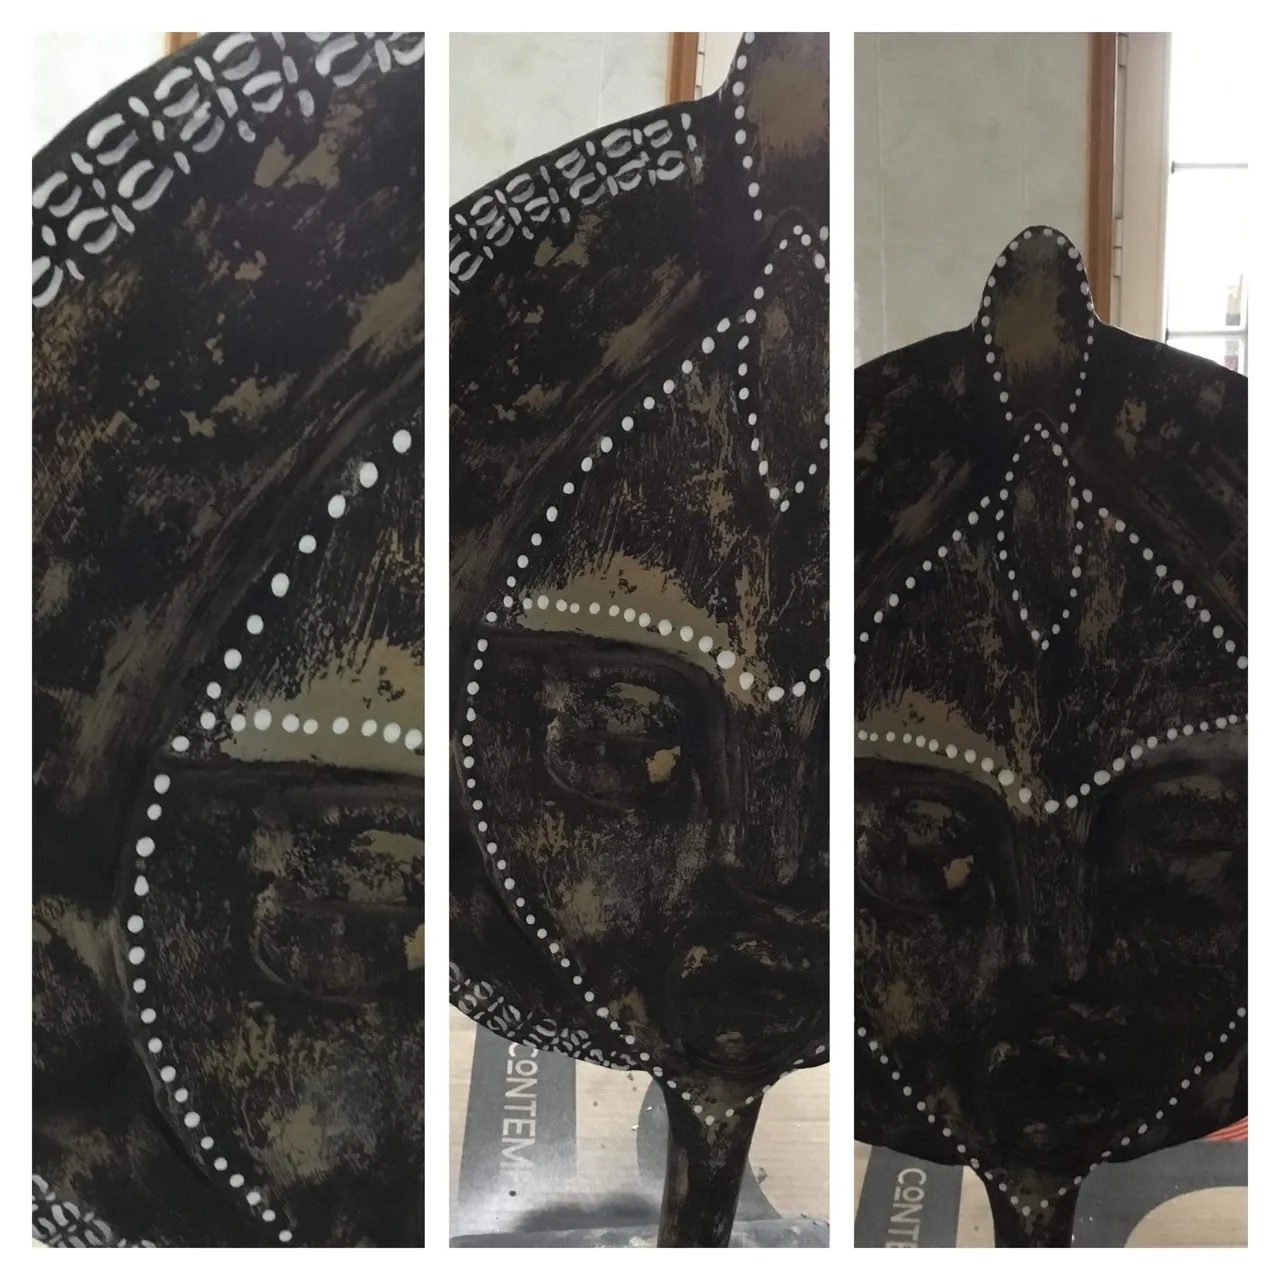

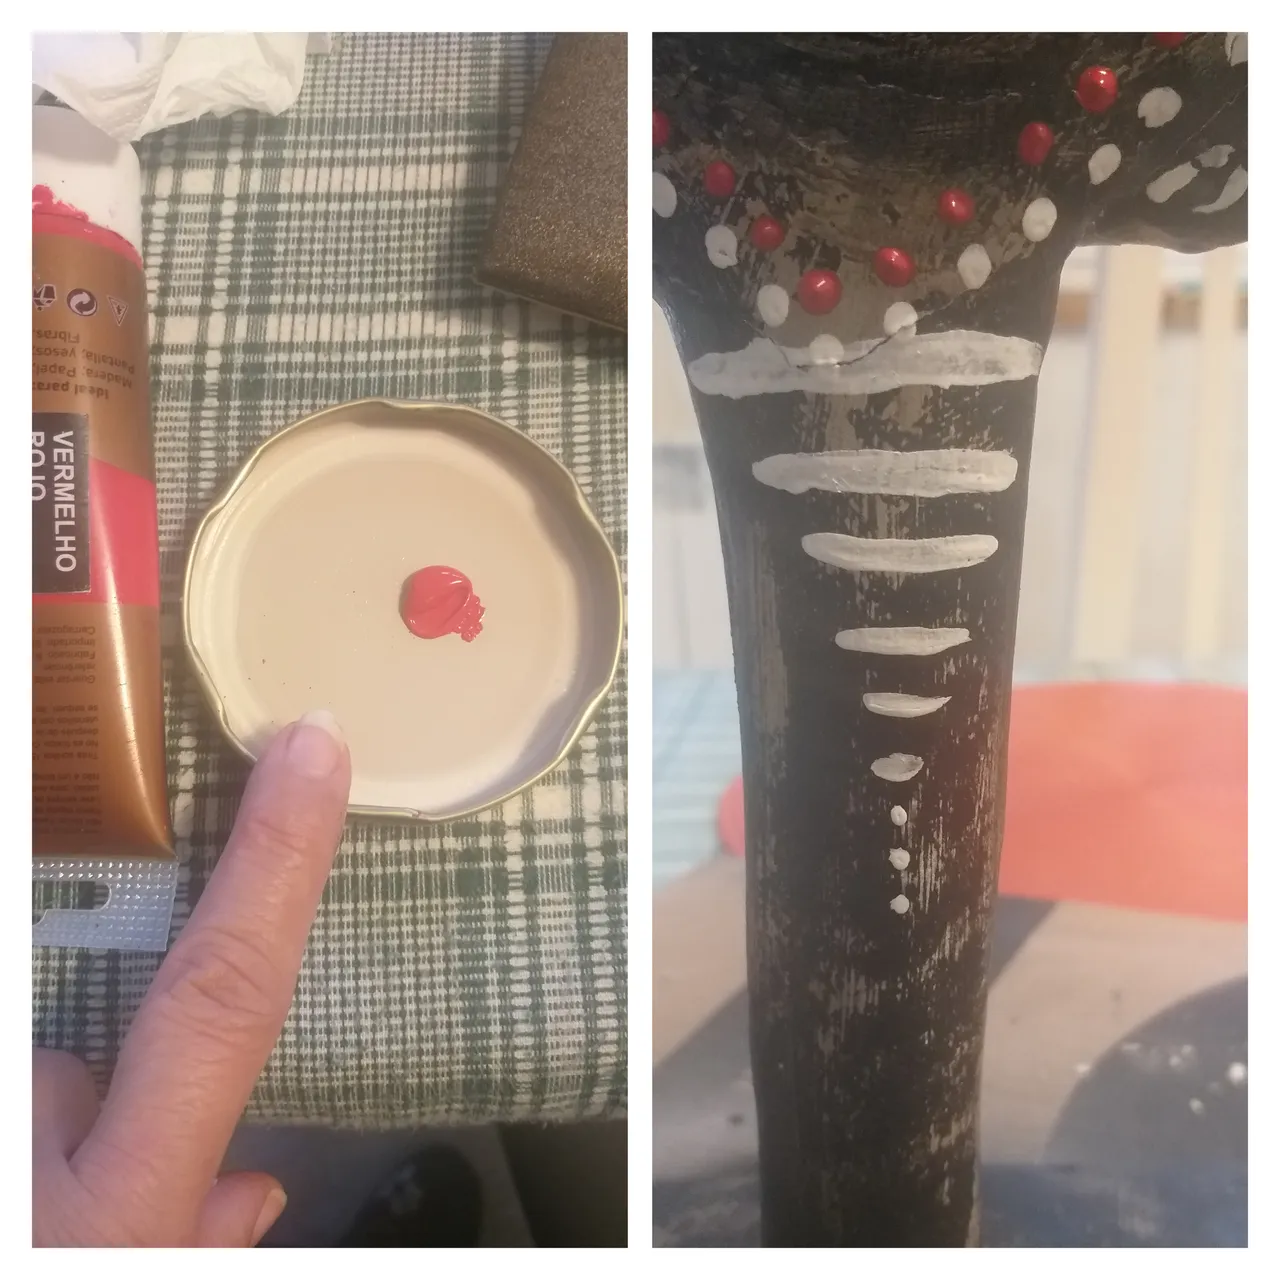
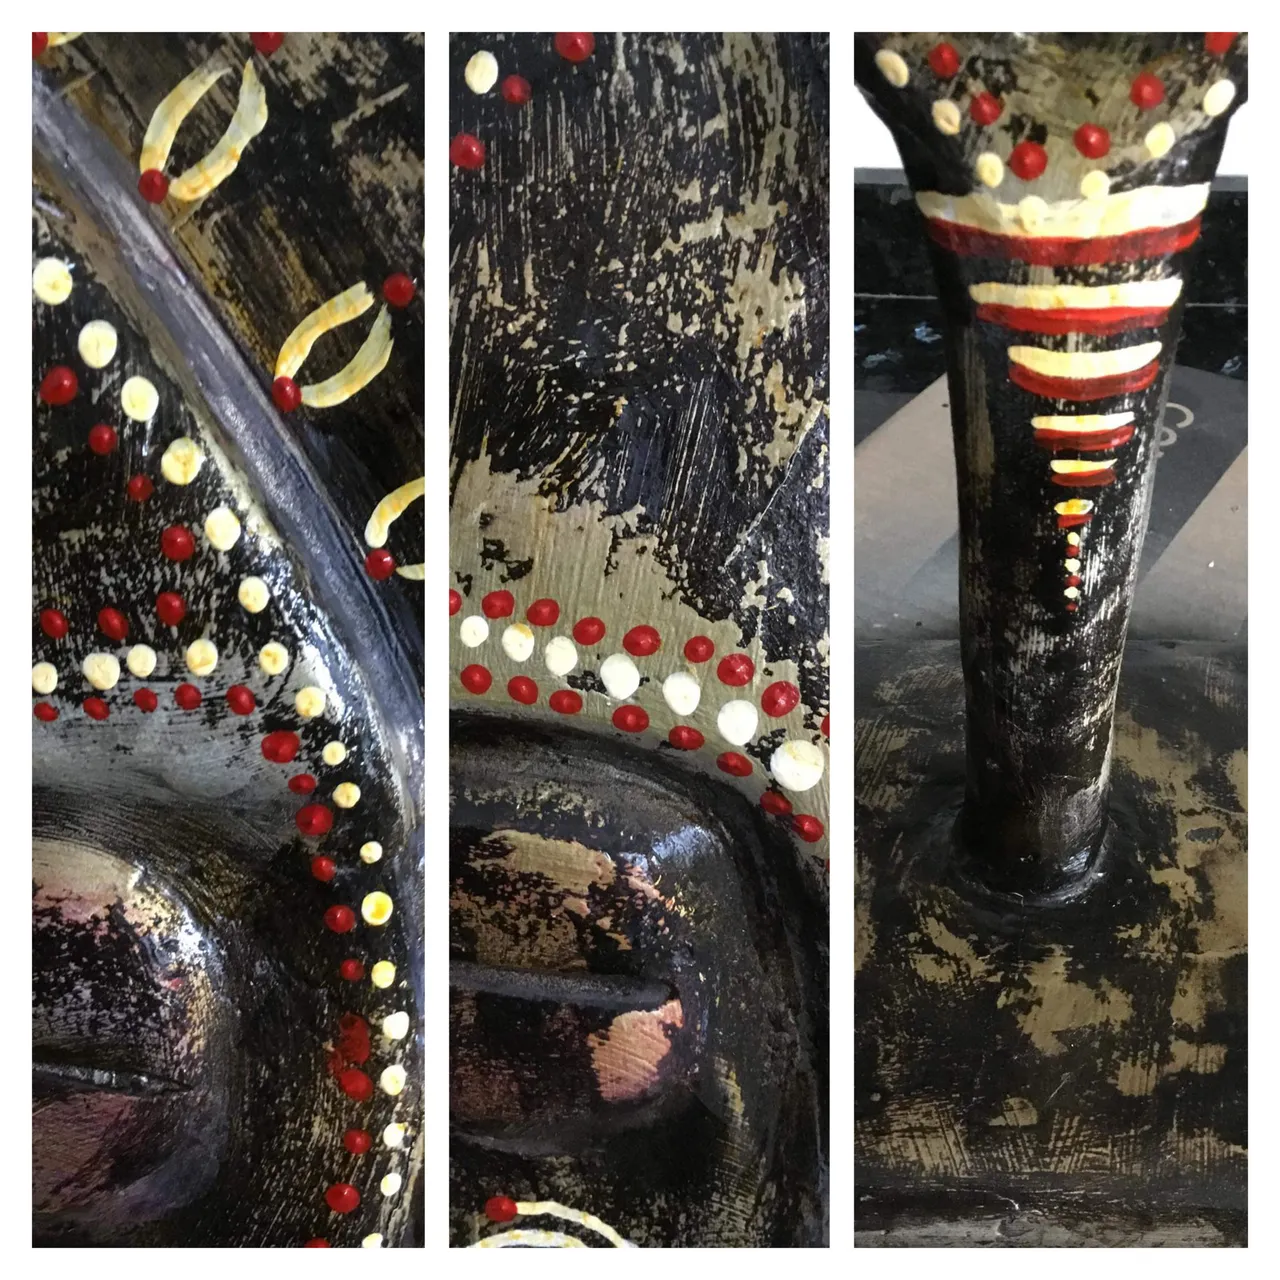
👣19. También haga puntos rojas al lado de cada punto blanco y en algunos sitios de la cara y el la parte del tubo rayas blancas.
👣19. Also make red dots next to each white dot and in some places on the face and the part of the tube white stripes.
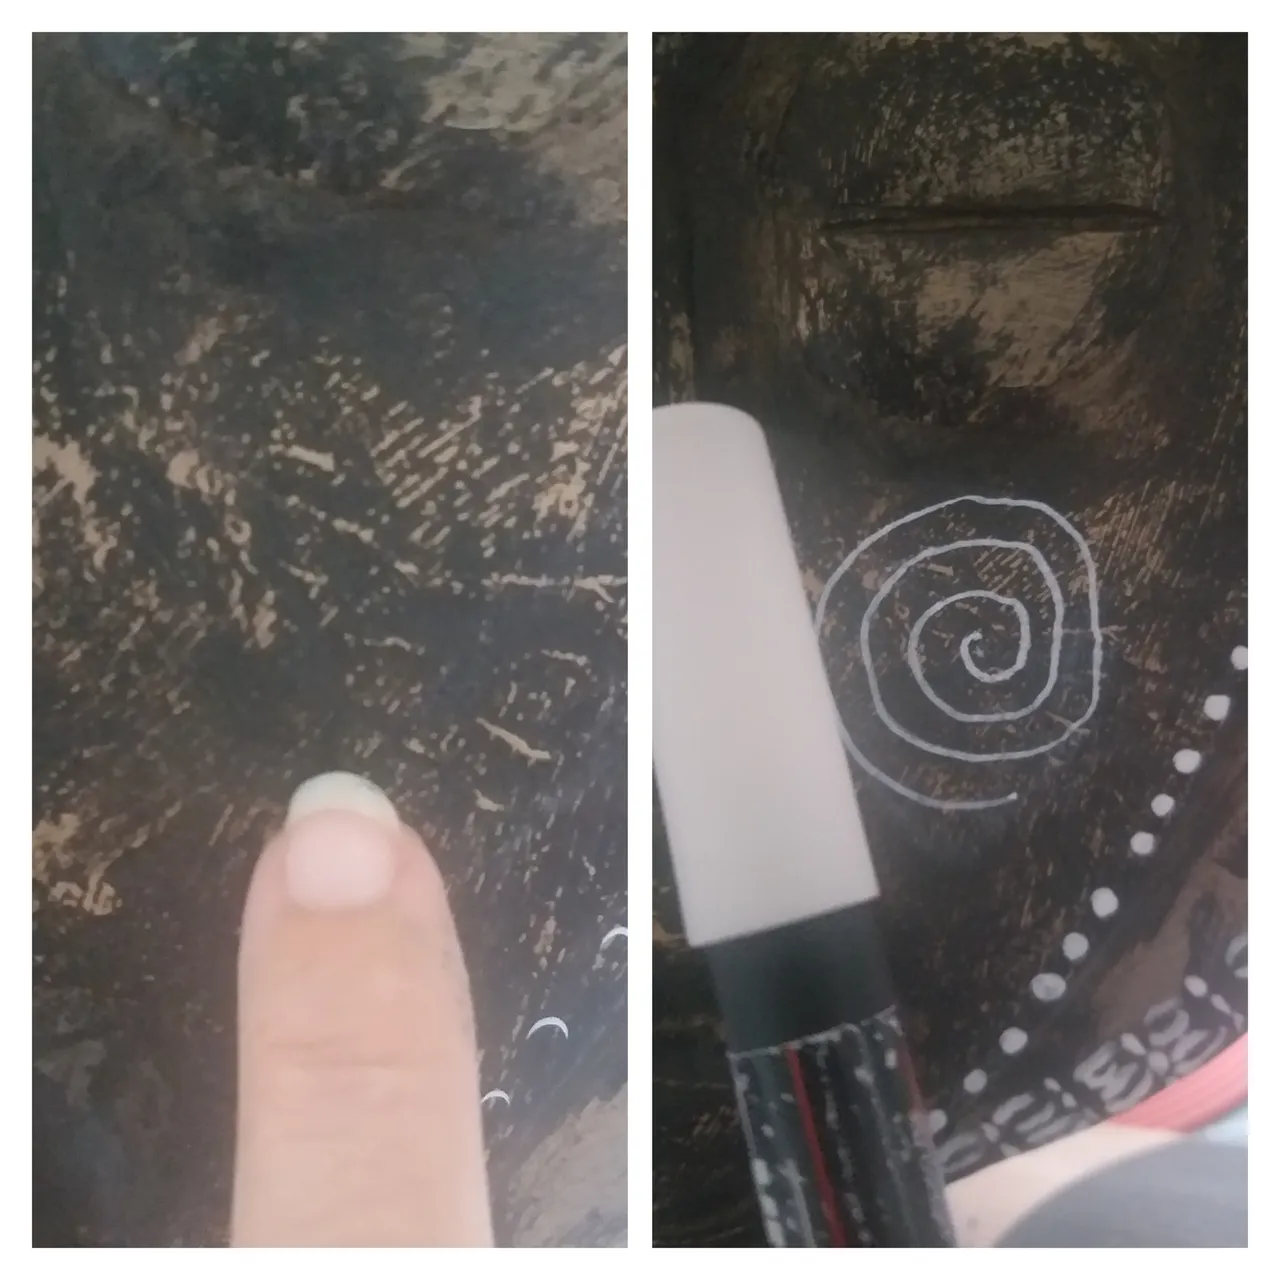
👣20. En la parte de los cachetes una figuras de forma de espiral y en las orejas alrededor puntos blancos.
👣20. In the part of the cheeks a spiral-shaped figures and in the ears around white dots
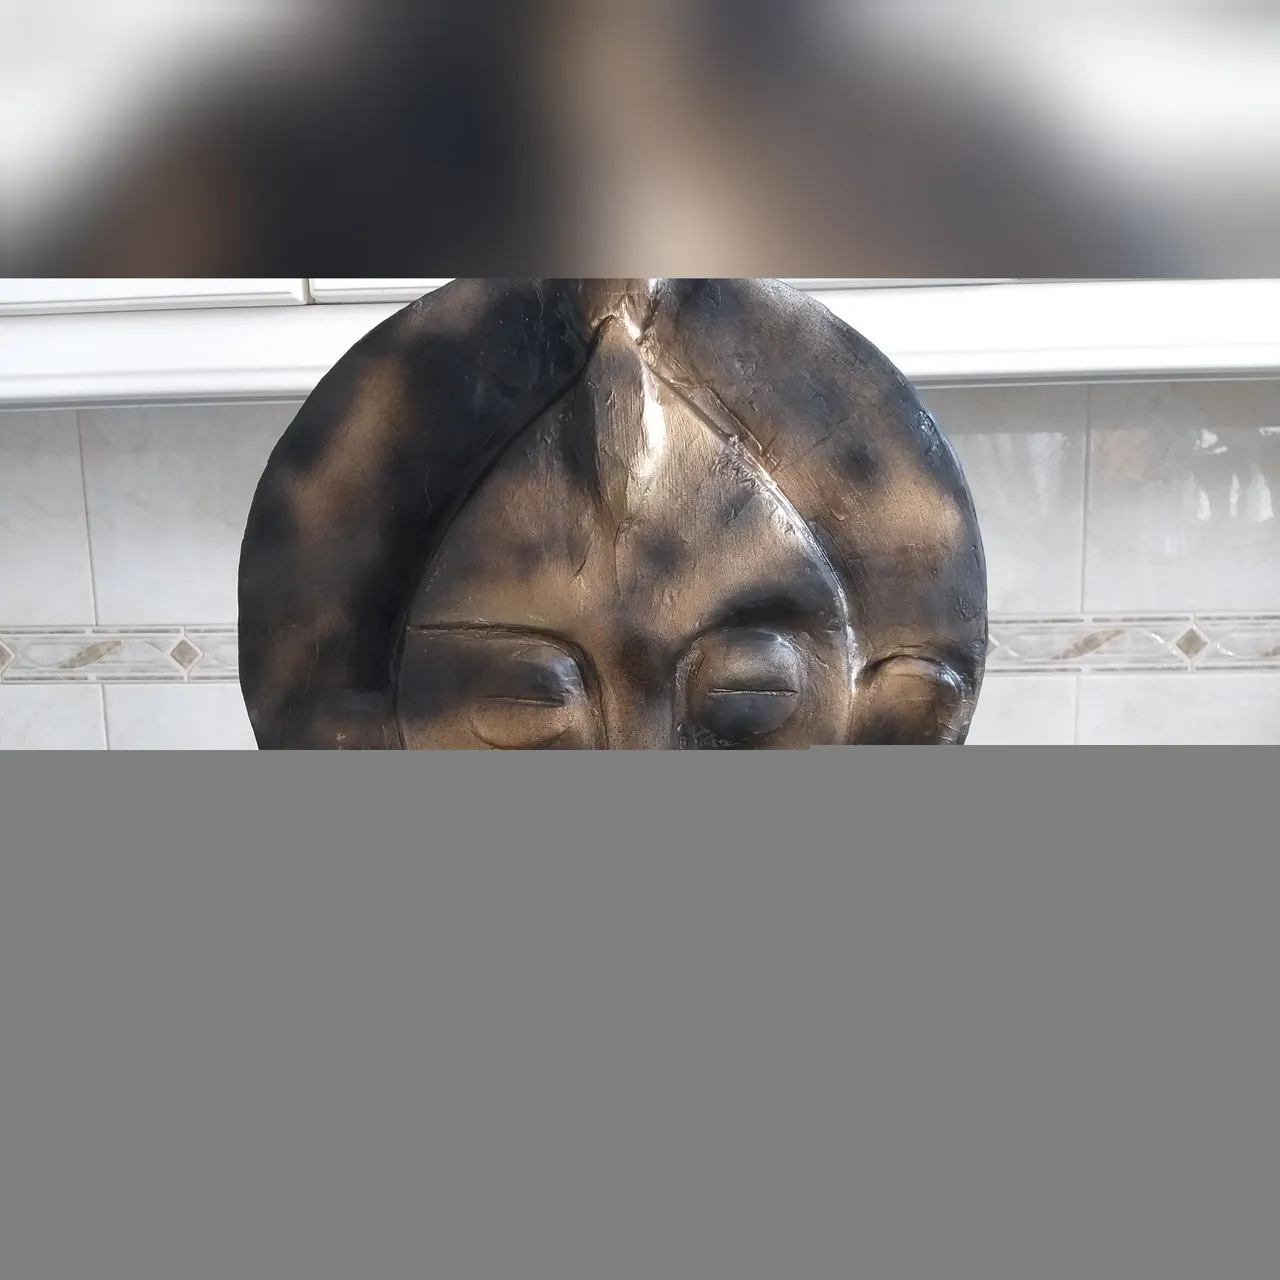
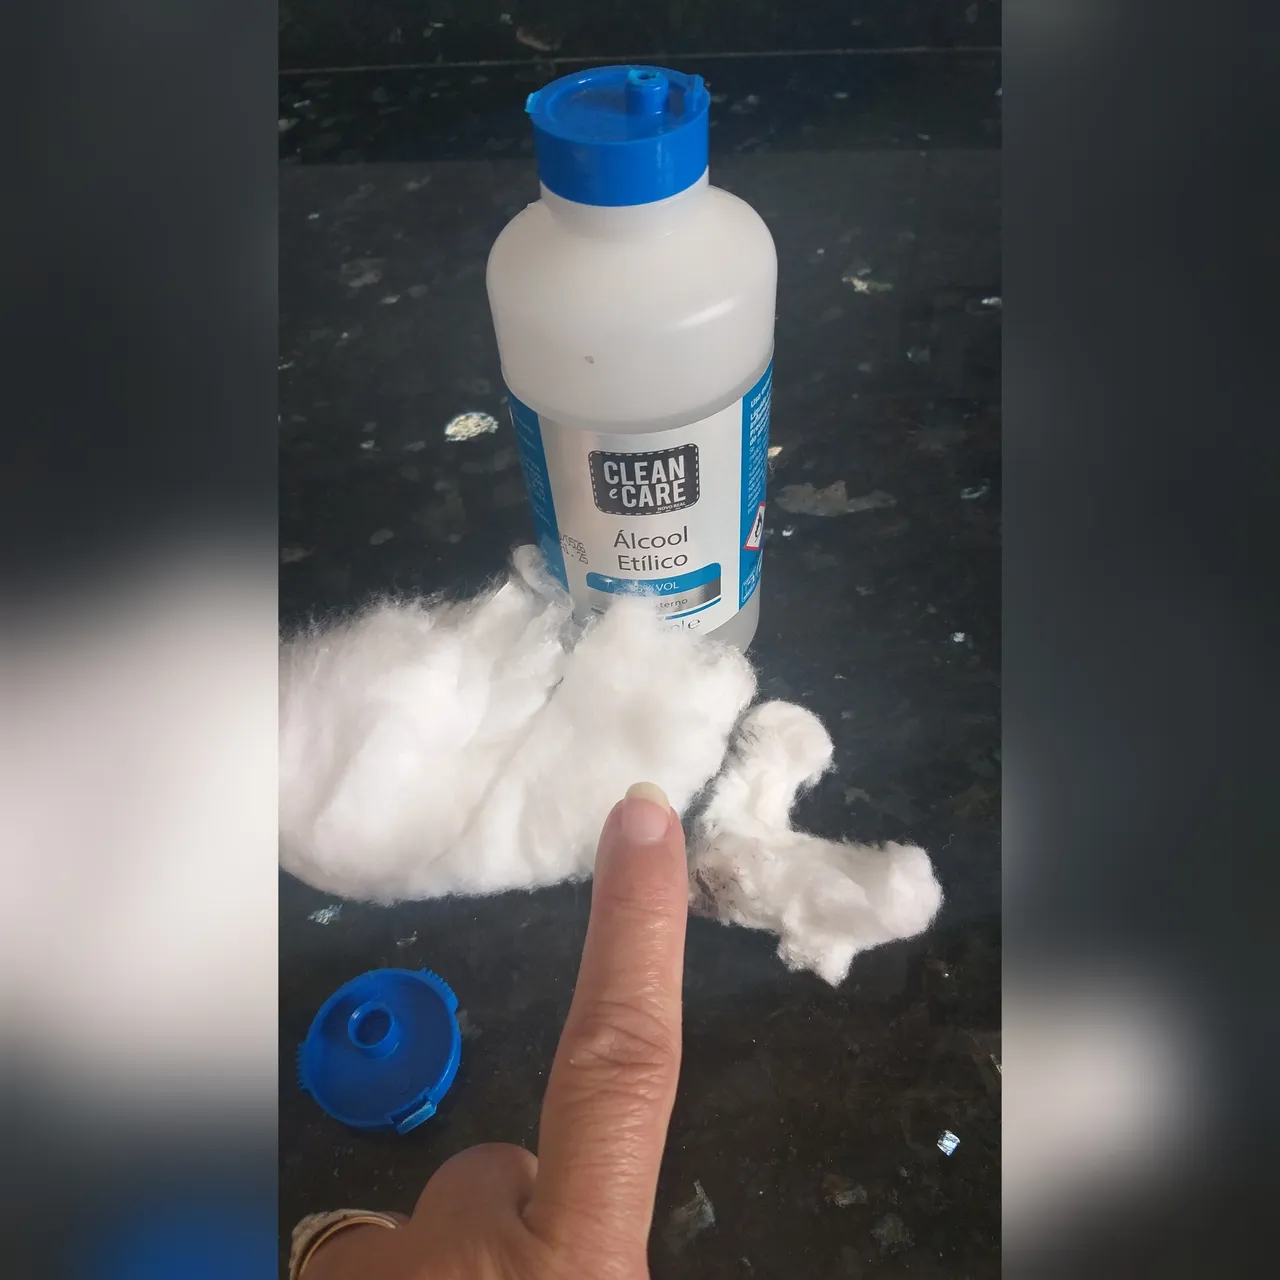
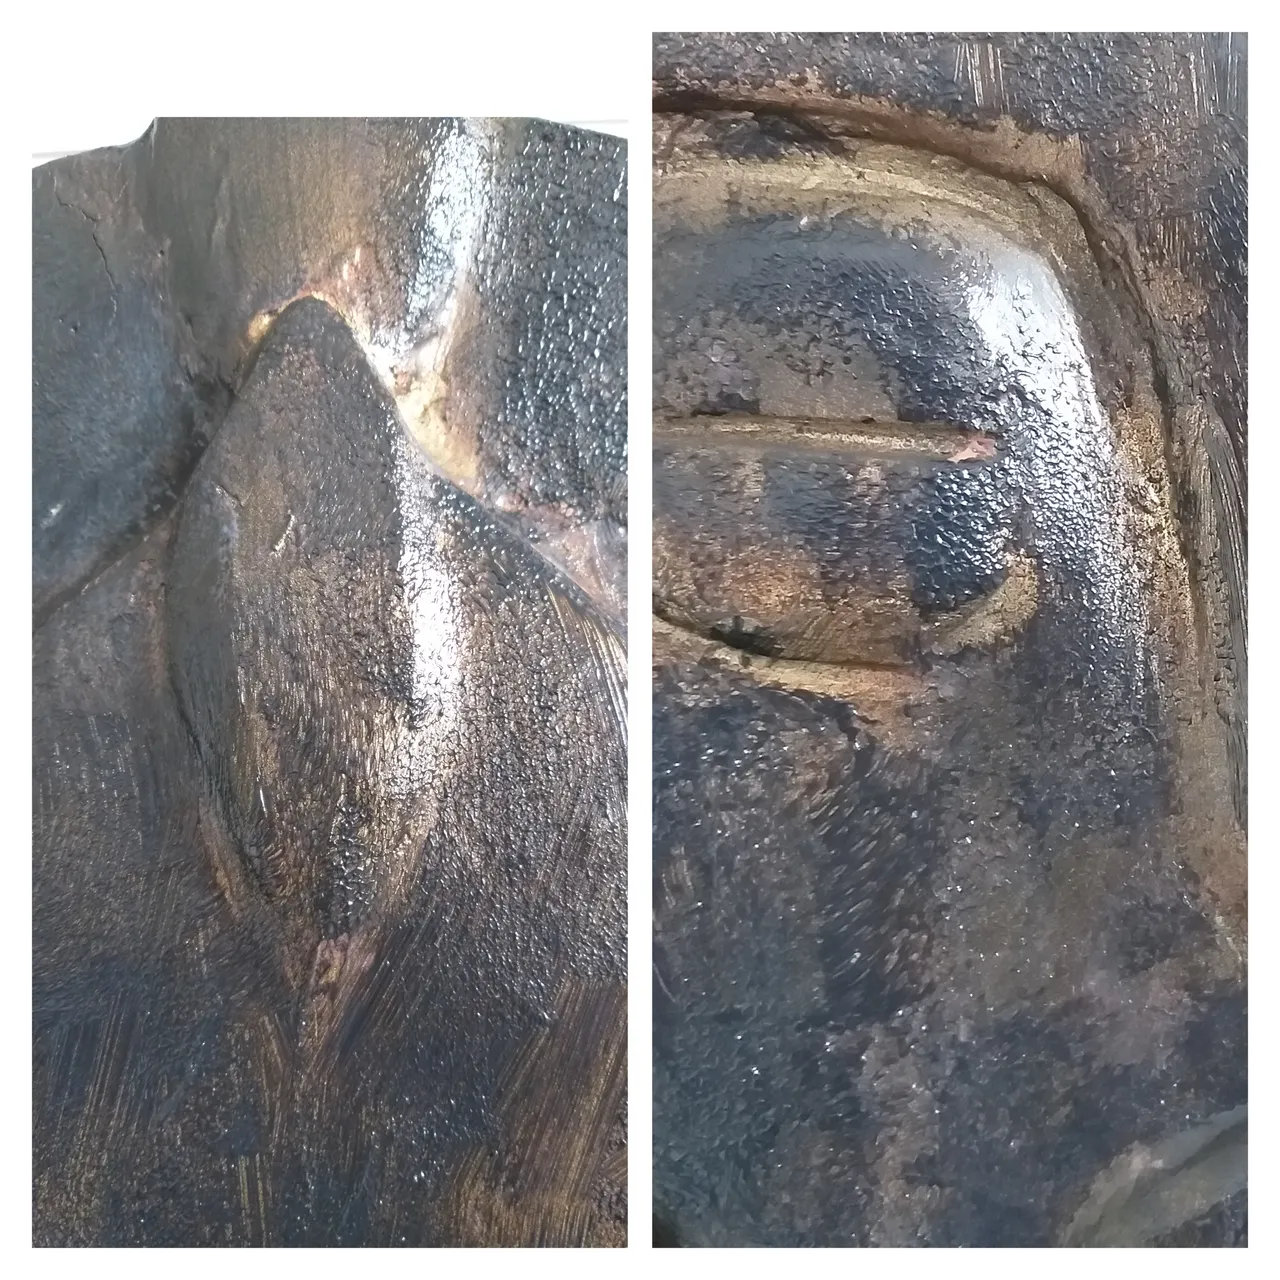
👣21. Con el aceite de bebé y el achote sacaremos como un betún y con el algodón lo pasamos por toda la escultura le da un brillo y un color a envejecido, por la orejas si quieren no le pasen.
👣21. With the baby oil and the achote we will remove it like a bitumen and with the cotton we pass it all over the sculpture it gives it a shine and an aged color, through the ears if you want, do not pass it.
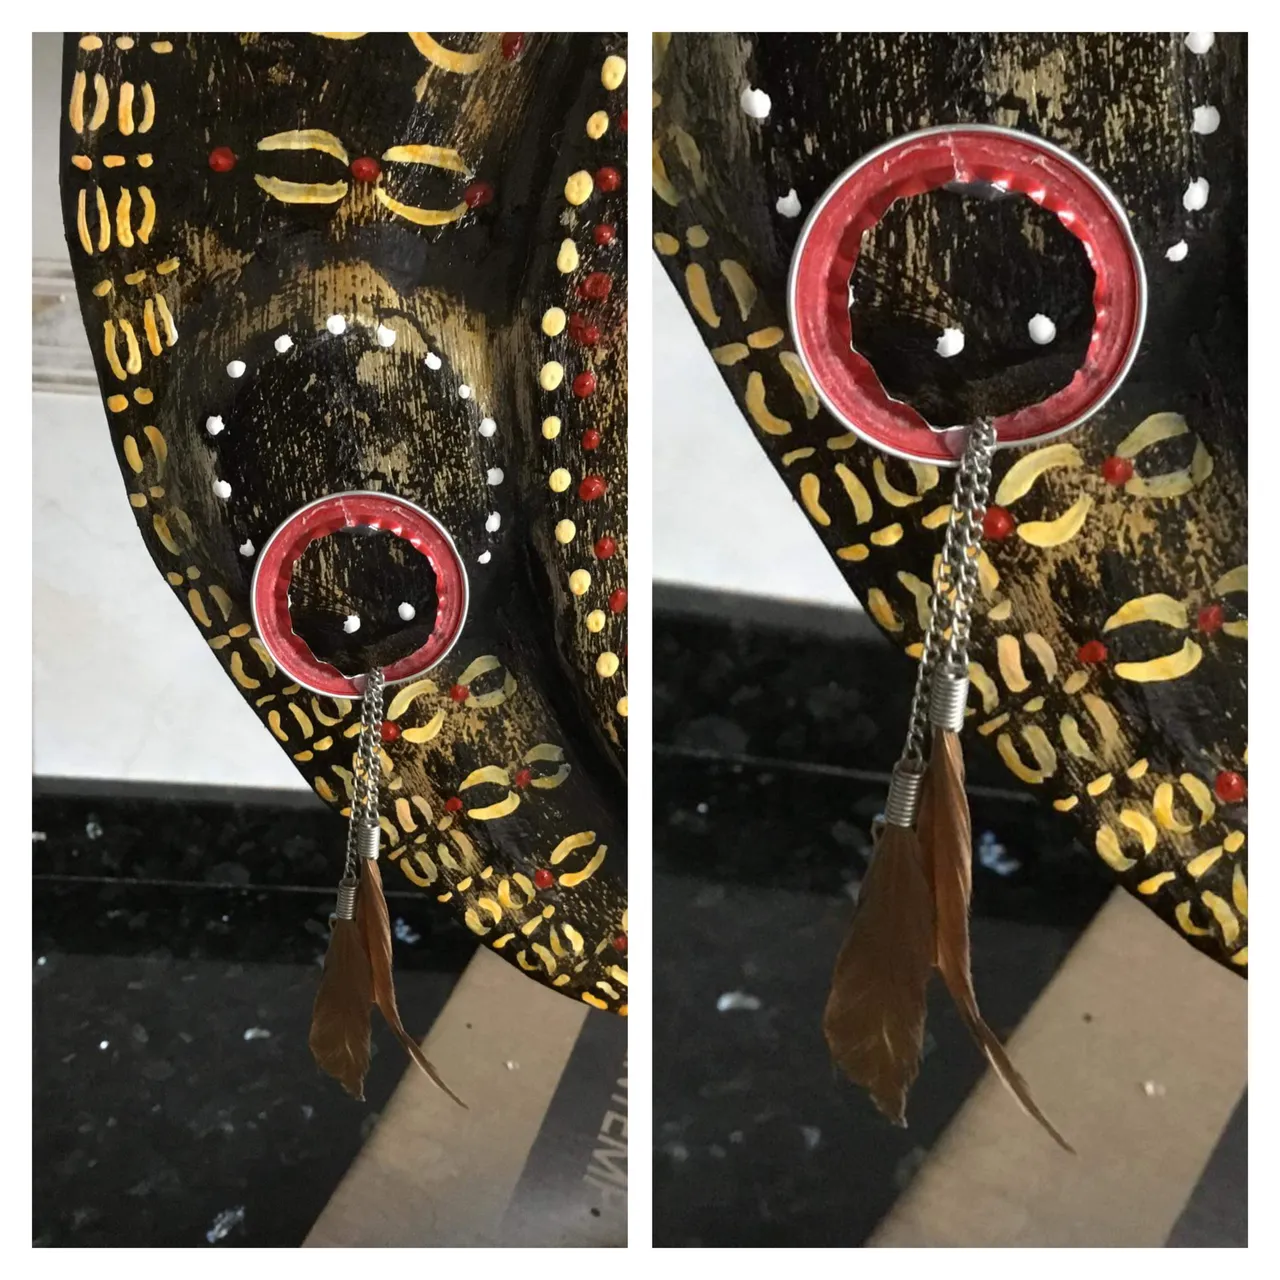
👣22. Con la cápsulas de café Nespresso haremos las argollas y las plumas. Cortamos por todo el borde de la cápsula y pegar con la pistola de silicona caliente
👣22. With the Nespresso coffee capsules we will make the rings and the feathers. We cut around the edge of the capsule and glue with the hot glue gun.
- Parte trasera- Rear
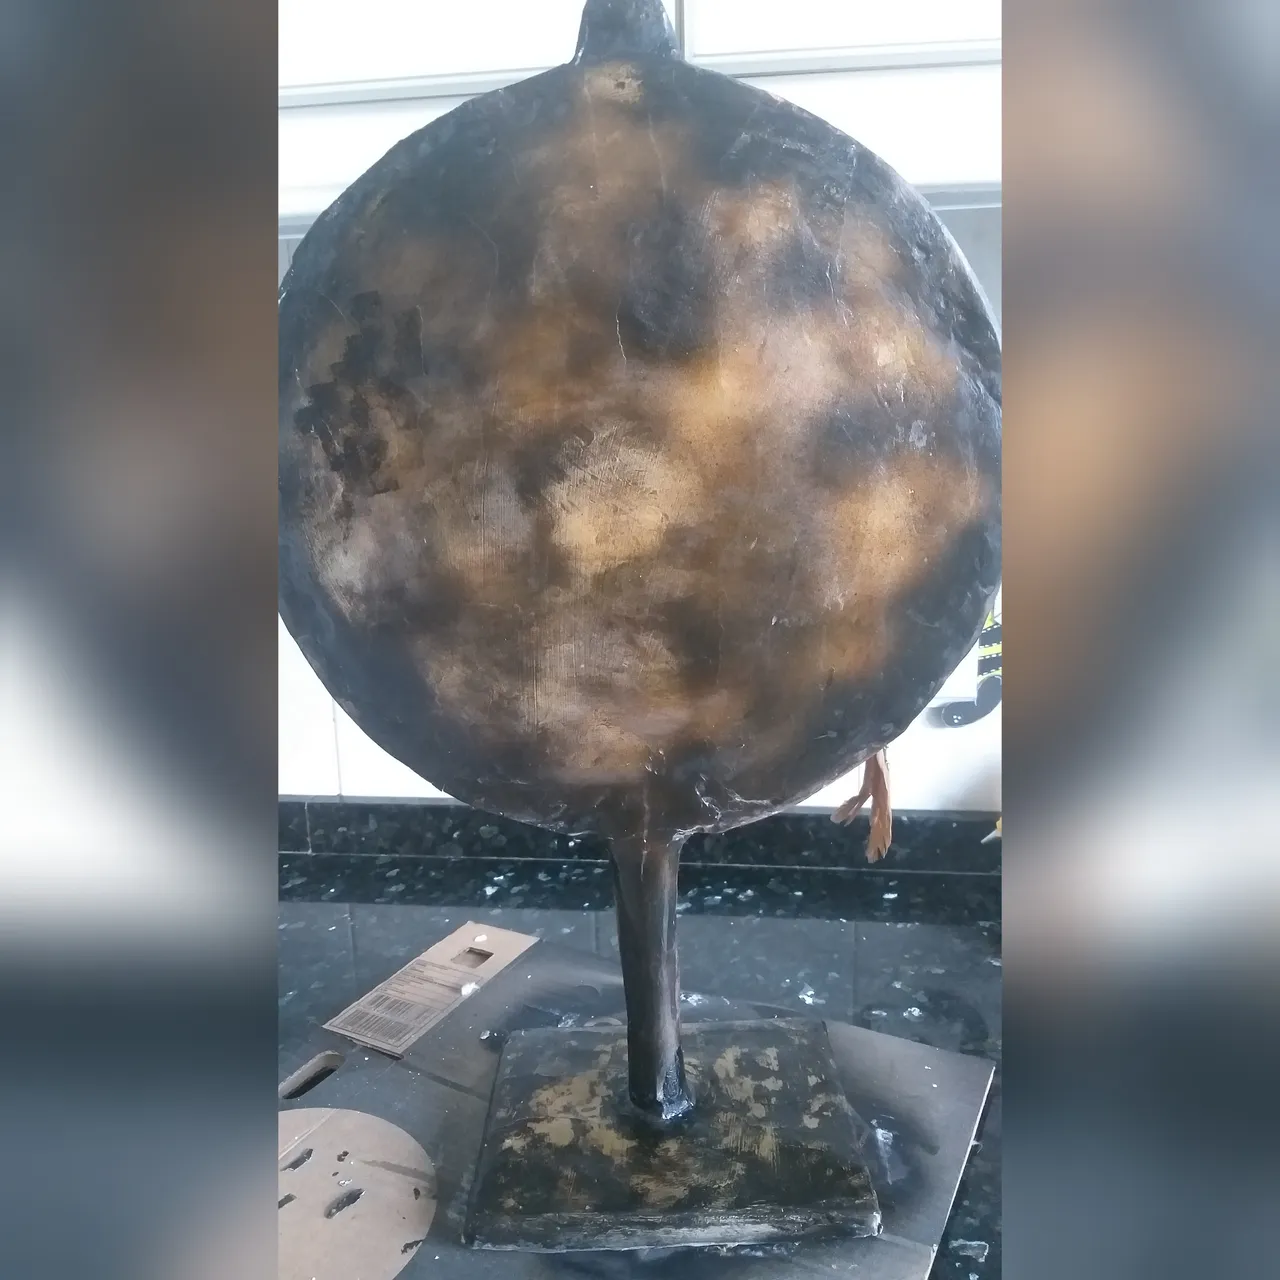
- Base- Base

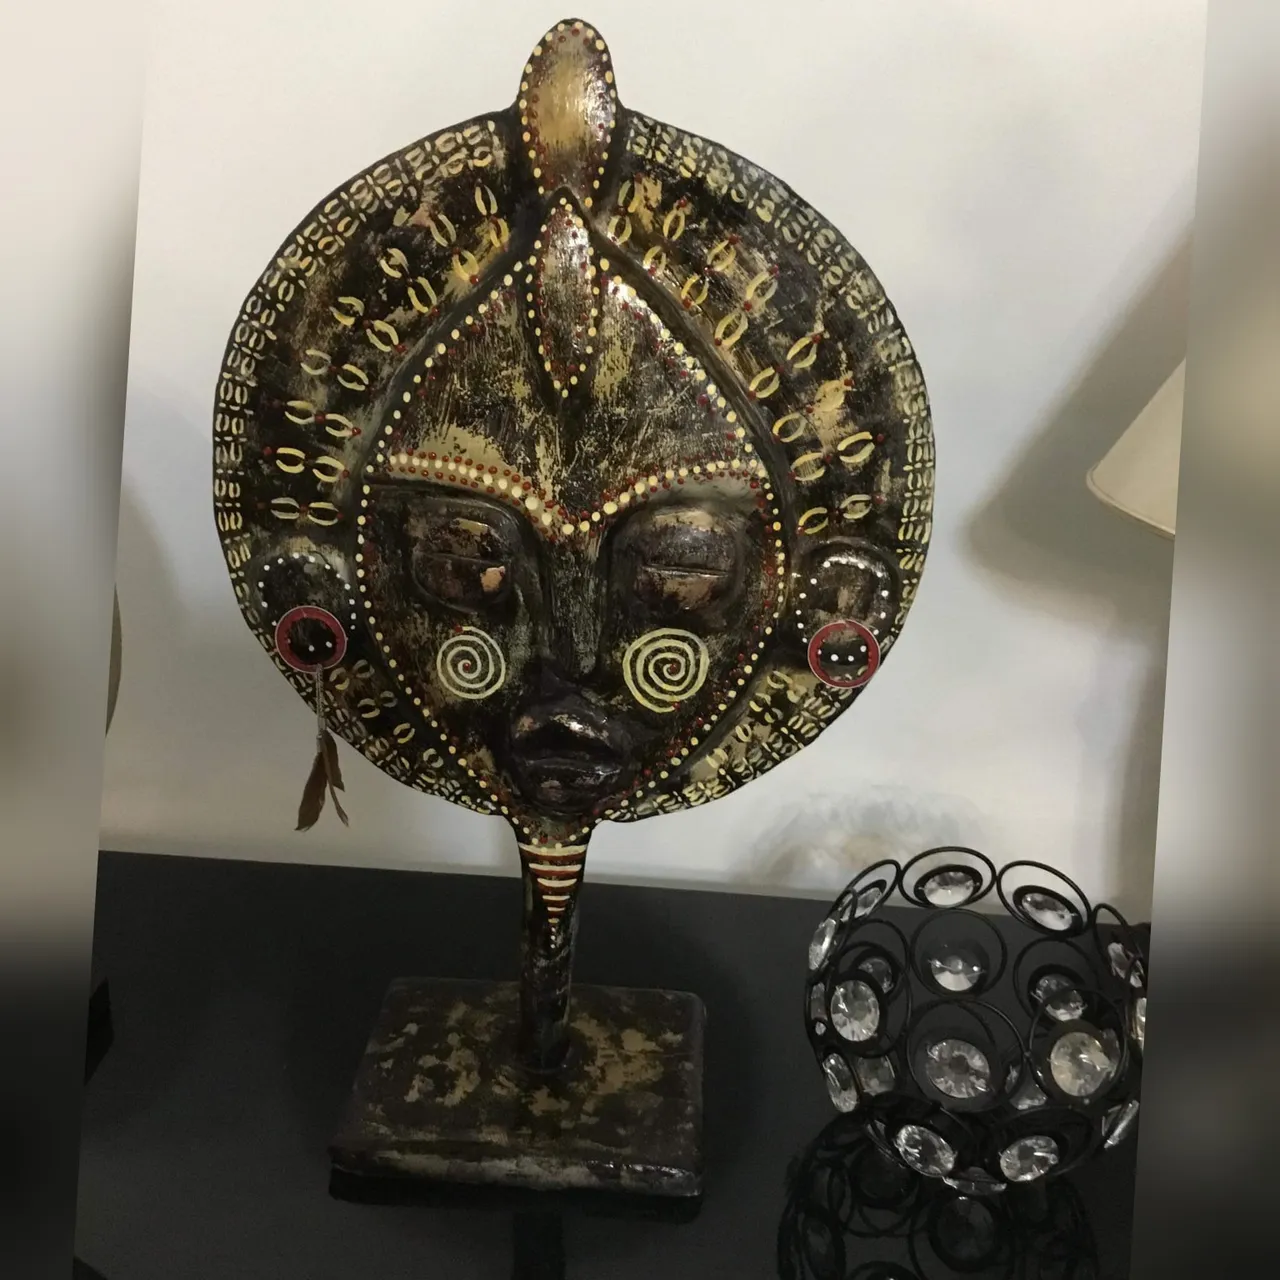
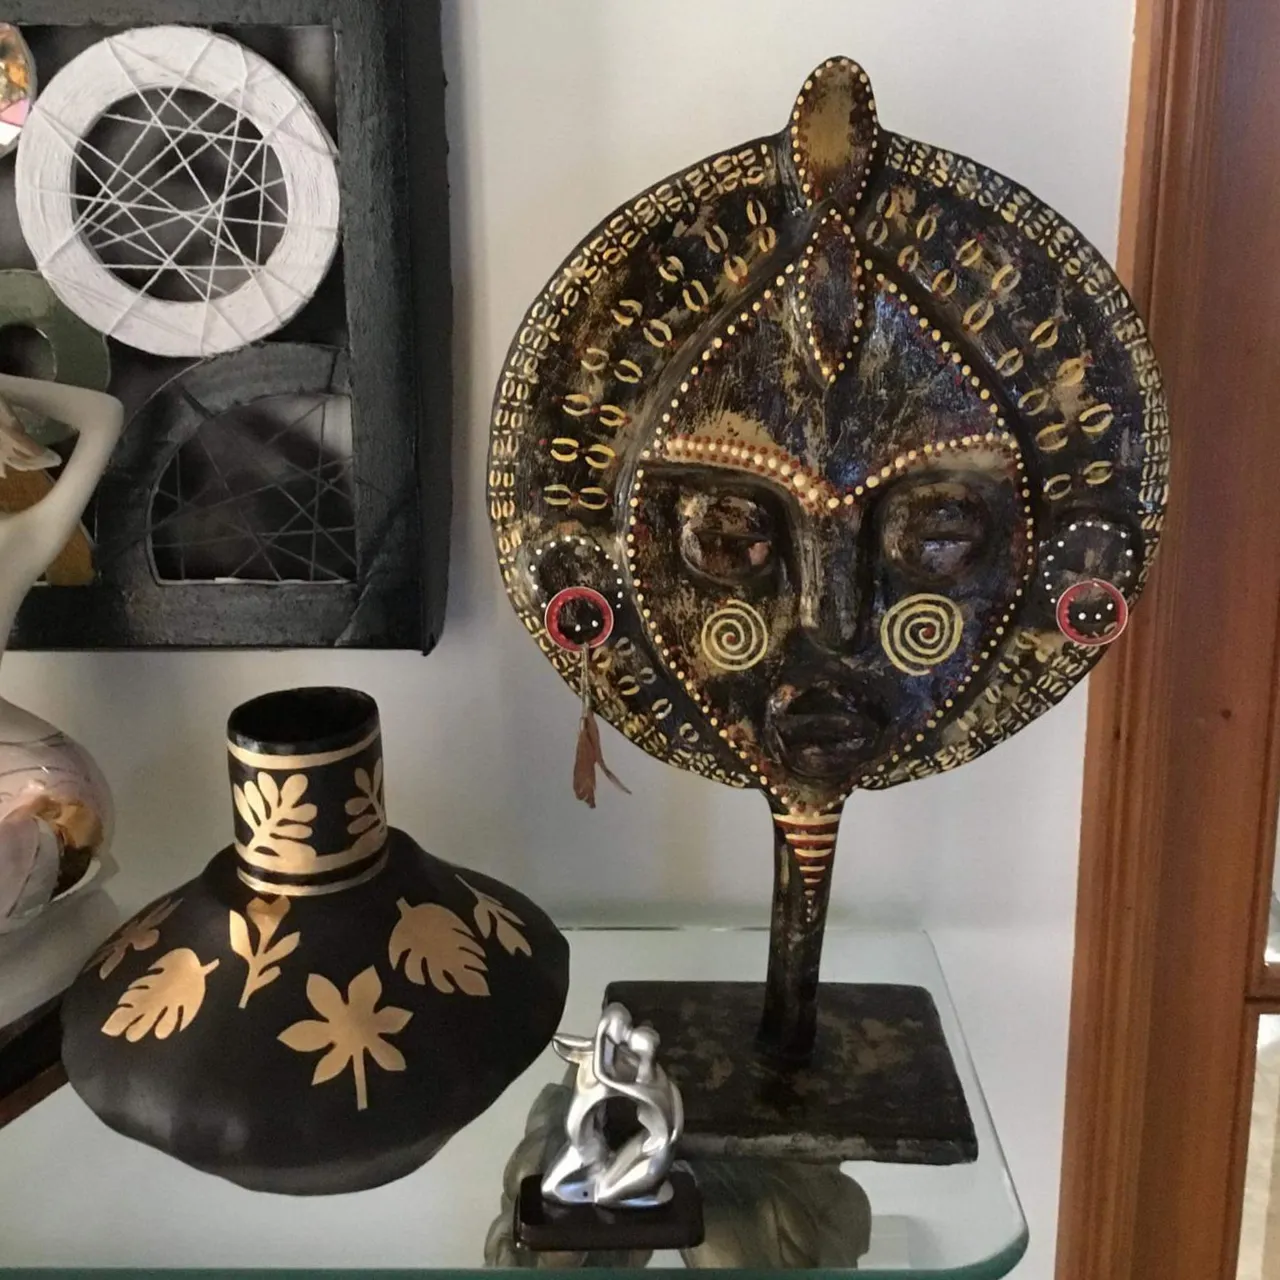
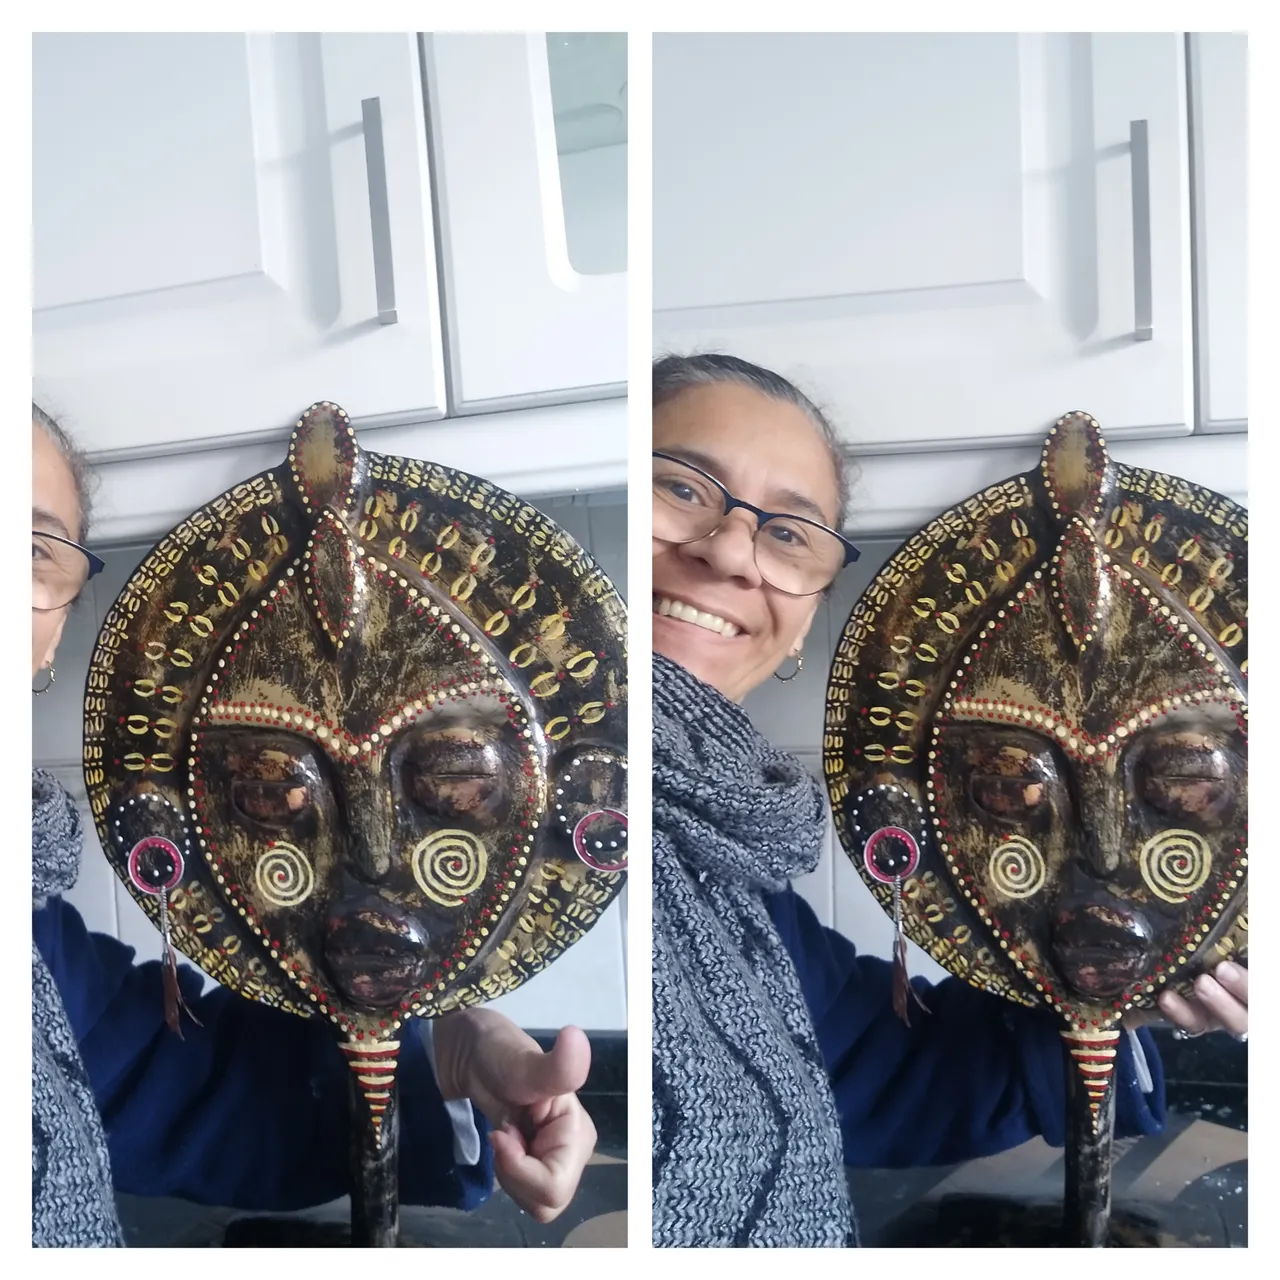
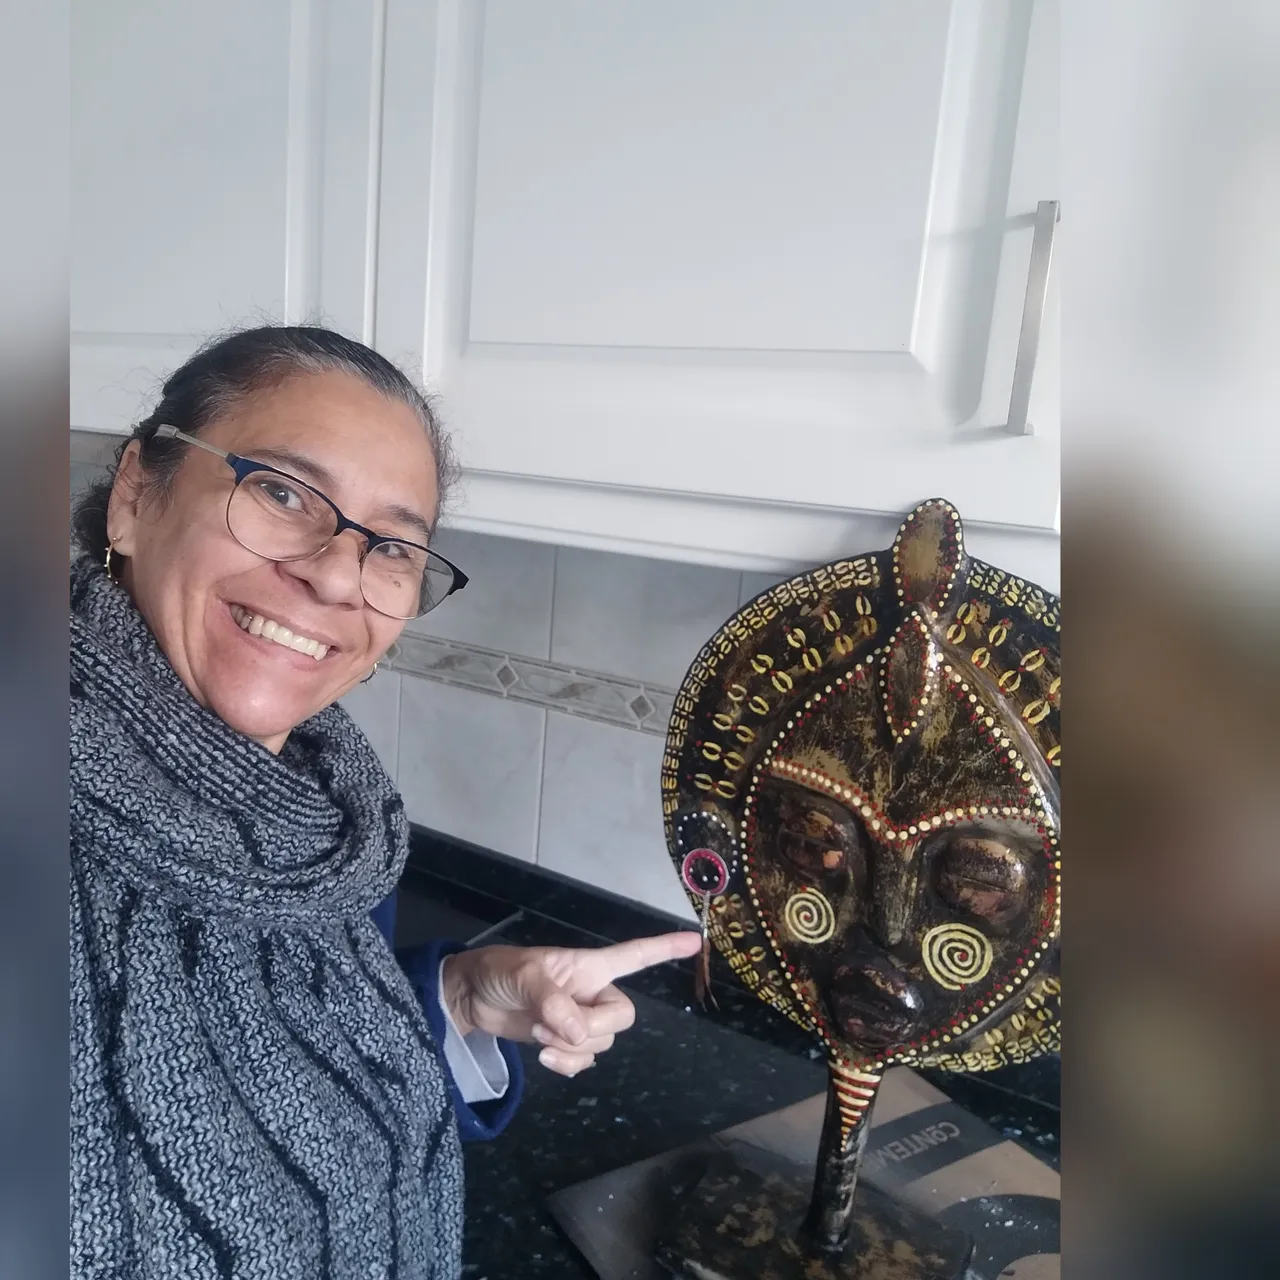
Resultado-Result
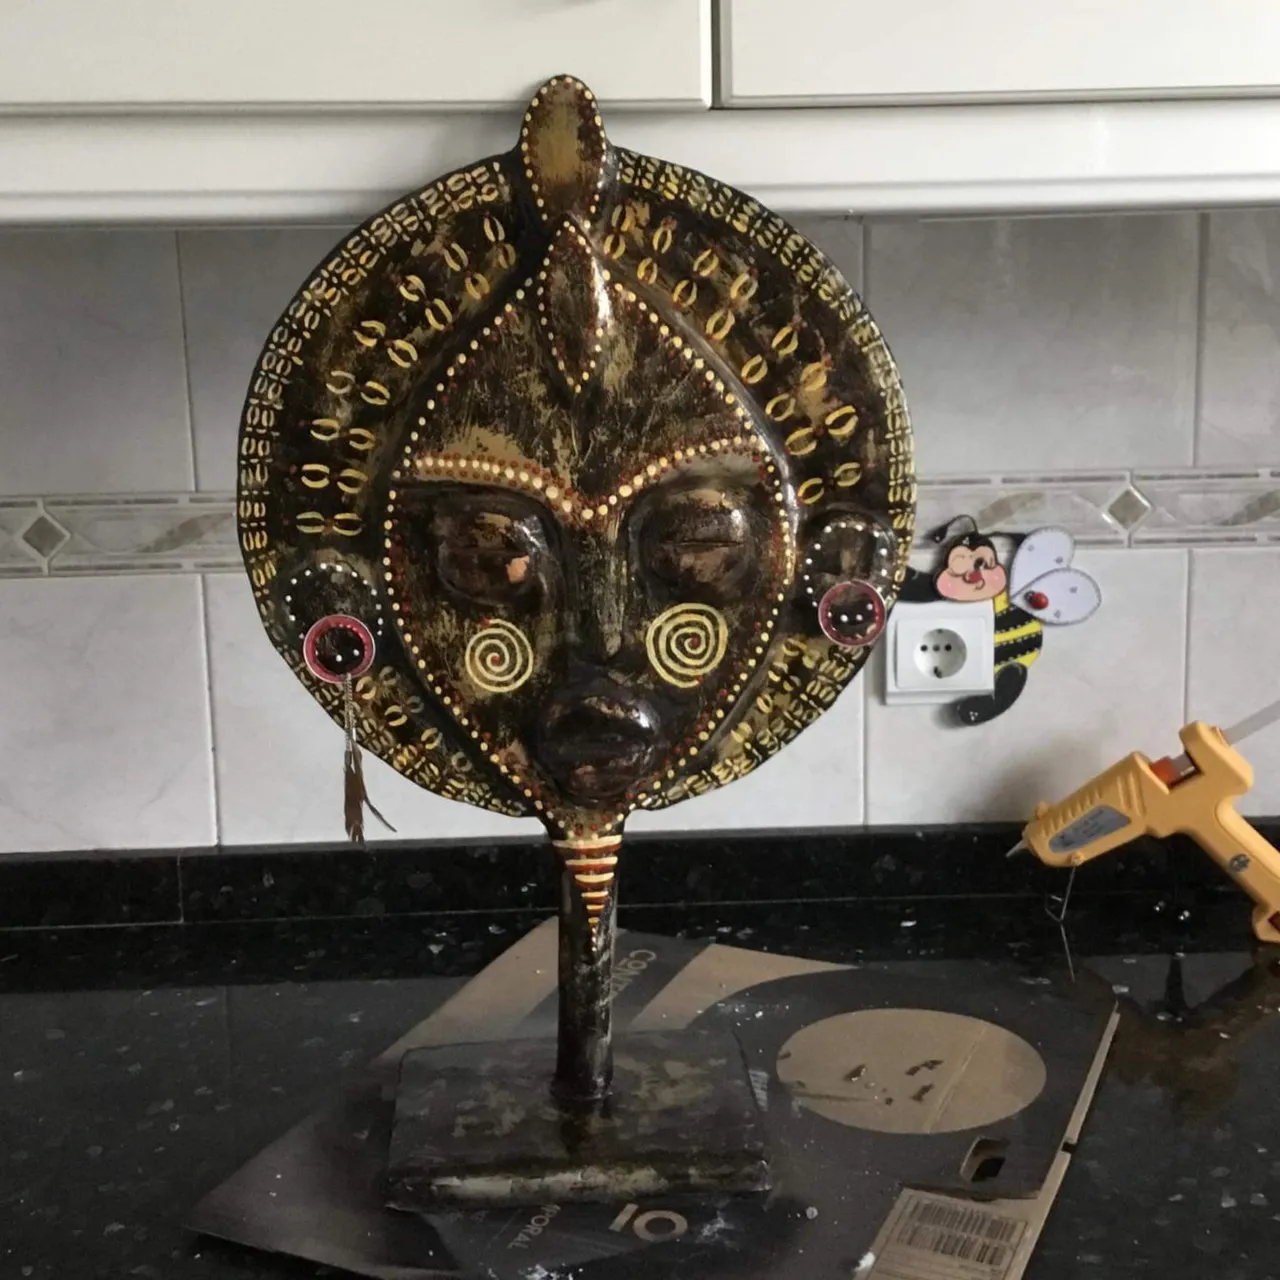
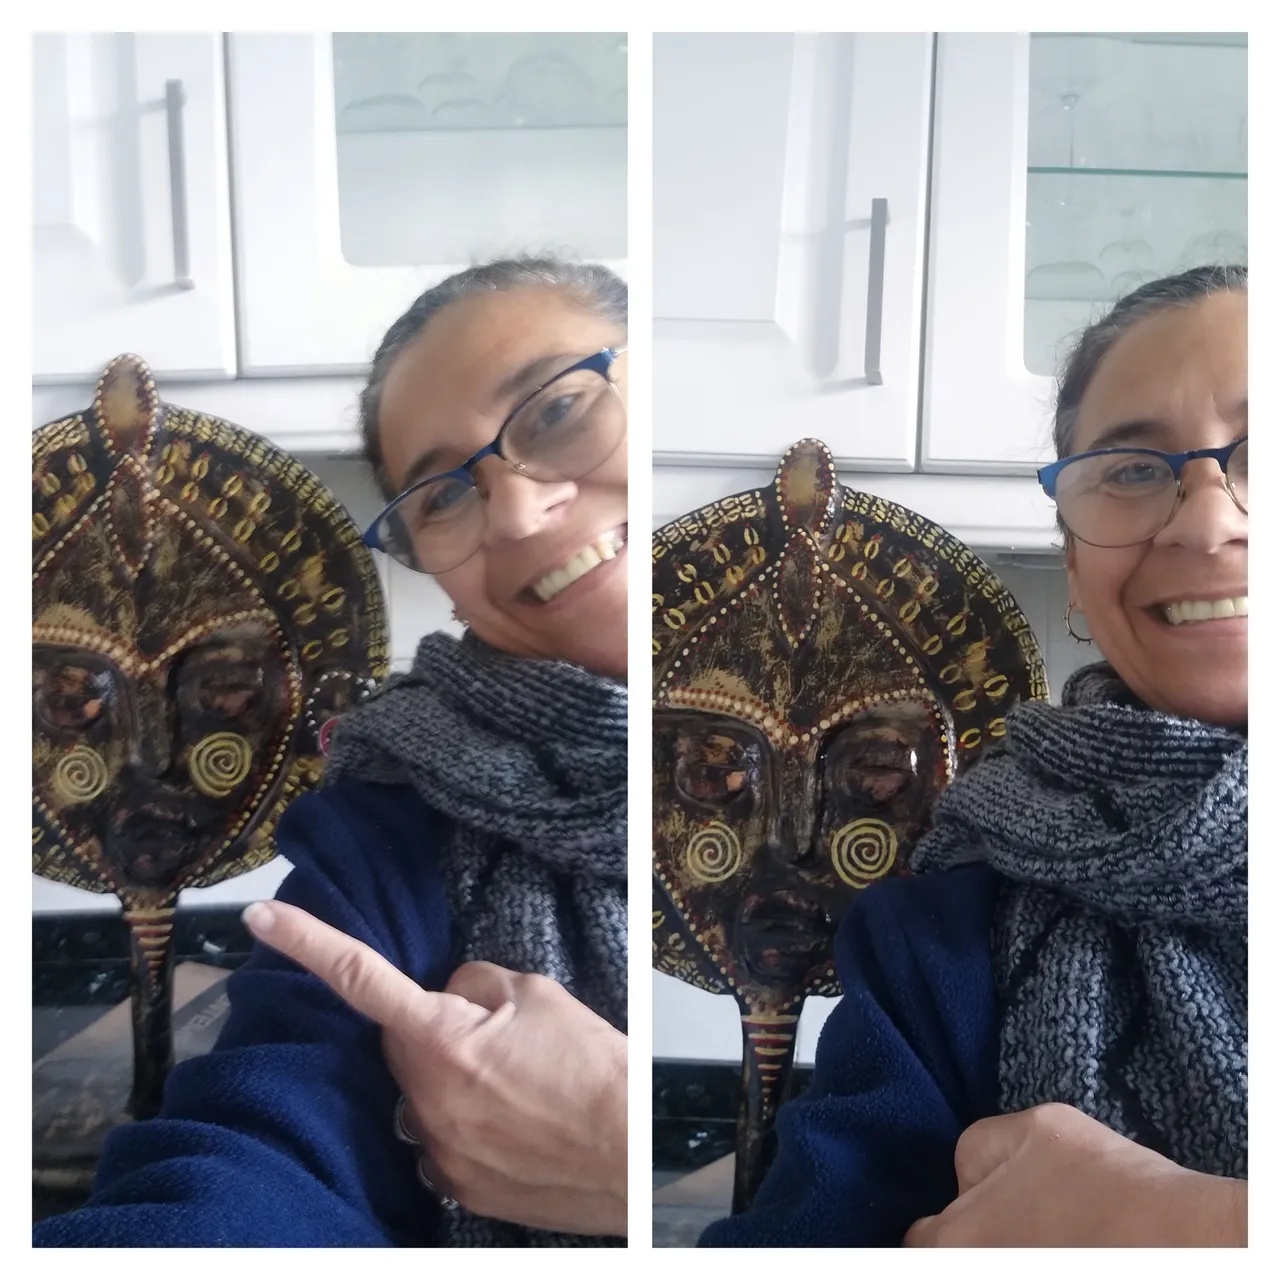
Vieron que hermoso quedó 💕 parece una escultura de madera y piedra ; espero que a ustedes le haya gustado y se atrevan a realizar, lo único es que deben tener paciencia porque hay que dejar secar varias veces la escultura. La idea de utilizar el onoto fue que los indígenas Venezolanos lo usaban para pintar y me dije porqué no hacer lo mismo y fue buen resultado😊😚. Muchas gracias a todos mis amigos que dejan sus lindos comentarios y me apoyan siempre y las diferentes comunidades de Hive 💕❤🥰. Mil bendiciones
You saw how beautiful it was 💕 it looks like a wood and stone sculpture; I hope you liked it and dare to do it, the only thing is that you must be patient because you have to let the sculpture dry several times. The idea of using the onoto was that the Venezuelan indigenous people used it to paint and I told myself why not do the same and it was a good result😊😚. Thank you very much to all my friends who leave their nice comments and always support me and the different Hive communities 💕❤ . A thousand blessings.
Las fotos son de mi propiedad tomadas con mi teléfono móvil Samsung Galaxy A6 y organizadas por la aplicación GridArt.
The photos are my property taken with my Samsung Galaxy A6 mobile phone and organized by the GridArt application.
@zullyarte❤GRACIAS- THANK