Como pasa el tiempo y para esta fecha yo estaba full con las carpetas de graduacion de todos los alumnos de 5to año del liceo donde estudio mi hijo @vicent21, que para mi gue un gran placer hacerlas, fue como mi regalo a los alumnos y aporte a la graduacion, claro el material se compro con la colaboracion de los padres y representantes, que tampoco fue tan facil, ya que como siempre hay algunos padres que se tardan o se hacen los olvidados.
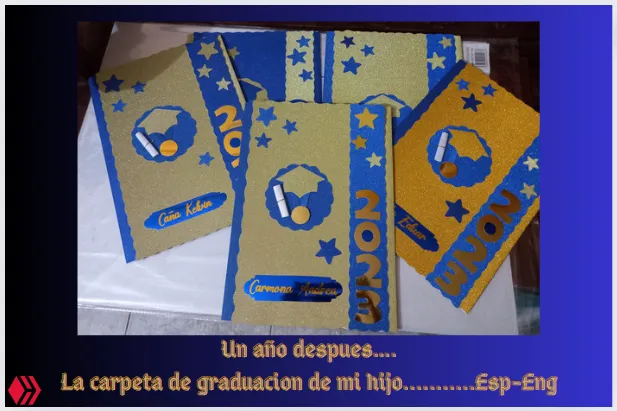
Empece por la seccion de mi hijo que fueron 33 alumnos y en total fueron 124 alumnos, 124 carpetas, ufffff, pero ya antes habia hecho esto y mas.
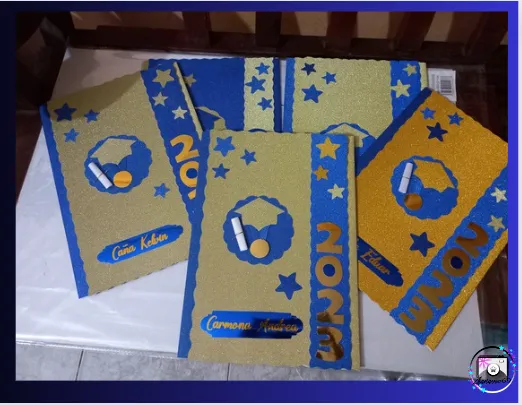
Como eran unos jovenes, busque un modelo no tan infantil y los colores eran dorado y azul rey para la decoracion y asi hice las carpetas.
Materiales:
-Cartulina microescarchada dorada y azul rey.
-Cartulina tipo espejo dorada y azul rey.
-Carpetas marrones tipo oficio.
-Pliego de papel blanco tornasol o nacarado.
-Paquete de barras de silicon.
-Papel autoadhesivo, para las calcomanias.
-Clips.
-Lapiz, reglas, tijeras, pistola de silicon,
Paso a Paso:
1.- Tomar las medidas en una de las carpetas de como iban hacer, si la idea era forrar la carpeta, con las cartulinas para que quedara mas fuerte.
2.- Unas irian de fondo dorado con las decoraciones en azul y las otras lo contrario.

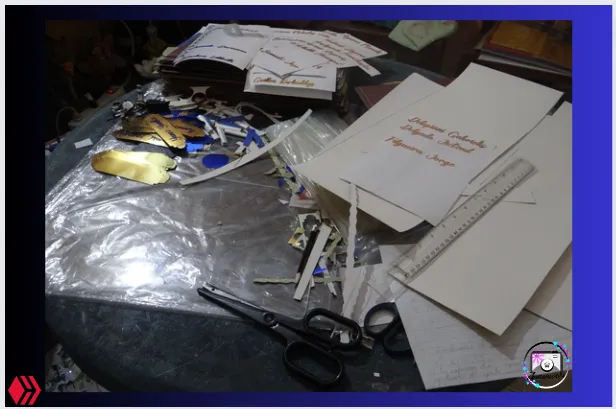
3.- Ya listas las medidas, empece a marcar en cada cartulina, las piezas, tratando siempre de ahorrar material, que con los recortes se hizo las estrellas, los birretes, medallas, se aprovecho al maximo.
4.- Iba preparando el material porque asi trabajaria por lotes, me busque a una representante tambien que me ayudara a recortar, no todos saben el recortar en manualidades tiene su arte y su ciencia.
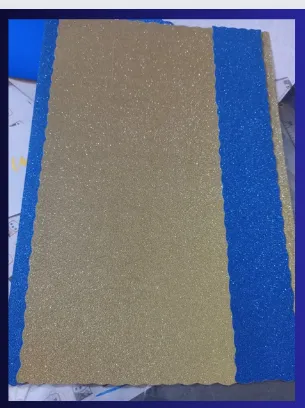
5.- Empece a forrar las carpetas, ejemplo las doradas con azules, primero en la parte de atras toda iba en dorado y al frente una parte y en el borde donde abre la carpeta en azul.
6.- En el lomo de la carpeta tambien iba del mismo color de la orilla donde abre la carpeta.
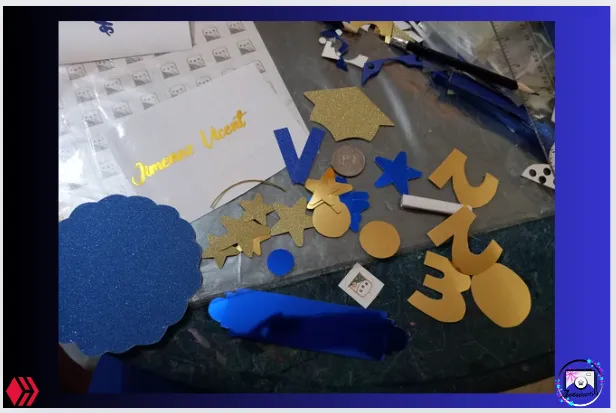
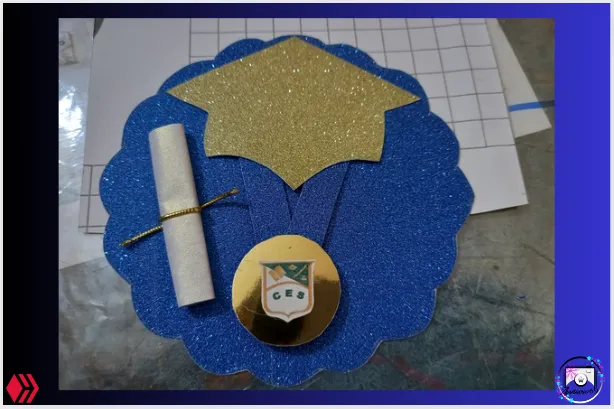
7.- En el centro de la carpeta o un poco mas arriba, peque como un circulo con bordes, en el mismo iria el birrete, con la medalla y el diploma, lo mas cuchi en la medalla pegue la calcomania, con el logo del liceo.
8.- Tambien hacia una esquina arriba unas estrellas y debajo del circulo otras.
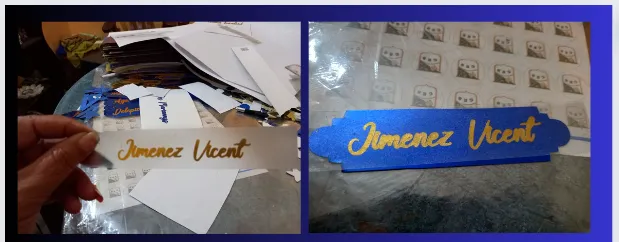
9.- Debajo el nombre que fueron mandados a hacer en vinil textil, los pegue como sobre una plaquita esta era azul y el nombre en dorado.
10.- En el borde derecho otras estrellas arriba y hacia abajo unos numeros que eran el año de la graduacion 2023.
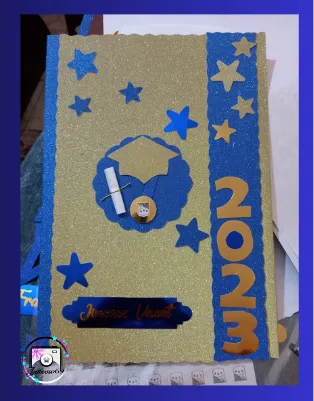
11.- Por ultimo y con cuidado en la parte de atras entre la cartulina y carpeta, hice con unas aberturas para meter los clips, para sujetar los papeles que irian adentro, para evitar que ese dia, se cayera algun documento.
12.- Y ya terminada esta carpeta, luego las demas en los colores inversos.
Alguien me pregunto si yo cobre por hacerlas y le dije esa fue mi colaboracion, mi aporte a la graduacion asi como otra representante hizo las tarjetas, otra hizo las estolas y no cobramos, porque era para la graduacion de nuestros hijos, si fuera para otro liceo, ahi si cobraria.
Cuando ya las tuve listas todas las lleve al liceo, como pesaban, pero no importaba, porque lo hice con amor.
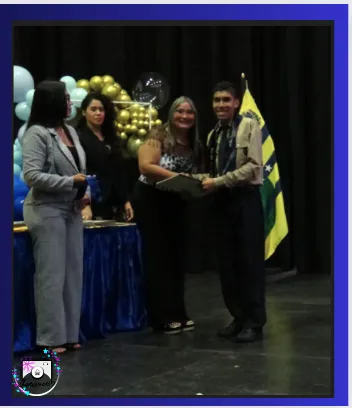
El mejor regalo para mi fue las caras alegres de esos bachilleres recibiendo su medalla y carpeta, como sus padres dandome las gracias por tan bonito trabajo.
Menos mal que guarde las fotos, porque en esos dias despues del acto no hice el post porque estaba agotada, ya habia pasado el furor de las graduaciones y dije ah la dejo para el año que viene, que ya llego que rapido paso el tiempo.
Cada foto del proceso las iba tomando con mi camara Sony y otras con mi celular Samsung Galaxy A12.
Contenido original.
Traducion con la app DeepL.
La traduccion con la app DeepL.

As time goes by and for this date I was full with the graduation folders of all the 5th year students of the high school where my son @vicent21 studied, which for me was a great pleasure to make them, it was like my gift to the students and contribution to the graduation, of course the material was purchased with the collaboration of parents and representatives, which was not so easy, because as always there are some parents who are late or are forgotten.
I started with my son's section, there were 33 students and in total there were 124 students, 124 folders, ufffff, but I had already done this and more.
As they were young, I looked for a not so childish model and the colors were gold and royal blue for the decoration and so I made the folders.
Materials:
-Gold and royal blue microfrosted cardboard.
-Mirror type cardboard gold and royal blue.
-Brown office type folders.
-Sheet of white litmus or pearlescent paper.
-Packet of silicon sticks.
- Self-adhesive paper for the stickers.
-Paper clips.
-Pencil, rulers, scissors, silicone gun,
Step by step:
1.- Take the measurements in one of the folders of how they were going to do, if the idea was to line the folder, with the cardboard so that it would be stronger.
2.- Some of them would have a golden background with the decorations in blue and the others the opposite.
3.-Once the measurements were ready, I began to mark on each cardboard, the pieces, always trying to save material, with the cuttings I made the stars, the birettas, medals, it was used to the maximum.
4.-I was preparing the material because this way I would work in batches, I also looked for a representative to help me to cut, not everyone knows that cutting in crafts has its art and science.
5 .- I started to line the folders, for example the gold with blue, first in the back all was in gold and the front part and the edge where the folder opens in blue.
6.- The spine of the folder was also in the same color as the edge where the folder opens.
7.- In the center of the folder or a little above, small as a circle with borders, in the same would go the biretta, with the medal and diploma, the most cuchi in the medal paste the sticker with the logo of the liceo.
8.- Also towards the top corner some stars and below the circle some others.
9.- Below the name that were sent to do in textile vinyl, I glued them as on a small plate this was blue and the name in gold.
10.- On the right edge other stars above and down some numbers that were the year of graduation 2023.
11.- Finally and carefully in the back between the cardboard and folder, I made some openings to put the clips, to hold the papers that would go inside, to prevent that day, any document would fall.
12 .- And now finished this folder, then the others in the reverse colors.
Someone asked me if I charged for making them and I told him that was my collaboration, my contribution to the graduation as well as another representative made the cards, another made the stoles and we did not charge, because it was for the graduation of our children, if it was for another school, there if I would charge.
When I had them all ready I took them to the high school, as they were heavy, but it didn't matter, because I did it with love.
The best gift for me was the happy faces of those high school graduates receiving their medal and folder, as well as their parents thanking me for such a beautiful job.
Thank goodness I kept the photos, because in those days after the ceremony I didn't do the post because I was exhausted, I had already passed the furor of the graduations and I said ah I'll leave it for next year, it's coming, how fast the time passed.
Each photo of the process I was taking with my Sony camera and others with my Samsung Galaxy A12 cell phone.
Original content.
Translation with the app DeepL.
Translation with the app DeepL.
