Saludos a todos Hivers, deseo que estén muy bien. Nuestra Comunidad Hive Diy, como cada semana nos invita a la participación en un Concurso, esto nos permite interactuar, conocer a otras personas, proyectarnos, aprender de los demás y elevar la calidad de nuestras publicaciones. Esta semana se trata de el DIY de un Diorama de Plastilina, moderado por nuestro compañero @gaboamc2393 quien tiene grandes habilidades y ha sido fuente de inspiración a través de sus publicaciones.
Greetings to all Hivers, I wish you are very well. Our Hive Diy Community, like every week, invites us to participate in a Contest, this allows us to interact, meet other people, project ourselves, learn from others and raise the quality of our publications. This week is about the DIY of a Plasticine Diorama, moderated by our colleague @gaboamc2393 who has great skills and has been a source of inspiration through his posts
El término Diorama no lo conocía, sin embargo la Publicación de Invitación al Concurso fue bastante clara y despertó inmediatamente mi curiosidad, ya que como madre ciertamente he apoyado a mis hijos con actividades que involucraban el arte del modelado con elementos como la plastilina, pero nunca lo había puesto en práctica para un proyecto personal. Recuerdo haber leído post de concurso y luego ir a contarle a @gardenkaiser quien es mi hijo, para que se hiciera también de la invitación, ya que tiene mucho interés en esta comunidad y le dije que era una gran oportunidad para comenzar en ella.
I did not know the term Diorama, however the Contest Invitation Publication was quite clear and immediately aroused my curiosity, since as a mother I have certainly supported my children with activities that involved the art of modeling with elements such as plasticine, but never I had put it into practice for a personal project. I remember reading the contest post and then going to tell @gardenkaiser who my son is so that he could also get the invitation, since he is very interested in this community and I told him that it was a great opportunity to start in it.
Plastilina / Clay
Trozo de anime / Anime snippet
Pega Blanca / White glue
Pintura al frio verde / Green cold paint
Alambre 1metro aproximadamente / Wire approximately 1 meter
Cinta de floristería / Florist tape
Pincel / Brush
Regla de metal / Metal ruler
Cuchillo / Knife
Pinza de corte / Cutting clamp*
Alfileres de latón / Brass pins
Limpiapipas / Pipe cleaners
Musgo para nacimientos o pesebres / Moss for births or cribs
Estufa para calentar el cuchillo / Stove to heat the knife
Trozo de estambre / Piece of yarn
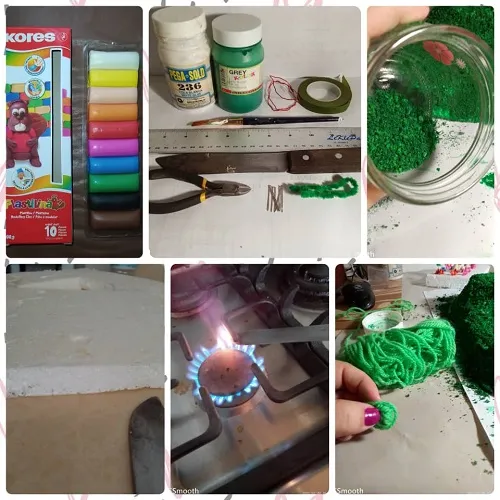
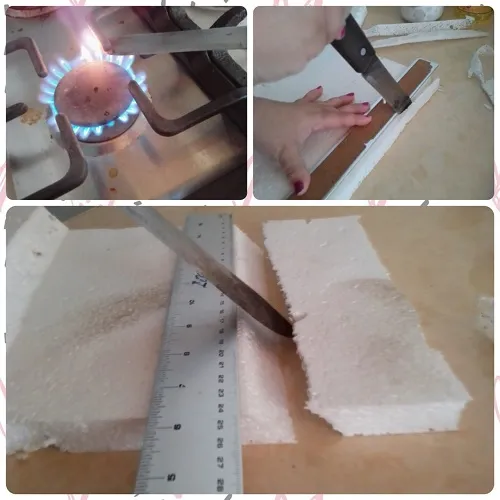
Paso 1: Mi base de anime mide aproximadamente 25cms por 20cms, Calenté la punta de un cuchillo en la estufa y corté los bordes del anime en forma diagonal. Usar el cuchillo caliente es un poco de cuidado, pero me gusta porque deja un borde bastante prolijo, no hay pelotitas de anime saltando por todos lados y eso me gusta, y también se corta como mantequilla, muy fácil, pero hay que tener cuidado de quemarse. Lo ideal sería un cortador de anime, pero no dispongo de eso en este momento. También corté otro trozo de anime de 6cms por 20 cms y lo coloqué en la parte de arriba, ya que quería hacer como un especie de montañita, ya que quería que se apreciase bien el diseño tridimensional de la base, además de aportarle interés.
Step 1: anime base is approximately 25cms by 20cms, I heated the tip of a knife on the stove and cut the edges of the anime diagonally. Using the hot knife is a bit careful but I like it because it leaves a pretty neat edge, there are no little anime balls jumping everywhere and I like that and it also cuts like butter very easy but you have to be careful to burn. An anime cutter would be ideal, but I don't have that at the moment. I also cut another 6cm by 20cm piece of anime and placed it on top, since I wanted to make it look like a kind of mountain, since I wanted the three-dimensional design of the base to be well appreciated, as well as adding interest.
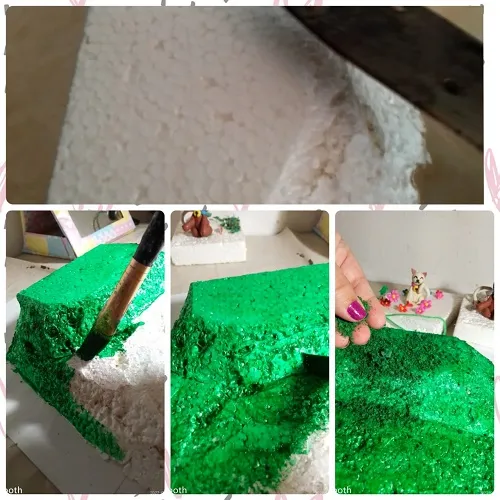
Paso 2: Con el mismo cuchillo caliente, lo fui pasando por la superficie del anime para darle algo de irregularidad a lo que sería la grama o jardín donde se desarrolla la escena del diorama. Luego lo pinté con pintura al frio de color verde, dejé secar bien y luego le apliqué pega blanca, para ir pegando el musgo que tenía guardado. Se trata del musgo que usamos para hacer los nacimientos, tenía suficiente y lo quise usar porque me gusta mucho el color que le aporta y la textura, que por cierto era un requisito que debía tener el diorama, textura. Así que me pareció perfecto... Como dicen las abuelas, el que guarda siempre tiene... Me fue bien guardar ese musgo. Y listo, ya la base está completa.
Step 2: With the same hot knife, I went through the surface of the anime to give some irregularity to what would be the grass or garden where the diorama scene takes place. Then I painted it with green cold paint, let it dry well and then I applied white glue, to stick the moss that I had saved. It is the moss that we use to make the nativity scenes, I had enough and I wanted to use it because I really like the color it gives it and the texture, which by the way was a requirement that the diorama had to have, texture. So it seemed perfect to me... As the grandmothers say, the one who keeps always has... It was good for me to keep that moss. And voila, the base is complete.
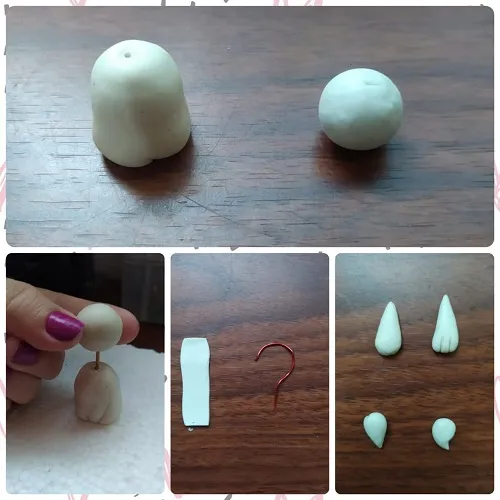
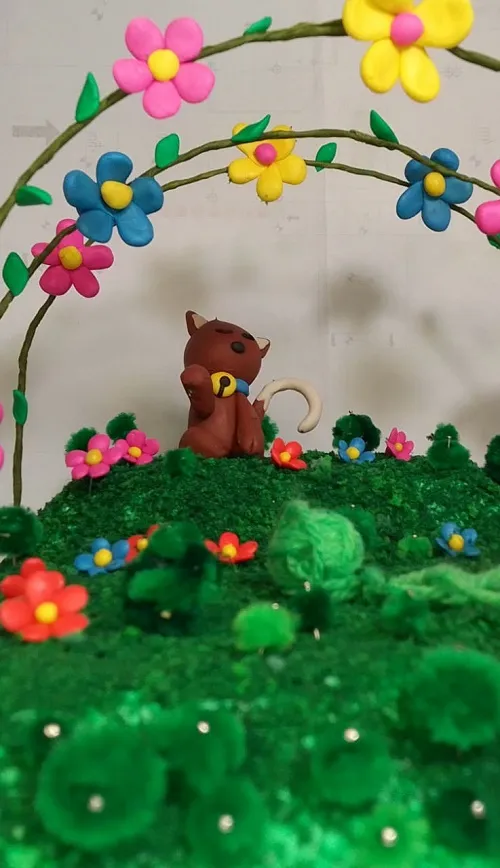
Paso 1 El cuerpo: Realmente los gatos fue lo que hice primero, hace un par de días que los había hecho, porque fue lo que más me costó, tenía en mente hacerlos mas real, pero mi creatividad decía una cosa y mi habilidades decían otras, así que decidí hacerlos con forma mas infantil pero me parecen lindos. Hice dos bolitas de plastilina, una para el cuerpo y otra para la cabeza, y las fijé con alfileres de latón en un trozo de anime para ir modelándolos ahí. Luego, hice la cola con un trocito de alambre para darle la forma curva y luego lo forré con plastilina. Las patas con bolitas de plastilina que luego di forma de gota y aplané, y marqué las deditos.
Step 1 The body: Actually the cats were what I did first, a couple of days ago I had done them, because it was what cost me the most, I had in mind to make them more real, but my creativity said one thing and my skills said another. , so I decided to make them in a more childish way but they seem cute. I made two balls of plasticine, one for the body and one for the head, and fixed them with brass pins on a piece of anime to model them there. Then, I made the tail with a piece of wire to give it a curved shape and then I covered it with plasticine. The legs with plasticine balls that I later shaped into drops and flattened, and marked the little fingers.
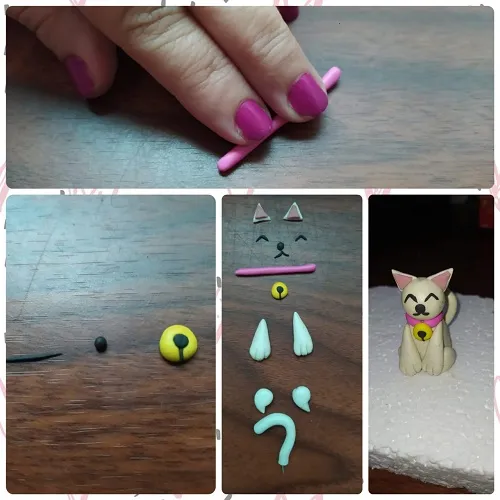
Paso 2 Los detalles del Gato: Con muy poquita plastilina, y esto fue lo mas difícil para mí, fui haciendo la carita del gato, un collar, un broche y las orejas. Luego lo pegué al cuerpo. Me gustó bastante el resultado, hice los dos gatos de la misma forma.
Step 2 The details of the Cat: With very little plasticine, and this was the most difficult for me, I made the cat's face, a necklace, a brooch and the ears. Then I glued it to the body. I quite liked the result, I made the two cats in the same way.
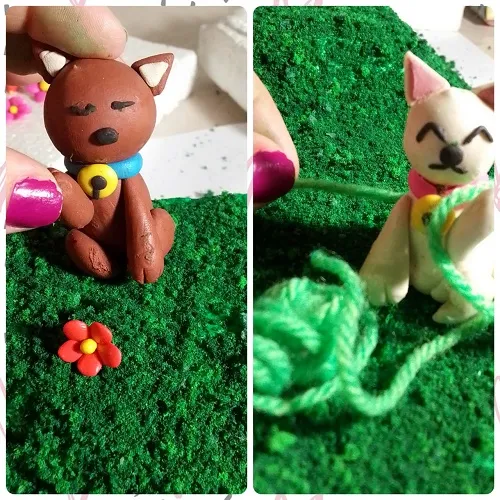
Paso 3 Ubicar a los gatos: Ya listos los gatos los ubiqué en la maqueta, el jardín del diorama, uno arriba en la montaña a la izquierda, y el otro abajo a la derecha. Le quise dar un poco de movimiento a los brazos o patas y luego se las moví. Al gato blanco le hice una pelota de estambre, ya que como saben los gatos son muy juguetones y curiosos, así que le hice una bola de estambre y se la crucé por el cuerpo y levanté su pata para que se viera como si jugaba con ella.
Paso 3 Ubicar a los gatos: Ya listos los gatos los ubiqué en la maqueta, el jardín del diorama, uno arriba en la montaña a la izquierda, y el otro abajo a la derecha. Le quise dar un poco de movimiento a los brazos o patas y luego se las moví. Al gato blanco le hice una pelota de estambre, ya que como saben los gatos son muy juguetones y curiosos, así que le hice una bola de estambre y se la crucé por el cuerpo y levanté su pata para que se viera como si jugaba con ella.
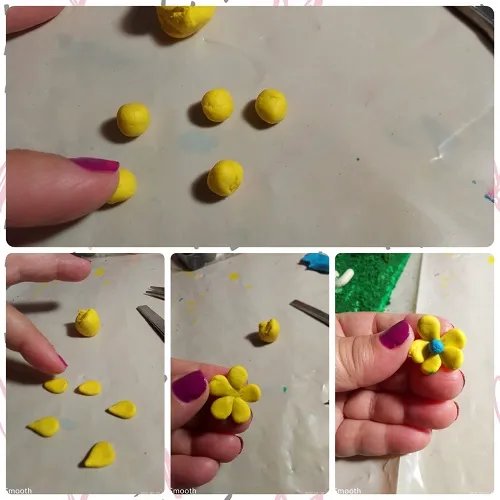
Las Flores las hice con 5 bolitas de plastilina, que luego di forma de gota y aplané un poco, luego las pegué una al lado de la otra ya que serían los pétalos. Luego con otra bolita de plastilina de otro color hice el centro. Básicamente hice dos tamaños de flores, unas mas pequeñas y otras mas grandes para la pérgola.
I made the Flowers with 5 balls of plasticine, which I then shaped into a drop and flattened a little, then I glued them one next to the other as they would be the petals. Then with another ball of plasticine of another color I made the center. Basically I made two sizes of flowers, some smaller and some larger for the pergola.

Los arbustos lo hice porque sentí que el jardín necesitaba mas interés. Con trocitos de limpiapipas, no sé con que nombre lo conozcan uds, pero siempre los he comprado con ese nombre, son unos alambritos que están forrados de pelitos. Yo tenía unos seis, los corté en pedacitos, les dí vueltas en un alfiler, así se forma como un pequeño arbusto que se fija fácilmente con el alfiler a la base de anime.
I did the bushes because I felt the garden needed more interest. With pieces of pipe cleaners, I don't know by what name you know them, but I've always bought them with that name, they are little wires that are lined with little hairs. I had about six, I cut them into little pieces, I turned them on a pin, so it forms like a small bush that is easily pinned to the anime base.
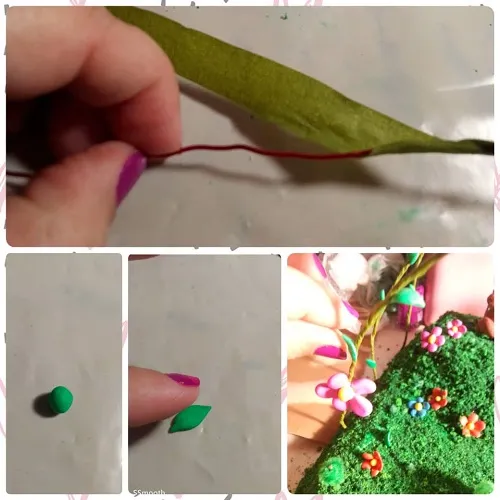
Las pérgolas las hice con trozos de alambre de 20cms aproximadamente, que forré en cinta de floristería, muy fácil no necesita pega ni nada. Luego hice una curva con ellos y los fijé en la base. Hice tres de estos, a los que fue decorando con las flores mas grandes, y además unas hojitas verdes que hice formando bolitas de plastilina, luego gotas y aplané, y al colocarlas en la pérgola les daba algo de curva para que diera como movimiento e interés, creo que estos pequeños detalles van sumando, aunque uno no los ve como importantes muchas veces.
I made the pergolas with pieces of wire of approximately 20cms, which I covered in florist's tape, very easy, you don't need glue or anything. Then I made a curve with them and fixed them on the base. I made three of these, which I decorated with the largest flowers, and also some green leaves that I made by forming little balls of plasticine, then drops and flattened them, and when I placed them on the pergola I gave them a little curve so that they would give movement and interest, I think these little details add up, although one does not see them as important many times.
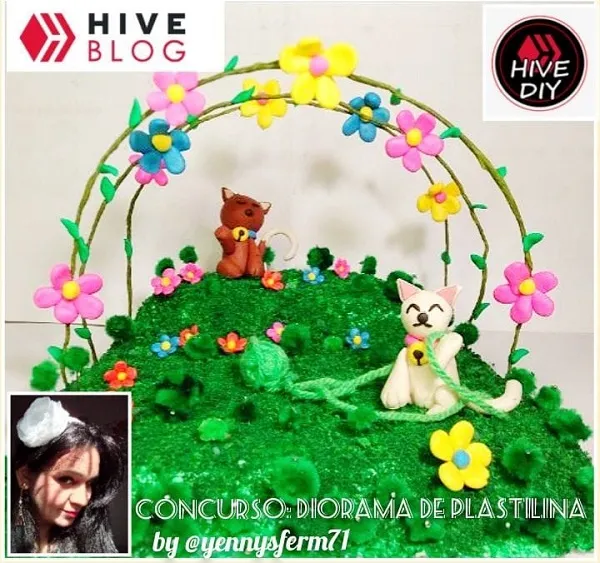
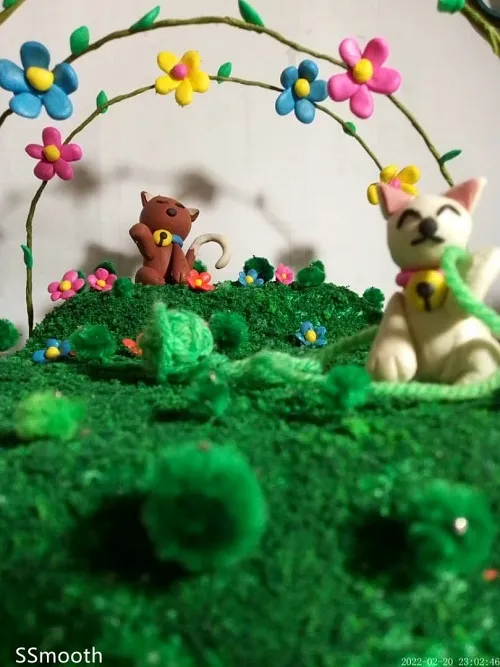
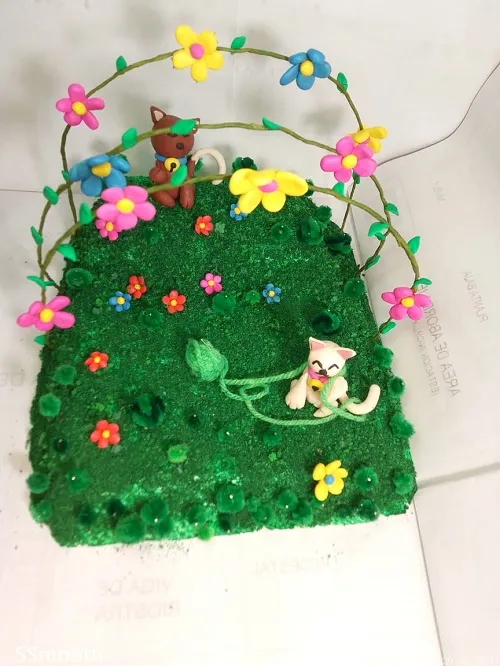
Ya mi Diorama de Plastilina inspirado en Gatos, está listo. A continuación les dejo unas fotos con diferentes perspectivas, donde se aprecian los elementos.
Now my Cat-inspired Plasticine Diorama is ready. Then I leave some photos with different perspectives, where you can see the elements.
Deseo que les guste, yo personalmente me sorprendí a mi misma haciendo y disfrutando este proyecto. Agradezco a nuestro moderador @gaboamc2393 por habernos invitado a conocer su arte, me resulta muy difícil. He visto sus obras y son hermosas y le extiendo mis respetos, porque además hacer personajes que transmiten una emoción, eso requiere de gran habilidad.
I hope you like it, I personally surprised myself doing and enjoying this project. I thank our moderator @ gaboamc2393 for inviting us to see his art, it is very difficult for me. I have seen his works and they are beautiful and I extend my respects to him, because in addition to making characters that transmit an emotion, that requires great skill.
Las fotos las tomé con mi teléfono Smooth 6.5
Los Collage con Photo Collage Maker
Usé Traductor GoogleLas fotos las tomé con mi teléfono Smooth 6.5
Los Collage con Photo Collage Maker
Usé Traductor Google