Without patterns or molds, I just make the circle of the size I want my vanity case and with a simple formula with PI (3,14) I calculate the EXACT size of the gusset.
Sin Patrones ni moldes solo hago el círculo del tamaño que quiero mi neceser y con una simple fórmula con PI (3,14) calculo la medida EXACTA del costado que lleva el cierre.
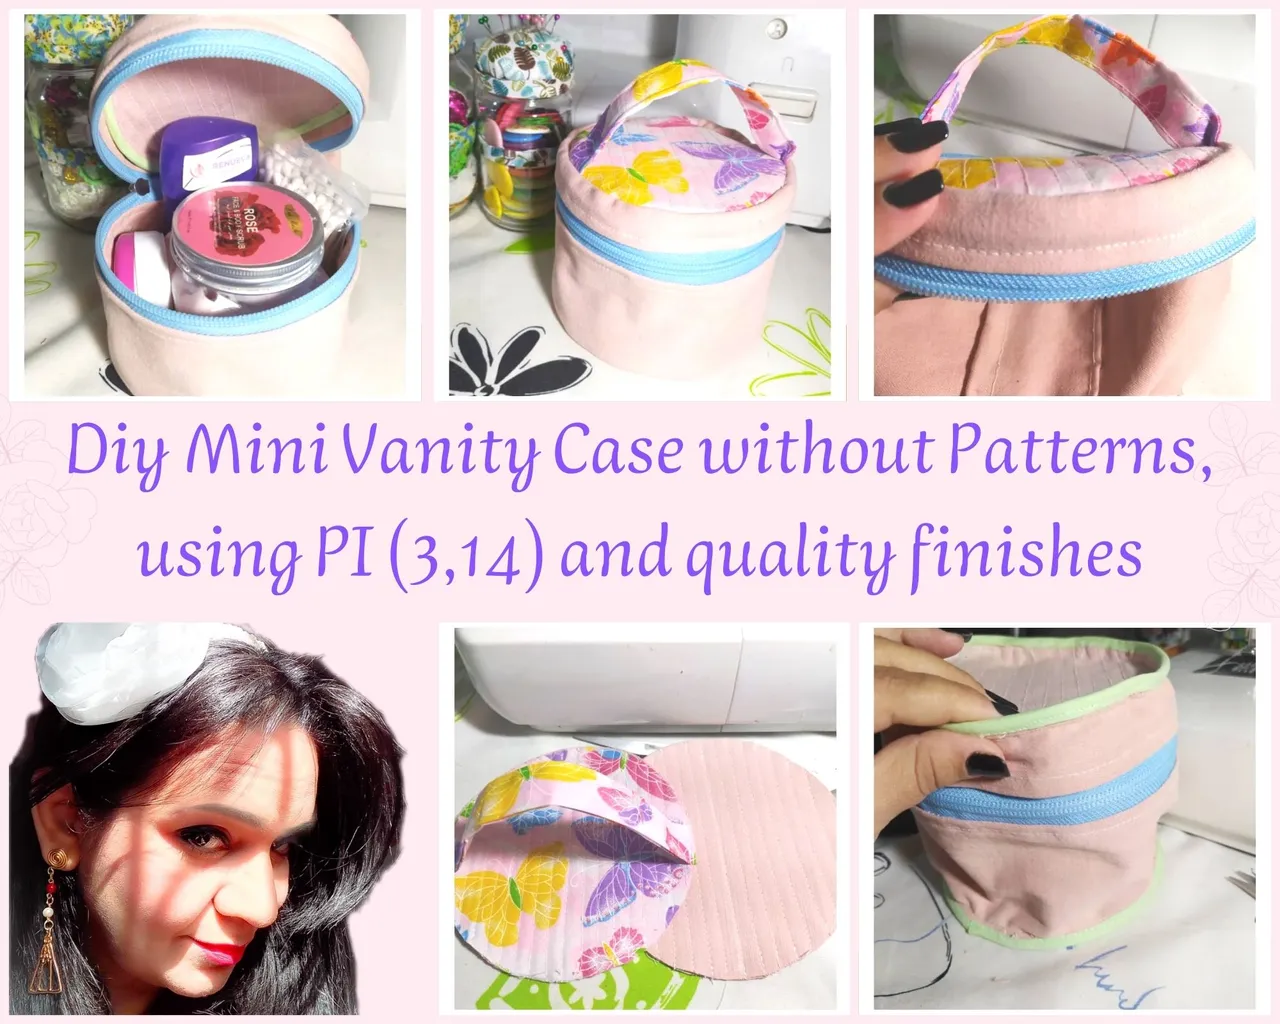
Greetings everyone ❤️❤️ I'm Yennys Fernandez content creator of Hive Blog mainly from Diy de Moda, Utility and Decoration. Today I bring you this Tutorial of a Mini Vanity Case, ideal for storing personal effects, personal hygiene, makeup, whatever you want .... You use very few materials, and with details of confection that add quality, you can show off when giving it as a gift to others.
Saludo a todos ❤️❤️ soy Yennys Fernández creadora de contenidos de Hive Blog fundamentalmente de Diy de Moda, Utilitarios y Decoración. Hoy les traigo este Tutorial de un Mini Neceser, ideal para guardar efectos personales, de higiene personal, maquillaje, lo que desees... Utilizas muy pocos materiales, y con detalles de confección que le agregan Calidad, podrás lucirte al obsequiarlo a otras personas.

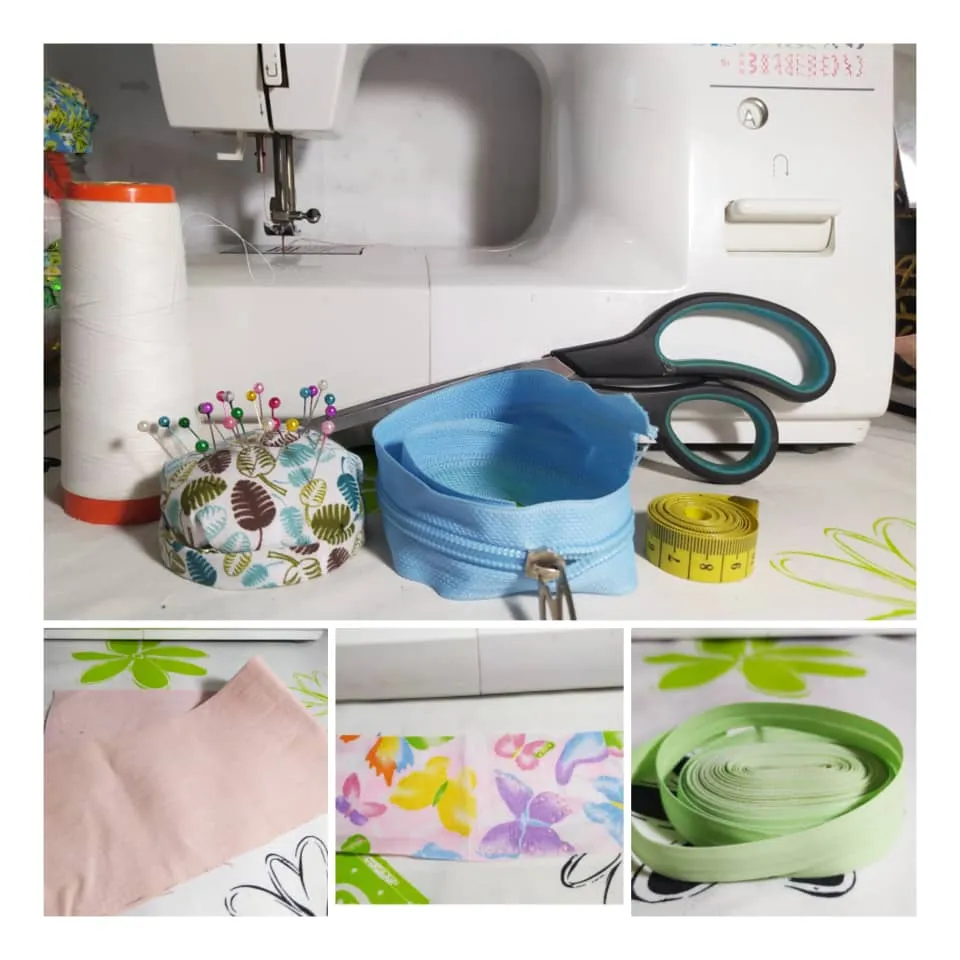
- Sewing machine
- Scissors - Pins - Measuring tape - Thread
- Fabric (I used recycled jean)
- Printed fabric
- Bias
- Slider zipper
- Máquina de coser
- Tijera - Alfileres - Cinta Métrica - Hilo
- Tela (Yo usé jean reciclado)
- Tela Estampada
- Sesgo
- Cierre con slider

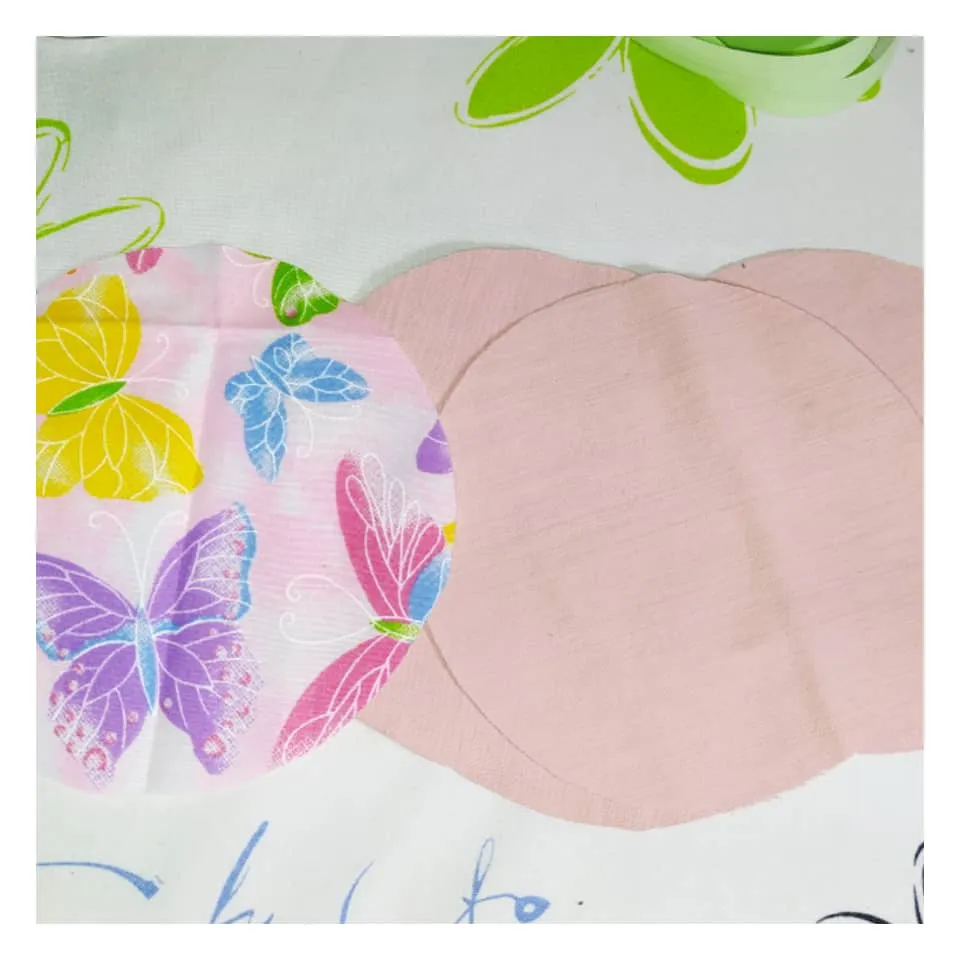
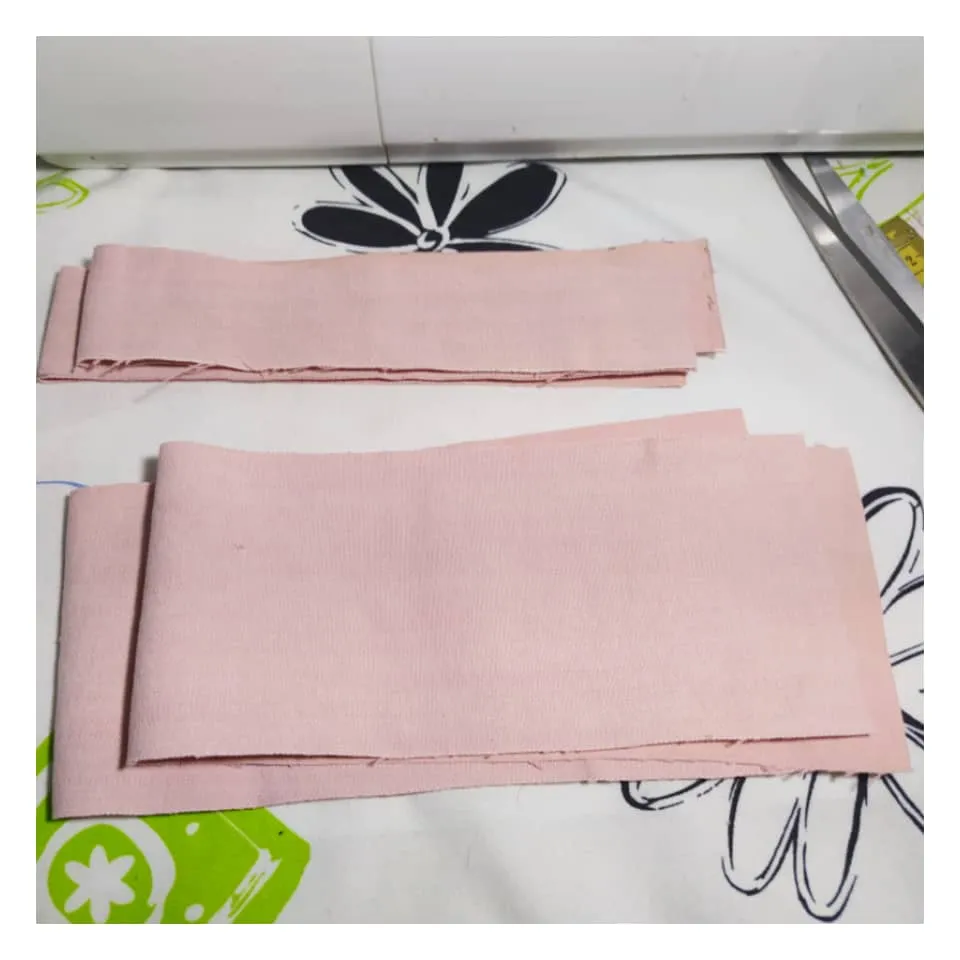
The first thing I did was to determine the size I wanted my Toiletry Bag to be, so I just made a circle, and cut it 5 times in pink jean fabric, since I recycled a pink jean that my daughter no longer wore. And once I cut it out of butterfly print fabric, also from scraps I saved from other projects.
Then, I measured the diameter of this circle I made, and it measured 13.5 cms in diameter (I took this measurement since I will need it later).
Lo primero que hice fue determinar el tamaño que quería que tuviera mi Neceser, de manera que solo hice un círculo, y lo corté 5 veces en tela de jean rosada, ya que reciclé un jean rosado que ya no usaba mi hija. Y una vez lo corté en tela estampada de mariposas, también de retazos que guardo de otros proyectos.
Luego, si medí el diámetro de este círculo que hice, y el mismo midió 13,5 cms de diámetro (esta medida la tomé ya que la voy a necesitar más adelante).
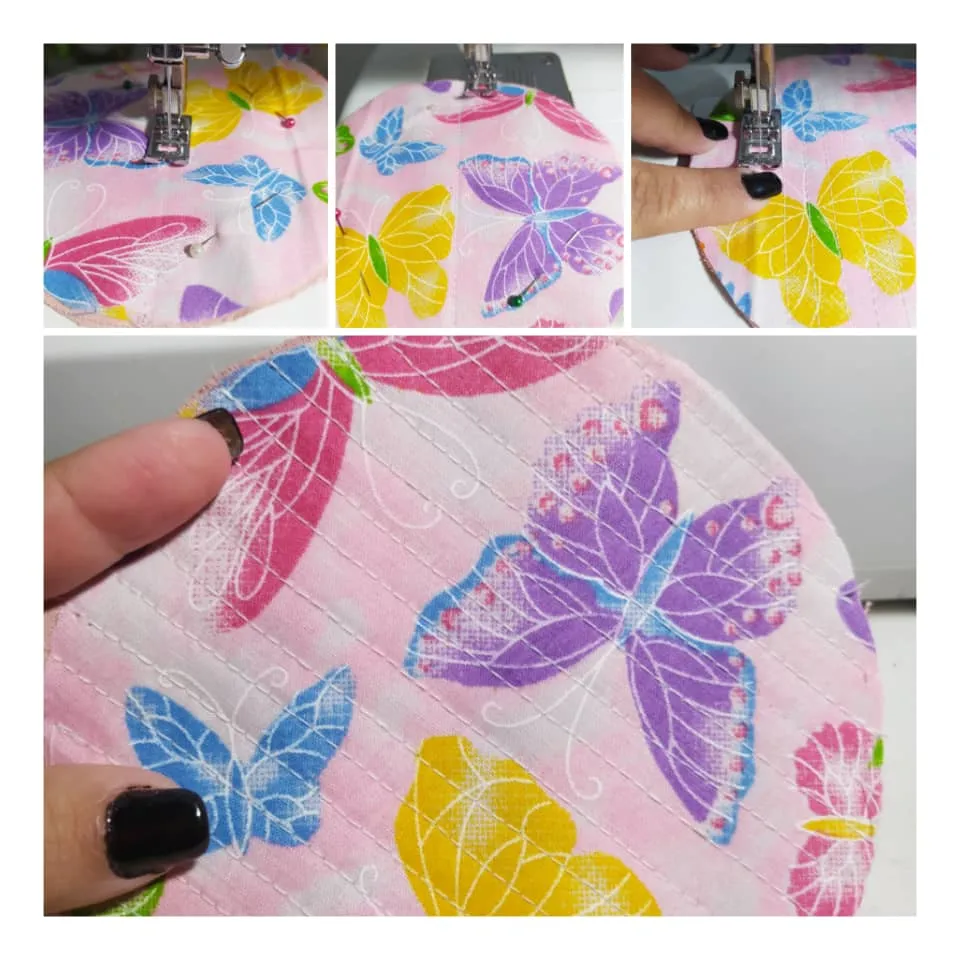
I will start making the top part, for this I take 2 pink circles and the pattern. I folded and ironed with my finger to mark the middle of the circle, and this mark I used as a guide to start stitching on my sewing machine, which will be the center line of the design I thought to give a little more interest to the material used.
Empezaré a confeccionar la parte de arriba, para ello tomo 2 círculos rosados y el estampado. Doble y planché con mi dedo para marcar la mitad del círculo, y esta marca la usé como guía para empezar a coser en mi máquina de coser, lo que será la línea central del diseño que pensé para darle un poco más de interés al material utilizado.
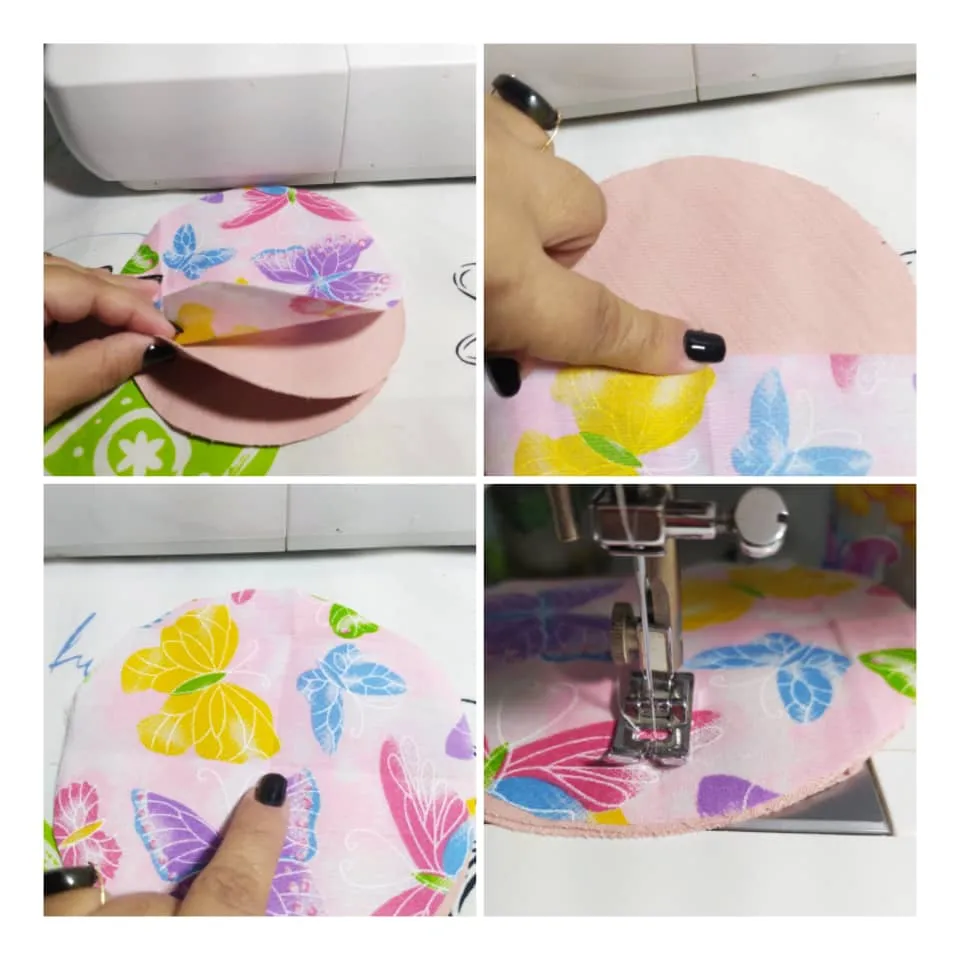
I am going to repeat on the sides of that central line that I sewed, several parallel lines until filling the whole circle, the distance that I considered between the parallel lines was only the distance of the machine foot between line and line.
The result is as you can see below, I use this effect a lot and I love it. I did not use quilting, I think it was enough to have several circles together, to give the rigidity I need and at the same time I use less materials.
Voy a repetir a los lados de esa línea central que cosí, varias líneas paralelas hasta llenar todo el círculo, la distancia que consideré entre las paralelas fue solamente la distancia del pie de máquina entre línea y línea.
Queda como puedes ver a continuación, este efecto lo uso mucho y es que me encanta. No usé acolchado, pienso que era suficiente con tener varios círculos juntos, para darla rigidez que necesito y al mismo tiempo utilizo menos materiales.
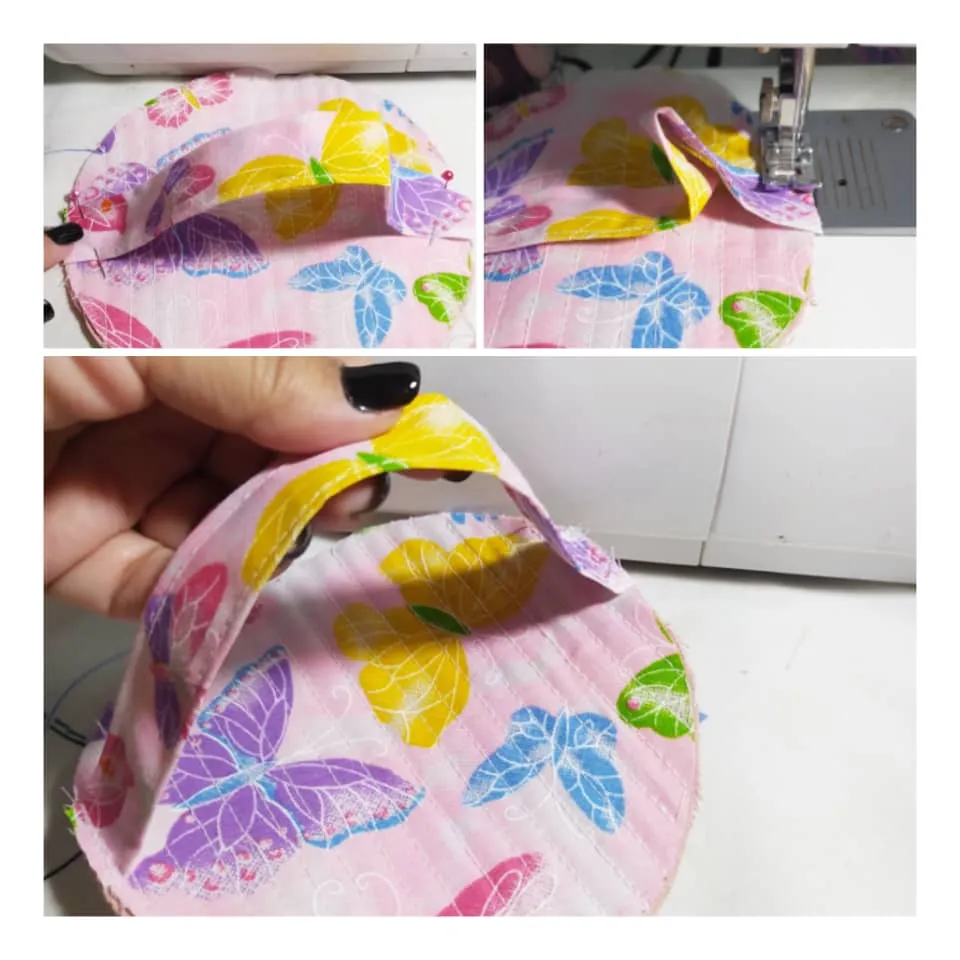
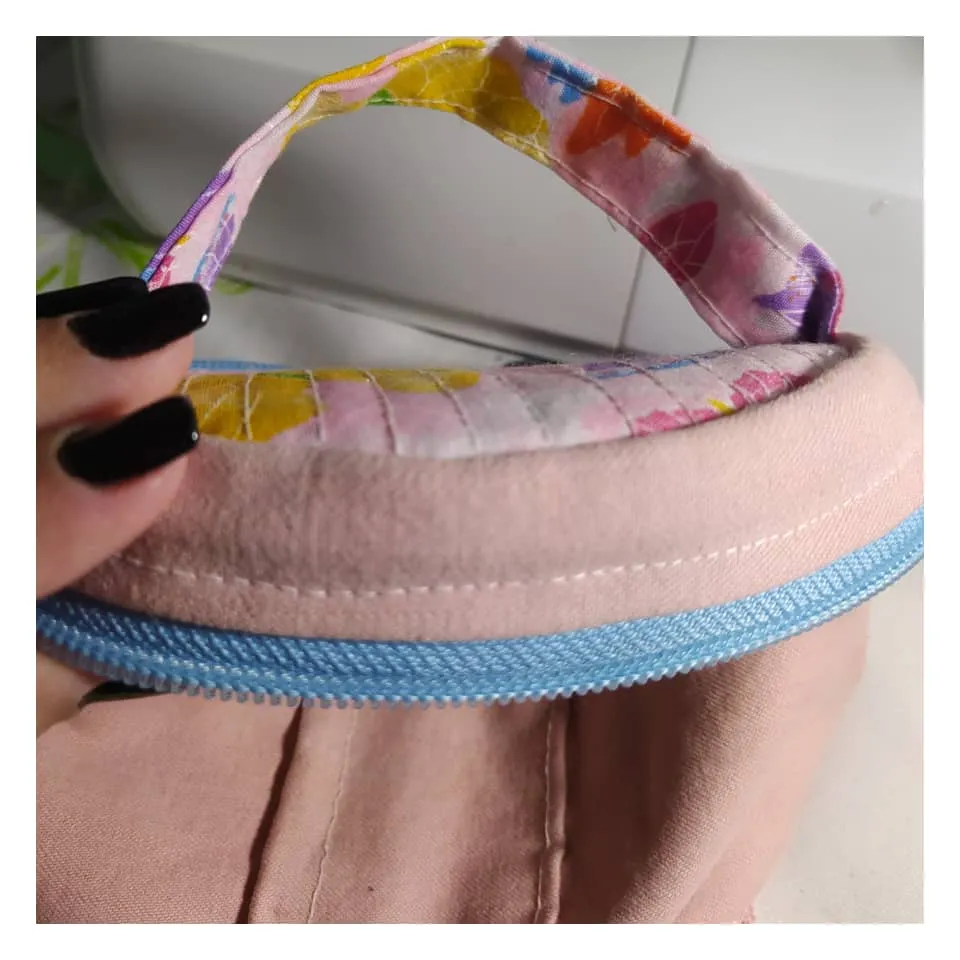
Now I am going to make the upper handle with a 16 cm by 19 cm piece of fabric that I folded like a bias binding and sewed on both sides.
Ahora voy a confeccionar el asa superior con un pedacito de tela de 16 cms por 19 cms que doble como tipo sesgo y cosí en ambos extremos laterales.

I placed the handle in the middle of the top lid and stitched the edges together, as you can see:
Ubiqué el asa en medio de la tapa superior y uní con costura en los bordes, como puedes ver:
For the bottom, I did the same procedure for texturing. I took three circles and sewed parallel lines on the sewing machine.
Para la parte inferior, realicé el mismo procedimiento para texturizar. Tomé tres círculos y cosí líneas paralelas en la máquina de coser.
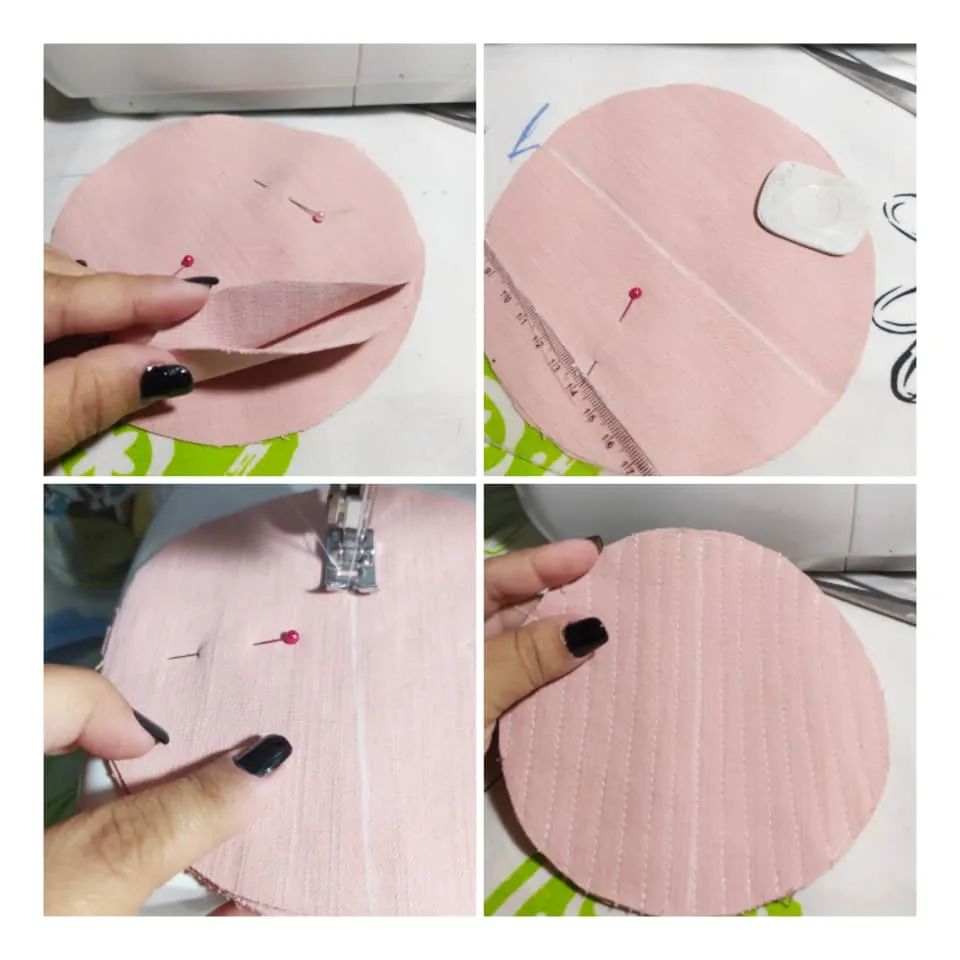
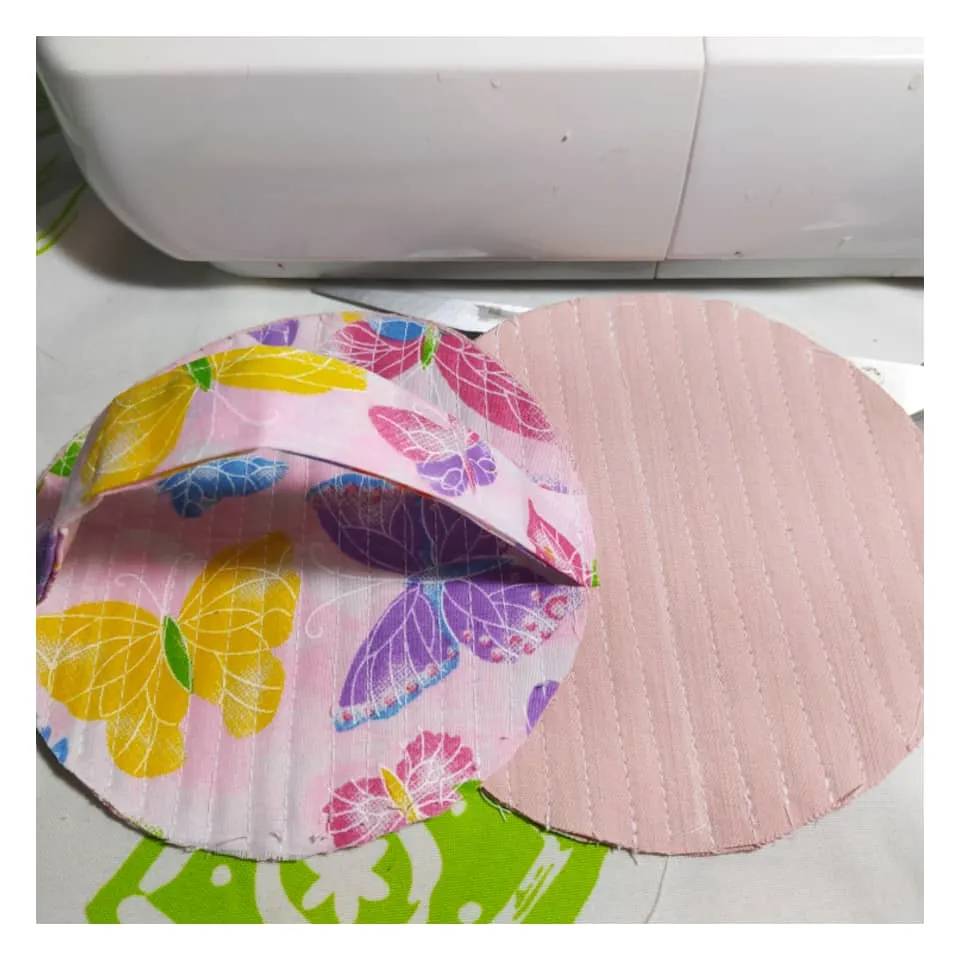
And just like that, the top and bottom pieces are ready. Personally, I think they look beautiful.
Y así de sencillo quedan listas las piezas superior e inferior. Personalmente, pienso que se ven hermosas.
❤️❤️PI helps me to calculate! ❤️❤️
¡PI me ayuda a calcular..!
This is all the math you are going to use, and it is all you need. To calculate the surrounding piece that will contain the clasp, I took the measurement of the diameter of my circles, which was 13.5 cm and multiplied it by PI, i.e. by 3.14. This gives as a result 42,39 cms, that I approximate it towards the next unit that would be 43 cms.
Well, mathematics tells us that 43 cms of fabric will be exact to border our circle and to give the seam allowance I add 1 cm more. So, it will be a piece with a length of 43 cm.
Esta es toda la matemáticas que vas a usar, y es toda la que necesitas. Para calcular la pieza de alrededor y que va a contener el cierre, tomé la medida del diámetro de mis círculos, que fué de 13,5 cms y lo multipliqué por PI, es decir por 3,14. Esto da como resultado 42,39 cms, eso lo aproximo hacia la siguiente unidad que sería 43 cms.
Pues así de fácil las matemáticas nos dicen que con 43 cms de tela serán exactos para bordear nuestro círculo y para dar el márgen de costura le pongo 1 cm más. Entonces, será una pieza que de largo tenga 44 cms
❤️❤️We continue! ❤️❤️
¡Continuemos.!
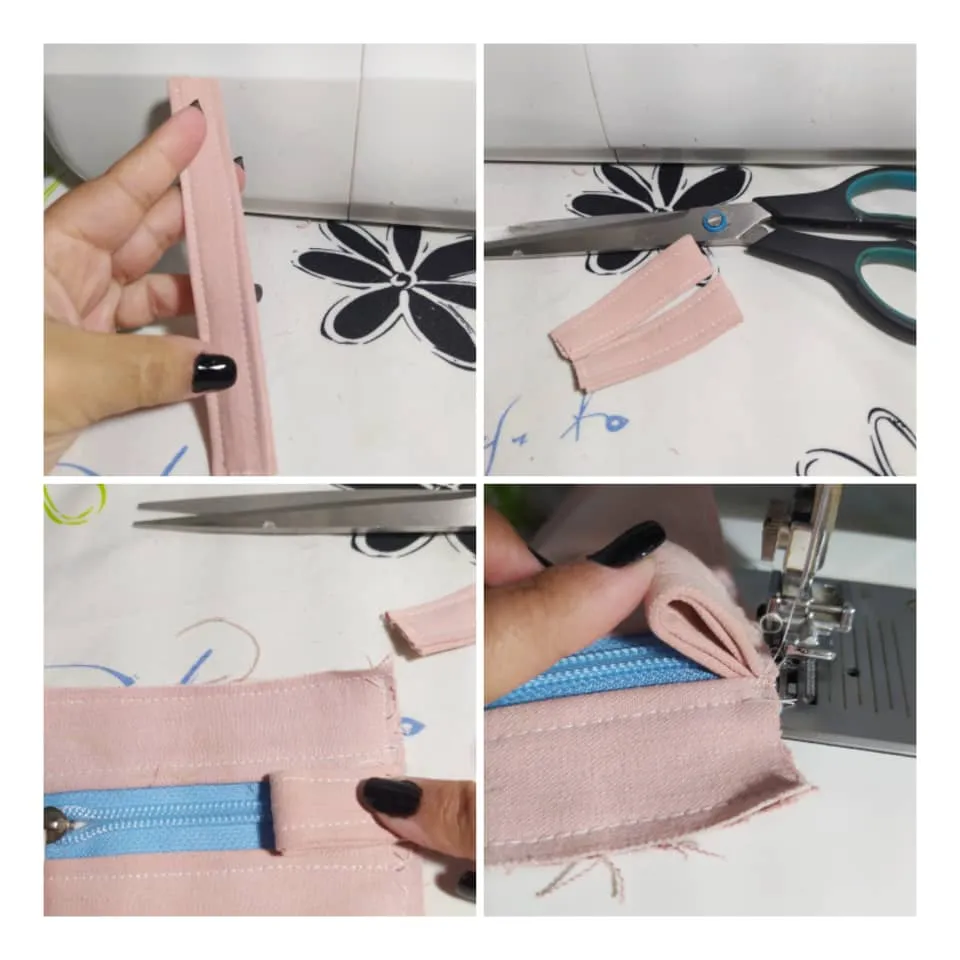
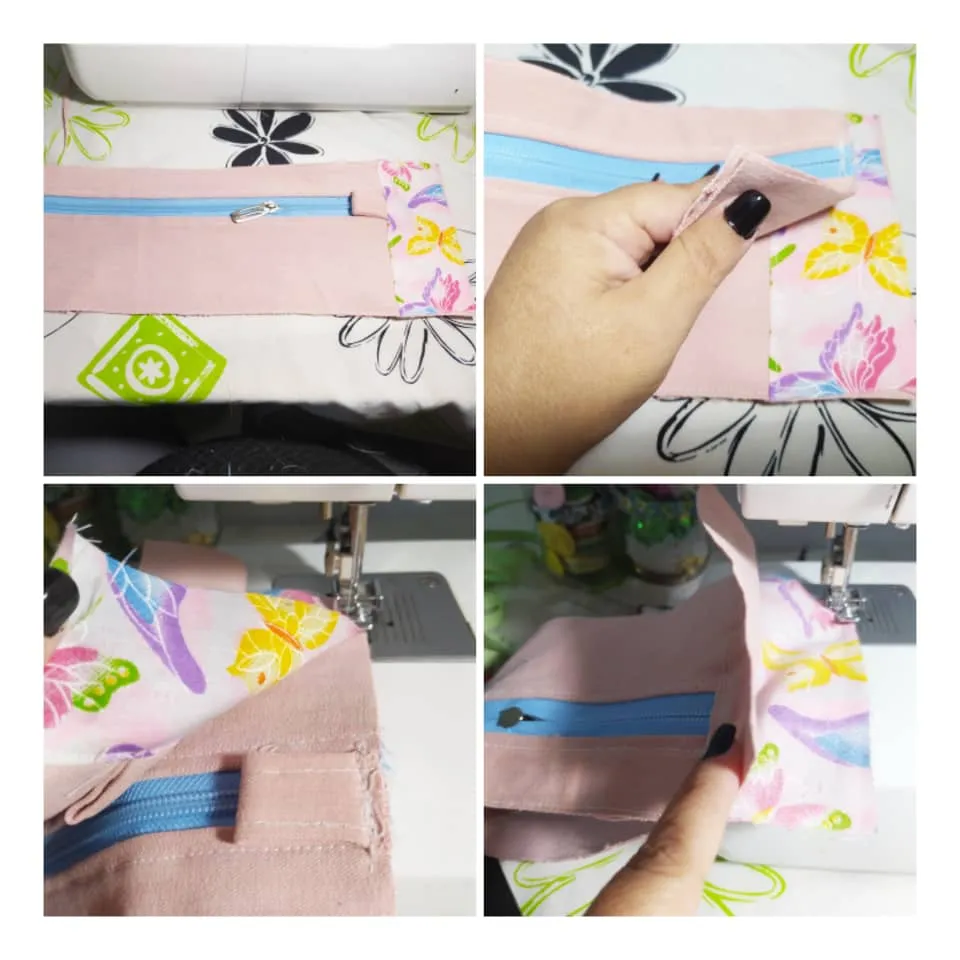
For the piece that goes around and contains the clasp, I cut 40 cm long by 13 cm wide. However, in 4 cms I made a cut and separated so that there would be 2 pieces. I did this twice, so that I have two thin pieces and two thicker pieces, with which I will form my clasp.
Para la pieza que va alrededor y que contiene el cierre, corté 40 cms de largo por 13 de ancho. Sin embargo, en 4 cms hice un corte y separé para que quedaran 2 piezas. Esto lo hice 2 veces, de manera que tengo dos piezas delgadas y dos piezas mas gruesas, con las que formaré mi cierre.
With the two thin pieces I covered one of the edges of my zipper, forming a sandwich. I went straight stitching on the machine, using the zipper foot to make the whole thing.
Con las dos piezas delgadas cubrí uno de los bordes de mi cierre, formando como un sandwich. Pasé costura recta en la máquina, utilizando el pie de cierre para elaborar todo.
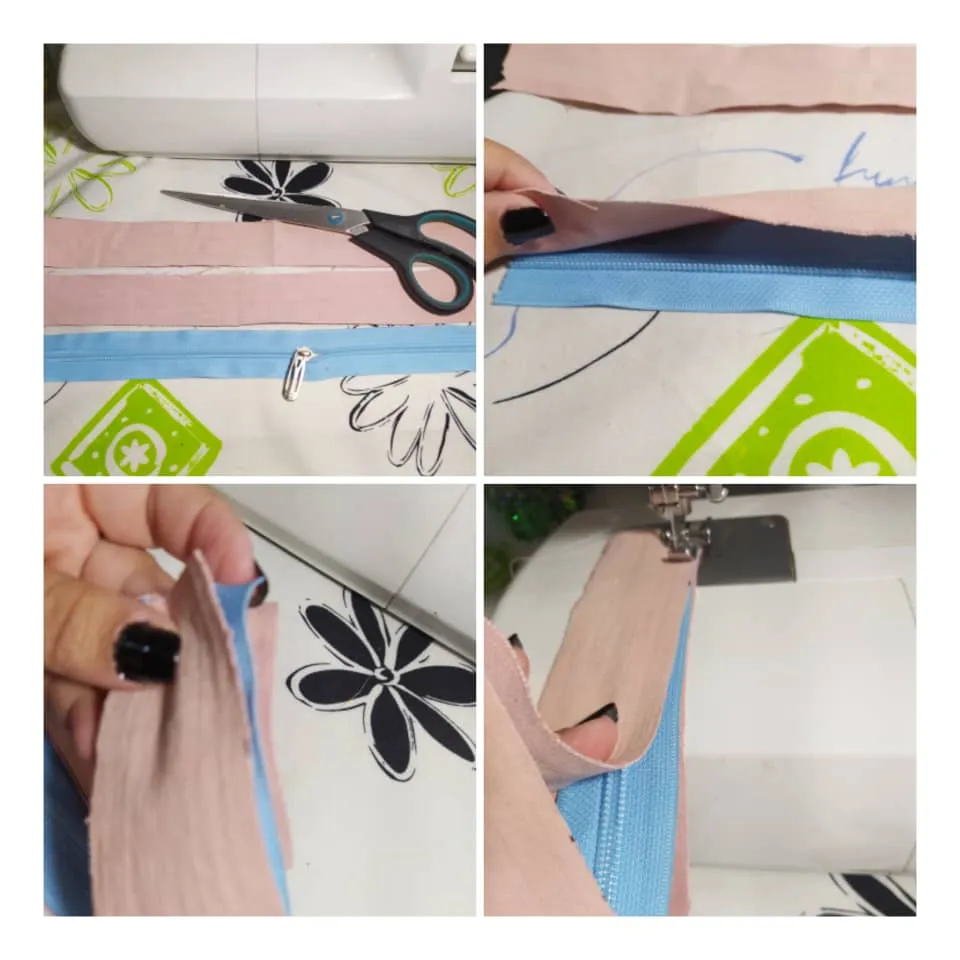
I open the pieces I have just sewn to expose the right side of the zipper, and I repeat all the way around the pink strips.
Abro las piezas que acabo de coser para exponer el cierre por su derecho, y repise por todo el alrededor de las tiras rosadas.
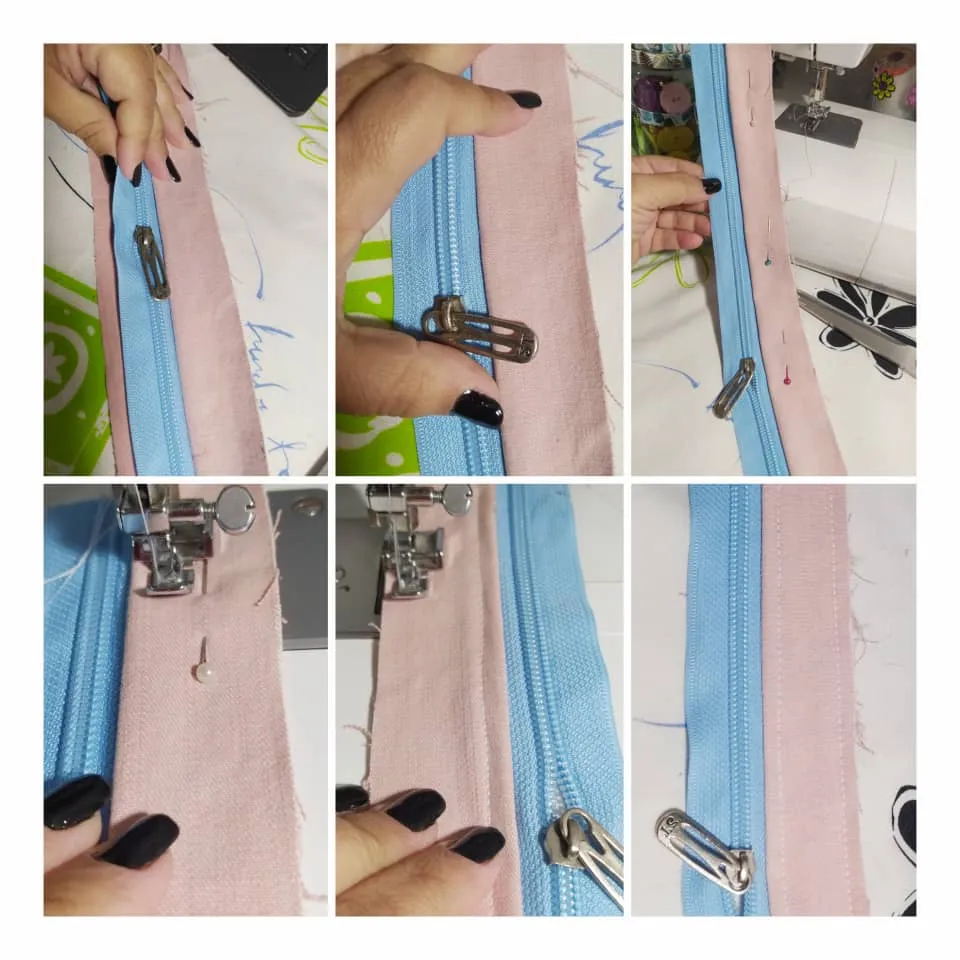
I do exactly the same at the other end of the fastener.
Hago exactamente lo mismo en el otro extremo del cierre.
This is a plus, I make like ears to make it easier to use the zipper. To do this with another piece of pink jean fabric 14 cms by 6 cms, and I sewed it by folding it as if it were a bias.
Esto es un plus, hago como unas orejas para que sea más fácil usar el cierre. Para ello con otro pedazo de tela de jean rosado de 14 cms por 6 cms, y lo cosí doblándolo como si fuese un sesgo.
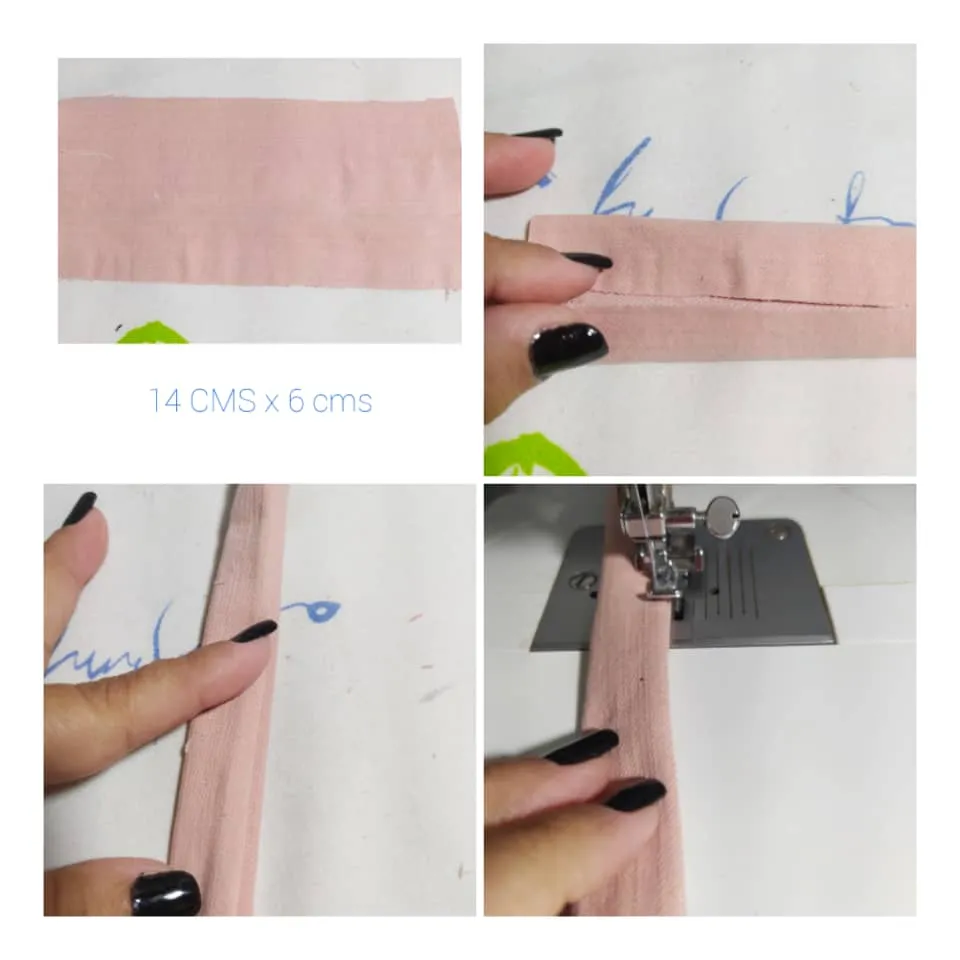
Then, I cut it in half and placed each one on the ends of the clasp. The zipper is now assembled very nicely, and it looks beautiful ❤️
Luego, lo corté por la mita y coloqué cada uno en los extremos del cierre. Ya con esto queda armado muy bien el cierre, y se ve hermoso ❤️
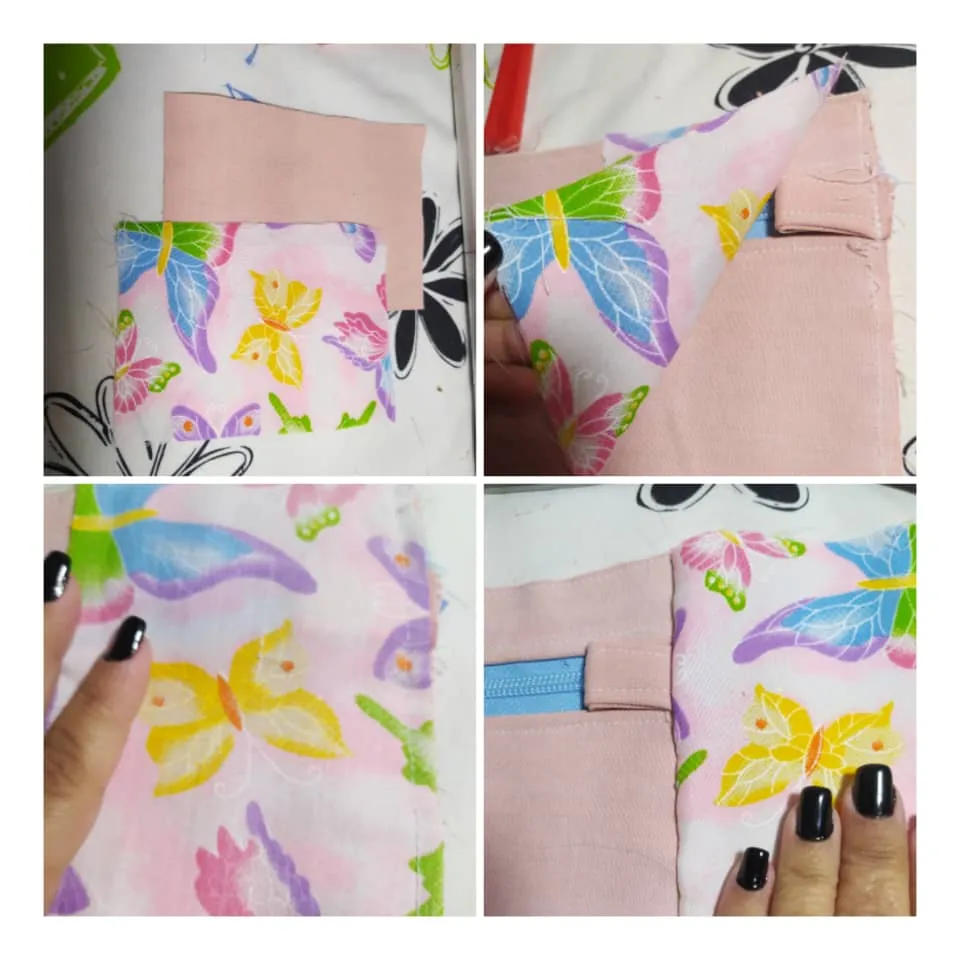
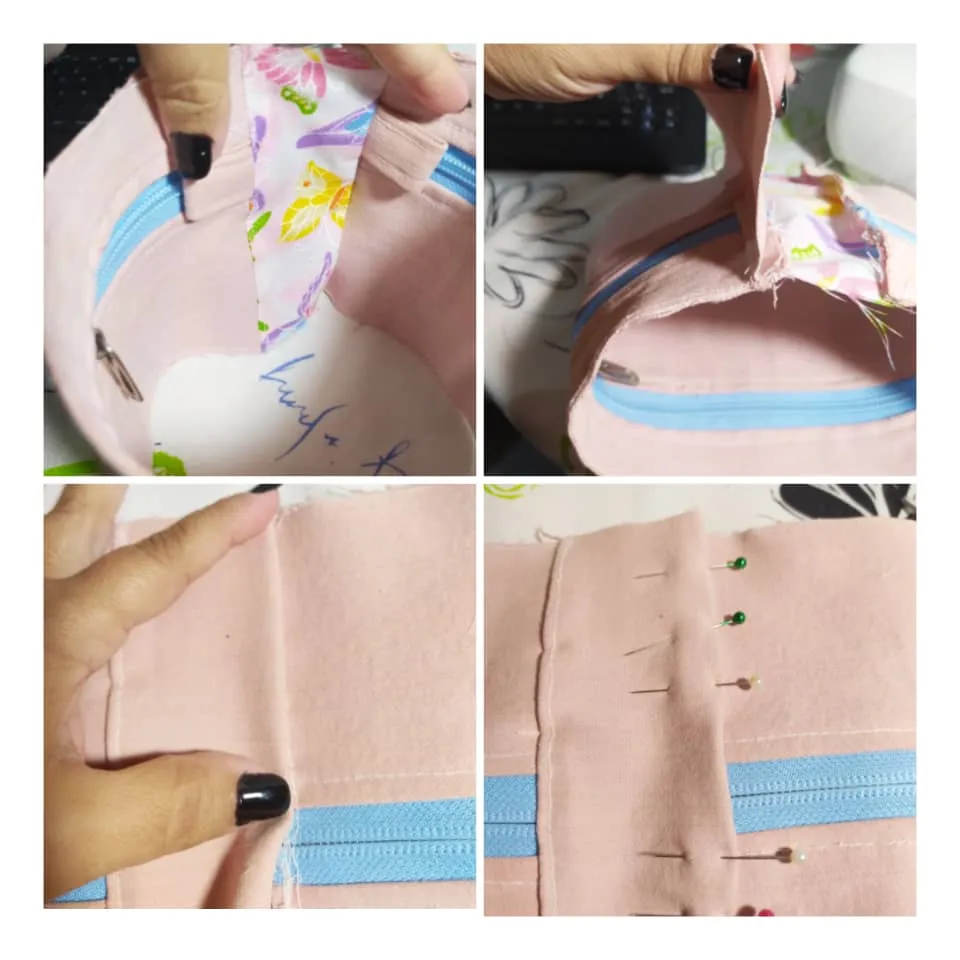
Now, we had already calculated that this piece should measure 44 cm to be EXACT, and the piece that contains the zipper measures 40 cm, so the missing piece we are going to form it with a piece that measures the difference, the 4 cm and the same width of the entire zipper piece. To do this I took a printed square and a pink jean square, and instead of 4 cm I cut them to 5 cm to have a seam allowance.
I sewed the printed piece first, right sides together.
Ahora bien, ya habíamos calculado que esta pieza debe medir 44 cms. para que quede EXACTA, y la pieza que contiene el cierre mide 40 cms, entonces el pedazo que nos falta lo vamos a formar con una pieza que mida la diferencia, los 4 cms y de ancho el mismo ancho de la pieza del cierre completa. Para ello tomé un cuadrado estampado y otro de jean rosado, y en lugar de 4 cms los corté de 5 cms para tener un margen de costura.
Cosí primero la pieza estampada, enfrentando derecho con derecho.
And now on the reverse side I face the other jean square, back to back and sew. Then I flip over and pin back.
This is very easy and fast.
Y ahora en el revés enfrento el otro cuadro de jean, revés con revés y coso. Luego volteo y repiso.
Esto es muy fácil y rápido.
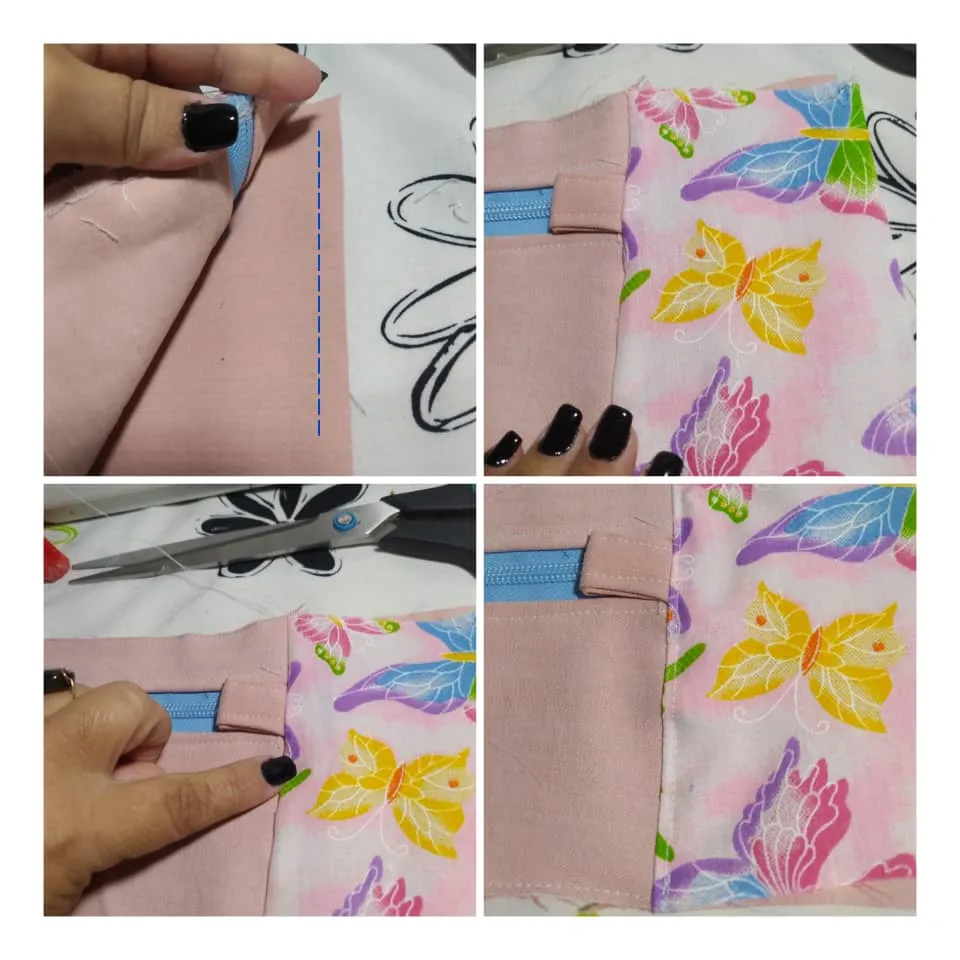
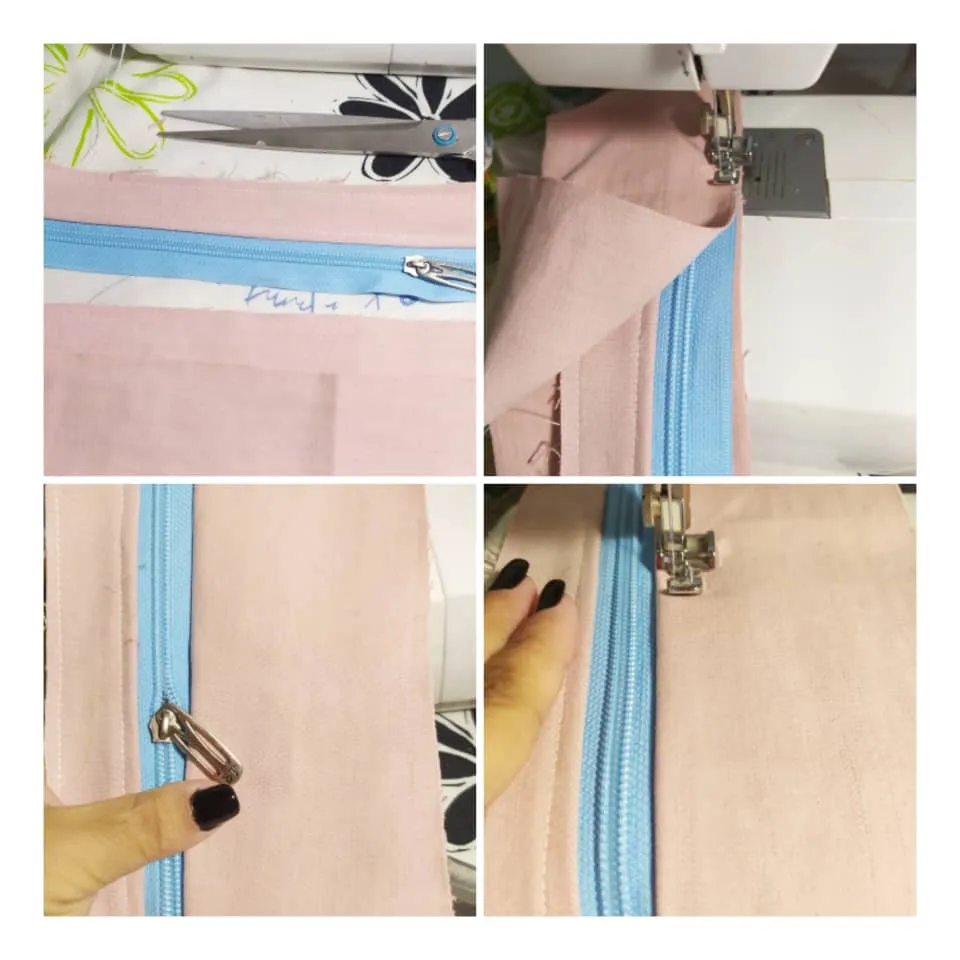
The other end of the zipper I bring it to the printed fabric square, naturally facing its right side with the right side of the printed fabric and sew... WITHOUT TAKING THE PINK SQUARE.
El otro extremo del cierre lo llevo hacia el cuadro de tela estampada, enfrentando naturalmente su derecho con el derecho del estampado y coso... SIN TOMAR EL CUADRO ROSADO.
Here you can see perfectly that I sewed the zipper piece only to the printed square, leaving the pink square free. This way you can see the right side of the whole thing and the pink square on the back...
See how natural this is, the pink square I flatten it towards the zipper and fold its edge, pin it, and that's what we want, that's how simple and neat we want it to look.
Aquí puedes ver perfectamente que cosí la pieza del cierre solo al cuadro estampado, dejando el cuadro rosado libre. Así se ve ya el derecho de todo y por el revés queda el cuadro rosado..
Fíjate que natural es esto, el cuadro rosado lo aplano hacia el cierre y doblo su borde, lo fijo con alfileres, y eso es lo que queremos, que se vea así de simple y prolijo.
To sew this piece that we have with pins, the easiest way is to open the zipper and sew inside comfortably.
And that's it, my friend... This would be the most complicated part and you can see that it is not complicated, in fact it is a lot of logic and attention... nothing else.
Para coser esta pieza que tenemos con alfileres lo más fácil es abrir el cierre y coser por dentro cómodamente.
Y listo amiga... Esta sería la parte más complicada y ya ves que no es complicado, de hecho es mucha lógica y atención... más nada.

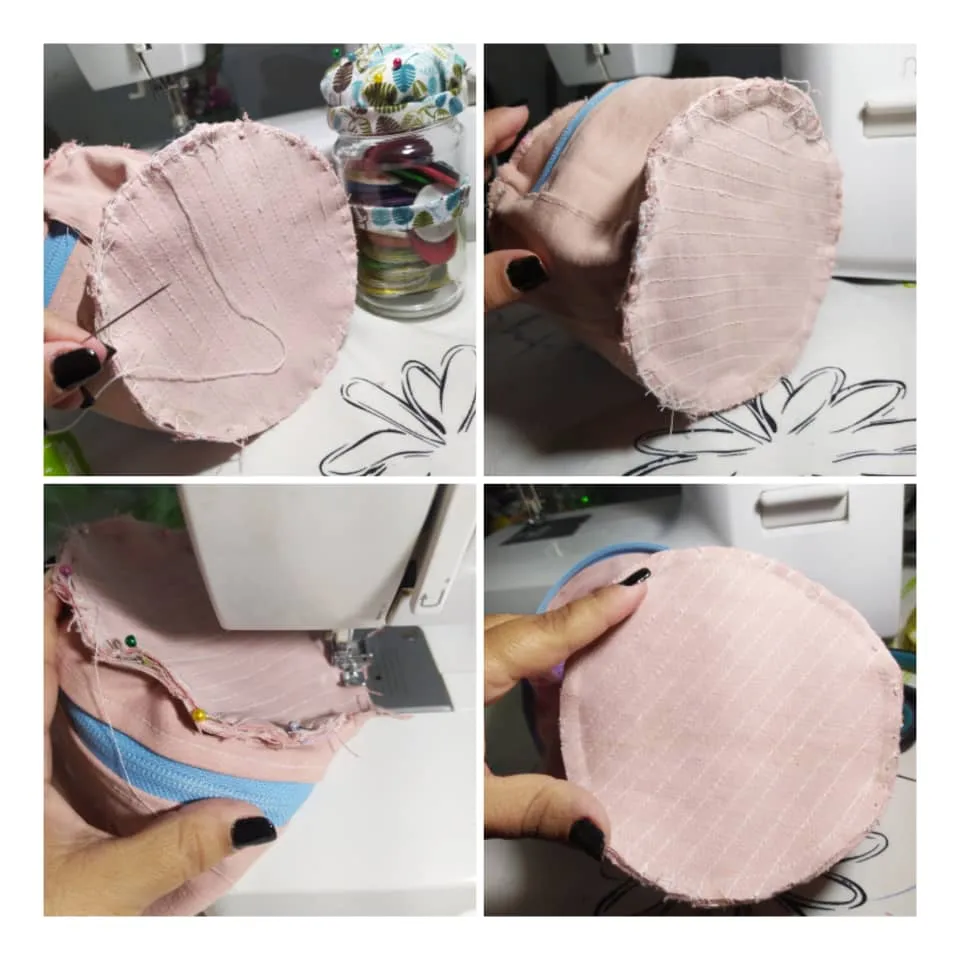
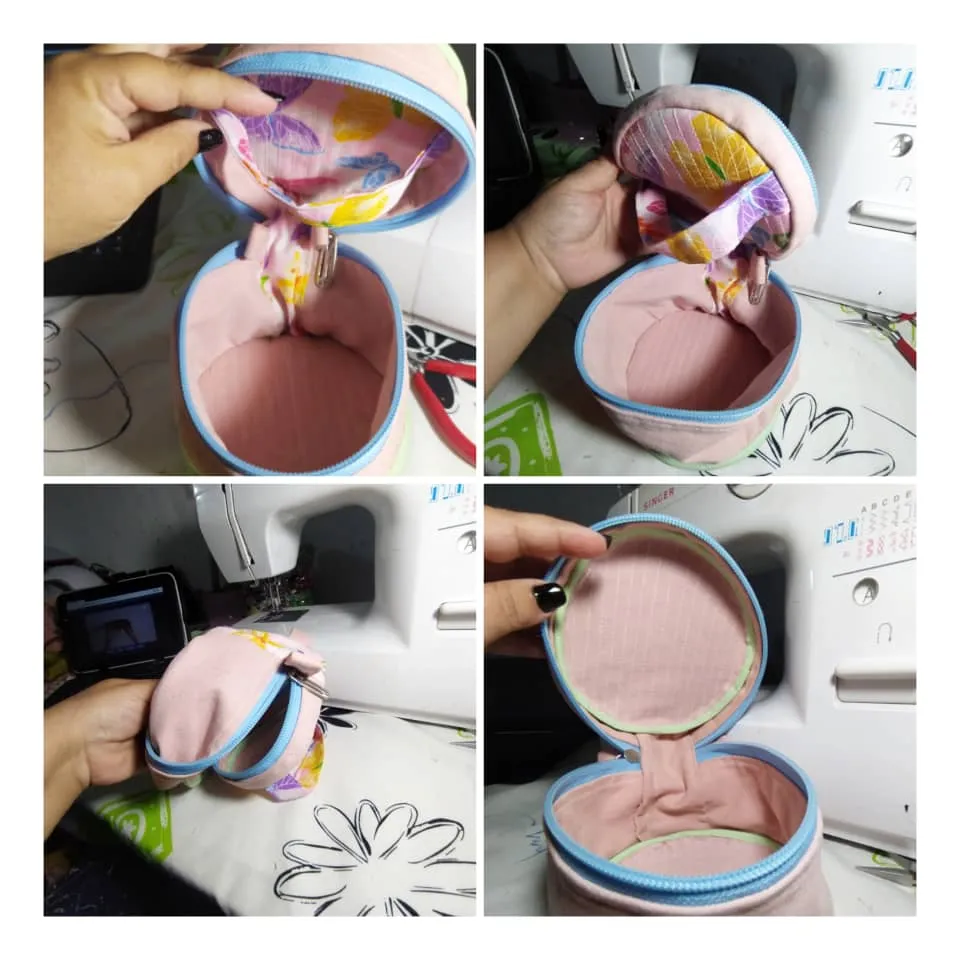
Okay, the zipper piece is left with the wrong side out and the zipper closed. Now I'm going to sew the top circle on the thinner side of the zipper.
Bien, la pieza del cierre la dejamos con el revés para afuera y cerrado el cierre. Ahora voy a coser el círculo superior por el lado más delgado del cierre.
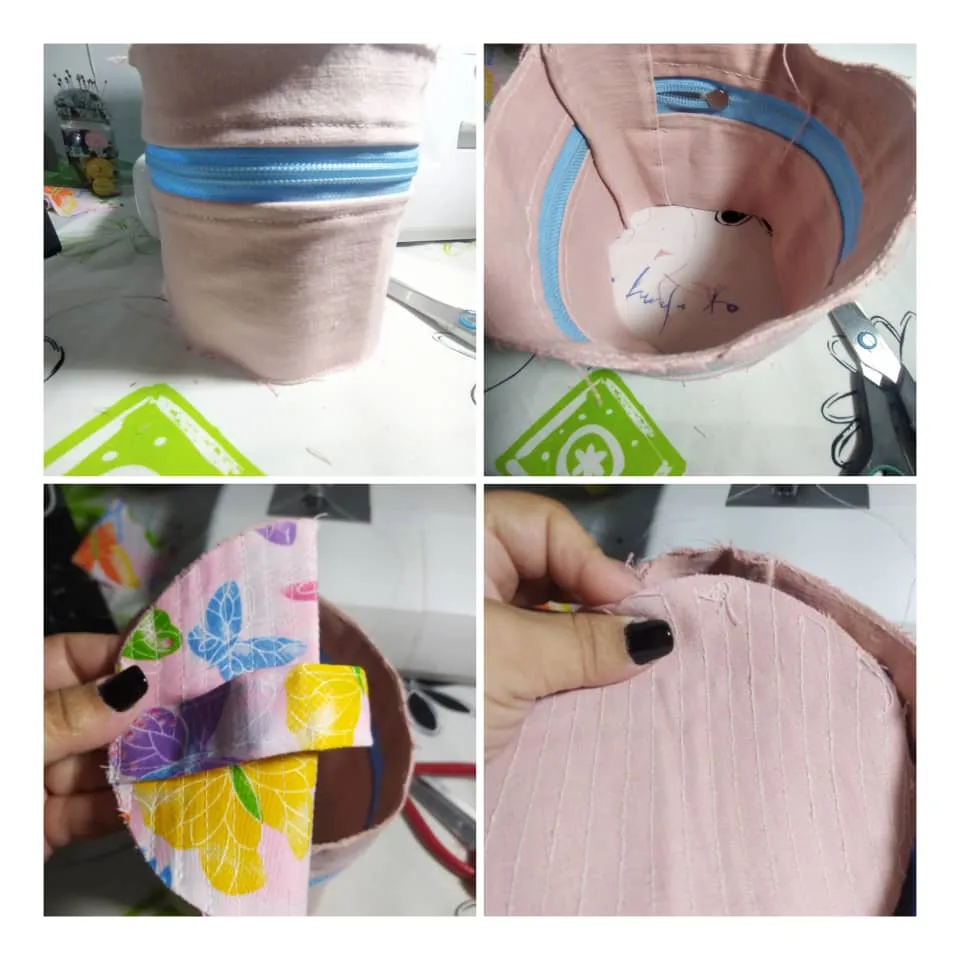
And here, as I have told you in my other publications, I am one of those who like to make a coarse by hand to make sure that indeed everything is going to fit very well and that nothing is going to be left over or missing.
And as you can see PI didn't let us down, everything fit PERFECTLY... ....
Y aquí como te he dicho en mis otras publicaciones, yo soy de las que les gusta realizar una basta a mano para asegurarme que efectivamente todo va a calzar muy bien y que no va a sobrar ni a faltar nada.
Y como puedes ver PI no nos ha fallado, todo cuadró PERFECTO...
Finishing the basta, now I sew on the sewing machine, and with the scissors I clean the edges. And I do the same on the bottom one, that is to say with the bottom circle on the other end of the zipper.
Terminando la basta, ahora sí coso en la máquina de coser, y con la tijera limpio los bordes. Y hago lo mismo en el inferior, es decir con el círculo inferior en el otro extremo del cierre.
Se ve genial...
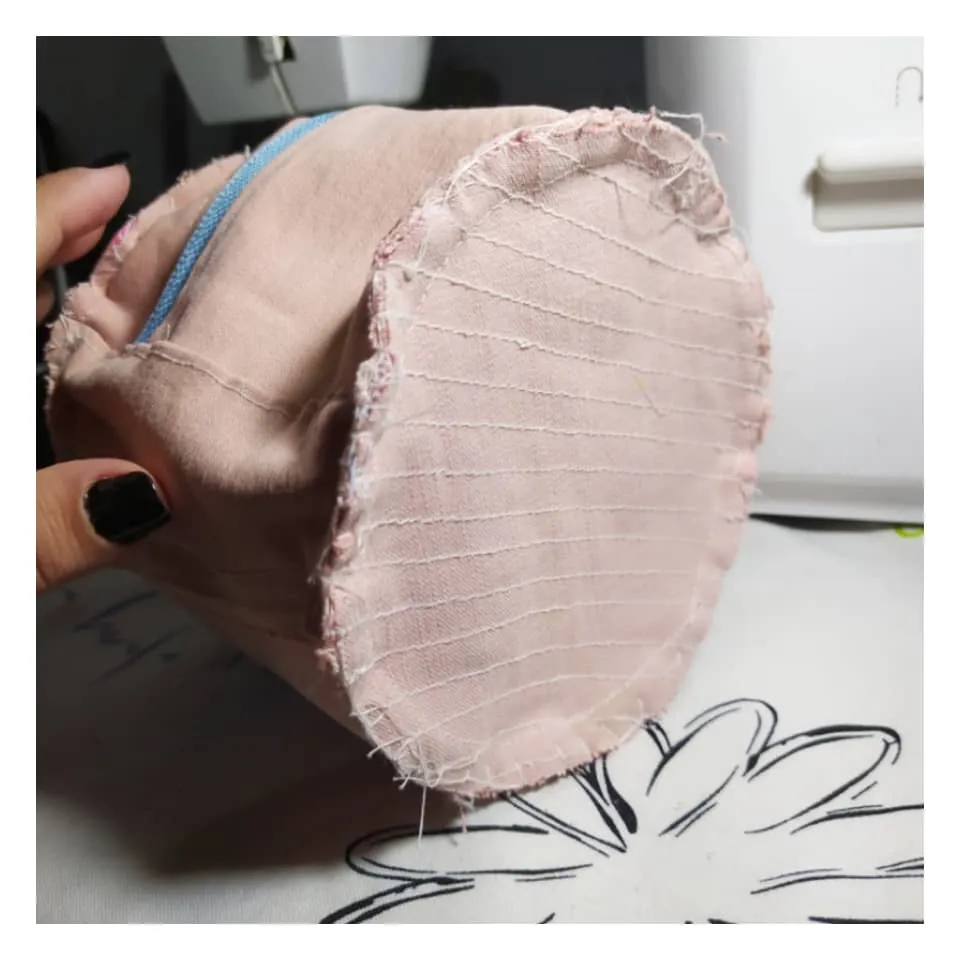
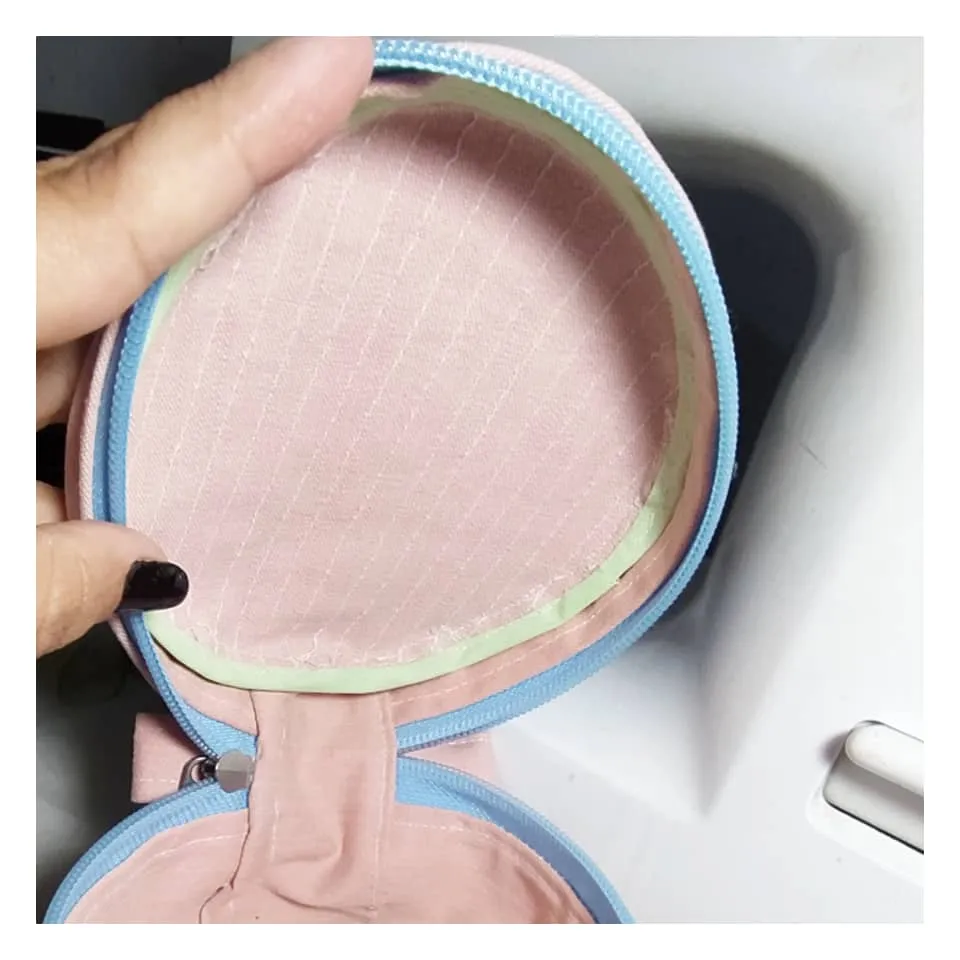
We're almost done, I'm going to place the bias binding to cover the inside seams. Remember that our pieces should look good on the outside and inside as well. I sew one end of the bias binding to the edge of the circle.
Ya casi terminamos, voy a colocar el sesgo para tapar las costuras internas. Recuerda que nuestras piezas deben verse bien por fuera y por dentro también. Coso un extremo del sesgo al borde del círculo.
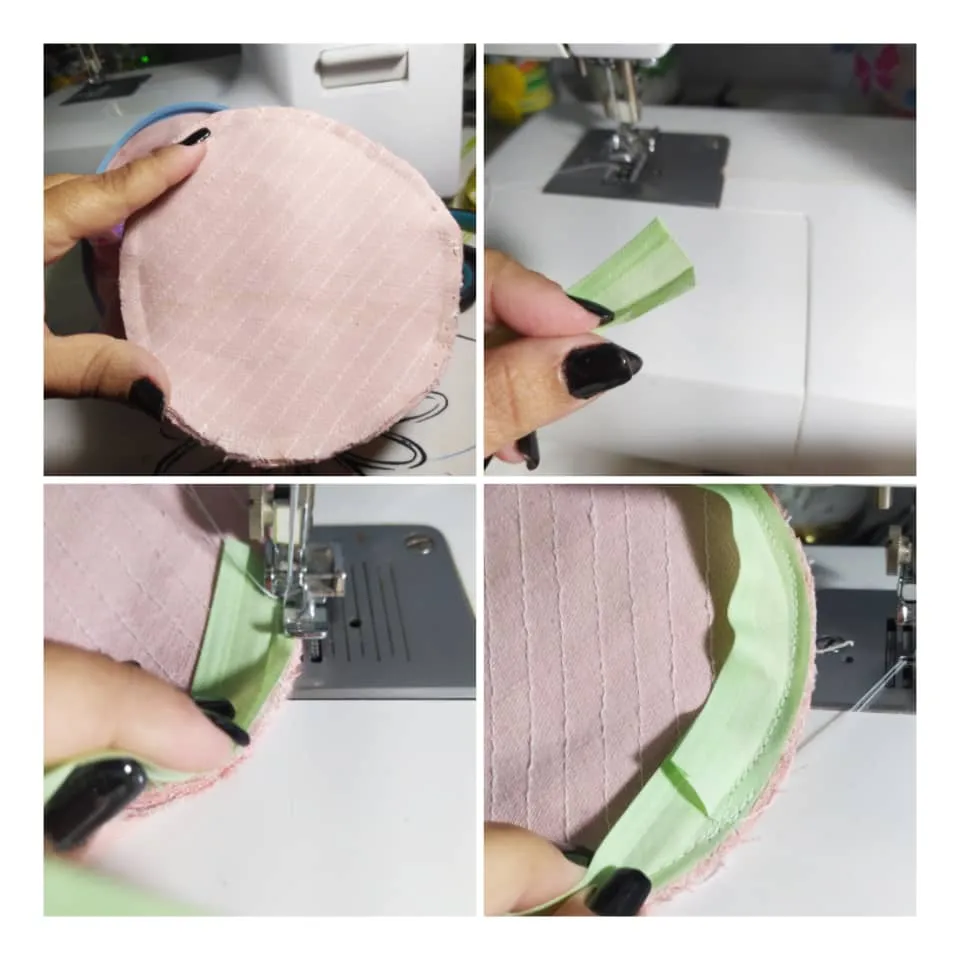
I turn the ribbon or bias binding up or the other side, and sew to finish as well. I do the same on the other end, that is, on the other circle.
Volteo la cinta o sesgo hacia arriba o el otro lado, y coso también para terminar. Hago lo mismo en el otro extremo, es decir en el otro círculo.
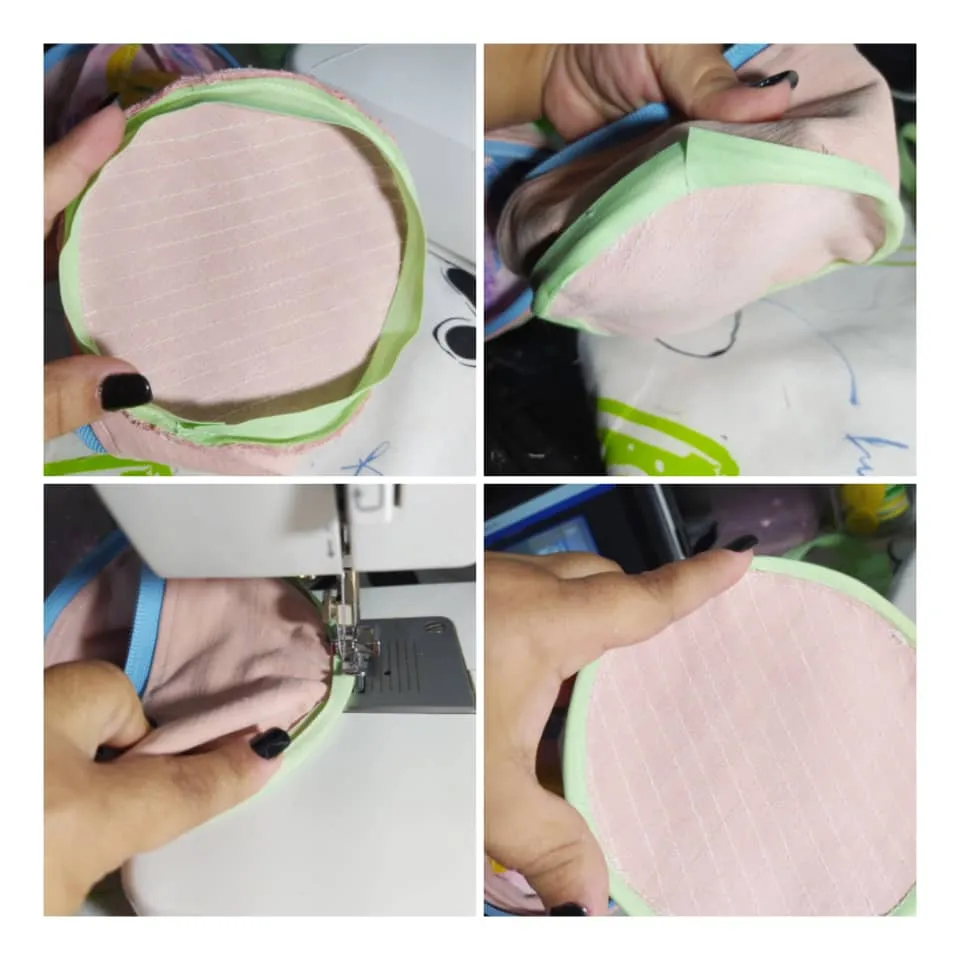
Never hesitate to give these details to your garments, how proud you will feel when someone sees your piece inside and finds these quality details 😍😍 they are beautiful aspects that will make your designs to be appreciated and valued.
Nunca dudes en dar estos detalles a tus confecciones, que orgullosa te vas a sentir cuando alguien vea tu pieza por dentro y se encuentre con estos detalles de calidad 😍😍 son hermosos aspectos que haran que tud diseños sean apreciados y valorados.
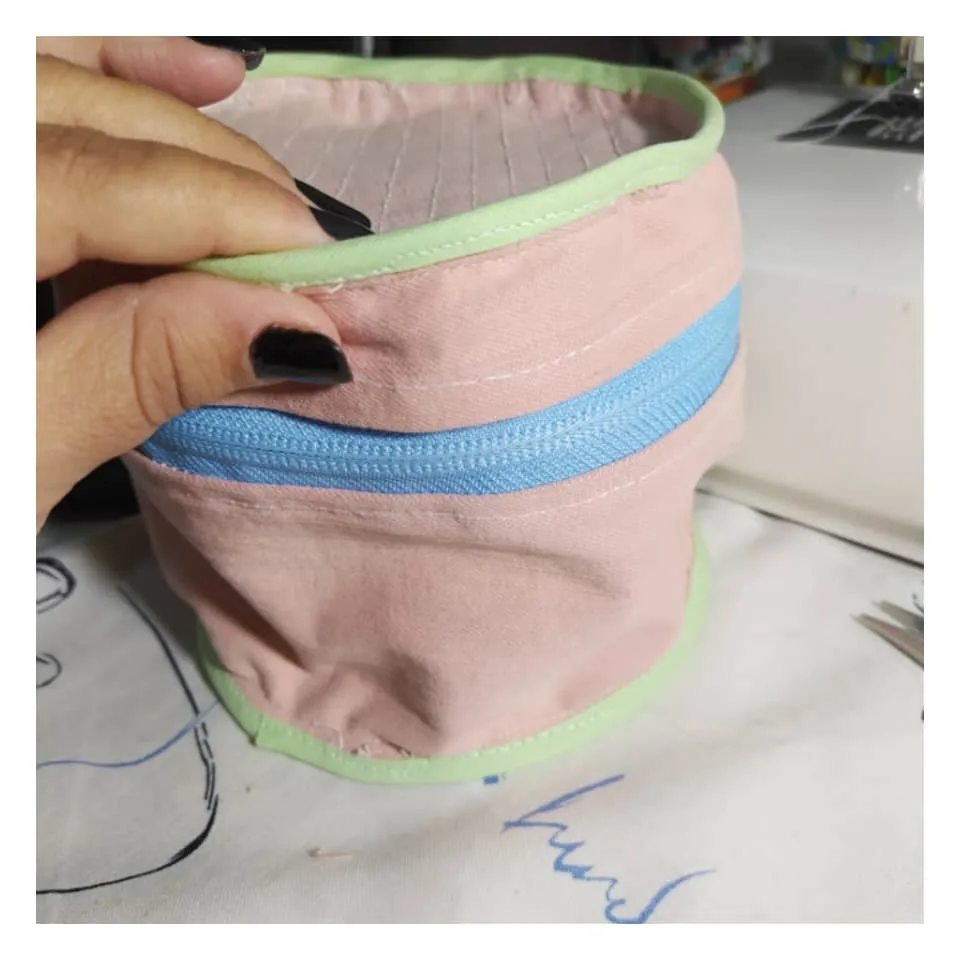
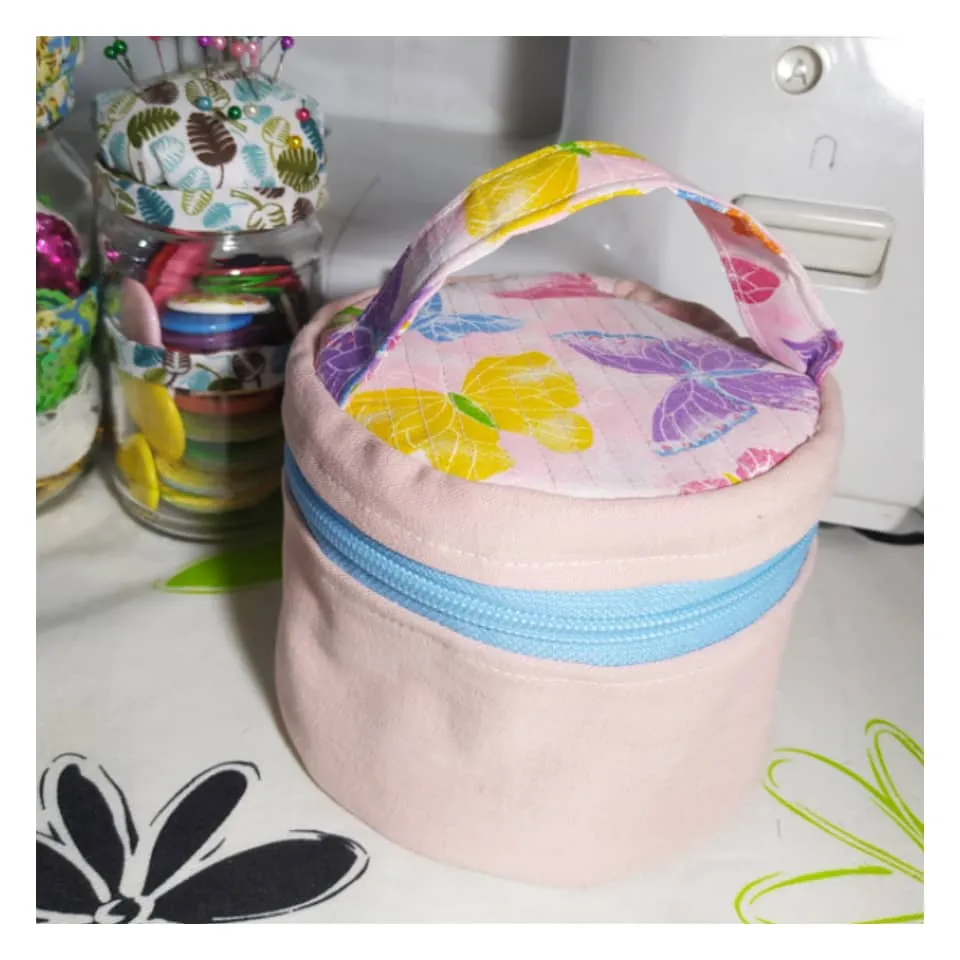
Let's turn our work right side out, as it is ready. You can take a few minutes to clean all the threads that remain ... Now you can appreciate it and enjoy it...
Vamos a voltear nuestro trabajo al derecho, ya que esta listo. Puedes tomarte unos minutos para limpiar todos los hilos que queden ... Ahora ya puedes apreciarlo y disfrutarlo...
Details that speak about you... Don't forget them ❤️❤️
Detalles que hablan de ti... No los olvides ❤️❤️
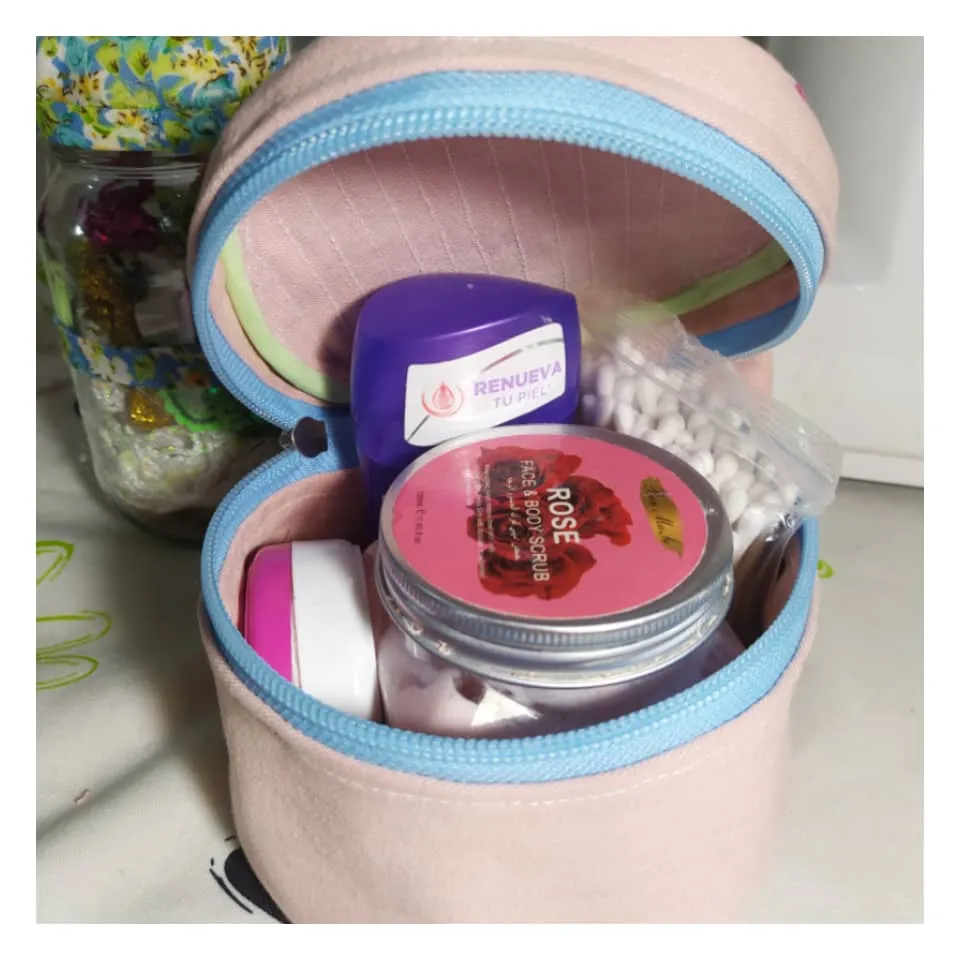
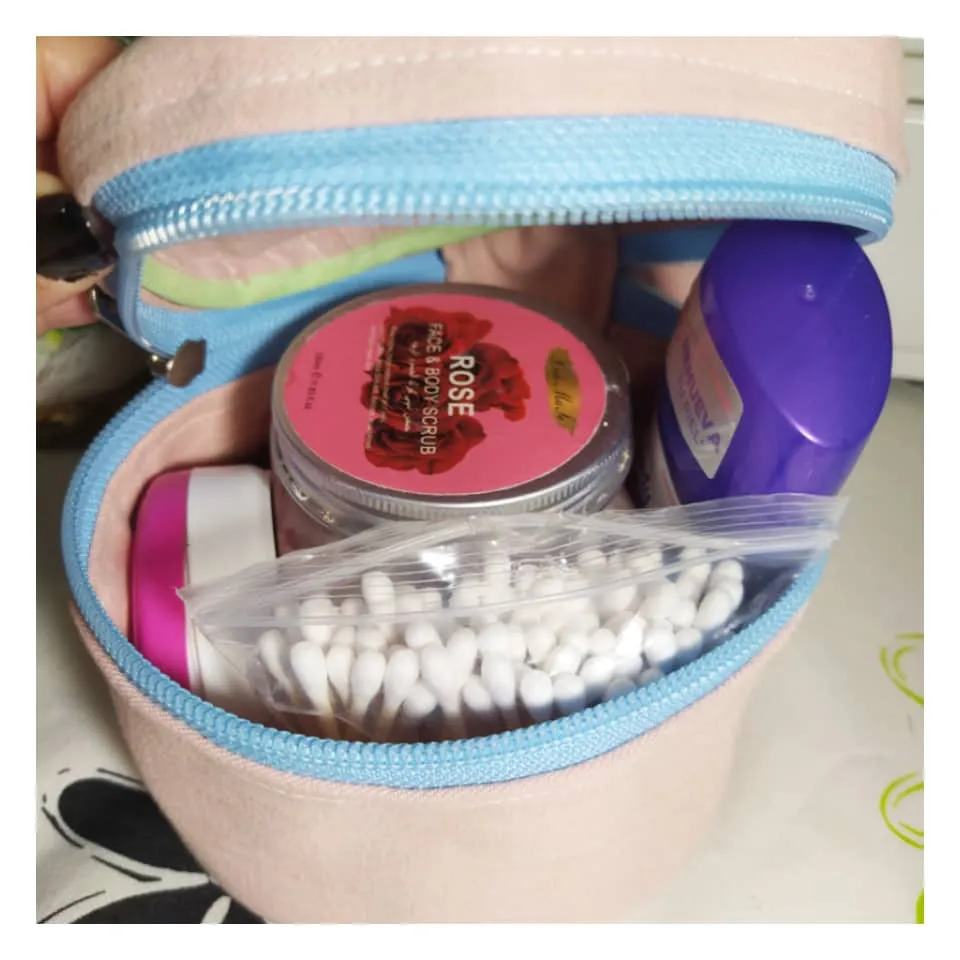
What a satisfaction... A few moments ago they were just scraps of recycled fabrics and see now what a beautiful object we have created..... ❤️❤️It's magic, magic that you make with your hands and with lots of love...❤️❤️❤️
Que satisfacción... Hace unos momentos eran solo retazos de telas recicladas y ve ahora que hermoso objeto hemos creado... ❤️❤️Es magia, magia que haces con tus manos y con mucho amor...❤️❤️

Never hesitate to dedicate yourself to the details...
No dudes nunca en dedicarte a los detalles...
I deeply hope you liked this tutorial and that you are encouraged to make it, here I have left you all my tips, and it is an excellent piece to get you started in the elaboration of these utilitarian and beautiful elements.
I invite you to my next publication.... Greetings. ❤️❤️
Deseo profundamente que te haya gustado este tutorial y que te animes a hacer, aquí te he dejado todos mis tips, y es una pieza excelente para iniciarte en la elaboración de estos elementos utilitarios y hermosos.
Te invito a mi próxima publicación... Saludos. ❤️❤️
---------- ❤️❤️❤️❤️ ----------
Las fotos las tomé con mi teléfono Redmi Note 8 y las edité en la App Photo Collage Maker y son de mi propiedad @yennysferm71. Por favor no las utilices sin mi Autorización.
También edité con https://www.canva.com/
Utilicé el Traductor Deepl
Mi redes sociales:
Discord: YennysYaneth#0189
Twitter: @yennysferm
Instagram: @yennysyaneth
I took the photos with my Redmi Note 8 phone and edited them in the Photo Collage Maker App and they are my property @yennysferm71. Please do not use them without my Authorization.
I also edited with https://www.canva.com/
I used Deepl Translate
My social networks:
Discord: YennysYaneth#0189
Twitter: @yennysferm
Instagram: @yennysyaneth