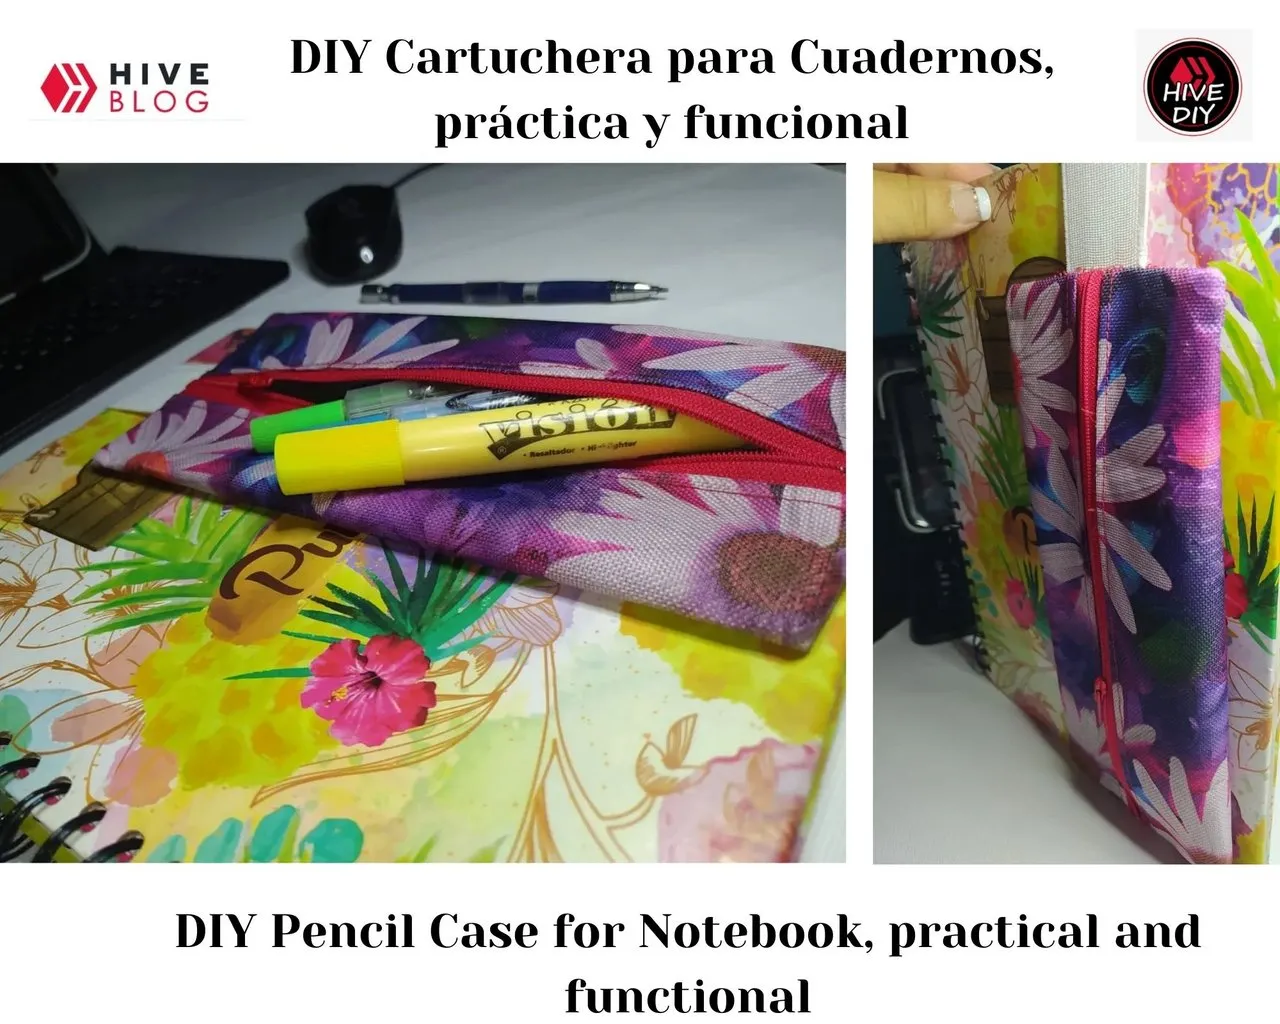
Hola a todos ❤️❤️ Me complace presentarles mi Diy Cartuchera para Cuaderno tiene una funcionalidad adicional que permite cerrar bien nuestro cuaderno o agenda con una elástica, de manera que podemos tener todo bien unificado para llevarlo ordenadamente en nuestro bolso o cartera, y al mismo tiempo guardar algunas cosas que utilizamos para tomar nuestros apuntes, como bolígrafos, resaltadores, corrector, marcadores, etc.
Esto lo necesitaba, aunque ya terminé la universidad y ya no estoy estudiando, siempre llevo en mi bolso una libreta para tomar notas, escribir mis proyectos, recordatorios de diligencias, comprar, materiales, etc. y quería tener mi bolígrafo y resaltadores bien ordenados y dispuestos. De manera que, este accesorio me venía ideal, y hoy les muestro cómo lo hice, son pasos sencillos, pero que te presento TIPS de elaboración y TIPS para que incluya acabados de calidad.
Te invito a ver mi Tutorial con Infografía descriptiva...
Hello everyone ❤️❤️ I am pleased to present you my Diy Pencil Case for Notebook it has an additional functionality that allows us to close our notebook or agenda with an elastic, so that we can have everything well unified to carry it neatly in our bag or purse, and at the same time store some things that we use to take our notes, such as pens, highlighters, corrector, markers, etc.
I needed this, even though I finished college and am no longer studying, I always carry a notebook in my bag to take notes, write my projects, errands, shopping, materials, etc. and I wanted my pen and highlighters neatly arranged and arranged. So, this accessory was ideal for me, and today I show you how I did it, they are simple steps, but I present to you TIPS of elaboration and TIPS to include quality finishes.
I invite you to see my Tutorial with descriptive infographic...

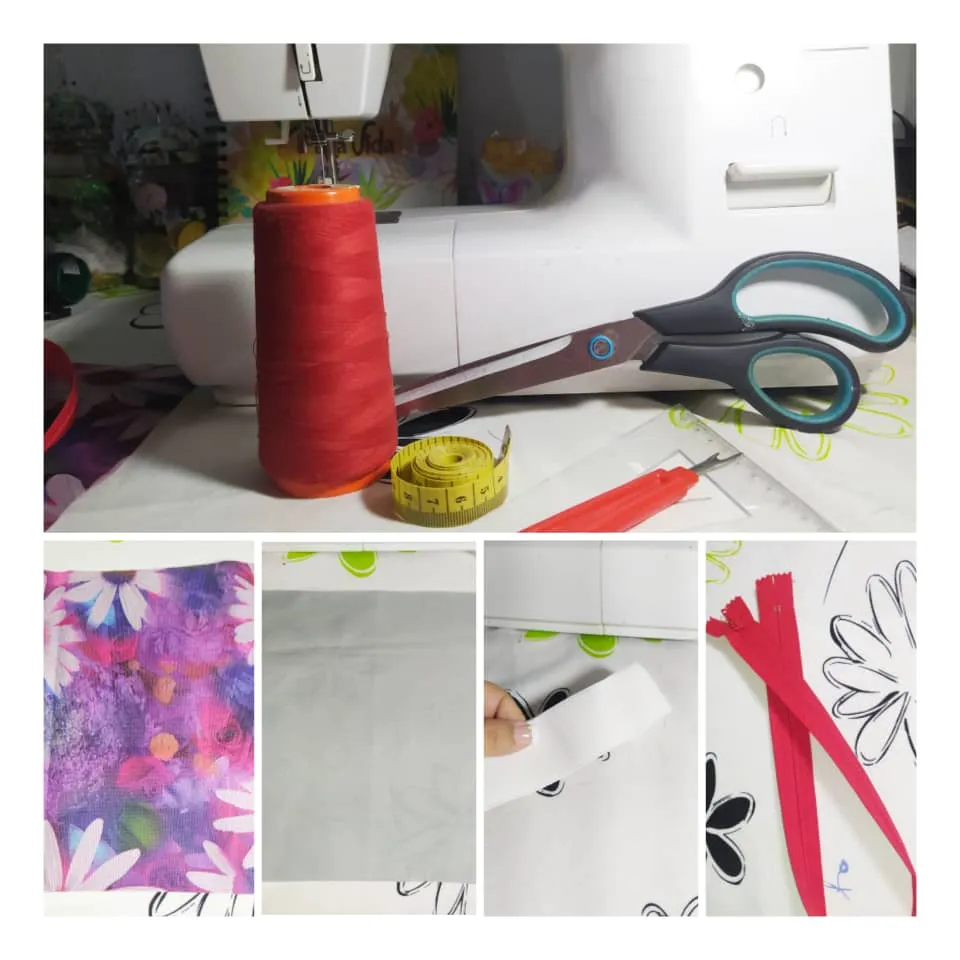
- Máquina de coser, hilo, tijera, regla y cinta métrica.
- Loneta Sky rectángulo de 22 cms por 25 cms.
- Tela de forro de 22 cms por 25 cms.
- Elástico de 30 cms.
- Cierre de 25 cms.
- Sewing machine, thread, scissors, ruler and tape measure.
- Rectangular Sky Canvas 22 cm by 25 cm.
- Lining fabric of 22 cms by 25 cms.
- 30 cm elastic.
- 25 cm closure.

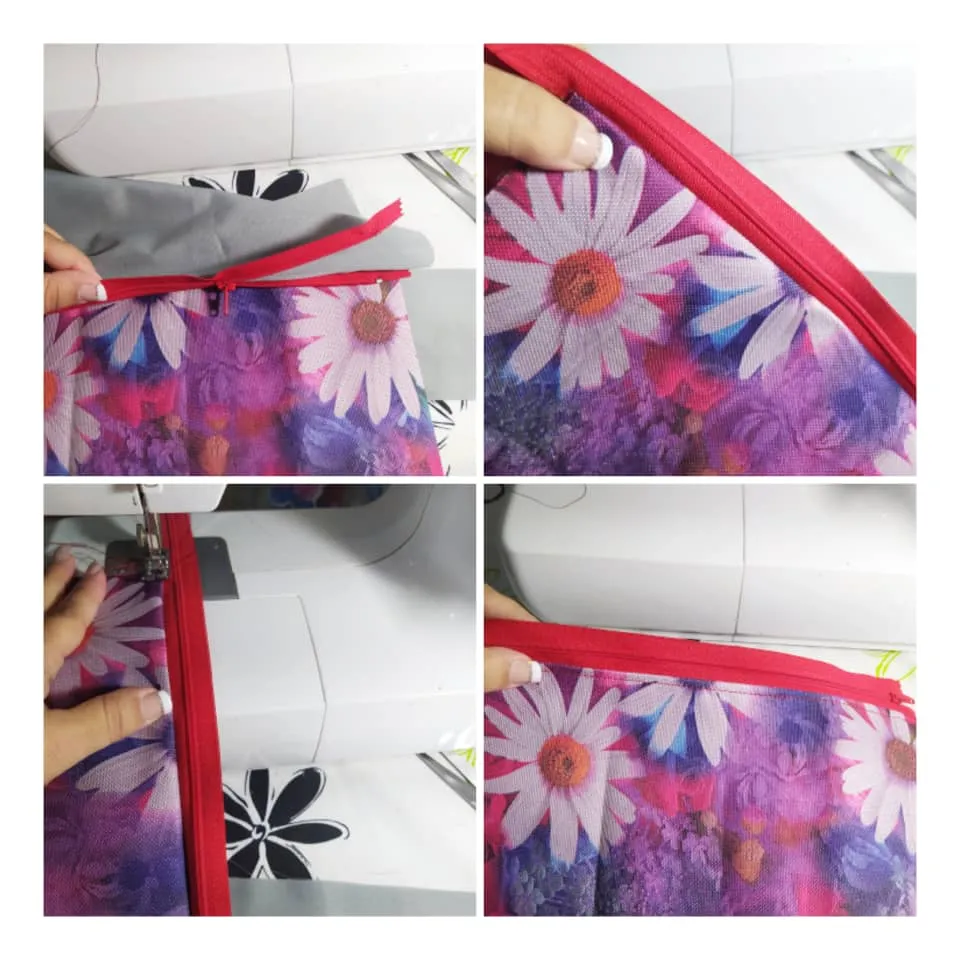
Empiezo a trabajar con la Loneta Sky, en mi caso utilicé una estampada, y con el cierre, el cual voy a ubicar en la parte más larga de la loneta, es decir la que mite 25 cms. Encaro el derecho del cierre con el derecho de la loneta y coso con costura recta en la máquina de coser.
I start working with the Sky Canvas, in my case I used a printed one, and with the closure, which I am going to place in the longest part of the canvas, that is, the one that measures 25 cms. I face the right side of the zipper with the right side of the canvas and sew with a straight seam on the sewing machine.
Luego, voy a unir el forro por la misma medida, la parte que mite 25 cms, lo coloco encima del cierre, de manera que va a quedar enfrentado con el derecho de la loneta que cosí en el paso anterior. Costura recta en la máquina de coser.
Then, I am going to join the lining by the same measure, the part that measures 25 cms, I place it on top of the zipper, so that it will be facing the right side of the canvas that I sewed in the previous step. Straight seam on the sewing machine.
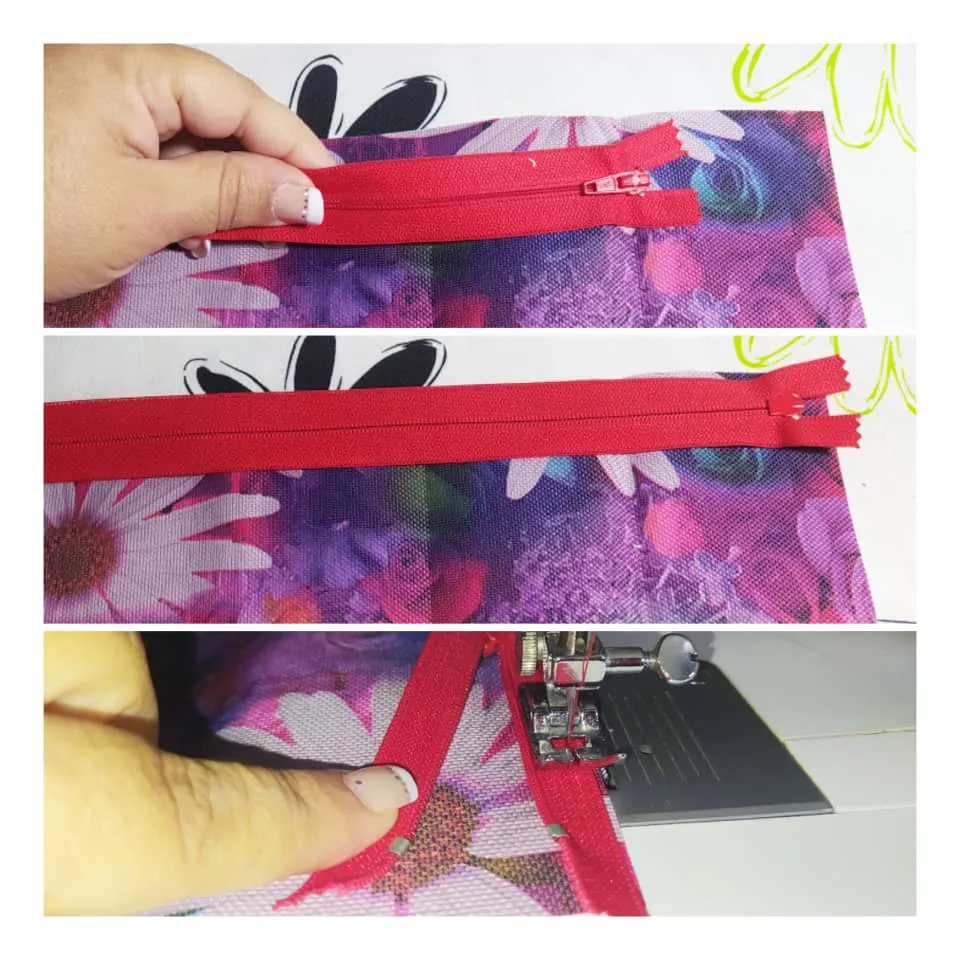
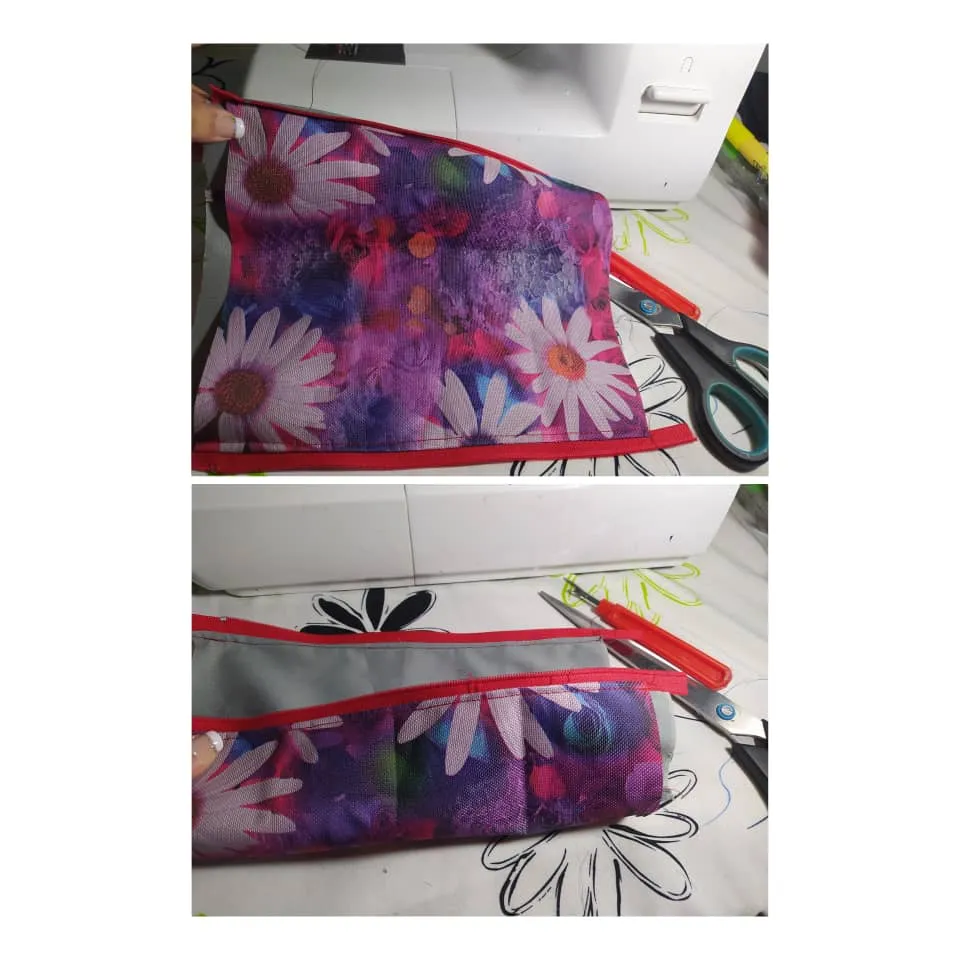
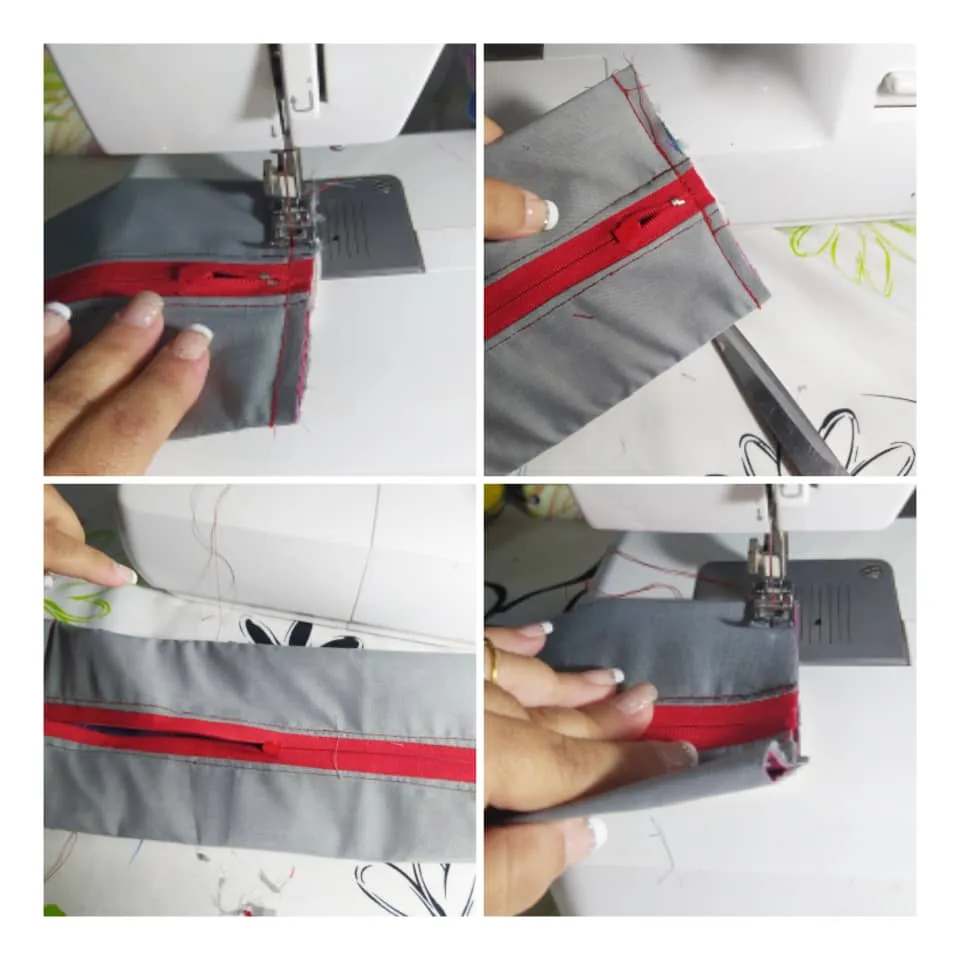
Al sacar la pieza de la máquina de coser, enderezamos todo dejando expuesto el derecho del cierre, y pasamos una costura recta para repisar todo ese borde que acabo de formar.
When we take the piece out of the sewing machine, we straighten everything, exposing the right side of the zipper, and we make a straight seam to cover all that edge that I just formed.
Voy a sacarle el slider al cierre para separar las dos piezas del cierre, y poder colocar ahora la parte del cierre que está libre al otro extremo de la loneta.
✅Tip de Elaboración: Este paso hay varias formas de hacerlo, puedes incluso hacerlo sin separar el cierre, pero al hacerlo de esta forma puedes repisar la pieza más cómodamente. Así que te recomiendo hacerlo de esta forma.
✅Tip de Elaboración: Al colocar el cierre en el otro extremo de la loneta, fíjate bien en alguna marca para que quede igual. Aquí yo utilicé como referencia el tope de metal que trae el cierre. Los ubico frente con frente, o al beso como decimos las costureras, de esta manera lo tomo con cuidado y así lo meto en la máquina de coser, y entonces tengo la garantía de que no va a quedar movido o torcido el cierre, lo que sería un desperfecto muy grande que tendrías que descoser completamente.
I am going to remove the slider from the closure to separate the two pieces of the closure, and now be able to place the part of the closure that is free at the other end of the canvas.
✅Processing Tip: There are several ways to do this step, you can even do it without separating the closure, but by doing it this way you can shelf the piece more comfortably. So I recommend you do it this way.✅Processing Tip: When placing the closure at the other end of the canvas, take a good look at a mark so that it stays the same. Here I used the metal stop that comes with the closure as a reference. I place them face to face, or to the kiss as we seamstresses say, in this way I take it carefully and put it in the sewing machine, and then **I have the guarantee that the zipper will not be moved or twisted, ** which would be a very large flaw that you would have to completely undo.
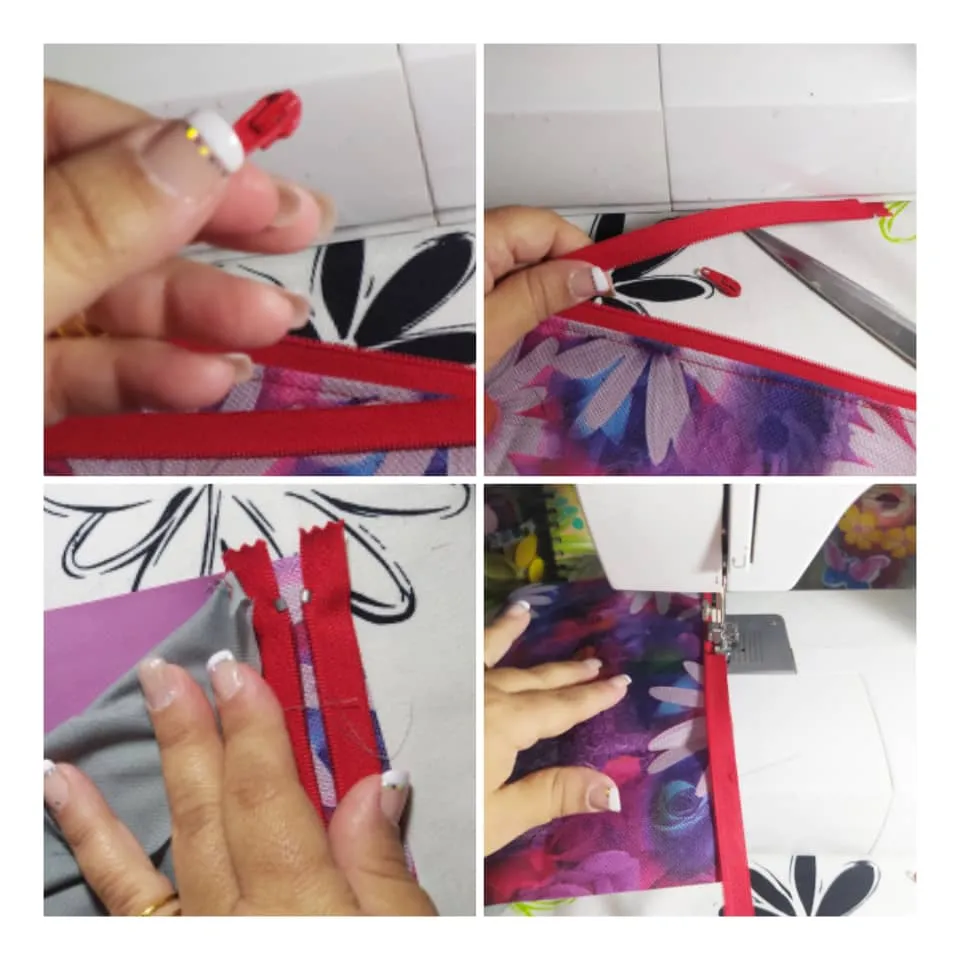
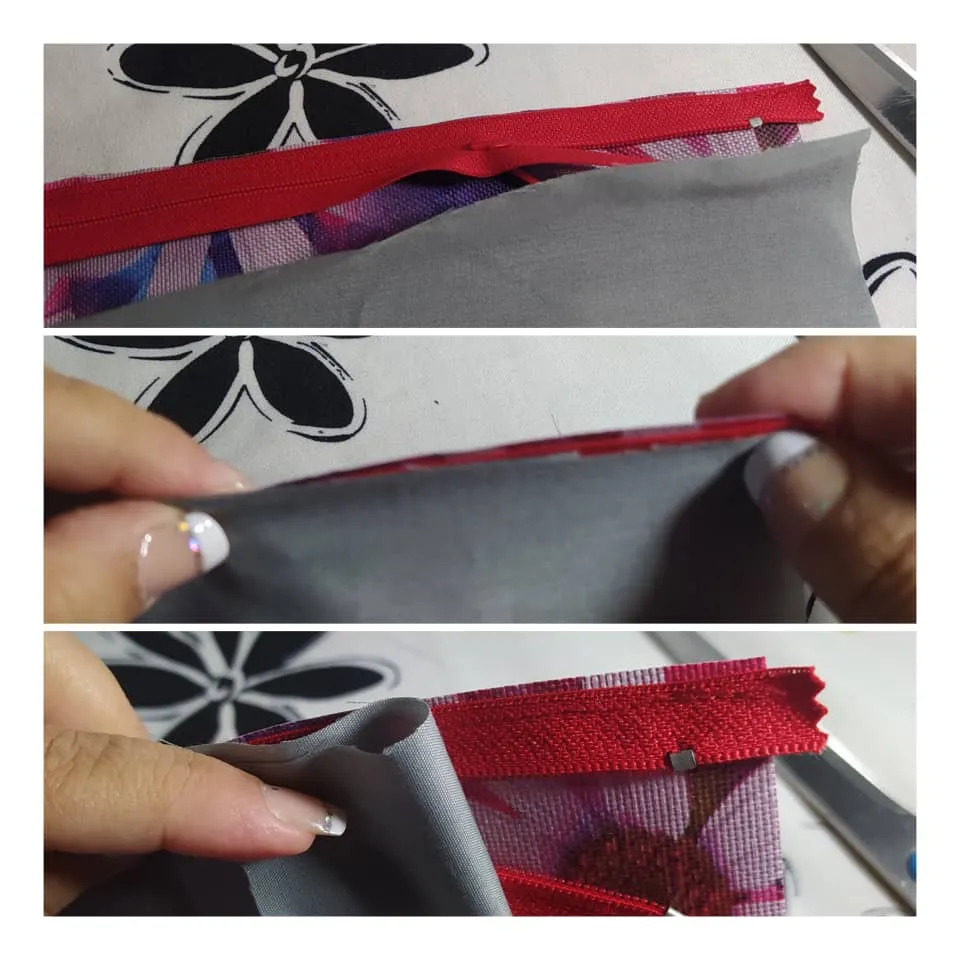
Para colocar el forro en este extremo, tomo el extremo libre del forro y le doy la vuelta para que quede en el lado del cierre que estoy colocando en este momento. De manera que, quedaría el conjunto de loneta-cierre-forro, y coso.
To attach the liner to this end, I take the free end of the liner and flip it over so it's on the side of the zipper I'm attaching right now. So, the canvas-closure-lining assembly would remain, and I sew.
Ahora simplemente volteo la pieza por el medio del tubito que formé con todo esto.
Now I just turn the piece in the middle of the little tube I made with all this.
Y nuevamente repiso el borde nuevo. Como te mencioné anteriormente, hacerlo de esta forma te permite repisar cómodamente las costuras.
And again I fill the new edge. As I mentioned before, doing it this way allows you to comfortably recast the seams.
✅TIP IMPORTANTE DE CONFECCIÓN a continuación
Lo amarás
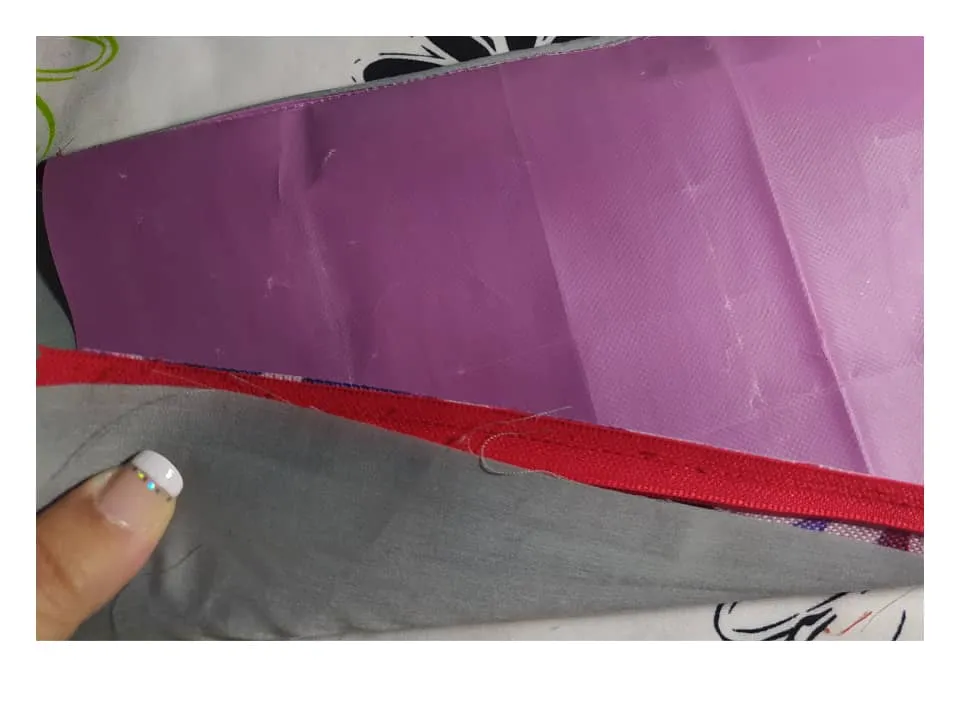
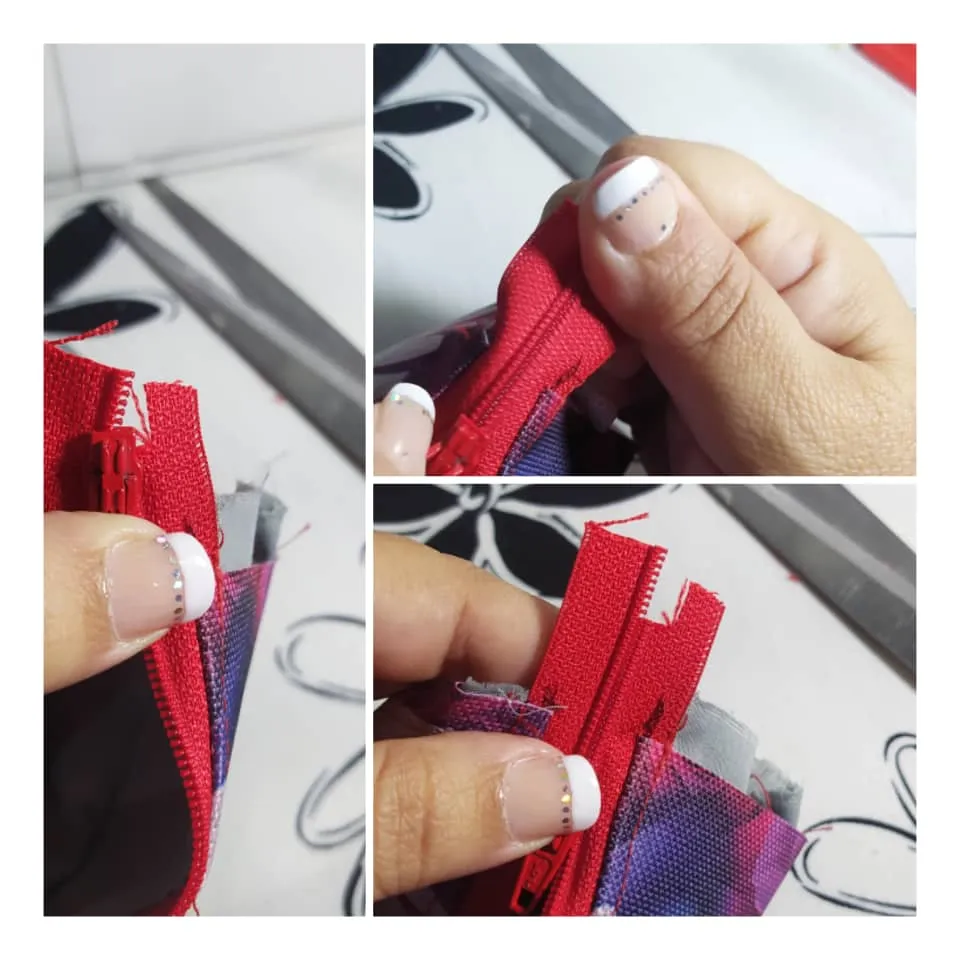
✅Tip para colocar el slider al cierre en el Primer Intento, es la forma MÁS FÁCIL Y RÁPIDA
Cuando voy a colocar un slider en el cierre, meto el slider en un extremo del cierre. A la otra parte del cierre le corto con la tijera un pedacito de los dientes, solo un pedacito del espacio de 1 cms aproximadamente, como se ve en el siguiente collage:
✅IMPORTANT CLOTHING TIP below
You will love it
✅Tip to place the slider at the close in the First Attempt, it is the EASIEST AND FASTEST way
When I'm going to put a slider on the zipper, I put the slider on one end of the zipper. To the other part of the zipper I cut with the scissors a little piece of the teeth, only a little piece of the space of approximately 1 cm, as seen in the following collage:
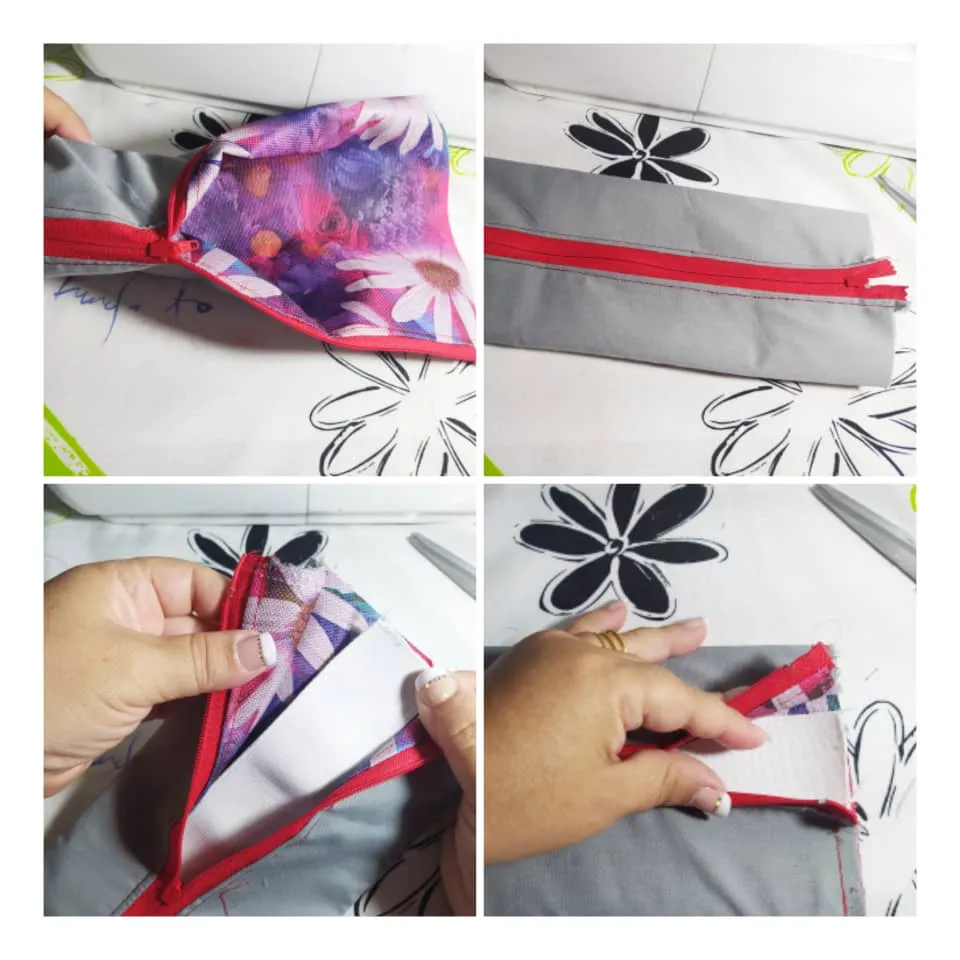
Meto un poco el slider, desde los dientes que empiezan donde corté. Ahora tomo cómodamente con mis dedos todo ese extremo del cierre y entonces ya puede deslizar el slider sin ningún inconveniente..! No se va a salir, no se va a mover, no tienes que hacer movimiento expertos para calzarlo, nada... Simplemente y fácilmente se va a deslizar por los dientes del cierre.
Este truco es el mejor que he utilizado, ya probé otras formas y usé incluso un tenedor para poner el slider... bueno muchas técnicas, porque siempre uso cierres en mis creaciones de bolso, carteras, etc y poner el slider siempre fue un problema, pero ya no..! Con está Técnica es muy Fácil y Rápido.
I put the slider in a bit, from the teeth that start where I cut. Now I take all that end of the zipper comfortably with my fingers and then you can slide the slider without any inconvenience...! It won't come off, it won't move, you don't have to make expert movements to put it on, nothing …It just and easily goes to slide through the zipper teeth.
This trick is the best I have used, I have already tried other ways and I even used a fork to put the slider... well many techniques, because I always use zippers in my bag creations, purses, etc and putting the slider was always a problem , but not anymore..! With this Technique it is very Easy and Fast.
Continuamos...
Voy a voltear nuevamente la pieza para poder coser los extremos por el lado interno. Abro un poco el cierre para que sea más fácil voltear la cartuchera, pero sin desarmar el cierre..!
Una vez volteada, aplano bien, centro el cierre para que tenga la forma la cartuchera con el cierre en medio. Abro un poquito el cierre y voy a Colocar la elástica en el lado de adentro, haciendo que coincida en el mismo espacio del cierre. Cierro de nuevo el cierre para coser en la máquina.
We continue...
I'm going to flip the piece again so I can sew the ends on the inside. I open the closure a little so that it is easier to turn the holster, but without disassembling the closure...!
Once flipped, flatten well, center the closure so that it has the shape of the holster with the closure in the middle. I open the zipper a little bit and I'm going to Place the elastic on the inside, making it coincide in the same space as the zipper. I close the zipper again to sew on the machine.
Coso todo este borde, puedo pasar un par de veces para asegurar bien las costuras. Limpio las costuras para que quede un borde prolijo y recto.
✅Tip de Confección: Antes de coser el otro extremo de la cartuchera, Abre el cierre en un buen tramo, ya que lo necesitaré abierto para poder voltear la cartuchera al terminarla. Este Tip es producto de la experiencia, porque me paso varias veces que no dejaba abierto un tramo del cierre y luego no podía voltear la pieza 😭en alguna oportunidad tuve que descoser para poder meter la mano y abrir el cierre..! Así que por favor, nunca olvides esto..!
I sew this entire edge, I can go over a couple of times to secure the seams well. I clean the seams so there is a neat, straight edge.
✅Crafting Tip: Before sewing the other end of the holster, Open the zipper a long way, since I will need it open to be able to turn the holster over when finished. This Tip is a product of the experience, because it happened to me several times that I didn't leave a section of the zipper open and then I couldn't turn the piece over 😭at some point I had to unsew to be able to put my hand in and open the zipper...! So please, never forget this..!
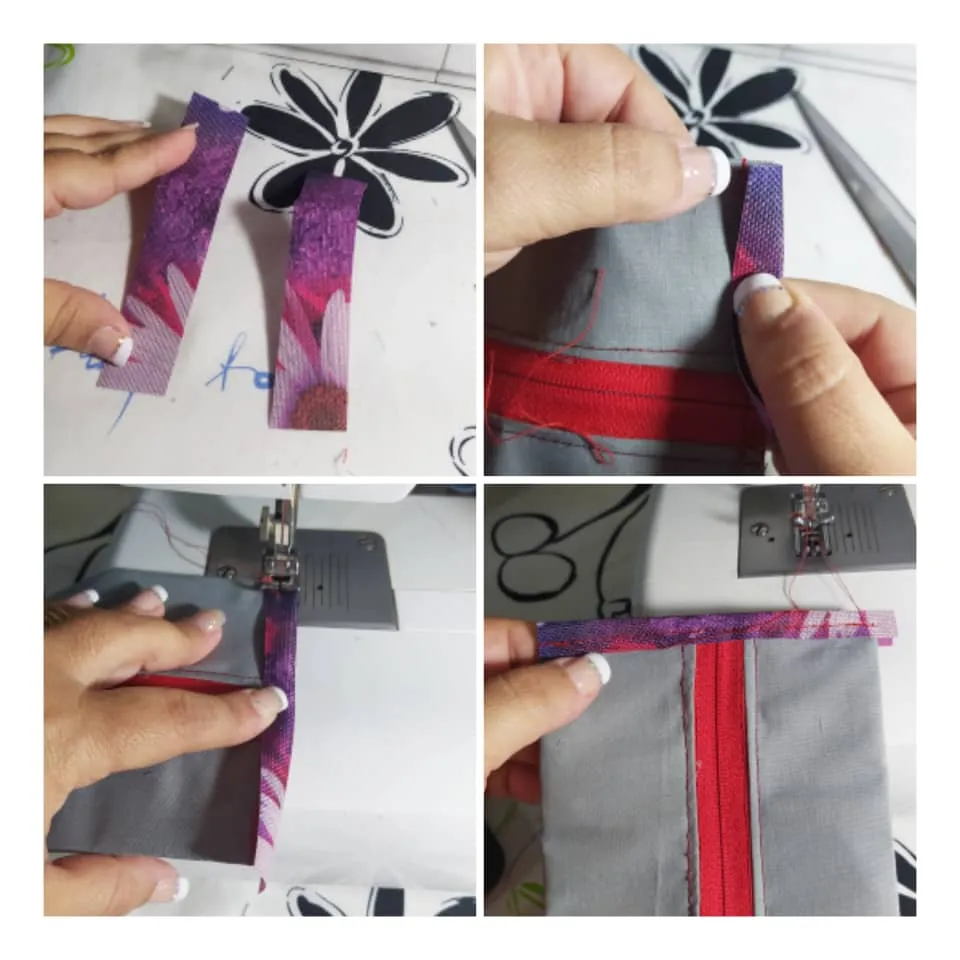
✅ Tip de Acabado de Calidad Siempre hay que cuidar los detalles internos, nuestros trabajos deben verse bien por fuera, por dentro, por arriba, por abajo, etc... Vamos a tapar las costuras internas, con unas tiras de loneta, no necesitas mucho, yo usé de los recortes, pedacitos de 2 cms aproximadamente. Lo ubico doblado encima de la costura y los coso con costura recta, y ya el espacio interno va a quedar bien prolijo y rematado.
✅ Quality Finish Tip We must always take care of the internal details, our work must look good on the outside, inside, above, below, etc... We are going to cover the internal seams, with some strips of canvas, you don't need much, I used the cutouts, pieces of approximately 2 cm. I place it folded on top of the seam and I sew it with a straight seam, and the internal space will be neat and finished off.
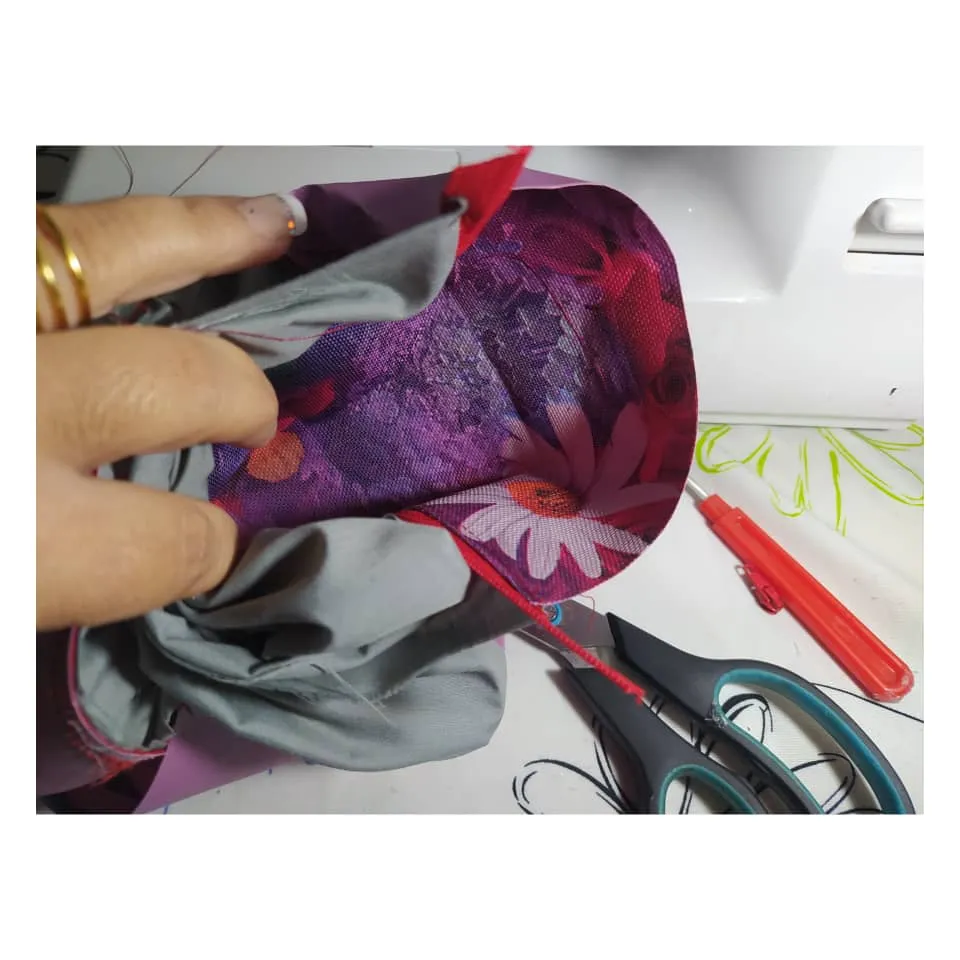
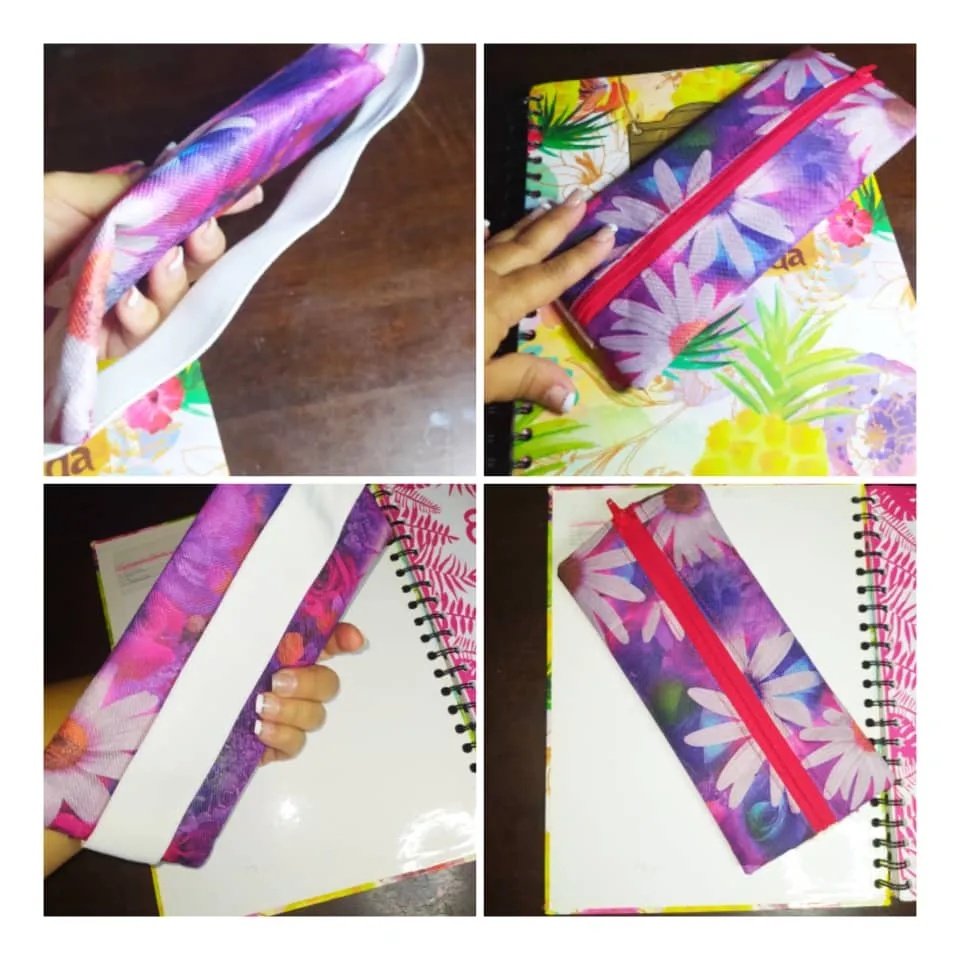
Ahora abro bien todo el cierre y volteo mi cartuchera porque ya está Lista..! Puedo ayudarme de la tijera o un bolígrafo para sacar bien las esquinas.
Now I open the entire zipper well and turn my holster because it's Ready...! I can help myself with scissors or a pen to get the corners right.
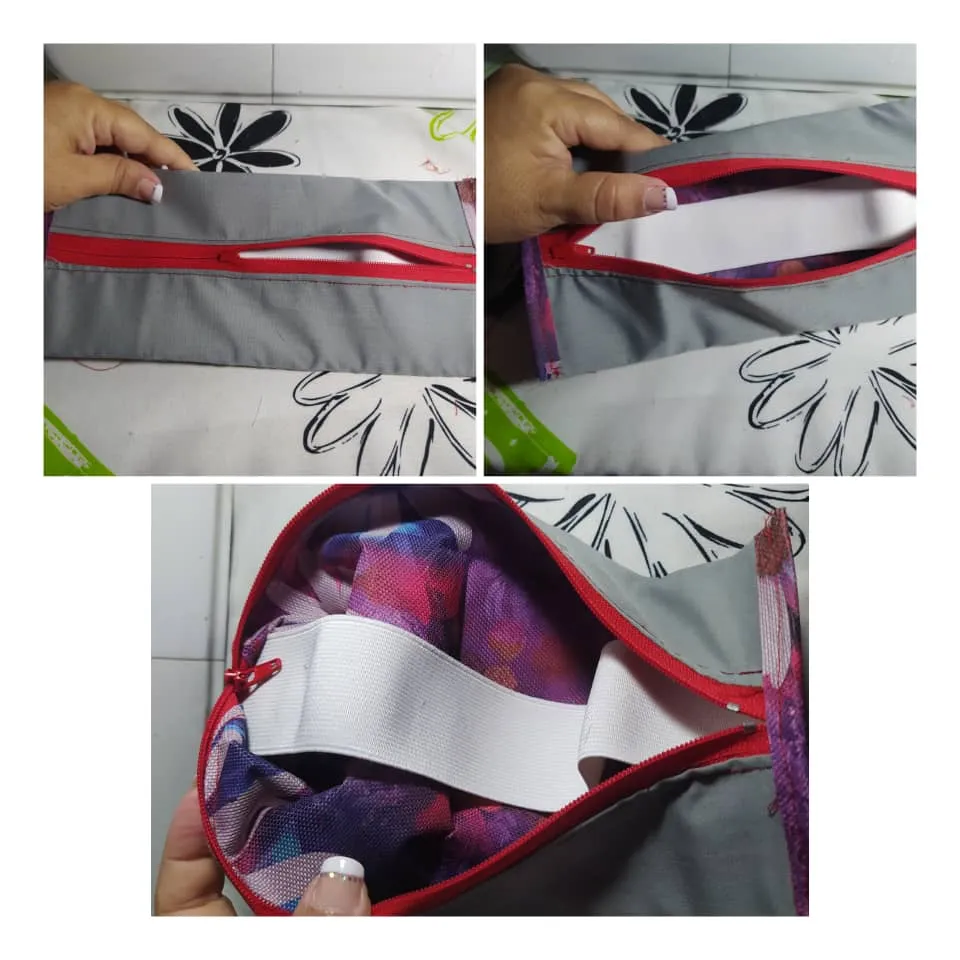
Así se ve por delante, y por la parte posterior donde queda ubicada la elástica. Yo utilicé una elástica gruesa, porque mi libreta es grande, pero puedes usar la que quieras o tengas.
This is how it looks from the front, and from the back where the elastic is located. I used a thick elastic, because my notebook is big, but you can use whatever you want or have.
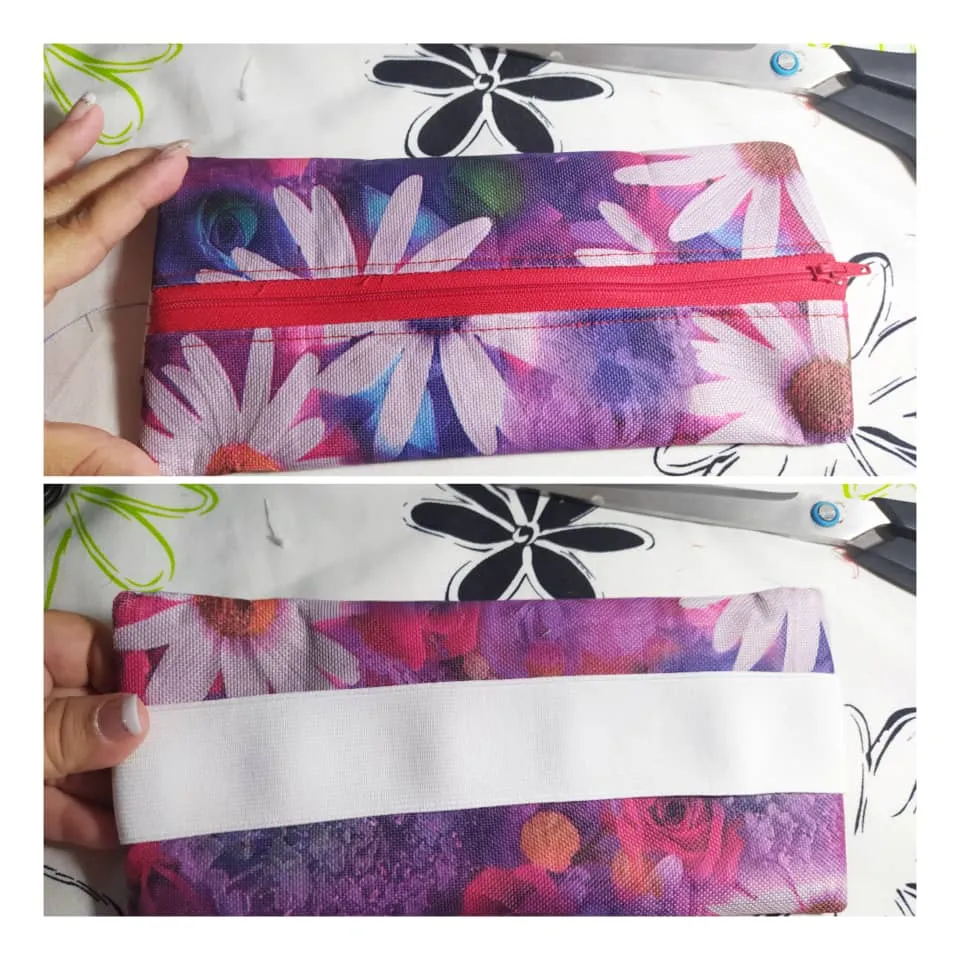
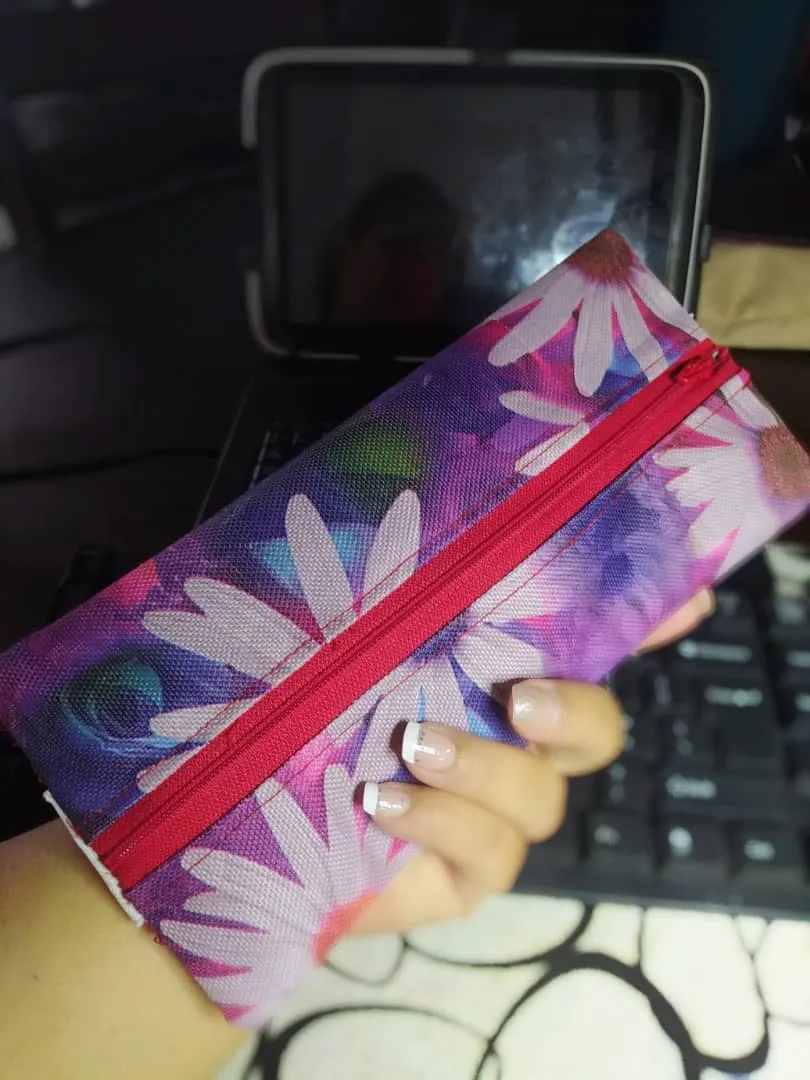
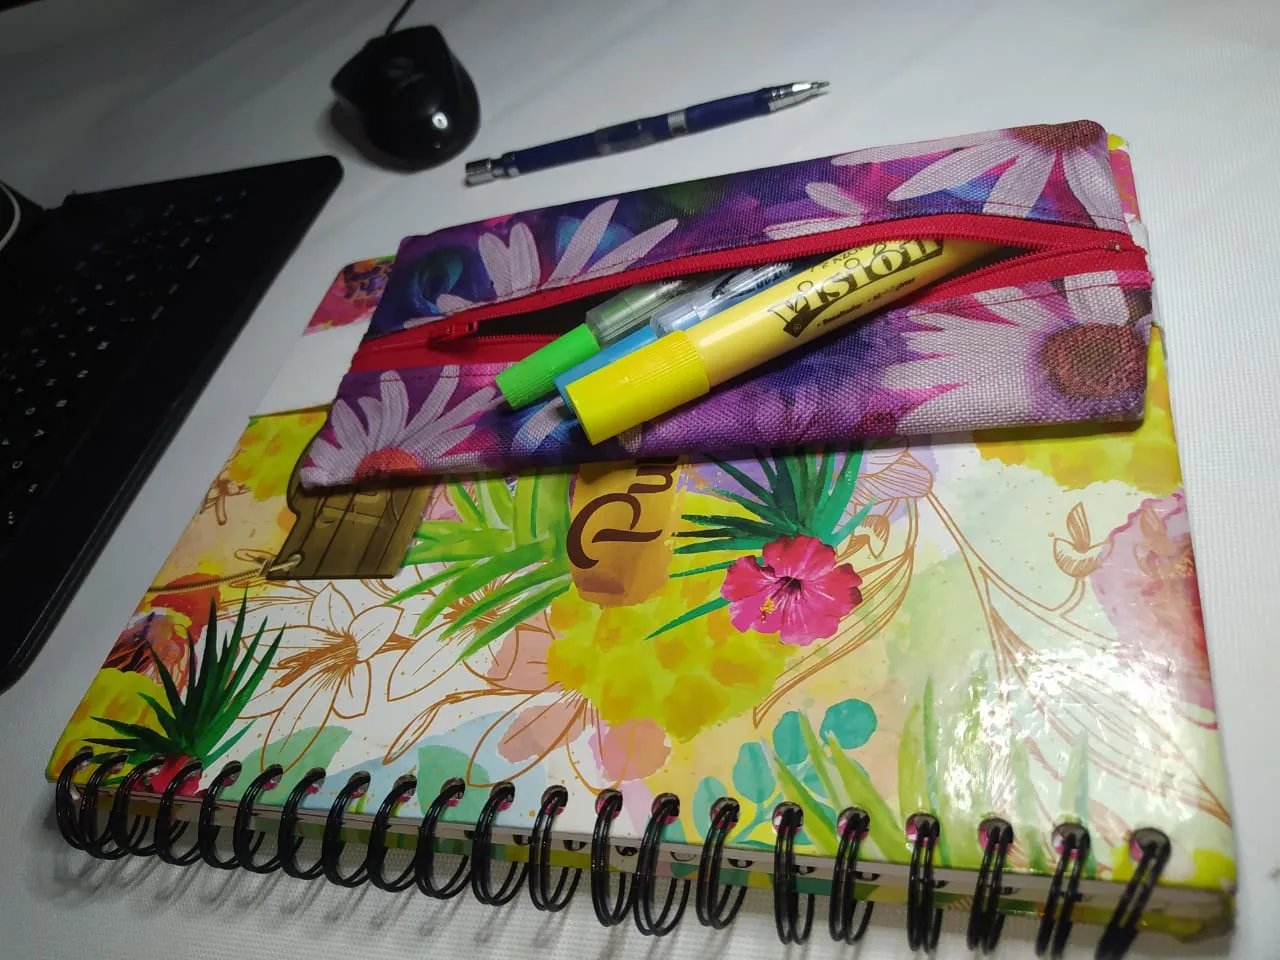
Fíjate que esta Cartuchera es delgada ya que su función es llevar algunas cosas puntuales y cerrar nuestra libreta, cuaderno o agenda, teniendo todo muy organizado y facilitando su acceso, ya no hay que buscar y buscar el bolígrafo o resaltador en todo el bolso, porque todo está donde tiene que estar.
Note that this Cartuchera is thin since its function is to carry some specific things and close our notebook, notebook or agenda, having everything very organized and facilitating its access, you no longer have to search and search for the pen or highlighter in everything the bag, because everything is where it has to be.
No lo pensé antes...
Mi hijo que acaba de ver mi proyecto, lo ve y lo ve y me dice: ¿Por qué no se me ocurrió cuando él estaba estudiando..? Porque muchas veces él iba al liceo solo con un cuaderno y hubiese sido ideal tener su cuaderno bien cerrado sin que se le salieran las hojas o cosas que tenía adentro, y sus útiles para escribir en una cartuchera plana fácil de transportar y todo bien amarrado...
Pero bueno... No se me había ocurrido antes ...
I didn't think about it before...
My son who has just seen my project, sees it and sees it and says to me: Why didn't it occur to me when he was studying...? Because many times he went to high school alone with a notebook and it would have been ideal to have his notebook tightly closed without the pages or things inside coming out, and his writing supplies in a flat, easy-to-carry pencil case and everything well tied. ..
But well... It hadn't occurred to me before...
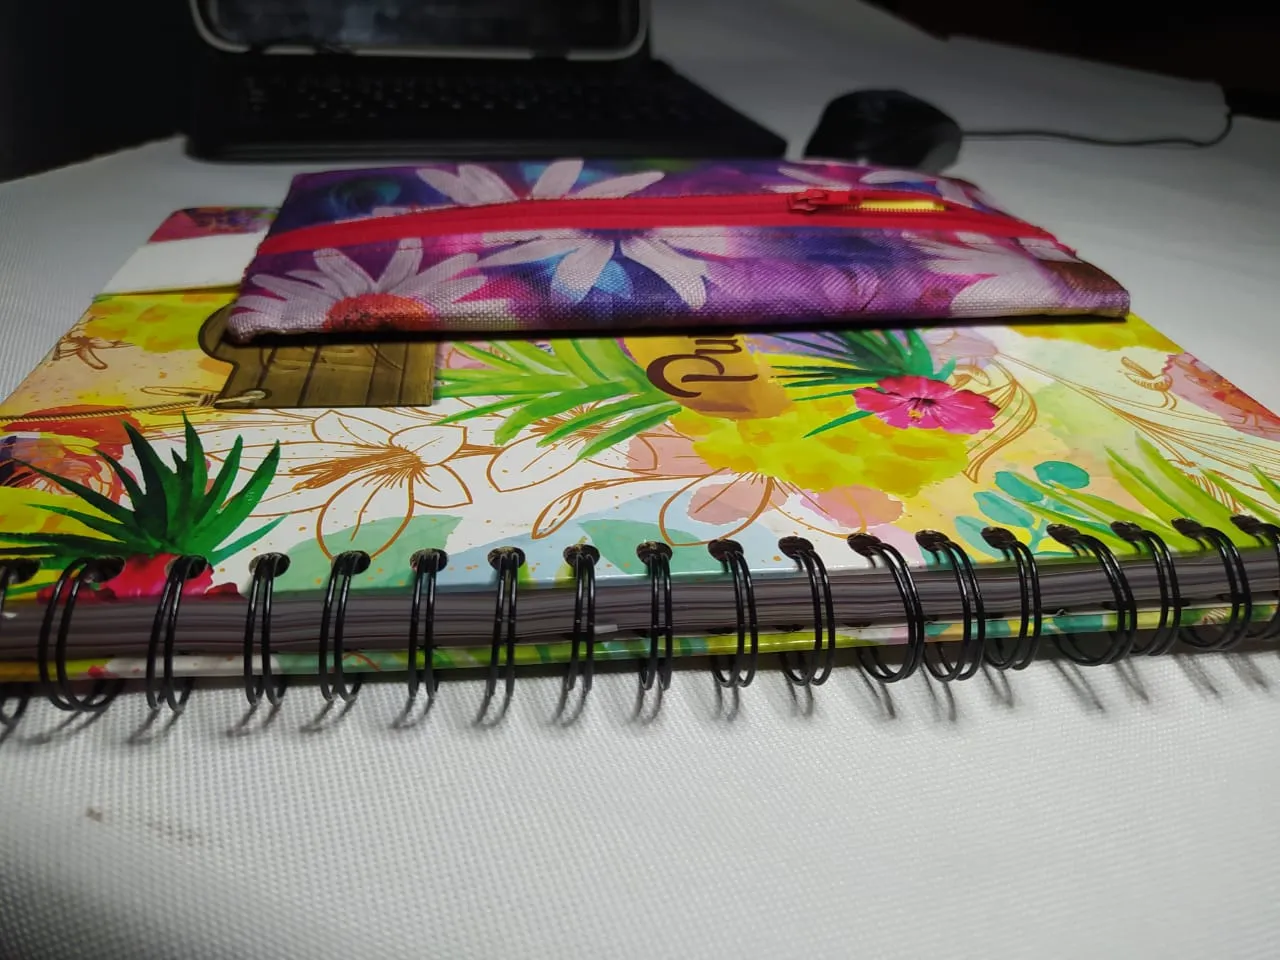
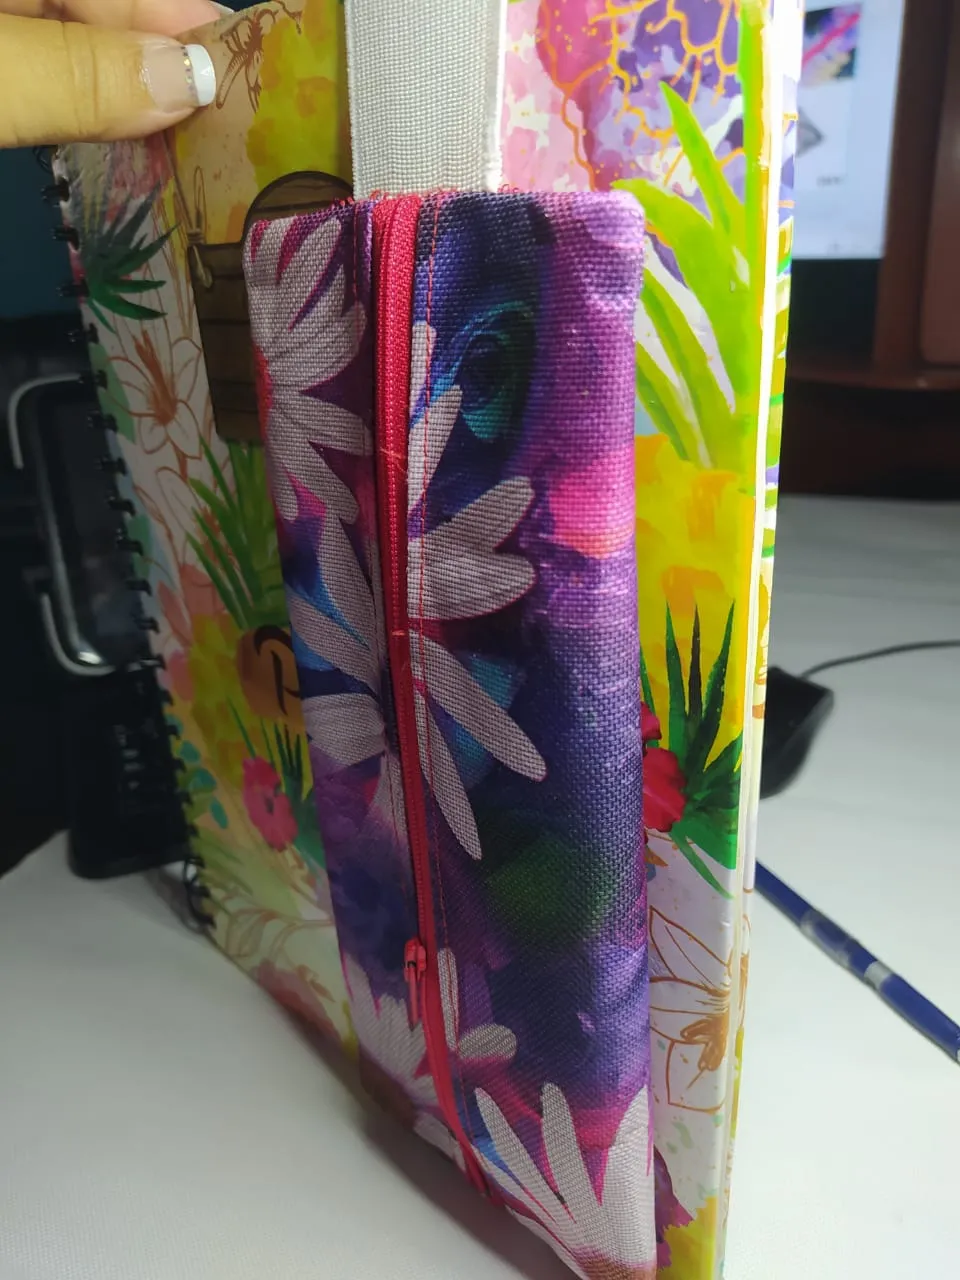
Fíjate que la Cartuchera queda perfectamente unida al cuaderno, y además reguarda bien todo lo que está dentro del cuadernos ya que no se va a salir nada como hojitas de notas, papelitos, tarjetas, etc que tengamos guardado entre las páginas.
Note that the Cartuchera is perfectly attached to the notebook, and also keeps well everything that is inside the notebook since nothing is going to come out like note sheets, pieces of paper, cards, etc. that we have stored between the pages.

Deseo sinceramente que te haya gustado, mi otra hija también me hizo el mismo comentario de ¿Por qué no se me ocurrió cuando ella estaba en el liceo?
Bueno, espero que uds si estén a tiempo y que se animen a hacerla... Un abrazo a todos...
I sincerely hope that you liked it, my other daughter also made the same comment to me: Why didn't I think of it when she was in high school?
Well, I hope that you are on time and that you are encouraged to do it... A hug to all...
---------- ❤️❤️❤️❤️ ----------
Las fotos las tomé con mi teléfono Redmi Note 8 y las edité en la App InShot y son de mi propiedad @yennysferm71.
Por favor no las utilices sin mi Autorización.
También edité con https://www.canva.com/
Utilicé el Traductor Google
Mi redes sociales:
Discord: YennysYaneth#0189
Twitter: @yennysferm
Instagram: @yennysyaneth
I took the photos with my Redmi Note 8 phone and edited them in the InShot App and they are my property @yennysferm71.
Please do not use them without my Authorization.
I also edited with https://www.canva.com/
I used Google Translate
My social networks:
Discord: YennysYaneth#0189
Twitter: @yennysferm
Instagram: @yennysyaneth