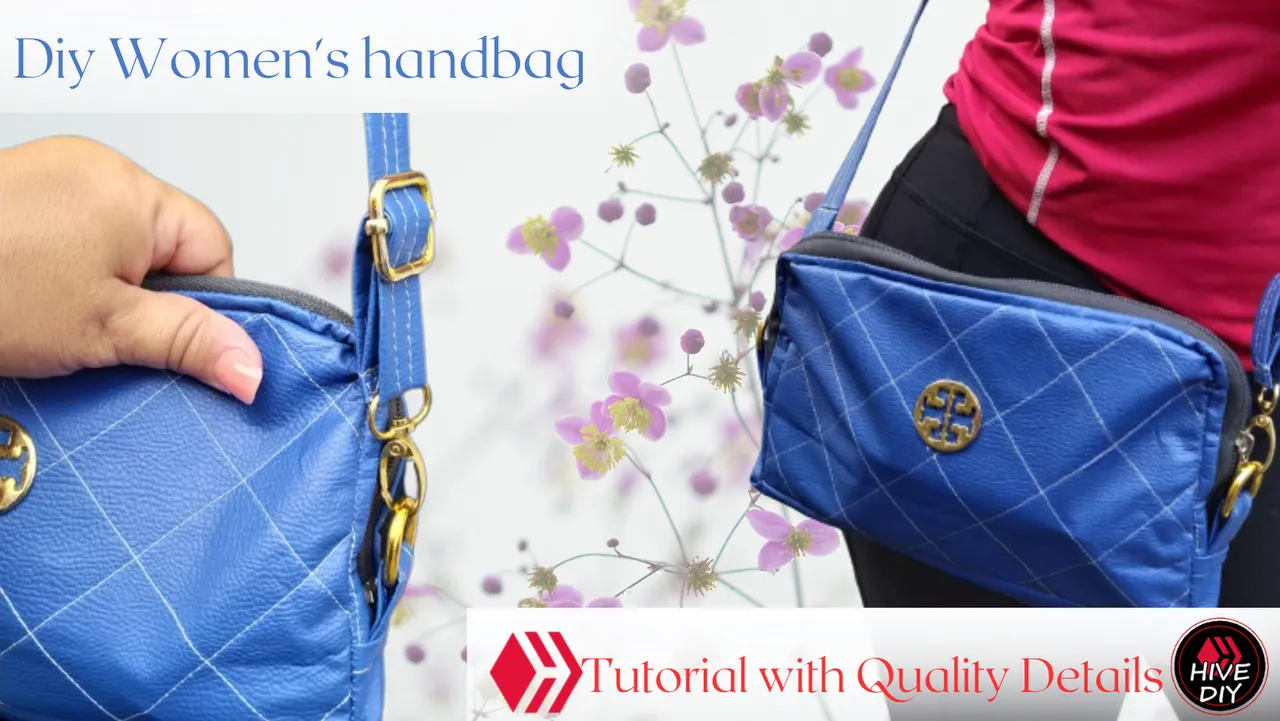
Hola amigos de Hive, hoy hice este bolso y quiero mostrarles el paso a paso. Les cuento que las piezas doradas que utilicé son Recicladas ya que eran de un bolso muy viejo que se deterioró el cuero, y antes de botarla le retiré estas piezas pensando en aprovecharlas en algún momento.
Hace unos días inicié este proyecto y mi máquina de coser de pronto dejó de coser. Mi esposo la revisó, le reforzó los puntos de soldadura y le cambió los carbones, y hoy ya pude terminar este proyecto, que me gustó mucho y deseo con mi corazón que les guste a uds también.
Hello friends of Hive, today I made this bag and I want to show you the step by step. I tell you that the golden pieces that I used are Recycled since they were from a very old bag that the leather deteriorated, and before throwing it away I removed these pieces thinking of using them at some point.
A few days ago I started this project and my sewing machine suddenly stopped sewing. My husband checked it, reinforced the welding points and changed the carbons, and today I was able to finish this project, which I liked very much and I hope with all my heart that you like it too.

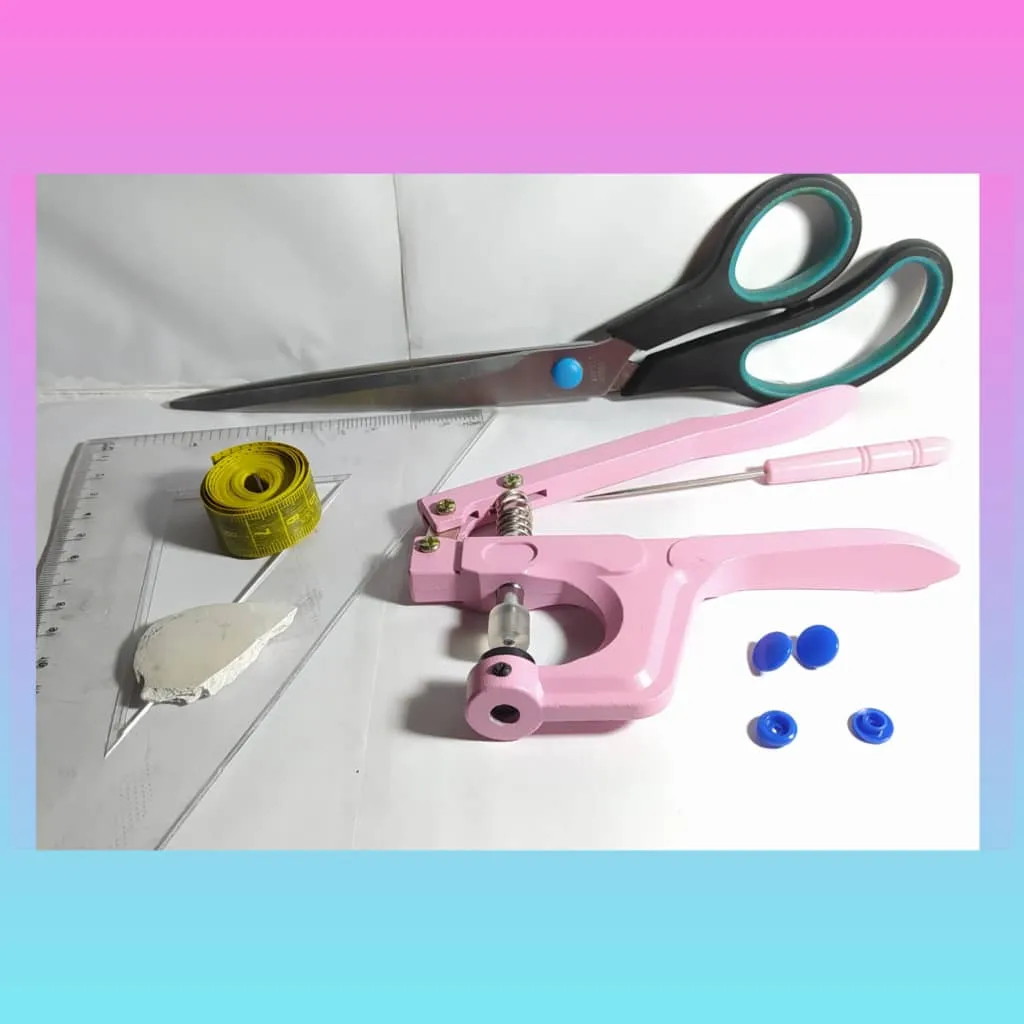
Maquina de coser
Semicuero azul
Tela de forro
Ganchos 2, Medialunas 2, Corredor
Cierre y slider.
Dije
Tijera
Tiza, regla y cinta métrica
Broches plásticos, alicate y punzón
Alfileres y clips de presión
Sewing machine
Blue half leather
Lining fabric
Hooks 2, Half-moon 2, Runner
Zipper and slider.
Dije
Scissors
Chalk, ruler and tape measure
Plastic snaps, pliers and awl
Pins and snap clips


Cortar 2 rectángulos 27 x 17 cms
Redondear 2 de sus esquinas
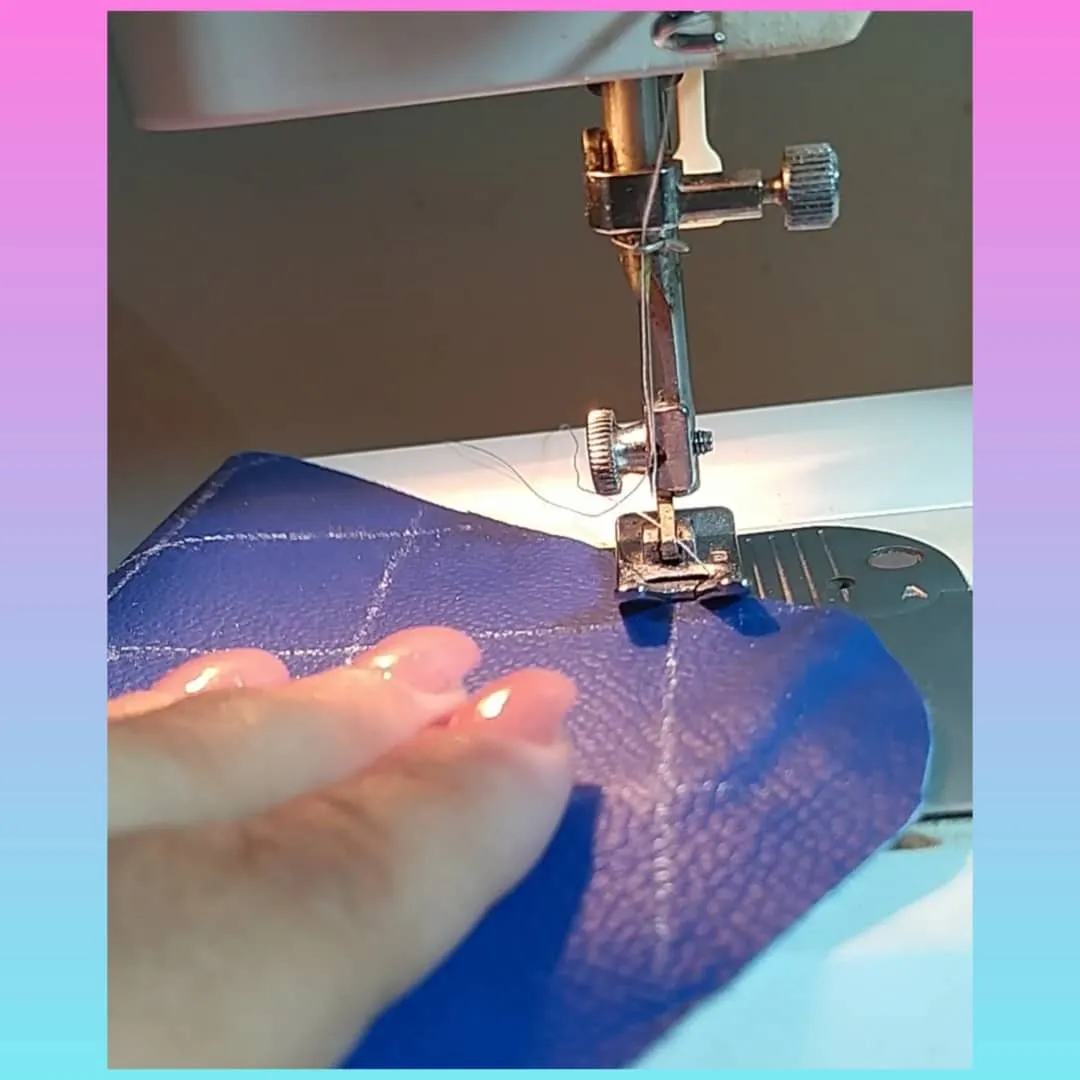
Dibujar la cuadrícula con la regla y la tiza, y coser siguiendo ese patrón de la cuadrícula
Cut 2 rectangles 27 x 17 cms.
Round off 2 of their corners
Draw the grid with the ruler and chalk, and sew following that pattern.
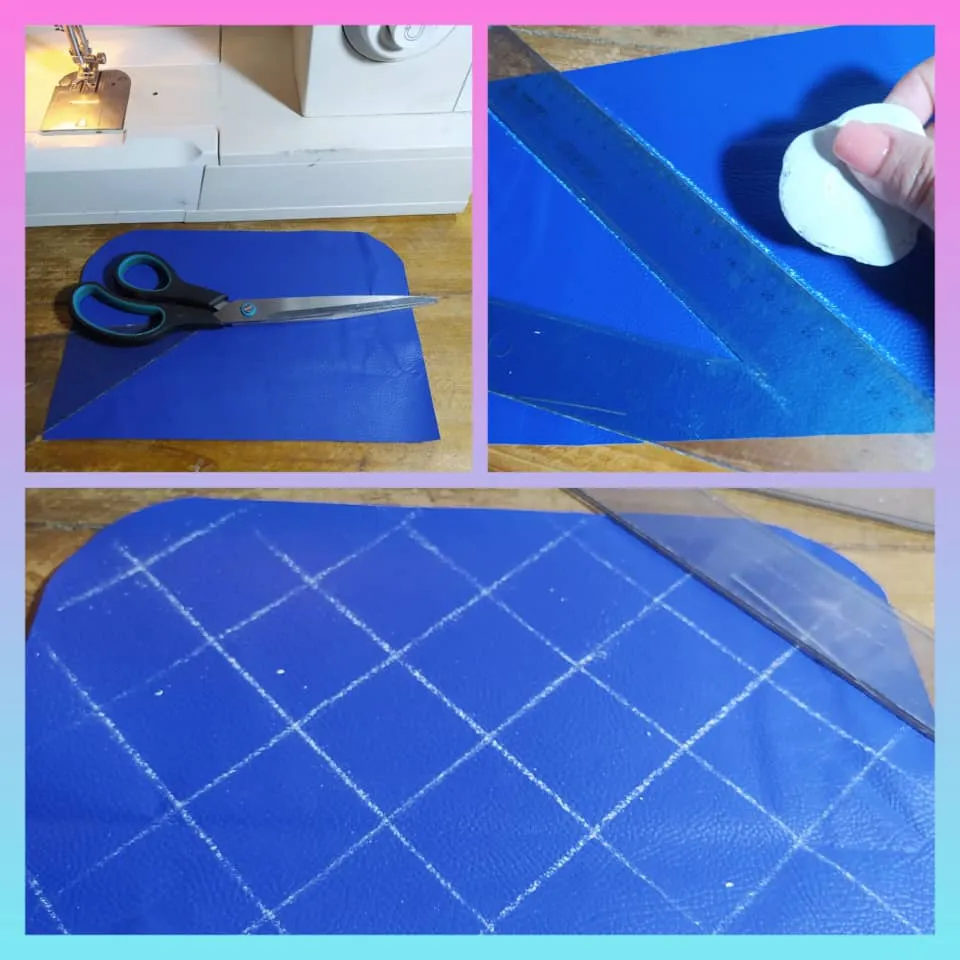
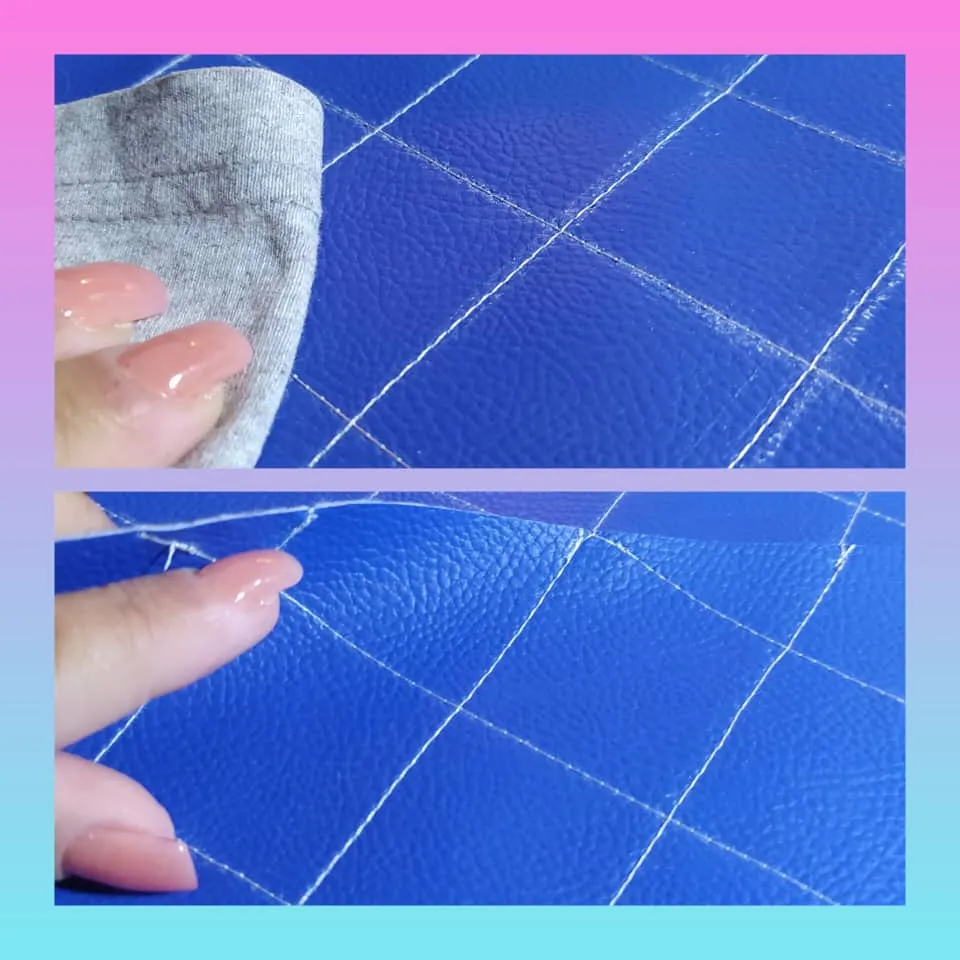
Borro con tela o servilleta, las marcas de tiza
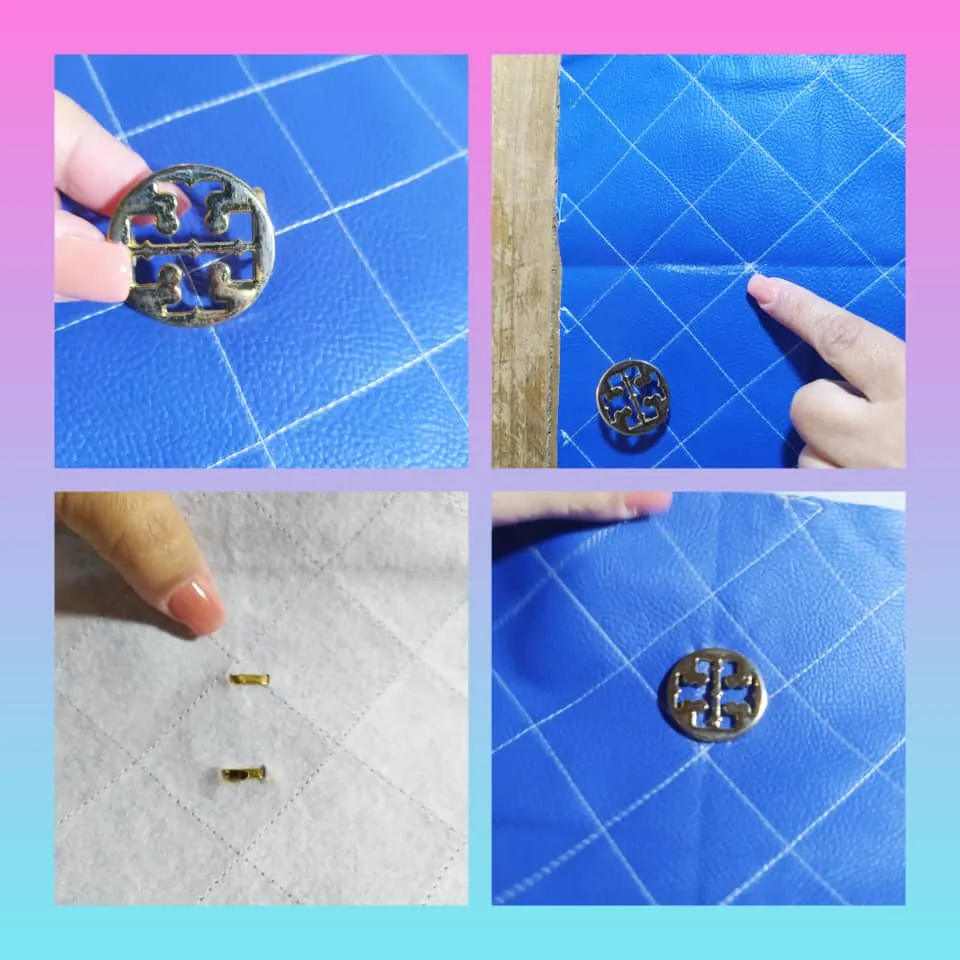
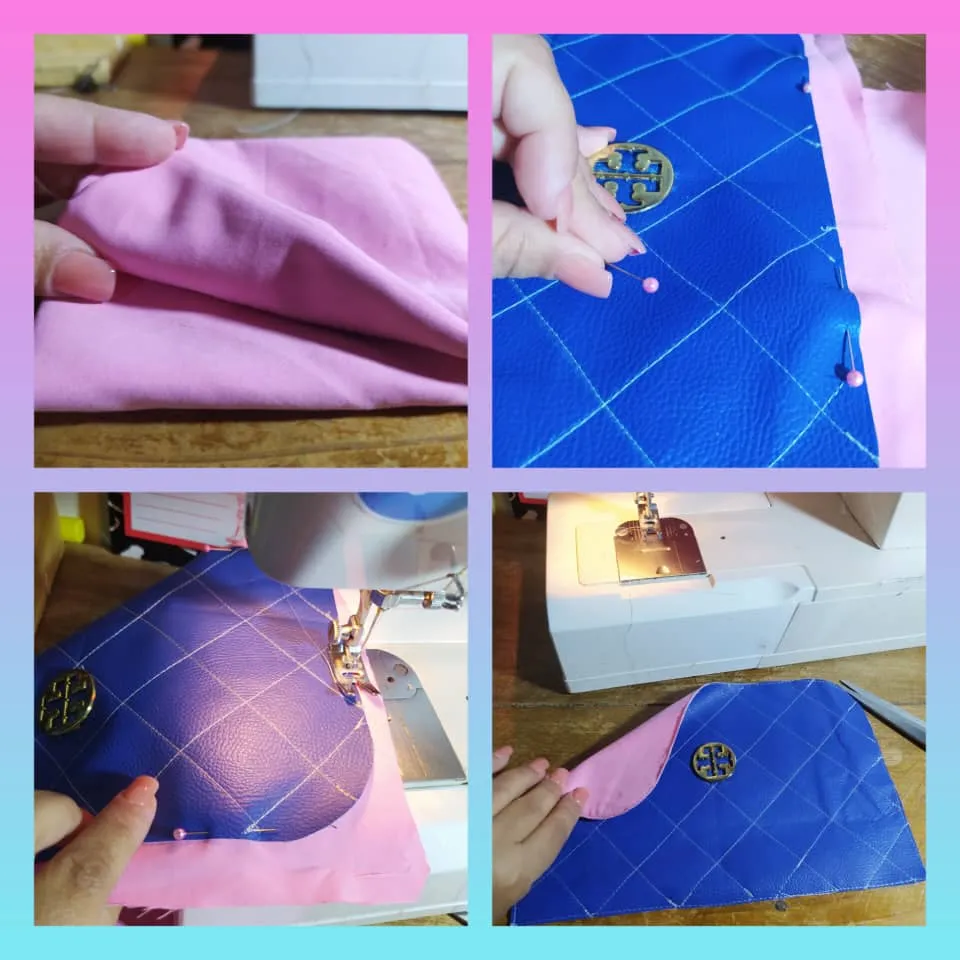
En una de las piezas rectángulares, marco el centro y coloco el dije, fijándolo con sus piezas. Esta será la pieza delantera del bolso.
I erase the chalk marks with cloth or napkin.
On one of the rectangular pieces, I mark the center and place the charm, fixing it with its pieces. This will be the front piece of the bag.
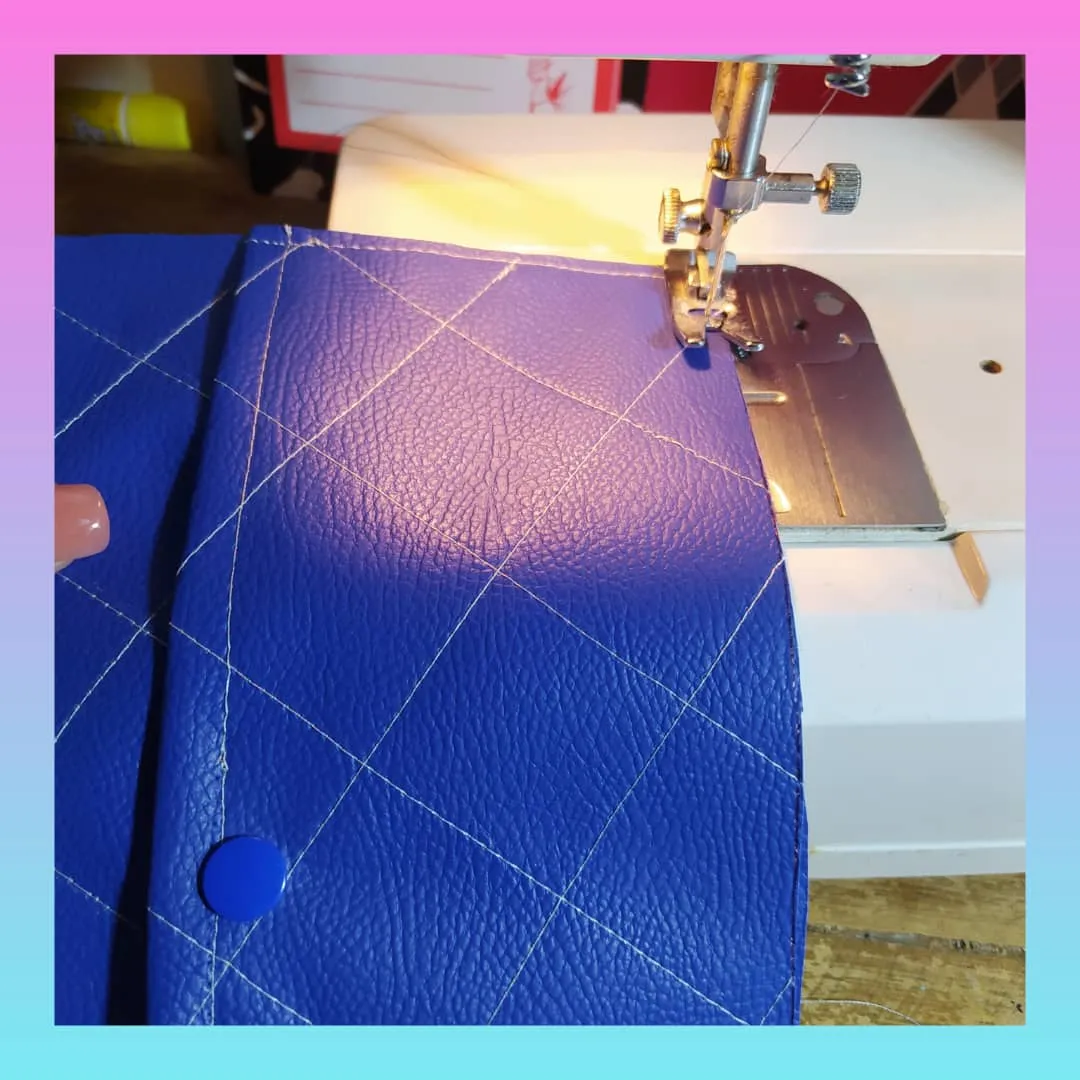
Corto un rectángulo de 27 x 11 cms para hacer un bolsillo posterior externo. Le dibujo la cuadrícula igualmente, es interesante hacer que coincida el diseño con la pieza más grande, para que tenga continuidad.
Ahora en la pieza más pequeña, coso su borde superior con un doble.
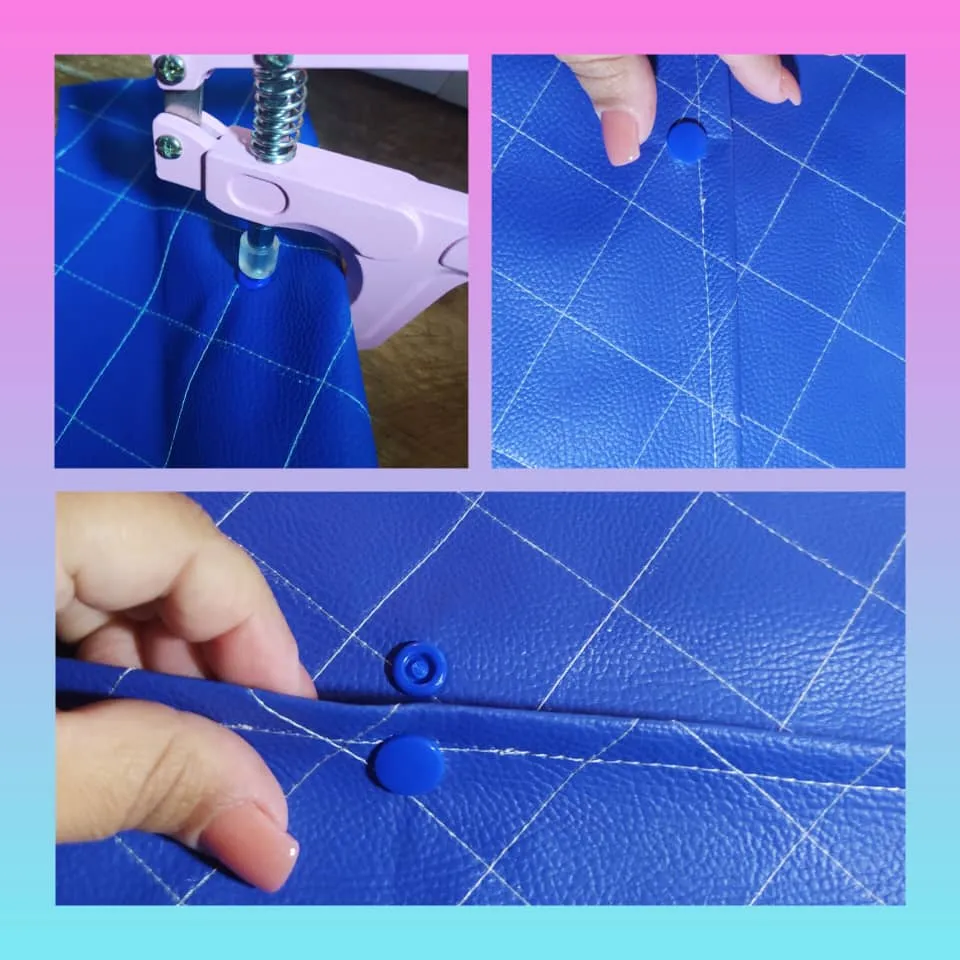
Ubico la pieza encima de la más grande, marco el centro superior y coloco un broche plástico para cerrarse con comodidad al usarlo.
I cut a 27 x 11 cm rectangle to make an external back pocket. I also draw the grid, it is interesting to match the design with the larger piece, so that it has continuity.
Now on the smaller piece, I sew its top edge with a double stitch.
I place the piece on top of the larger one, mark the top center and place a plastic clasp to close it comfortably when wearing it.
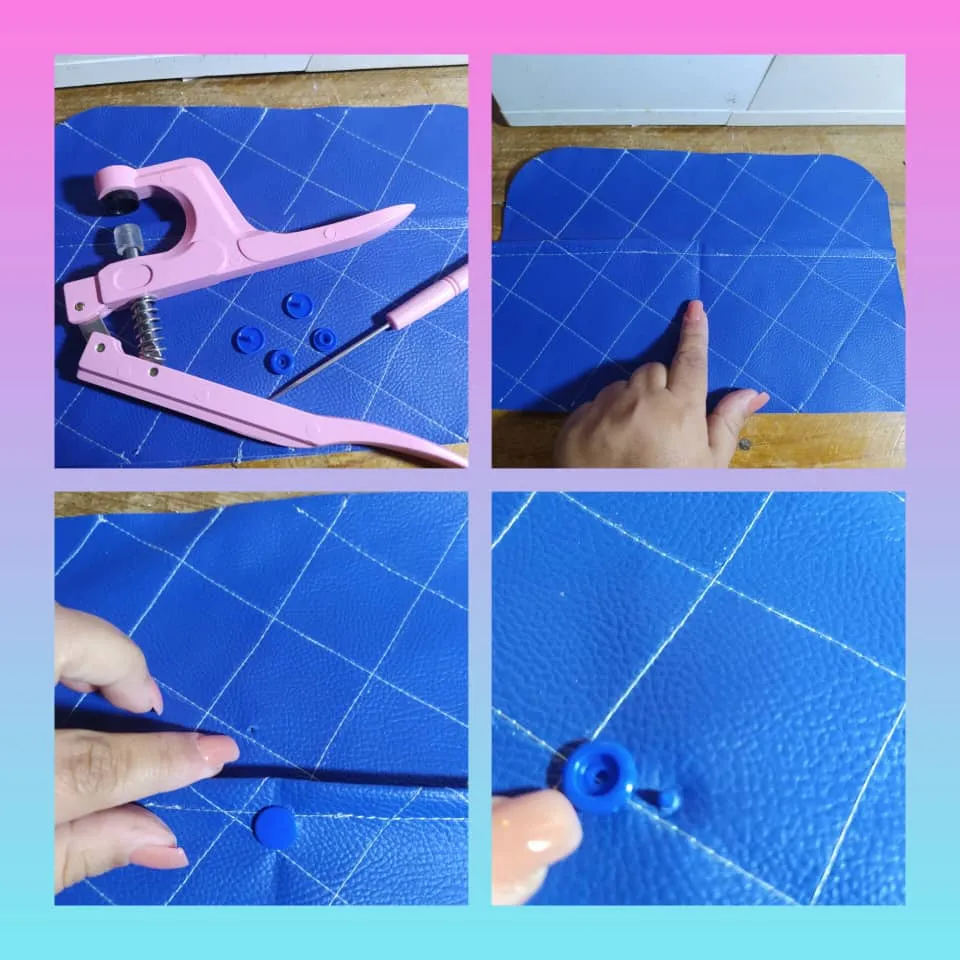
Coloco las 2 piezas de los broches, usando su punzón para marcar y el alicate para presionar y ubicar los broches.
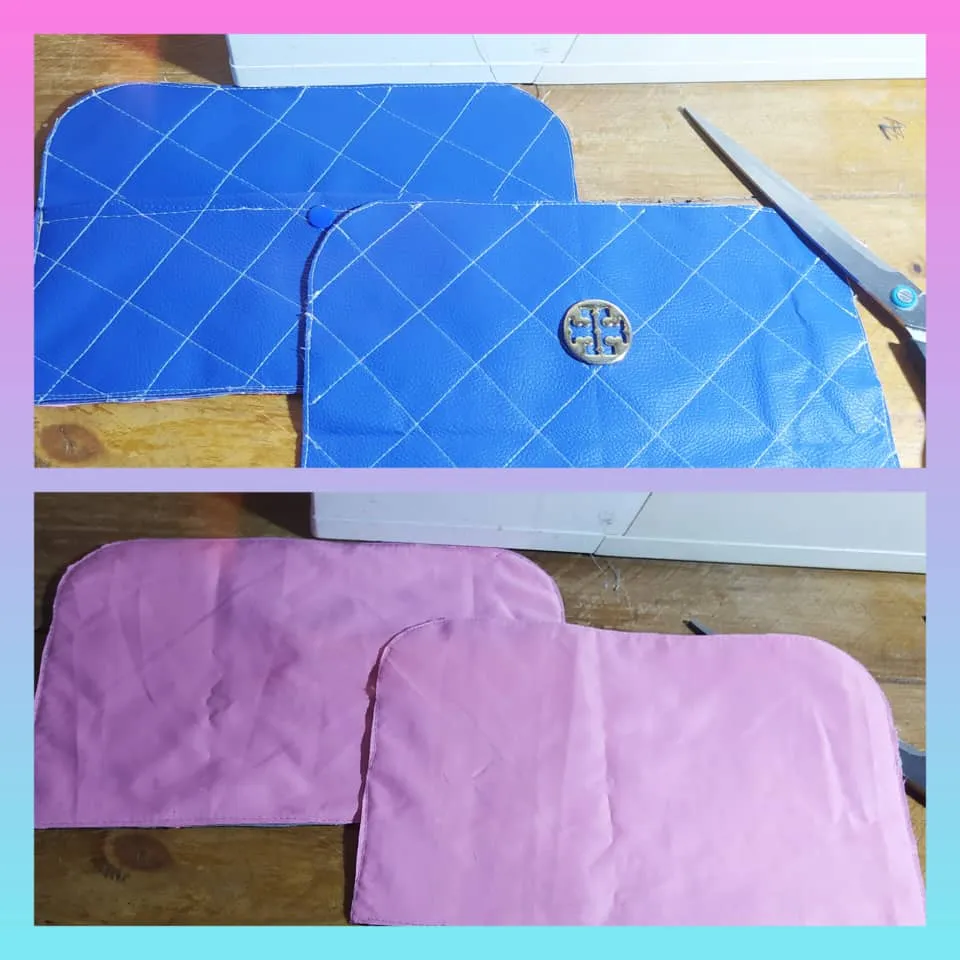
Estas 2 piezas que serán la parte posterior del bolso, las fijo cosiendo y uniendo ambas por los laterales e inferior.
I place the 2 pieces of the clasps, using the punch to mark and the pliers to press and place the clasps.
These 2 pieces that will be the back of the bag, I fix them by sewing and joining both sides and bottom.
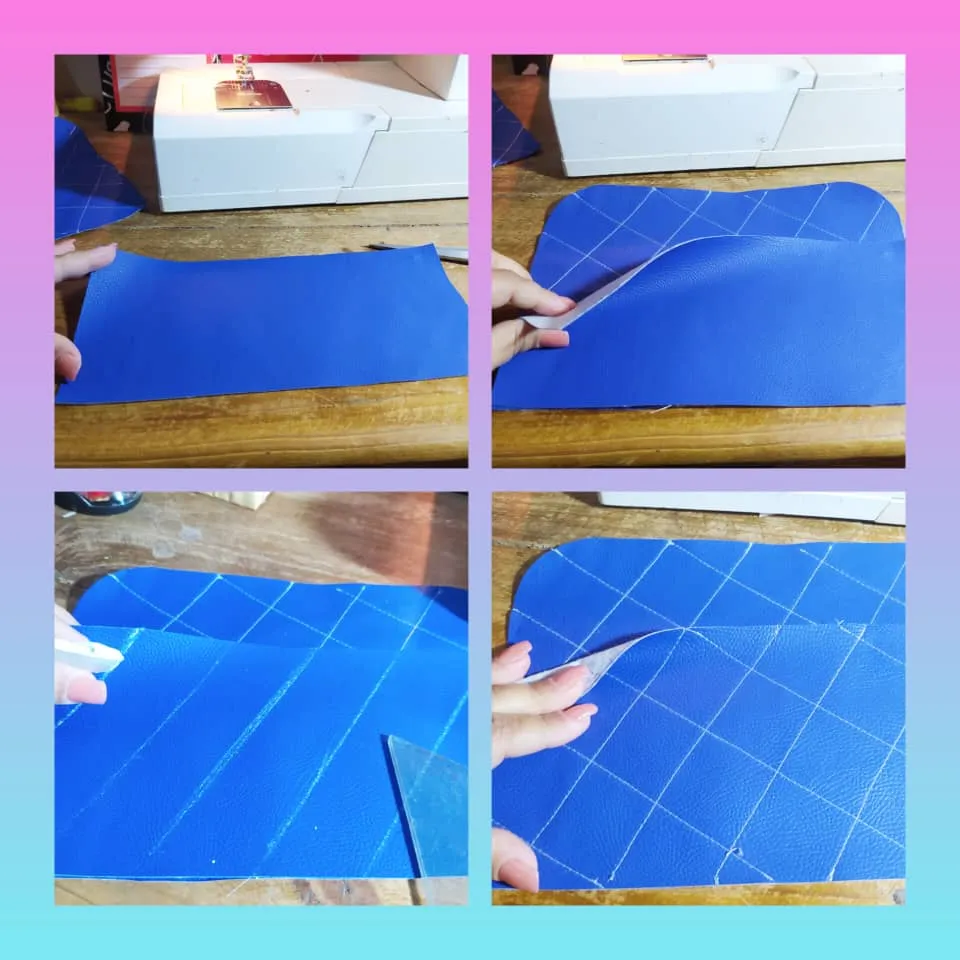
Con la tela para el forro, corto 2 rectángulos algo más grande que las piezas frontal y posterior del bolso, para tener facilidad al coser. Fijo con alfileres, coso alrededor y luego limpio los excedentes con la tijera, para dejar las piezas preparadas.
Así se ven por fuera y por dentro cada pieza.
With the fabric for the lining, I cut 2 rectangles slightly larger than the front and back pieces of the bag, to make it easier to sew. I pin, sew around them and then clean the excess with the scissors, to leave the pieces ready.
This is how each piece looks on the outside and inside.
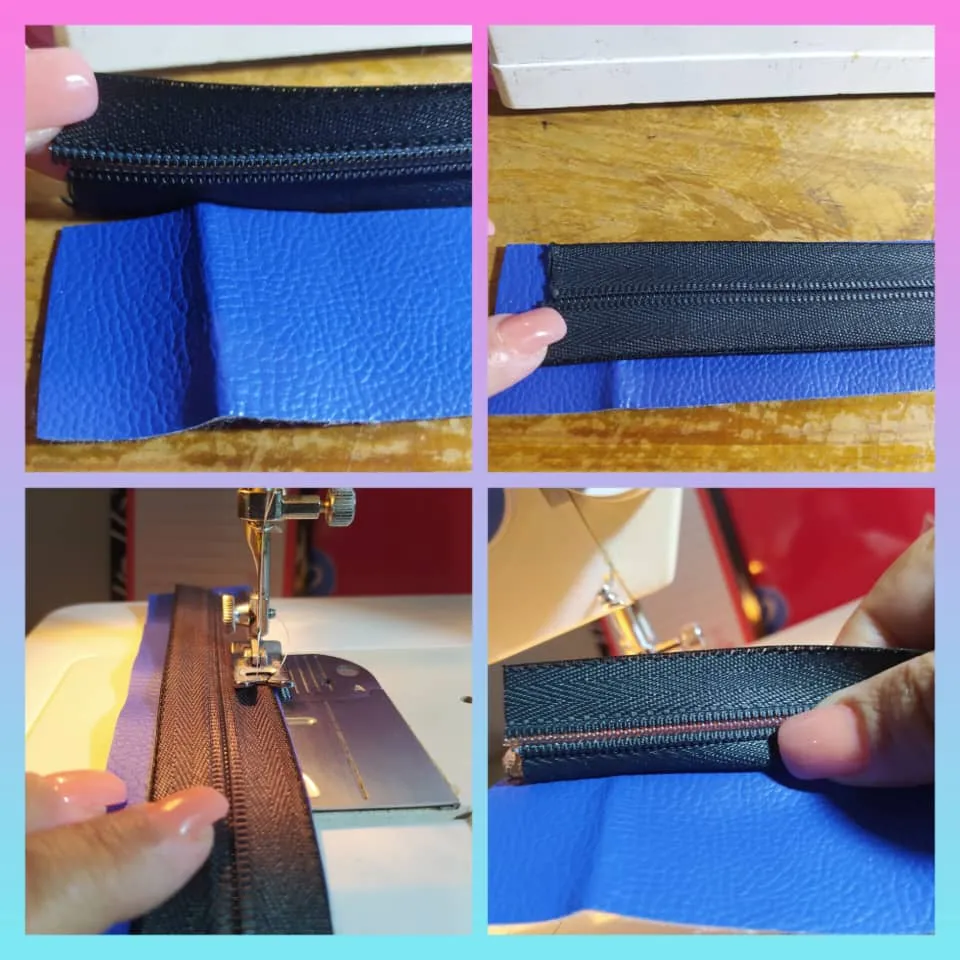
Corté 34cms de cierre. Y una tira de 3cms del semicuero.
Coloco derecho con derecho de ambos, y paso costura recta.
En la parte de atrás coloco una pieza del igual tamaño de tela de forro.
Paso costura recta, y luego abro el semicuero y la tela para dejar expuesto el cierre.
I cut 34cms of zipper. And a 3cms strip of the semi leather.
I place right side to right side of both, and sew a straight seam.
On the back I place a piece of the same size of lining fabric.
I sew a straight seam, and then open the half leather and the fabric to expose the zipper.
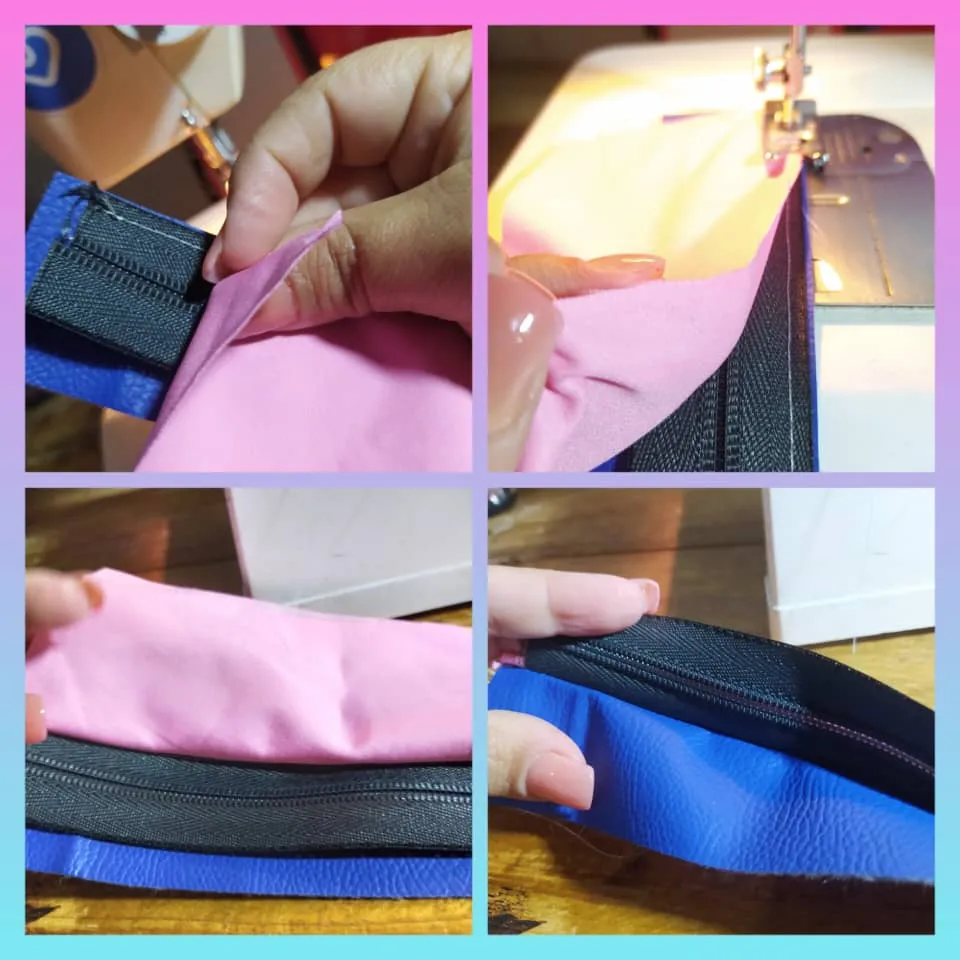
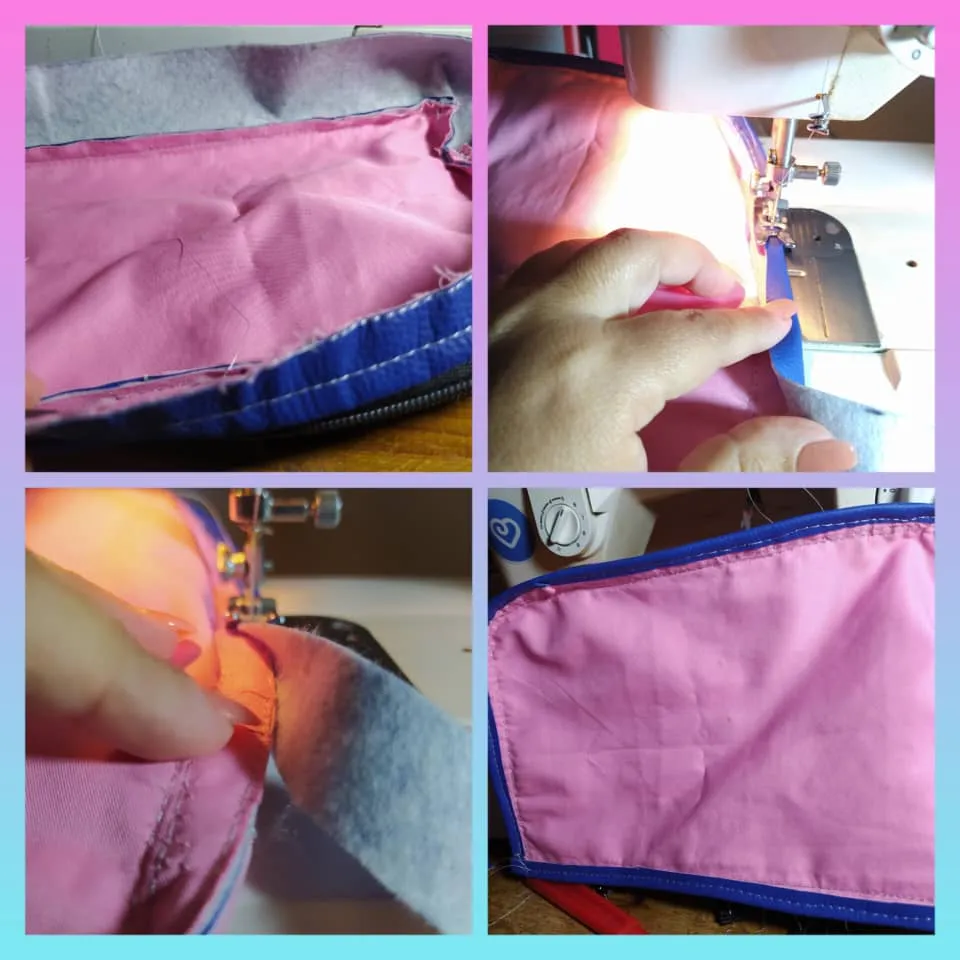
Con el cierre expuesto de un lado, ahora coso para unir las piezas de semicuero y tela. Esto hará más fácil el armado del bolso. Limpio los excesos para dejar los bordes limpios.
En el otro extremo del cierre hago todo igual. Deben quedar iguales.
With the zipper exposed on one side, I now sew to join the semi-leather and fabric pieces together. This will make it easier to assemble the bag. I clean up the excess to leave the edges clean.
On the other end of the zipper I do the same thing. They should be the same.
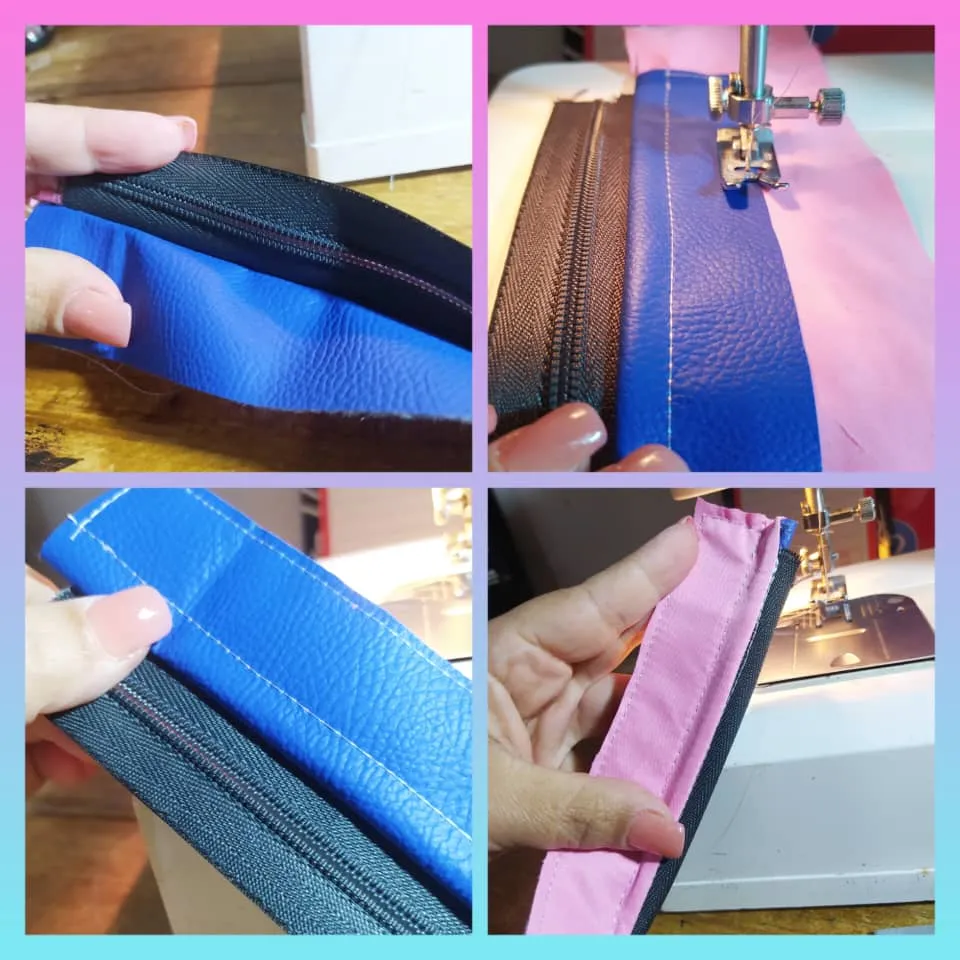
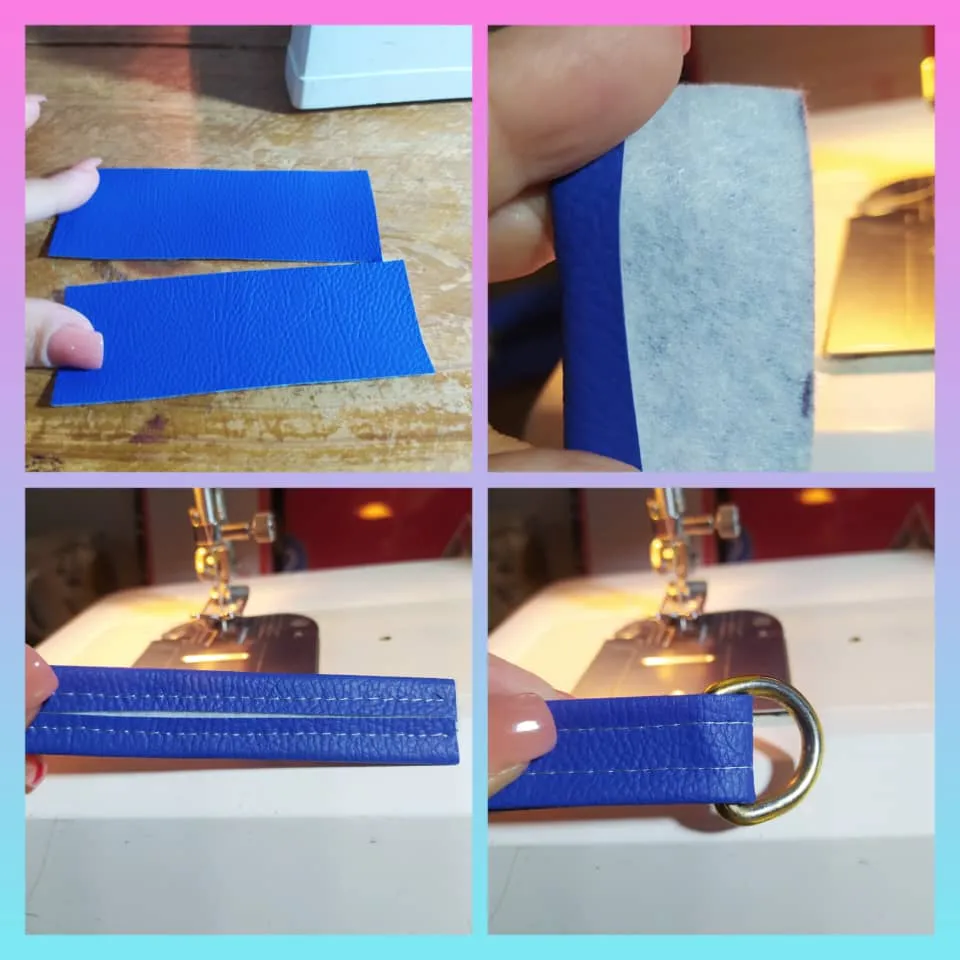
Corto 2 tiras de semicuero de 10 x 4 cms. Coso los bordes largos.
Inserto una medialuna en cada pieza.
Ubico cada pieza en los extremos del fuelle que acabamos de hacer con el cierre y coso.
I cut 2 strips of half leather of 10 x 4 cm. Sew the long edges together.
Insert a half-moon in each piece.
Place each piece at the ends of the gusset we just made with the zipper and sew.
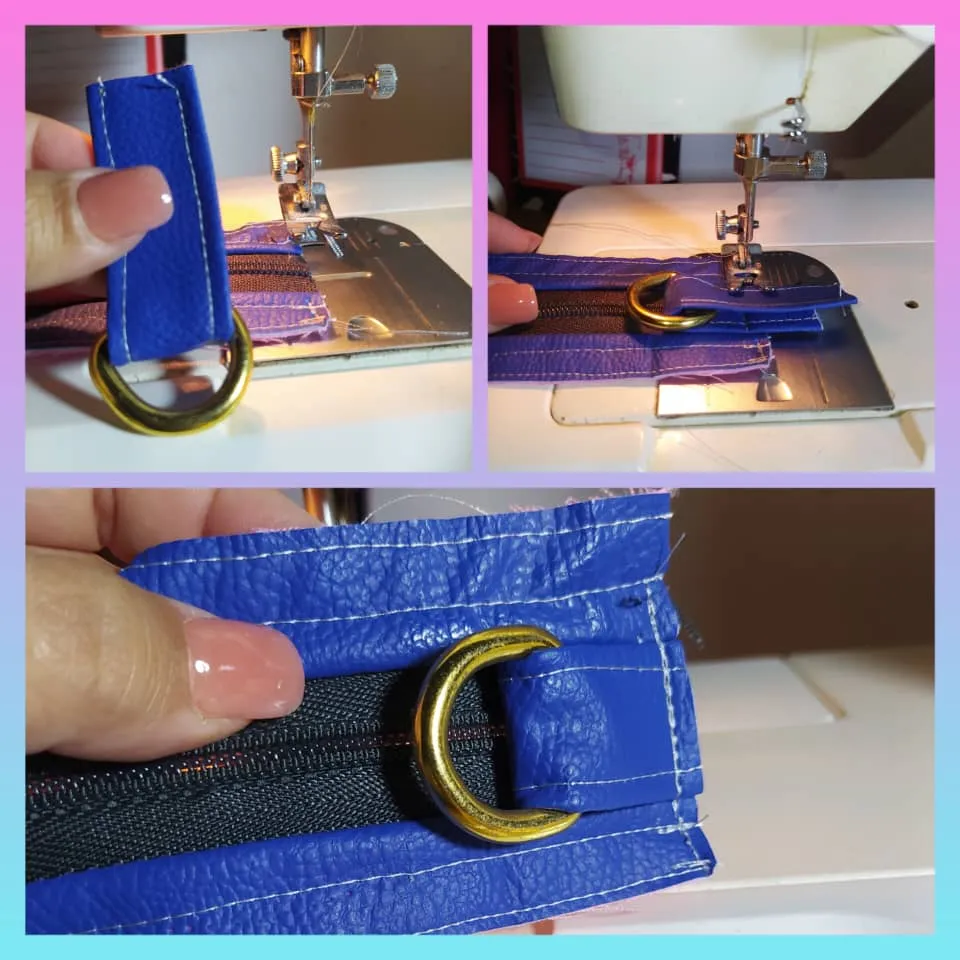
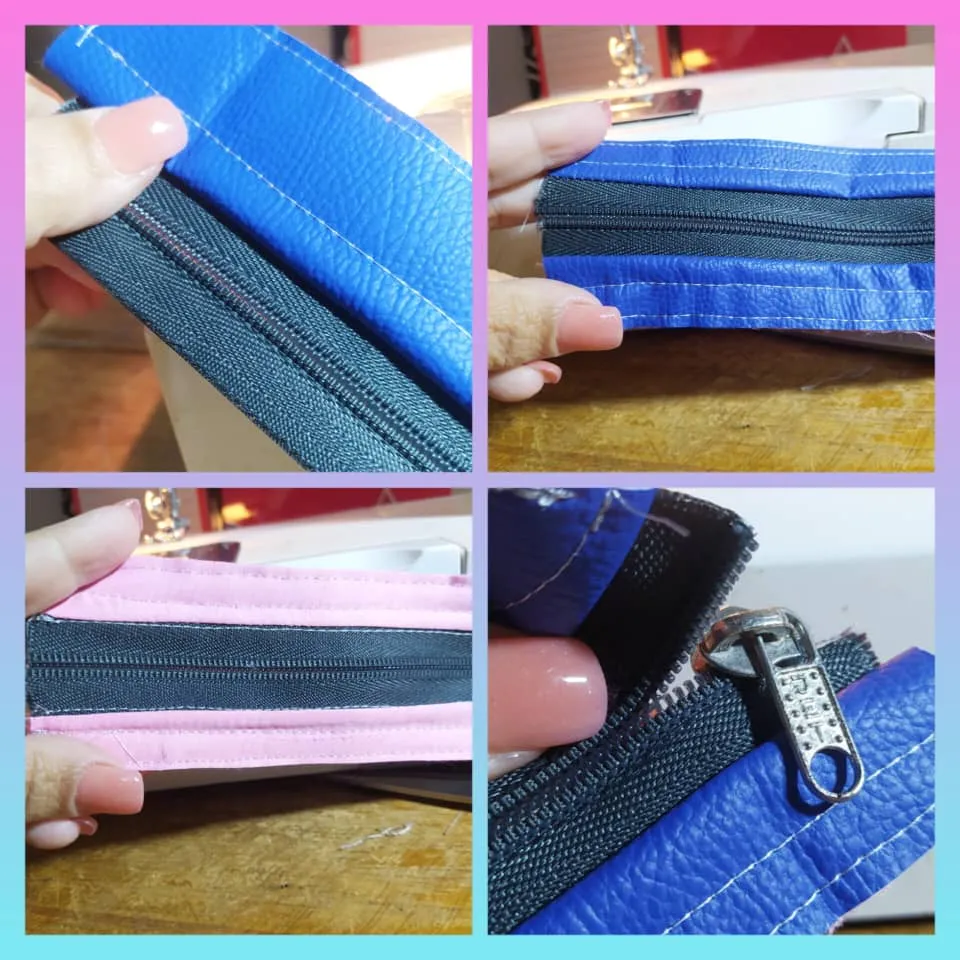
Para que el fuelle esté completo, lo ubico en la pieza frontal o posterior del bolso y mido lo que faltaría para que envuelva la pieza. Entonces corto una tira de semicuero del mismo ancho de la parte del fuelle que tiene el cierre, y coso sus extremos, y repiso.
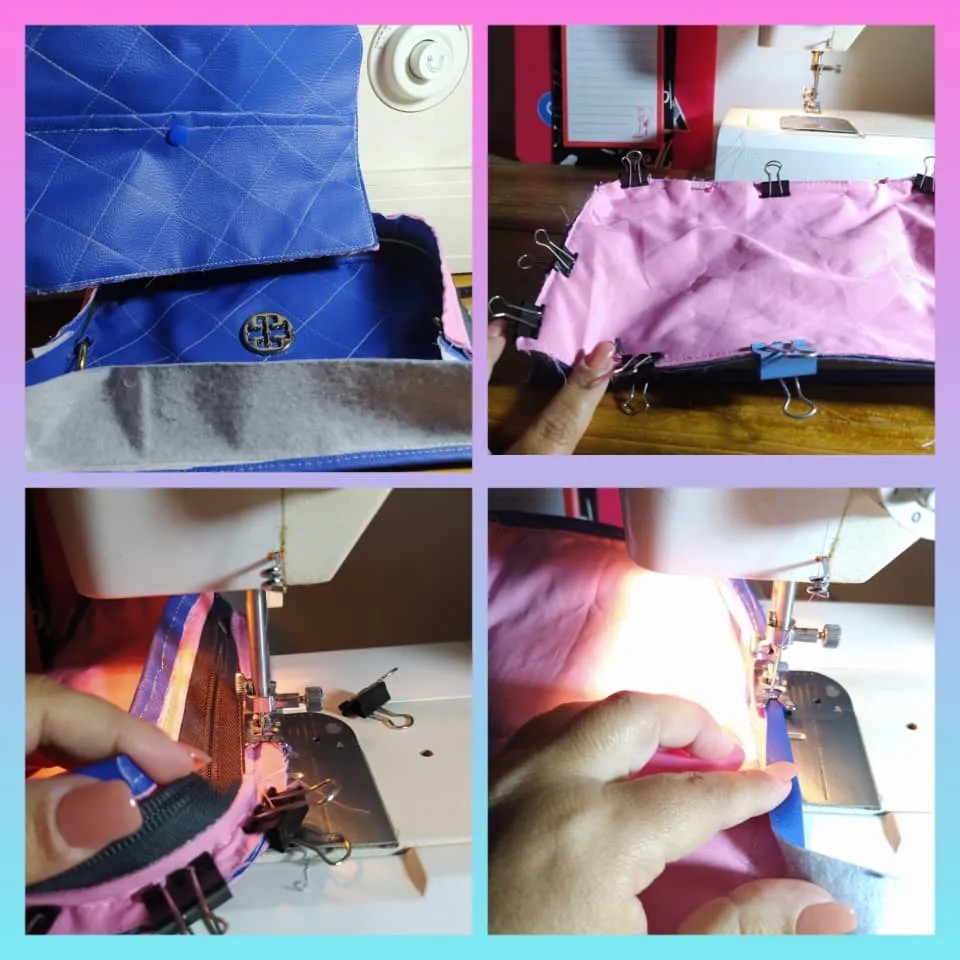
Con esto está listo el fuelle o pieza lateral de todo el bolso, que contiene el cierre y las asas (medialunas). Ahora lo fijo a la pieza frontal con clips de presión y coso.
To make the gusset complete, I place it on the front or back piece of the bag and measure what would be missing to wrap around the piece. Then I cut a strip of semi-leather the same width as the part of the gusset that has the zipper, and sew the ends together, and I sew it back together.
With this is ready the gusset or side piece of the whole bag, which contains the zipper and the handles (croissants). Now I attach it to the front piece with pressure clips and sew.
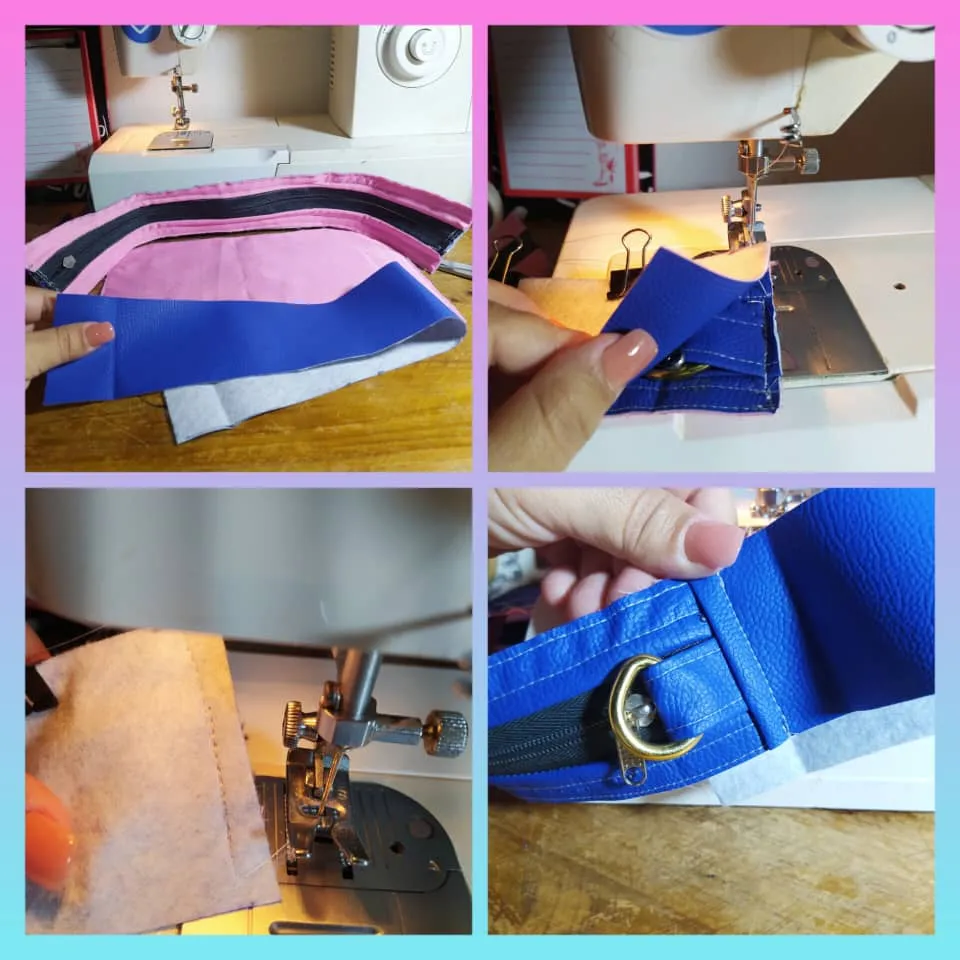
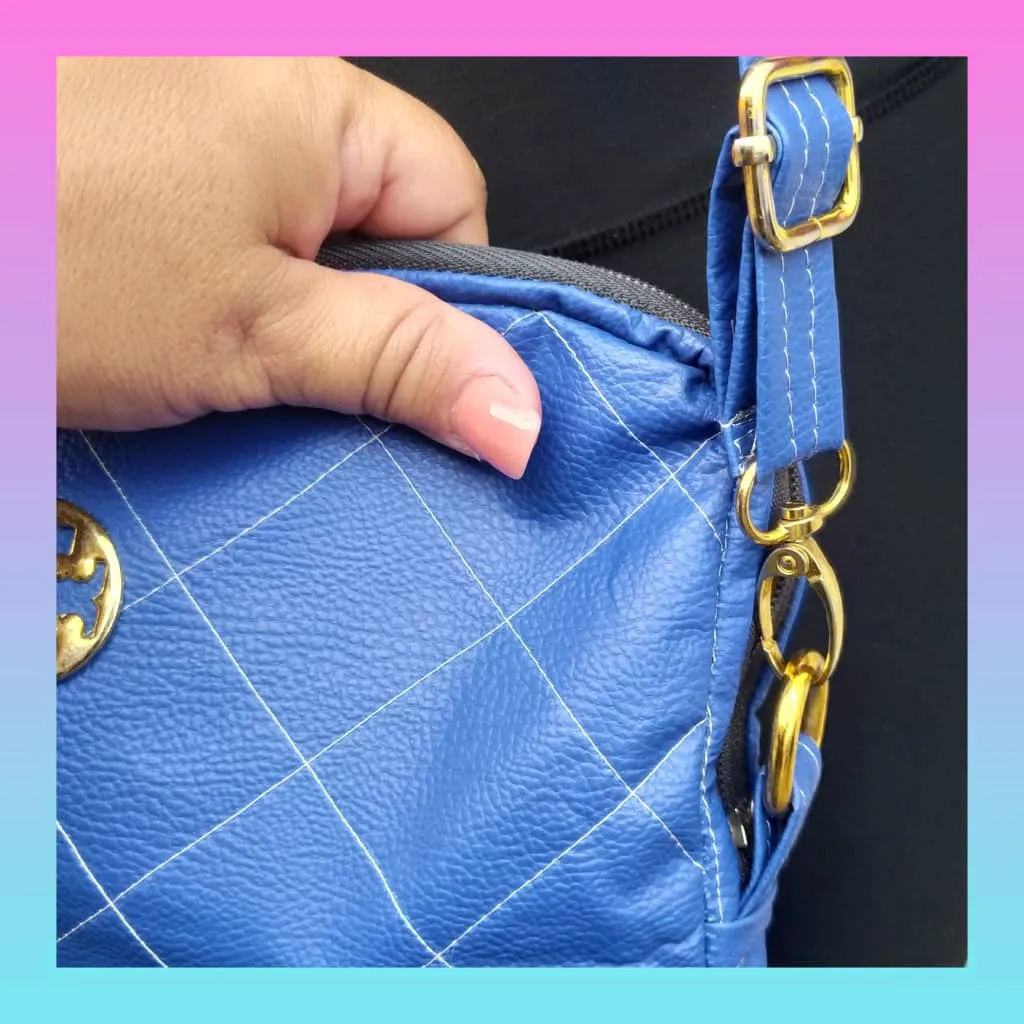
Así se ve unido el fuelle a la pieza frontal. Para darle un mejor acabado, corto una tira de semicuero de 2,5 cms de ancho para Tapar Costuras y coso por todo el borde, de esta forma el bolso tendrá un buen aspecto por dentro.
Luego, repito todo al unir ahora la pieza posterior del bolso al fuelle, coser y colocar tapa costura de semicuero.
This is how the gusset looks attached to the front piece. To give it a better finish, I cut a 2.5 cm wide strip of semi-leather to cover seams and sew around the edge, this way the bag will look good on the inside.
Then, I repeat everything by joining now the back piece of the bag to the gusset, sew and place the semi-leather seam cover.
Ya hemos terminado el bolso, como expliqué en los pasos anteriores se trata de 3 piezas:
- Pieza frontal ( que tiene un dije)
- Pieza posterior ( que tiene un bolsillo externo)
- Fuelle ( que tiene el cierre y las medialunas)
De eso se trata el bolso, solo 3 piezas... Muy fácil. Ahora solo nos queda hacer la tira para colgar el bolso.
We have already finished the bag, as I explained in the previous steps it consists of 3 pieces:
- Front piece ( which has a charm)
- Back piece ( which has an external pocket)
- Bellows (which has the zipper and the croissants).
That's what the bag is about, only 3 pieces... Very easy. Now we just need to make the strap to hang the bag.

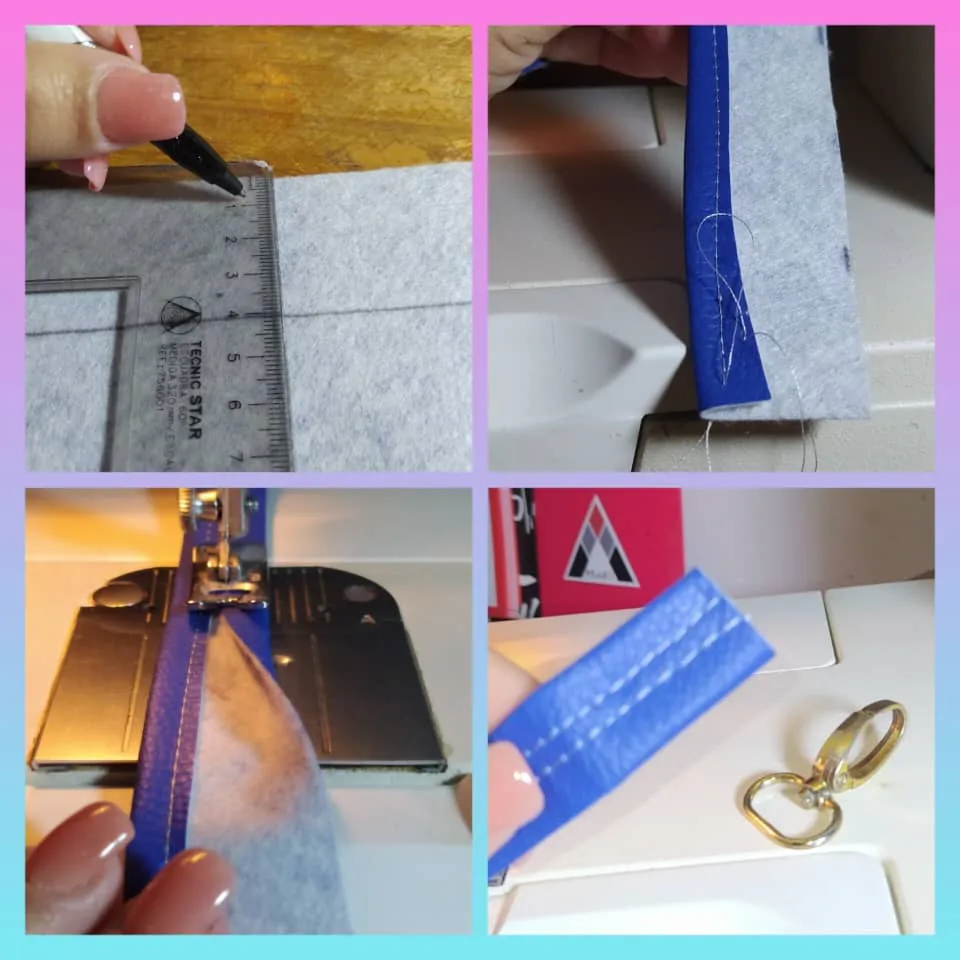
En el semicuero corté una tira de 4 x 150cms para hacer la tira del bolso.
Doblé sus extremos para que se encuentren en el centro y cosí con costura recta en ambos lados.
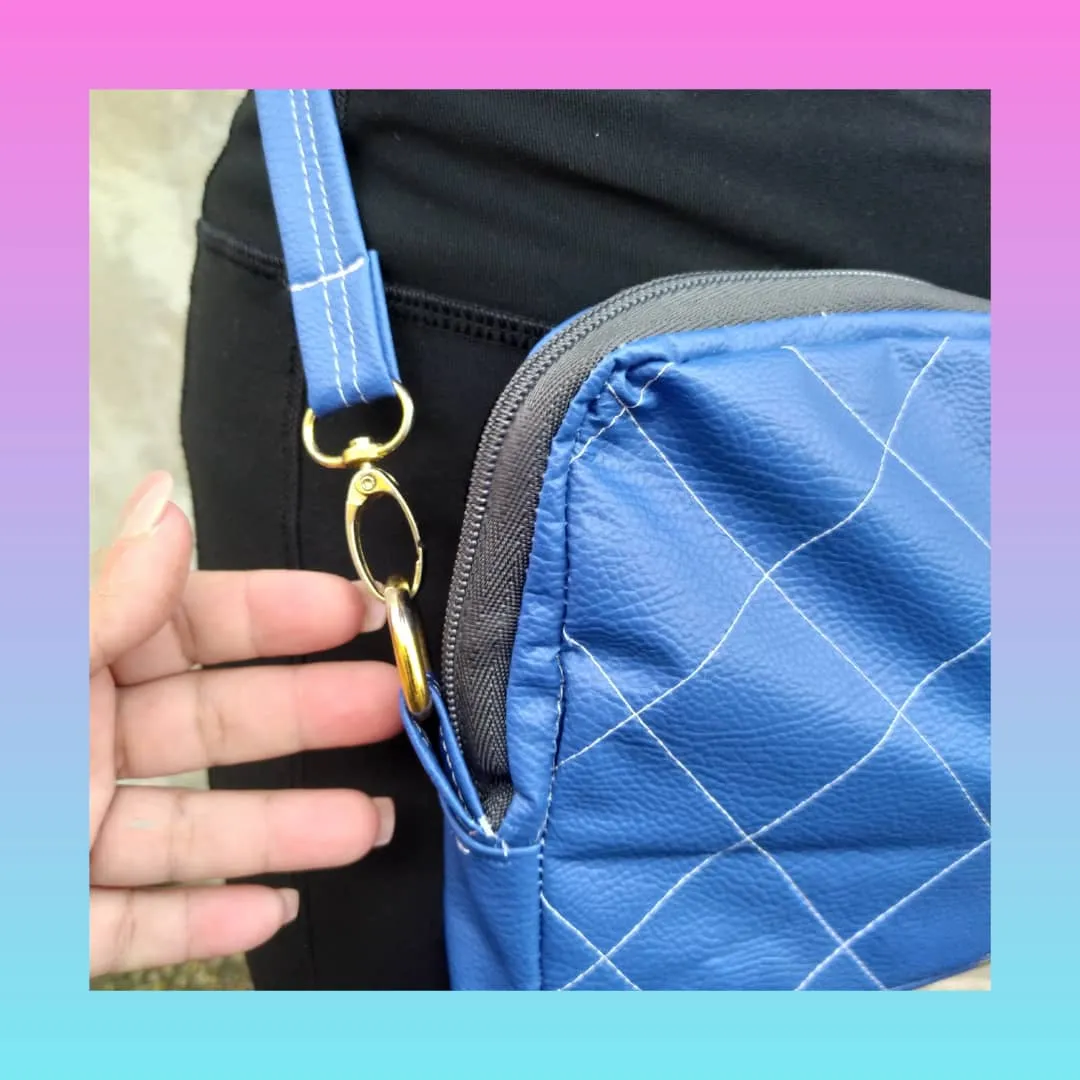
En uno de los extremos coloqué un gancho, el cual cosí a la tira.
In the semi leather I cut a 4 x 150cms strip to make the strip of the bag.
I folded its ends so that they meet in the center and sewed with a straight seam on both sides.
At one end I placed a hook, which I sewed to the strip.
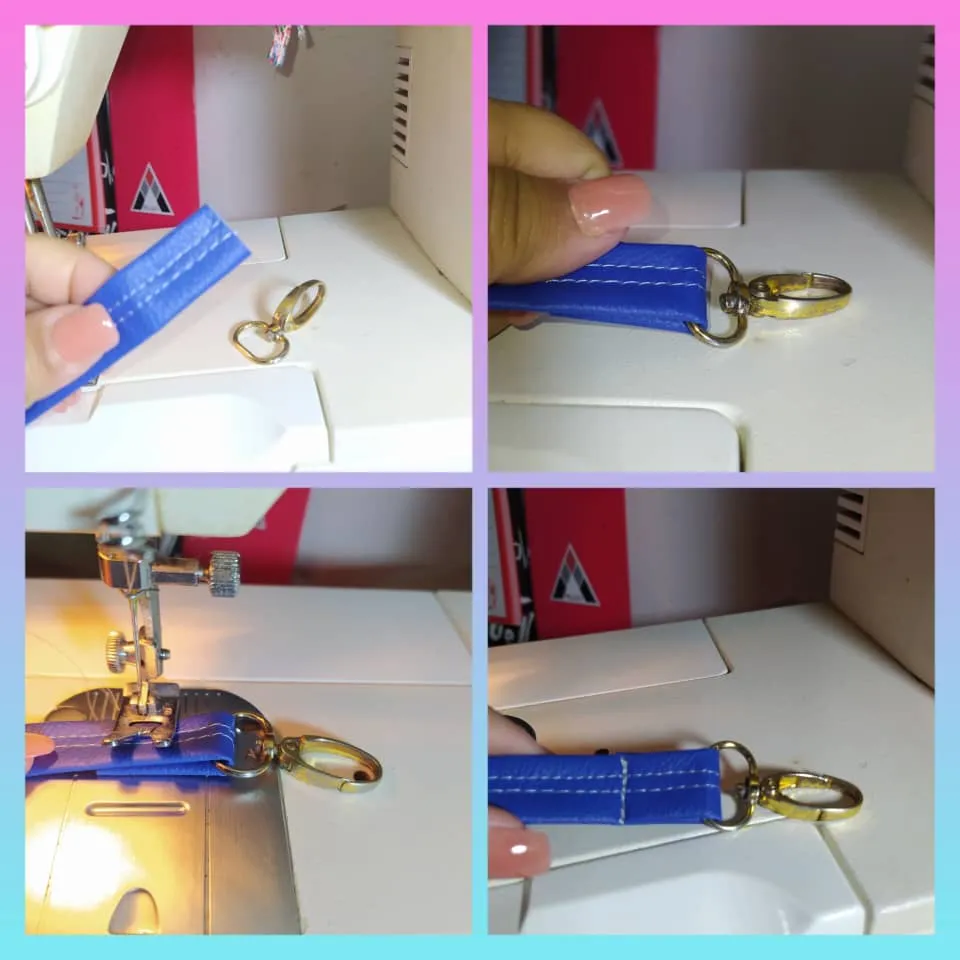
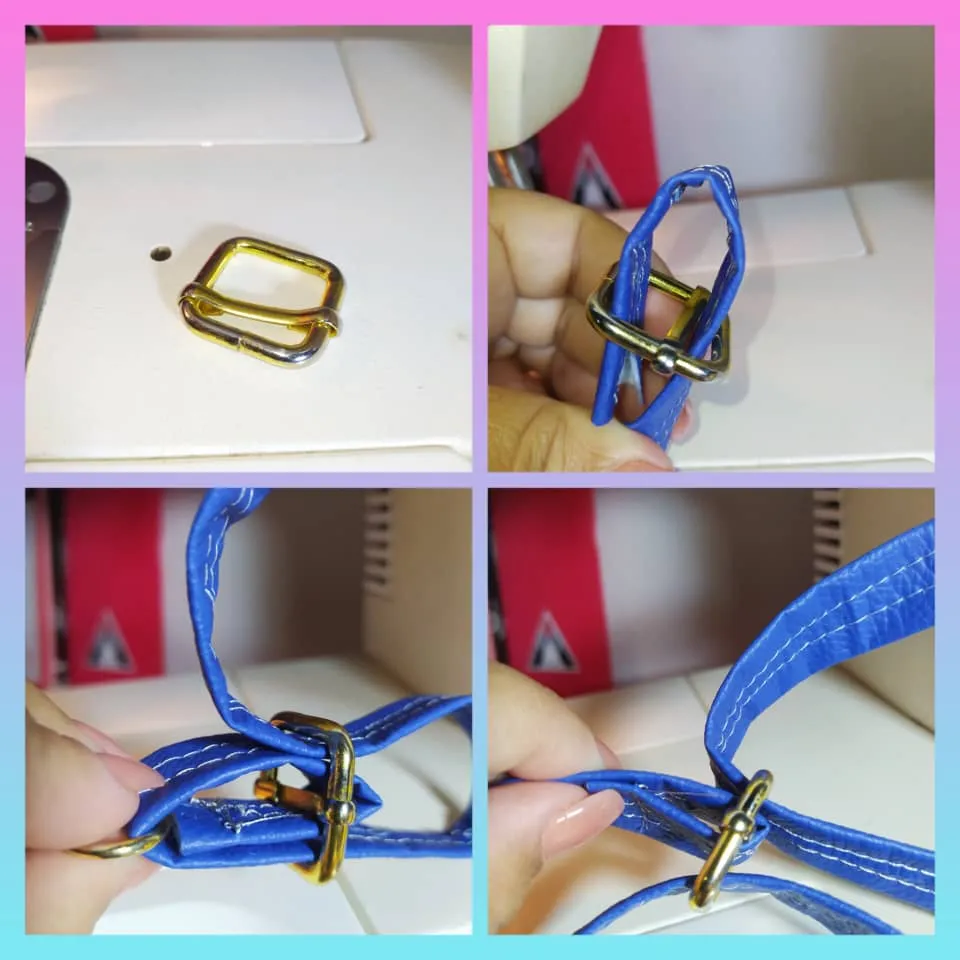
En el otro extremo de la tira, coloqué el corredor que tiene la función de permitir ajustar el largo del bolso a nuestro gusto. Meto la tira y la saco dejando la piecita móvil en el medio. Y luego, nuevamente meto y saco ahora envolviendo esa pieza móvil, y coso para fijar.
Este paso es el más complicado de toda la confección del bolso, pero es cuestión de analizar bien. Es lo mismo que tenían los broches de cierre de las ropas de bebés, y también es igual a las piezas de ajusto de nuestros brasiers.
At the other end of the strap, I placed the runner that has the function of allowing us to adjust the length of the bag to our liking. I put the strip in and take it out, leaving the movable piece in the middle. And then, I put it in and take it out again, now wrapping the mobile piece, and sew to fix it.
This step is the most complicated of the whole bag making process, but it's a matter of analyzing it well. It's the same as the fasteners on baby clothes, and it's also the same as the fastening pieces on our brasiers.

Ya está listo mi bello bolso, como pueden ver se ven muy bien los ganchos y las medialunas en el diseño. Quiero que sepan que estos fueron reciclados de otra cartera anterior, que se daño por los años y antes de botarla retiré estas piezas para reutilizarlas posteriormente.
Nunca boten nada sin antes evaluar que pueden aprovechar en algún proyecto.
My beautiful purse is ready, as you can see, the hooks and the crescent moons look very nice in the design. I want you to know that these were recycled from a previous bag, which was damaged by the years and before throwing it away I removed these pieces to reuse them later.
Never throw anything away without first evaluating what you can use in a project.
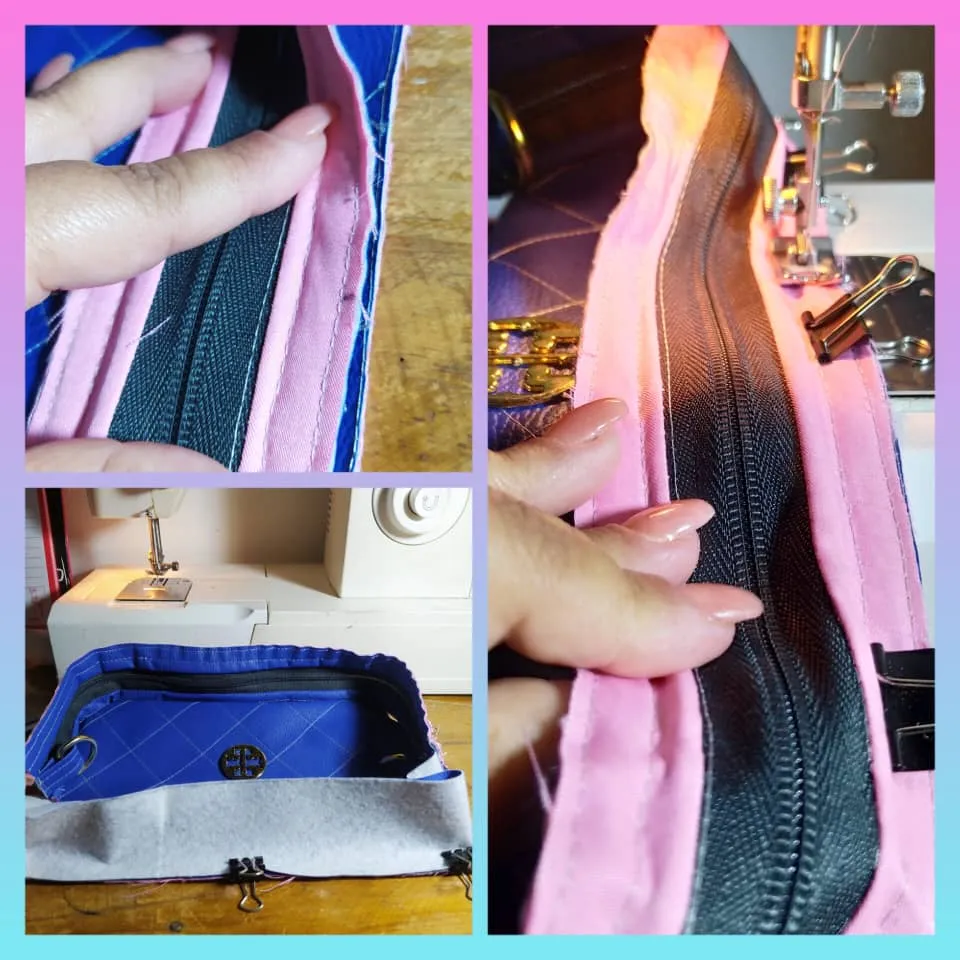
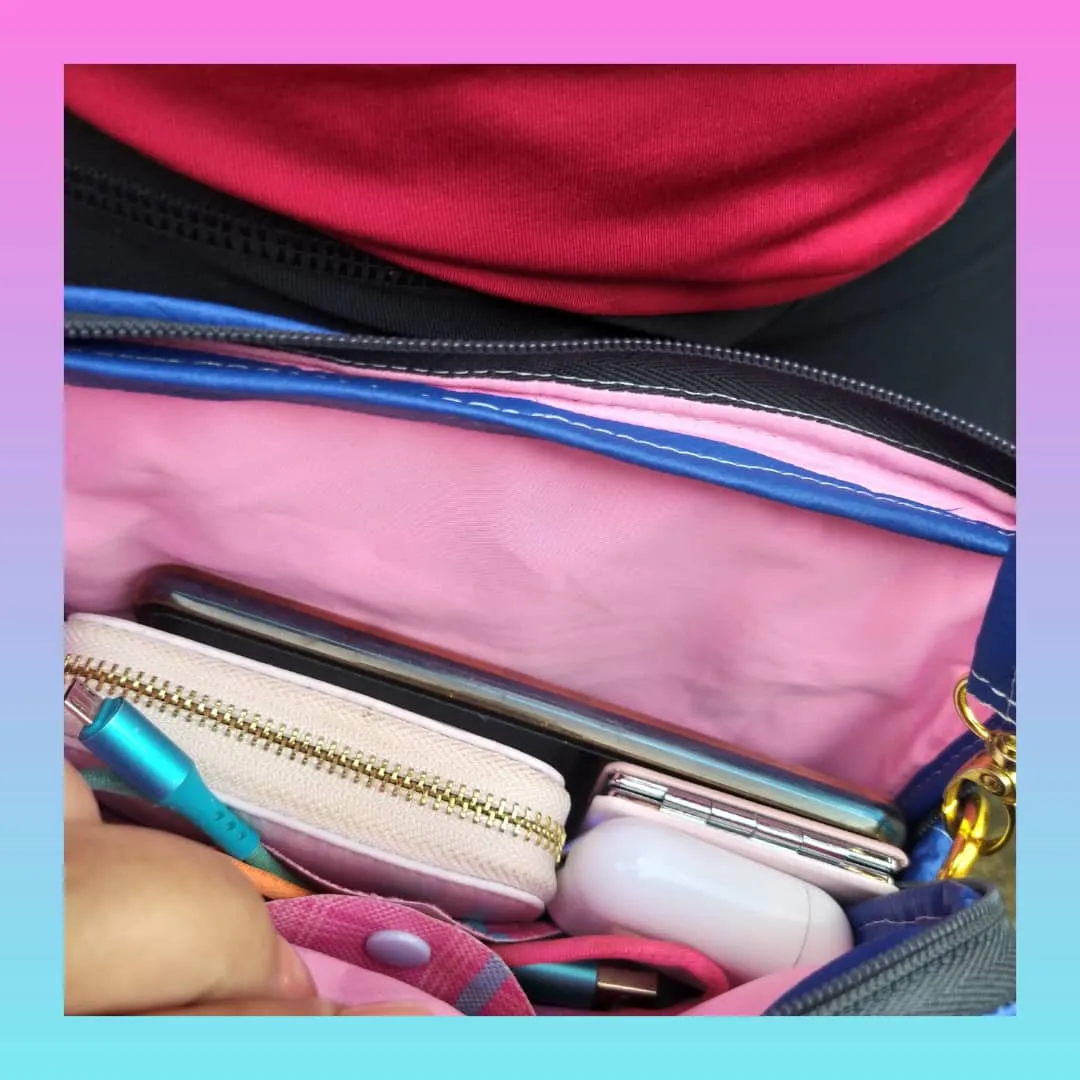
Por dentro luce muy bien todo, ya que el forro de color rosado hace buen contraste con el azul, los tapa costura hacen que se vea limpio y ordenado todo. El espacio es bastante cómodo, puedo llevar celular, billetera, espejo, cables, etc.
The inside looks very nice, as the pink lining makes a good contrast with the blue, the stitching covers make it look neat and tidy. The space is quite comfortable, I can carry my cell phone, wallet, mirror, cables, etc.
El diseño de cuadrícula también aporta mucho al diseño del bolso, y el dije central que también fue reciclado, hace buen contraste. Me gustó mucho el resultado final.
The grid design also adds a lot to the design of the bag, and the central charm, which was also recycled, makes a nice contrast. I really liked the final result.
Deseo que les haya gustado este Tutorial y que se animen a hacer sus bolso, a su gusto, con los materiales que dispongan y en las medidas que les guste. Yo generalmente no trabajo con patrones, me gusta pensar en el tamaño que quiero que tengan mis bolsos y el fuelle o pieza que contiene el cierre lo hago midiendo alrededor.
Los invito cordialmente a mi próxima publicación... Un abrazo 🤗
I hope you liked this Tutorial and that you are encouraged to make your own bag, as you like, with the materials you have and in the sizes you like. I usually don't work with patterns, I like to think about the size I want my bags to have and I make the gusset or piece that contains the zipper by measuring around it.
I cordially invite you to my next publication..... Best regards 🤗
---------- ❤️❤️❤️❤️ ----------
Las fotos las tomé con mi teléfono Redmi Note 8
Apps que utilicé:
Canva para la Portada
Inshot para los Collage
Utilicé el Traductor Deepl
Mi redes sociales:
Discord: YennysYaneth#0189
Twitter: @yennysferm
Instagram: @yennysyaneth
---------- ❤️❤️❤️❤️ ----------
I took the photos with my Redmi Note 8 phone
Apps I used:
Canva for the Cover
Inshot for the Collage
I used Deepl Translate
My social networks:
Discord: YennysYaneth#0189
Twitter: @yennysferm
Instagram: @yennysyaneth