
¡Bienvenidos, amigos creativos!🎨
Para esta oportunidad te muestro mi participación en el nuevo concurso dedicado al Día del Amor y la Amistad en la bonita comunidad de Hive Diy. Sé que ya el día paso, y entre unas ocupaciones y otras no pude subir mi tutorial antes, pero en otros países no se celebra el 14 de Febrero el día del amor y la amistad, así que si la idea te gusta puedes guardarla para cuando te toque esa celebración en tu país o simplemente obsequiarla en cualquier fecha sea especial o no, porque el amor se manifiesta cada día.
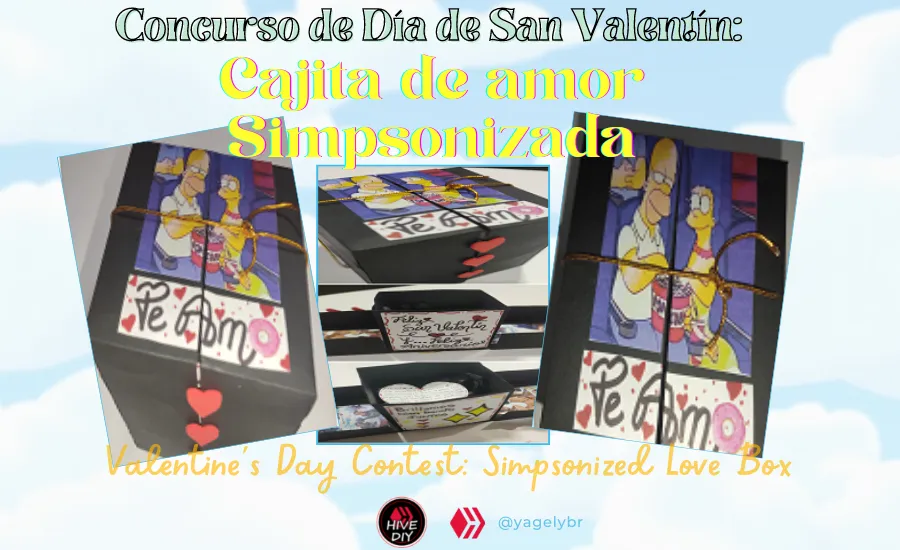
Esta cajita la hice para obsequiársela a Maykol este 14 de febrero, siendo también nuestro día de aniversario N°4. Como toda venezolana deje todo para última hora, así que no se me ocurrió algo diferente resaltando que él ama las cajitas y es fan de la serie de Los Simpson, aunque para esta ocasión quise realizarla de una manera diferente a lo convencional, les confieso que es primera vez que realizo este modelo de caja. Sin más preámbulos ¡VAMOS A CREAR!👩🎨
Esta cajita la hice para obsequiársela a Maykol este 14 de febrero, siendo también nuestro día de aniversario N°4. Como toda venezolana deje todo para última hora, así que no se me ocurrió algo diferente resaltando que él ama las cajitas y es fan de la serie de Los Simpson, aunque para esta ocasión quise realizarla de una manera diferente a lo convencional, les confieso que es primera vez que realizo este modelo de caja. Sin más preámbulos ¡VAMOS A CREAR!👩🎨

Greetings, creative friends!🎨
For this opportunity I show you my participation in the new contest dedicated to the day of love and friendship in the beautiful community of Hive Diy. I know that the day has already passed, and between some occupations and others I could not upload my tutorial before, but in other countries do not celebrate February 14 the day of love and friendship, so if you like the idea you can save it for when you touch that celebration in your country or just give it as a gift on any date whether special or not, because love is manifested every day.
I made this little box as a gift for Maykol this February 14th, also being our anniversary day N°4. Like all Venezuelan women I left everything to the last minute, so I couldn't think of anything different, highlighting that he loves boxes and is a fan of The Simpsons series, although for this occasion I wanted to make it in a different way from the conventional, I confess that it is the first time I make this model of box. Without further ado, LET'S GET CREATING! 👩🎨
 |
|---|
| 🎨 Cartulina color negro / Black cardboard |
| 🎨 Fotografías impresas / Printed photographs |
| 🎨 Cordón o hilo dorado / Cord or golden thread |
| 🎨 Hoja blanca / White sheet |
| 🎨 Lápiz / Pencil |
| 🎨 Silicón frío / Cold Silicone |
| 🎨 Tijera / Scissors |
| 🎨 Regla / Rule |
| 🎨 Marcadores / Markers |
| 🎨 Papel de ceda / Yield paper |

👩🎨🎁 Paso 1:
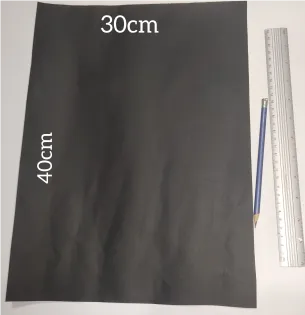
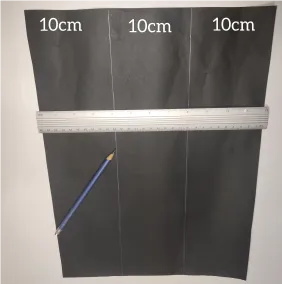
Para empezar utilice una cartulina color negro con un tamaño de 30 cm horizontalmente y 40 cm verticalmente.
👩🎨🎁 Step 1:
To start with, use a black cardboard with a size of 30 cm horizontally and 40 cm vertically.

👩🎨🎁 Paso 2:
Por el lado de 30 cm marque tres divisiones de 10 cm cada una, como se puede apreciar en la imagen siguiente.
👩🎨🎁Step 2:
On the 30 cm side, mark three divisions of 10 cm each, as shown in the following image.
👩🎨🎁 Paso 3:
Seguidamente por el lado de 40 cm marque divisiones de: 5 cm; 2,5 cm; 7,5 cm; 10 cm; 7,5 cm; 2,5 cm y 5 cm. (Ver la siguiente imagen).
👩🎨🎁 Step 3:
Then on the 40 cm side mark divisions of: 5 cm; 2.5 cm; 7.5 cm; 10 cm; 7.5 cm; 2.5 cm and 5 cm (see the following image).

👩🎨🎁 Paso 4:
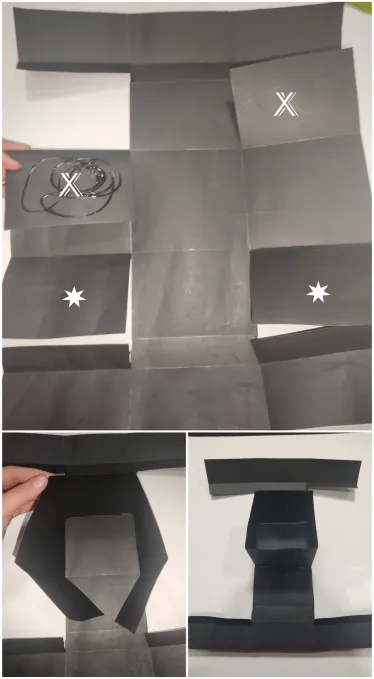
Ya lista todas las divisiones realice los cortes entre la división de 2,5 cm y 7,5 cm (Para entender mejor este paso marque en línea blanca la parte que se debe recortar, apreciándolo mejor en la siguiente imagen).
👩🎨🎁 Step 4:
Once all the divisions are ready, make the cuts between the division of 2.5 cm and 7.5 cm (To better understand this step, mark in white line the part to be cut, better appreciated in the following image).

👩🎨🎁 Paso 5:
Realice los dobles por cada línea marcada de esta forma la cartulina se puede manejar mucho más fácil al momento de pegar.
👩🎨🎁 Step 5:
Make doubles for each marked line so that the cardboard can be handled much easier when gluing.

👩🎨🎁 Paso 6:
Ya es momento de dar forma a la caja, así que con silicón frio pegue la parte que está marcada con equis (X) juntas, y luego las estrellas. Dando como resultado una cajita en el centro.
👩🎨🎁 Step 6:
Now it's time to shape the box, so with cold silicone glue the part marked with X's together, and then the stars. The result is a little box in the center.
👩🎨🎁 Paso 7:
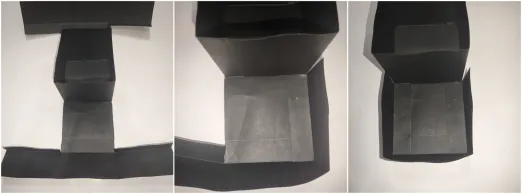
Luego la pestaña de 2,5 cm la pegue con silicon en el cuadrado de 7,5 cm de la forma en que se puede apreciar en la imagen dando una media caja.
👩🎨🎁 Step 7:
Then I glued the 2.5 cm flange with silicone on the 7.5 cm square in the way you can see in the image giving a half box.
👩🎨🎁 Paso 8:
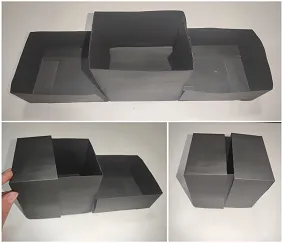
Para el otro extremo repito el paso anterior, quedando una caja en el centro y al lado derecho e izquierdo media caja las cuales llevándolas al centro hacen referencia a las tapas de la caja del medio. (Ver la siguiente imagen).
👩🎨🎁 Step 8:
For the other end I repeat the previous step, leaving a box in the center and on the right and left side half a box, which by bringing them to the center make reference to the middle box lids (see the following image).
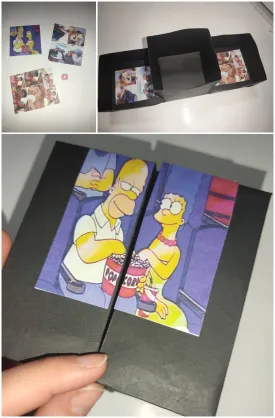
👩🎨🎁 Paso 9:
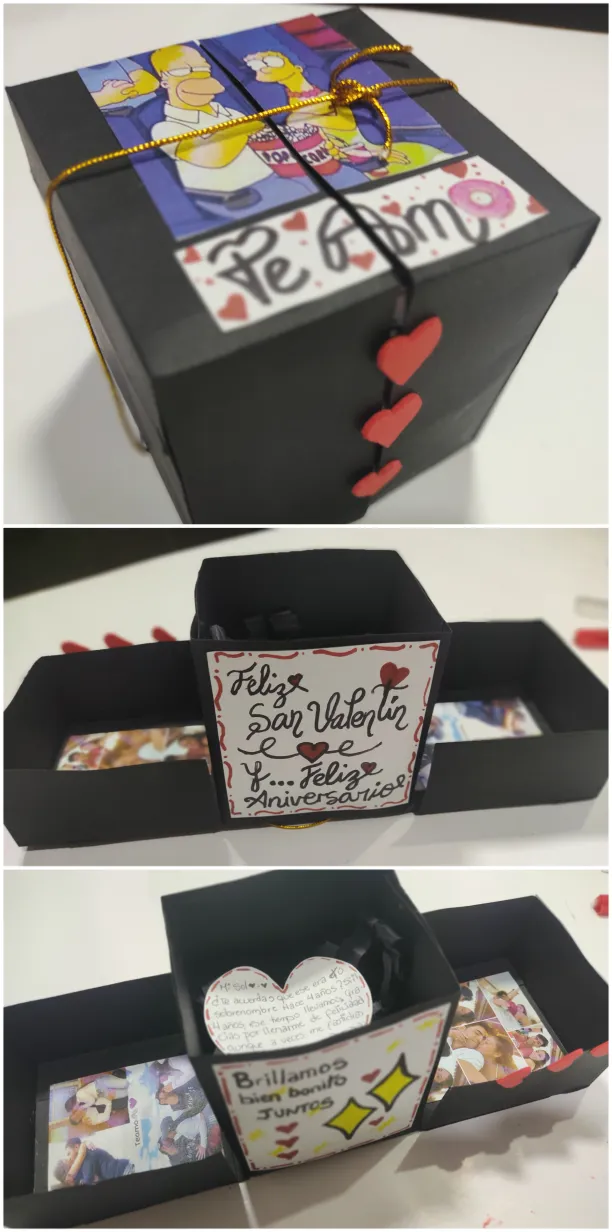
Para decorar la caja, imprimí algunas fotos favoritas que tengo con Maykol, también una de Homero y Marge puesto que disfrutamos mucho viendo Los Simpson (es una de las series favorita de él) . Pegando la foto de ambos por dentro y la de Homero y Marge por la parte superior de la caja haciendo un corte para que la misma se pueda abrir.
👩🎨🎁 Step 9:
To decorate the box, I printed some favorite pictures I have with Maykol, also one of Homer and Marge since we enjoy watching The Simpsons (it is one of his favorite series). I glued the picture of both of them inside and the one of Homer and Marge on the top of the box making a cut so that the box can be opened.
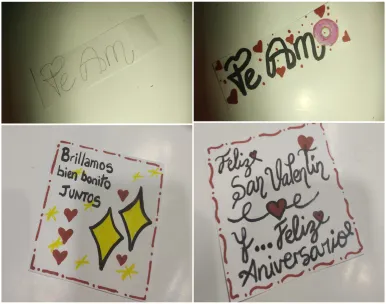
👩🎨🎁 Paso 10:
En hoja blanca realice lindas frases y decore con marcadores, de igual forma serian pegadas para decorar la caja.
👩🎨🎁 Step 10:
On a white sheet of paper, make cute phrases and decorate them with markers, which will also be glued to decorate the box.
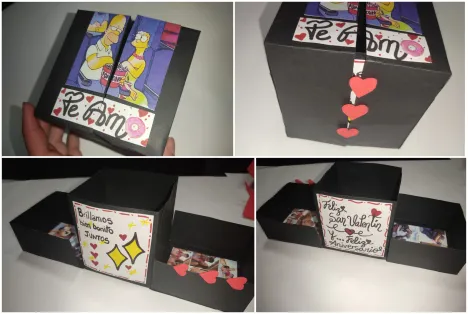
👩🎨🎁 Paso 11:
Teniendo las cosas listas para decorar, las ubique donde se pudieran apreciar mejor, sumado a eso realice en foami tres corazones pequeños y los pegue.
👩🎨🎁 Step 11:
Having the things ready to decorate, I placed them where they could be better appreciated, in addition to that I made three small hearts in foami and glued them.
👩🎨🎁 Paso 12:
Recorte tiras en papel celofán para darle relleno a la caja, y en hoja blanca en forma de corazón realice pequeñas dedicatorias.
👩🎨🎁 Step 12:
Cut out strips of cellophane paper to fill the box, and make small dedications on a white heart-shaped sheet.

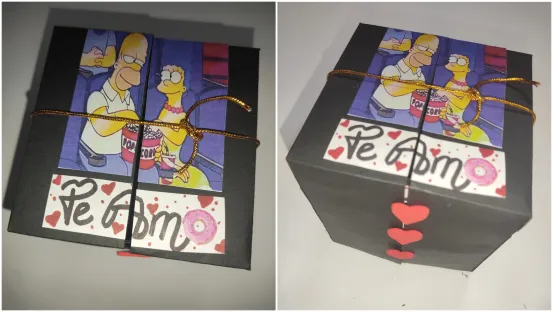
👩🎨🎁 Paso 13:
Por último, para que la caja no se abriera con un pequeño cordón o hilo dorado realice un nudito pasando el hilo por debajo hasta arriba no tan apretado de manera que fuese fácil de soltar.
👩🎨🎁 Step 13:
Finally, so that the box would not open with a small cord or golden thread, I made a little knot by passing the thread from the bottom to the top, but not so tight that it would be easy to undo.

Gracias por llegar hasta aquí y leerme una vez más, espero haya sido de tu agrado y lo disfrutes tanto como yo al realizar esta cajita.
Les deseo un gran día cargado de buenas vibras, momentos familiares y alegrías infinitas. Y recuerden:
Tendrán todo el dinero del mundo, pero hay algo que jamás podrán comprar: un dinosaurio
Homero Simpson
Les deseo un gran día cargado de buenas vibras, momentos familiares y alegrías infinitas. Y recuerden:
Thank you for stopping by and reading me once again, I hope you enjoyed making this beautiful box as much as I did.
I wish you a great day full of good vibes, family moments and endless joys. And remember:
They will have all the money in the world, but there is one thing they will never be able to buy: a dinosaur.
Homer Simpson
I wish you a great day full of good vibes, family moments and endless joys. And remember: