Les saludo desde mi atelier compañeros artesanos en esta ocasión les traigo un pequeño proyecto sobre la recuperación de una herramienta, esta vez un serrucho de carpintero.
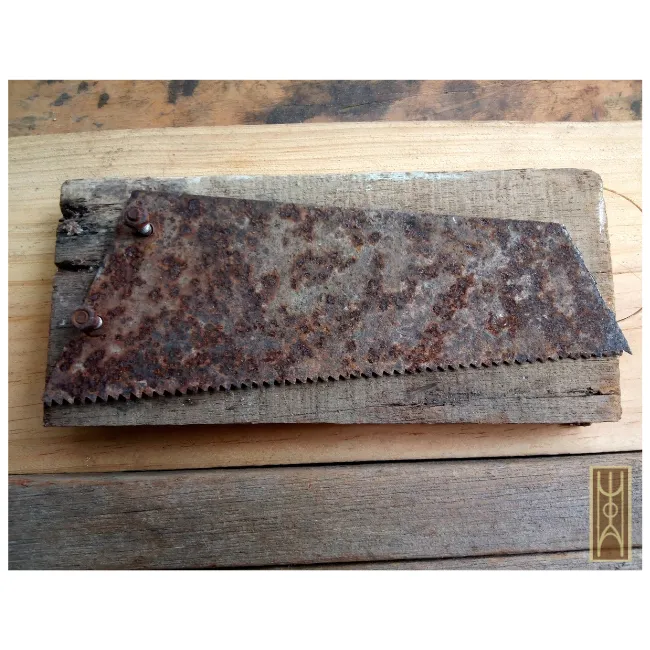
Este serrucho estaba desechado, enterrado bajo tierra, pero llego al lugar indicado para su renovación, además de que tenía el calibre justo (0.05 mm) para transformarlo en un serrucho para ranurar los trastes de los cordófonos es un serrucho de los pequeños, solo se le había partido la punta, esto para su nueva fusión no es un problema.
Los siguientes pasos lo podemos ajustar a nuestras necesidades acá muestro como resolví para obtener una herramienta totalmente funcional y necesaria para este oficio, de esta manera podemos hacerlo con una herramienta similar, a continuación les muestro los materiales a utilizar.

materiales
Madera de 2 cm de espesor (semidura/ para el mango)
agua y vinagre
lijas 80 y 120
cepillo de alambre
Dos tornillo de 4mm con sus tuercas
Mototool con disco de corte pequeño
serrucho
En este trabajo de recuperación y reciclaje estaremos trabajando con herramientas manuales, la única máquina que intervendrá es el mototool para sacar un poco de filo a los dientes...
Paso 1
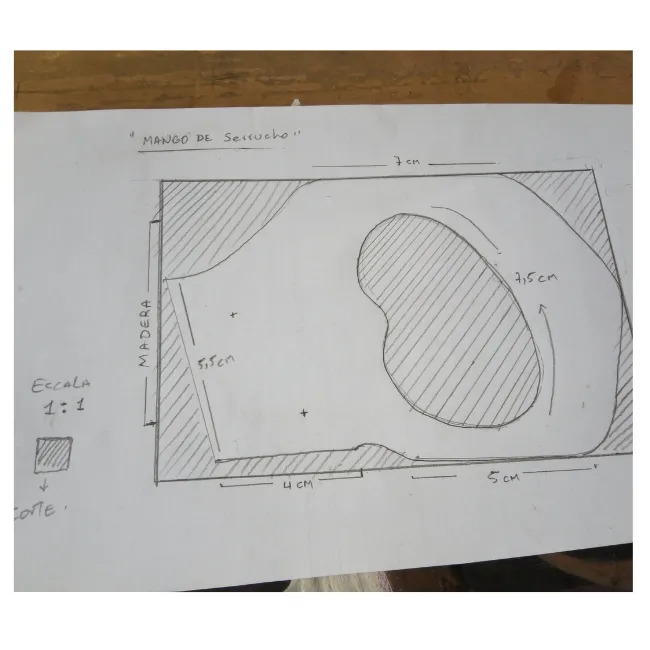
Como toda obra a diseñar es indispensable tener el diseño, siempre estaré haciendo énfasis aunque en el camino nos dispersemos un poco de lo planteado pero es más didáctico porque de allí nos guiaremos sobre todo con las medidas, además de que nuestra imaginación pueda jugar con morfología y ergonomía.
Paso 2
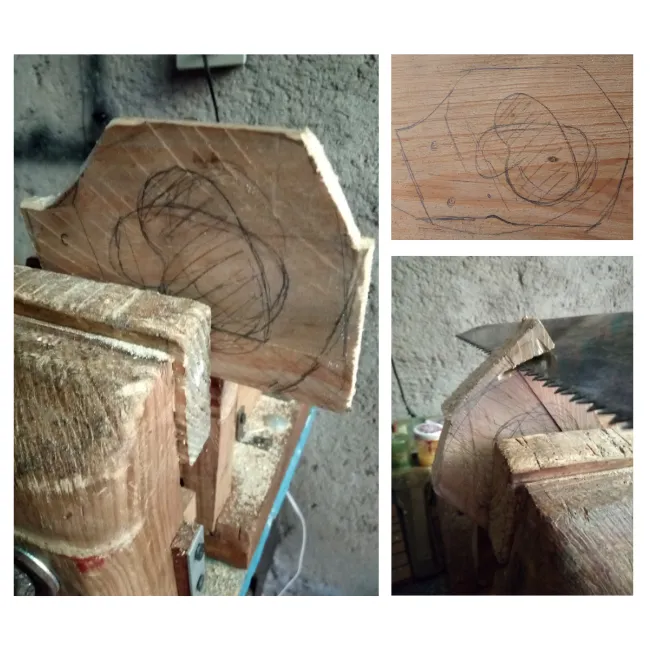
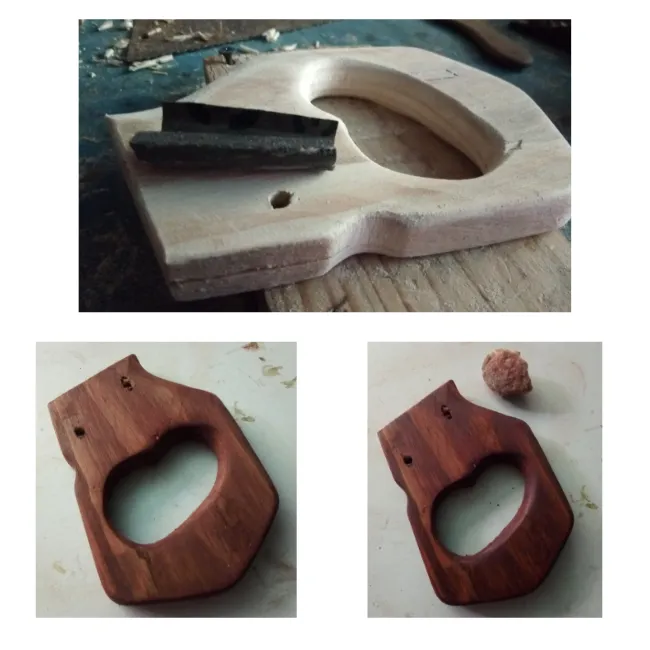
Una vez teniendo la idea del mango, buscamos lo que utilizaremos como soporte, en este caso traigo un pino, hacemos la silueta, bosquejamos y comenzamos a dar serrucho...
| Nota: Es conveniente tener un prensista de mesa (morsa) ayuda mucho, ya que es la tercera mano práctica, podemos cortar con mucha más precisión, esta que tengo me la tuve que fabricar. |
Paso 3
Luego de hacer los corte y de tener la pieza en bruto, suavizamos un poco los bordes con la escofina para ir observando la forma y se presenta junto al serrucho.
Paso 4
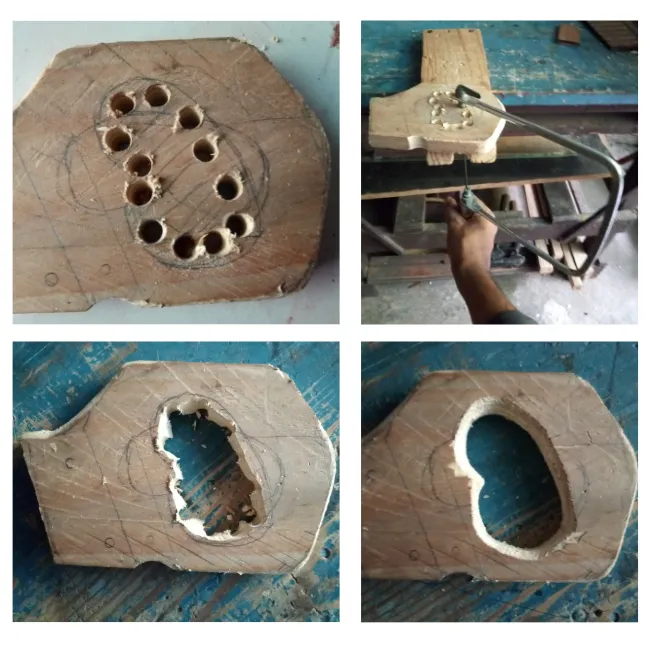
Una vez teniendo su forma a un 50% lista, calamos la parte del agarradero, como estamos haciendo una herramienta a nuestra medida debemos de tomar en cuenta nuestro tamaño de mano con 1 cm más de cada lado para que no sea tan justa irá muy bien, procedemos a dibujar con el taladro y luego calamos para facilitar el manejo de la herramienta, con una cierra sin fin el trabajo sería en un abrir y cerrar de ojos, luego con una escofina o lima redonda suavizamos los bordes y seguimos.
Paso 5
llevamos la pieza a la prensa y abrimos la abertura por donde pasara la cierra, la podemos abrir con una hoja de segueta o con un serrucho pequeño y al culminar marcamos por donde pasaran los tornillos, abrimos los agujeros con una mecha del mismo espesor y ya tendríamos nuestro mango casi terminado.
Paso 6
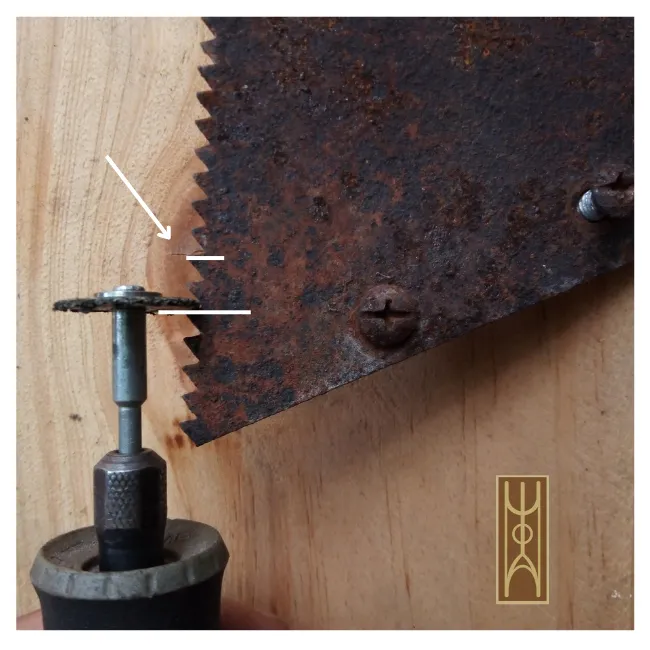
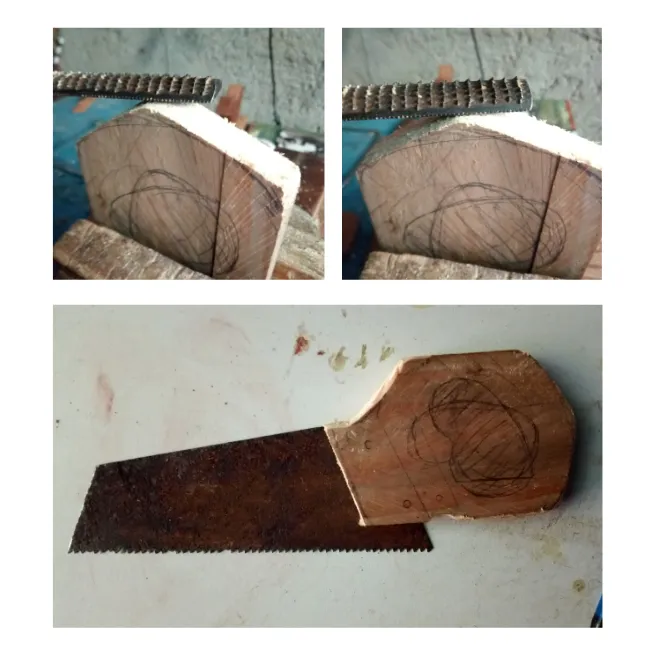
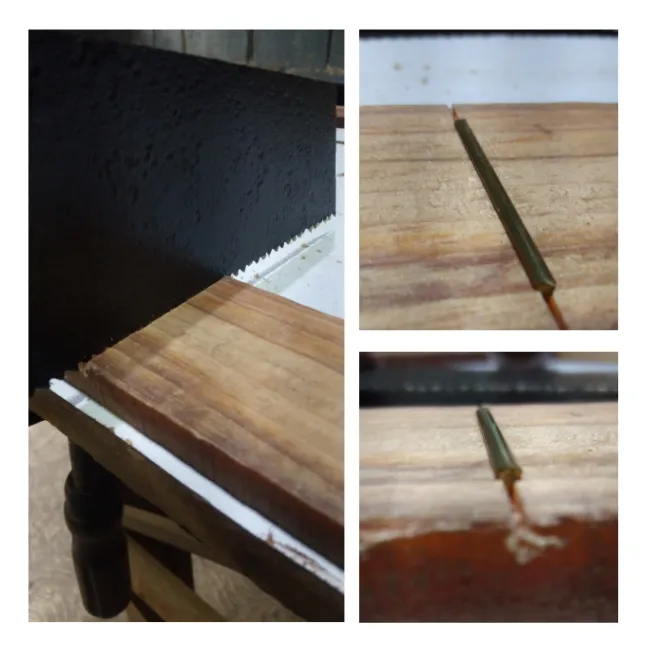
Reservamos lo que llevamos del mango y trabajemos un poco el metal, usaremos el mototool (dremel) con un disco de corte pasamos por la parte recta de los dientes, esto para sacar un poco de punta y filo de 3 a 5 segundos por cada pasada.
Paso 7
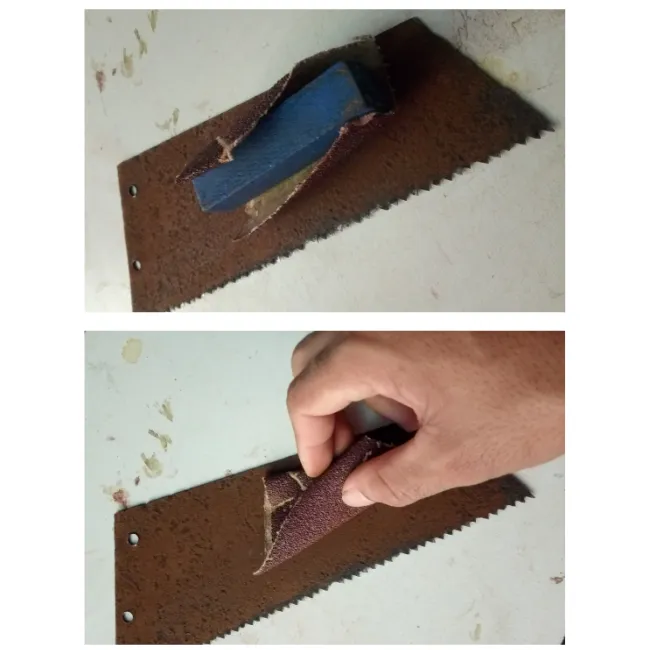
Para eliminar un poco el óxido pasamos una lija gruesa al seco y luego hacemos lo que llamo un baño químico endógeno, hacemos una mezcla de 3 partes de agua por una de vinagre, remojamos la pieza por 2 horas o vamos revisando, si va soltando el óxido es hora de secar la pieza, le pasamos con el mismo producto el cepillo de alambre y luego lavamos para que deje de actuar el vinagre, le pasamos un trapo y dejamos secar al sol.
| Nota: Baño químico endógeno (me refiero a soluciones originadas dentro del taller con lo que se tiene al alcance para resolver el problema) si tienes la oportunidad de usar un fosfatizante mucho mejor, en este caso suplantas el baño artesanal. |
Paso 8
Al tener el mango preparado, lijamos hacemos una bajada de lija 80, 120, 180 y 220 y aprovechamos de dar un poco de tinta en este caso una caoba Africana, una vez entintada y seca pasamos un poco de sellador, unas cuatro manos y tenemos el proyecto de recuperación casi culminado.
Paso 9
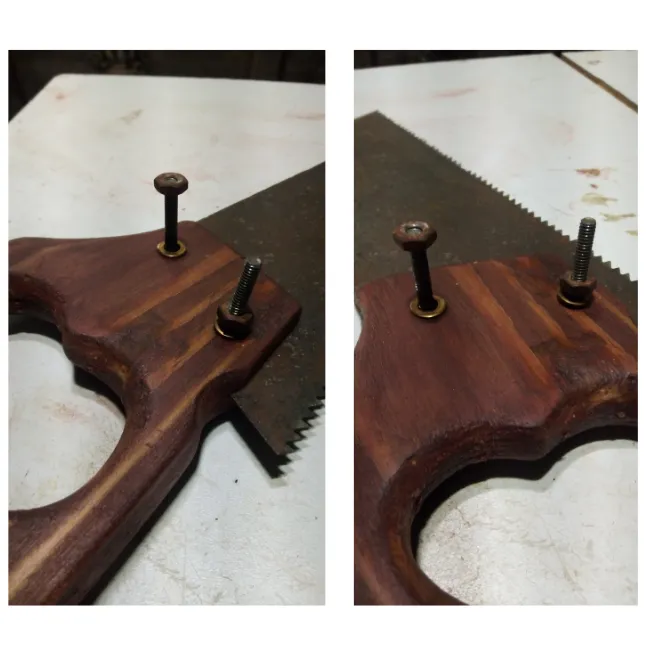
Ensamblamos el mango con el serrucho, incrustamos el serrucho en la abertura y colocamos los tornillos y apretamos, como en este caso los tornillos eran largo corte el excedente, siempre con la tuerca puesta, ya que de esta manera se puede desenroscar fácilmente.
Paso 10
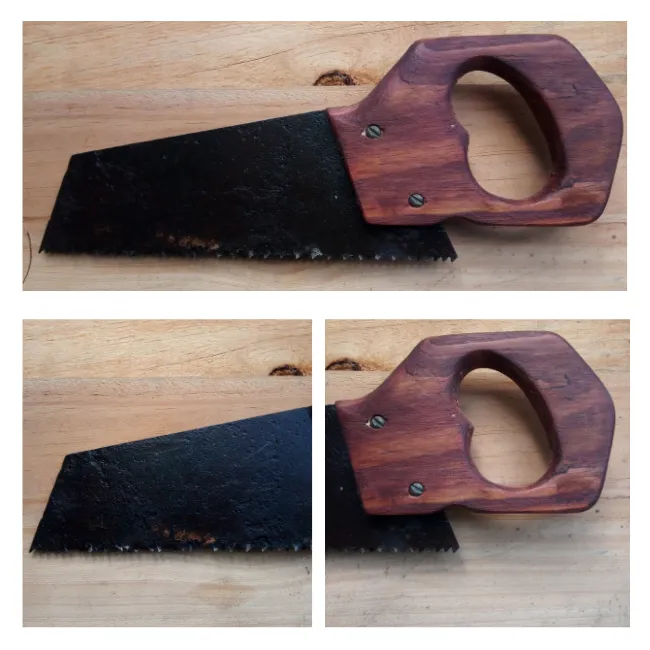
Ya estamos al final de la recuperación, como ya tenemos armado nuestro serrucho para ranura traste solo nos queda dar una película de aceite en el metal esto para protegerlo de la humedad ambiente y no vuelva a oxidarse, podemos usar aceite quemado de carro, aceite 3 en 1 o el que tengamos a la mano, pasamos con un pincel y el excedente lo quitamos con un trapo.
Muestra de como funciona el instrumento de trabajo y como a través de la voluntad la paciencia podemos recuperar algunas herramientas que podemos encontrar en algún lugar dada como basura o chatarra y de esta manera alargamos un poco más su funcionalidad a esto le llamo objetos encontrados, como le llaman los artistas que hacen arte povera y ensamblajes escultóricos a su materia prima.
Este serrucho lo encontró mi esposa enterrado en el patio de la casa de su madre, estaban haciendo jardinería y de allí broto una lámina de hierro, me la obsequio a ver que podía hacer con la pieza y aquí está el resultado, yendo un poco más allá con la historia el antiguo dueño de la casa fue un carpintero...
Muchas gracias por leer y espero que les sea de utilidad para así recuperar algunas herramientas que está en el olvido, estoy atento por si tienen alguna pregunta o sugerencia y si desean recuperar una herramienta también me pueden contactar, hasta la próxima.
Creditos
Fotografías tomadas desde mi celular.
Edición de collage en canva.
Separador hecho en Adobe illustrator.
texto traducido en deelp.
English
An object found underground, a saw recovered and functional.
I greet you from my atelier fellow craftsmen on this occasion I bring you a small project on the recovery of a tool, this time a a tool, this time a carpenter's saw.
carpenter's saw.
This saw was discarded, buried under the ground, but it arrived at the right place It had the right gauge (0.05 mm) to transform it into a saw to groove the frets of the chordophones, it is a small saw, only the tip was broken, this is not a problem for its new fusion.
The following steps can be adjusted to
our needs, here I show how I solved to get a
I solved to obtain a fully functional and necessary fully functional and necessary for this job, this way we can In this way we can do it with a similar tool, then I show the materials to use
materials
2 cm thick wood (semi-hard/ for the handle)
water and vinegar
sandpaper 80 and 120
Wire brush
Two 4mm bolts with their nuts
Mototool with small cutting disc
saw
In this work of recovery and recycling
we will be working with manual tools, the only machine that will intervene is the mototool to take a little sharpness out of the teeth...
Step 1
as any work to design it is essential to have the design, I will always be emphasizing although on the way we disperse a little of what is raised but it is more didactic because from there we will be guided above all with the measures, besides that our imagination can play with morphology and ergonomics.
Step 2
once we have the idea of the handle, we look for what we will use as support, in this case I bring a pine tree, we make the silhouette, we sketch and we begin to saw...
| Note: It is convenient to have a table presser (vise) helps a lot, as it is the third hand practice, we can cut with much more precision, this one I have I had to make it. |
Step 3
after making the cuts and having the raw piece, we smooth the edges a little with the rasp to observe the shape and present it next to the saw.
Step 4
once having its shape to 50% ready, we openwork the part of the handle, as we are making a tool to our measure we must take into account our hand size with 1 cm more on each side so that it is not so fair will go very well, we proceed to draw with the drill and then openwork to facilitate the handling of the tool, with an endless saw the work would be in the blink of an eye, then with a rasp or round file we smooth the edges and we continue.
Step 5
We take the piece to the press and open the opening where it will go through the lock, we can open it with a saw blade or with a small saw and at the end we mark where the screws will go through.
with a small saw and at the end we mark where the screws will pass, open the holes with a wick of the same thickness and we would have our handle almost finished.
Step 6
We reserve what we have of the handle and work a little metal, we will use the mototool (dremel) with a cutting disc, we go through the straight part of the handle and
cutting disc we go through the straight part of the teeth, this to remove a little tip and edge.
Step 7
To remove some rust we do what I call an endogenous chemical bath, we make a mixture of 3 parts water to one part vinegar, soak the piece for 2 hours or go checking, if it is releasing the rust is time to dry the piece, we pass with the same product with the wire brush and then wash to stop the vinegar, we pass a cloth and let dry in the sun.
| Note: Endogenous chemical bath (I refer to solutions originated within the workshop with what is available to solve the problem) if you have the opportunity to use a phosphatizing much better, in this case you replace the artisan bath. |
Step 8
having the wizard prepared sandpaper we make a descent of sandpaper 80,
120, 180 and 220 and take the opportunity to give a little ink in this case an African mahogany, once inked and dry we pass a little sealer, about four hands and we have the recovery project almost completed.
Step 9
We assemble the handle with the saw, we embed the saw in the opening and place the screws and tighten, as in this case the screws were long cut the excess, always with the nut on, because this way you can unscrew it easily.
Step 10
Already we are at the end of the recovery, as we already have armed our fret saw for fret slot we just have to give a film of oil on the metal this to protect it from the ambient humidity and not to rust again, we can use burnt car oil, 3 in 1 oil or the one we have at hand, we pass with a brush and the surplus we remove it with a rag.
It shows how the work instrument works and how through the will and patience we can recover some tools that we can find somewhere given as garbage or scrap and in this way we extend a little more its functionality to this I call it found objects, as artists who make arte povera and sculptural assemblies call their raw material.
This saw my wife found it buried in the yard of her mother's house, they were gardening and from there sprouted a sheet of iron, she gave it to me to see what I could do with the piece and here is the result, going a little further with the story the former owner of the house was a carpenter ...
Thank you very much for reading and I hope you find it useful to recover some tools that are in oblivion, I am attentive if you have any questions or suggestions and if you want to recover a tool you can also contact me until next time.
Credits
Photographs taken from my cell phone.
Collage editing in canva.
Separator made in Adobe illustrator.
Text translated in deelp.