Saludos amigos artesanos y creadores de hive diy, espero que se encuentren muy bien, en mi atelier desarrollo principalmente el oficio de la luthería, la reparación y restauración, a la par de este, la escultura, ya sea en talla de madera como también modelado, ya que es una técnica artística que vengo ejecutando desde el inicio como creador, transformándose así hasta ahora en una actividad complementaria en mi vida trascendiendo el hecho del arte por el arte, siendo entonces el atelier un espacio integral para el arte y la música
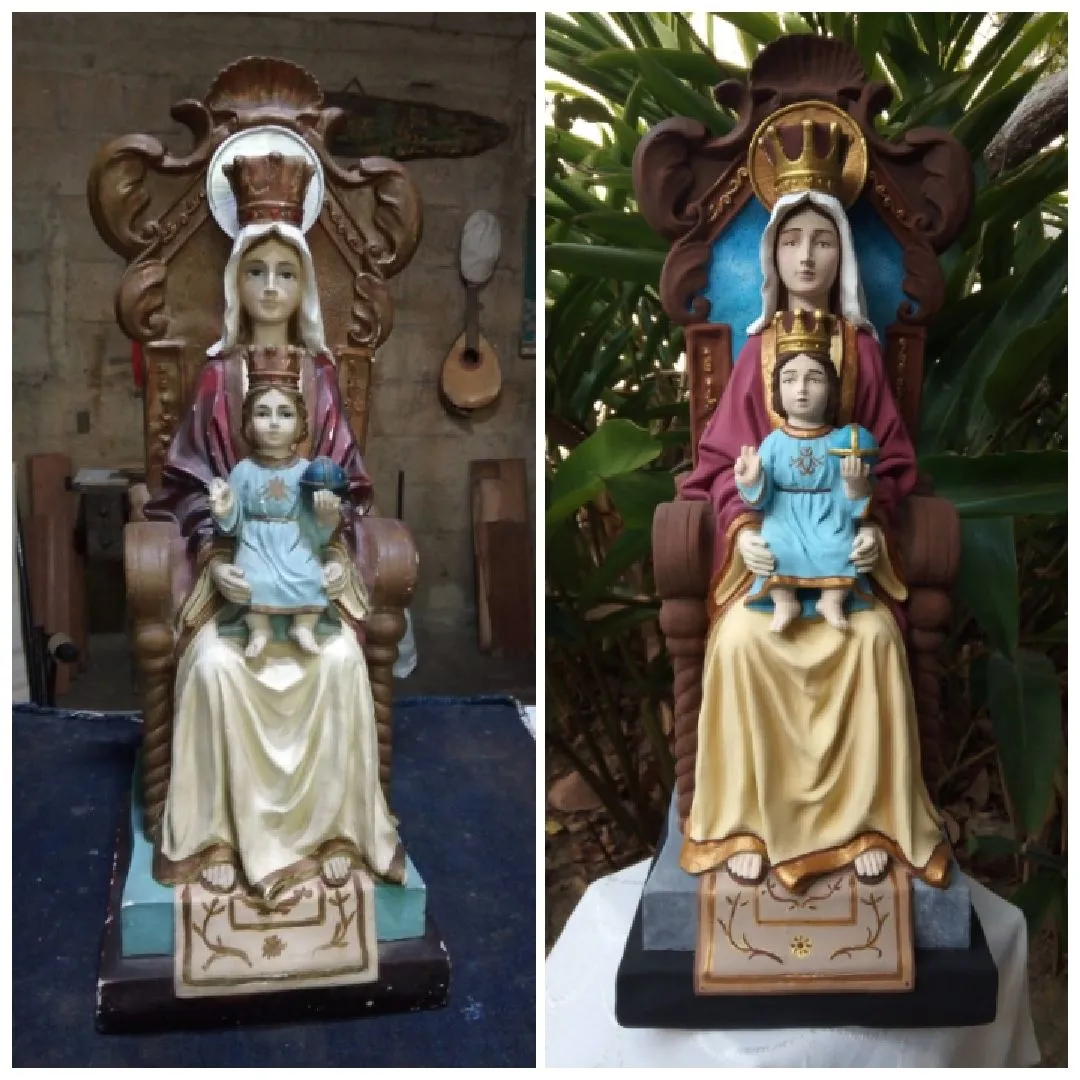
La restauración de imaginería religiosa forma parte de la escultura, por supuesto la escultura sacra es un estilo lo cual no engloba a toda el área de esta disciplina, pues la escultura tiene varios estilos según los periodos de las artes y el arte sacro es uno de esos, en este post les comparto la restauración de la policromía de una virgen de Coromoto, una pieza de serie vaciada en yeso, que por lo visto en su diagnóstico es una pieza con cierta edad, su pátina no los comparte, así que el objetivo es aplicarle nuevos colores, con más armonía y matices, además de aplicarle al final laca transparente para proteger su pintura del polvo y la luz.

- Espátula
- Yeso de construcción
- Pintura al frío y pinceles
- Laca transparente en spray
Paso 1
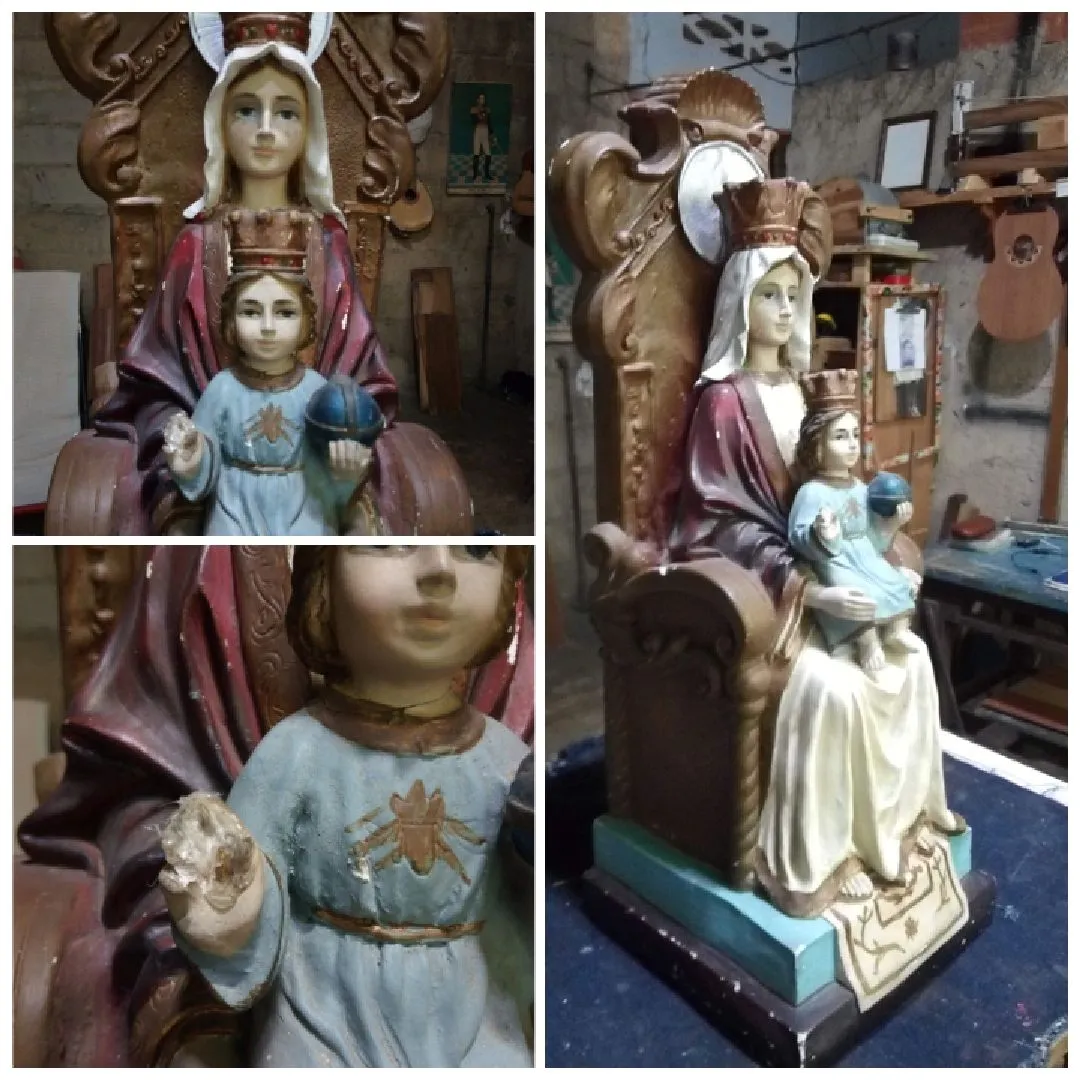
Lo que se debe hacer al inicio de cada pieza es observar y ver si existen fracturas y fisuras que puedan desarrollar un problema a futuro luego limpiar con una brocha de 2 pulgadas el polvo y con un trapo húmedo pasar con cuidado por la superficie, como podemos apreciar en la imagen, debo reconstruir la mano del niño, lo cual elimino resto de un pegamento.
Paso 2

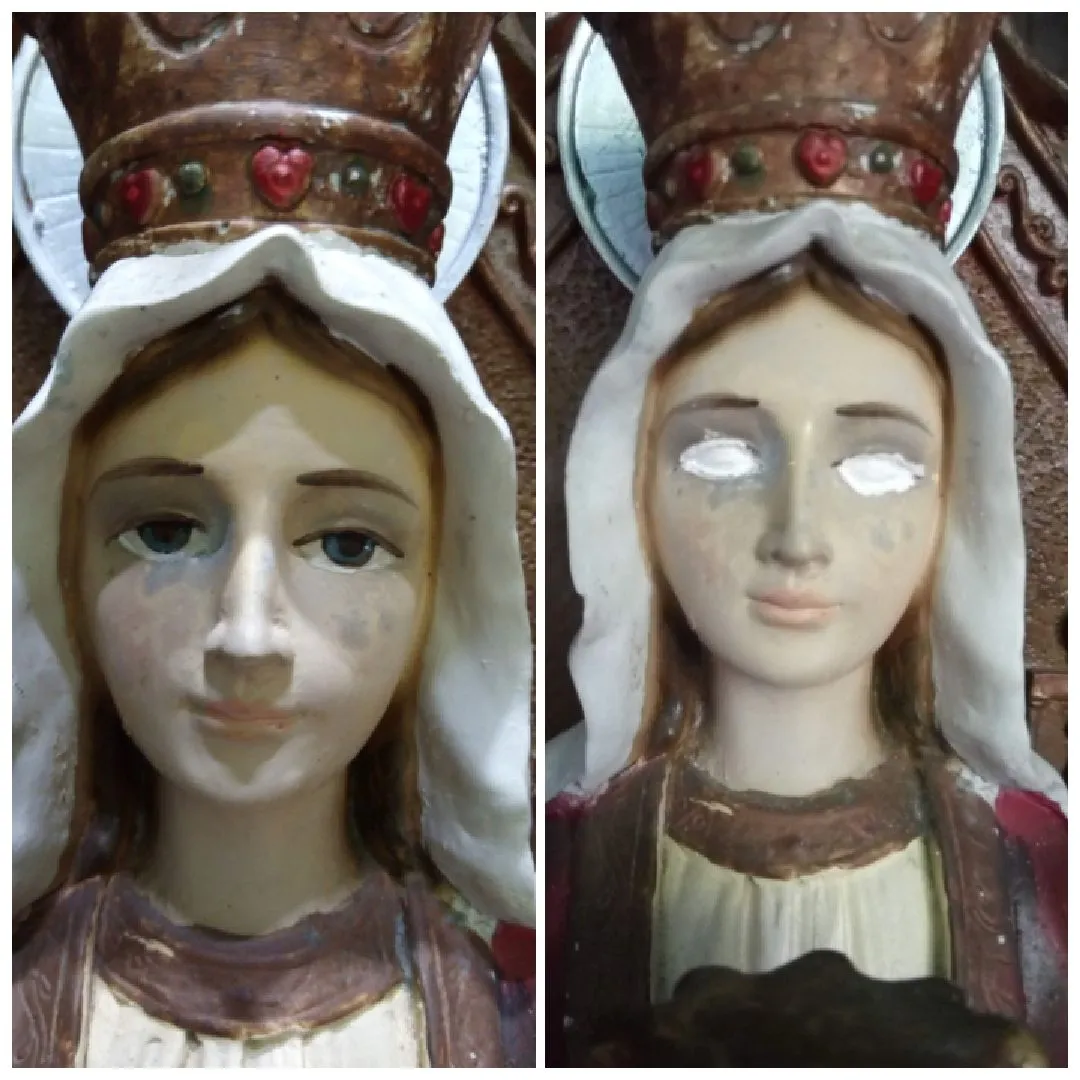
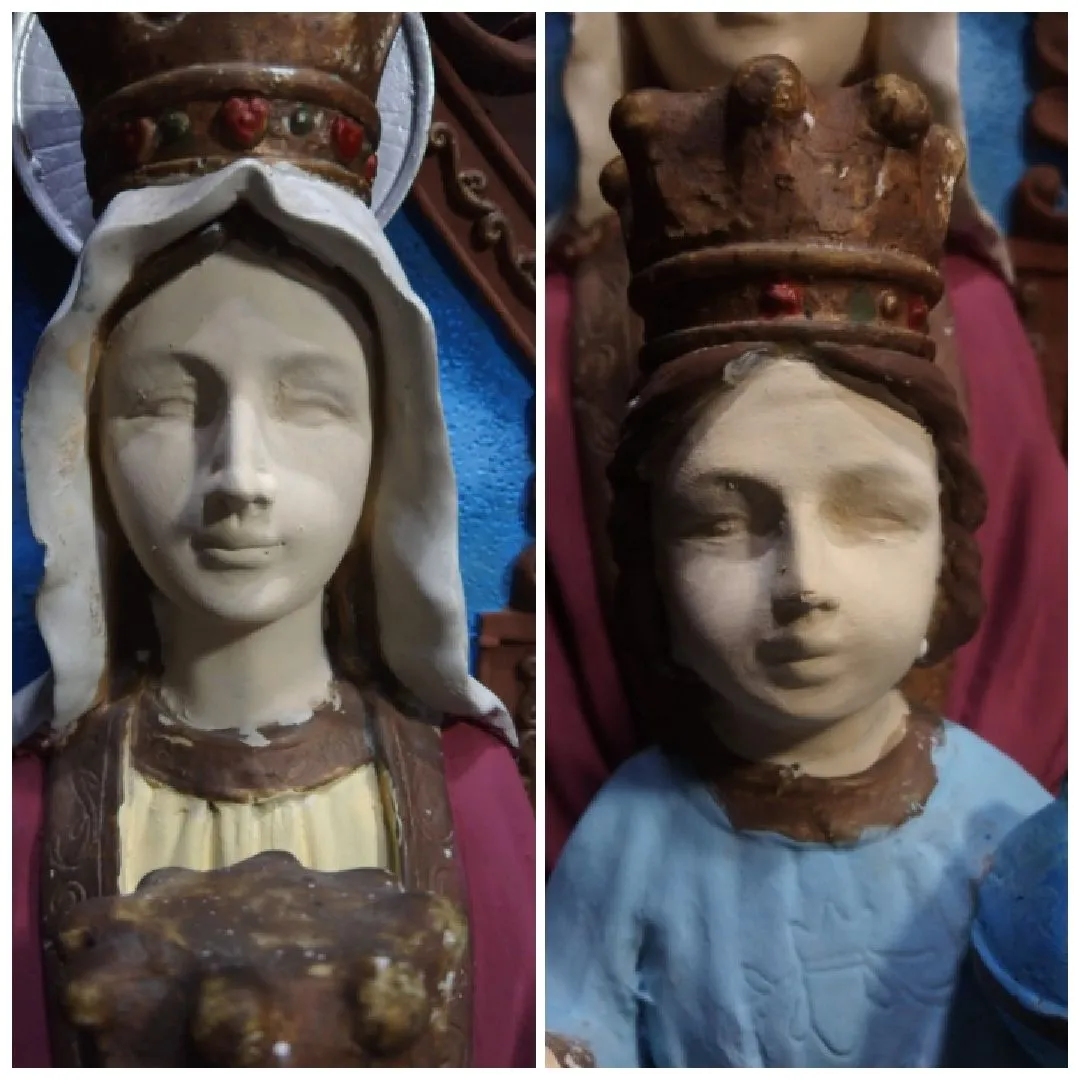
Uno de los detalles que traen estas imágenes en serie son su calidad de pintura y representación, pues es una de las diferencias a una con un máximo de 10 vaciados o 5 porque en esta impera la calidad artística y la dedicación del creador, ni hablar de las inéditas o vaciado único, así que quitaré la pintura de los ojos para luego realizar los detalles un poco mejor o con más realismo.
Paso 3
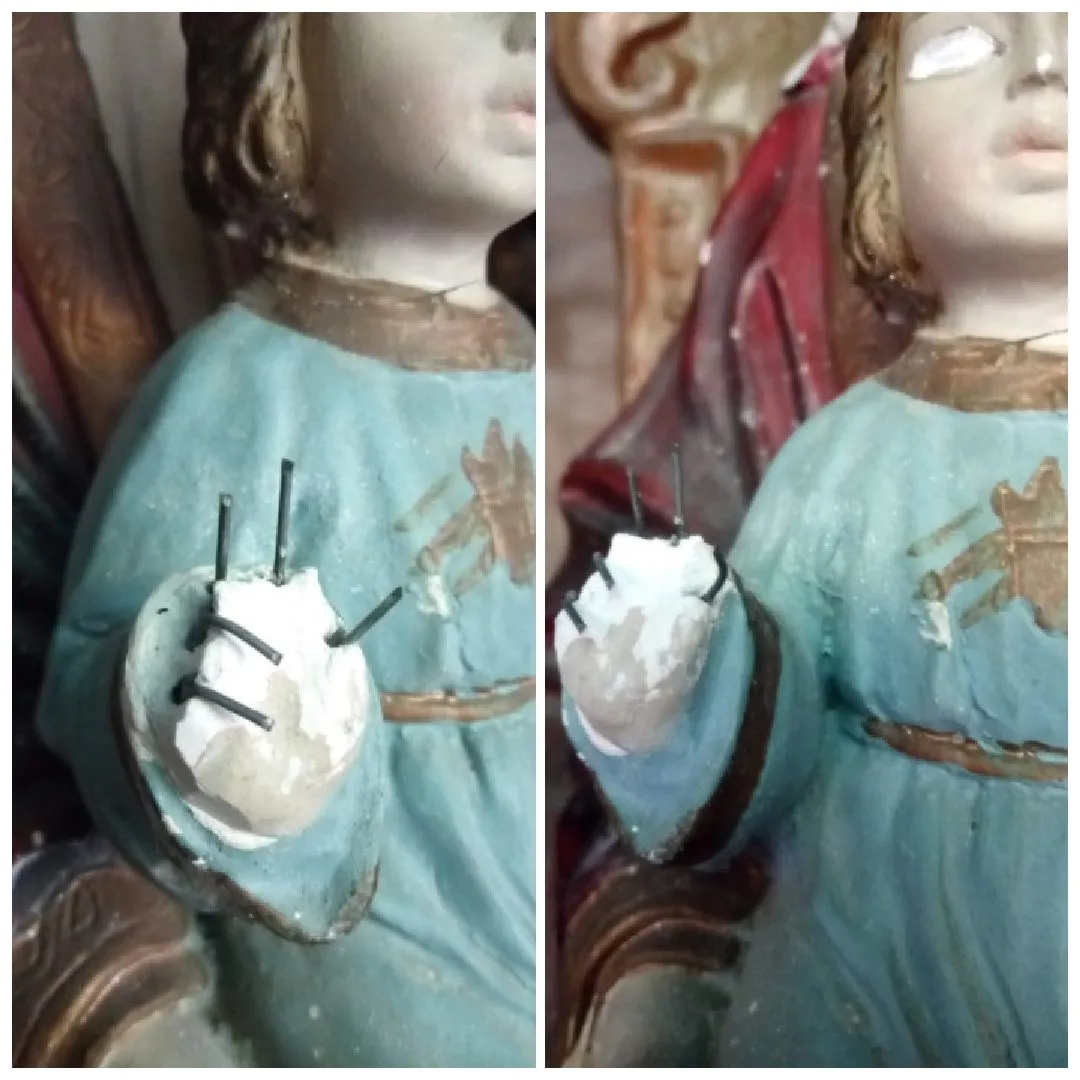
En este paso me enfocaré en rehacer la mano del niño, una vez eliminado todo residuo de pegamento abro unos orificios con una mecha de 1 mm donde corresponde cada dedo, luego pico 5 alambres y con un poco de yeso (preparado con agua y un poco de cola, esta debe quedar un poco líquida, ates de aplicarla en cada orifico humedecer la superficie para que no absorba tan rápido el yeso) colocamos cada alambre en los orificios esto para generar una estructura y así no se fracturen tan fácilmente.
| Nota: Es conveniente que quien desee reparar una pieza pueda tener los restos de lo partido, ya que de esta manera podemos reestructurar mucho mejor, así que la idea es no botar estos pedazos. |
Paso 4
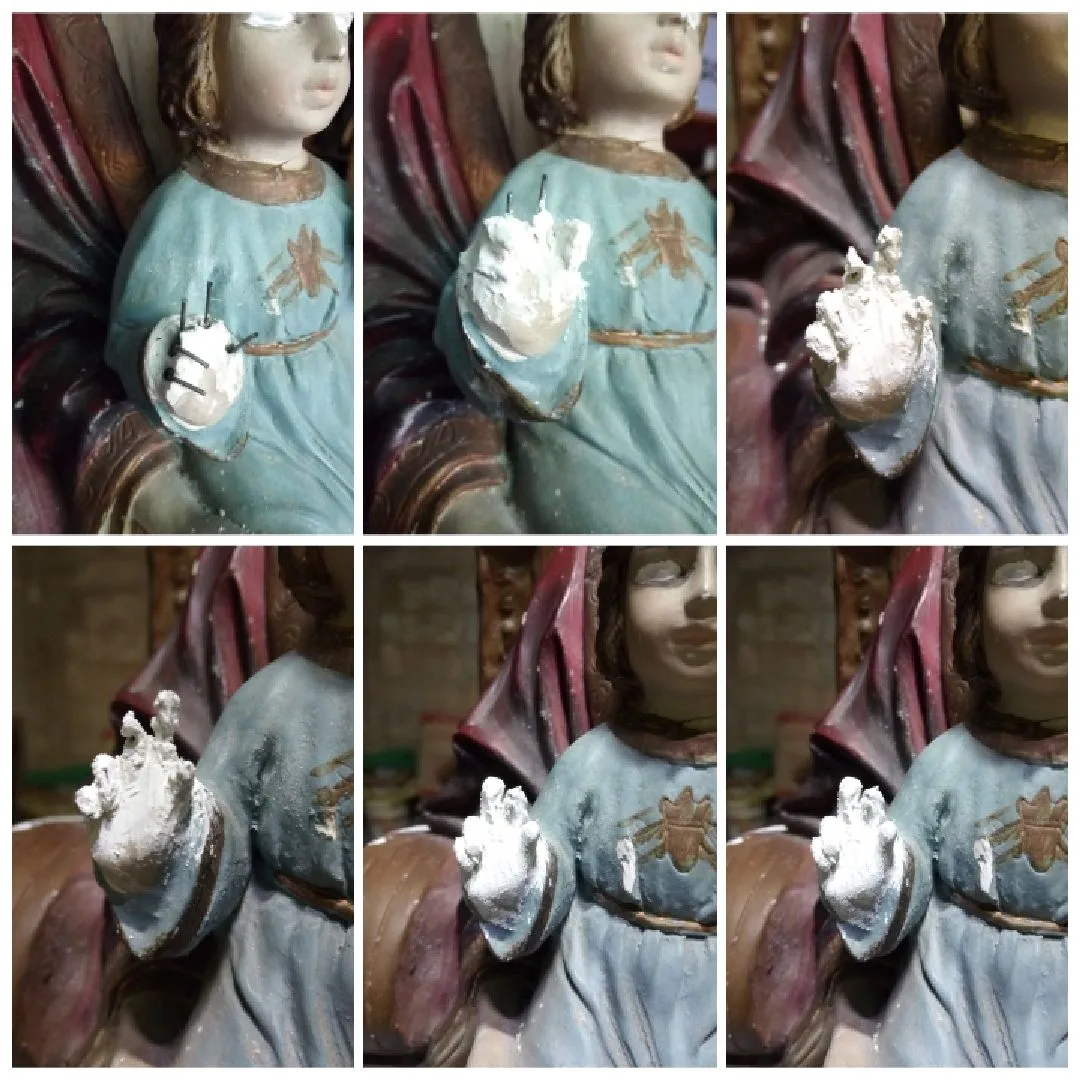
Al estar seca la estructura de la mano preparamos yeso con solo agua, colocamos primero yeso y untamos en agua de a poco hasta obtener una mezcla cremosa (ni tan líquida ni espesa) vamos aplicando por etapas, aplicamos una partes que solo cubra la estructura, sin tanto perfeccionismo la idea es que quede con textura, esto nos va ayudando a que se vaya agarrando la mezcla que posteriormente estaremos aplicando en la imagen podemos ver su evolución.
Paso 5
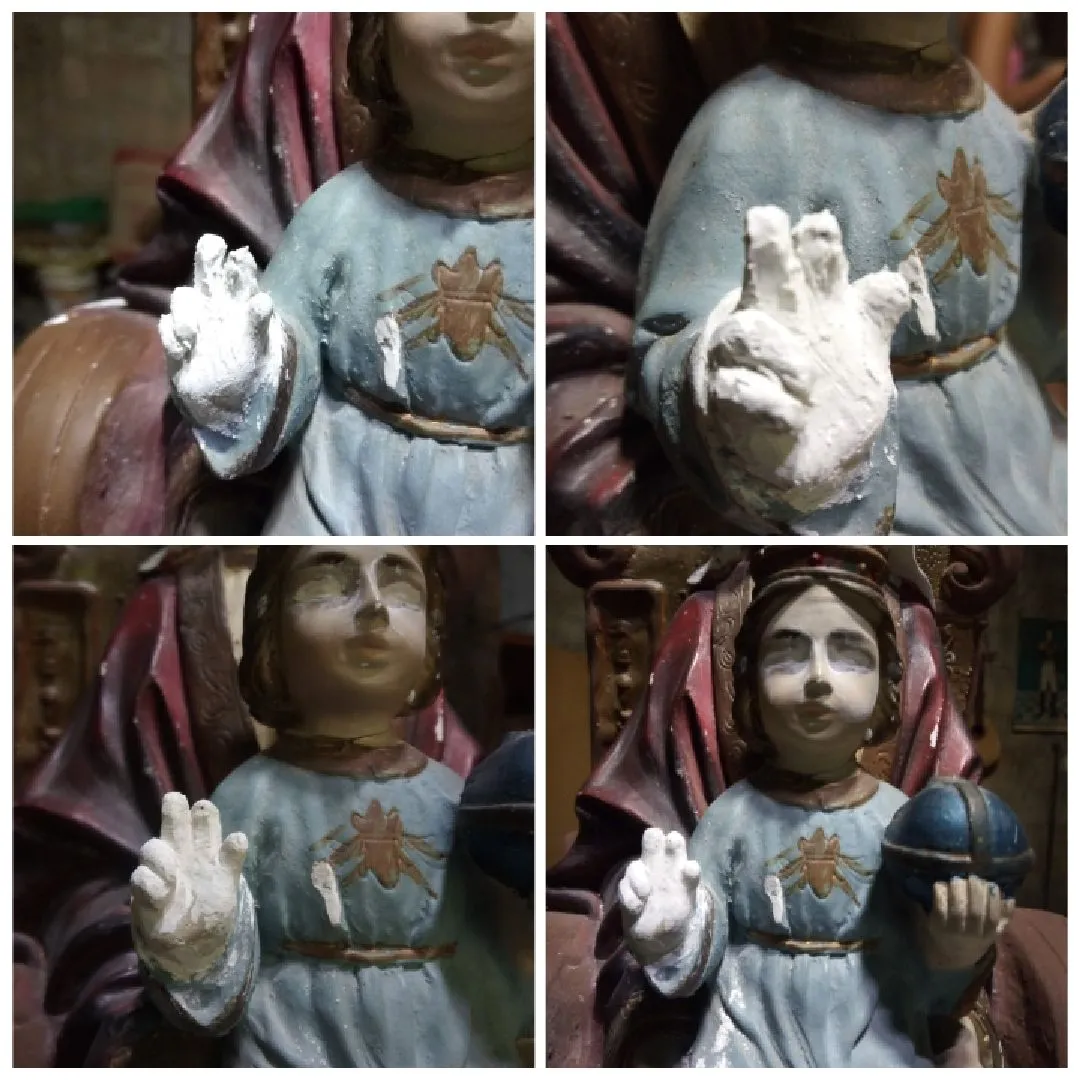
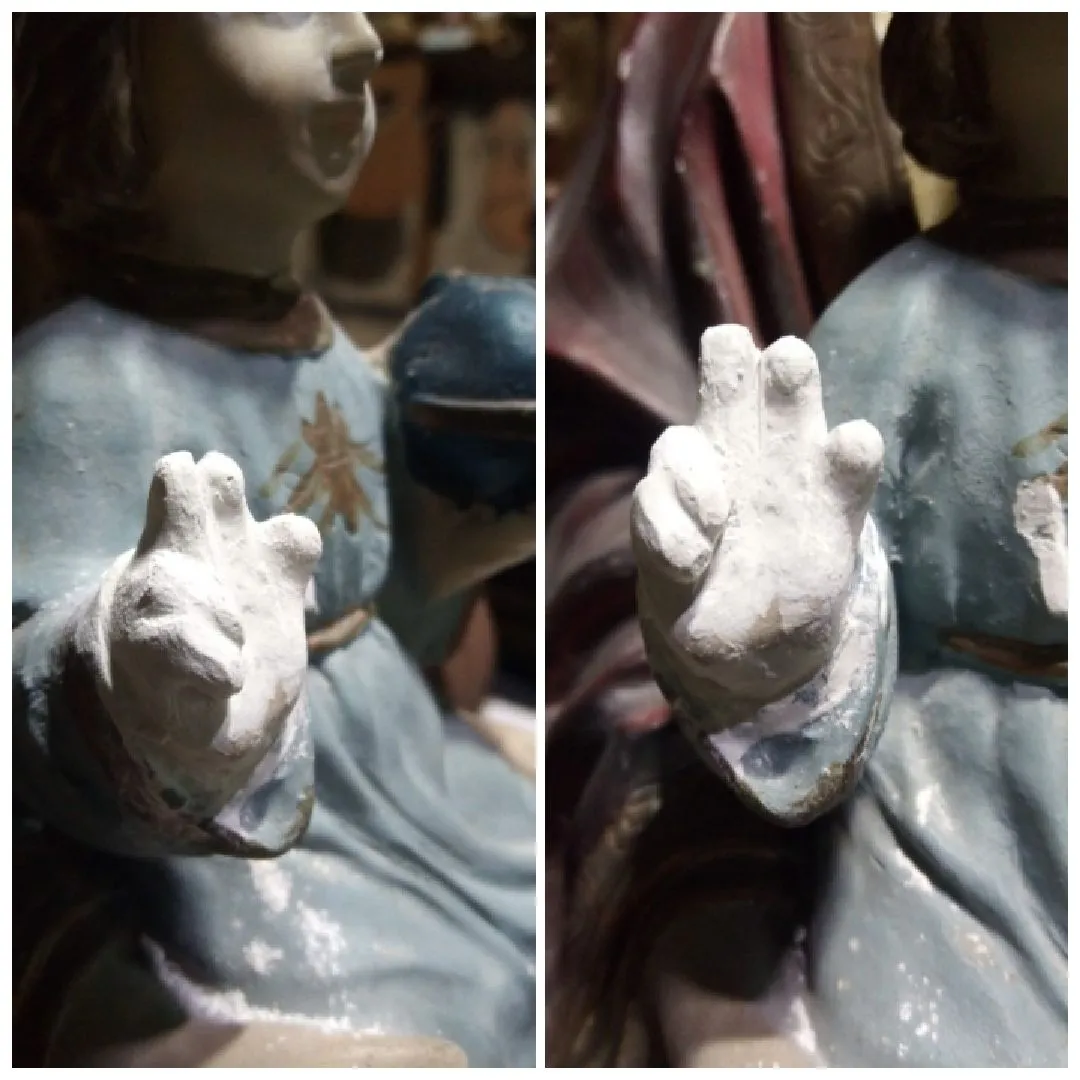
Aquí comenzamos a divertirnos con el modelado directo, con el paso anterior logramos una estructura, con este, vamos aplicando y dando forma a cada dedo, también por fases de tiempo es decir cuando logremos cierto volumen dejamos secar un poco, en este momento de trabajo podemos ir aplicando el yeso más líquido porque si lo aplicamos muy denso el yeso base se absorbe el líquido y no se adhiere, al final de haber logrado la mano con un pincel con agua aliamos para que quede con una superficie lisa, dejamos secar por un día.
Paso 6
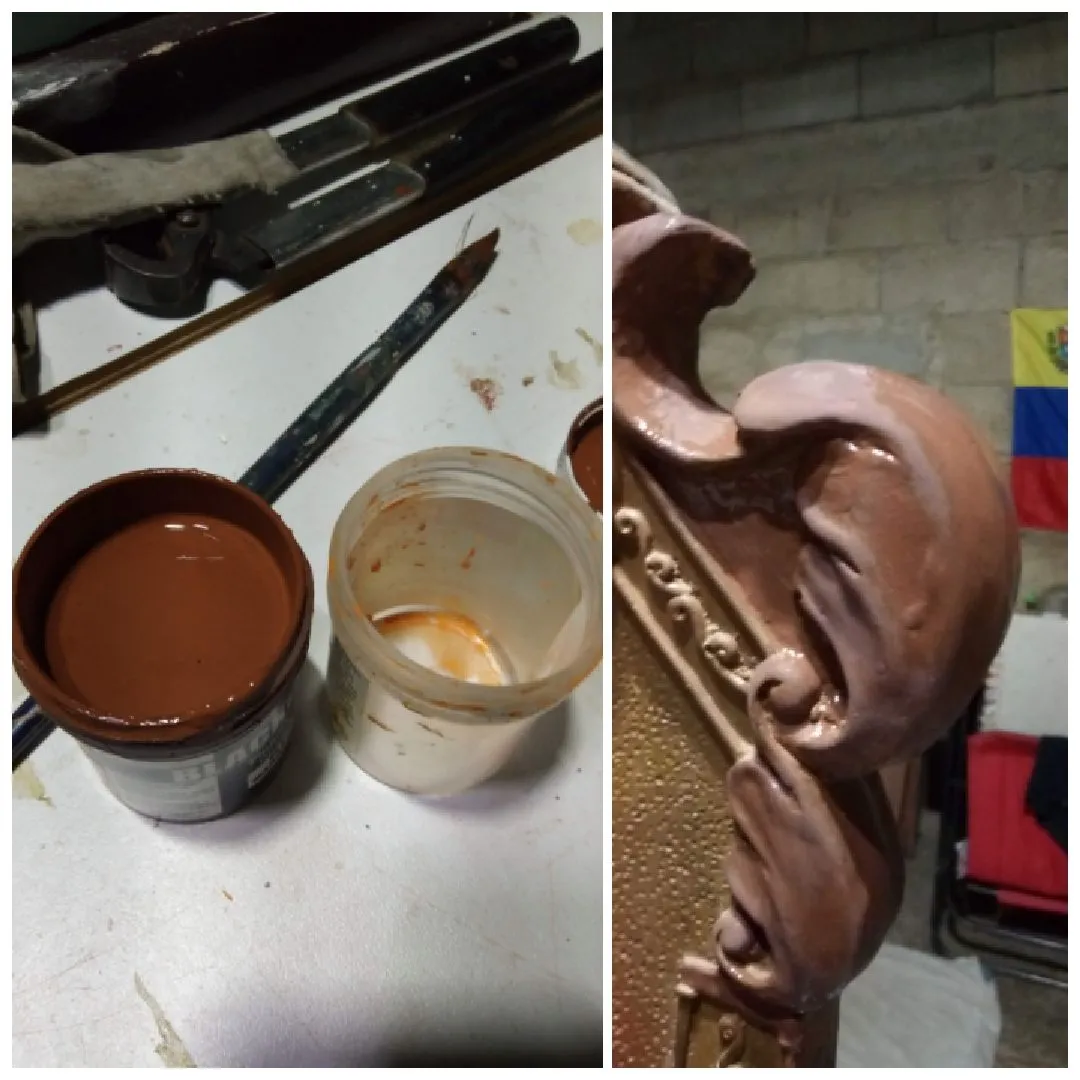
Vamos a ir pintando el trono, prepare un tono marrón, para así darle más apariencia de madera, yo por lo general preparo los colores, pero pueden aplicarle un tono caoba o terracota, a la terracota pueden agregar un poco de azul y unos puntos de negro y así vamos creando tonos que no están en el mercado.
Paso 7
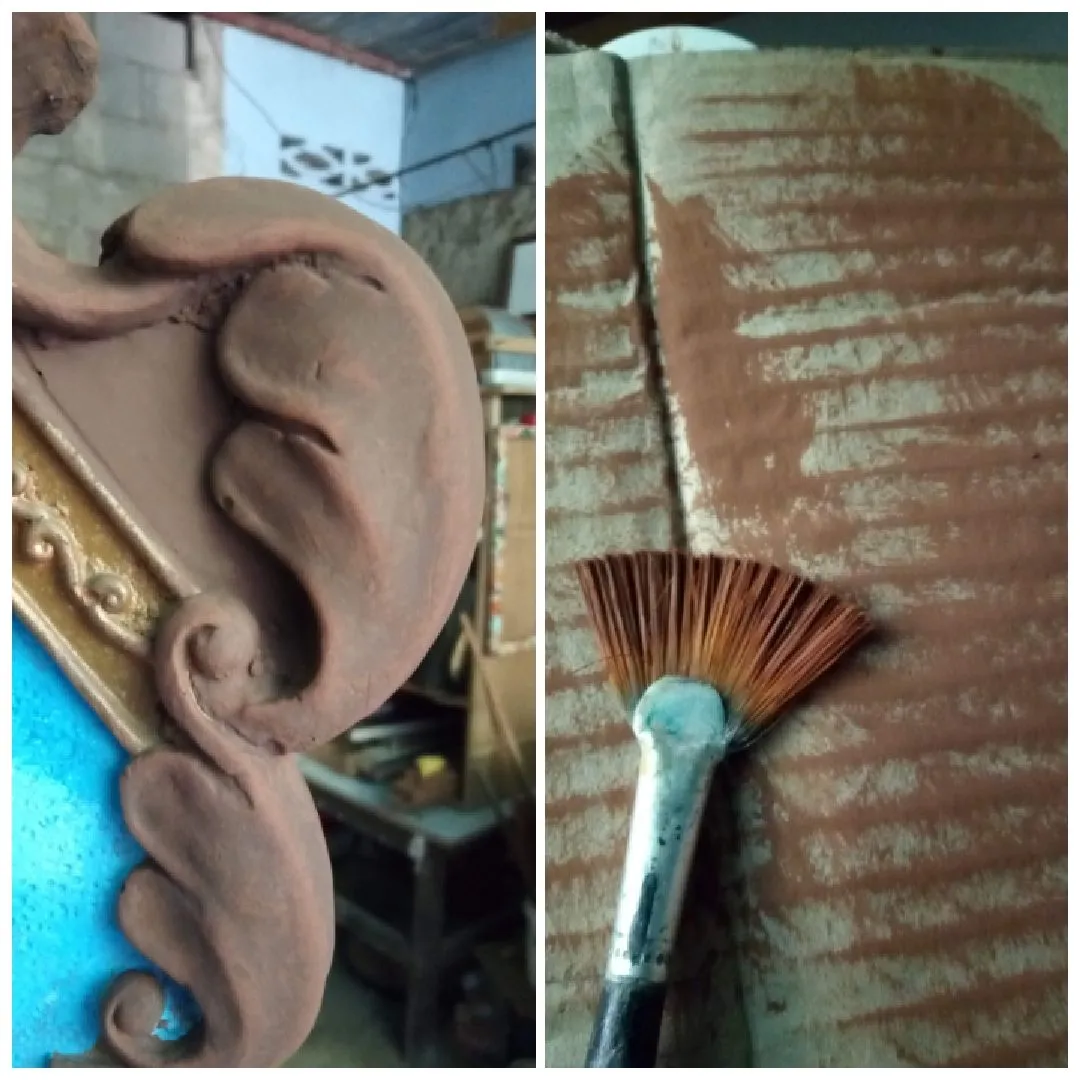
Una vez hayamos pintado el trono, aplico la técnica del pincel seco para resaltar los volúmenes del trono con un marrón más claro, agarramos pintura con el pincel y quitamos del pincel toda la pintura que podamos y luego pasamos como si estuviésemos quitando el polvo muy rápido sin afincar el pincel sobre la superficie, así logramos esta técnica de envejecido.
Paso 8
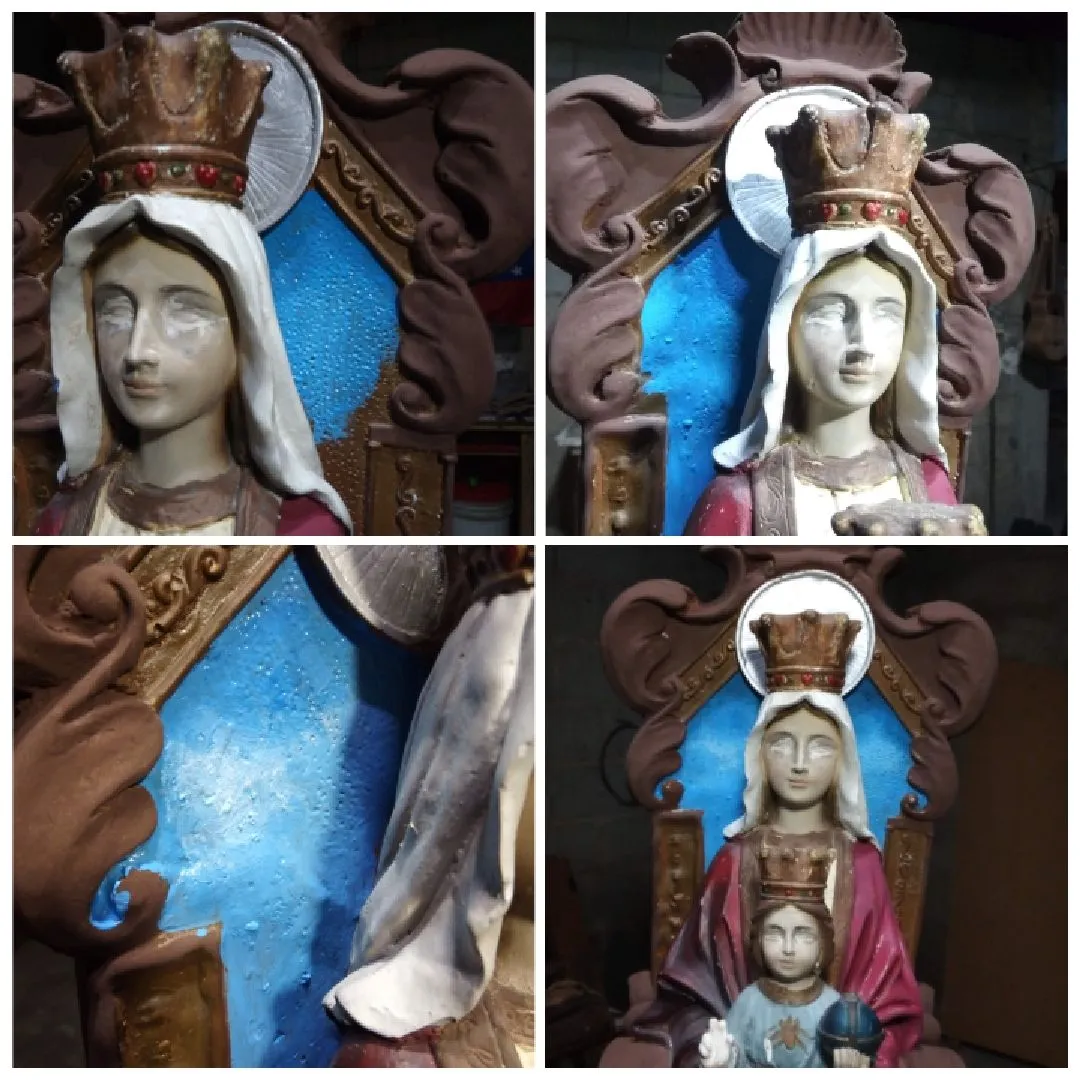
Pasemos a pintar el fondo del espaldar, este no tenía el color que le corresponde iconográficamente, esta parte representa el cielo por lo que imagine un cielo con nubes, ya con estos grandes avances podemos ver el cambio de la imagen.
Paso 9
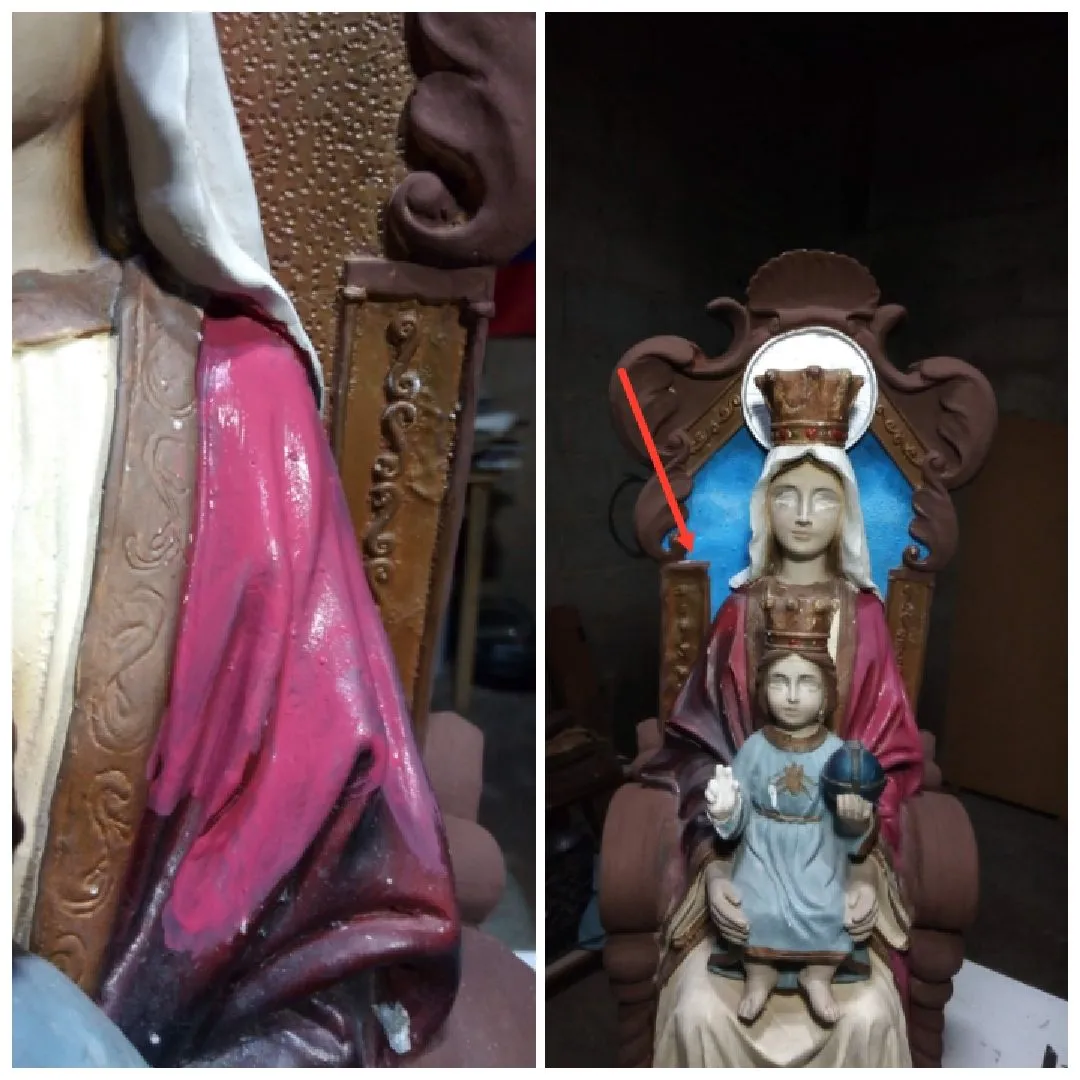
Ahora pintemos el turbante, con un tono vino tinto claro, pues podemos ver como indica la flecha en la imagen el color oscuro que presentaba, los tonos bajos representan melancolía, tristeza, entre otras emociones en el caso de esta escultura debe representar lo contrario así que los tonos claros debemos aplicarlo en este estudio.
Paso 10
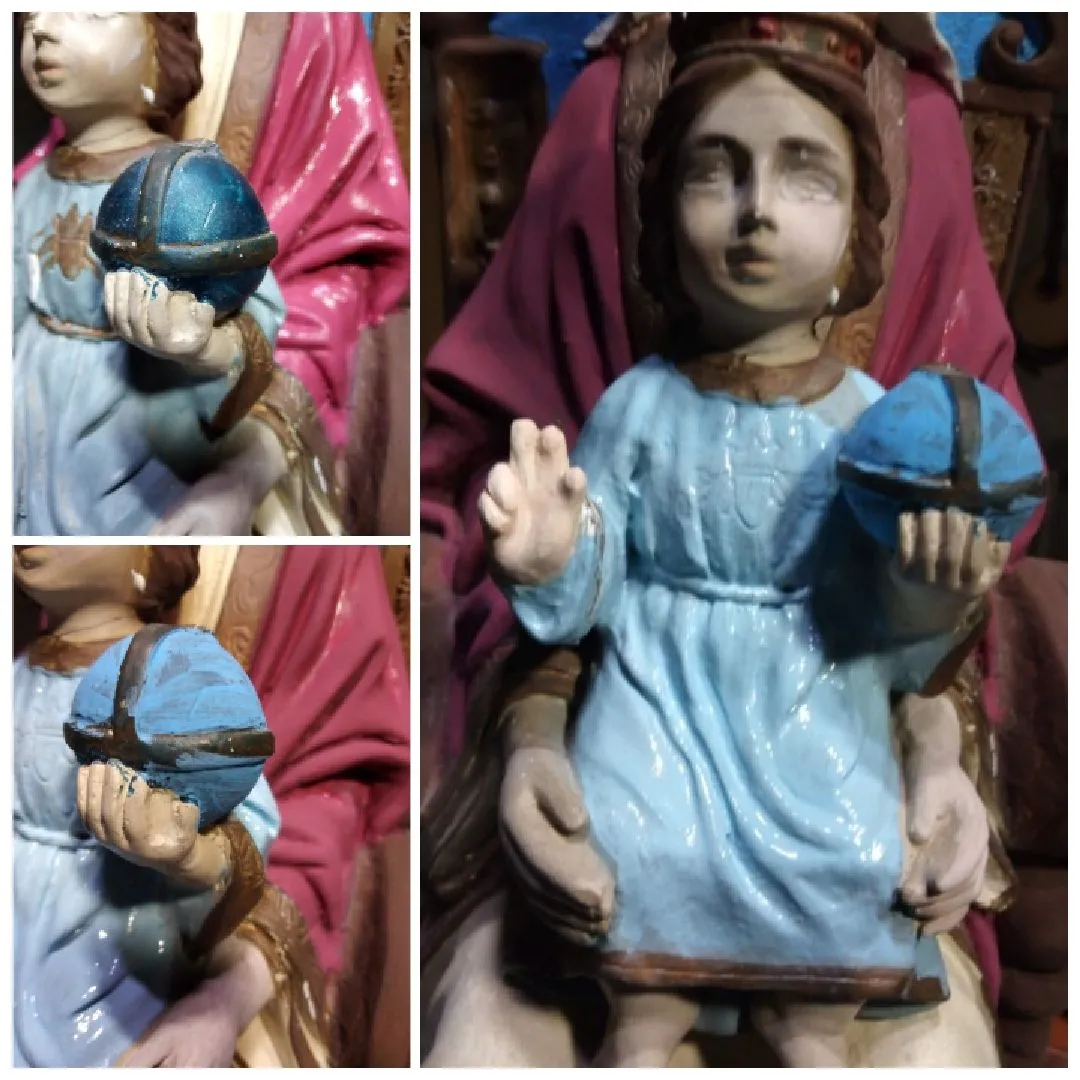
En este momento, mientras seca el área pintada en el paso anterior, pasamos al niño pintado su camisón y el planeta.
Paso 11
Al vestido de la virgen le aplico un marfil, le apliqué tres manos porque la imagen la representa con este color, además de que su color es muy armónico con respecto a los demás tonos y junto a este proceso también le aplique color a la alfombra.
Paso 12
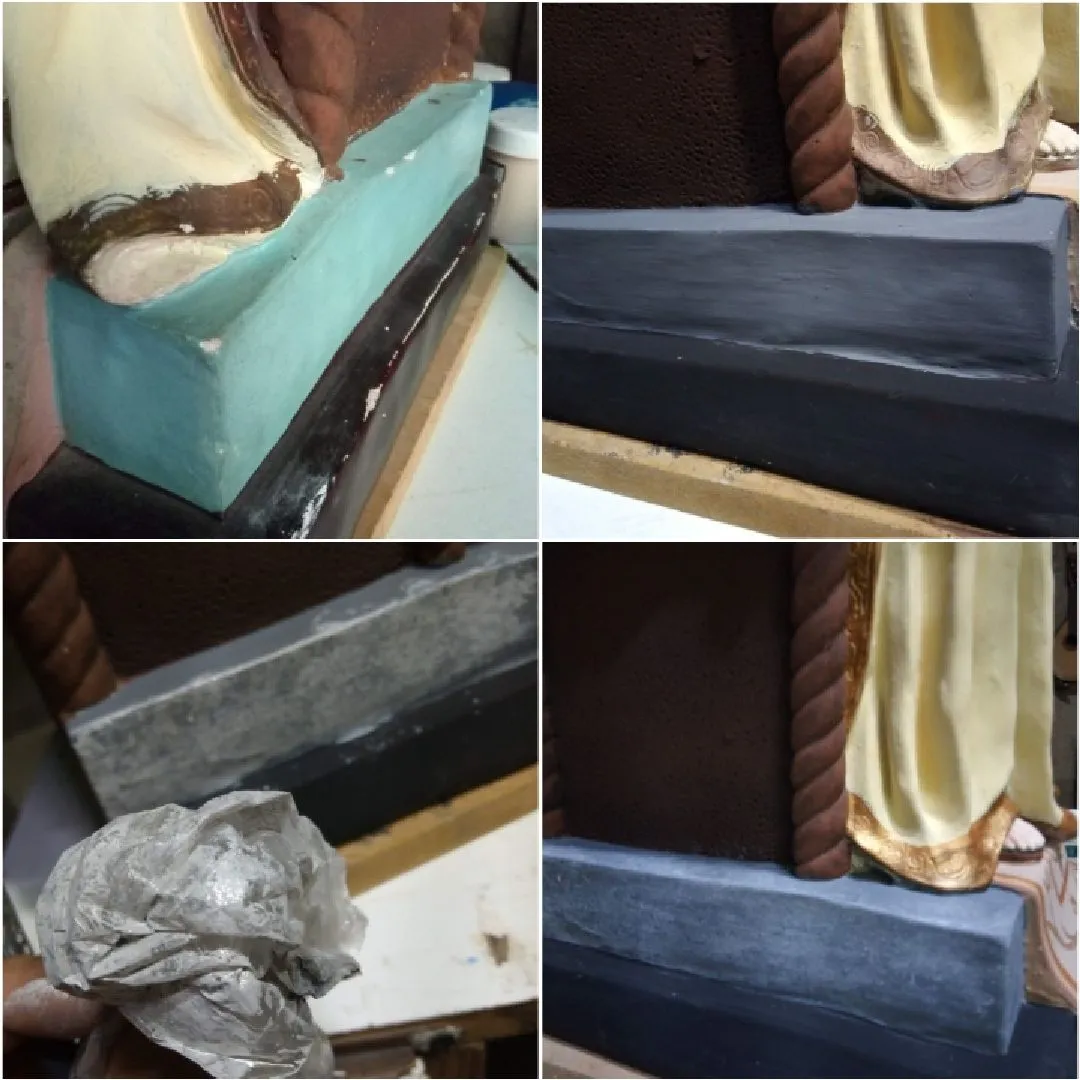
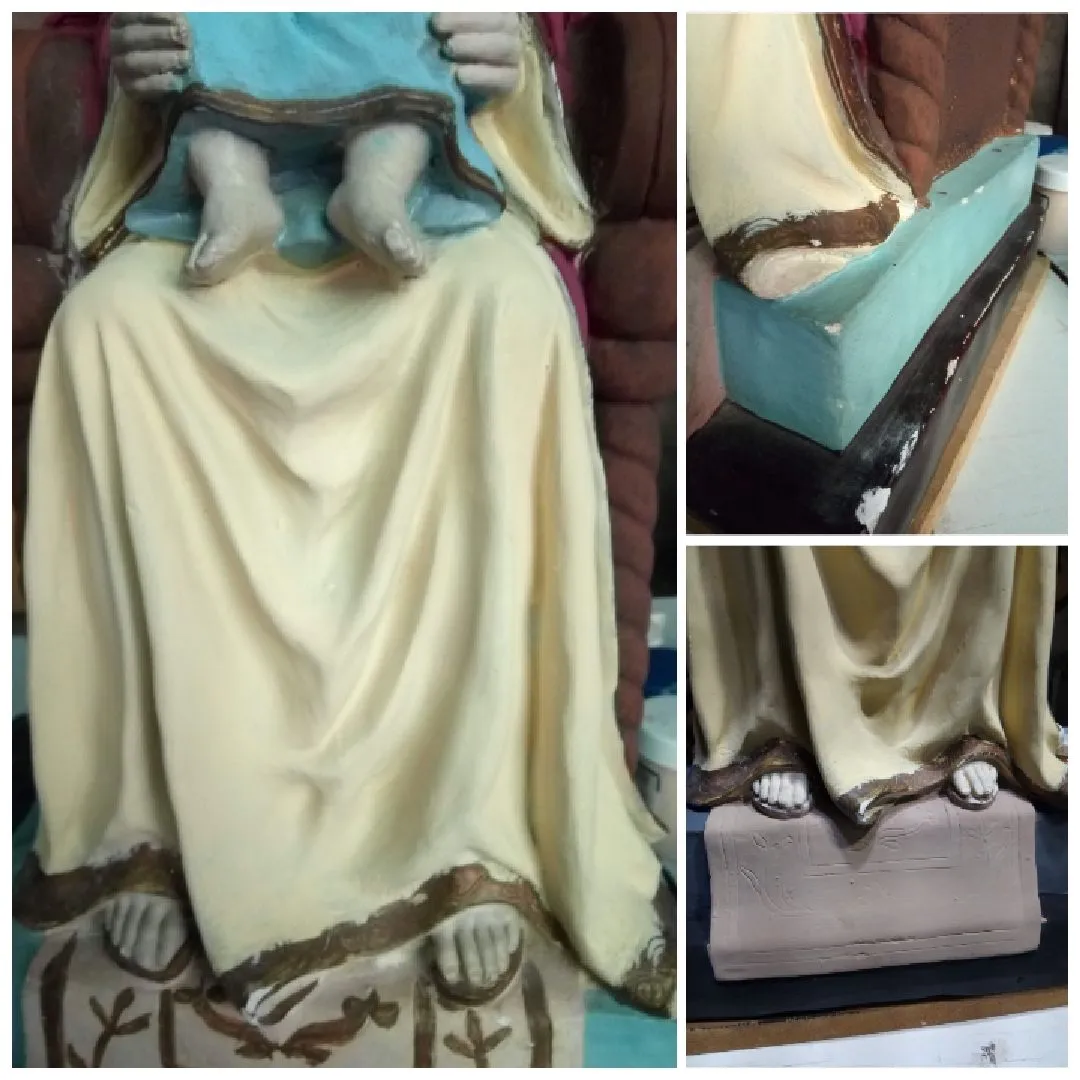
Aquí consulté con el dueño de la pieza para sugerir un cambio al pedestal, para pintarlo simulando como si fuera un mármol, para esto di una pintura base de color gris y luego pase con blanco con una bolsa plástica, ya que estaría como haciendo una impresión con las arrugas de la misma.
Paso 13
Ahora comencemos a dar color a los rostros, manos y pies, acá igual preparo el tono piel, por ello debemos de conocer un poco de teoría de color y el manejo del círculo cromático, matizo con tonos ocres y en los lados cóncavos un tono verdoso.
Paso 14
En este paso casi estoy culminando el proceso de policromía, aquí estuve realzando los detalles con tono bronce y dorado, como en la corona y aureola.
Paso 15
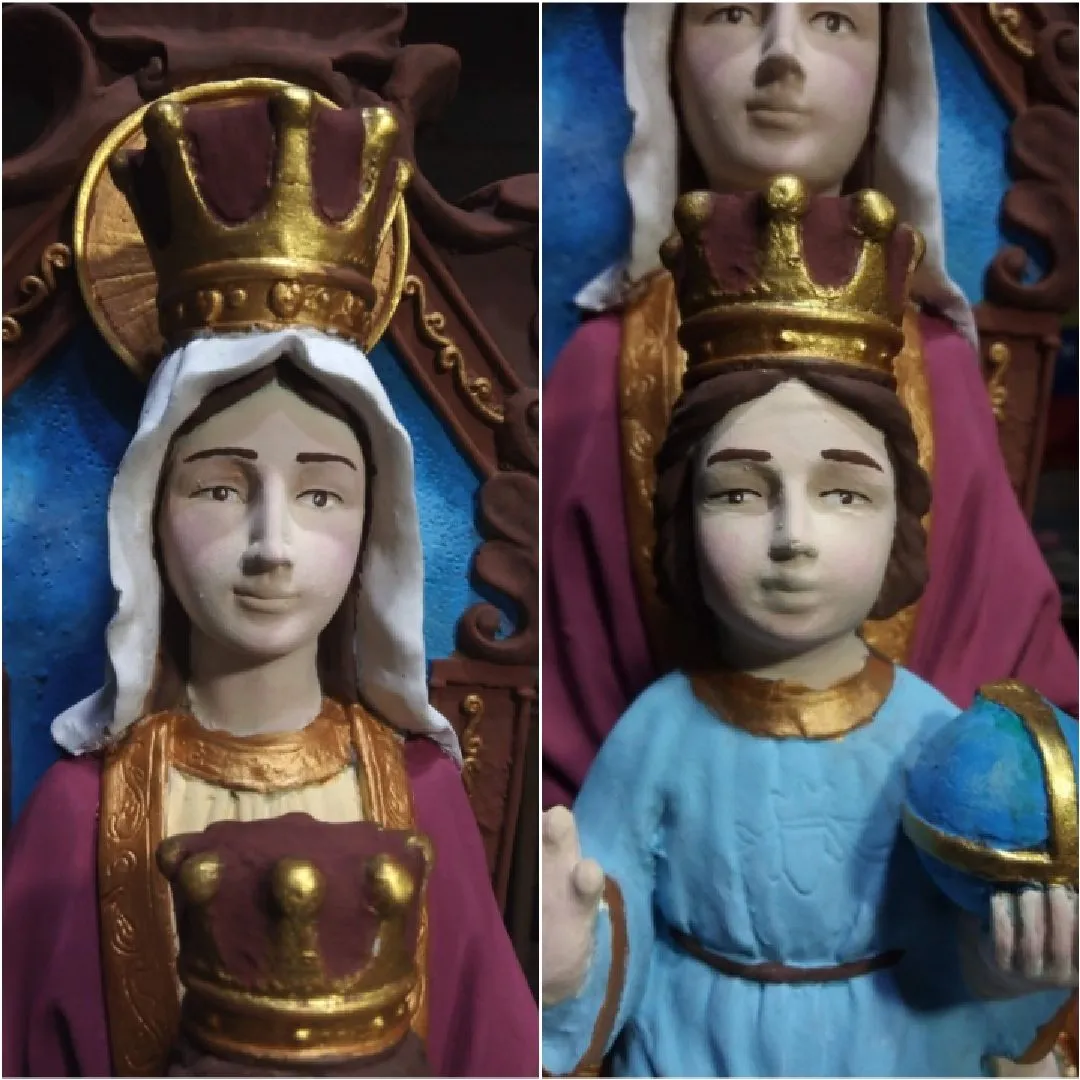
Los detalles como los ojos y el iris es determinante en este proceso, la idea no es usar negro, pues su aspecto no sería muy armónico usemos tonos ámbares, ocres y un tono más claro en el iris y un punto blanco en que refleja la luz, también delineemos la pestaña superior esto nos da una sensación de profundidad, simulando una sombra, también dibujamos las cejas con la tonalidad del cabello.
Paso 16
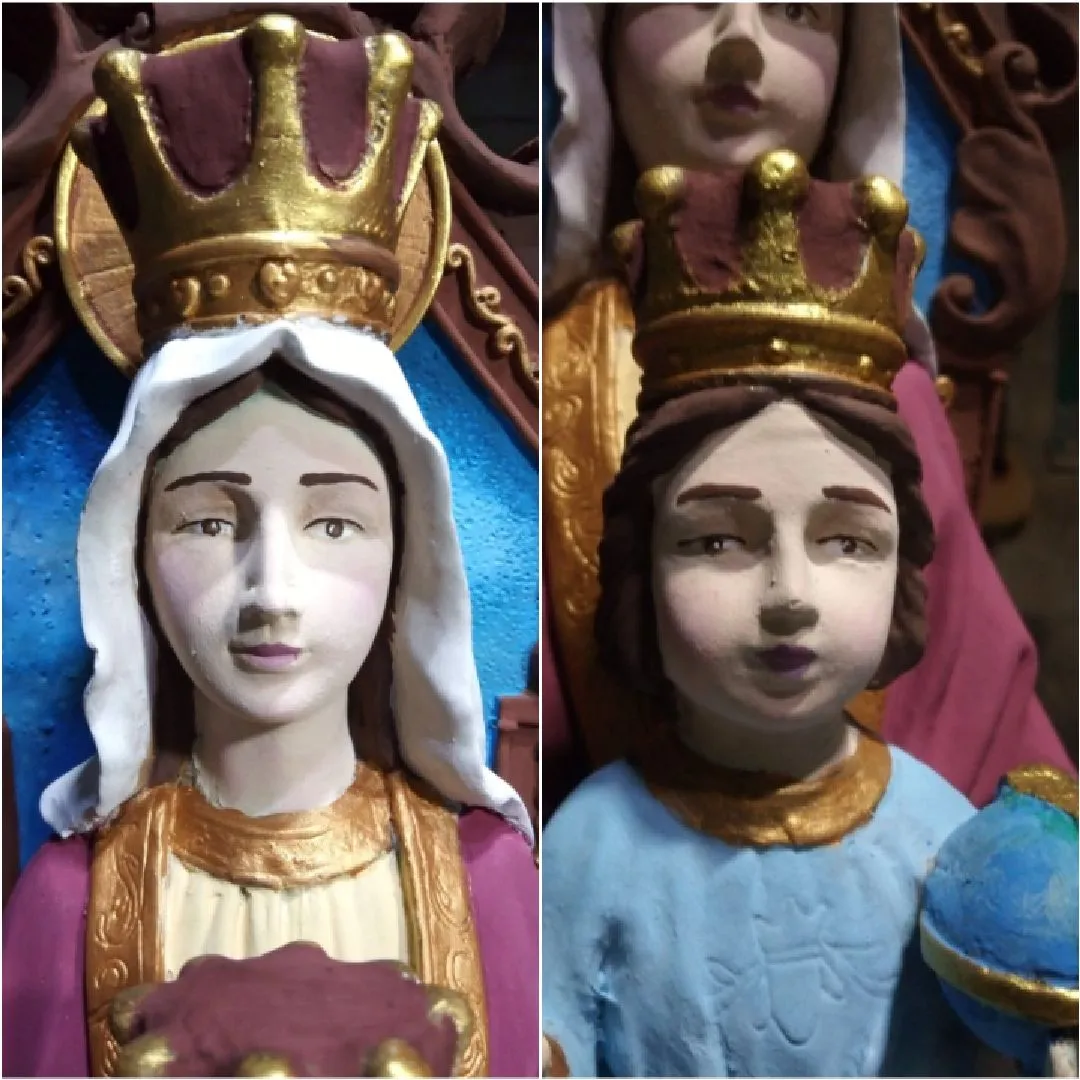
Para finalizar el rostro culminamos con los labios, el labio superior debe ser siempre un tono más oscuro y el inferior más claro, pues está con su convexidad, está más expuesta a la luz.
Paso 17
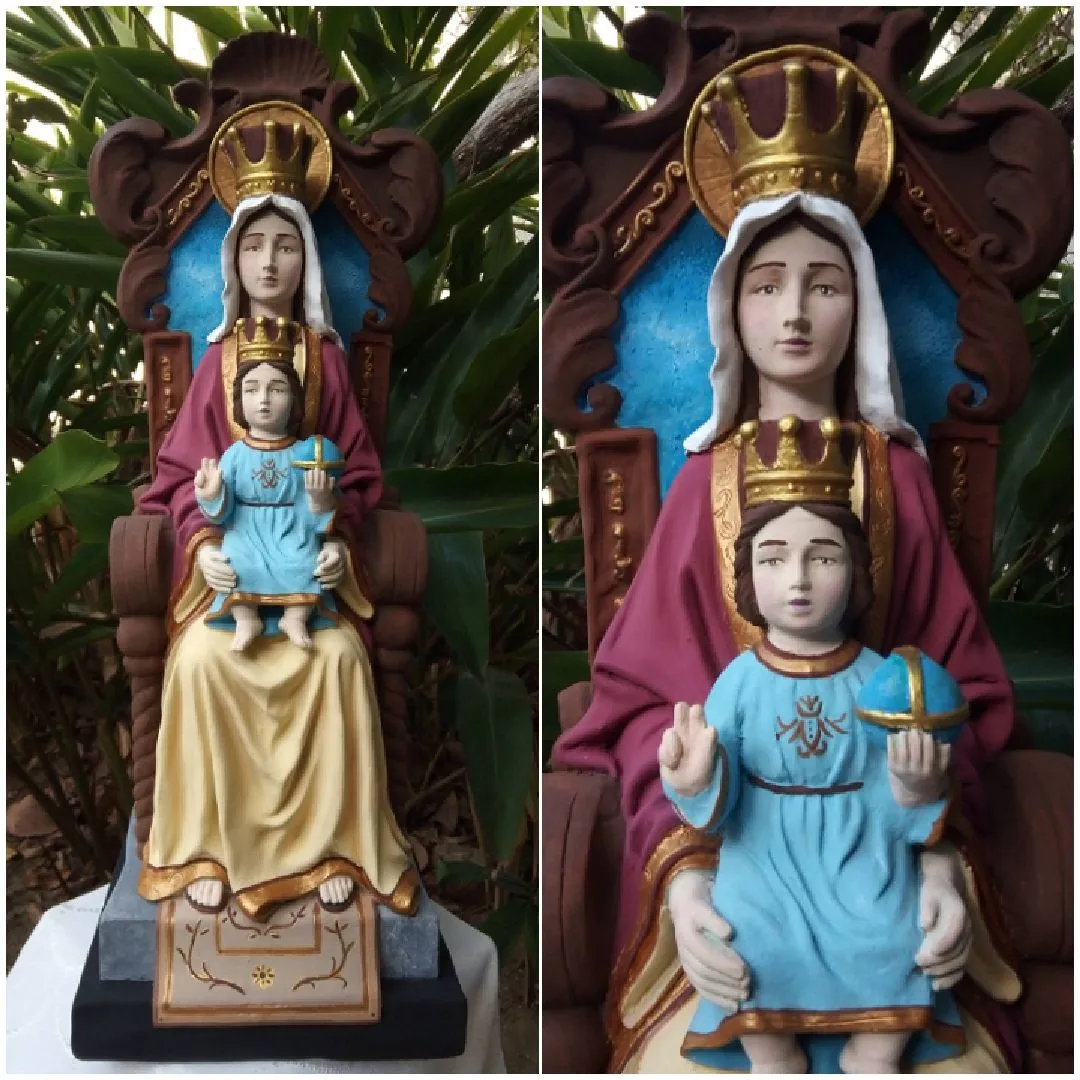
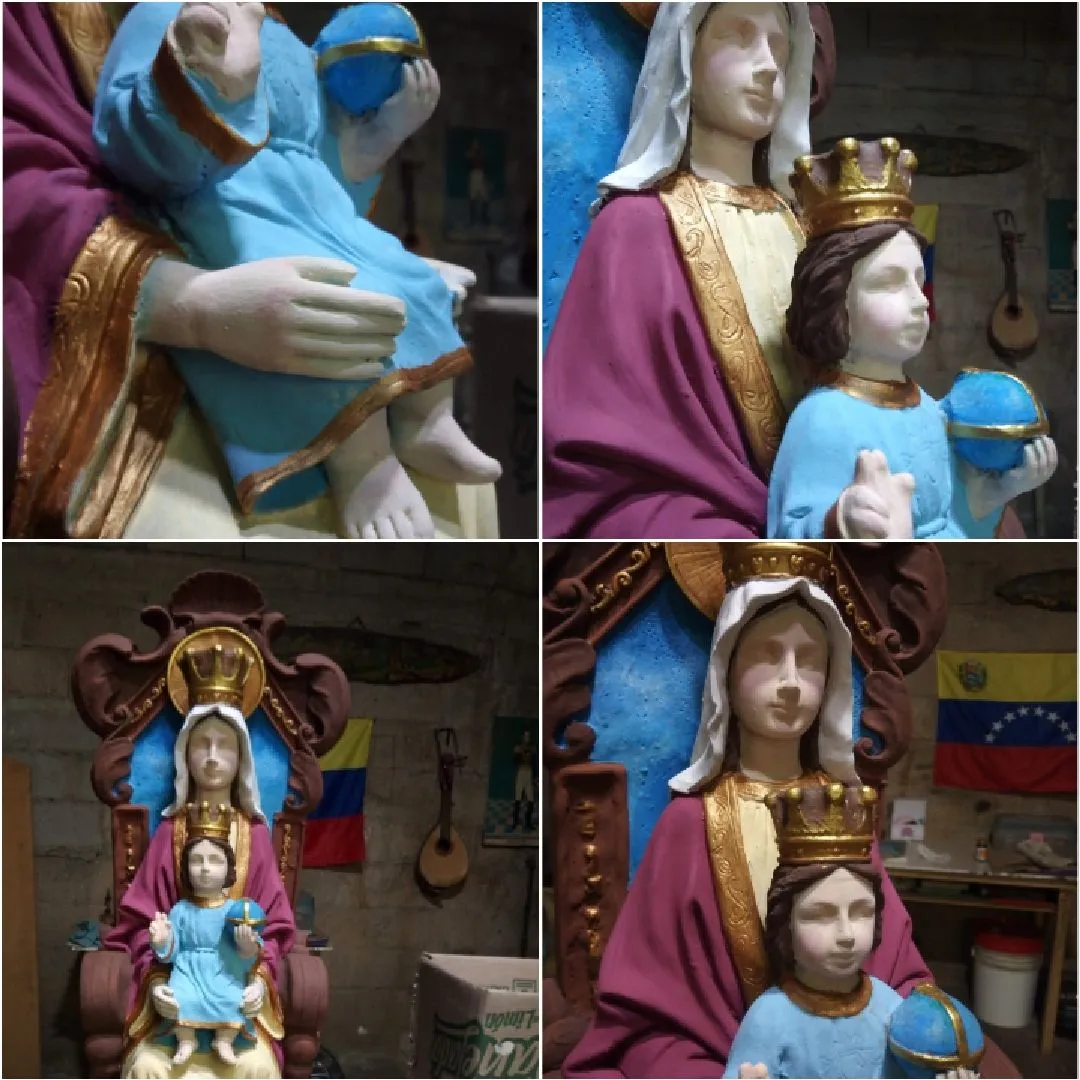
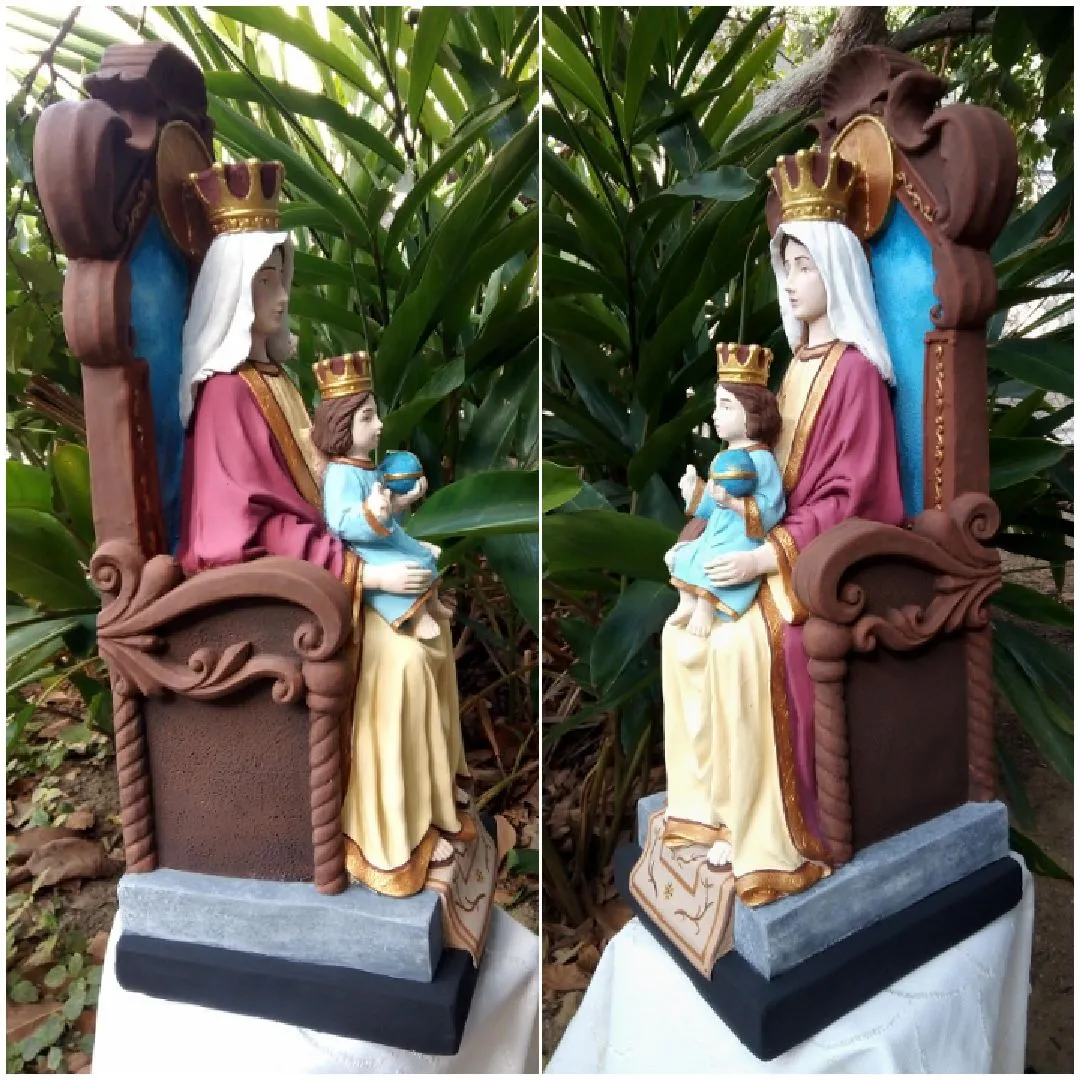
Con este paso damos por finalizada la obra lade , aquí podemos dar los detalles finales y visualizar que todo haya quedado como lo imaginamos para así aplicar la laca, porque si quedaron algunos detalles al aplicar la laca no tendremos marcha atrás.
Paso 18
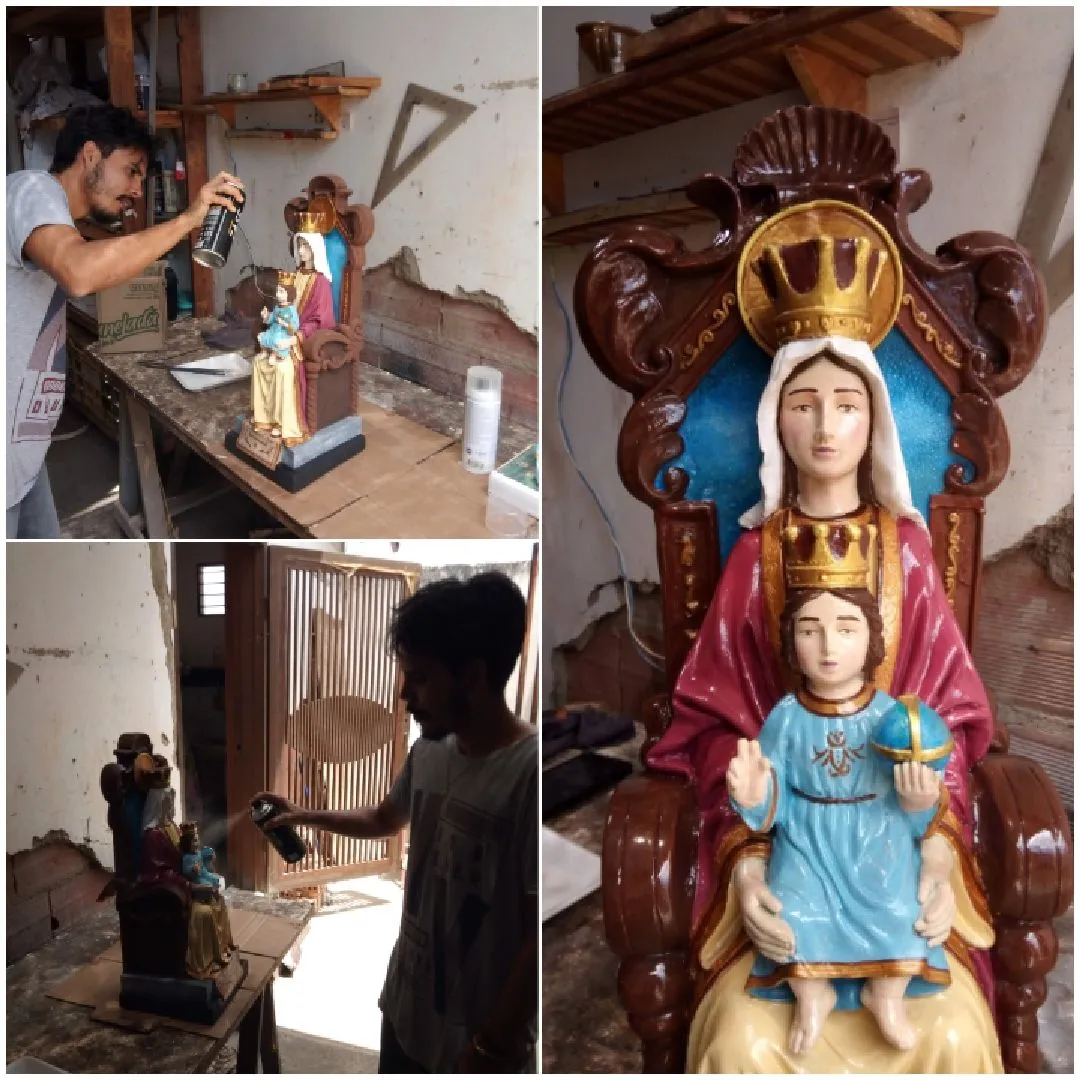
Aplicamos la laca siempre a unos 22 cm de distancia, con unas dos manos es suficiente y notamos como realza los colores, siempre es bueno aplicar un barniz, ya que esto la protege del polvo y al limpiar no se ensucia la superficie porque queda con un esmalte resinoso, en realidad esta es la primera vez que uso esmalte en spray y me dio muy buen resultado, siempre lo uso con pistola de aire.
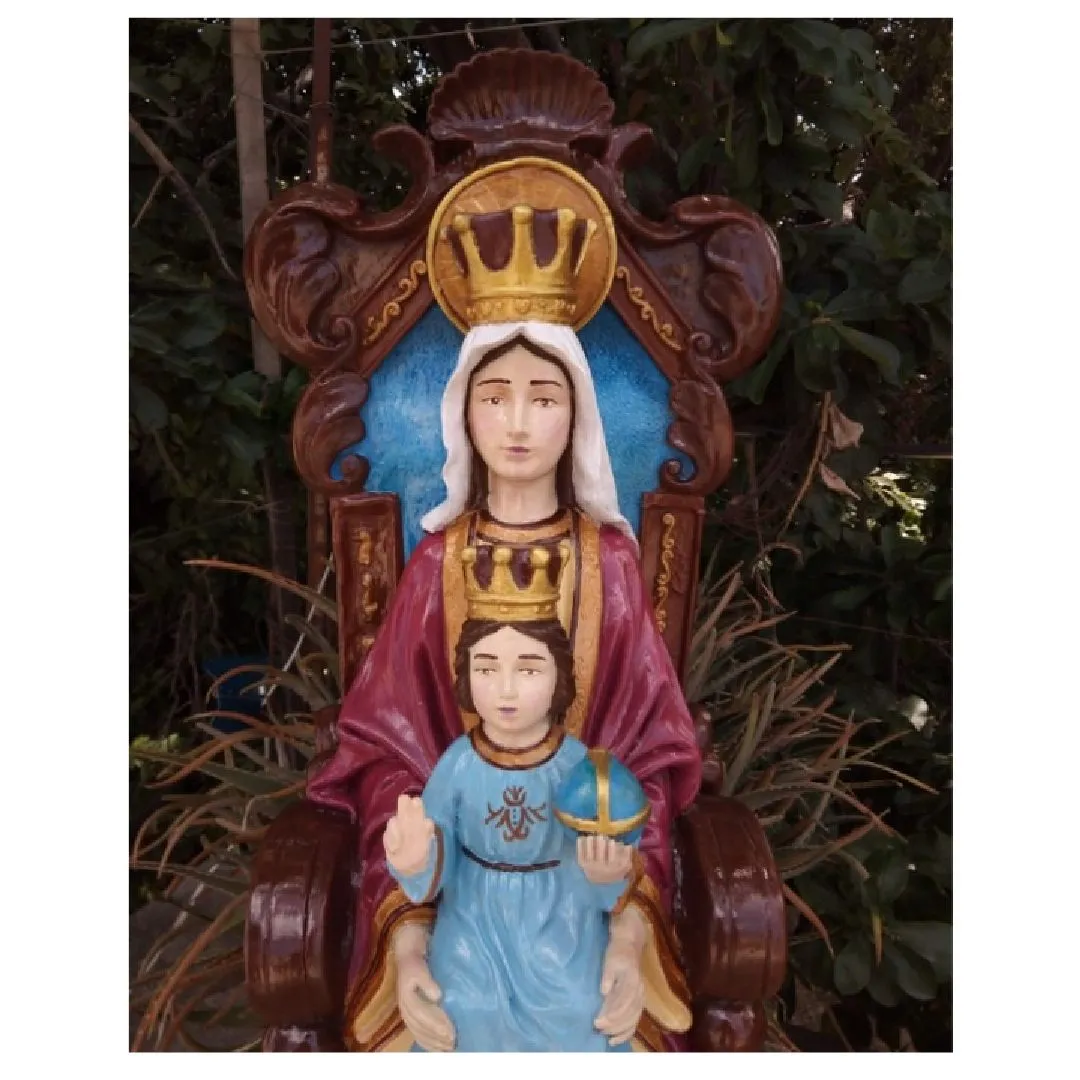
De esta manera se finalizó la restauración de la imagen de la virgen de Coromoto fue una tarea paciente sobre todo la reconstrucción de la mano y aplicar los tonos piel y los detalles de los ojos y ceja esto último es muy impórtate, el rostro nos comunica lo que representa y también lo que representamos como creadores, así que siempre al hacer estas actividades debemos de estar concentrado y con buena disposición porque como sabemos todo arte es una expresión de lo que pasa dentro de nosotros así sea pintar una escultura, esto se refleja en los trabajos ejecutados.

Me despido y espero que sea de provecho este contenido, muchas gracias por leer, si tienen alguna sugerencia o duda estoy atento a los comentarios y si desean hacer algún pedido o adquirir algún trabajo de los que hago pueden contactarme, hasta una próxima publicación.
- Fotografías tomadas desde mi celular
- texto traducido en deelp
- separador de texto hecho an AI
- Edición de imágenes desde mi celular
English version
Greetings friends artisans and creators of hive diy, I hope you are very well, in my atelier I develop mainly the craft of lutherie, repair and restoration, on a par with this, sculpture, either in wood carving as well as modeling, as it is an artistic technique that I have been running since the beginning as a creator, thus becoming until now a complementary activity in my life transcending the fact of art for art, being then the atelier an integral space for art and music.
The restoration of religious imagery is part of the sculpture, of course the sacred sculpture is a style which does not encompass the whole area of this discipline, because the sculpture has several styles according to the periods of the arts and sacred art is one of those, in this post I share with you the restoration of the polychrome of a virgin of Coromoto, a serial piece cast in plaster, which apparently in its diagnosis is a piece with a certain age, its patina does not share them, so the goal is to apply new colors, with more harmony and nuances, in addition to applying transparent lacquer at the end to protect the paint from dust and light.
- Spatula
- Construction plaster
- Cold paint and brushes
- Transparent spray lacquer
Step 1
What should be done at the beginning of each piece is to observe and see if there are fractures and cracks that may develop a problem in the future then clean with a 2-inch brush the dust and with a damp cloth carefully pass over the surface, as we can see in the picture, I have to rebuild the child's hand, which I remove the rest of a glue.
Step 2
One of the details that bring these images in series are their quality of painting and representation, because it is one of the differences to one with a maximum of 10 casts or 5 because in this one the artistic quality and the dedication of the creator reigns not to mention the unpublished or unique casting, so I will remove the paint from the eyes to then make the details a little better or with more realism.
more realism.
Step 3
In this step I will focus on remaking the child's hand, once removed all glue residue I open some holes with a wick of 1 mm where each finger corresponds, then I pick 5 wires and with a little plaster (prepared with water and a little glue, this should be a little liquid, before applying it in each hole moisten the surface so it does not absorb the plaster so fast) we place each wire in the holes this to generate a structure and thus do not fracture so easily.
| Note: It is convenient that whoever wants to repair a piece can have the remains of the split, because in this way we can restructure much better, so the idea is not to throw away these pieces |
Step 4
When the structure of the hand is dry we prepare plaster with only water, we first place plaster and spread in water little by little until we get a creamy mixture (not so liquid or thick) we will apply in stages, we apply a parts that only covers the structure, without so much perfectionism the idea is that it is textured, this will help us to go grabbing the mixture that later we will be applying in the image we can see its evolution.
Step 5
Here we begin to have fun with the direct modeling, with the previous step we achieve a structure, with this, we apply and shape each finger, also by phases of time that is to say when we achieve a certain volume we let dry a little, at this time of work we can apply the plaster more liquid because if we apply it very dense the basie plaster absorbs the liquid and does not adhere, at the end of having achieved the hand with a brush with water aliamos so that it is with a smooth surface, let dry for a day.
Step 6
We are going to paint the throne, prepare a brown tone, to give it more wood appearance, I usually prepare the colors, but you can apply a mahogany or terracotta tone, to the terracotta you can add a little blue and a few points of black and so we create tones that are not on the market.
Step 7
Once we have painted the throne, I apply the dry brush technique to highlight the volumes of the throne with a lighter brown, we grab paint with the brush and remove from the brush as much paint as we can and then we pass as if we were dusting very fast without sharpening the brush on the surface, so we achieve this technique of aging.
Step 8
Let's paint the background of the trellis, this did not have the color that corresponds iconographically, this part represents the sky so imagine a sky with clouds, and with these great advances we can see the change of the image.
Step 9
Now let's paint the turban, with a light red wine tone, because we can see as the arrow indicates in the image the dark color that it presented, the low tones represent melancholy, sadness, among other emotions in the case of this sculpture should represent the opposite so the light tones should be applied in this study.
Step 10
At this time, while the area painted in the previous step dries, we pass to the child painted his nightgown and the planet.
Step 11
To the dress of the virgin I apply an ivory, I applied three coats because the image represents her with this color, besides its color is very harmonious with respect to the other tones and along with this process I also apply color to the carpet.
Step 12
Here I consulted with the owner of the piece to suggest a change to the pedestal, to paint it simulating as if it were a marble, for this I gave a gray base paint and then pass with white with a plastic bag, as it would be like making an impression with the wrinkles of it.
Step 13
Now let's start giving color to the faces, hands and feet, here I prepare the skin tone, so we must know a little color theory and the management of the chromatic circle, I shade with ocher tones and in the concave sides a greenish tone.
Step 14
In this step I am almost culminating the polychrome process, here I was enhancing the details with bronze and gold tone, as in the crown and halo.
Step 15
The details such as the eyes and the iris is crucial in this process, the idea is not to use black, because its appearance would not be very harmonious use amber tones, ocher and a lighter shade in the iris and a white point that reflects the light, also outline the upper eyelash this gives us a sense of depth, simulating a shadow, also draw the eyebrows with the shade of hair.
Step 16
To finish the face we finish with the lips, the upper lip should always be a darker tone and the lower lip lighter, because it is with its convexity, it is more exposed to light.
Step 17
With this step we finish the polychrome work, here we can give the final details and visualize that everything has been as we imagined so we can apply the lacquer, because if there were some details when applying the lacquer we will not be able to go back.
Step 18
We apply the lacquer always about 22 cm away, with about two coats is enough and we notice how it enhances the colors, it is always good to apply a varnish, as this protects it from dust and when cleaning does not dirty the surface because it is with a resinous enamel, actually this is the first time I use spray enamel and gave me very good results, I always use it with air gun.
In this way the restoration of the image of the virgin of Coromoto was finished, it was a patient task especially the reconstruction of the hand and applying the skin tones and the details of the eyes and eyebrow, this last one is very important, the face communicates us what it represents and also what we represent as creators, so always when doing these activities we must be concentrated and with good disposition because as we know all art is an expression of what happens inside of us, this is reflected in the work, I leave you the final photos and the result when the lacquer dries.
I say goodbye and I hope this content is of benefit, thank you very much for reading, if you have any suggestions or questions I am attentive to the comments and if you want to place an order or purchase any of the work I do can contact me, until a future publication