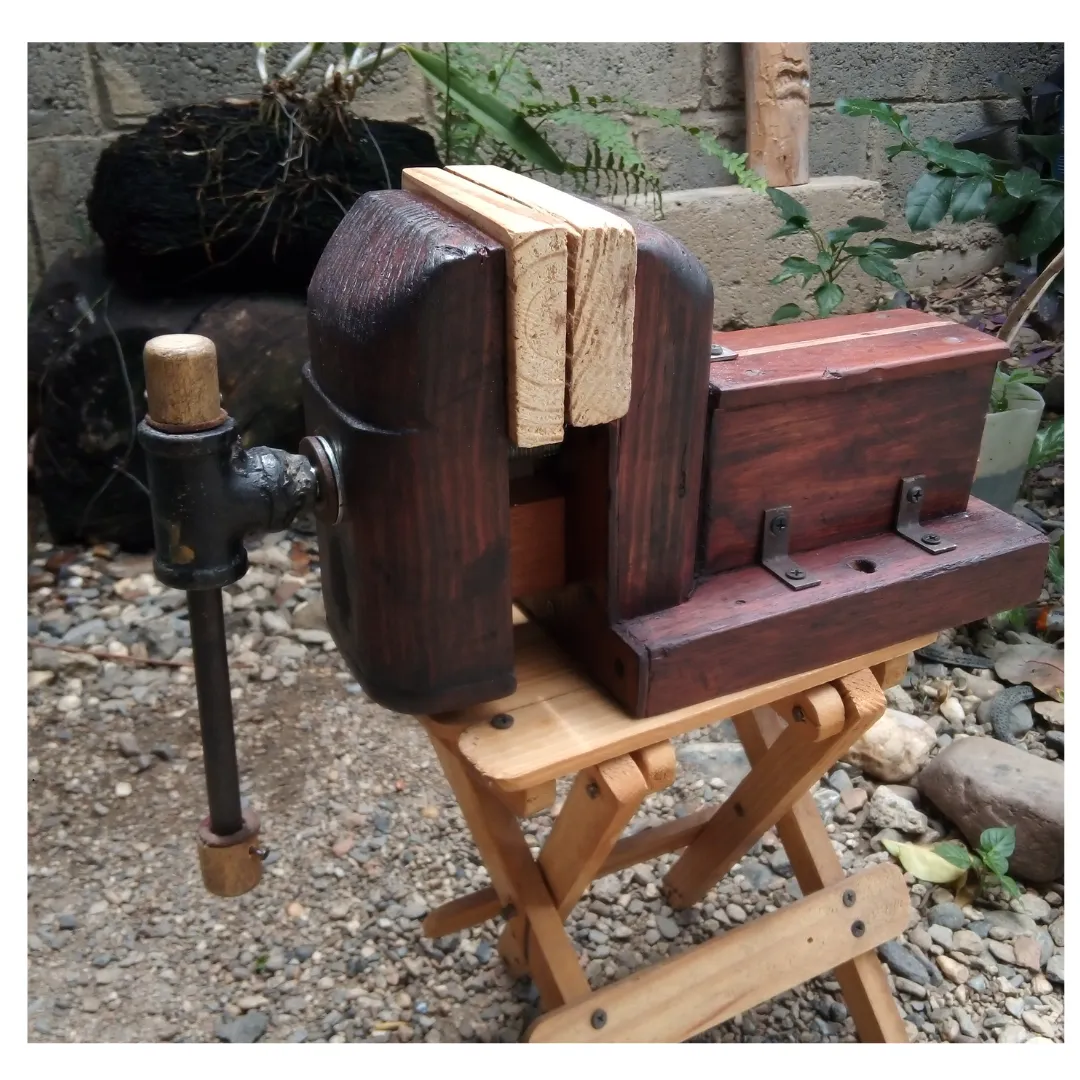
Les saludo desde mi atelier compañeros artesanos de la comunidad hive diy, vuelvo después de unos días de labores en el atelier, con otro proyecto de reparación y reajuste, es un tornillo de carpintero, también le llaman prensa de banco y morsa, una herramienta indispensable para los que trabajamos con madera, escultura y luthería.
Esta prensa la fabriqué hace tres años y tras pasar los años me di cuenta de que su construcción no había sido muy óptima, en el momento que la hice contaba con muy pocas herramientas, de hecho la intervine hace un tiempo para mejorarla, pero el resultado no fue muy diferente; sin embargo, me ayudo en muchas labores hasta ahora, tras reflexionar me dispuse a repararla y hacer que su funcionamiento sea mucho más preciso y que su estructura sea mucho más rígida, cabe destacar que es una herramienta que ha ido mutando, esto porque, como sabemos, en este universo del arte manual cada día es un aprendizaje cada trabajo una experiencia y así vamos sacando de nuestro ensayo y error un resultado que nos ayuda a ir mejorando en todo esto y en el caso de hacer una herramienta es igual.

Remplazar y encastrar la guía de madera.
hacer cambio de tuerca principal mal situada.
ajuste estructural de la boca fija para soportar torque.
- entintado y lacado para conservación.
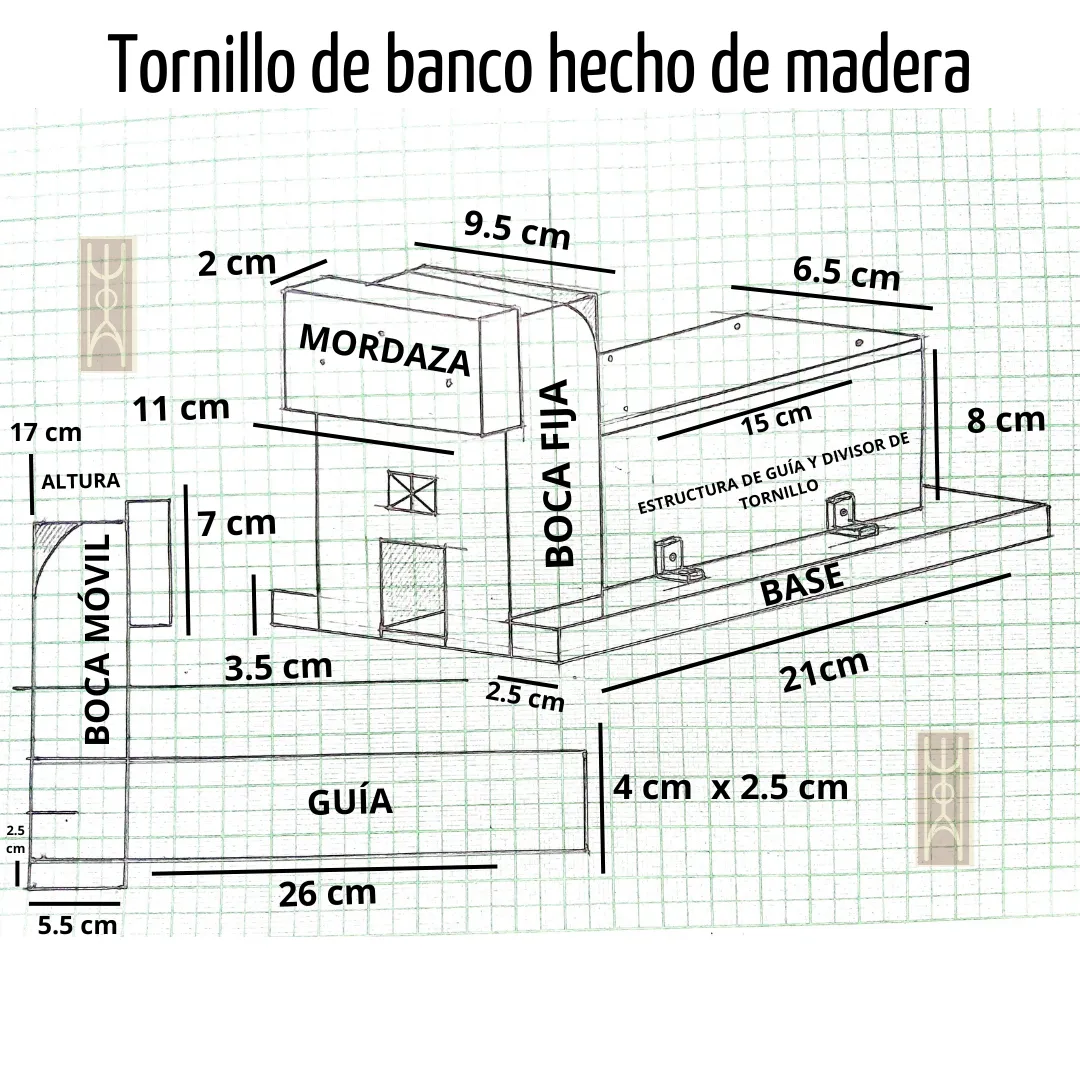
Por acá les dejaré el plano por si se animan hacer una, estaría muy bueno y con los consejos que les daré con este reajuste tendrán un tornillo de banco súper resistente para sostener maderas entre otras cosas, es una prensa de madera para trabajos en maderas y bricolaje, aunque también podría servir para algunas cosas de herrería y mecánica su uso no está diseñado para este, ya que para esto último debería ser de metal.
Característica constructiva del tornillo
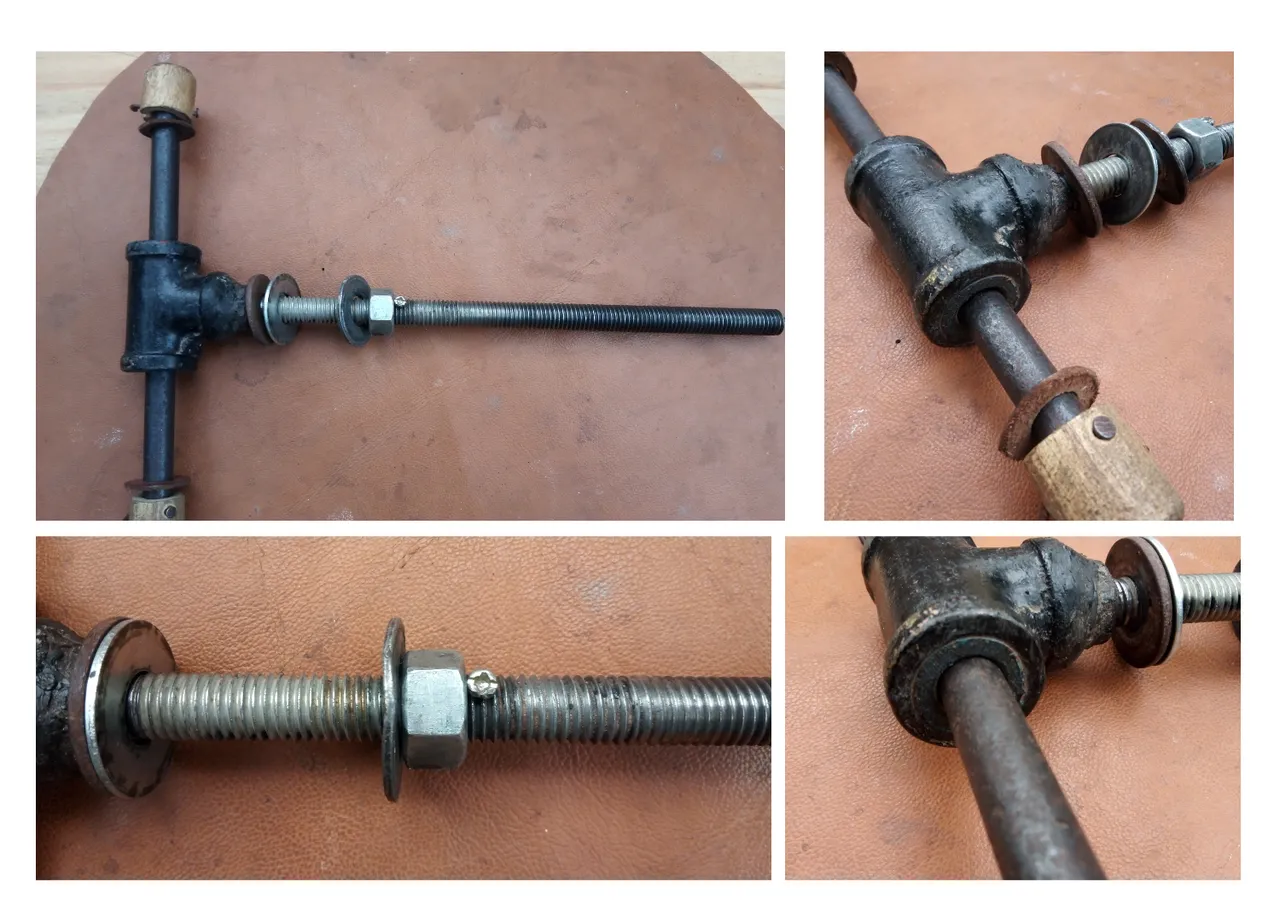
La fabricación es sencilla, es mi caso tenía una barra roscada de 1/2 "" determine el largo que necesitaba y corté, debemos de tener al menos 3 tuerca, dos que se sitúa en la punta las cuales quedarán fija y soldadas y otra que quedará justo a la medida del espesor de la boca móvil con una tuerca que no dejará que está se salga, también y mejor aún a esta tuerca podemos abrirle un orificio de 3mm y que el tornillo sea pasante entre la tuerca y el tornillos de 1/2"", funcionaria mucho mejor.
En la punta le coloque una T de 1/2 pulgada y una barra lisa de metal de 1/2 que funcionaria de palanca.
Proceso de reparación y ajuste
Paso 1
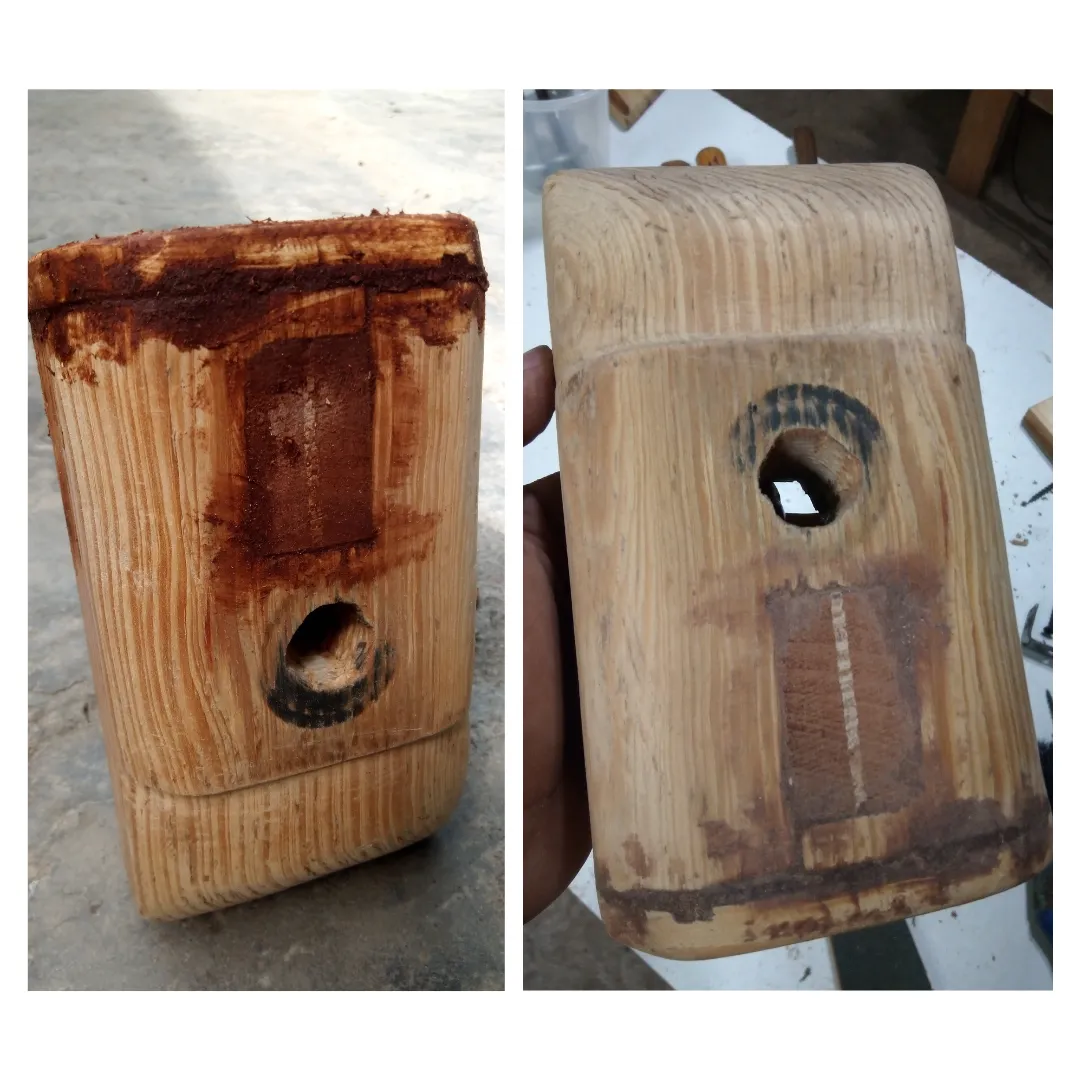
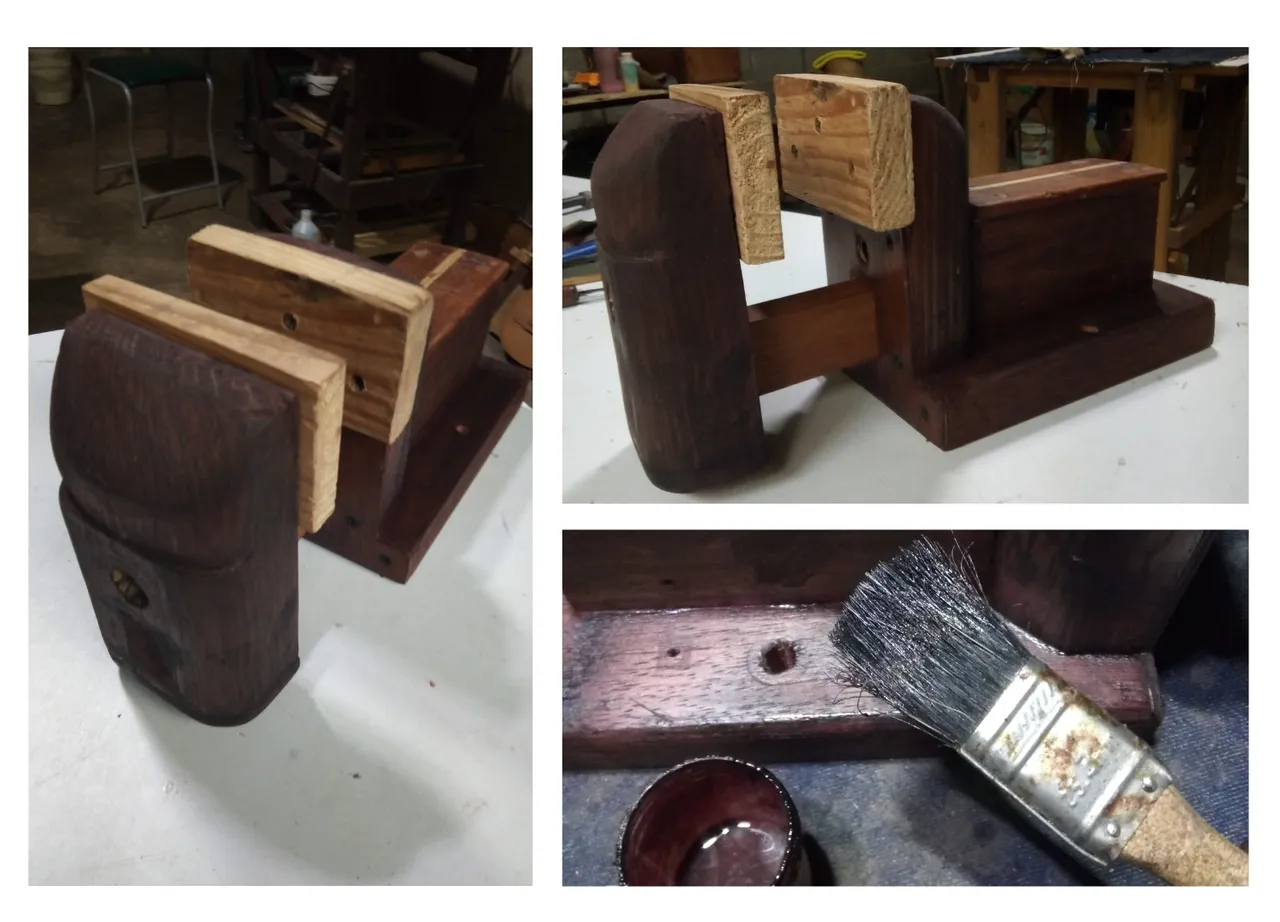
Lo primero que realice fue desmontar la boca móvil, inspeccionar las piezas y quitar el tornillo sin fin.
Paso 2
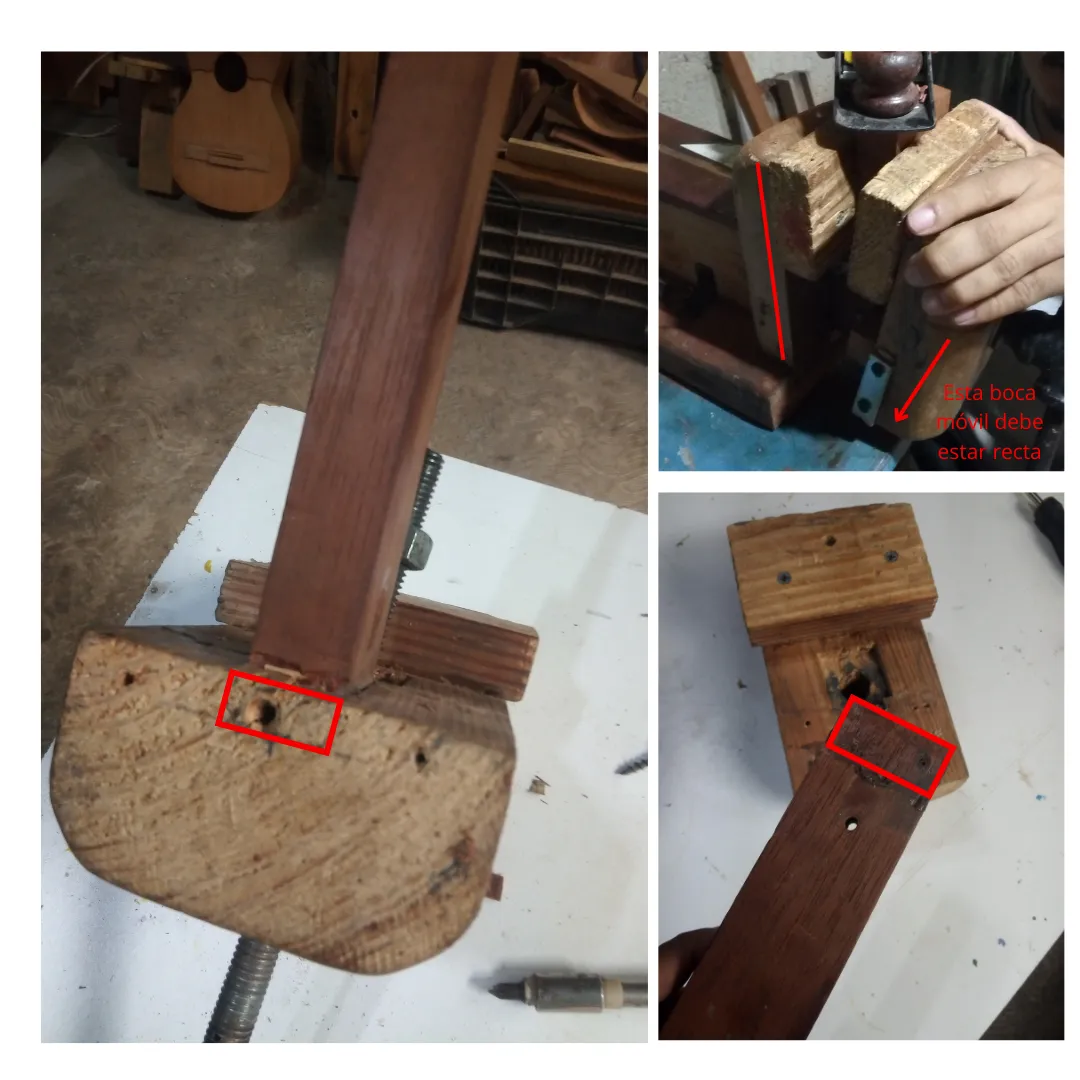
Tras observar podemos notar que cuando hice esta prensa la guía no la encastre lo suficiente, así que este es uno de los inconvenientes a resolver, al tenerla de esta forma cuando prensaba alguna pieza se corría hacia atrás.
Paso 3
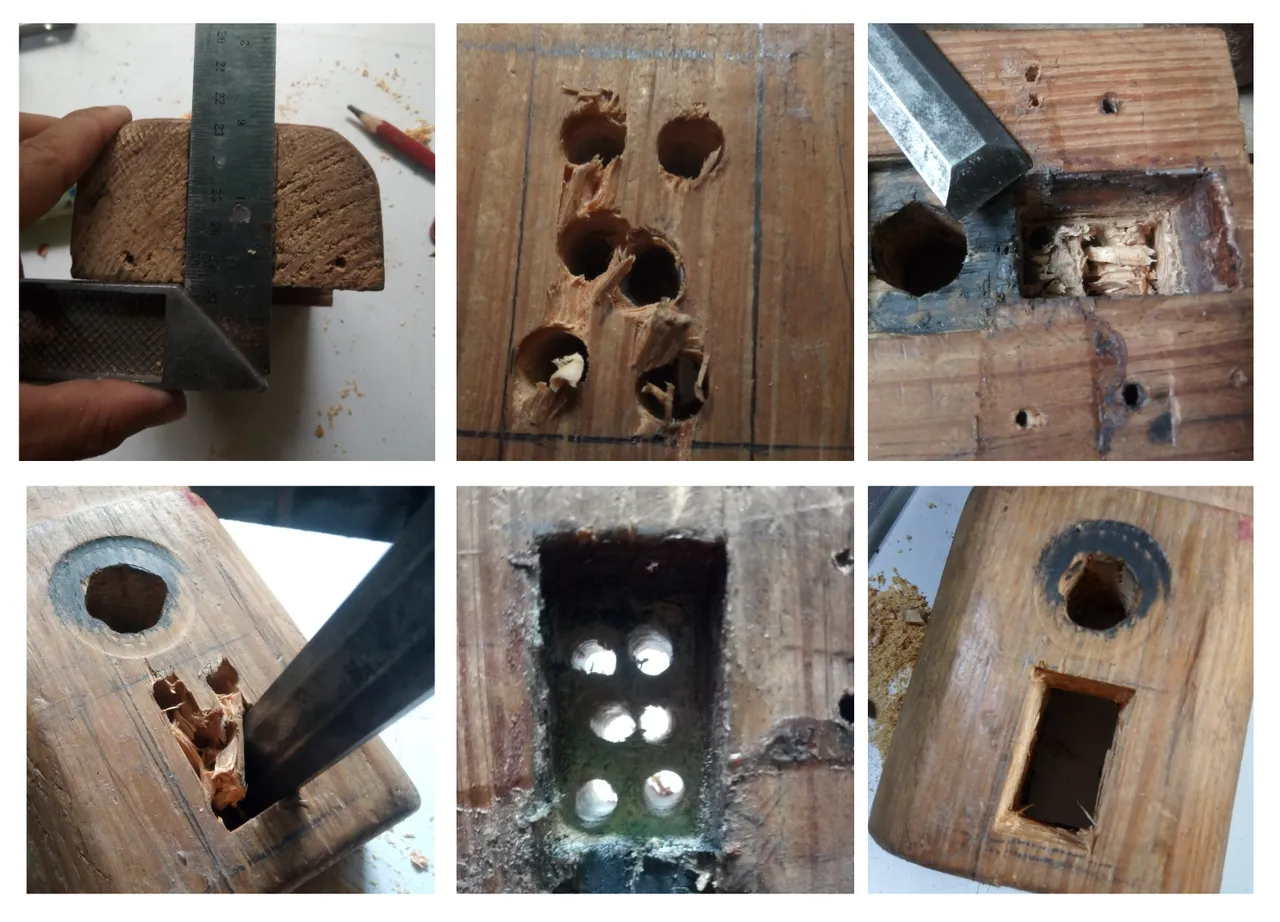
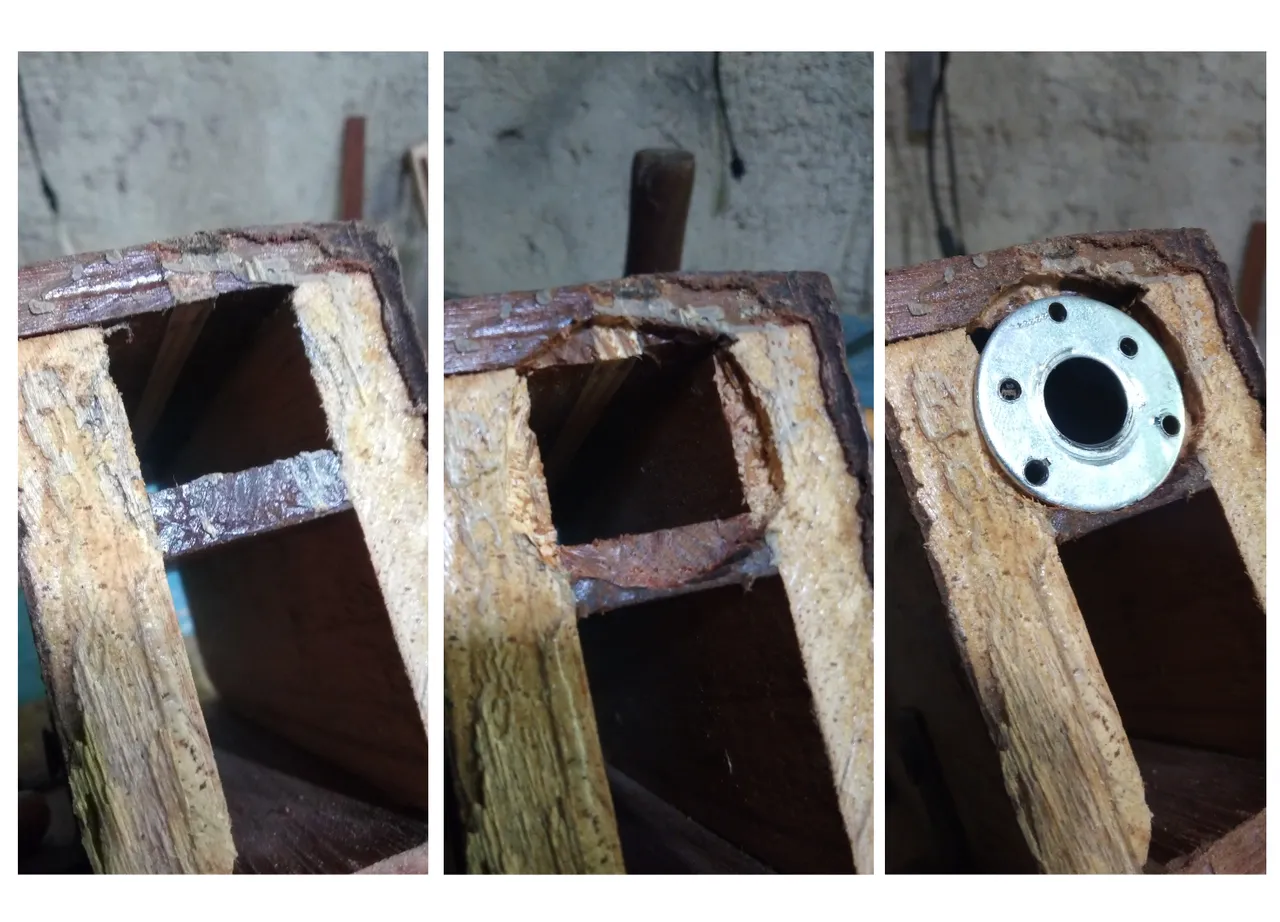
Lo que realice para dar solución era hacer la caja sobrepasando toda la boca, de esta manera la guía se encastraría completamente, de esta forma no podría tener juego la boca móvil, ya que la guía está justa.
Se bordea por la parte interna del rectángulo trasado y se perfora con una mecha gruesa, luego vamos desbastando materia hasta tener una caja limpia.
Paso 4
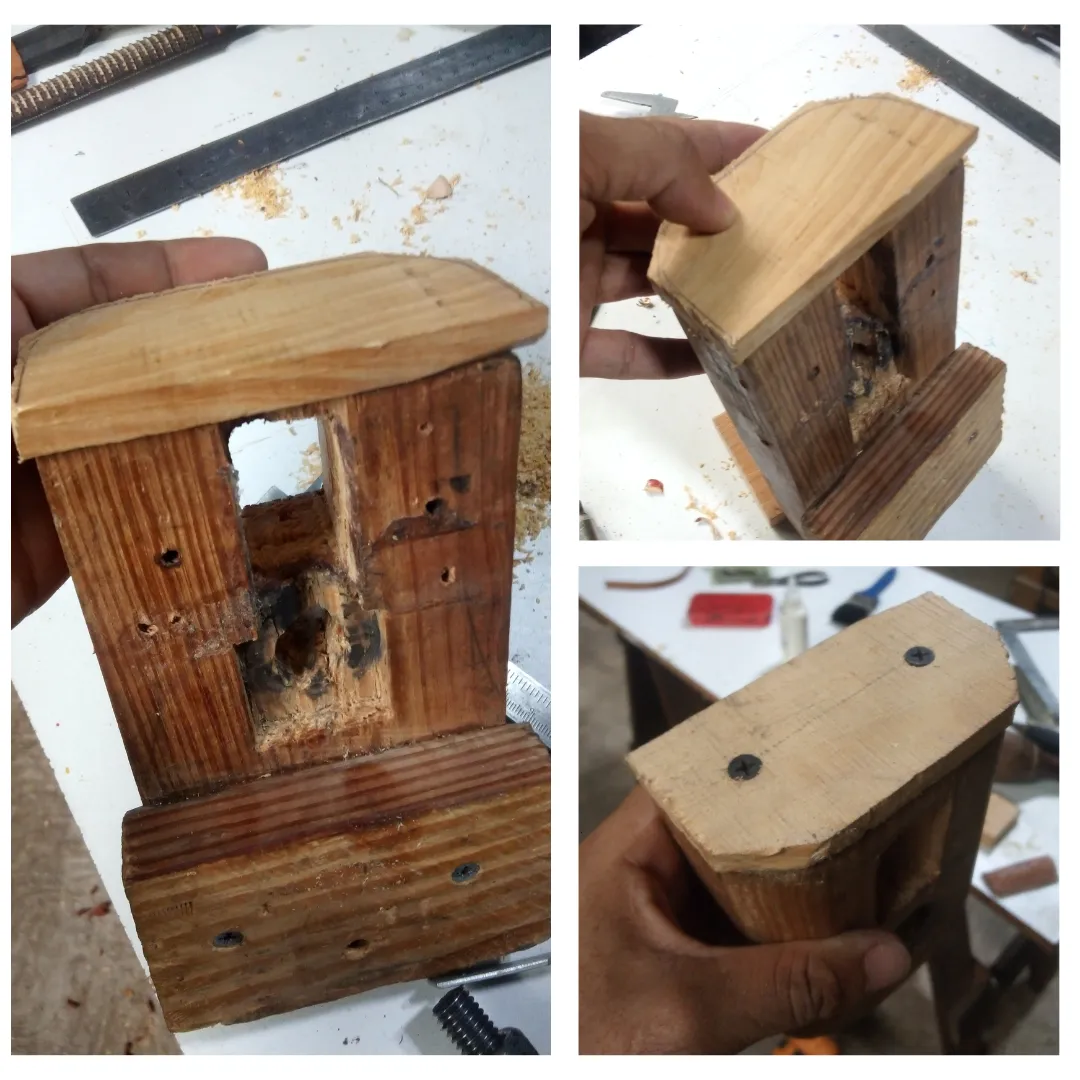
En vista de que la caja por donde pasará la guía estaba muy al borde inferior le coloque una madera de 1 cm de espesor para reforzar, pues está estaba un poco debilitada tras el impacto que ejerció el formón, sin esto último se fracturaría al en castrar la guía, ya que entraría a presión, encole la madera, perfore y les atornille unos tornillos de 1 1/2
Paso 5
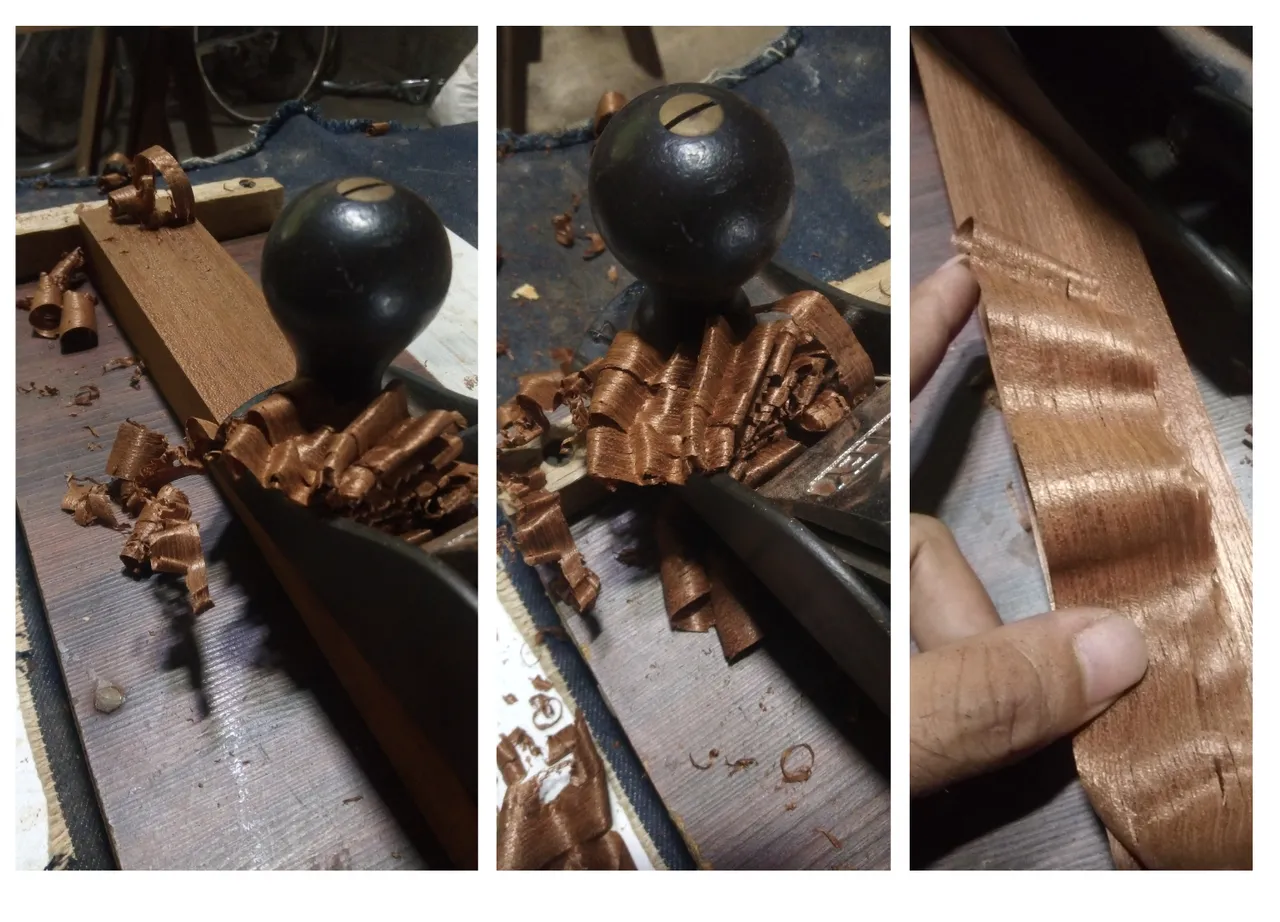
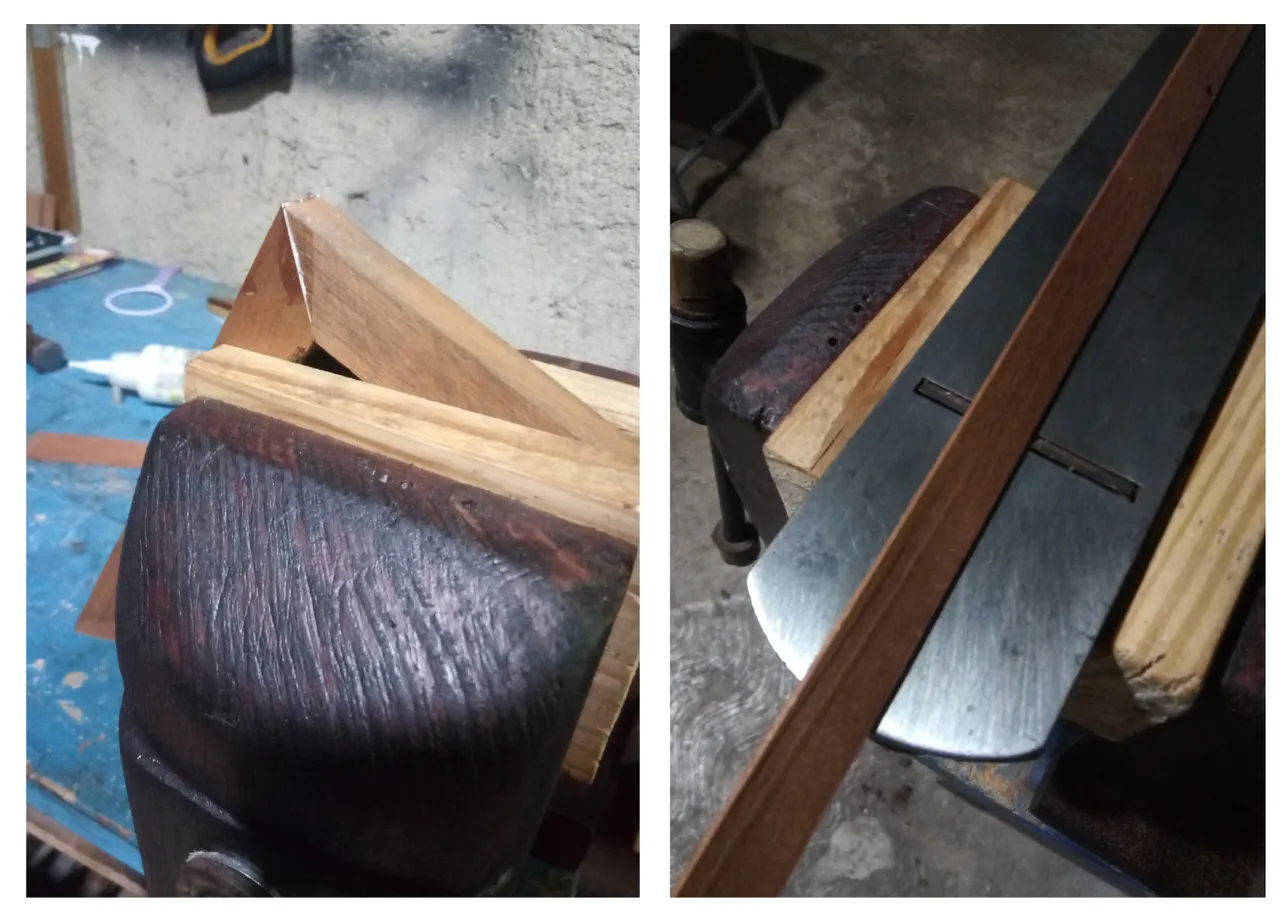
Como la idea marcada en los objetivos era reemplazar la guía, así que busque un listón de caoba, una madera semidura ideal para este trabajo, la cepille y calibre justo a la medida interna de la caja de la boca móvil.
Paso 6

Encastramos la guía, pero antes serruchamos unos centímetros en la parte del medio de la punta, ya que acá pondremos una cuña para que ejerza presión, al encastrar la guía si cuesta que entre con cierta presión pasamos el cepillo al mínimo o una lija 80, cuando pasemos la guía colocamos la cuña.
Paso 7
Masillamos la parte frontal de la boca y el borde del refuerzo inferior, al secar pasamos lija y reservamos.
Paso 8

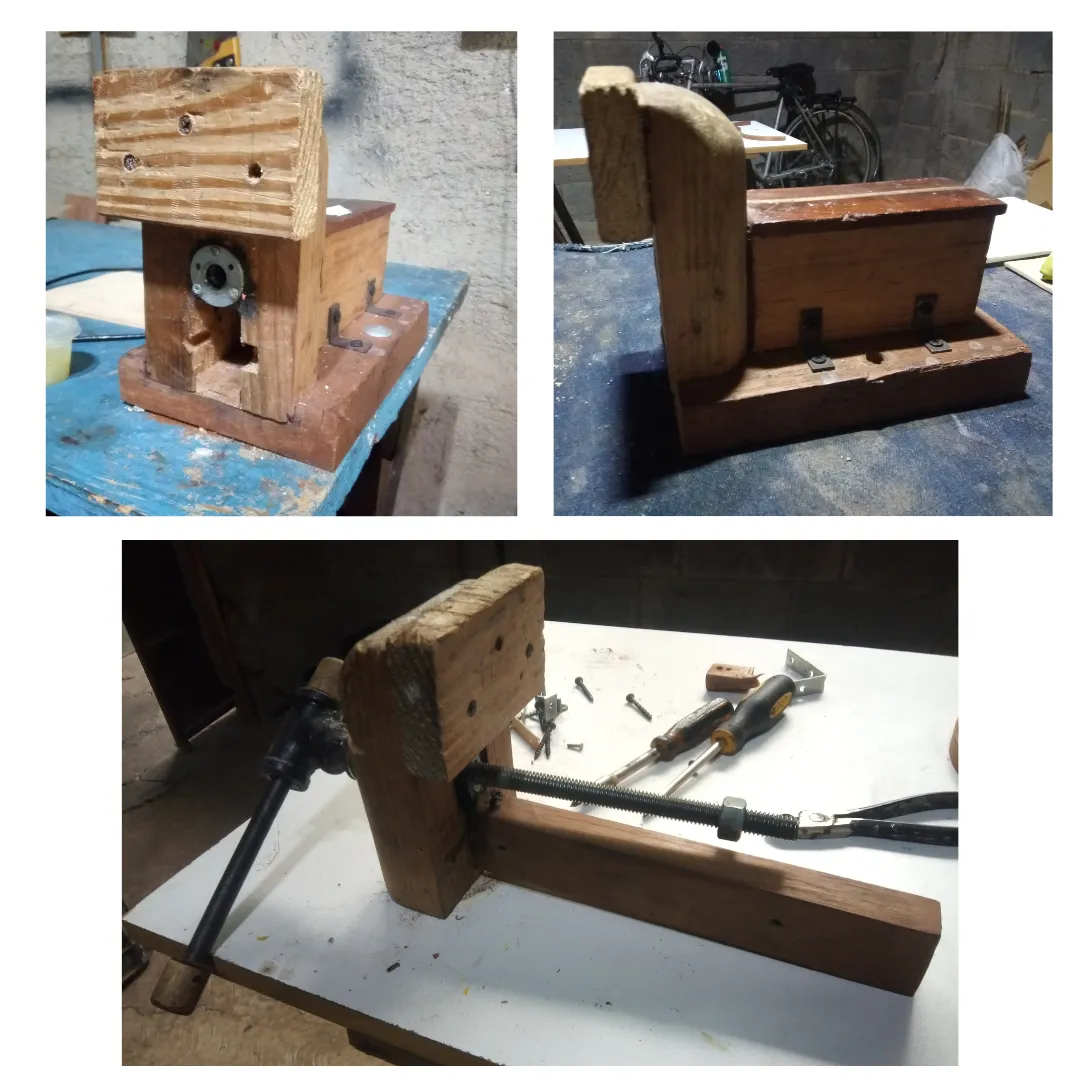
En este paso nos adentraremos a trabajar la boca fija de la prensa, desmontamos la tuerca, ya que esta la situaremos, esta vez por la parte trasera, así que dibujamos el borde de esta y con un formón 1/2 pulgada vamos sacando madera, la profundidad la determinamos con el espesor de la tuerca.
Paso 9
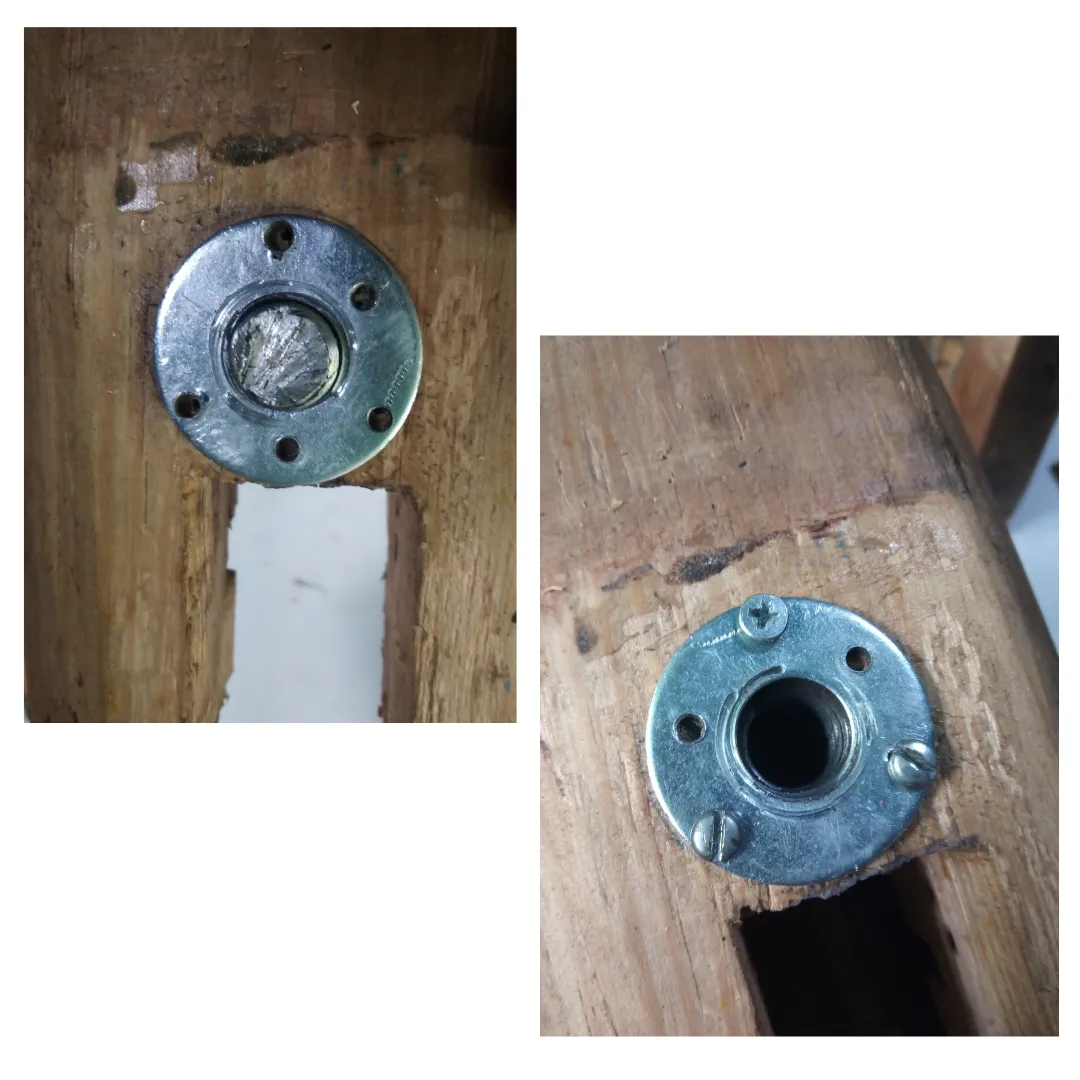
Ya teniendo listo el tallado donde irá la tuerca, marcamos la tapa de protección de la tuerca, esta la realicé con una arandela y la perfore para colocarle unos tornillos pequeños, de esta manera no se nos sale la tuera.
| Nota: cabe destacar que la tuerca debe ir en la parte de atrás, ya que al tornillo ejercer presión tumbara hacia delante y si se sitúa como lo tenía al principio la presión sacaría la tuerca. |
Paso 10
Acá debemos de tallar un poco la estructura para que calce esta pieza redonda para que al fijar la boca fija quede justa como si nada fuese pasado.
Paso 11
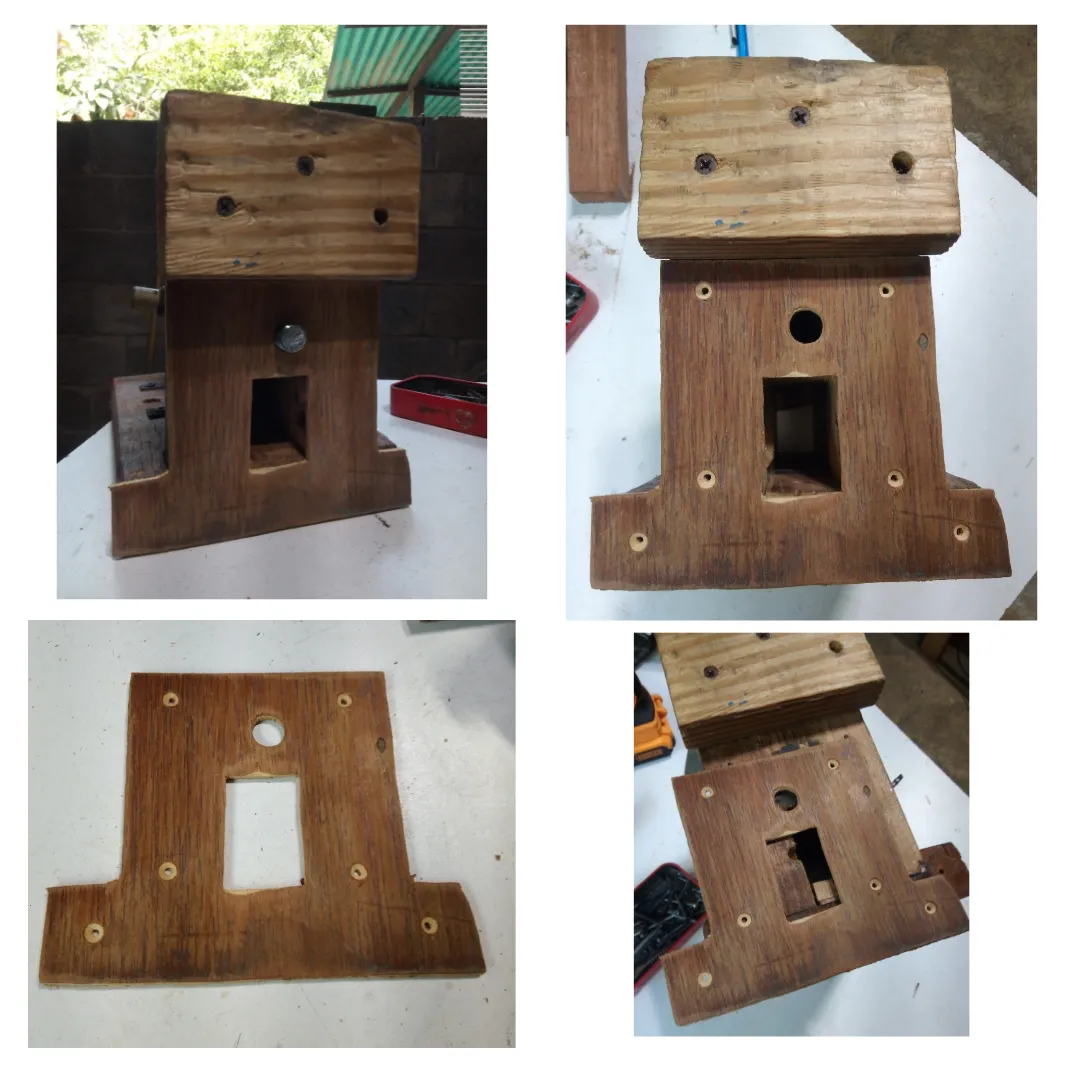
Con una madera laminada de 5 mm le realicé una tapa al frente de la boca fija, esto por motivos estéticos y que a su vez generará ese cambio que le estaba haciendo a esta noble herramienta.
Paso 12
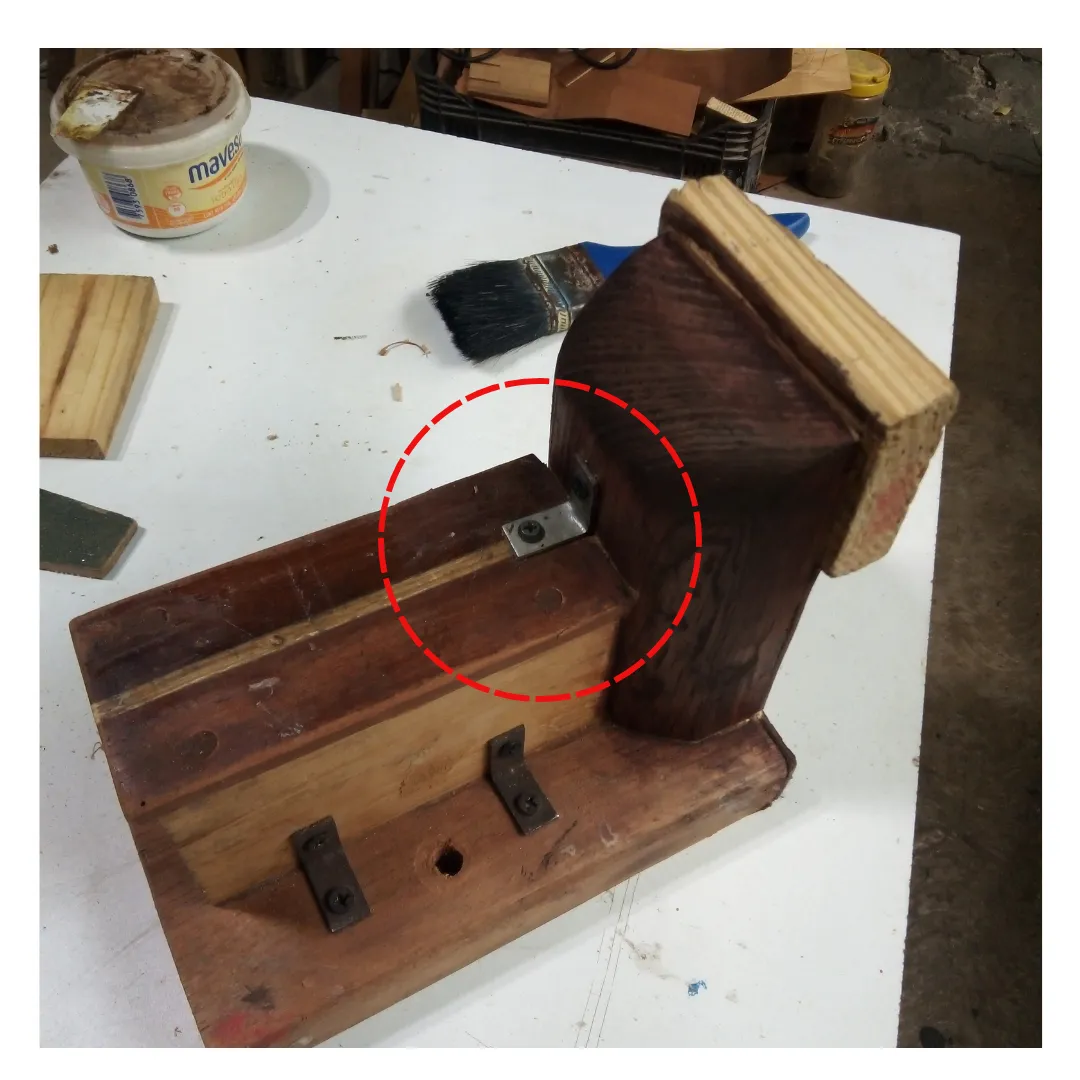
Al fijar la boca fija a la base con cuatro tornillos de 2 pulgadas le coloco una escuadra pie amigo de 1 pulgada, esto para reforzar su fijación, use tornillo de punta fija driwall 7 x 7/16 y uno perforado en la boca fija de 1 1/2.
Paso 13
Ya estamos culminando el proyecto, para dar por terminado aplicamos tinta en la superficie, para así notar aún más su reparación además de conservar la herramienta, luego de este paso aplicamos unas tres manos de sellador y procedemos a armar.
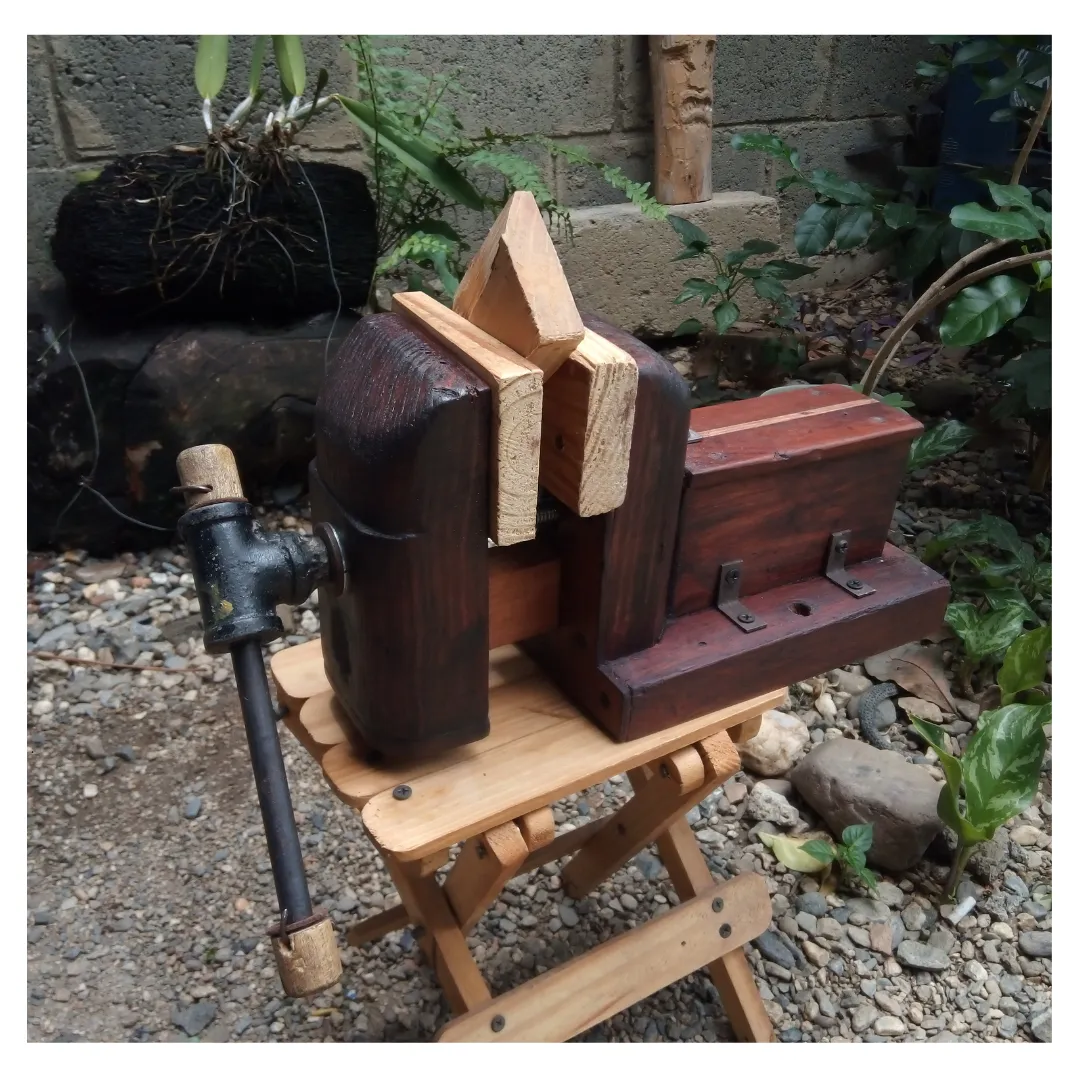
De esta manera quedo la renovación del tornillo de banco, totalmente funcional y rígido, realice todos los objetivos planteados, lo coloque en el banco de trabajo y le di unas pruebas cepillando una madera y haciendo unos cortes y quedo como me lo esperaba con buen resultado funcional.
Con el plano y las reparaciones que en este post les mostré pueden lograr esta valiosa herramienta que todos los artesanos debemos tener en nuestro espacio de trabajo.
Me despido y espero que sea de provecho este contenido, muchas gracias por leer, si tienen alguna sugerencia o duda estoy atento a los comentarios y si desean hacer algún pedido o adquirir algún trabajo de los que hago me pueden contactar hasta una próxima publicación.
Fotografías personales.
texto traducido en deepl.
Edición de fotografías en canva.
Separador de texto hecho en Adobe illustrator.
English version
I greet you from my atelier fellow artisans of the hive diy community, I return after a few days of work in the atelier, with another repair and readjustment project, it is a carpenter's vise, also called vise and vise, an indispensable tool for those who work with wood, sculpture and luthiery.
I made this vise three years ago and after the years passed I realized that its construction had not been very optimal, at the time I made it I had very few tools, in fact I intervened some time ago to improve it, but the result was not much different; However, it helped me in many tasks until now, after reflecting I decided to repair it and make its operation much more precise and its structure much more rigid, it should be noted that it is a tool that has been mutating, this because, as we know, in this universe of manual art every day is a learning, every work an experience and so we get from our trial and error a result that helps us to improve in all this and in the case of making a tool is the same.
To replace and fit the wooden guide.
Replace the main nut badly positioned.
Structural adjustment of the fixed mouth to support torque.
- staining and lacquering for preservation.
Here I will leave the plan in case you dare to make one, it would be very good and with the advice I will give you with this readjustment you will have a super strong vise to hold wood among other things, it is a wood press for woodworking and DIY, although it could also serve for some things of blacksmithing and mechanics its use is not designed for this, since for the latter should be made of metal.
The manufacture is simple, in my case I had a 1/2" threaded rod to determine the length I needed and cut, we must have at least 3 nuts, two that are located at the tip which will be fixed and welded and another that will be just to the extent of the thickness of the mobile mouth with a nut that will not let it out, also and even better this nut can open a hole of 3mm and the screw is through between the nut and the 1/2" screws, it would work much better.
At the tip I placed a 1/2 inch T and a 1/2 inch smooth metal bar that would work as a lever.
Step 1
The first thing I did was to disassemble the moving jaw, inspect the parts and remove the worm gear.
Step 2
After observing we can notice that when I made this press the guide did not fit enough, so this is one of the drawbacks to be solved, when I had it this way when I pressed a piece it would run backwards.
Step 3
What I did to give a solution was to make the box exceeding the entire mouth, in this way the guide would be completely recessed, in this way the mobile mouth could not have play, since the guide is just right.
It is bordered by the internal part of the back rectangle and it is perforated with a thick bit, then we are roughing matter until we have a clean box.
Step 4
Since the box where the guide will go through was very close to the lower edge, I put a 1 cm thick wood to reinforce it, because it was a little weakened after the impact of the chisel, without the latter it would fracture when the guide was castrated, since it would enter under pressure, I glued the wood, drilled and screwed some 1 1/2" screws.
Step 5
As the idea marked in the objectives was to replace the guide, so I looked for a mahogany lath, a semi-hard wood ideal for this work, I planed it and calibrated it just to the internal measurement of the box of the mobile mouth.
Step 6
Insert the guide, but before sawing mos a few centimeters in the middle of the tip, because here we will put a wedge to exert pressure, to embed the guide if it is difficult to enter with some pressure pass the brush to the minimum or sandpaper 80, when we pass the guide we place the wedge.
Step 7
Putty the front of the mouth and the edge of the lower reinforcement, when dry pass sandpaper and reserve.
Step 8
In this step we will enter to work the fixed mouth of the press, we disassemble the nut, since we will place it, this time on the back side, so we draw the edge of this and with a chisel 1/2 inch we remove wood, the depth is determined by the thickness of the nut.
Step 9
Already having ready the carving where the nut will go, we mark the protection cap of the nut, I made it with a washer and drill it to place some small screws, this way the nut will not come out.
| Note: it is necessary to emphasize that the nut must go in the back part, since to the screw to exert pressure it will fall forward and if it is located as it had it at the beginning the pressure would take out the nut. |
Step 10
Here we must carve a little the structure to fit this round piece so that when we fix the fixed mouth it will be just as if nothing had happened.
Step 11
With a 5 mm plywood I made a cover to the front of the fixed mouth, this for aesthetic reasons and that in turn will generate that change that I was doing to this noble tool.
Step 12
When fixing the fixed mouth to the base with four 2 inch screws I put a 1 inch square foot friend, this to reinforce its fixation, I used a 7 x 7/16 driwall fixed point screw and one drilled in the fixed mouth of 1 1/2.
Step 13
Now we are finishing the project, to finish we apply ink on the surface, to further notice its repair and preserve the tool, after this step we apply three coats of sealant and proceed to assemble.
In this way was the renovation of the vise, fully functional and rigid, I made all the objectives set out, I placed it on the workbench and gave it a few tests planing a wood and making some cuts and it was as I expected with good functional result.
With the plan and the repairs that I showed in this post you can achieve this valuable tool that all artisans should have in our workspace.
I hope you find this content useful, thank you very much for reading, if you have any suggestions or questions I am attentive to the comments and if you wish to place an order or purchase any of the work I do you can contact me until a future publication.
Personal photographs.
Text translated in deepl.
Photo editing in canva.
Text separator made in Adobe illustrator.