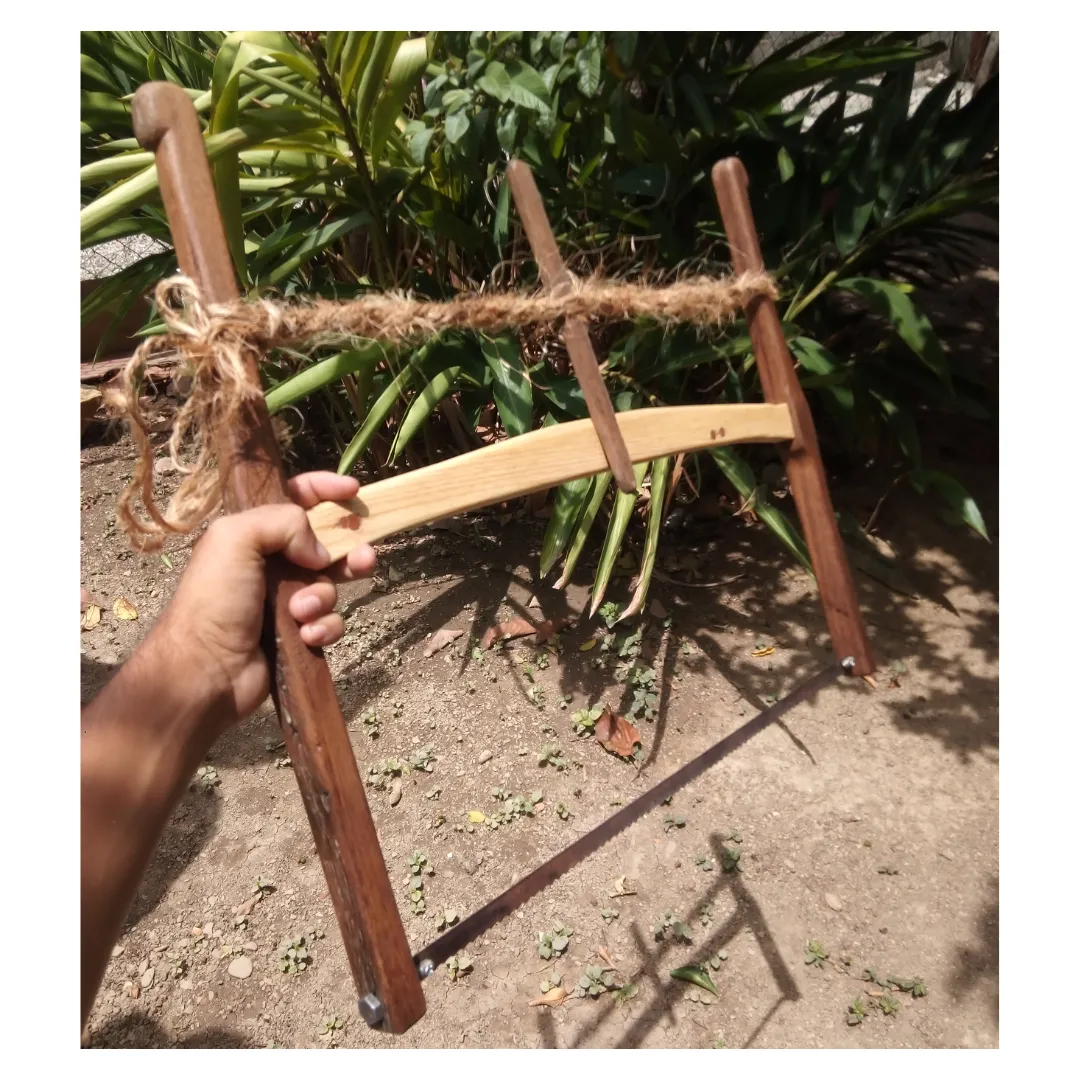
Les saludo desde mi atelier, compañeros artesanos de la comunidad hive diy, en esta ocasión les traigo un tutorial de cómo fabricar una sierra de bastidor viajera, en vista de que cada ciertos meses suelo salir de mi casa por varias semanas necesitaba fabricarme una de estas sierras usadas por los maestros carpinteros del pasado y como puede desarmarse que mejor para llevarla cuando este fuera de las herramientas del atelier para poder hacer cortes y así crear con pocas herramientas.
Tenía un tiempo postergando esta fabricación así que aproveche la energía creadora e inicie la misión con la intención de compartirles el tutorial para que así en algún momento puedan tener una en su espacio, la ventaja es que podemos hacerla con las dimensiones que queramos lo primero que debemos buscar la hoja de la sierra y la voluntad de crear una herramienta con nuestras propias manos.

- Madera (densidad media)
- 2 tornillos de 5/16 pulgadas (8mm)
- 2 tornillos con tuerca 1/8 pulgadas (3mm)
- Mechas para hacer orificios según el diámetro de los tornillos
- Formones
- Escofina
- lijas 80,120,220
- sellador y thiner
- Esmeril angular de mano con piedra de desbaste
- bastren
Por aquí le dejo el plano graficado para que puedan citar las medidas que les comparto y así puedan tener una idea de lo que quieren ejecutar, como les he comentado en otras ocasiones siempre nos podemos salir del plano, ya que en la ejecución muchas veces nos encontramos con circunstancia las cuales debemos modificar.
Paso 1
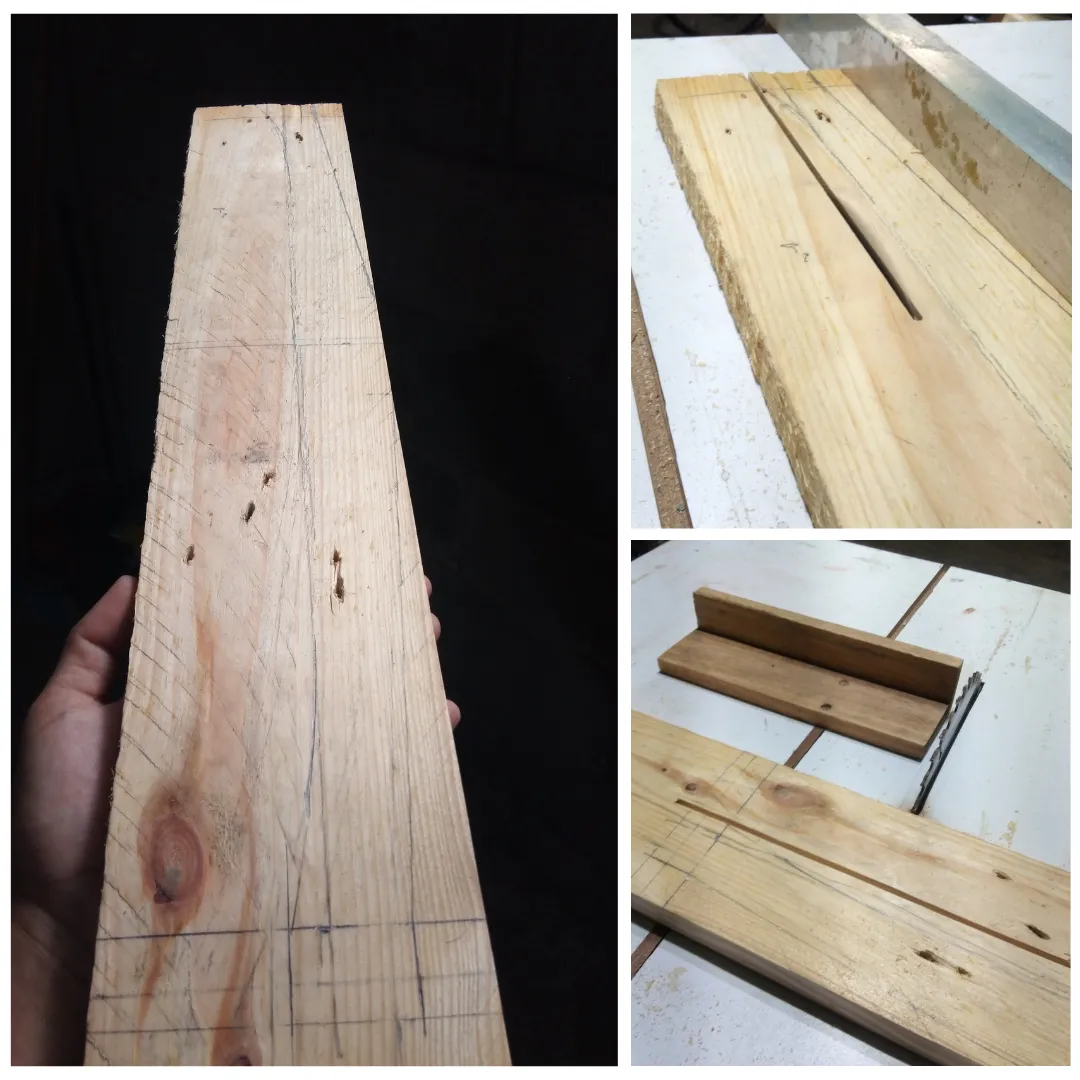
Lo primero en lo que me enfocaré será en hacer la guía central que une los dos brazos tome un listón de madera de pino de espesor de 2.5 cm, realice unos cortes con la sierra para aligerar el proceso esto se puede hacer con una caladora eléctrica, nos colocamos el protector auditivo en mi caso no soy muy amigo de estos ruidos eléctricos invasivos.
Paso 2
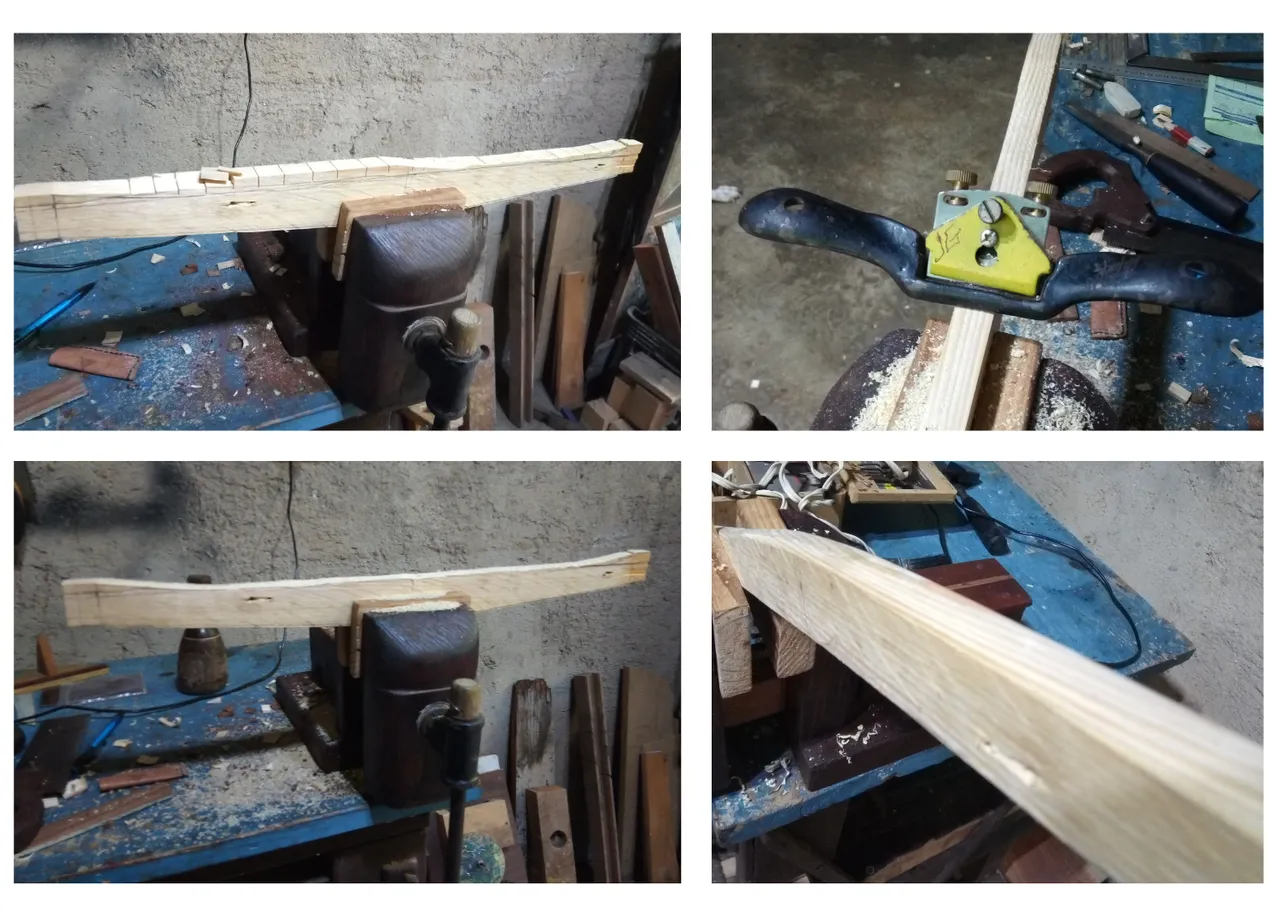
Al tener los cortes de la guía central pasamos a estilizar la obra, acá usamos un poco el serrucho para hacer unos cortes para el arco, quitamos material con el formón, escofina y suavizamos los borde con el bastren y culminamos con lija 220.
| Nota: realice esta pieza de la sierra en primer lugar, ya que sin estas dimensiones no podemos realizar posteriormente las cajas de los brazos donde se encastrara, ya que mientras más preciso sea mucho mejor. |
Paso 3
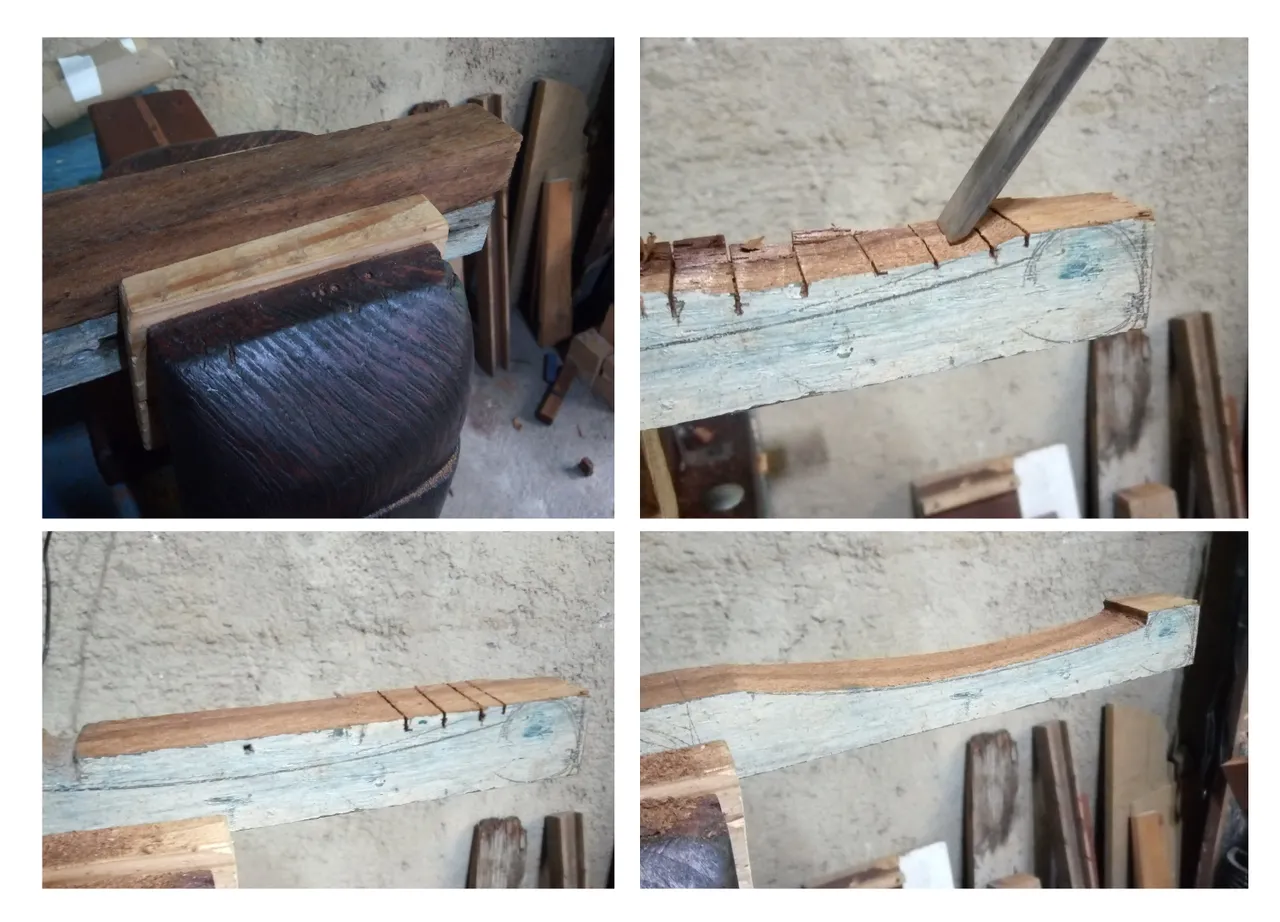
Al ubicar nuestras maderas y materiales procedemos a trabajar los brazos de la sierra, siempre es bueno tenerlas canteadas a escuadra, luego hacerle algún diseño como lo hice en la que muestro en la imagen, ya que quería hacerle una voluta en la parte superior por estética.
Al dibujar el diseño, hacemos con un serrucho pequeño unos corte hasta casi llegar a la línea, luego pase el formón y quité el exceso con la escofina, esto con cuidado porque esta herramienta se dota de rudeza, ya que es usada para devastar madera de manera rápida dejándonos una superficie rústica, luego pasamos lija 80 hasta llegar a la 220.
Paso 4
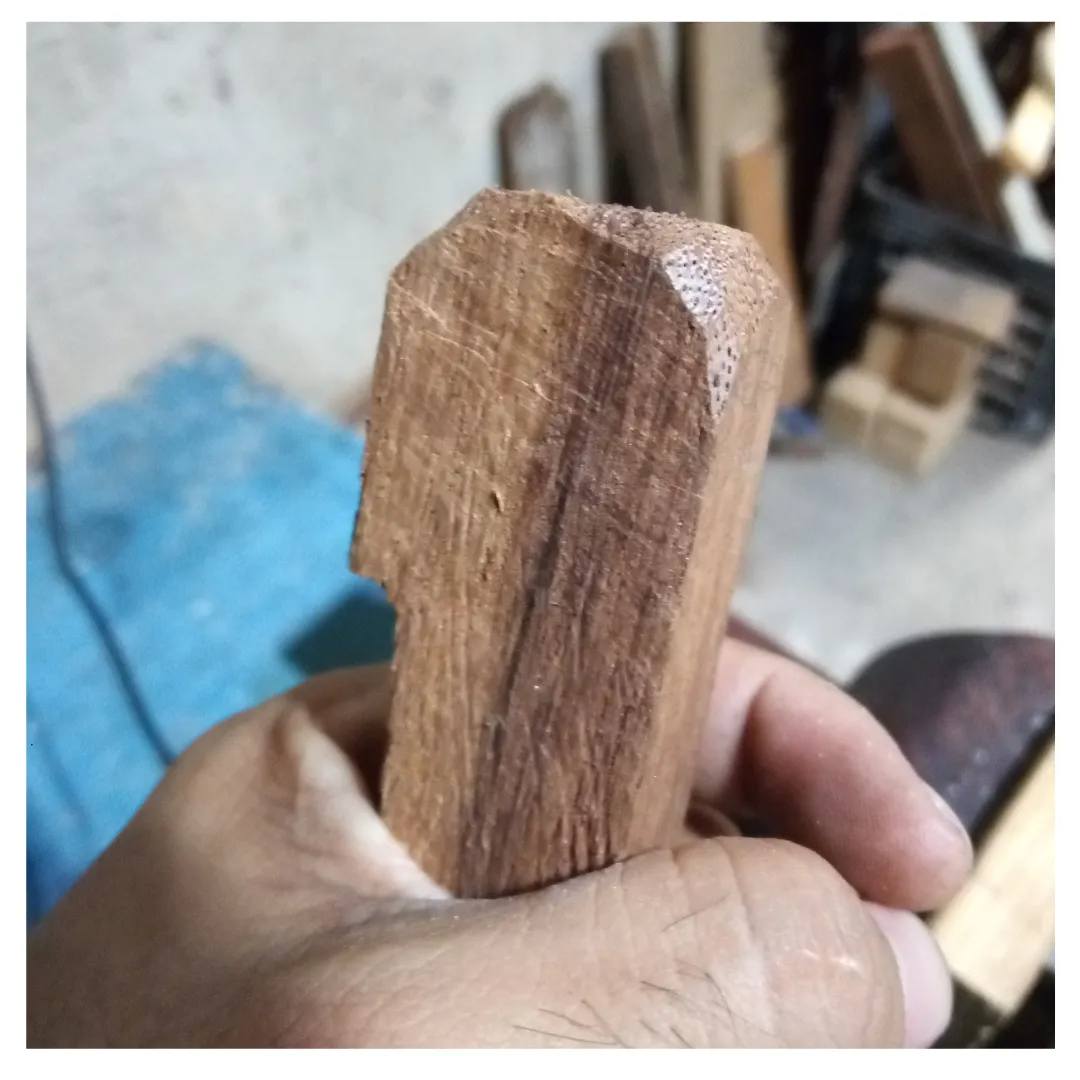
Con la cuchilla tallamos la voluta yendo del borde al centro siempre tallando de nuestro cuerpo hacia afuera, ya que tallando de manera contraria podemos correr el riesgo de tener una cortada por imprudencia.
Paso 5
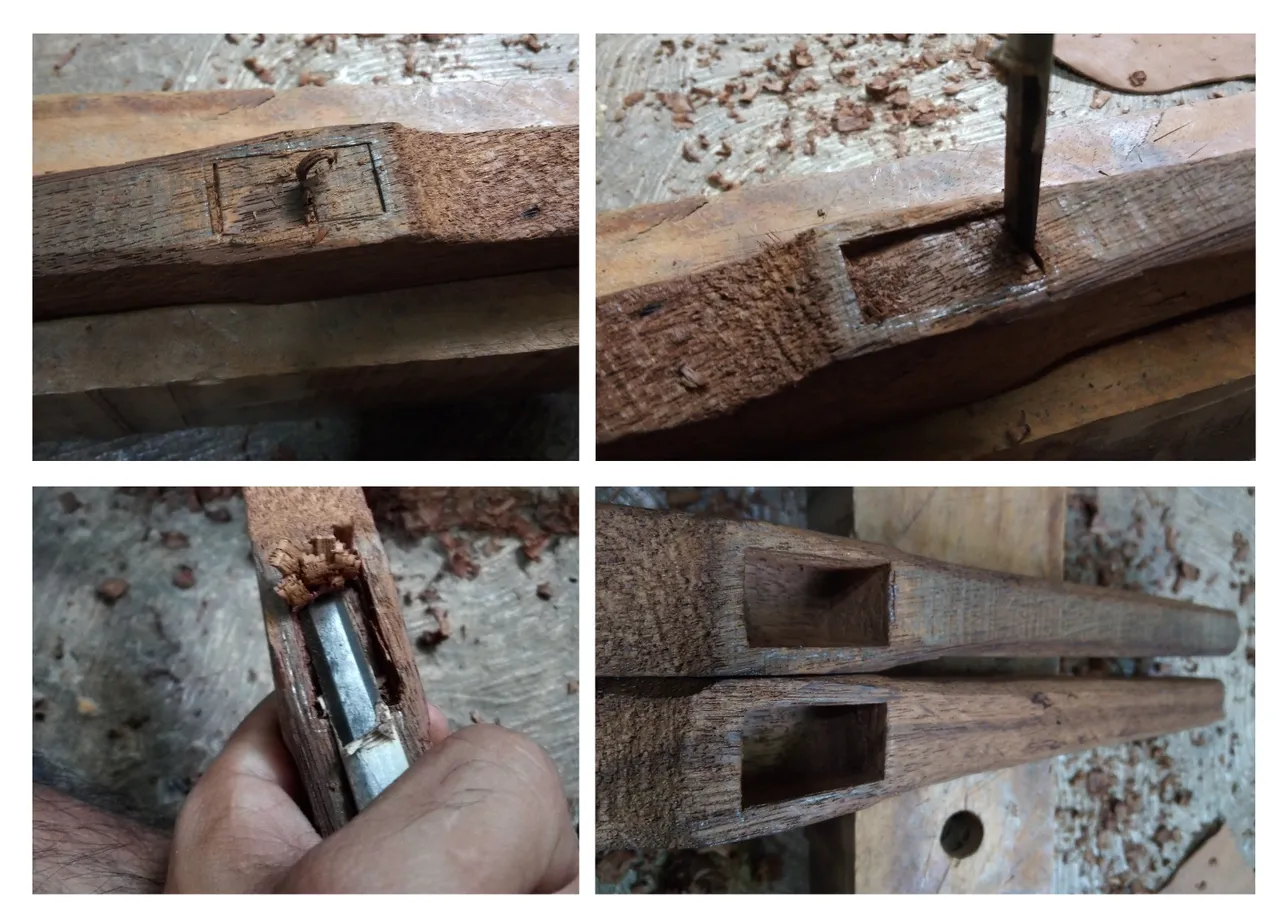
Este paso nos aproxima casi al final de la construcción; hacer las cajas para él encastre, acá debemos de tomar en cuenta la dimensiones de las puntas de guía central, al tomarlas marcamos y usamos el formón, por lo general hago una marca de profundidad con una cinta de enmascarar para no pasarme.
Paso 6
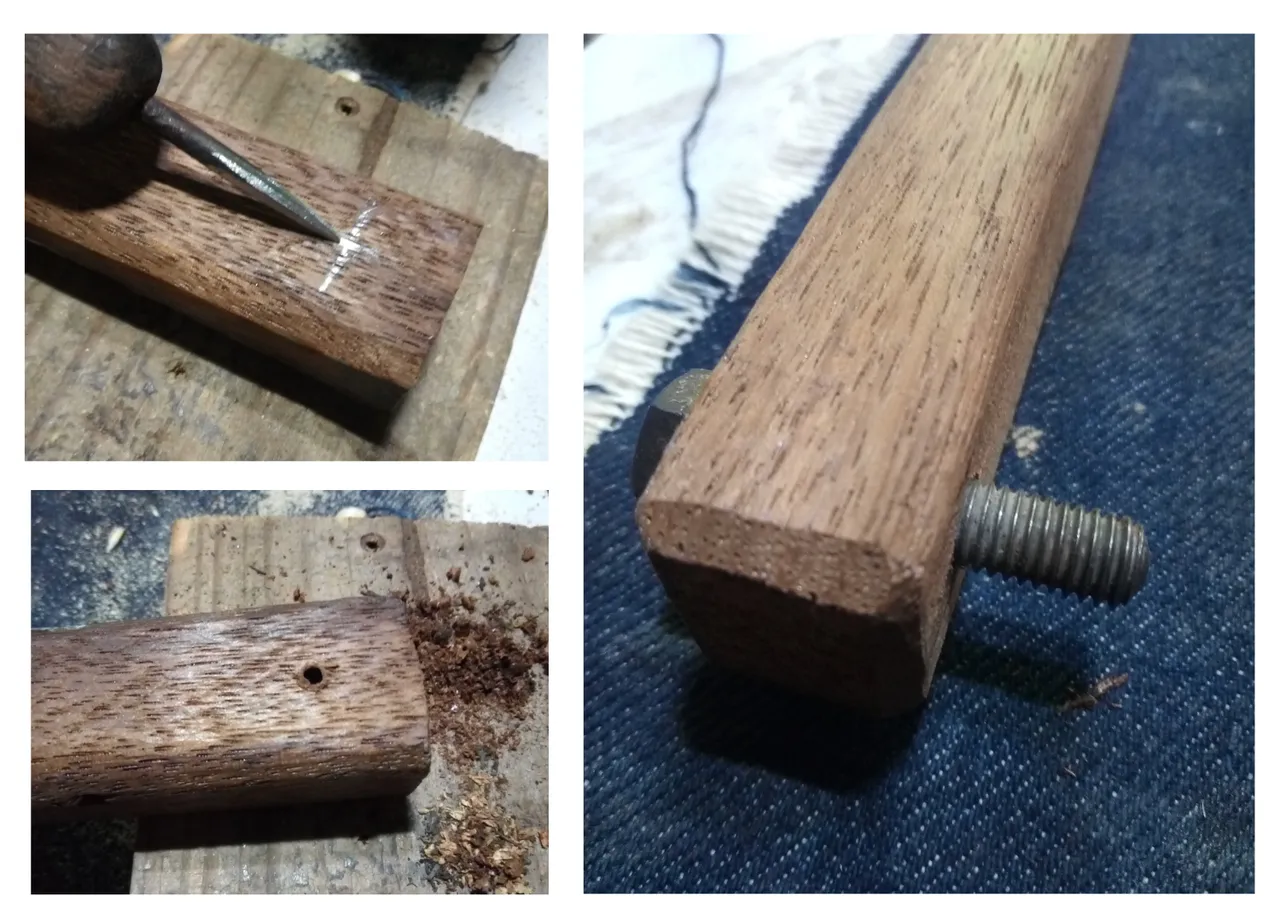
Para culminar el brazo en su totalidad perforamos donde ubicaremos los tornillos que sostendrá la hoja de sierra, lo hacemos a 1 cm de distancia del borde para que este no se fracture.
Paso 7
La palanca de tensión la hacemos preferiblemente de una madera de alta densidad (dura) puede ser de 1.5 cm de espesor.
Paso 8
Herrería, metal y fuego
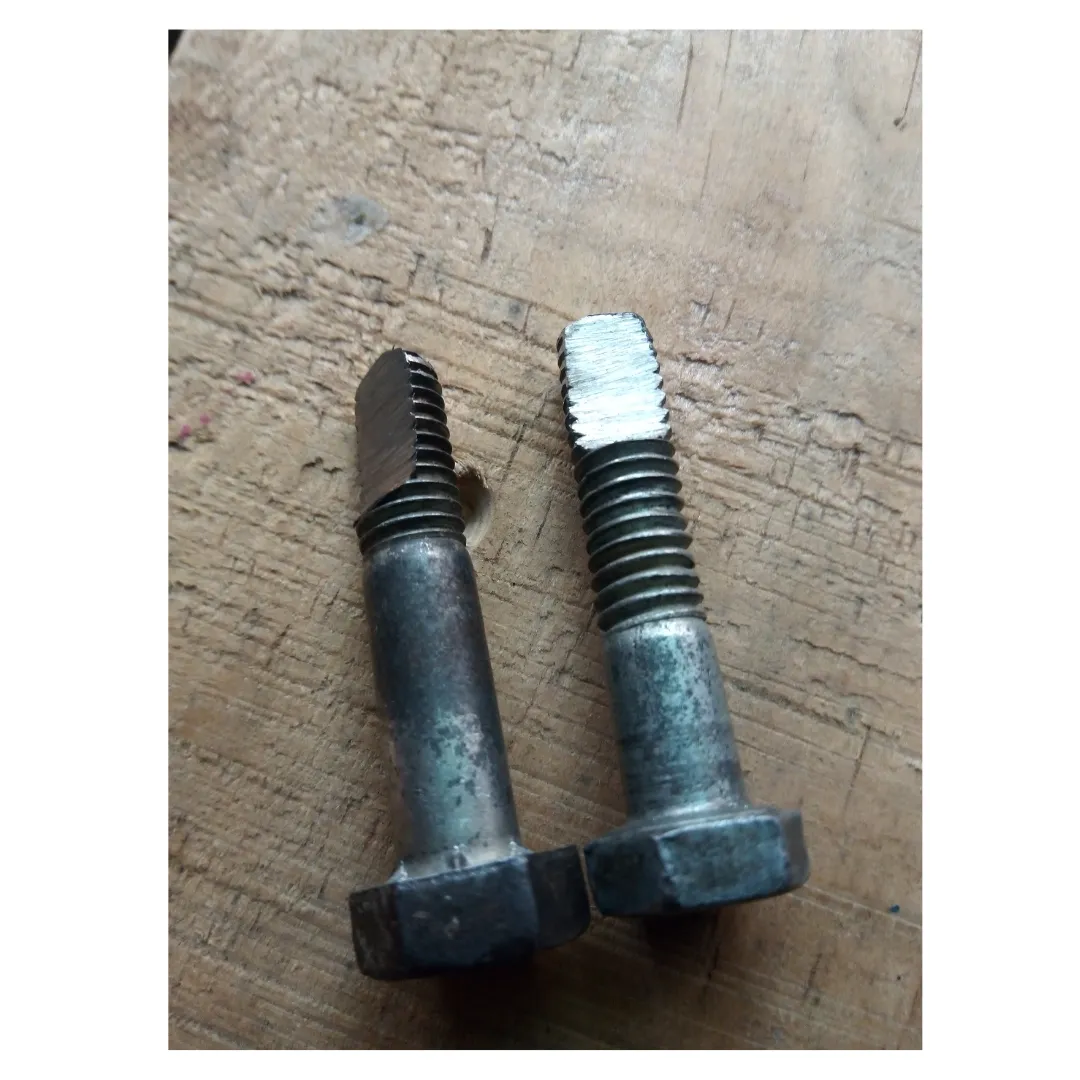
Acá debemos de hacer un rebaje a los tornillos usando la amoladora, buscamos sostener con una prensa o sargento, ya que esta herramienta es muy fuerte, desbastamos hasta formar un plano, esto para que la hoja tenga mejor soporte.
Paso 9
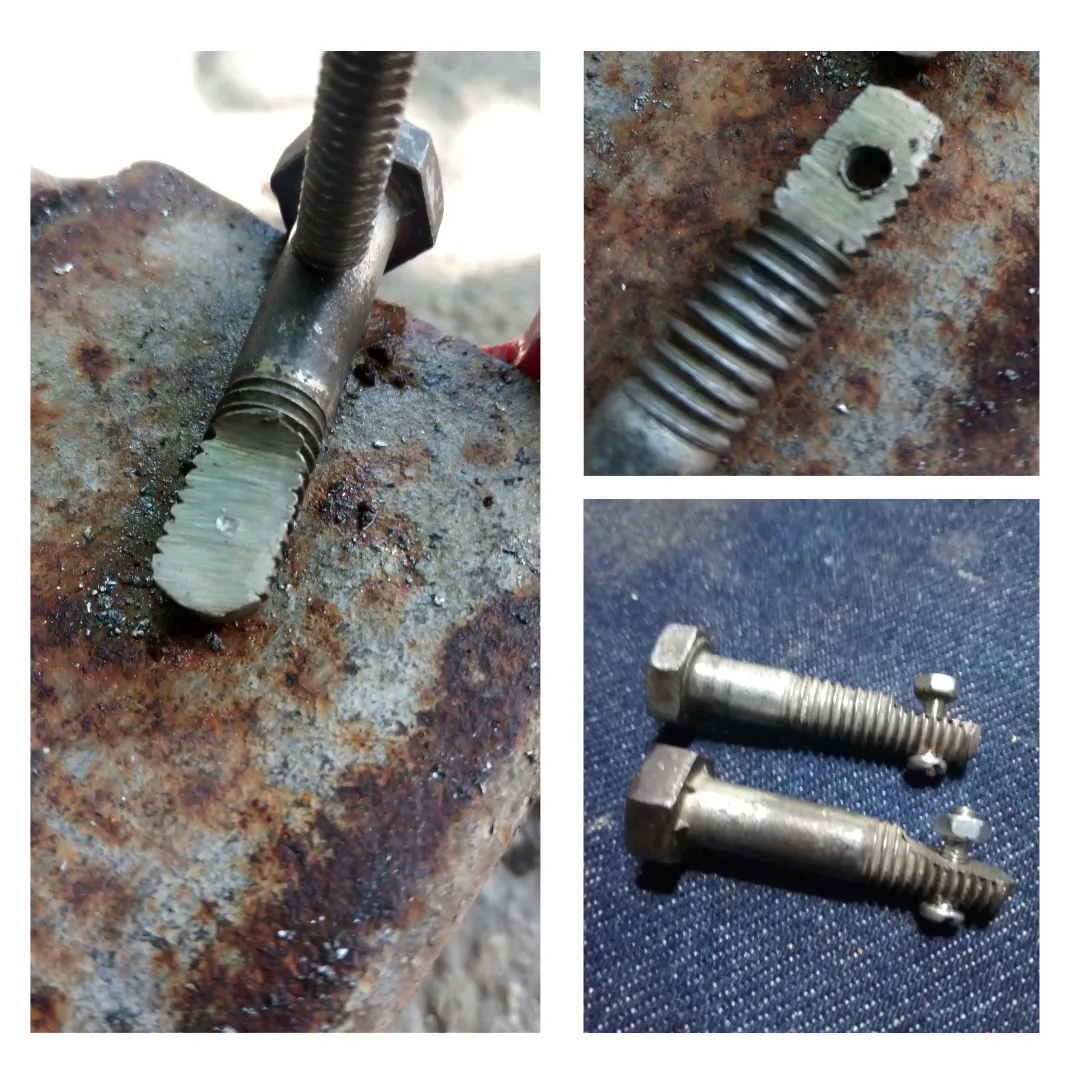
Al rebajar el tornillo perforamos con una mecha de metal de 3mm, con un clavo de acero marcamos generando impacto con el martillo, para que la mecha no se corra, es conveniente que la mecha tenga buen filo e ir mojando al abrir el agujero para que esta no se sobre caliente.
Paso 10
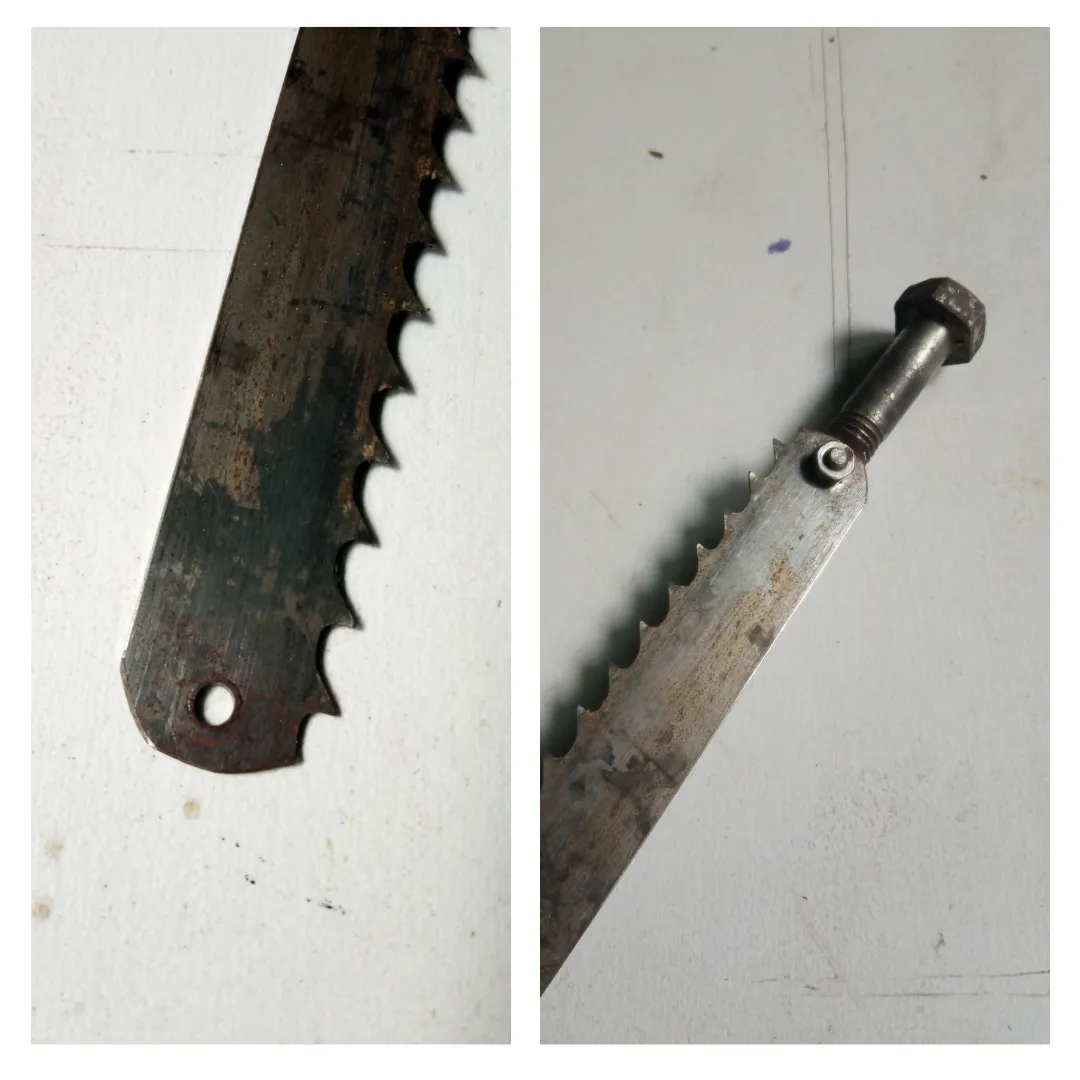
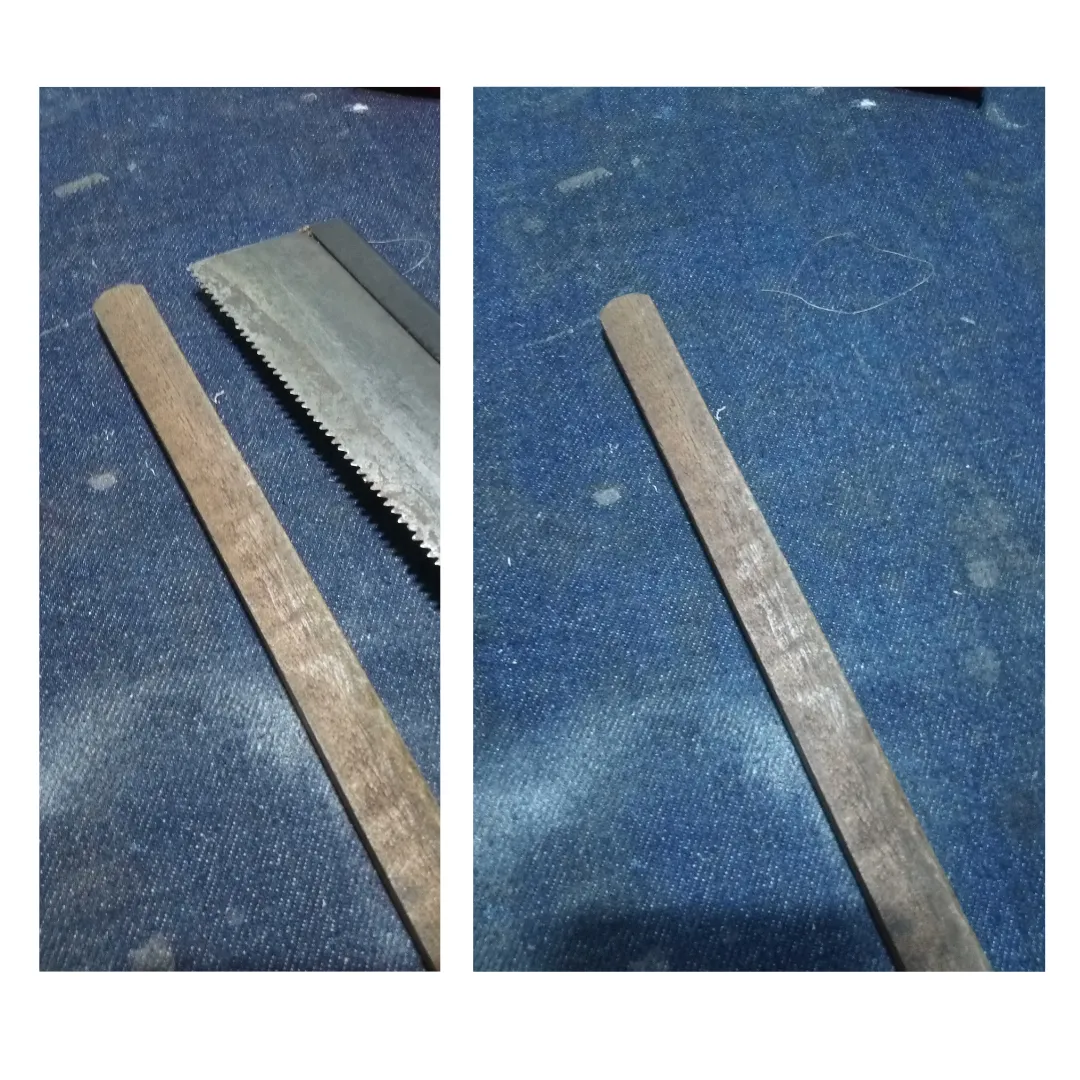
La hoja la realicé con un pedazo de hoja de sierra cinta, en algunas carpinterías y carnicerías se parten y la desechan, así que le di las dimensiones que necesitaba y suavice los bordes, luego perfore, tal como el paso anterior, acá como la mecha es de un metal bastante templado con una mecha convencional de acero rápido no se puede abrir, pues como no tengo mecha para acero templado, opte con ayudarme con mi clavo.
Paso 11
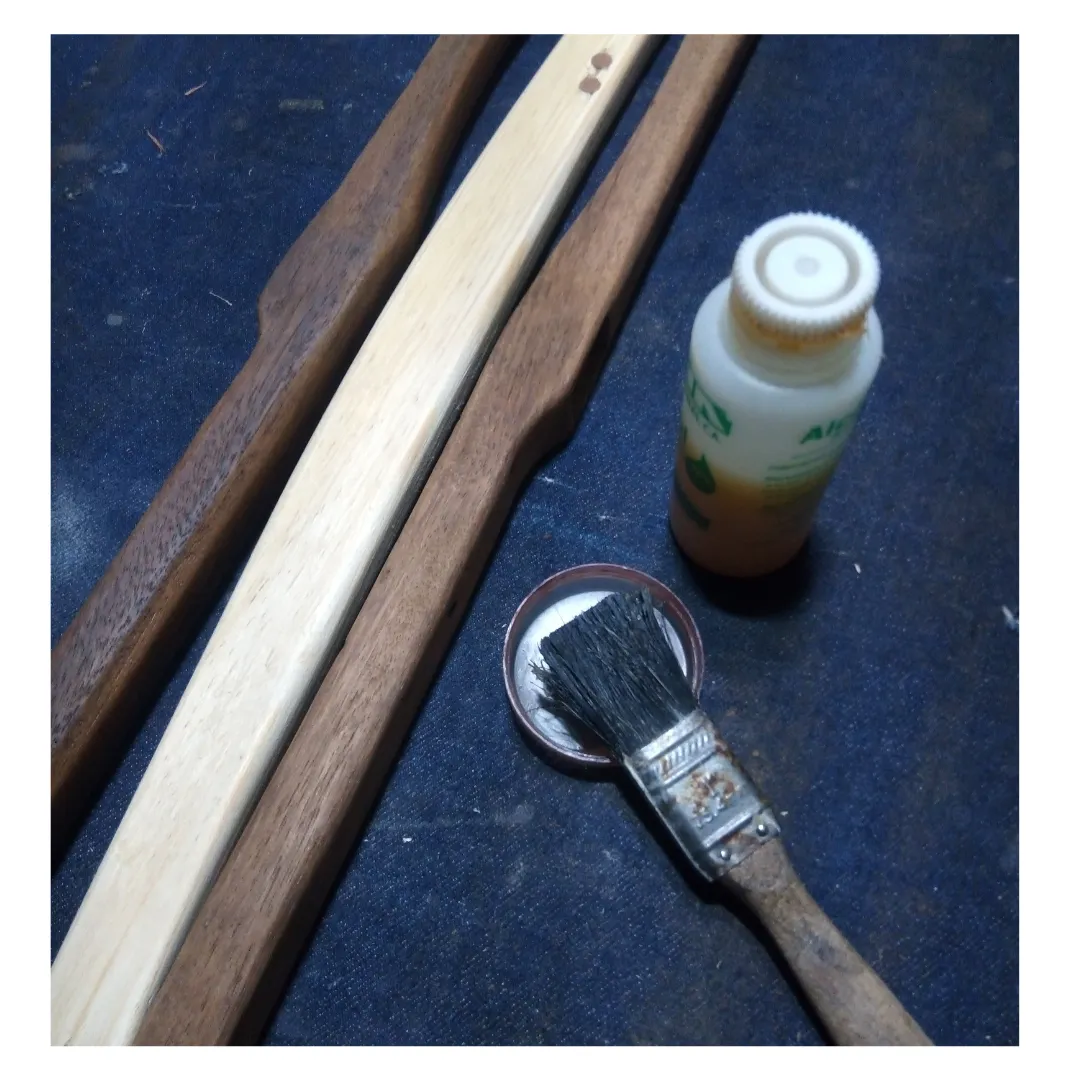
Ya lista todas las piezas, preparamos un poco de sellador y aplicamos en la superficie para así proteger la herramienta, aplicamos tres manos y culminamos este proceso.
Paso 12
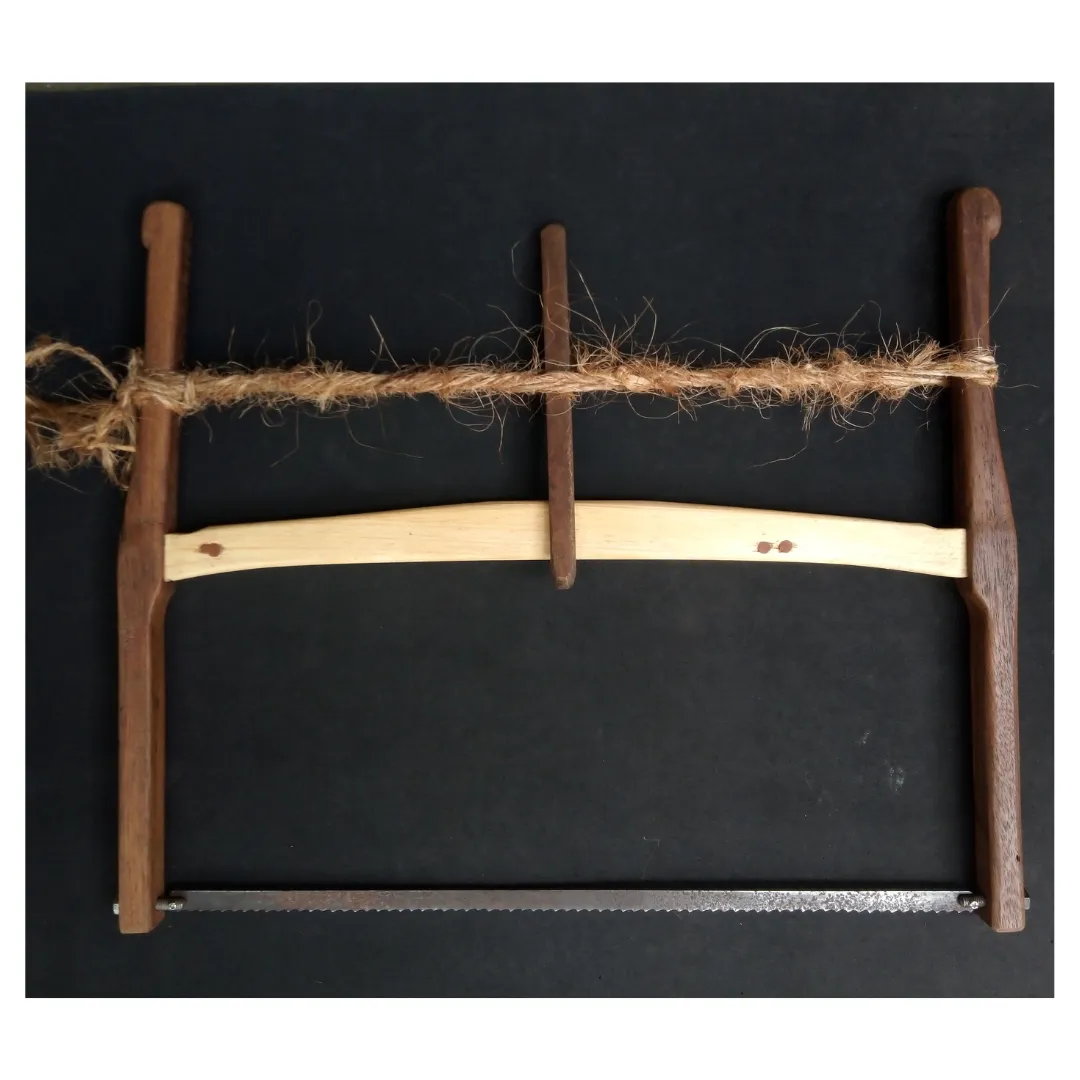
Ensamblamos todas las piezas primero colocamos los tornillos a los brazos y luego los tornillos de 3mm llevamos los brazos a la guía central y montamos la hoja de la sierra, aseguramos colocándole las tuercas y procedemos a rodear los brazos con la cabuya de cocuiza le damos tres vueltas sin tanta tensión amarramos en una punta y en el medio colocamos la palanca, le damos un par de vueltas hasta que se sienta bien tensa la hoja, no podemos sobrepasarnos de tensión, ya que podríamos estropear los brazos de la sierra viajera.
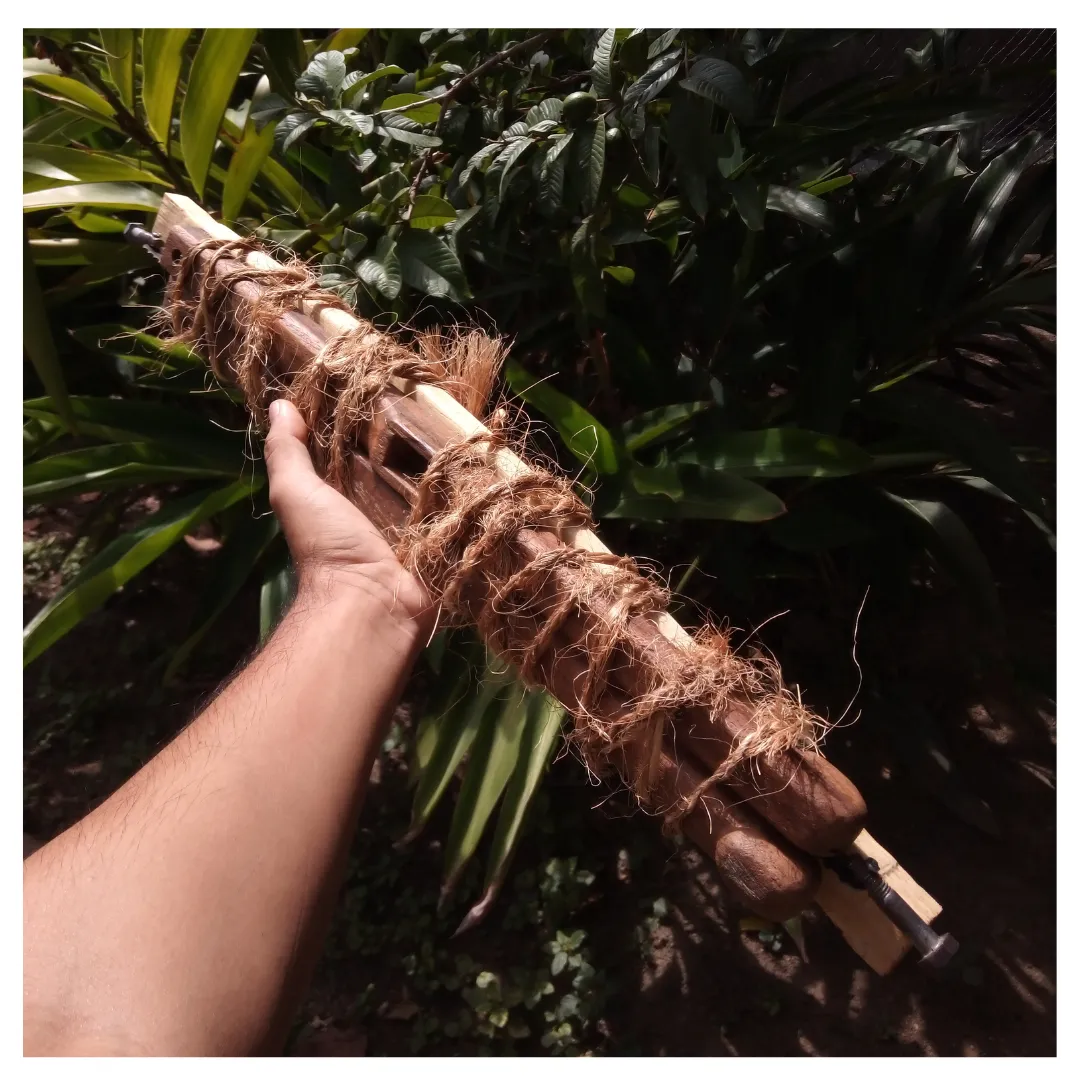
De esta manera culminé mi sierra de bastidor viajera, lista para llevarla a algún viaje, para cortar alguna madera encontrada ya sea para tallar o hacer algún instrumento, pues desde hace un tiempo he estado reflexionando sobre como los lutieres podríamos sobrevivir en una viaje llevando el atelier en una maleta, pues muchos artesanos pueden recorrer el mundo o visitar muchos lugares, puesto que estos se dedican a cosas pequeñas como orfebrería y bisutería, ocupando poco espacio, teniendo por obligación el luthier que asentarse por un tiempo, ya que es una labor de tiempo, espacio y reflexión, esto no es una limitación, pero tal vez se pueda experimentar.
Me despido y espero que sea de provecho este contenido, muchas gracias por leer, si tienen alguna sugerencia o duda estoy atento a los comentarios y si desean hacer algún pedido o adquirir algún trabajo de los que hago pueden contactarme, hasta una próxima publicación.
- imágenes editadas en canva
- texto traducido en deelp
- separador hecho en adobe illustrator
- imágenes tomadas desde mi celular
English version
Greetings from my atelier, fellow artisans of the hive diy community, this time I bring you a tutorial on how to make a traveling frame saw, since every few months I usually leave my house for several weeks I needed to make me one of these saws used by the master carpenters of the past and as it can be disassembled what better to take it when I'm out of the atelier tools to make cuts and create with few tools.
I had some time postponing this fabrication so I took advantage of the creative energy and started the mission with the intention of sharing the tutorial so that at some point you can have one in your space, the advantage is that we can make it with the dimensions we want the first thing we must look for the saw blade and the will to create a tool with our own hands.
- Wood (medium density)
- 2 screws of 5/16 inch (8mm)
- 2 screws with nut 1/8 inch (3mm)
- Bits to make trades according to the diameter of the screws
- Chisels
- rasp
- sandpaper 80,120,220
- sealer and thiner
- Hand angle grinder with grinding stone
- bastren
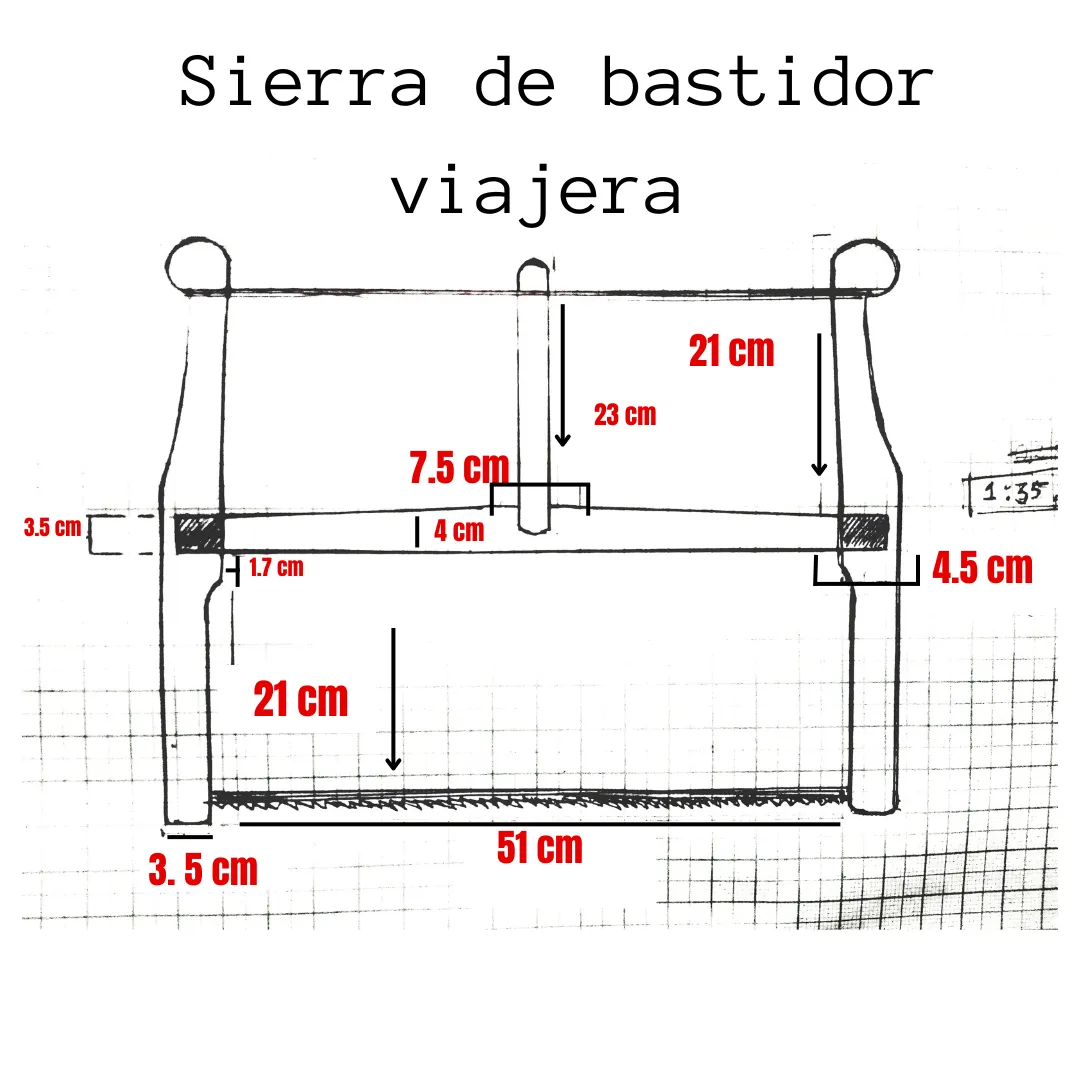
Here I leave the graphic plan so that you can quote the measures that I share with you and so you can have an idea of what you want to execute, as I have commented in other occasions we can always leave the plan, since in the execution many times we find ourselves with circumstances which we must modify.
Step 1
The first thing I will focus on will be to make the central guide that joins the two arms, take a pine wood strip of 2.5 cm thick, make some cuts with the saw to lighten the process this can be done with an electric jigsaw, we put the hearing protector in my case I am not very fond of these invasive electrical noises,
Step 2
When we have the cuts of the central guide we move to stylize the work, here we use a little saw to make some cuts for the arc, we remove material with the chisel and rasp and smooth the edges with the bastren and finish with sandpaper 220.
| Note: make this piece of the saw first, because without these dimensions we cannot make the boxes of the arms where it will be embedded, the more precise the better. |
Step 3
After locating our wood and materials we proceed to work the arms of the saw, it is always good to have them square, then make some design as I did in the one I show in the picture, because I wanted to make a scroll at the top for aesthetics.
When drawing the design, we do with a small saw a cut until almost reach the line, then pass the chisel and remove the excess with the rasp, this carefully because this tool is endowed with rudeness that, as it is used to devastate wood quickly leaving us a rustic surface, then pass sandpaper 80 to reach the 220.
Step 4
With the blade we carve the scroll going from the edge to the center always carving from our body outwards, since carving in the opposite way we can run the risk of having a cut due to imprudence.
Step 5
This step brings us almost to the end of the construction; make the boxes for the socket, here we must take into account the dimensions of the central guide points, when taking them we mark and use the chisel, I usually make a depth mark with a masking tape to avoid overdoing it.
Step 6
To complete the arm in its entirety we drill where we will place the screws that will hold the saw blade, we do it 1 cm away from the edge so that it does not fracture.
Step 7
The tension lever is preferably made of a high density wood (hard) can be 1.5 cm thick.
Step 8
Blacksmithing, metal and fire
Here we must make a rebate to the screws using the grinder, we seek to hold with a press or sergeant, as this tool is very strong, we rough to form a plane, this so that the blade has better support.
Step 9
When lowering the screw we drill with a 3mm metal bit, with a steel nail we mark generating impact with the hammer, so that the bit does not run, it is convenient that the bit has a good edge and go wetting when opening the hole so that it does not overheat.
Step 10
Once all the pieces are ready, prepare some sealer and apply it on the surface to protect the tool, apply three coats and finish this process.
Step 11
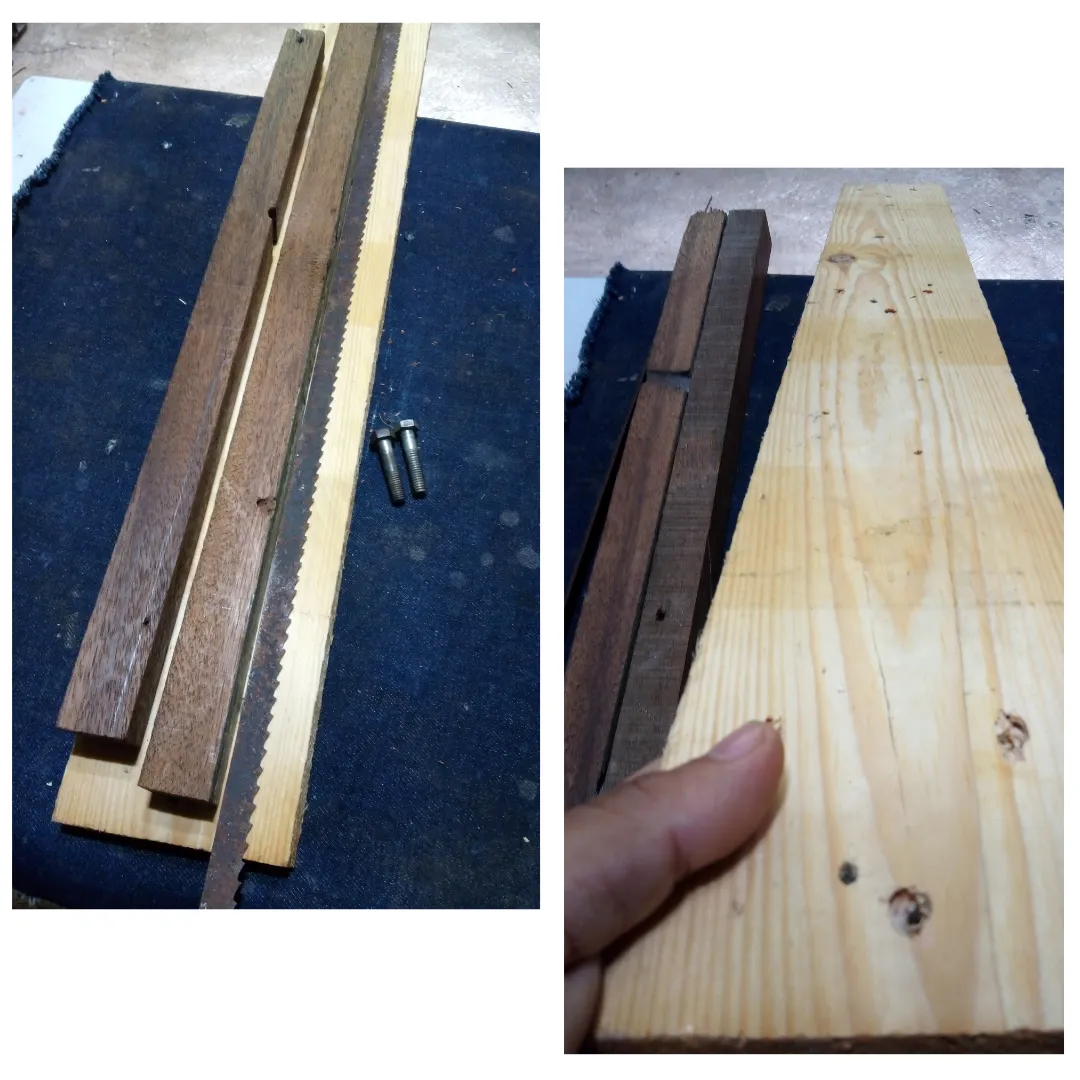
I made the blade with a piece of band saw blade, in some carpentries and butcher shops they break and discard it, so I gave the dimensions I needed and smoothed the edges, then drill, as in the previous step, here as the bit is a fairly hardened metal with a conventional high speed steel bit can not be opened, because as I do not have a hardened steel bit, I opted to help me with my nail.
Step 12
We assemble all the pieces first we put the screws to the arms and then the 3mm screws we take the arms to the central guide and mount the blade of the saw, we secure by placing the nuts and proceed to surround the arms with the cocuiza cabuya we give three turns without much tension we tie at one end and in the middle we place the lever, we give a couple of turns until the blade feels well tense, we can not exceed tension, as we could damage the arms of the traveling saw.
In this way I finished my traveling frame saw, ready to take it to some trip, to cut some found wood either to carve or to make some instrument, because for some time I have been reflecting on how we luthiers could survive in a trip carrying the atelier in a suitcase, because many artisans can travel the world or visit many places, since these are dedicated to small things like goldsmithing and jewelry, occupying little space, having by obligation the luthier to settle for a while, since it is a work of time, space and reflection, this is not a limitation, but perhaps it can be experimented.
I say goodbye and I hope this content is of benefit, thank you very much for reading, if you have any suggestions or questions I am attentive to the comments and if you want to place an order or purchase any of the work I do you can contact me, until a future publication.
- images edited in canva
- text translated in deelp
- separator made in adobe illustrator
- images taken from my cell phone