English

Greetings to the DIY community at Hive, it is a pleasure to share with you again, wishing you are in the best possible situation and in good spirits to face the challenges that the week brings us. I have been busy doing #repairs around the house, there are always things to do.
On this occasion I came into my hands a very nice LED wall lamp, with a rather nice minimalist design, they left it for me to make arrangements, if it was possible to leave it working.

The fact that the glass of the lamp is frosted and that it has two white covers, one opaque and one semi-translucent on the inside, is a practical use of the knowledge of physics developed by the studies of reflection and refraction of #light from Newton. It is the practical application of knowledge about light behavior principles made many years ago by researchers who bequeathed their work to us. I sometimes wonder if Newton ever imagined all the applications that all of his discoveries would have for us.

Image's Source - Image Source
The lamp works powered by a switched source, which will make repair easier, as long as the damage is due to a deteriorated #led. If the power supply, instead of being switched, were a capacitor supply, the repair would need a little more work and spare parts to get it ready.

I disassemble the lamp has very few elements.

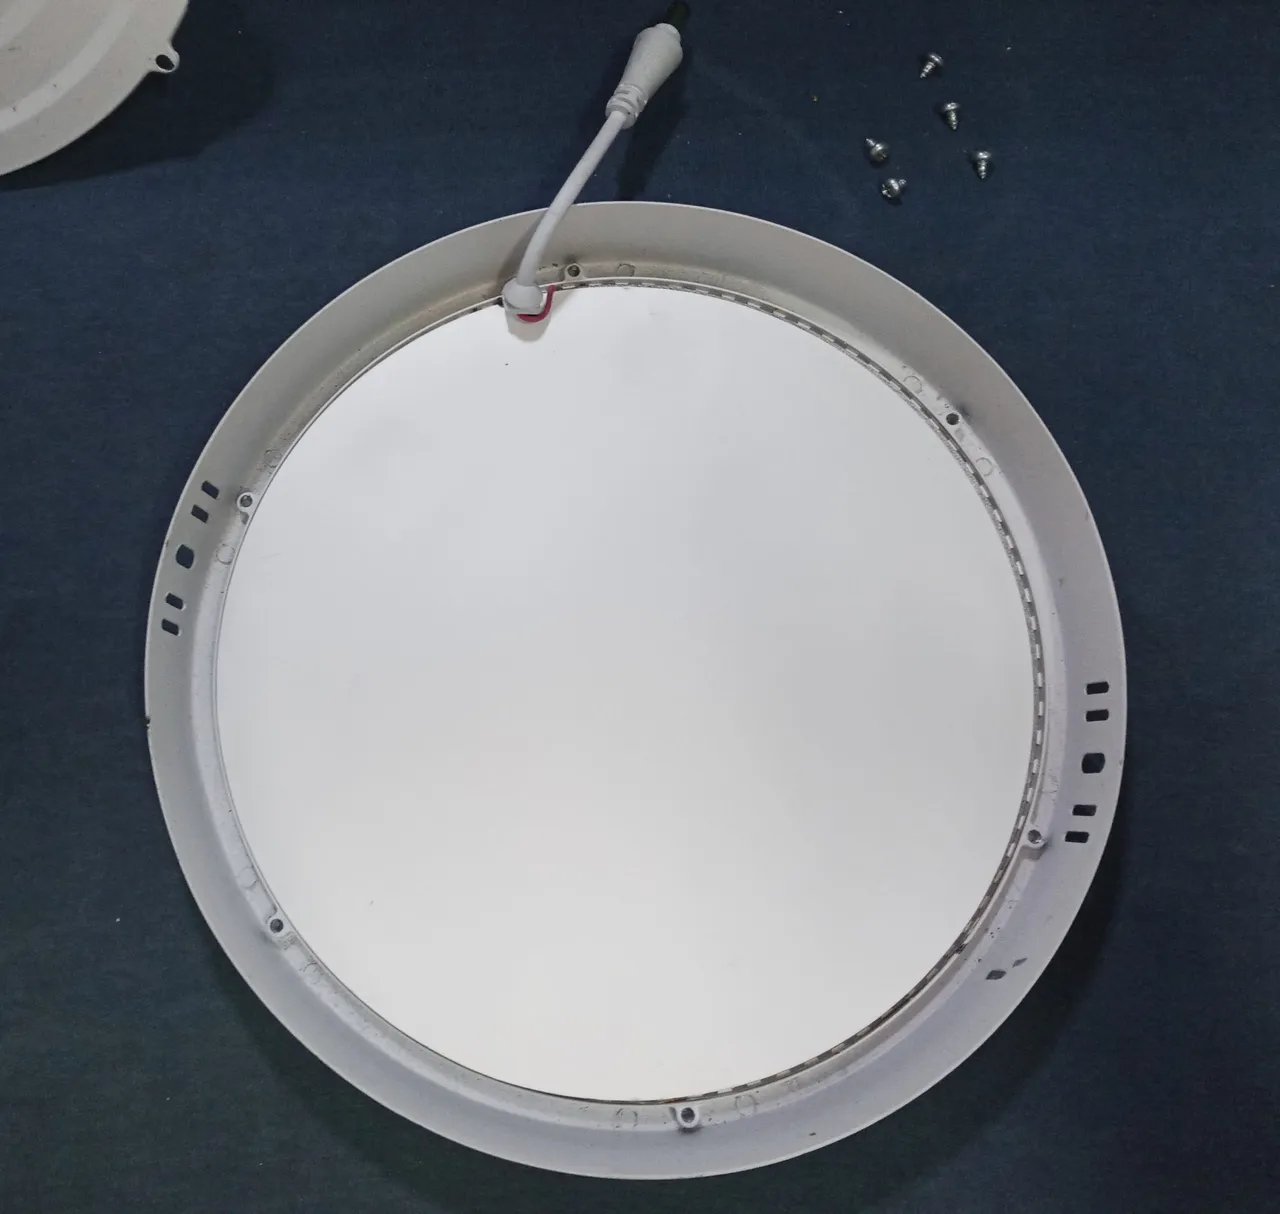

Then I remove the covers and use the LED tester, it is a very practical tool, I can test a single LED or a complete LED strip, which makes it much easier for me to check.

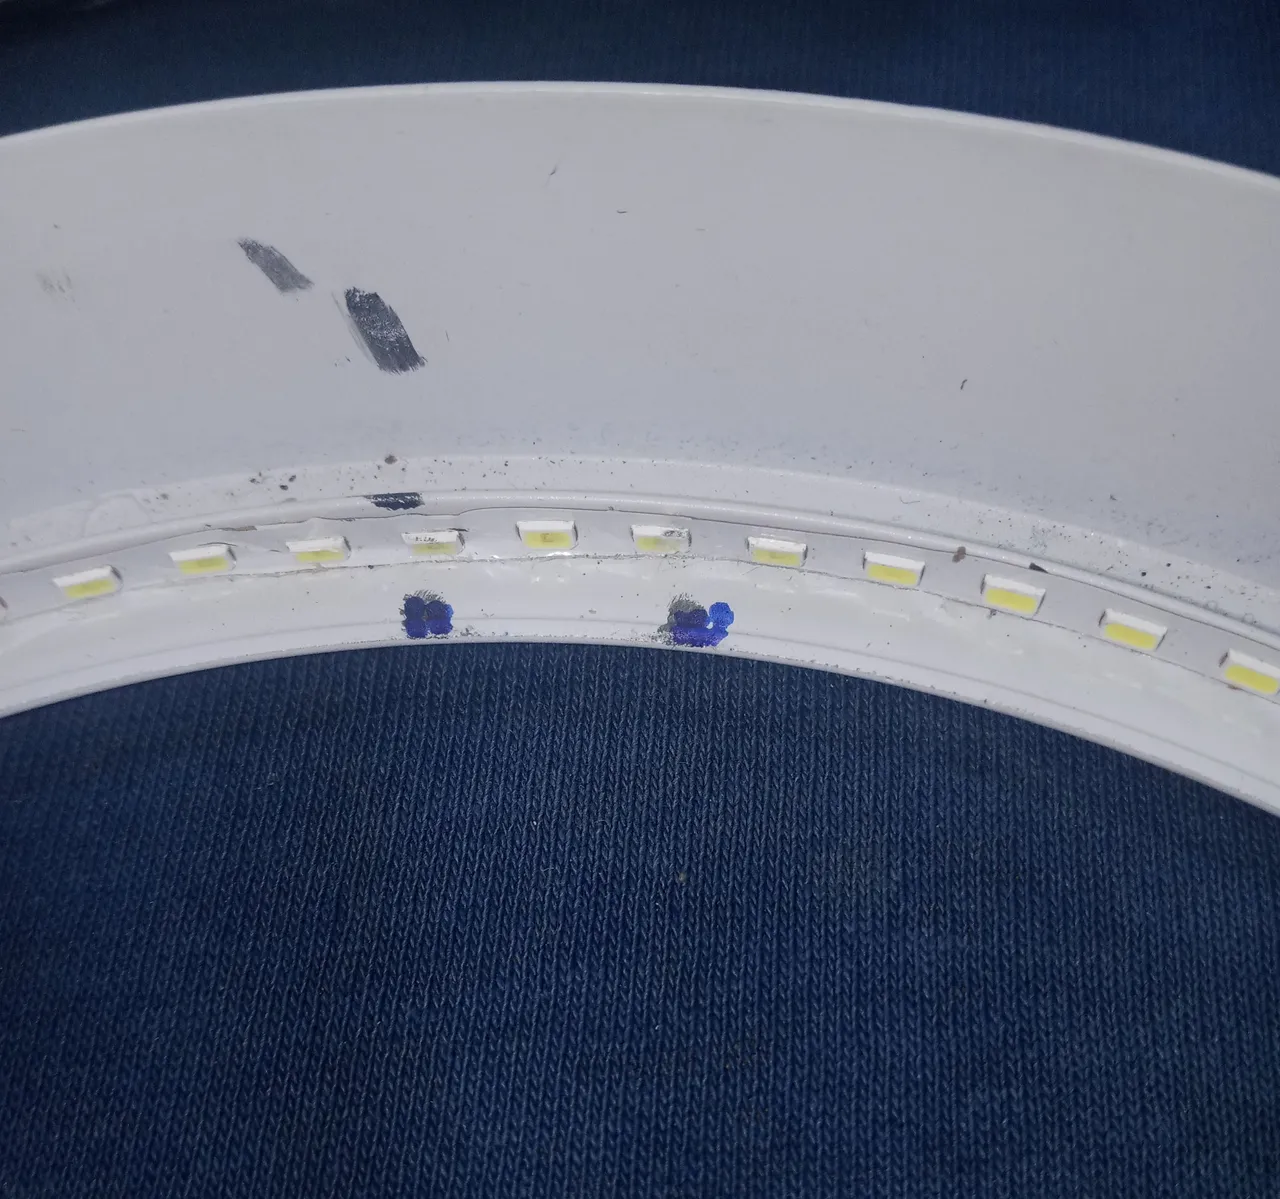
I find three LEDs with faults, but the issue is that because of the material of the #lamp and that the LED strip is attached with glue in its position, which I am going to try to work without disassembling it, since the LED strip could break if I try to remove it from the deck where it is attached and the damage would be a little more.

Since it's powered by a switching power supply, I can make a jumper to bypass the bad LEDs and get the rest of the LEDs to work just fine. If this were a LED #bulb, it would be treated differently, since when a LED bulb has more than two damaged LEDs, it is necessary to evaluate whether it is better to replace the damaged LEDs or use the bulb as a spare to repair another one that is failing with better conditions.
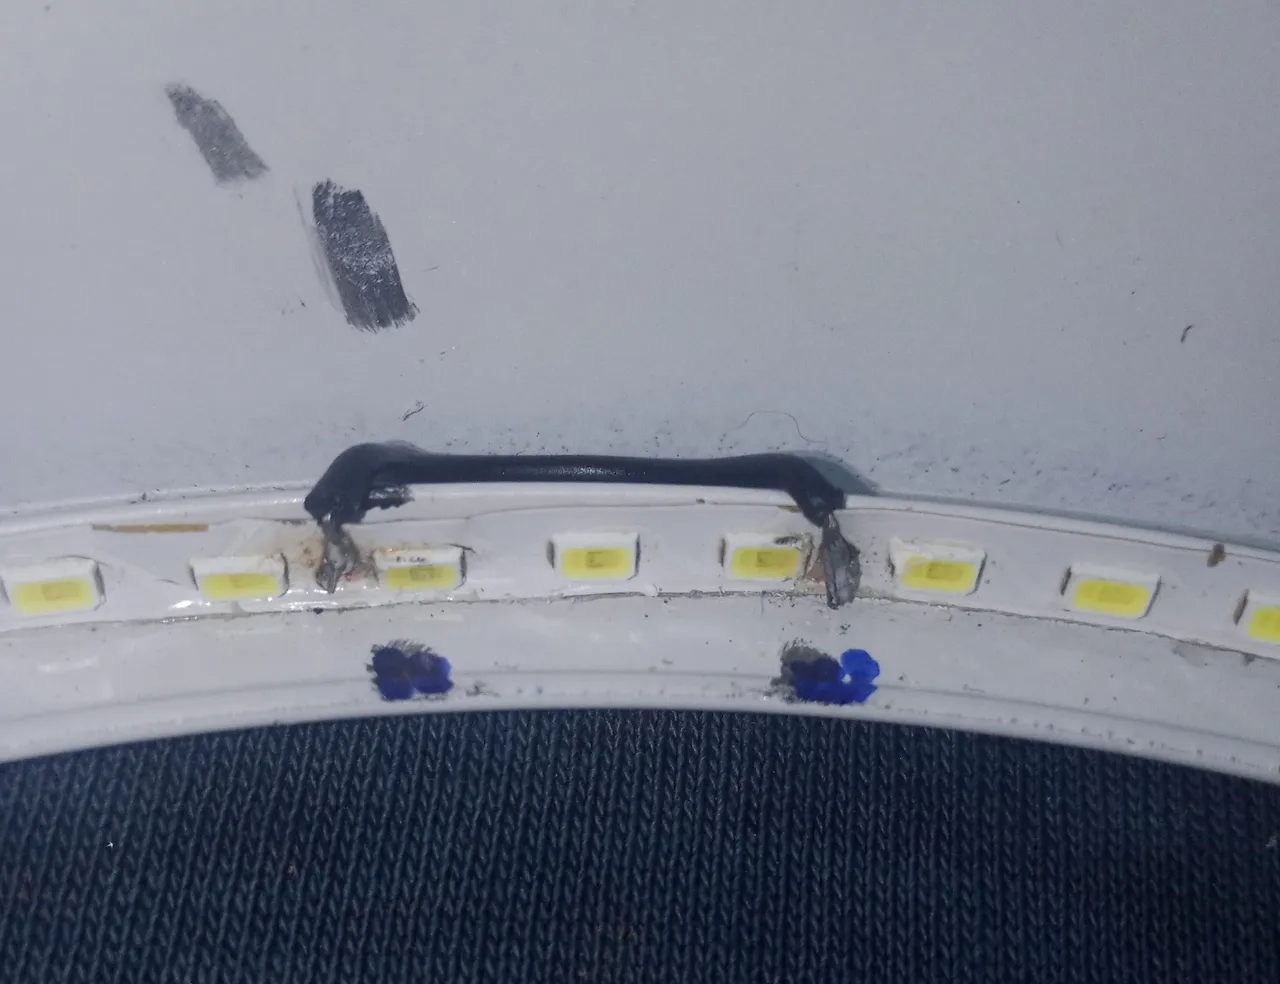
I needed to make a bridge with a thin and sufficiently resistant wire, so I decided to use recycled cables from old computers, the solder is easily fixed, and they are quite thin and malleable.

I remove some of the paint that is on the contact tracks on the sides of the three damaged LEDs and carefully apply a little bit of solder, and also to the piece of wire that I will place as a jumper, I apply solder to the ends before soldering it to the LED strip.

Only very little heat is needed, and we solder the jumper between the three bad LEDs. I try and verify that this section is working well, then I repeat the same operation on another edge of the lamp where there were other damaged LEDs, and it still works.
The continuous failures in the supply of the #electrical system end up causing damage to almost all the electrical equipment inside the houses, luckily I was able to recover this lamp.
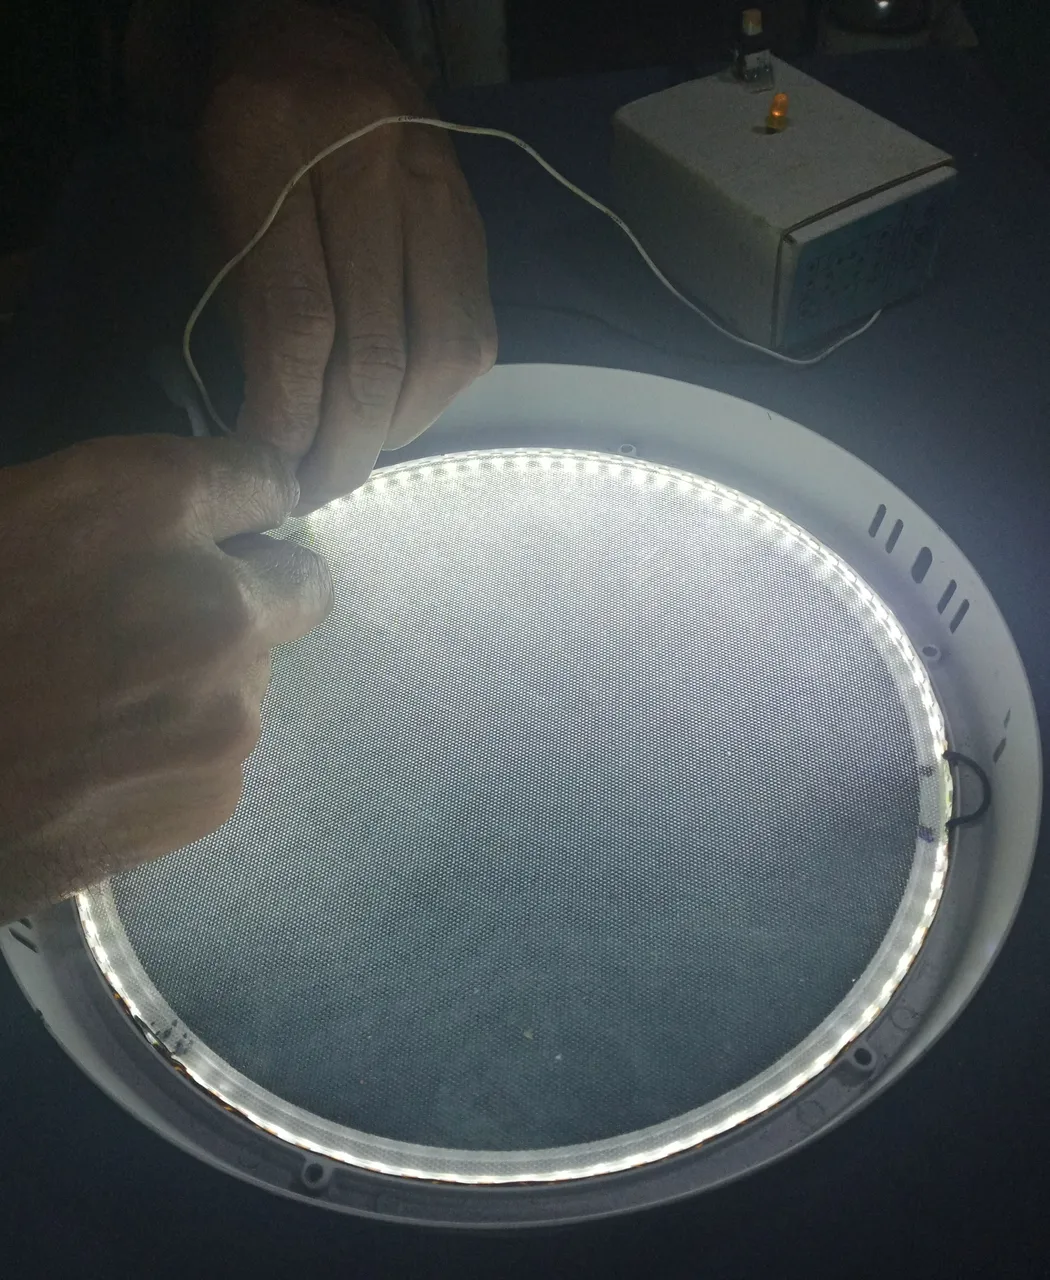
The two repaired sections are barely noticeable in LED strip, this lamp is a very simple design, but I am still impressed by all the engineering behind its development.

I was celebrating finishing the repairs, sadly when I tested the power supply, I found it to be malfunctioning. Surely, when the source of power was damaged, it was what caused the damage to the lamp. So I finished with the lamp, now I have to repair the switching power supply, it is quite compact, a few years ago it would be bigger in size and weight, but with the advancement of technologies they have been reduced in size.

I will dedicate a post to the repair of the source, it deserves it, it has really been a great advance to go from the large and heavy sources of long ago to these small, efficient switching sources.

As I always remember: This post is not a tutorial. It's just part of my #workshop work, how I solve the repairs that are presented to me.
If you are going to do any work with electricity, please take training courses, it is to avoid accidents and avoid damaging the equipment. Safety measures must always be respected.
One more detail in case someone has a voltammeter like the one in the image.

An acquaintance left it with me to repair his tool, but I can't find out the value of a burnt resistor (the one under number 2 marked in the red circle). If someone has one of the same model and has a minute, could you tell me what number that resistor is printed on? I would thank you a lot.

Thank you very much for stopping by and reading.
Have an excellent week.
Peace.
I have used Google Translate for the English language.
Images unless stated are screenshots of work in my workshop.
Español
Saludos a la comunidad de DIY en Hive, es un gusto compartir nuevamente con ustedes, deseando que estén en la mejor situación posible y con buen ánimo para enfrentar los retos que nos traiga la semana. He estado entretenido haciendo reparaciones en la casa, siempre hay cosas que hacer.
En esta ocasión llego a mis manos una lámpara de pared de leds, muy bonita, con un diseño minimalista bastante agradable, me la dejaron para que le hiciera arreglos, si era posible dejarla funcionando.
El que el vidrio de la lámpara, este esmerilado y que tenga las dos cubiertas blancas, una opaca y una semi translúcida por la parte interna, es un uso práctico del conocimiento de física desarrollado por los estudios de reflexión y refracción de la #luz de Newton. Es la aplicación práctica de conocimientos sobre principios del comportamiento de la luz hechos hace muchos años por investigadores que nos legaron su trabajo. Algunas veces me pregunto si Newton se llegaría en algún momento a imaginar todas las aplicaciones que tendrían para nosotros todos sus descubrimientos.
Image's Source - Fuente de la Imagen
La lámpara trabaja alimentada por una fuente conmutada, lo que hará más sencilla la reparación, siempre y cuando el daño sea por algún #led deteriorado. Si la fuente de alimentación, en vez de ser conmutada, fuese una fuente de capacitores, la reparación necesitaría de un poco más de trabajo y repuestos para dejarla a punto.
Desmonto la lámpara tiene muy pocos elementos.
Luego retiro las cubiertas y uso el probador de led, es una herramienta muy práctica, puedo probar un led solo o una tira completa de led, lo que me hace bastante más fácil la revisión.
Encuentro tres leds con fallas, pero el asunto es que por el material de la #lampara y que la tira de led está adosada con pegamento en su posición, que voy a procurar trabajar sin desmontarla, ya que la tira de led podría romperse si trato de retirarla de la cubierta donde está fijada y el daño sería un poco mayor.
Como está alimentada por una fuente conmutada, puedo hacer un puente para saltarme los leds dañados y hacer que funcione el resto de los leds sin problemas. Si esto fuese un #bombillo de led, sería tratado de forma diferente, ya que cuando un bombillo de led tiene más de dos leds dañados hay que evaluar si es mejor reemplazar los leds dañados o usar el bombillo como repuesto para reparar otro que esté en mejores condiciones.
Necesitaba hacer un puente con un cable delgado y suficientemente resistente, así que me decido por el uso cables reciclados de computadores viejos, la soldadura se les fija con facilidad y son bastante delgados y maleables.
Retiro un poco de la pintura que está en las pistas de contacto a los lados de los tres leds dañados y con cuidado aplico un poco de soldadura, y también al trozo de cable que colocaré como puente, le aplico soldadura en los extremos antes de soldarlo en la tira de led.
Solo se necesita muy poco calor y soldamos el puente entre los tres leds dañados. Pruebo y verifico que esa sección quedo funcionando bien, luego repito la misma operación en otro borde de la lámpara donde había otros leds dañados y queda funcionando.
Los continuos fallos en el suministro del sistema eléctrico terminan causando daños en casi todos los equipos eléctricos dentro de las casas, por suerte pude recuperar esta lámpara.
Apenas se notan las dos secciones reparadas, es un diseño muy simple el que tiene esta lámpara, pero no dejo de impresionarme por toda la ingeniería que hay detrás de su elaboración.
Estaba celebrando el haber terminado las reparaciones, tristemente cuando probé la fuente de alimentación, encontré que tenía fallos en su funcionamiento. De seguro al dañarse fue lo que produjo el daño de la lámpara. Así que termine con la lámpara, ahora debo reparar la fuente conmutada, es bastante compacta, hace unos años sería de un tamaño y peso mayor, pero con el avance de las tecnologías se han reducido de tamaño.
A la reparación de la fuente, le dedicaré una publicación, se lo merece, en verdad ha sido un gran avance pasar de las fuentes grandes y pesadas de hace tiempo atrás a estas fuentes conmutadas, eficientes y pequeñas.
Como siempre recuerdo: esta publicación no es un tutorial. Es solo parte de mi trabajo de taller, como soluciono las reparaciones que se me van presentando.
Si van a hacer algún trabajo con electricidad, por favor tomen cursos de capacitación, es para evitar accidentes y evitar dañar los equipos. Siempre se deben respetar las medidas de seguridad.
Un detalle más por si alguien tiene un voltamperímetro como el de la imagen.
Un conocido me lo dejo para reparar su herramienta, pero no logro saber el valor de una resistencia quemada (la que está bajo el número 2 marcada en el círculo rojo). Si alguien tiene uno del mismo modelo y tiene un minuto, ¿podrían decirme que número tiene impresa esa resistencia? Se los agradecería mucho.
Muchas gracias por pasar y leerme.
Que tengan una excelente semana.
Paz.
He usado el traductor de Google para el idioma inglés.
Las imágenes a menos que se indique son capturas del trabajo en mi taller.