Hello Hivers~
Today I bring you my first number of a section I wanted to start on my blog since long time ago: handcrafts.
I always have enjoyed a lot make my own things by myself and mainly recycling, is something I have clear since I was teenager, is a good way to save and use materials we already have in our houses, it also helps a little to reduce highly polluting waste that goes to the environment every day and seriously affect all living things, including us.
I know it is a minimal help but it is my way of reducing my negative environmental impact
📑A little description: The crafts that I am going to share with you, I will try they fullfil some characteristics that seem fundamental to me:
- Must be with recycling materials, in part or in full.
- Functional and well made.
That would be in summary what this topic is going to be on my blog.
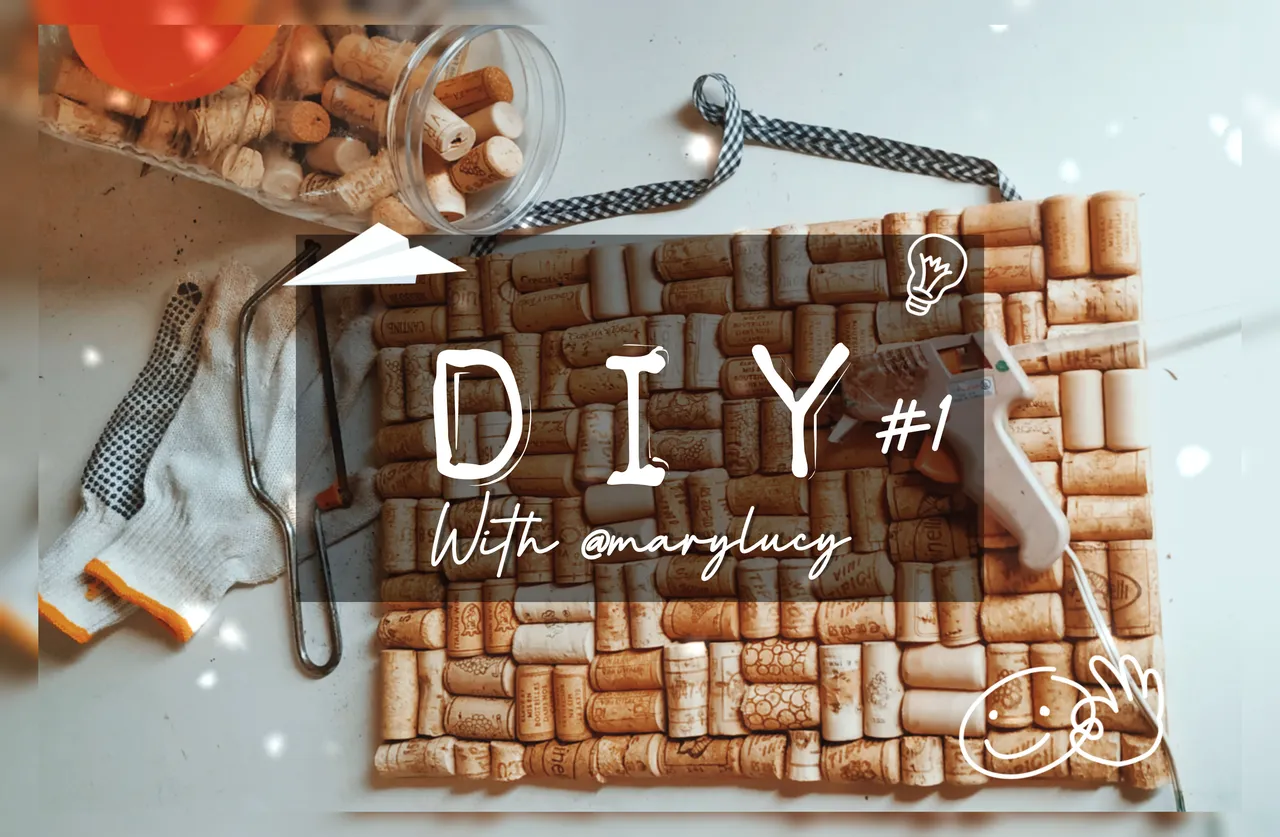
In this first episode I share an idea that I personally liked a lot and that I think you may also like and serve, it is a cork board in which you can hang important notes, photos, keys or whatever you like and that is both decorative (it can be a small decoration corner), as well as functional and serve to organize yourself and place there everything you should have in mind and in sight so as not to forget it, you just have to hang it in a good place.
Next I am going to show you how I did part I of this craft, I am also going to tell you a little about recommendations and my experience with this DIY (do it yourself).
Materials:

- 65 corks
- 1 rope with the length and design of your preference
- Brown cardboard 43cmx28cm
- Carton 43cmx28cm
- Saw blade or saw knife
- Pair of scissors
- Garden gloves
- White glue or hot / cold silicone
Step by step
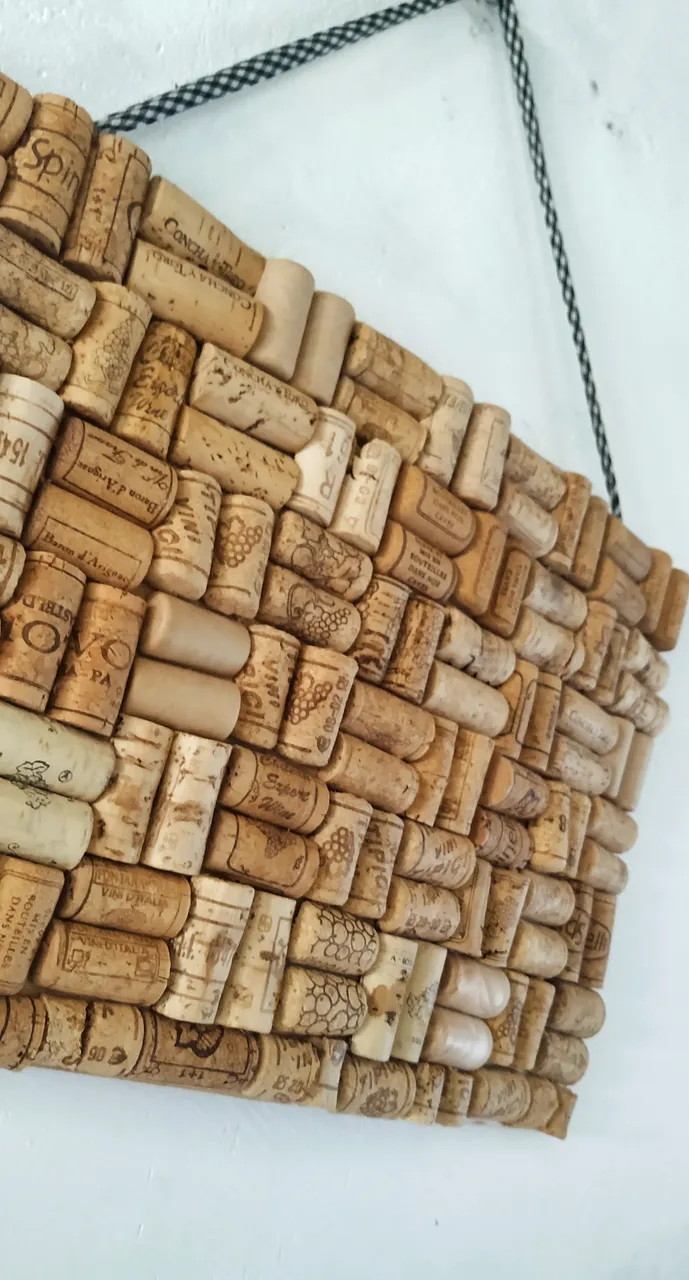
The first thing I started to do was cut all the corks necessary to cover the surface of the tabloid-size card, and it was exactly 65 corks, chopped in half to make the design that most caught my attention.
It took me several hours that I divided into two days for health reasons, because it is a task that requires some physical strength. Some corks are harder than others.
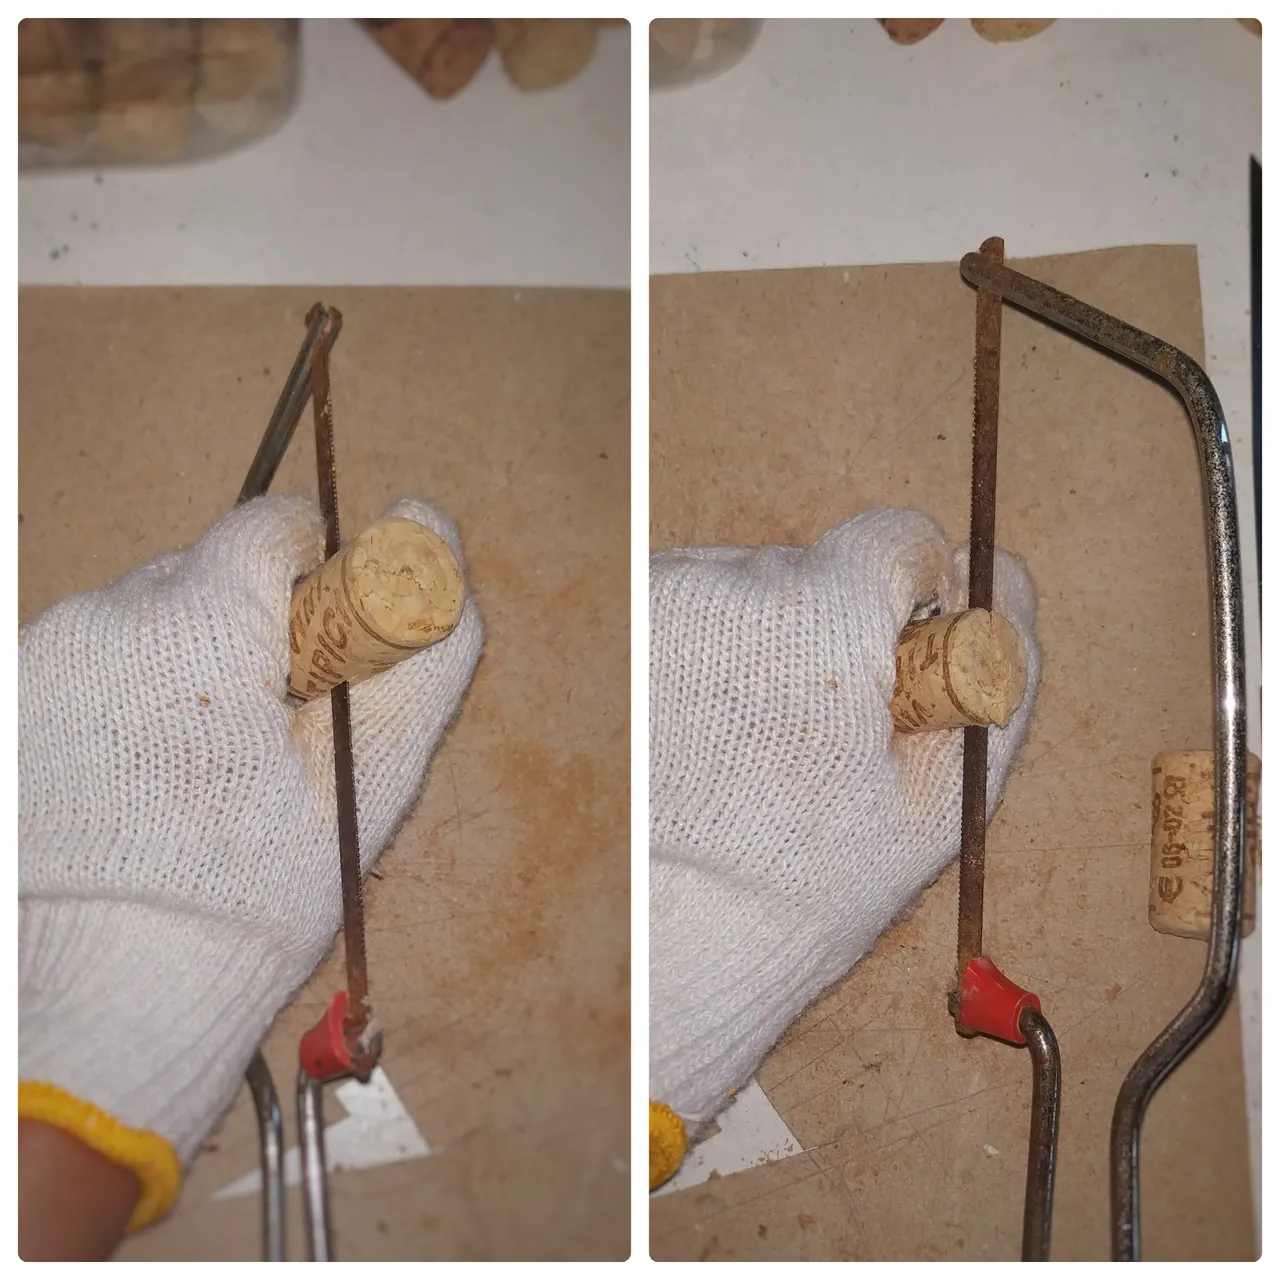
This is the part that takes the longest of the entire process. To make it easier, I recommend using a small saw (or saw knife) that is comfortable to grip and some gloves that protect you, this will give you the security of holding the cork firmly and cutting it with the saw applying enough force. With the gloves you will be able to hold the cork in the best way and avoid accidents.
At first I wasn't using them and I came very close to hurting myself, even being careful. So I went for them and it was all more comfortable 🧤.
Here I show you two ways in which you can cut the cork: one is sawing it from top to bottom and the other from bottom to top, as I mentioned, with gloves you can do this safely.
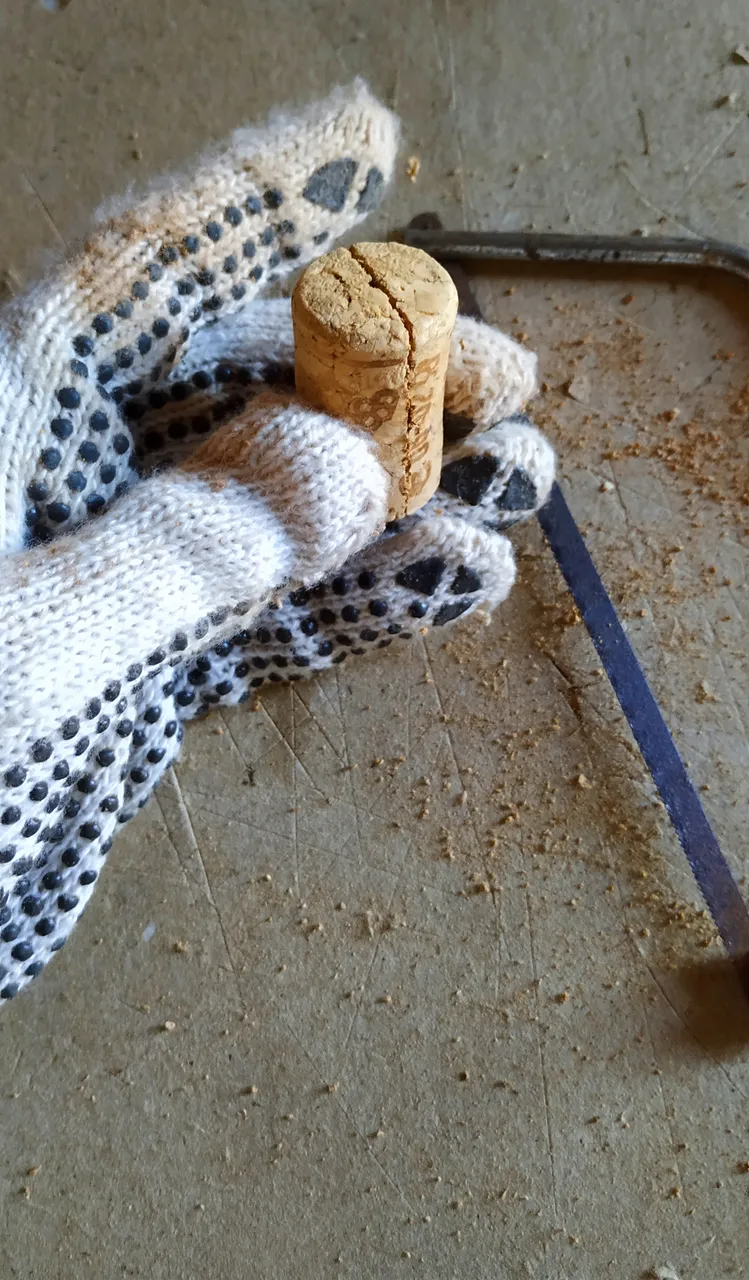
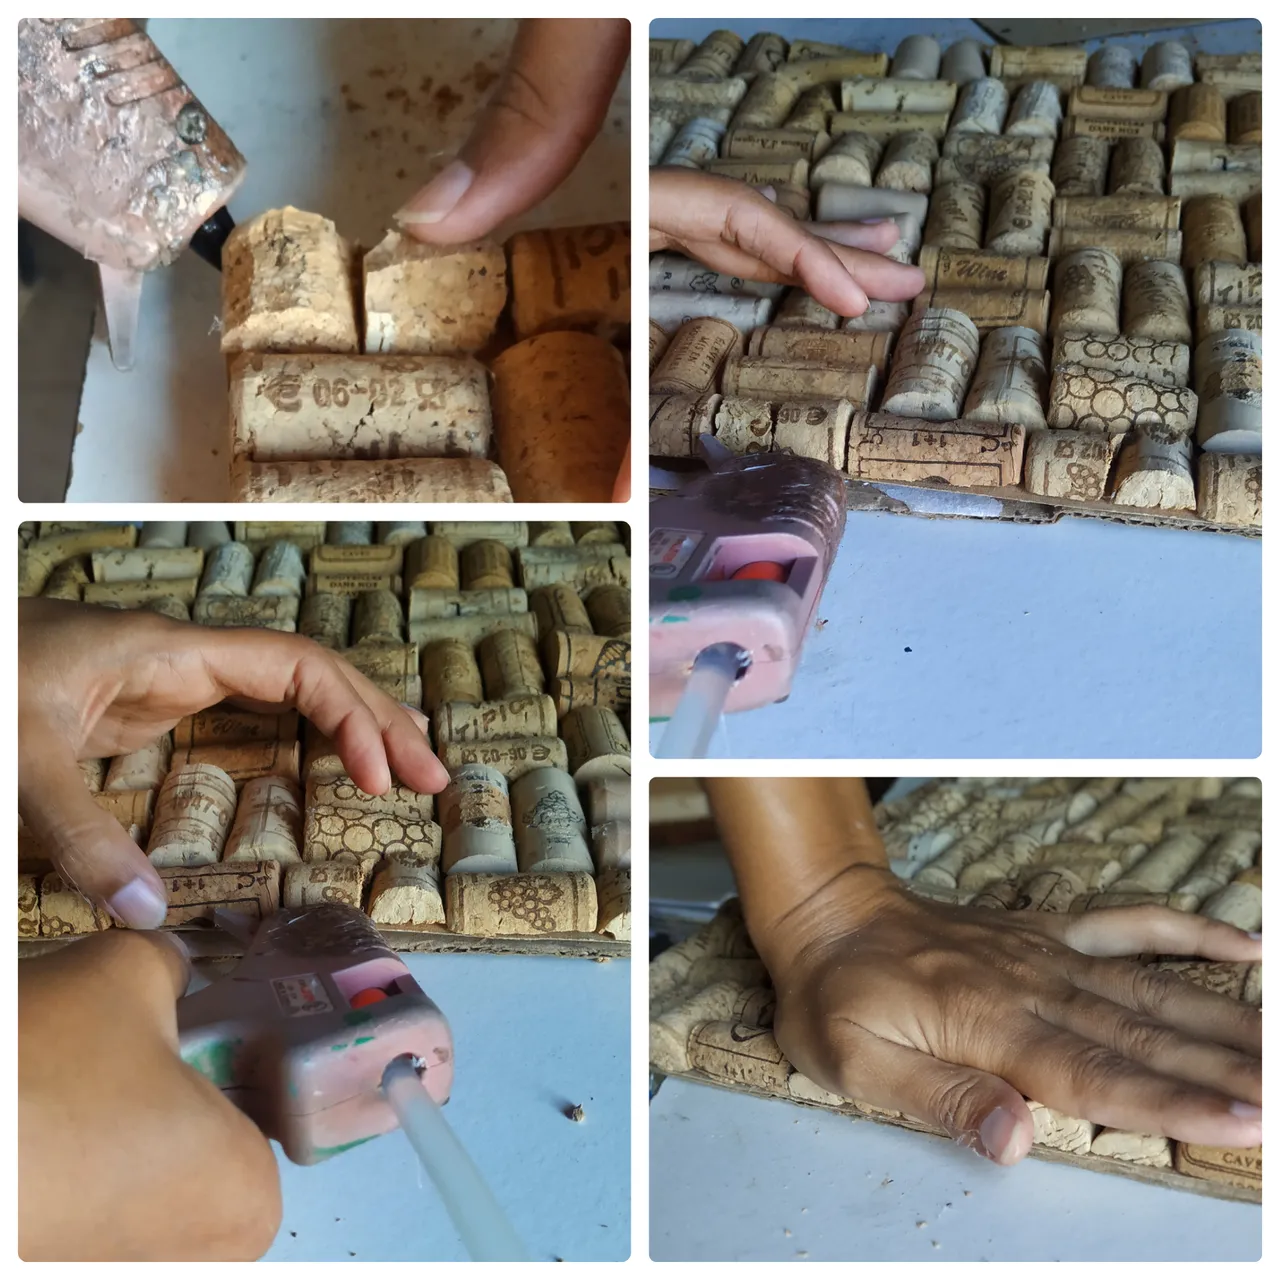
Cutting the corks I realized that there were some that were made of a different material, they seemed more like plastic, these were the hardest, and the saw as it had small teeth, it slipped on the surface, in these cases I had to use the knife that had the largest teeth and could easily pierce them, and with that opening then you could continue with the hacksaw if you wanted.
So that the cut in half comes out straight, I suggest with the hacksaw to leave the guide lines on the sides as I show in the photo, this allows you to saw with force and that you see that you are going straight and the same tool follows those gaps. In any case, if you get a very uneven cut or the cork breaks, it still works so do not discard them.
As you cut, you must organize them on the cardboard where you are going to stick them, you can also ignore the thin cardboard and stick directly on the strong cardboard or wood which is what will give it support, I did not do it like that because the my strong cardboard was very worn by things that I had to take off and you could see so I covered it, and I did not have a wood.
As a first option I was going to use a white cardboard but I changed it for a brown one so that the spaces between the corks were not noticeable.
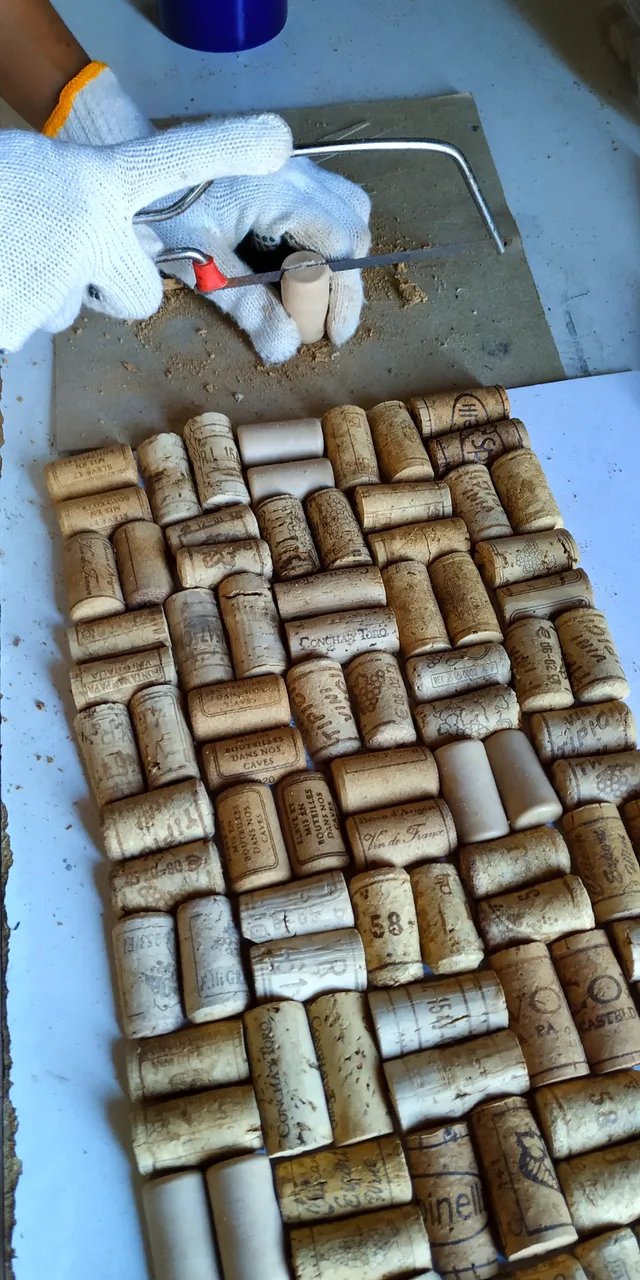
Before you start gluing them, you must place all the corks on the surface to position them properly and that there is as little space as possible between them, sometimes you will have to change some of their position for others until you find that they all fit perfectly and do not protrude too much out of the cardboard; It was honestly a relaxing, entertaining and quick task to do. Like to put together a puzzle.
I didn't start that way because I already had them on the white cardboard and I was pasting on the brown one; In the first line there were empty spaces so I tore some of them out and paste more neatly. So I opted to organize them all on the brown card stock that would fit perfectly. Also at the beginning I was applying white glue with a brush, but it took a long time to adhere because it has a slow drying (it works, you just have to add enough and wait), so I switched to hot silicone and it was much faster.
I was taking each one and applying the silicone (you also have to apply enough), to put it back in its place, and maintain the order in which I had put them. I admit that I got burned several times, so you have to be careful; I couldn't use the gloves because they didn't allow me to grip the corks comfortably.
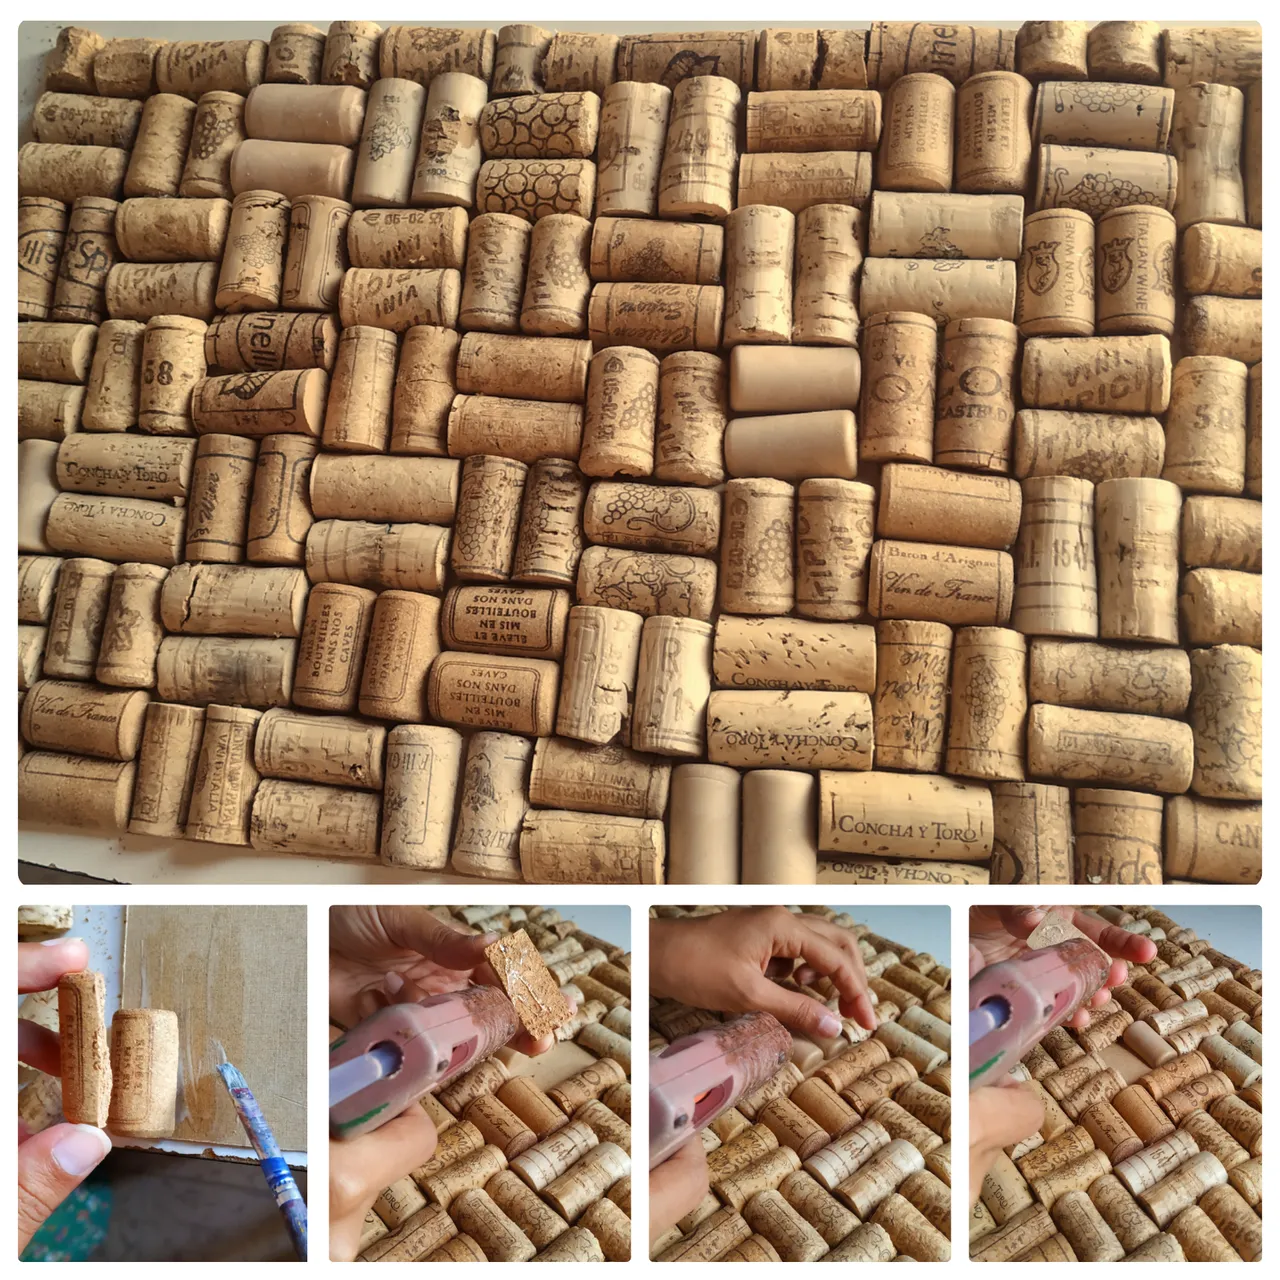
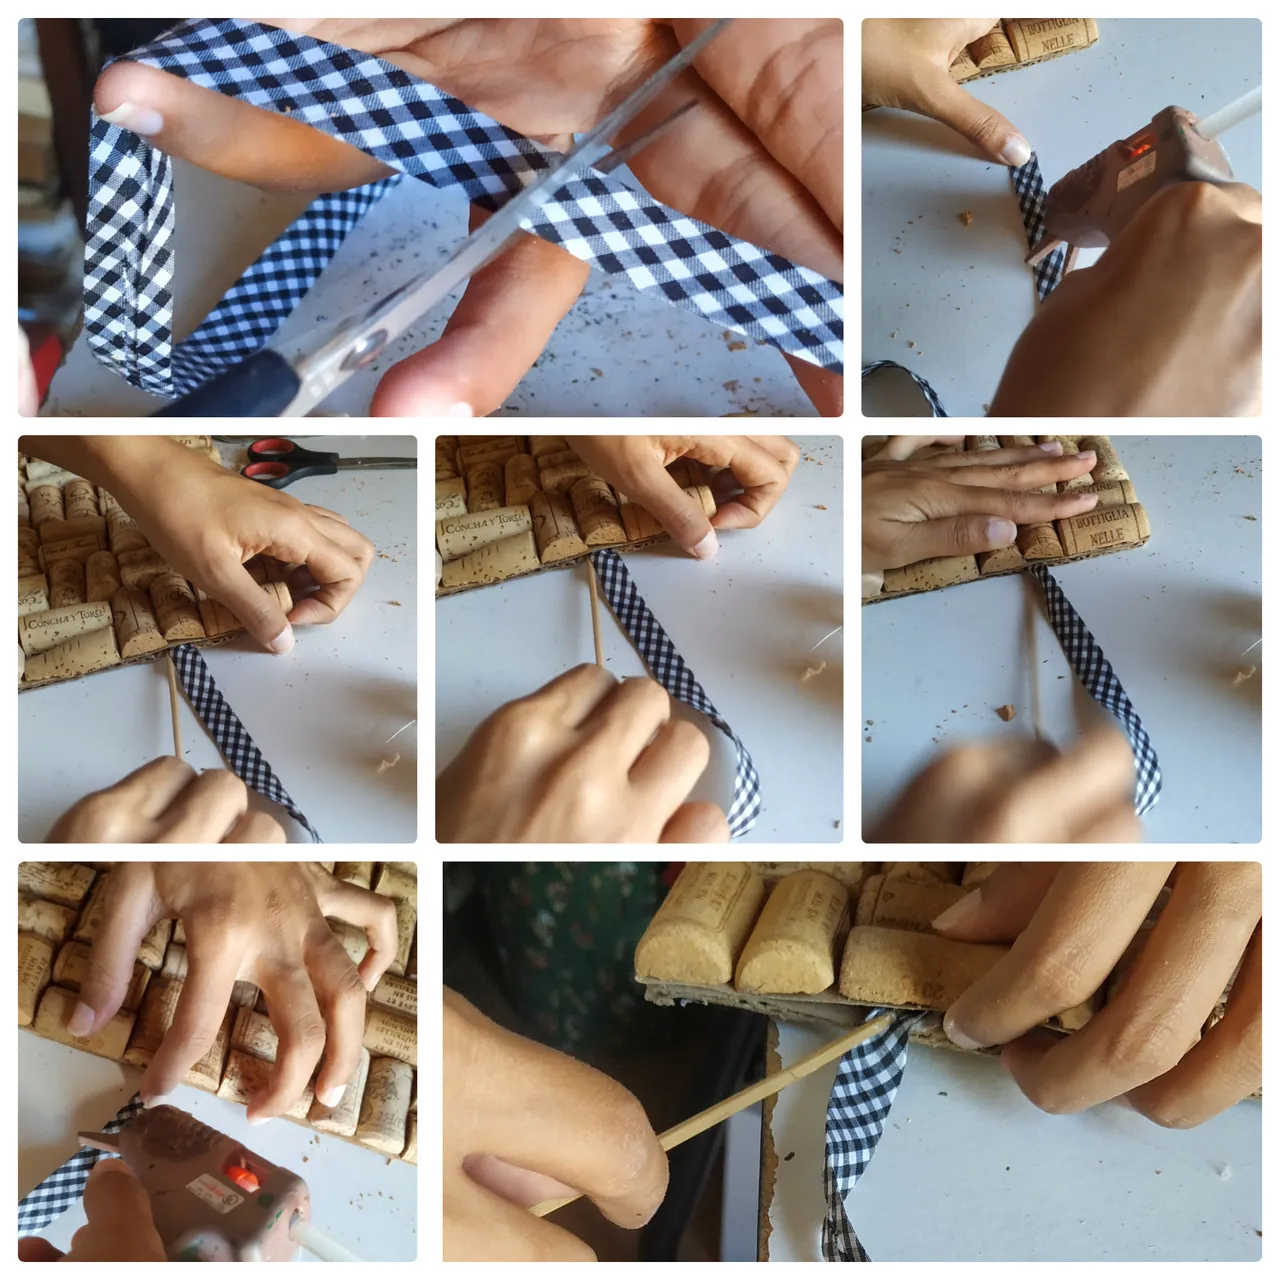
I am new to using hot silicone and it is something that must be worked on quickly, because the drying time is instantaneous and the dispenser gun that I have sometimes melted the silicone and went out a little while I was not using it, so I would quickly grab it so as not to waste the glue. In this process, after gluing all the corks, I immediately glued the thin cardboard where they were, to the thicker cardboard (which gives firmness to the structure). And I completely forgot to put the tape that was located between the cardboards, so I mention this to you so that it does not happen to you.
First I cut the tape to the length that I thought was necessary, you have to leave enough rope at each end that will go between the cardboards, this allows it to be better fixed because it will be more of the surface of the tape with glue. After adding the silicone to one end, I proceeded to insert it where it was going with the help of a skewer stick, and then I did the same with the other end. It was not complicated but it would have been easier to first glue the tape when the cardboard was still not attached to anything. And I could have squared the string better, achieved a better finish.
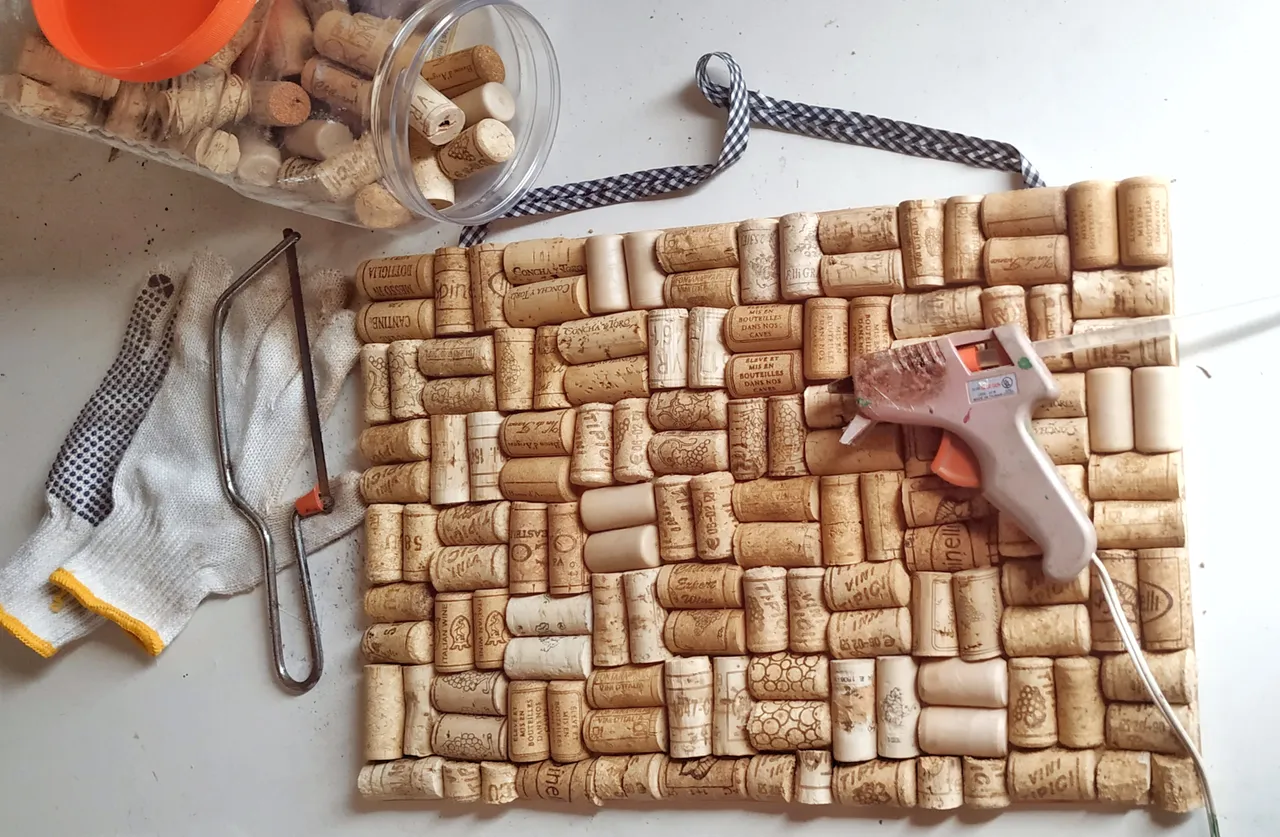
Result
And so the finished project is.
Right away I went to add my notes and important things so you can see it personalized. I am going to use it as an organizer, I will hang there reminders of my goals, notes from my mother's treatment, projects in Hive, among other personal things. I have it hanging in my room.
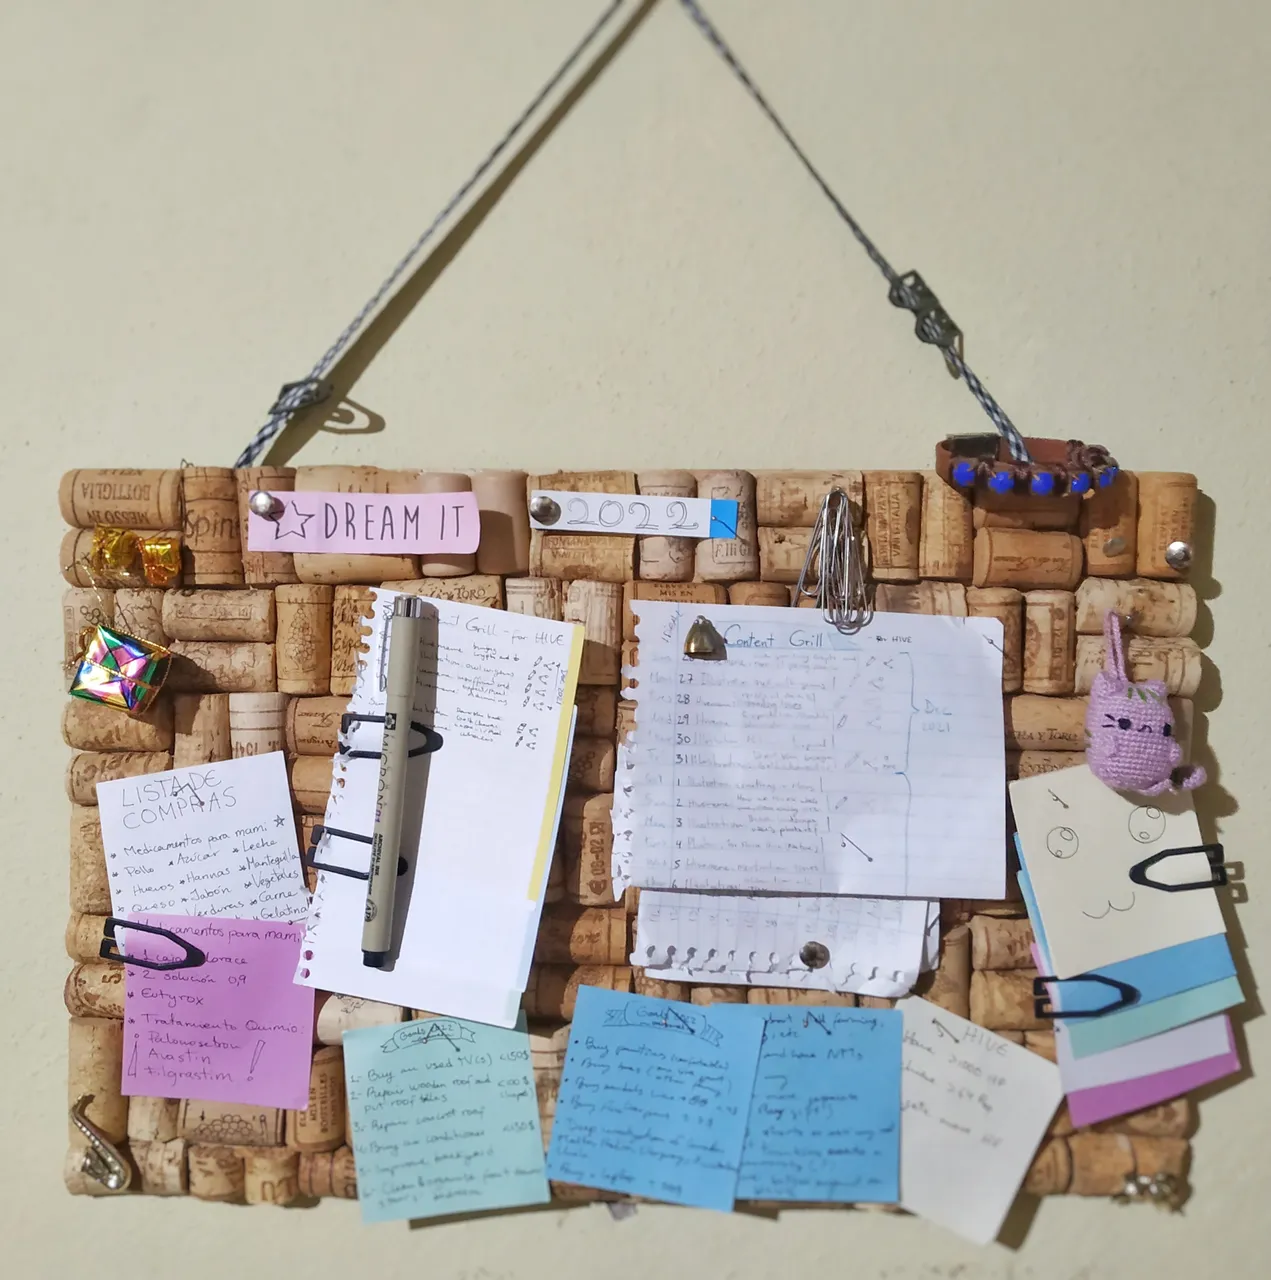
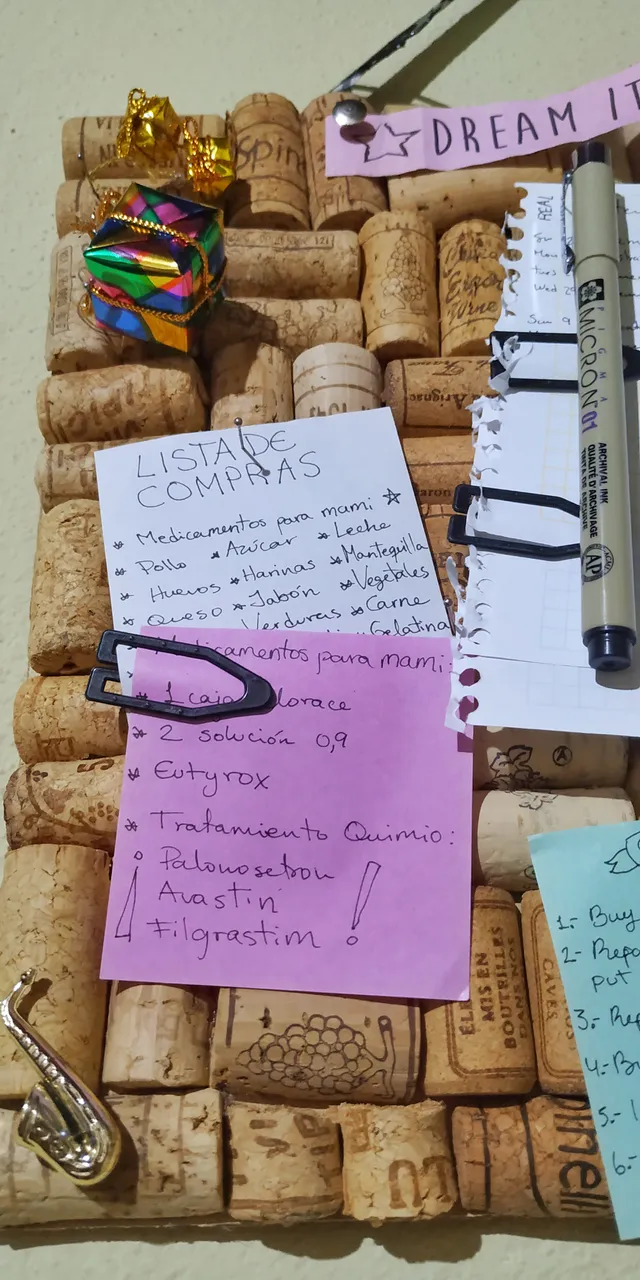
You can see I already put up a market list. My mom's medicines and her chemo.
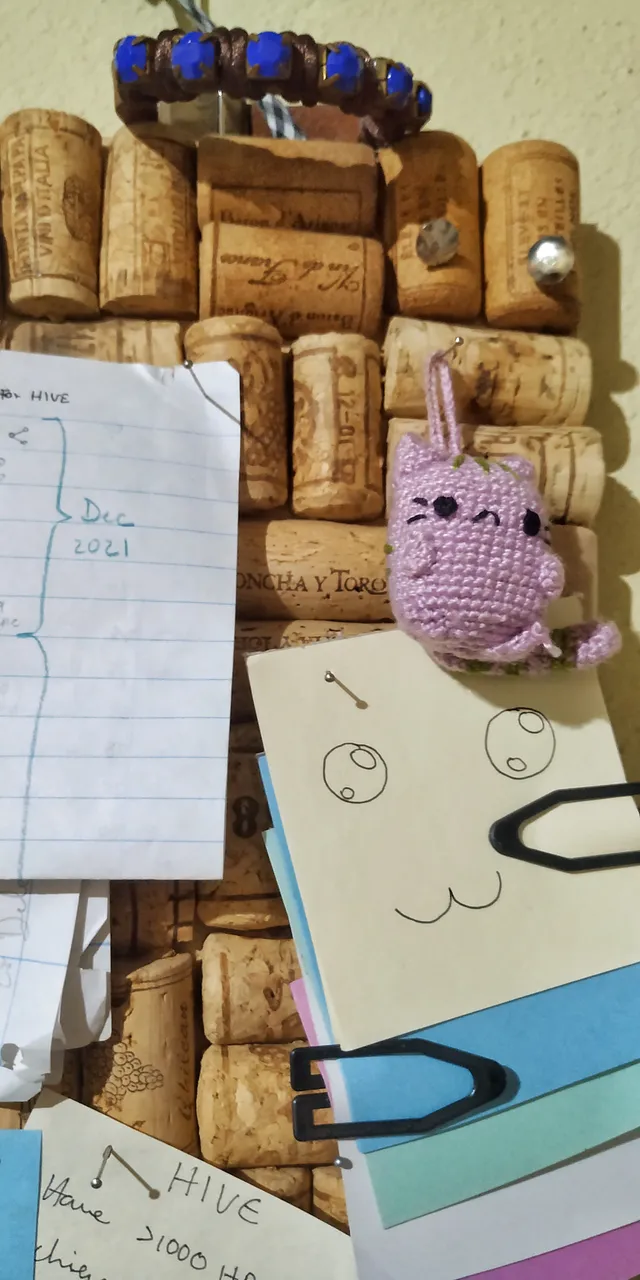
Among the decorations is the amigurumi that my mother gave me for my birthday in 2021, I have other of the first ones when she was practicing, so there are still things that I am going to add and organize better.
This project is very versatile, you can do it with the shape you like, a geometric figure, the silhouette of an animal or objects, etc. And corks can be cut in many other ways, this is one option among many. Also there are places where sell cork sheets, but my idea was to give a second use to something that you can collect and recycle.
That was it, this first part I wanted to leave the board fully functional until finished, because the next part will consist of how to add a frame, a back support with pallets so that it does not bend in the middle, because the cardboard has a fold and see if it lasts over time. I don't think it's soon because I need to gather the materials, this section of crafts takes time. I hope it has inspired you and is useful to you.
Thank you very much to see! Leave me your opinion in the comments ^^.
News section
Remember that I receive requests to illustrate whoever you want, click here for more details ✅😊.
You can follow me on My Twitter where I promote Hive with my art.
All these photos and designs / drawings belong to me, please do not reproduce or distribute for personal or commercial use without my permission.
Hola Hivers~
Hoy les traigo mi primer número de una sección que hace mucho que quería comenzar en mi blog: manualidades.
Siempre me ha gustado mucho hacer mis propias cosas y sobretodo reciclar, es algo que tengo muy en claro desde la adolescencia, es una buena forma de ahorrar y usar materiales que ya tenemos en casa, además ayuda un poco a disminuir los desechos altamente contaminantes que a diario van a parar al medioambiente y afectan gravemente a todos los seres vivos, incluyéndonos.
Sé que es una ayuda mínima pero es mi forma de reducir mi impacto ambiental.
📑Un poco de descripción: Las manualidades que les vaya a compartir voy a tratar que cumplan algunas características que me parecen fundamentales:
- Deben ser con materiales de reciclaje, en parte o en su totalidad.
- Funcionales y bien hechas.
Eso sería en resumen lo que va a ser este tema en mi blog.
En este primer episodio les comparto una idea que personalmente me gustó mucho y que creo que también les puede gustar y servir, es un tablero de corchos en el cual puedes colgar apuntes importantes, fotos, llaves o lo que gustes y es tanto decorativo (puede ser un pequeño rincón de decoración), como funcional y servirte para organizarte y colocar ahí todo lo que debas tener presente y a la vista para no olvidarlo, solo debes colgarlo en un buen lugar.
A continuación les voy a mostrar cómo hice la parte I de esta manualidad, también les voy a hablar un poco de recomendaciones y mi experiencia con este DIY (do it yourself).
Materiales:
- 65 Corchos
- 1 cuerda con el largo y diseño de tu preferencia
- Cartulina marrón 43cmx28cm
- Cartón 43cmx28cm
- Segueta o cuchillo de serrucho
- Tijeras
- Guantes de jardinería
- Pega blanca o silicón frío/caliente
Paso a paso
Lo primero que empecé a hacer fue cortar todos los corchos necesarios para cubrir la superficie de la cartulina tamaño tabloide, y fueron exactamente 65 corchos picados a la mitad para hacer el diseño que más me llamó la atención.
Me tomó varias horas que dividí en dos días por motivos de salud, porque es una tarea que requiere algo de fuerza física. Algunos corchos son más duros que otros.
Ésta es la parte que más tarda de todo el proceso. Para que sea más fácil recomiendo usar una pequeña sierra (o cuchillo de serrucho) cómoda de agarrar y unos guantes que te protejan, esto te dará la seguridad de agarrar el corcho con firmeza y cortarlo con la sierra aplicando bastante fuerza. Con los guantes vas a poder sujetar el corcho de la mejor forma y evitarás accidentes.
Al principio no los estaba usando y estuve muy cerca de lastimarme, incluso teniendo cuidado. Así que fui por ellos y fue todo más cómodo 🧤.
Acá les muestro dos formas en las que pueden ir cortando el corcho: una es serruchándolo desde arriba hacia abajo y la otra desde abajo hacia arriba, como les mencioné, con los guantes puedes hacer esto de forma segura.
Cortando los corchos me di cuenta que había unos que eran de un material diferente, parecían más como un plástico, estos eran los más duros, y la sierra como era de dientes pequeños, se resbalaba por la superficie, en estos casos tenía que usar el cuchillo que tenía los dientes más grandes y los atravesaba fácilmente, y con esa abertura ya luego si podía continuar con la segueta si quería.
Para que el corte por la mitad salga derecho, sugiero con la segueta ir dejando por los lados las líneas de guía como muestro en la foto, esto te permite serruchar con fuerza y que vayas viendo que vas recto y la misma herramienta va siguiendo esos canales. De todos modos si sale un corte muy disparejo o se te rompe el corcho, igualmente sirve así que no los descartes.
A medida que vas cortando, debes ir organizándolos sobre la cartulina donde los vas a pegar, también puedes obviar la cartulina y pegar directamente sobre el cartón o madera que es lo que le va a dar soporte, yo no lo hice así porque el cartón estaba muy desgastado por cosas que le tuve que despegar y se podían ver, y no tenía una madera.
Como primera opción iba a usar una cartulina blanca pero la cambié por una marrón para que no se notase mucho los espacios que quedaran entre los corchos.
Antes de empezar a pegarlos debes colocar todos los corchos sobre la superficie para ubicarlos adecuadamente y que haya el menor espacio posible entre ellos, a veces vas a tener que cambiar algunos de su posición por otros hasta dar con que todos cuadren perfectamente y que no sobresalgan demasiado de la cartulina; sinceramente fue una tarea relajante, entretenida y rápida de hacer. Como armar un rompecabezas.
Yo no empecé así porque ya los tenía sobre la cartulina blanca e iba pegando en la marrón; en la primera línea quedaron espacios vacíos por lo que arranqué algunos y volví a pegar más ordenadamente. Así que opté por organizarlos todos en la cartulina marrón que encajaran perfectamente. También al principio estaba aplicando pega blanca con un pincel, pero tardaba mucho tiempo en adherirse porque tiene un secado lento (si funciona, solo hay que agregar suficiente), así que cambié a silicón caliente y fue mucho más rápido.
Iba tomando cada uno y aplicando el silicón (también hay que aplicar suficiente), para volverlo a poner en su sitio, y mantener el orden en que los había puesto. Admito que me quemé varias veces, así que hay que tener cuidado; no podía usar los guantes porque no me permitían agarrar los corchos cómodamente.
Soy nueva usando el silicón caliente y es algo que se debe trabajar rápidamente, porque el tiempo de secado es instantáneo y la pistola dispensadora que tengo a veces iba derritiendo el silicón e iba botando un poco mientras no la usaba, entonces iba rápidamente agarrarla para no desaprovechar la pega. En este proceso luego de pegar todos los corchos, pegué enseguida la cartulina donde estaban, al cartón (lo que le da firmeza a la estructura). Y olvidé por completo colocar la cinta que iba ubicada entre el cartón y la cartulina, así que les menciono esto para que no les pase.
Primero corté la cinta del largo que me pareció necesario, hay que dejar suficiente cuerda a cada extremo que va a ir entre la cartulina y el cartón, esto permite que esté mejor fijado porque será más superficie de la cinta con pega. Luego de agregarle el silicón en un extremo, procedí a introducirlo donde iba con la ayuda de un palillo, y luego hice lo mismo con el otro extremo. No fue complicado pero hubiese sido más fácil primero pegar la cinta cuando todavía el cartón no estaba unido a nada. Y hubiese podido cuadrar mejor la cuerda, lograr un mejor acabado.
Resultado
Y así queda el proyecto terminado.
Enseguida fui a agregarle mis notas y cosas importantes para que puedan verlo personalizado. Yo lo voy a usar como un organizador, colgaré allí recordatorios de mis metas, notas del tratamiento de mi mamá, proyectos en Hive, entre otras cosas personales. Lo tengo colgado en mi cuarto.
Pueden ver que ya puse una lista de mercado. Medicinas de mi mamá y su quimio.
Entre los adornos está el amigurumi que mi mamá me regaló para mi cumpleaños en 2021, tengo otros de los primeros cuando estaba practicando, así que todavía hay cosas que le voy a añadir y organizar mejor.
Este proyecto es muy versátil, puedes hacerlo con la forma que gustes, una figura geométrica, la silueta de un animal u objetos, etc. Y los corchos se pueden cortar de muchas otras formas, esta es una opción entre muchas. También venden los pliegos de corcho, pero mi idea era darle un segundo uso a algo que puedes ir reuniendo y reciclar.
Eso fue todo, esta primera parte quería dejarla hasta terminado el tablero totalmente funcional, porque la siguiente parte va a consistir en como agregarle un marco, un soporte atrás con paletas para que no se doble en el medio, porque el cartón tiene un doblez y ver si perdura en el tiempo. No creo que sea pronto porque necesito reunir los materiales, esta sección de manualidades toman tiempo. Espero les haya inspirado y les sea de utilidad.
¡Muchas gracias por ver! Déjame tu opinión en los comentarios ^^.
Sección de noticias
Recuerde que recibo solicitudes para ilustrar a quien desee, Haga clic aquí para más detalles ✅😊.
Puedes seguirme en Mi Twitter donde promuevo Hive a través de mi arte.
Todas estas fotos y diseños / dibujos me pertenecen, no reproduzca ni distribuya para uso personal o comercial sin mi permiso.