¡Hola gente!
Participando por segunda vez en uno de los concursos de la gran y creativa comunidad HiveDiy. Esta vez nos invitan a regalar una tarjeta a un hiver. Hay muchos usuarios en la plataforma a los que sigo y me gusta lo que hacen, pero cuando estaba leyendo los criterios del concurso, me vino a la mente una usuaria a la que admiro y valoro lo que hace, su perseverancia y las ganas y disposición que tiene de aprender para aportar contenido de valor a Hive son las razones para regalar esta tarjeta hecha con mis manitas y corazón a Sarix.
Hello people!
Participating for the second time in one of the contests run by the great and creative HiveDiy community. This time we are invited to give a card to a hiver. There are many users on the platform that I follow and I like what they do, but when I was reading the contest criteria, a user came to my mind that I admire and value what she does, her perseverance and the desire and willingness she has to learn in order to bring valuable content to Hive are the reasons to give this card made with my little hands and heart to Sarix.
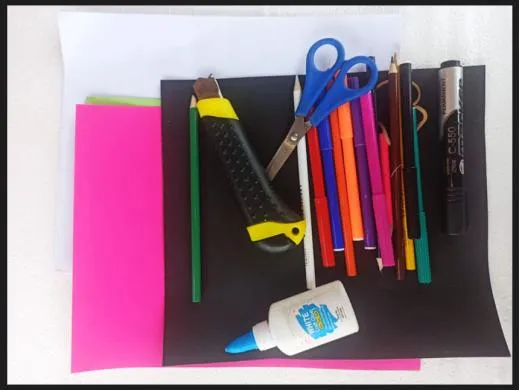
💌 Cartulina negra
💌 Cartulina fucsia
💌 Cartulina verde
💌 Hojas blancas
💌 Marcadores
💌 Colores
💌 Pega
💌 Tijera
💌 Cutter
💌 Silicona
💌 Regla
💌 Black cardboard
💌 Fuchsia card stock
💌 Green cardboard
💌 White sheets
💌 Markers
💌 Colors
💌 Glue
💌 Scissors
💌 Cutter
💌 Silicone
💌 Ruler
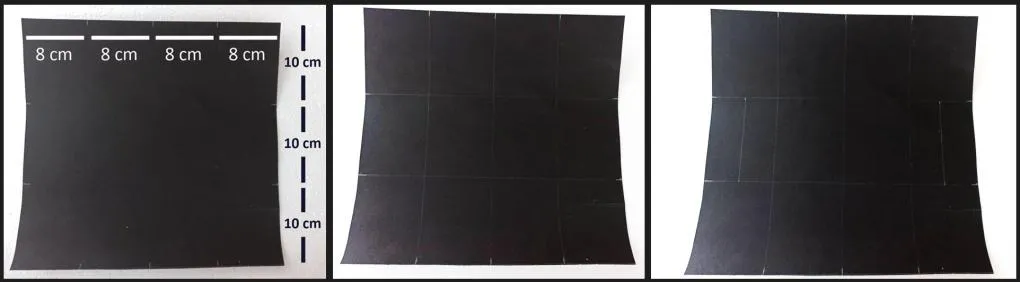
💌 Para la elaboración de esta tarjeta utilicé una cartulina negra de 32 cm x 30 cm. Puedes usar tu color de preferencia
💌 I used a 32 cm x 30 cm black cardstock to make this card. You can use your favorite color


💌 Hago las marcas para dividir y trazar de la siguiente manera :
La parte horizontal, que es de 32 cm, la divido en 4 partes iguales, es decir, 8 cm cada cuadrado. 8 cm x 8 cm x 8 cm x 8 cm x 8 cm.
La parte vertical, que mide 30 cm, la divido en 3 partes iguales, es decir, 10 cm cada cuadrado. 10 cm x 10 cm x 10 cm x 10 cm.
En la segunda fila, el primer y el último cuadrado se dividirán en dos, es decir, 2,5 cm.
💌 We make the marks to divide and trace as follows :
The horizontal part, which is 32 cm, I divide it into 4 equal parts, i.e. 8 cm each square. 8 cm x 8 cm x 8 cm x 8 cm x 8 cm.
The vertical part, which is 30 cm, I divide it into 3 equal parts, i.e. 10 cm each square. 10 cm x 10 cm x 10 cm x 10 cm.
In the second row, the first and last square will be divided in two, i.e., 2.5 cm.
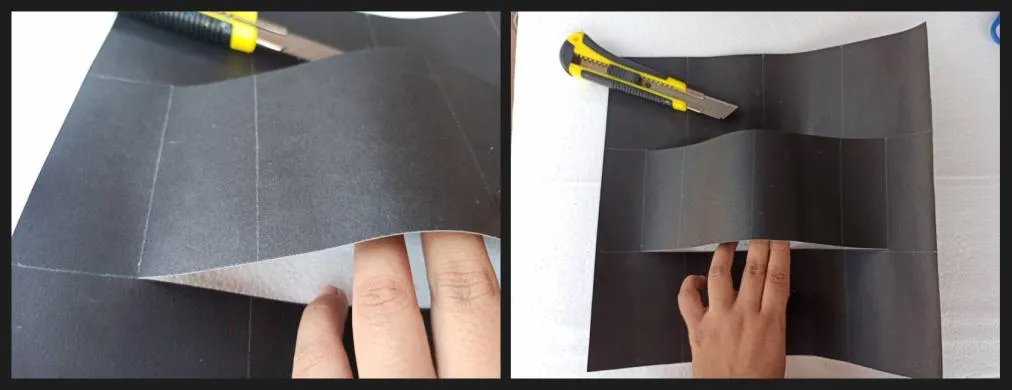
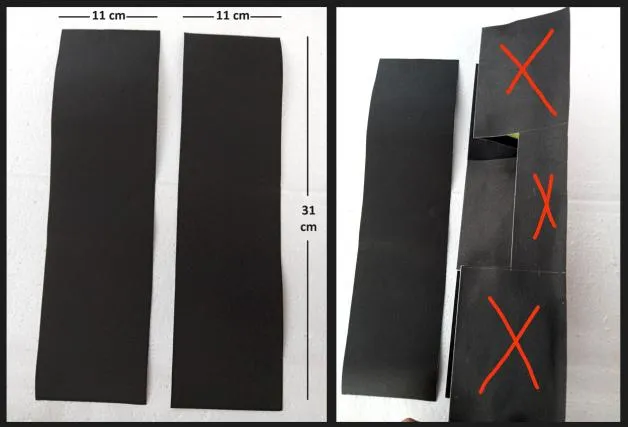
💌 Hago dos cortes hasta las medidas que hicimos en el paso anterior. Ver imagen
💌 I make two cuts up to the measurements we made in the previous step. See image
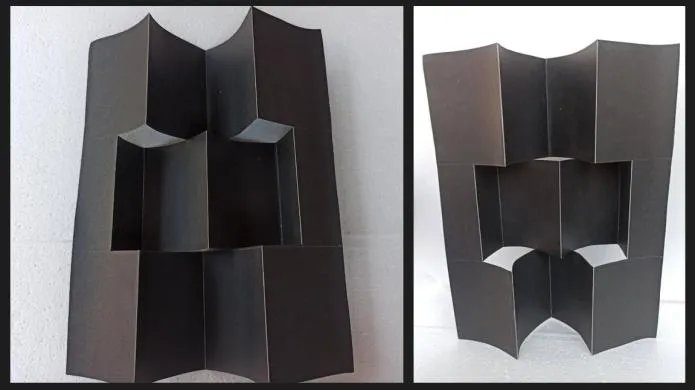
💌 Doblo en todas las líneas trazadas de la siguiente manera:
En forma de acordeón vamos a hacer los pliegues de la primera fila. El primer trazo hacemos el pliegue hacia arriba, el siguiente hacia abajo y el tercero el pliegue hacia arriba.
La fila del medio, empezamos a hacer el pliegue en el primer trazo que es de 2,5 cm. lo doblamos hacia arriba, el siguiente hacia abajo, el tercero hacia arriba y el último hacia abajo.
- La tercera y última fila el mismo procedimiento que la primera.
Si te fijas en la imagen te darás cuenta de que cada fila está intercalada.
Ahora ya tengo lista la base de la tarjeta
💌 I fold in all the traced lines as follows:
In the form of an accordion we are going to make the folds of the first row. The first stroke we make the fold upwards, the next one downwards and the third one the fold upwards.
The middle row, we start making the fold in the first stroke which is 2.5 cm. we fold it upwards, the next one downwards, the third one upwards and the last one downwards.
- The third and last row the same procedure as the first one.
If you look at the image you will notice that each row is interleaved.
Now I have the card base ready
Hago las tapas de las portadas. Corto dos cartulinas de 11 cm x 31 cm. Pego en la parte superior e inferior, colocando pega solo en las partes donde indico en la imagen.
I make the covers of the covers. I cut two pieces of cardboard 11 cm x 31 cm. I glue on the top and bottom, placing glue only in the parts where I indicate in the image.
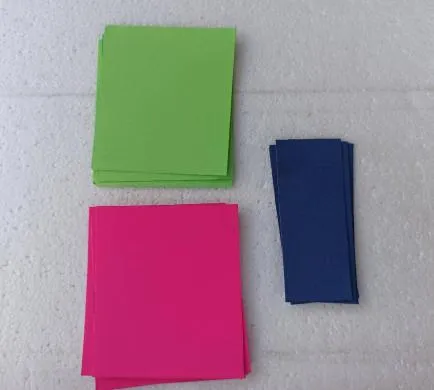
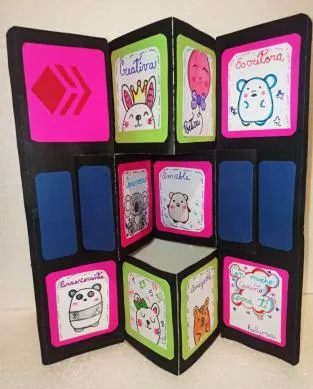
💌Para empezar a decorar la parte interior de la tarjeta, realice diez cuadros de 7 cm x 9 cm (6 fucsias, 4 verdes) y cuatro cuadros de 7 cm x 2 cm (azules)
💌To start decorating the inside of the card, make ten 7 cm x 9 cm squares (6 fuchsia, 4 green) and four 7 cm x 2 cm squares (blue). .
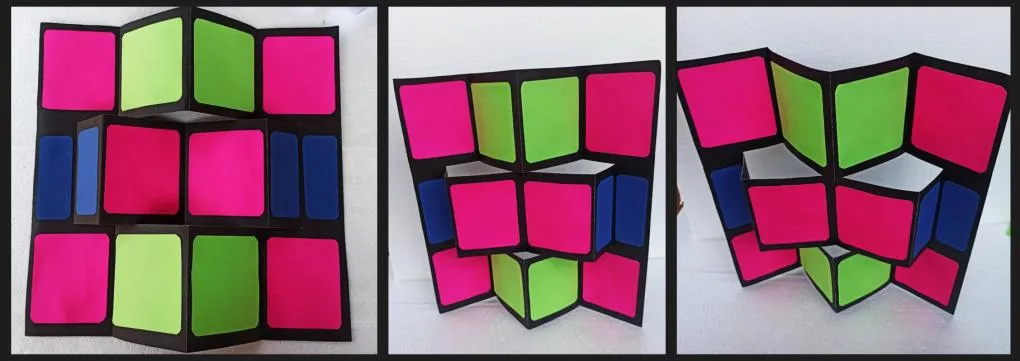
💌Los he pegado sobre la base negra, jugando con las posiciones de los cuadrados.
Puedes usar los colores que prefieras y colocarlos como quieras.
💌I glued them on the black base, playing with the positions of the squares.
You can use whatever colors you prefer and position them as you like
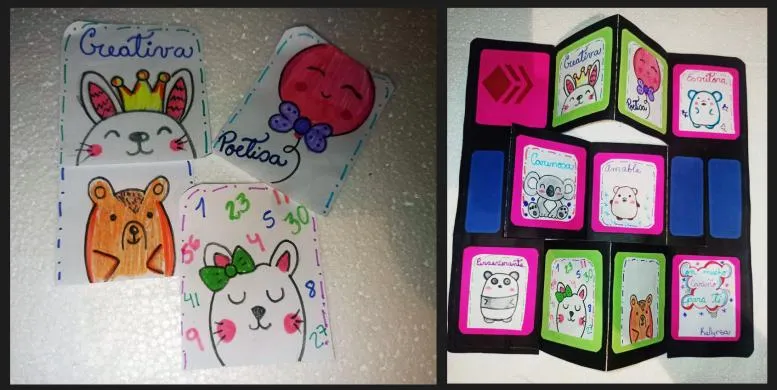
💌 Luego en hojas blancas hice unos dibujos acompañados de una palabra y los pegué sobre los cuadrados de color, colocándolos a mi gusto. Los cuadrados para estos dibujos son de 6 cm por 8 cm.
- Este paso utiliza mucha creatividad, puedes imprimir los dibujos, las palabras o hacerlos a mano como hice yo, colocando escritos que caractericen a la persona que le voy a regalar la tarjeta.
Ya tengo lista la parte interna de la tarjeta
💌 Then on white sheets I made some drawings accompanied by a word and glued them on the colored squares, positioning them to my liking. The squares for these drawings are 6 cm by 8 cm.
- This step uses a lot of creativity, you can print the drawings, words or make them by hand as I did, placing writings that characterize the person that I will give the card.
I have ready the inner part of the card
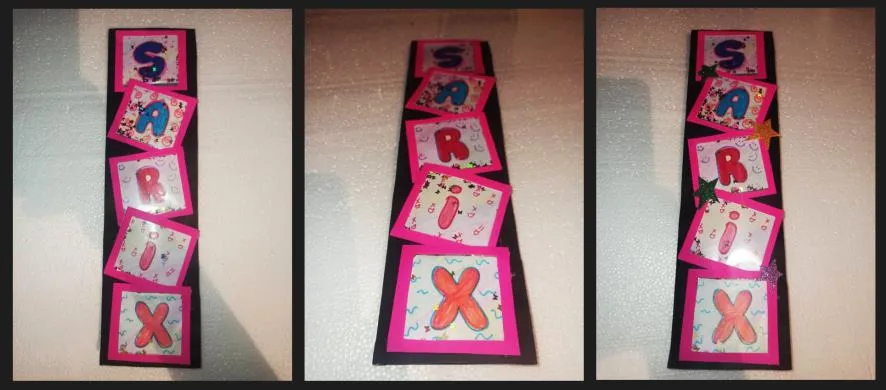
💌 Continúo con la parte exterior de la tarjeta, en este caso la cubierta. Esto fue un poco complicado, no el procedimiento como tal, sino decidir qué hacer. Este fue el resultado:
- Sobres transparentes donde vienen los CD's, si no los tienes, puedes usar cualquier bolsa de plástico, pero tiene que ser resistente. Las bolsas que usan para el hielo no
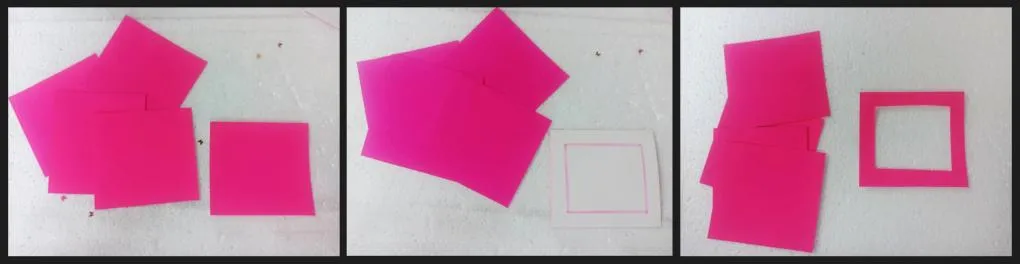
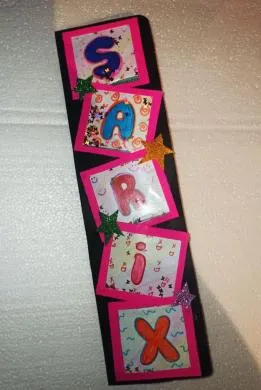
- Recorta unos cuadrados de 6 cm x 5 cm. En cada cuadrado coloqué una letra del nombre de la persona a la que le regalaré la tarjeta. Coloree a mi gusto usando marcadores y colores.
💌 I continue with the outer part of the card, in this case the cover. This was a bit complicated, not the procedure as such, but deciding what to do. This was the result
- Transparent envelopes where the CD's come, if you don't have them, you can use any plastic bag, but it has to be resistant. The bags they use for ice do not
- Cut out some squares of 6 cm x 5 cm. In each square I placed a letter of the name of the person I will give the card to. Color to my liking using markers and colors.

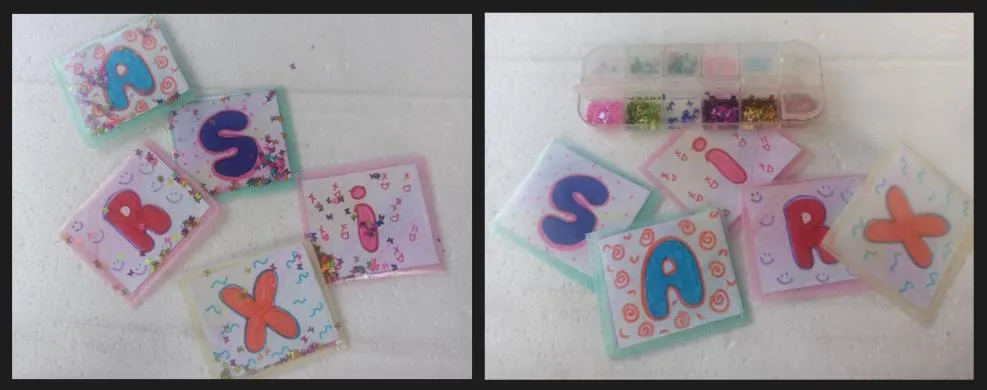
- Una vez que las cartas estuvieron listas, las metí en los sobres que hice con el plástico del CD. Sellé las aperturas con pegamento, dejando sólo una abierta para poner purpurina o incrustaciones que se usan para decorar las uñas. Lo cerré completamente, ¡me gustó mucho esta idea!
- Once the letters were ready, I put them into the envelopes I made with the CD plastic. I sealed the openings with adhesive, leaving only one open to put glitter or inlays that are used to decorate nails. I closed it completely, I really liked this idea!
- Con las letras listas, procedo a hacer un marco con cartulina. Recorto cinco cuadrados de 6 cm x 5 cm, que es el número de letras que tiene el nombre, luego hago un margen de 0,5 cm de separación, paso el cúter por las líneas dibujadas para quitar el centro y ya tenemos el marco.
- With the letters ready, I proceed to make a frame with cardboard. I cut out five squares of 6 cm x 5 cm, which is the number of letters that the name has, then I make a margin of 0.5 cm of separation, I pass the cutter along the lines drawn to remove the center and we have the frame.
- Pego los marcos a cada letra
- I glue the frames to each letter
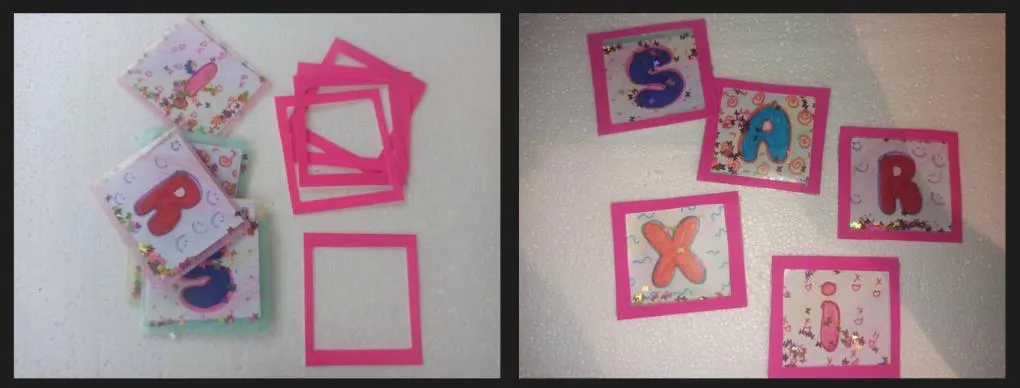
- Finalmente, pego las letras en la parte delantera de la tarjeta, adicional coloco unas estrellas hechas en foamy escarchado.
- Finally, I glue the letters on the front of the card, additional stars made in frosted foamy.

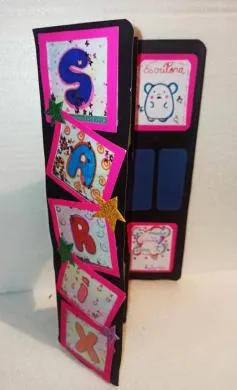
💌 Tengo lista la tarjeta, ¿ qué te parecio? Te animas a hacerla?
💌 I have the card ready, what did you think? Would you like to make it?
 |  |
|---|
 |  |
|---|
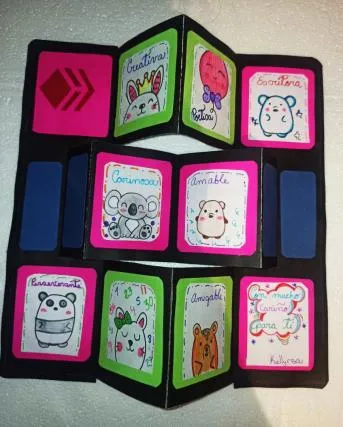
Cada una de las etiquetas que puse en la tarjeta es porque definen a Sarix, una poeta y escritora que pone su corazón, creatividad y pasión en cada escrito. Perseverante que busca aprender y mejorar cada vez un poco más para aportar contenidos de calidad a la plataforma. Amable, simpática que produce cierta ternura. En una de las fotos coloqué números, una de las cosas que me llamó la atención es ver como lleva un control de todo lo que hace en la plataforma, lleva un control de cada programa que participa, cada poesía, contenido de bisutería están enumeradas, esto me hace pensar que es una persona ordenada.
Sarix, esta tarjeta es para ti, espero que te guste, ¡seguro que sí!
Aprovecho para invitar a @davidpena21 a participar en los próximos concursos, ya que para este no tendrá oportunidad ja, ja, he visto algunas de tus manualidades, seguro que estarás atento a la próxima iniciativa de esta comunidad.
Each of the tags I put on the card is because they define Sarix, a poet and writer who puts her heart, creativity and passion in each writing. Persevering who seeks to learn and improve every time a little more to bring quality content to the platform. Kind, friendly that produces a certain tenderness. In one of the pictures I placed numbers, one of the things that caught my attention is to see how he keeps track of everything he does on the platform, he keeps track of each program that participates, each poetry, jewelry is listed, this makes me think that he is an orderly person.
Sarix, this card is for you, I hope you like it, I'm sure you will!
I take this opportunity to invite @davidpena21 to participate in the next contests, since for this one he won't have a chance ha, ha, I have seen some of your crafts, I'm sure you will be attentive to the next initiative of this community.

Fotografías de mi propiedad tomadas con el celular Redmi note 8 pro, editadas en canva
Traducción realizada con la versión gratuita del
traductor DeepL
Todos los diseños fueron creados en canva
Fotografías de mi propiedad tomadas con el celular Redmi note 8 pro, editadas en canva
Traducción realizada con la versión gratuita del
traductor DeepL
Todos los diseños fueron creados en canva