
Hola amigos de esta linda y creativa comunidad ❤️
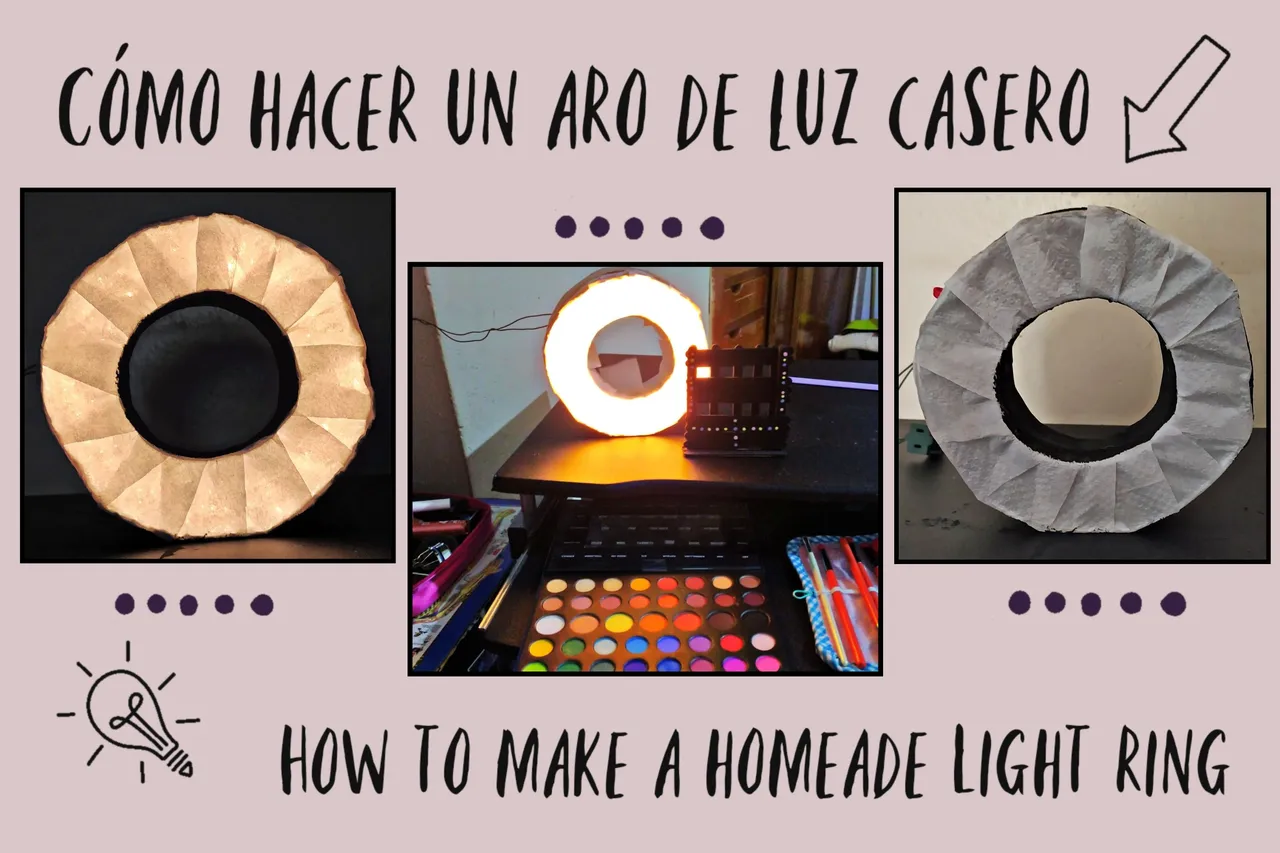
Hoy les traigo un tutorial muy creativo para todas esas personas que les gustaría empezar a grabar vídeos o tomar mejores fotografías pero no tienen los recursos suficientes para comprarse un aro de luz led, de esos que actualmente están de moda y usan los tiktokers, youtubers, entre otros.
Hoy acá en el blog, les traigo un fácil y rápido tutorial para elaborar un aro de luz casero.
Los materiales que necesitaremos son:
- Cartón suave
- Luces de navidad, preferiblemente blancas
- Silicón
- Servilletas
- Engrudo
- Pega escolar
- Papel aluminio
- Tijeras
- Silicón
- Pintura
- Grapadora
- Compás
- Lápiz o marcador
Hello friends of this cute and creative community ❤️
Today I bring you a very creative tutorial for all those people who would like to start recording videos or take better pictures but do not have enough resources to buy a led light ring, one of those that are currently in fashion and used by tiktokers, youtubers, among others.
Today here on the blog, I bring you a quick and easy tutorial to make a homemade ring light.
The materials we will need are:
- Soft cardboard
- Christmas lights, preferably white
- Silicone
- Napkins
- Grease
- School glue
- Aluminum foil
- Scissors
- Silicone
- Paint
- Stapler
- Compass
- Pencil or marker
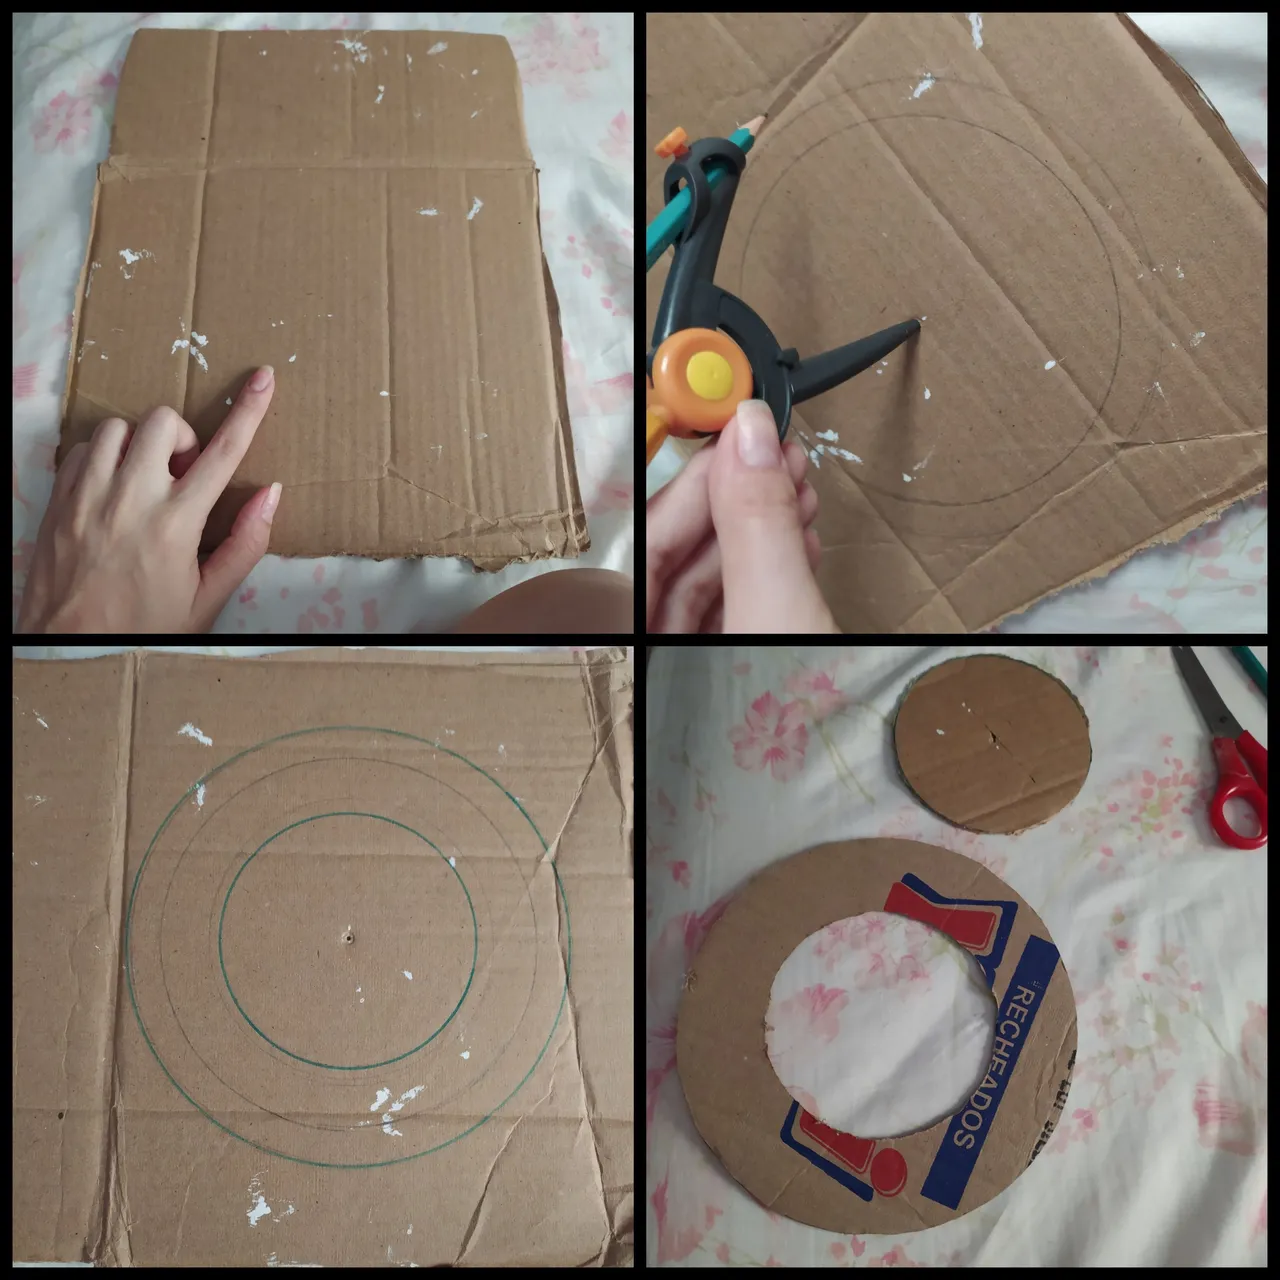
Lo primero que haremos es dibujar con el compás y el marcador o lápiz un círculo del tamaño que queremos nuestro aro, y el grueso, de manera que haremos un círculo adentro.
Ya trazado en el cartón, recortaremos con mucho cuidado.
The first thing we will do is to draw with the compass and the marker or pencil a circle of the size we want our hoop, and the thickness, so that we will make a circle inside.
Once traced on the cardboard, we will cut it out very carefully.
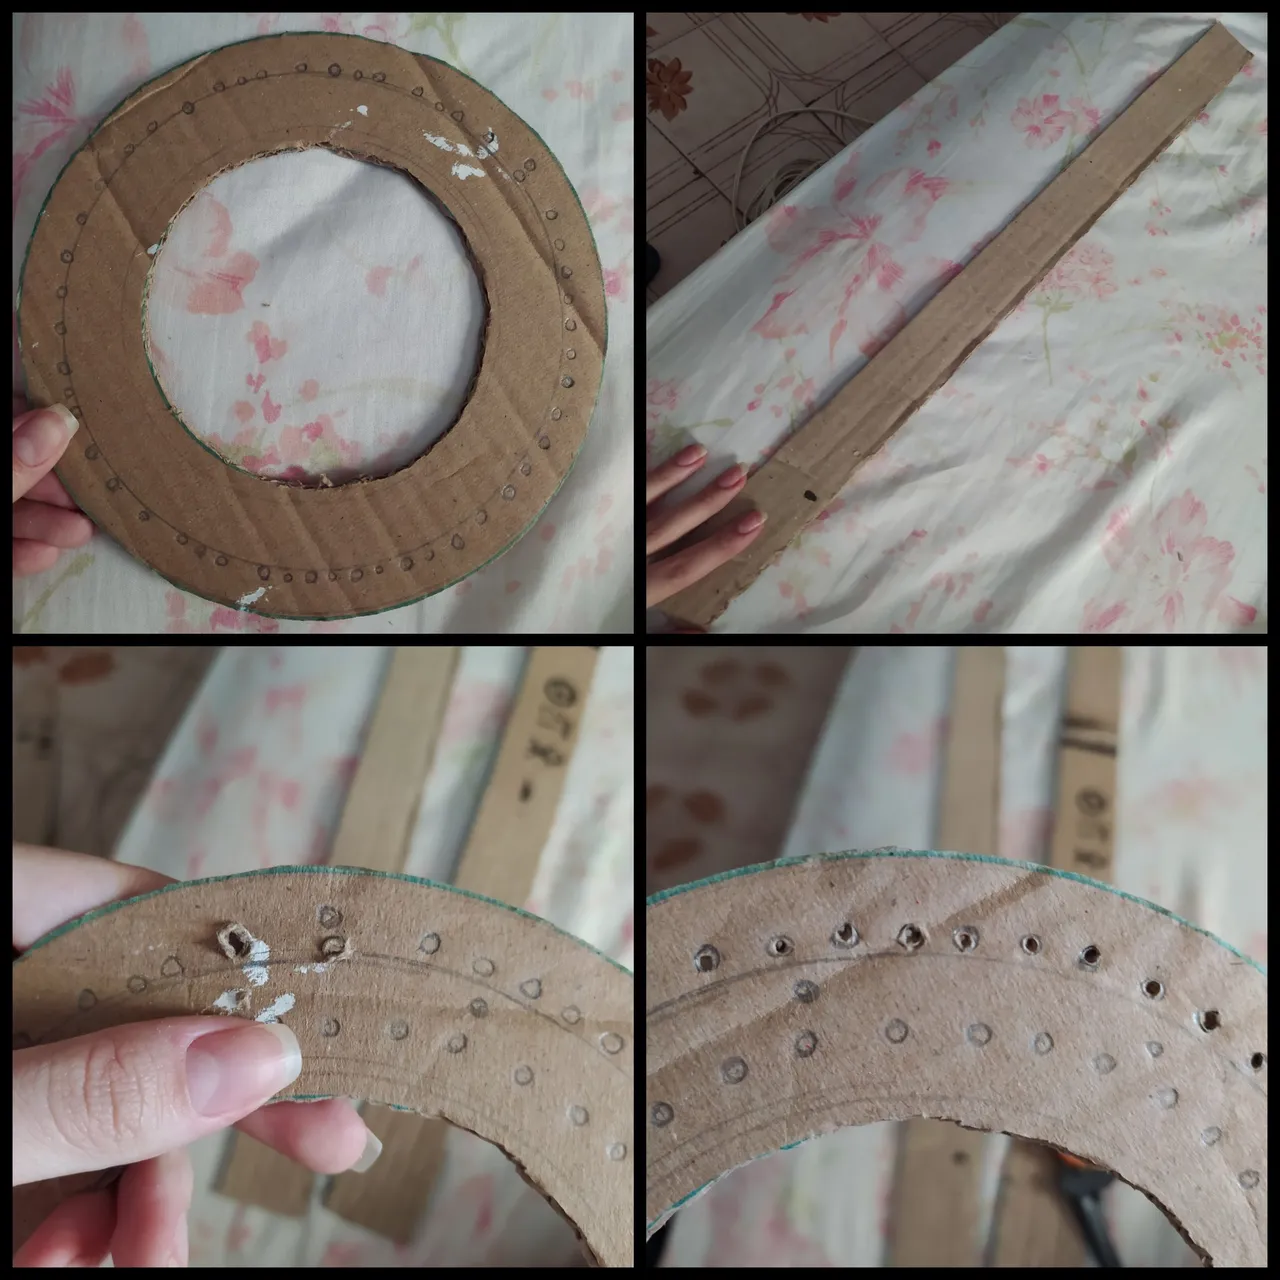
Luego, recortaremos una tira de cartón de unos 12 cm de ancho y el largo dependerá de nuestro aro, debe rodearlo completamente.
Con ayuda del marcador haremos los puntos donde irán bien distribuidas nuestras luces y perforaremos los orificios con un clavo o con la misma punta del compás (en mi caso).
Then, we will cut a strip of cardboard about 12 cm wide and the length will depend on our hoop, it must surround it completely.
With the help of the marker we will make the points where our lights will be well distributed and we will drill the holes with a nail or with the tip of the compass (in my case).
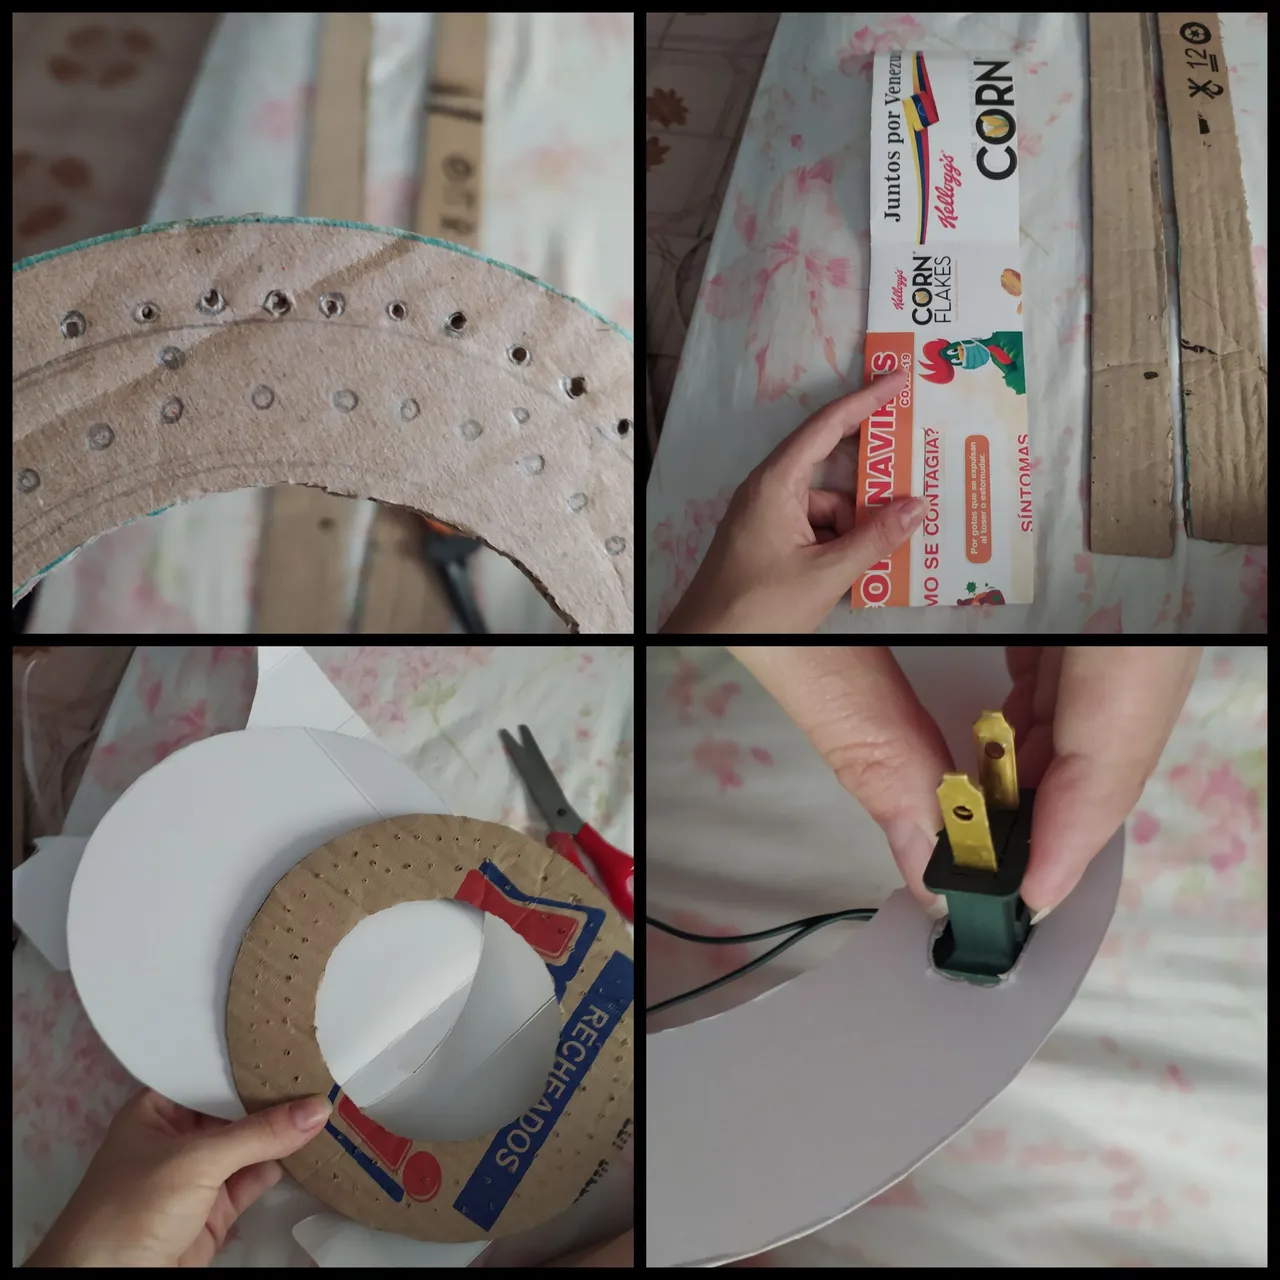
Recortaremos un segundo aro, con un cartón más suave, preferiblemente esos cartones de los cereales para la parte trasera del aro.
También recortaremos otra tira de 15 cm de ancho, pero esta con el largo del aro interno.
We will cut out a second ring, with a softer cardboard, preferably those cereal cartons for the back of the ring.
We will also cut another 15 cm wide strip, but this one with the length of the inner hoop.
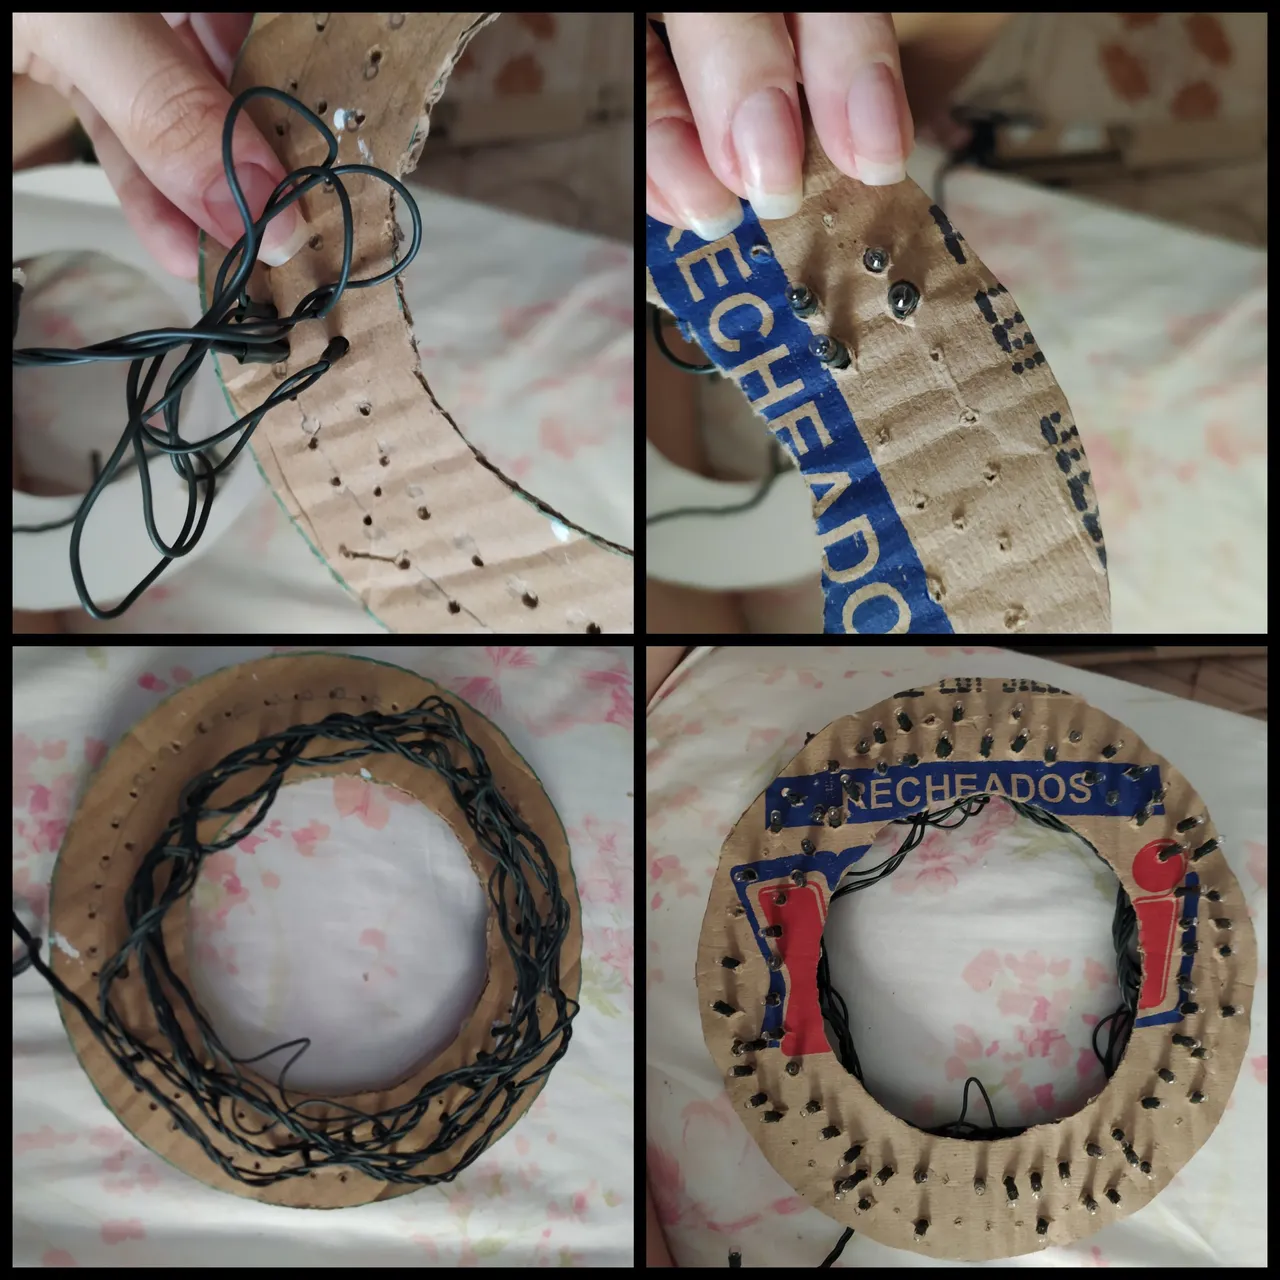
Ahora viene la parte más importante, insertaremos con mucho cuidado cada luz en los orificios con cuidado de no dañar los mini bombillos.
Now comes the most important part, we will carefully insert each light into the holes taking care not to damage the mini bulbs.
Después de tener el aro y las luces listas, vamos a abrir un pequeño orificio donde entre el enchufe de las luces y lo vamos a introducir.
Probamos las luces, para comprobar de que ninguna se haya dañado.
Y empezamos a unir los extremos de las tiras y a unirlas a los aros.
La tira del aro del centro, le vamos a recortar pequeños retazos para darle forma redondeada y adaptarlo al aro externo que cubrirá los cables para que no queden por fuera y puedan romperse.
Uniremos esta tira al orificio central trasero, con la grapadora.
After having the ring and the lights ready, we are going to open a small hole where the plug of the lights will enter and we are going to introduce it.
We test the lights, to check that none of them has been damaged.
And we start to join the ends of the strips and attach them to the hoops.
The strip of the center ring, we are going to cut small pieces to give it a rounded shape and adapt it to the outer ring that will cover the wires so that they are not outside and can break.
We will attach this strip to the center hole.

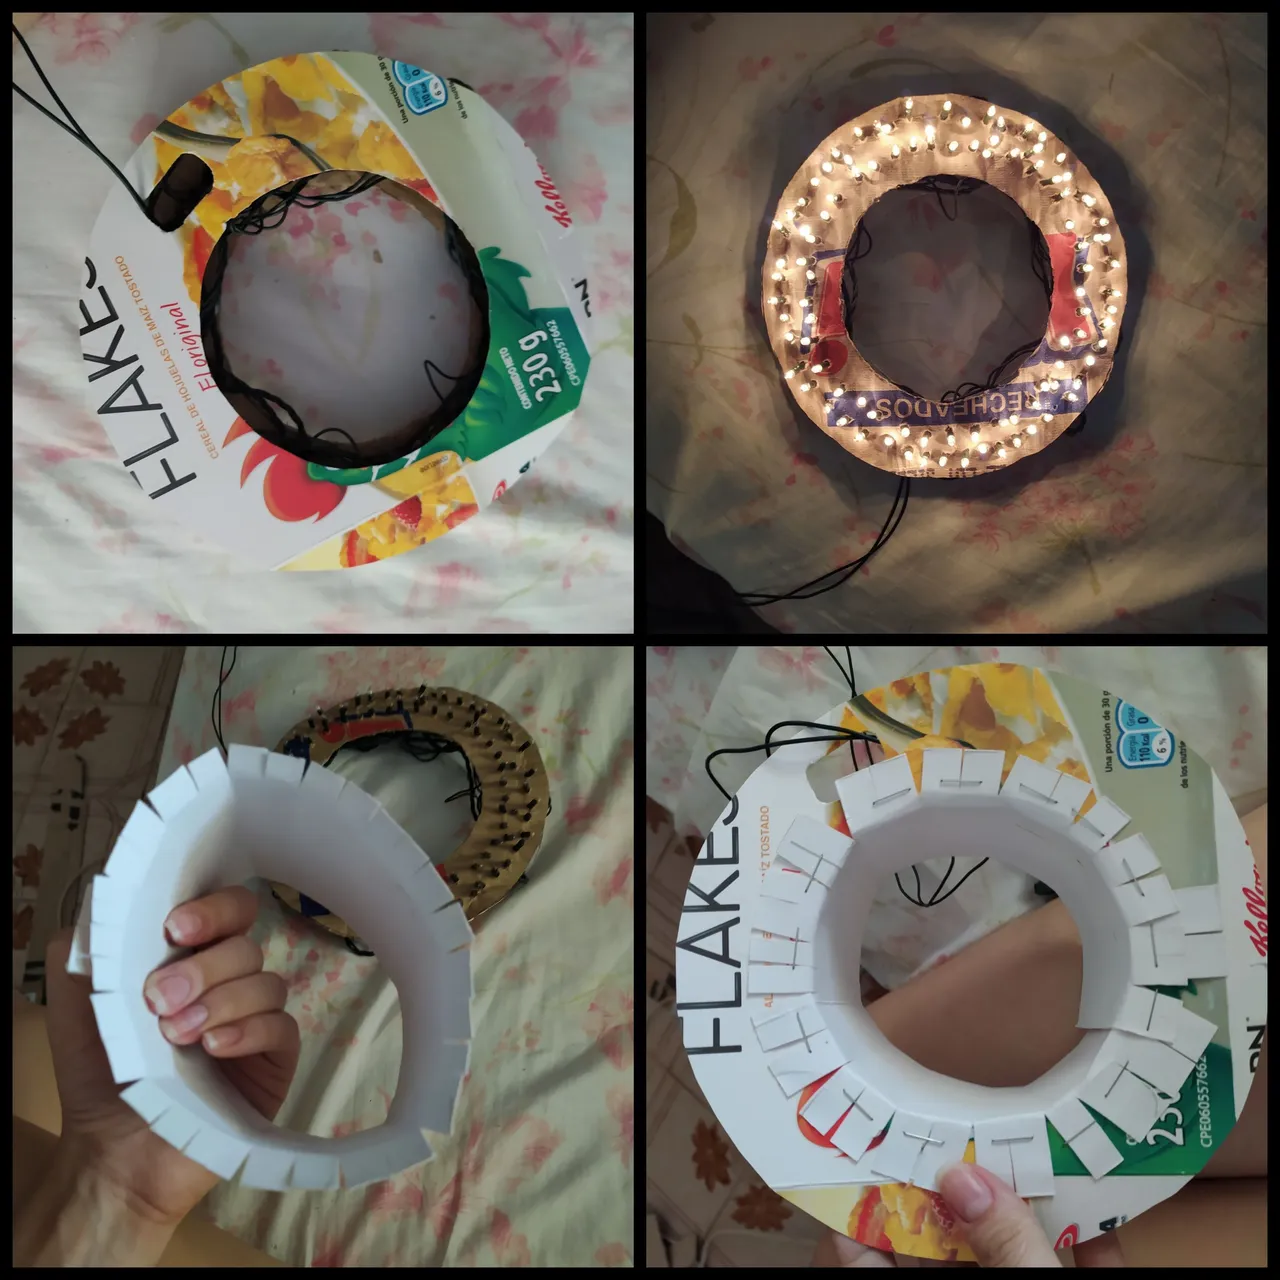
Ahora es el turno de la tira más larga, que cubrirá el exterior del aro, vamos a unir los extremos con grapas. Y armamos con esto un 50% de nuestro aro.
Now it is the turn of the longest strip, which will cover the outside of the hoop, we are going to join the ends with staples. And with this we assemble 50% of our hoop.
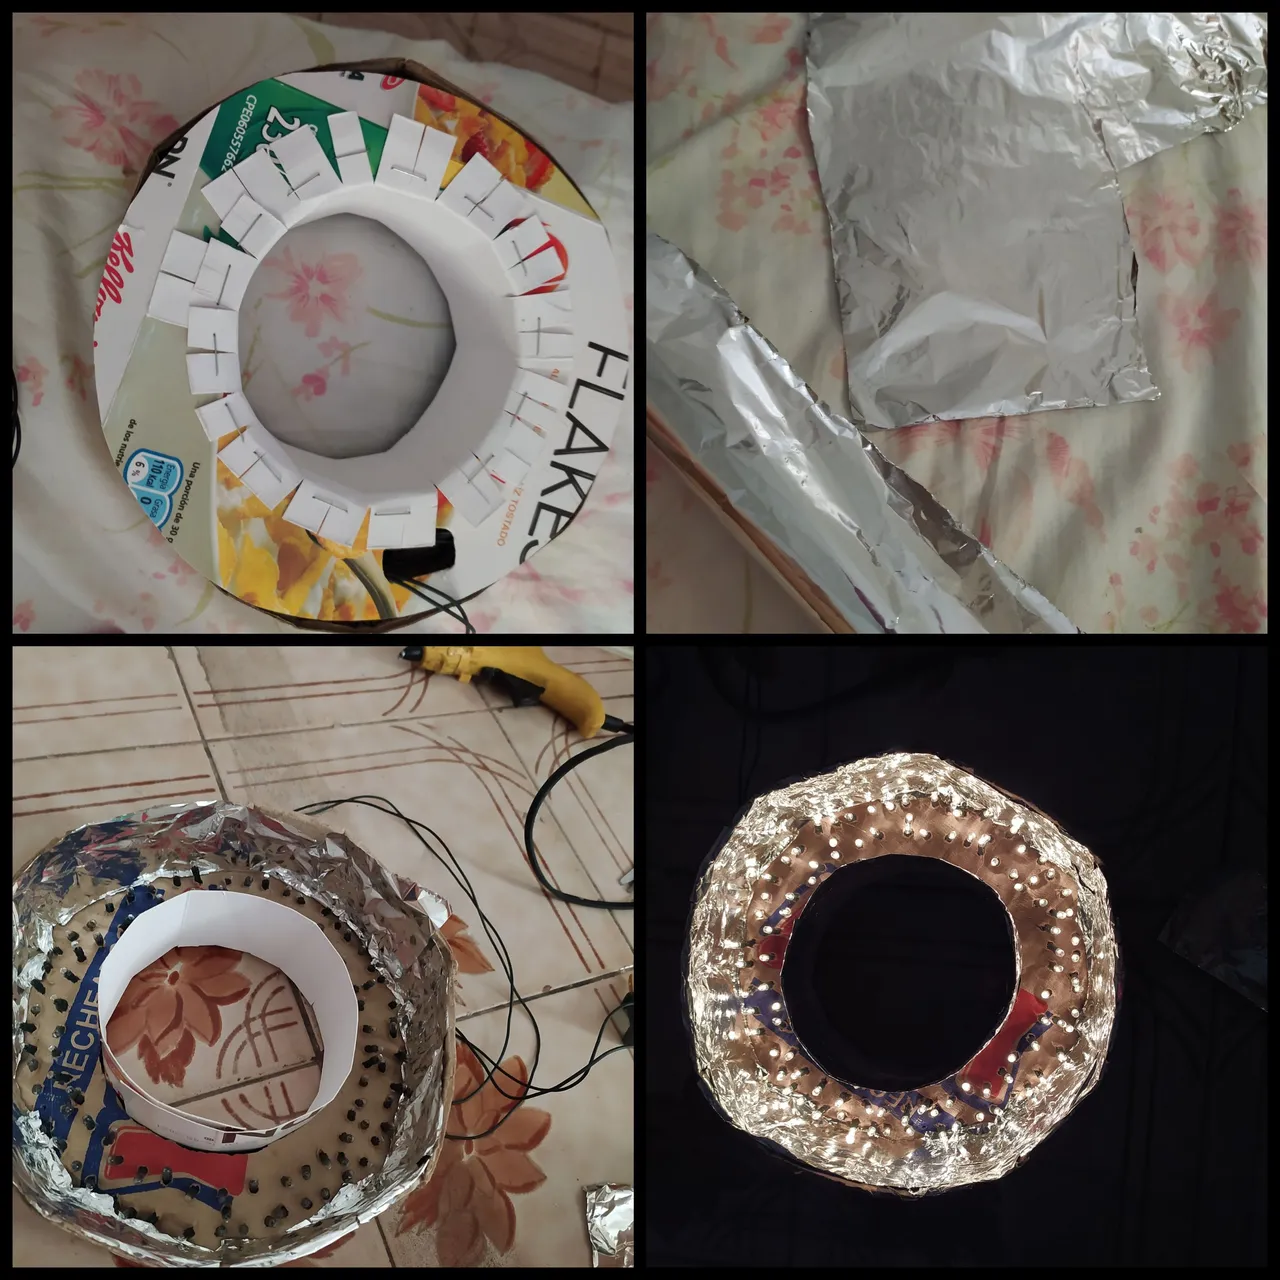
Vamos a recortar tiras de papel aluminio que cubran las paredes internas del aro que dan cara a las luces. Y las pegaremos con silicón, así como también la tira externa con los bordes del aro.
We will cut out strips of aluminum foil to cover the inner walls of the ring that face the lights. And we will glue them with silicone, as well as the external strip with the edges of the hoop.
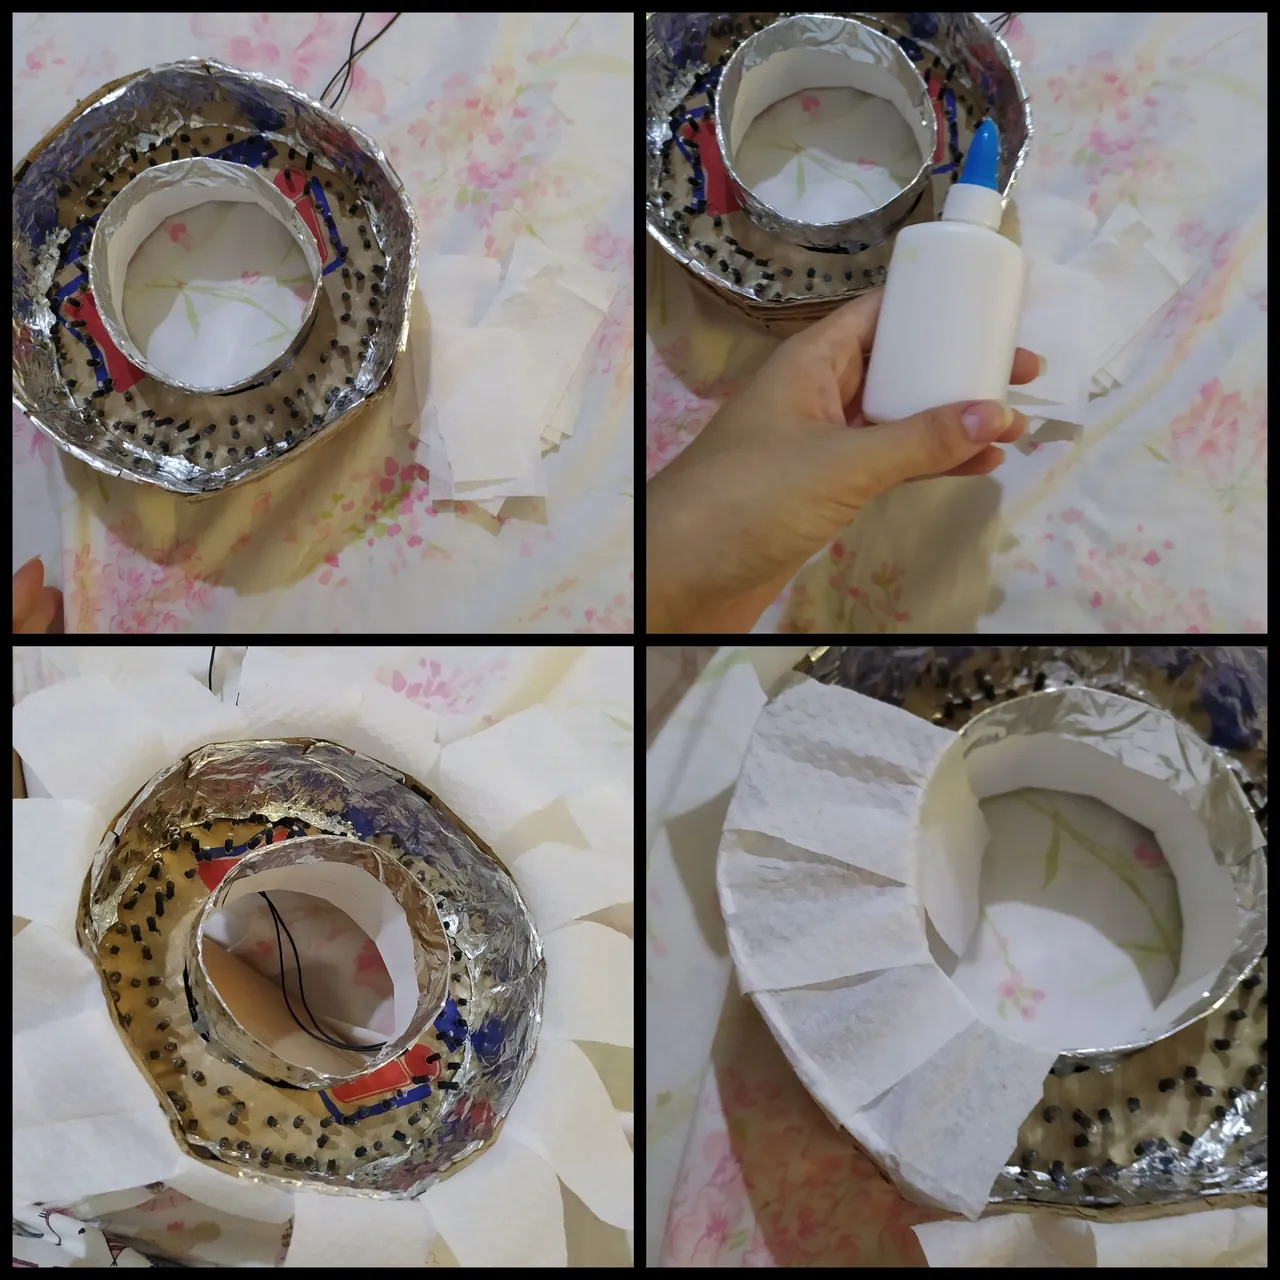
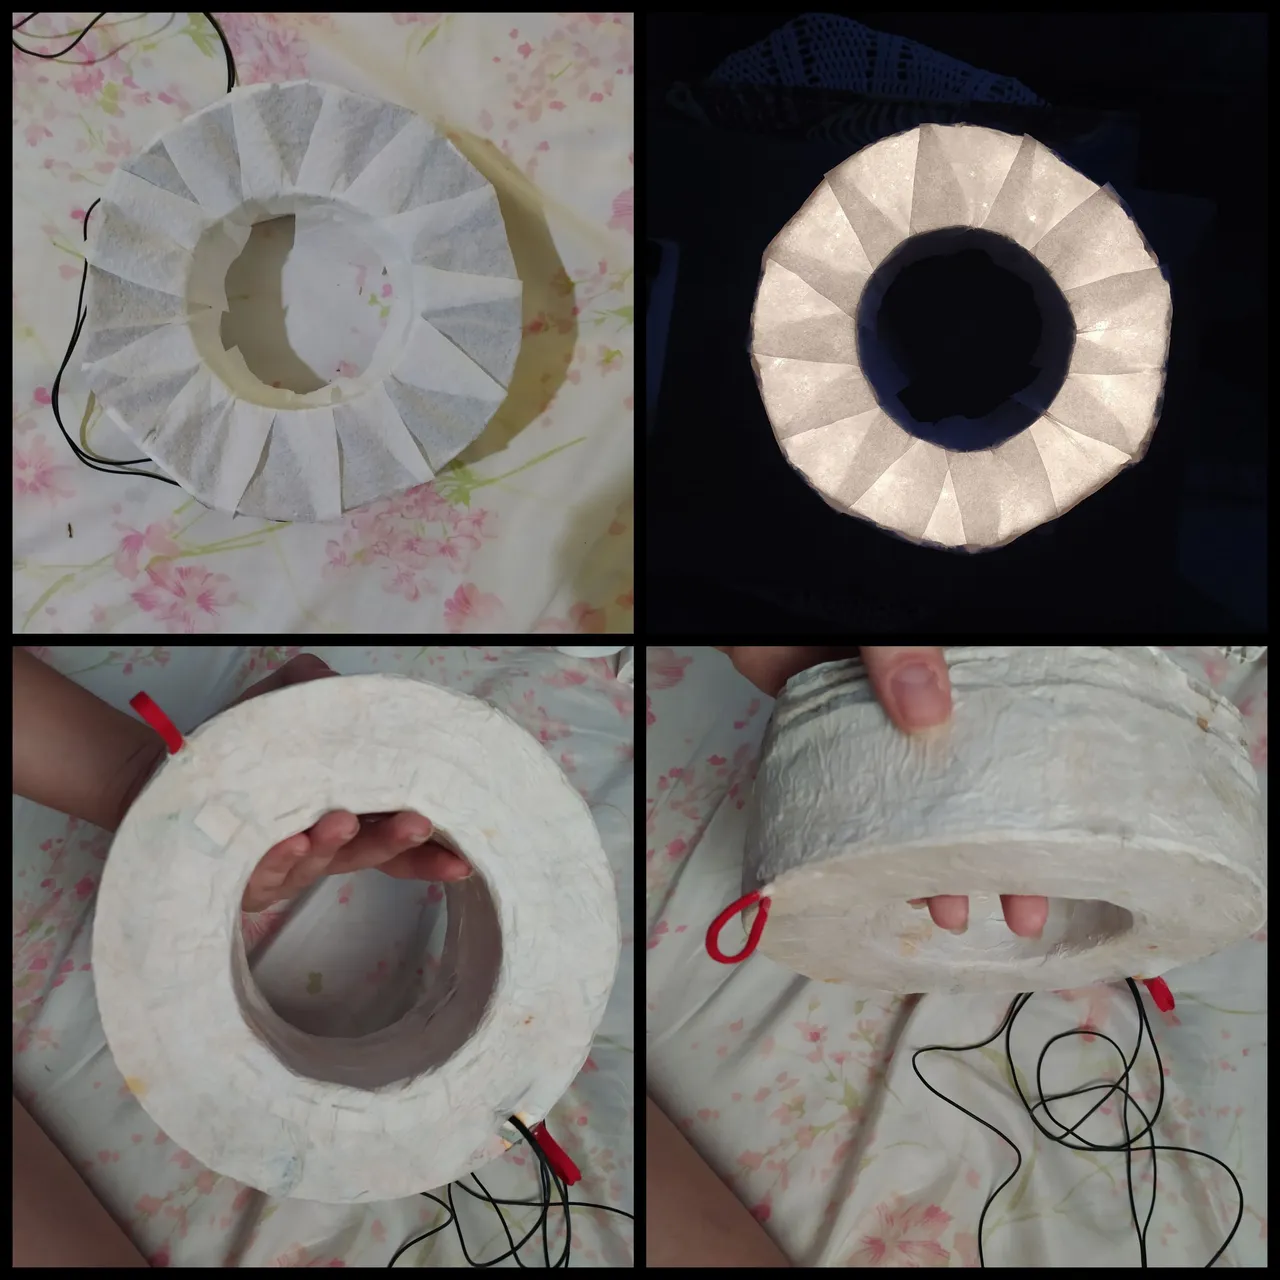
Ahora, recortaremos tiras de servilleta que pegaremos en toda la parte que nos queda descubierta, utilizando pega escolar.
La servilleta hará que la luz se vea uniforme.
(Con luces blancas, el aro queda más profesional, yo lo elaboré con luces amarillas porque no conseguí las otras)
Now, we will cut out napkin strips that we will glue all over the uncovered part, using school glue.
The napkin will make the light look uniform.
(With white lights, the hoop looks more professional, I made it with yellow lights because I couldn't get the others.
Esta parte es opcional, yo lo hice, para reforzar aún más el aro.
Haremos engrudo, con media taza de agua y dos cucharadas de harina de trigo, cocinaremos hasta que espese, y cuando se repose, cubriremos todo el aro de luz con servilletas y engrudo. Excepto, la parte de adelante que es la que proyecta la luz.
Y dejaremos secar 1 día entero.
This part is optional, I did it, to further strengthen the hoop.
We will make paste, with half a cup of water and two tablespoons of wheat flour, we will cook until it thickens, and when it rests, we will cover all the light ring with napkins and paste. Except, the front part that is the one that projects the light.
And we will leave to dry 1 whole day.
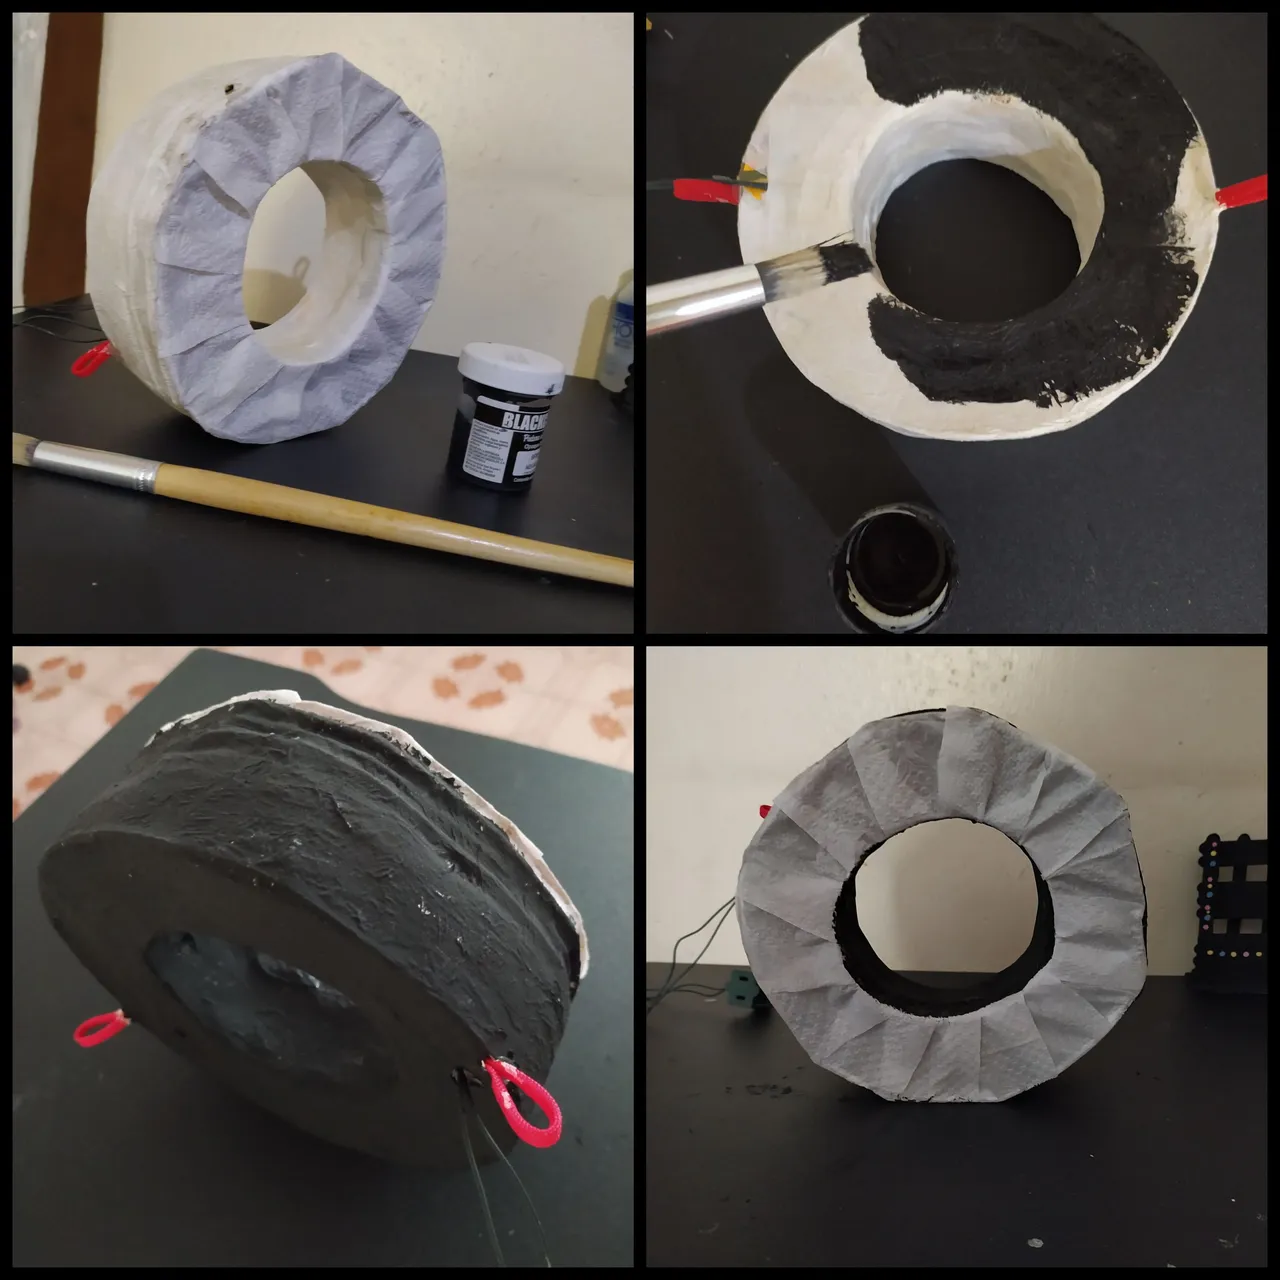
Y finalmente pintaremos con pintura al frío del color de su preferencia, yo elegí mi color favorito, "negro".
Y así de fácil, elaboramos un aro de luz casero.
Los aros de luz en las tiendas suelen costar entre 30$ a 50$ depende el tamaño.
Elaborándolo nosotros mismos, solo gastamos 3$ en luces y los demás materiales los encontramos en casa.
Y lo mejor es que obtenemos los mismos resultados, una mejor iluminación para nuestros vídeos o fotografías.
And finally we will paint with cold paint in the color of your choice, I chose my favorite color, "black".
And that's how easy it is to make a homemade light ring.
The light hoops in the stores usually cost between 30$ to 50$ depending on the size.
By making it ourselves, we only spent 3$ on lights and the rest of the materials we found at home.
And the best thing is that we get the same results, a better illumination for our videos or photographs.
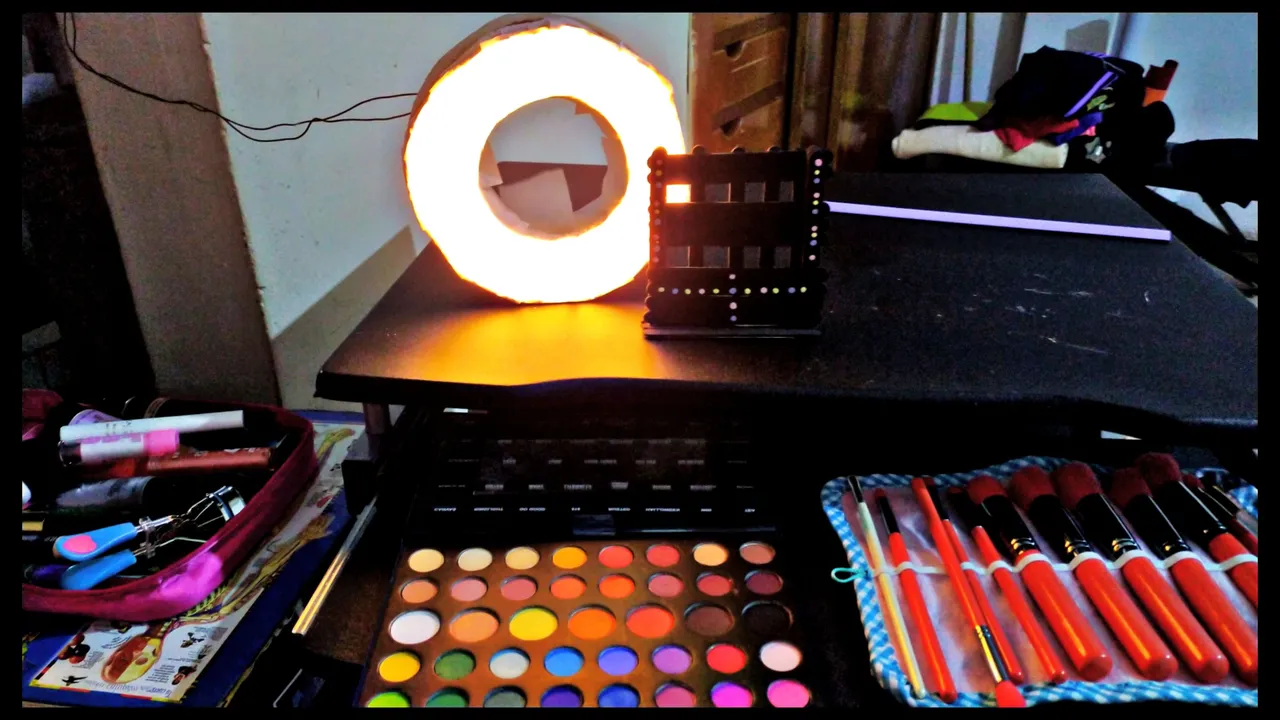
Este es el resultado, con este aro de luz grabé mi video de maquillaje para Halloween a las 10pm y el resultado en iluminación fue bastante bueno teniendo en cuenta que no había luz natural y mi cámara frontal no tiene flash.
Espero les haya gustado la idea.
Hasta la próxima!💡✨
This is the result, with this light ring I shot my Halloween makeup video at 10pm and the lighting result was pretty good considering there was no natural light and my front camera has no flash.
I hope you liked the idea.
See you next time!!! 💡✨

Todas las fotografías son de mi autoría
Ediciones elaboradas con PicsArt
Traducido por DeepL
Separadores de texto para blog
All photographs are by me
Editions made with PicsArt
Translated by DeepL
Text separators for blog