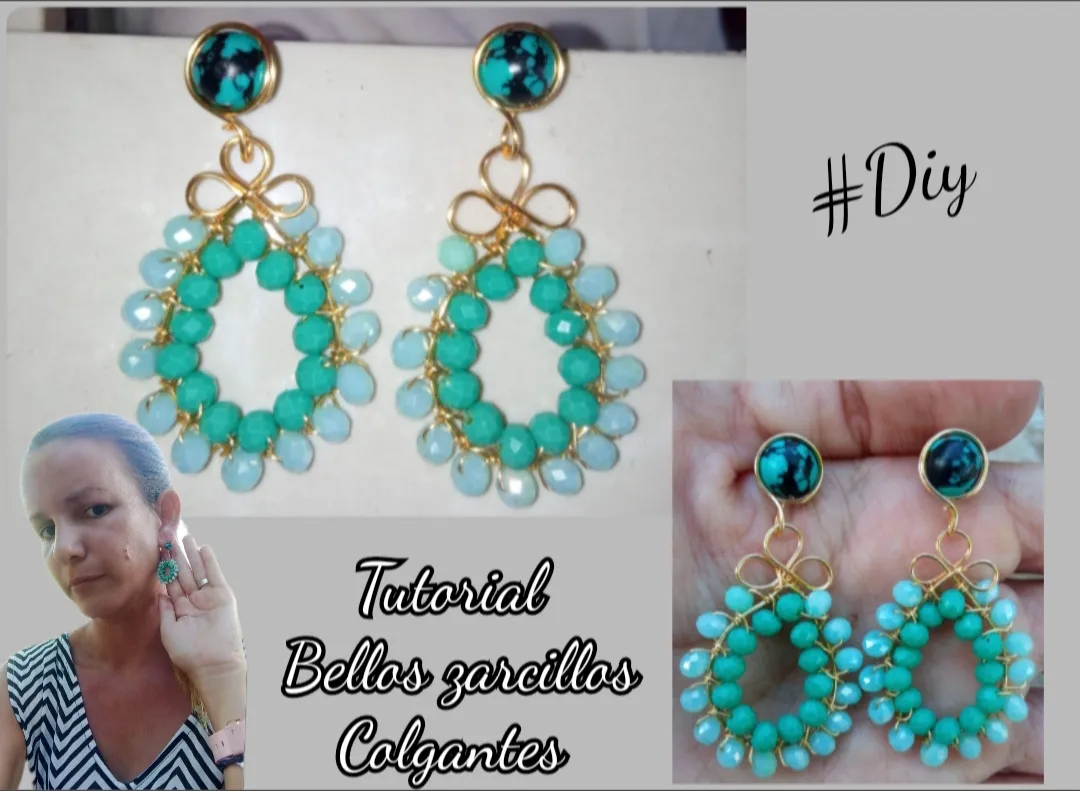
feliz y bendecida tarde tengan todos, es un gran placer para mí el poder compartir con ustedes en esta creativa comunidad una vez más, en esta oportunidad les comparto un tutorial con el que quiero mostrarles y enseñarles paso a paso como elaborar unos hermosos pendientes en alambrismo con un diseño diferente y muy elegante, ideal para lucir en ocasiones especiales. Son muy faciles de elaborar, les invito a acompañarme en este tutorial.
Happy and blessed afternoon everyone, it is a great pleasure for me to be able to share with you in this creative community once again, on this occasion I share with you a tutorial with which I want to show you and teach you step by step how to make some beautiful Wire earrings with a different and very elegant design, ideal to wear on special occasions.
They are very easy to make, I invite you to join me in this tutorial.
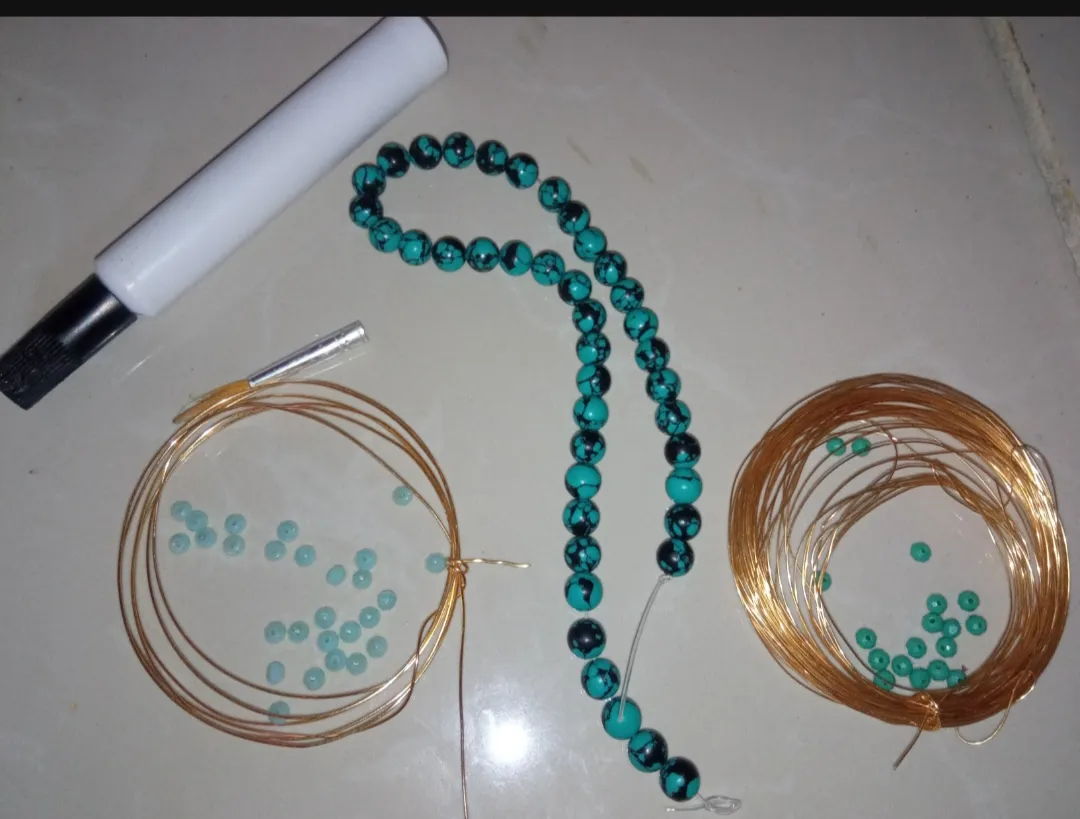
- alambre de bisutería calibre 20.
- alambre de bisutería calibre 26.
- cristales verdes claros.
- cristales verdes oscuros.
- Piedra circular verde.
- Pinza de bisutería.
- 20 gauge jewelry wire.
- 26 gauge jewelry wire.
- light green crystals.
- dark green crystals.
- Green circular stone.
- Jewelry clamp.
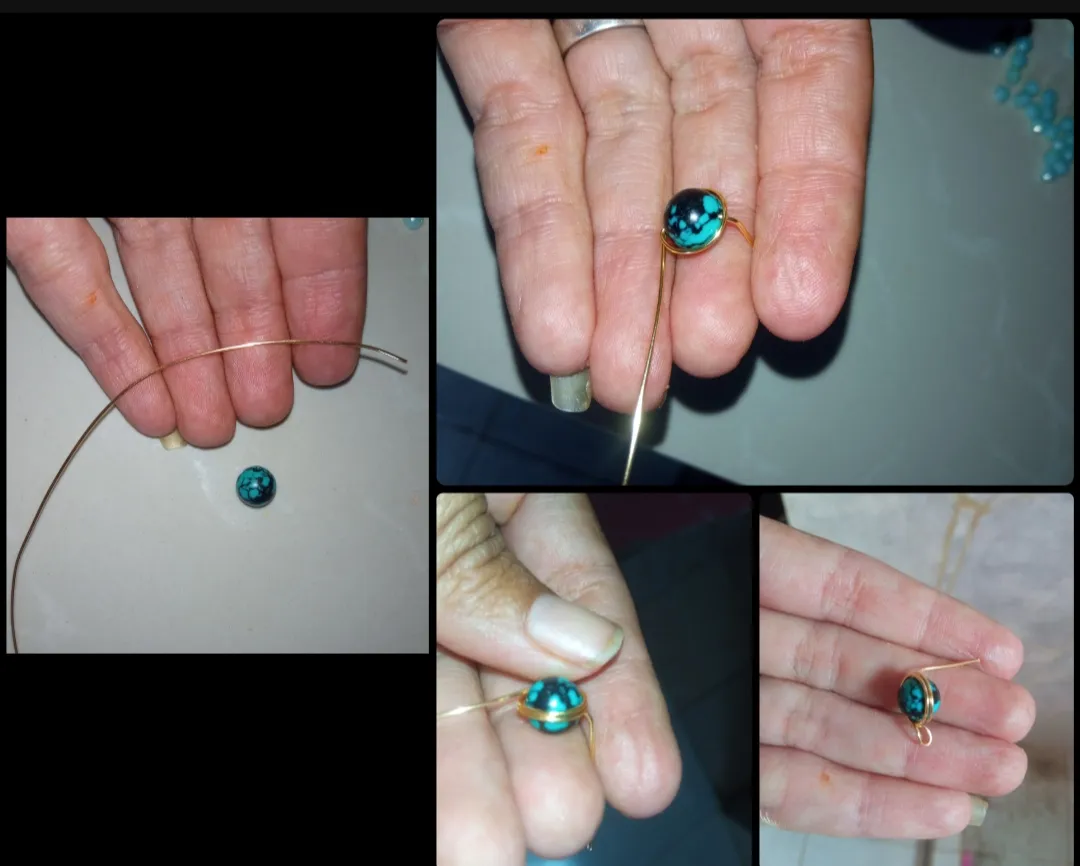
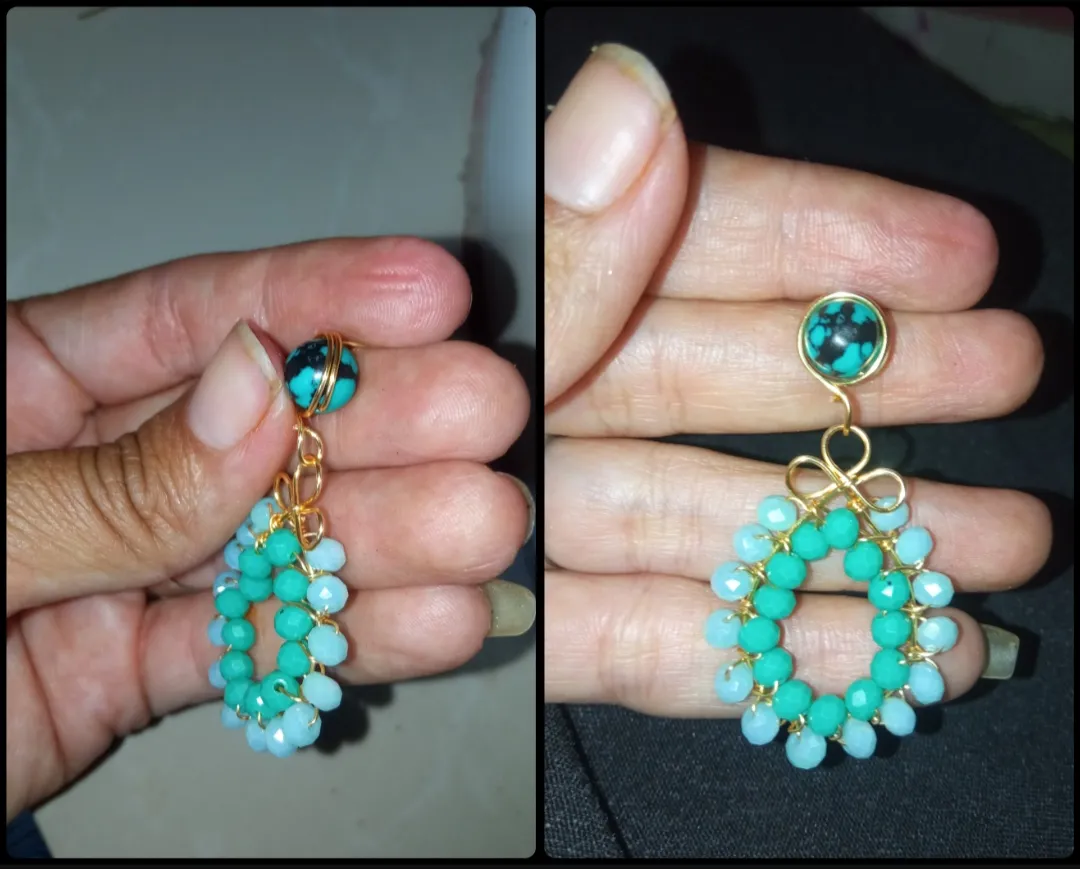
⭐ Paso 1: para iniciar la elaboración de estos creativos zarcillos vamos a tomar el alambre de bisutería calibre 20 y cortaremos un pedazo de 12 cm, por este introduciremos la piedra verde con destellos negros que he seleccionadi para esta elaboracion y dejaremos 2cm de alambre por encima de esta piedra el cual doblaremos haxia la oarye de atrás. Y con el exceso de alambre que nos queda por debajo procederemos a enrrollalo alrededor de la piedra, moldeando su forma circular, yo elaboré dos vueltas y en la parte de abajo de la piedra con el sobrante de este alambre realizaremos una forma de gancho como pueden observar a continuación.
⭐ Step 1: to start making these creative tendrils we are going to take the 20 gauge jewelry wire and cut a 12 cm piece, through this we will introduce the green stone with black sparkles that I have selected for this making and we will leave 2cm of wire above this stone which we will bend towards the back oarye. And with the excess wire that remains below we will proceed to wind it around the stone, molding its circular shape.
I made two turns and at the bottom of the stone with the excess of this wire we will make a hook shape as you can observe below.
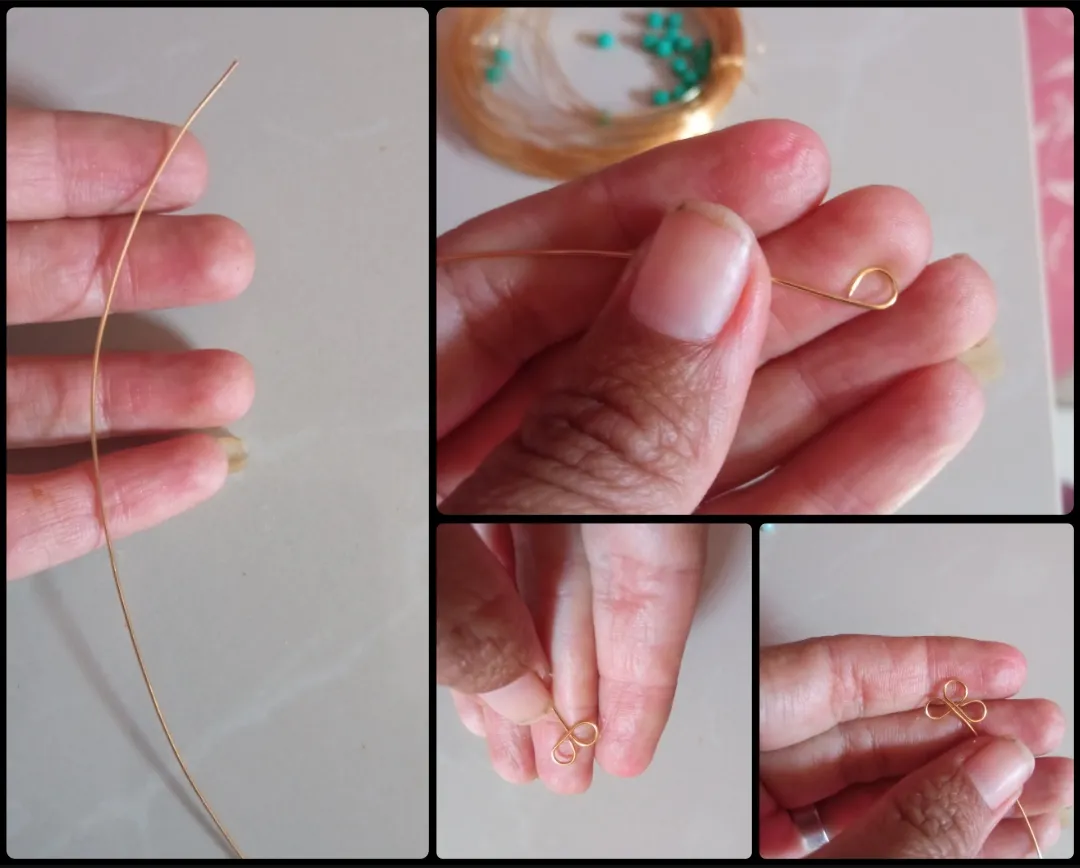
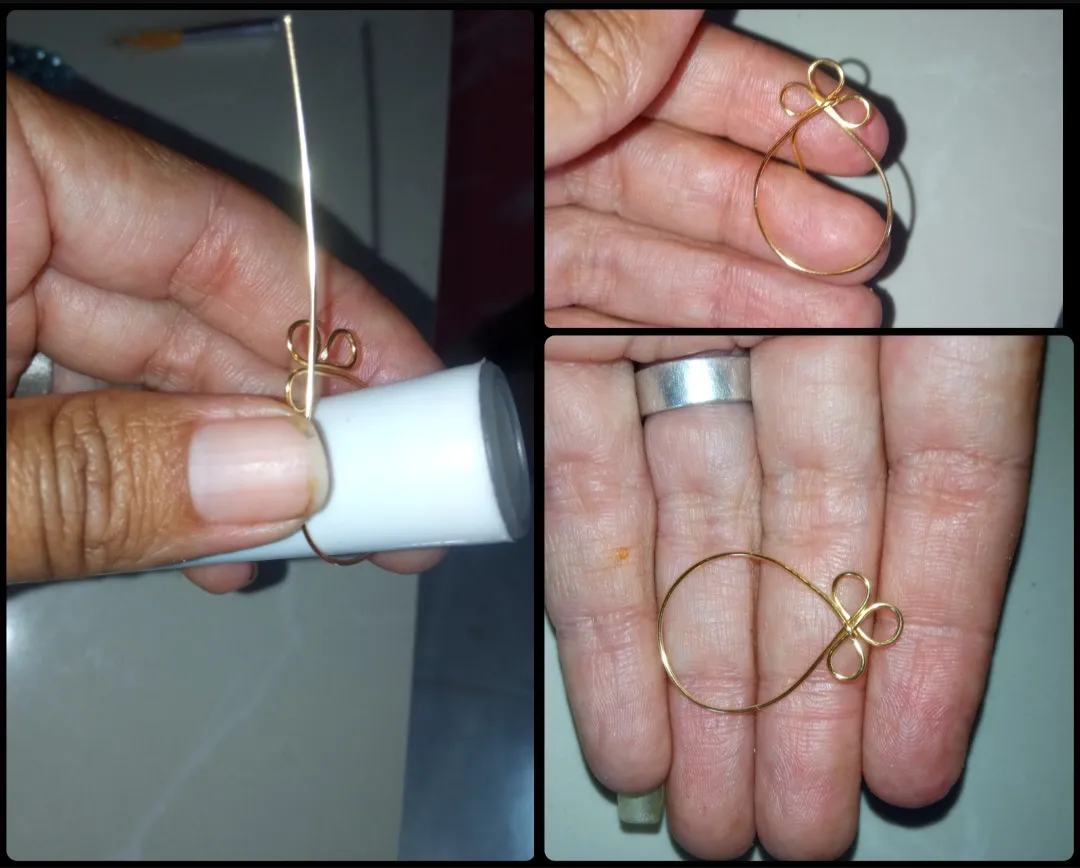
⭐ Paso 2: seguidamente tomaremos otro pedazo de alambre de bisutería calibre 20 de aproximadamente 15 cm y con ayuda de un palillo y objeto circular delgado elaboraremos una forma de trébol de tres hojas, primero elaboramos el petalo de un lado, con el mismo alambre elaboramos un petalo un poco mas alto que sera el del centro y uno del otro extremo como observaran a continuación.
⭐ Step 2: next we will take another piece of 20 gauge jewelry wire of approximately 15 cm and with the help of a toothpick and thin circular object we will make a three-leaf clover shape, first we make the petal on one side, with the same wire we make a petal a little higher that will be the one in the center and one at the other end as you will see below.
⭐ Paso 3: con el sobrante del alambre calibre 20 lo pasaremos hacia la parte de abajo y con ayuda de un molde cilindro moldearemos el alambre realizando una forma ovalada, llevando el alambre nuevamente hasta nuestro pequeño trébol y doblaremos la punta enganchando lo entre los pétalos del trébol para así sujetar la forma deseada, esta será la base que decoraremos con pedrería.
⭐ Step 3: with the leftover 20 gauge wire we will pass it to the bottom and with the help of a cylinder mold we will mold the wire making an oval shape, taking the wire again to our small clover and we will bend the tip hooking it between the petals of the clover to hold the desired shape, this will be the base that we will decorate with rhinestones.
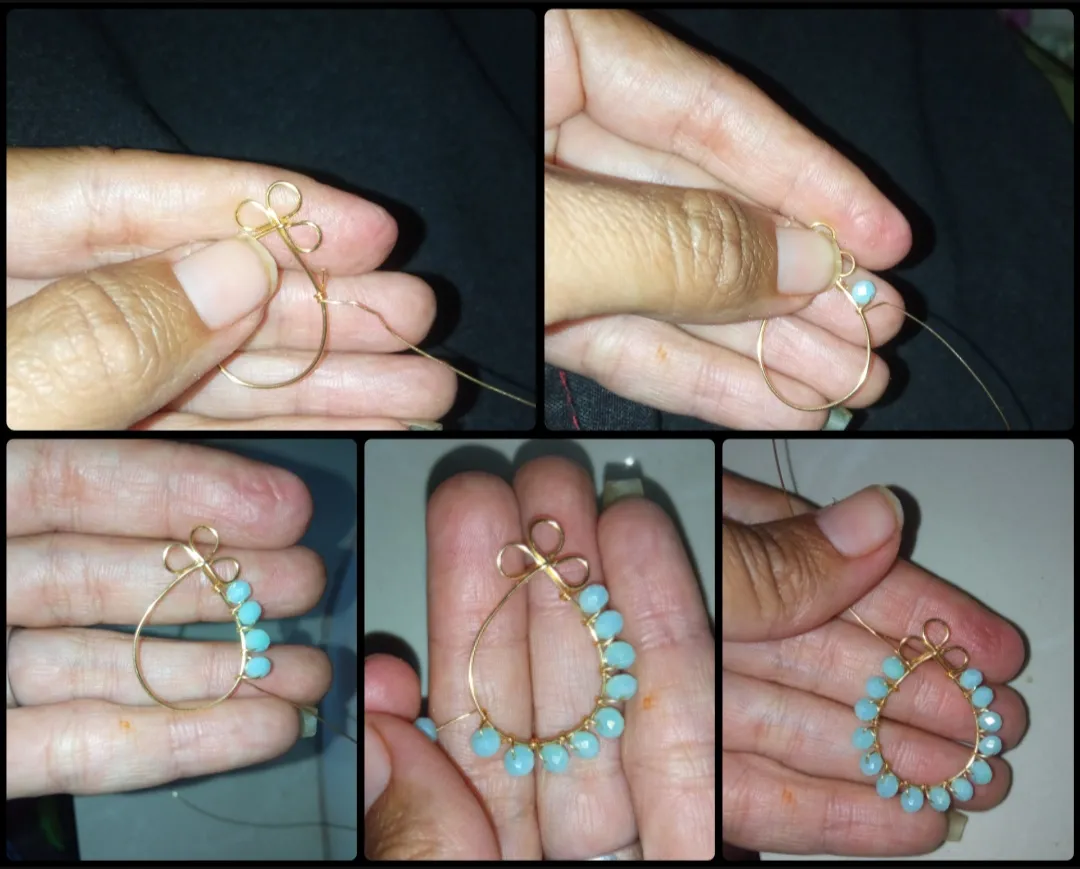
⭐ Paso 4: para la decoración tomaremos una hebra de alambre de bisutería calibre 26 bastante larga y la enrollaremos al principio de uno de los lados del óvalo, debajo del trébol y por este alambre introduciremos un cristal verde claro y unimos nuevamente el alambre en la base para sujetar el cristal que moldear la parte de afuera del óvalo. Así sucesivamente iremos introduciendo uno a uno los cristales y decoraremos la parte de afuera de nuestro diseño, hasta cubrir la forma en su totalidad.
⭐ Step 4: for the decoration we will take a fairly long strand of 26 gauge jewelry wire and we will wind it at the beginning of one of the sides of the oval, under the clover and through this wire we will insert a light green crystal and join the wire at the base to hold the glass to mold the outside of the oval.
So successively we will introduce the crystals one by one and decorate the outside of our design, until the shape is completely covered.
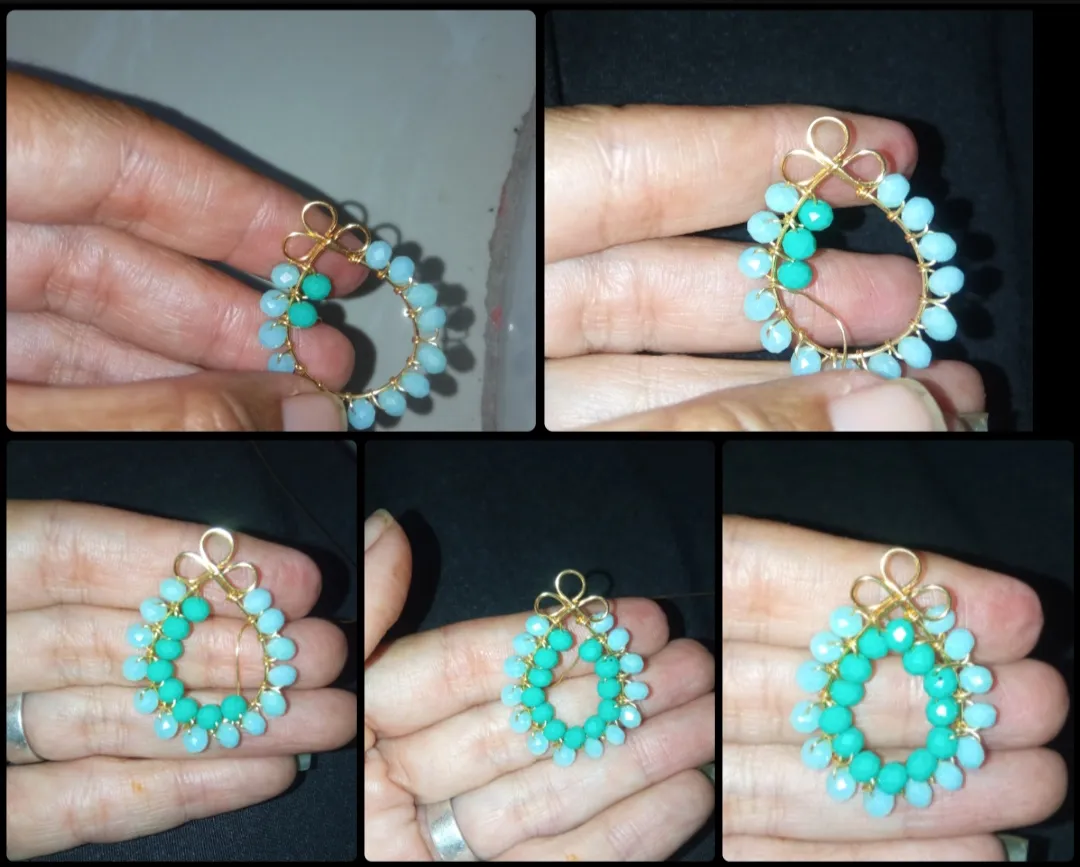
⭐ Paso 5: con el mismo alambre de bisutería calibre 26 ahora introduciremos los cristales verde oscuros Pero estos los colocaremos en la parte de adentro de la forma ovalada, y siguiendo el mismo procedimiento del paso anterior cubriremos toda la parte de adentro como podrán observar a continuación y cortaremos el exceso de alambre.
⭐ Step 5: with the same 26 gauge jewelry wire we will now introduce the dark green crystals. But we will place these on the inside of the oval shape, and following the same procedure as the previous step we will cover the entire inside as You can see below and we will cut the excess wire.
⭐ Paso 6: por último uniremos las dos piezas elaboradas enganchando el pétalo superior del trébol en el gancho debajo de la piedra verde grade es decir la primera pieza. Y así tendremos nuestro primer zarcillos, repetimos el procedimiento para realizar el par.
⭐ Step 6: finally we will join the two elaborate pieces by hooking the upper petal of the clover on the hook under the grade green stone, that is, the first piece. And so we will have our first tendrils, we repeat the procedure to make the pair.
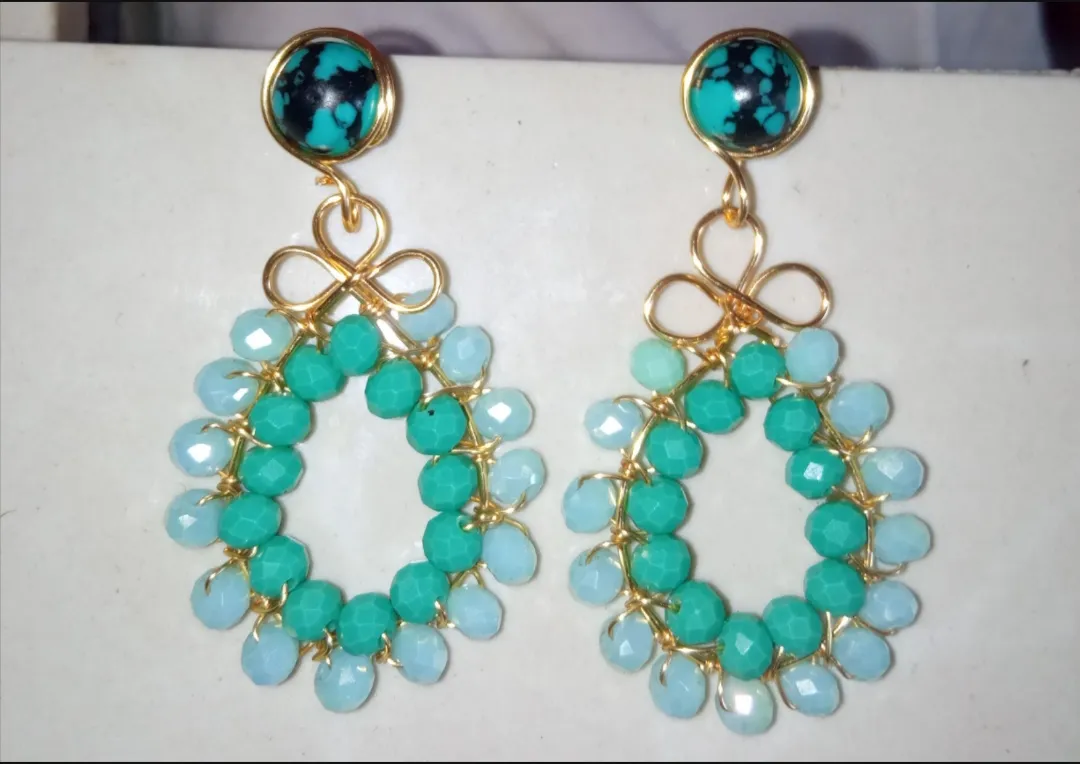
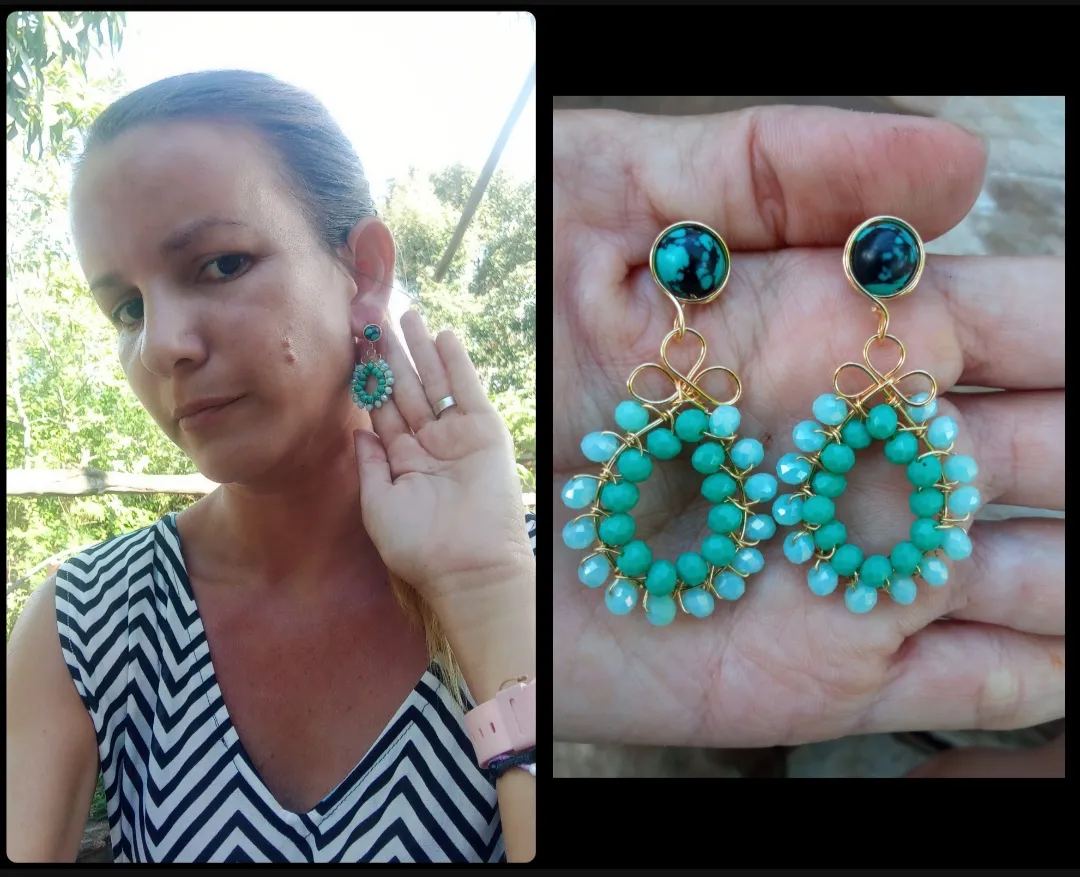
Todas las Fotos son de mi autoría y fueron tomadas con mi Celular Redmi 9.And so my dear and appreciated friends we will be able to make some beautiful tendrils for which I combined several shades of green, you can make it in another color if it is your preference, this was my creation today for all of you, which I hope has been of your liking. I say goodbye grateful for your visit.
All Photos are my authorship and were taken with my Redmi 9 Cellphone