ENGLISH
Hello Hive community!
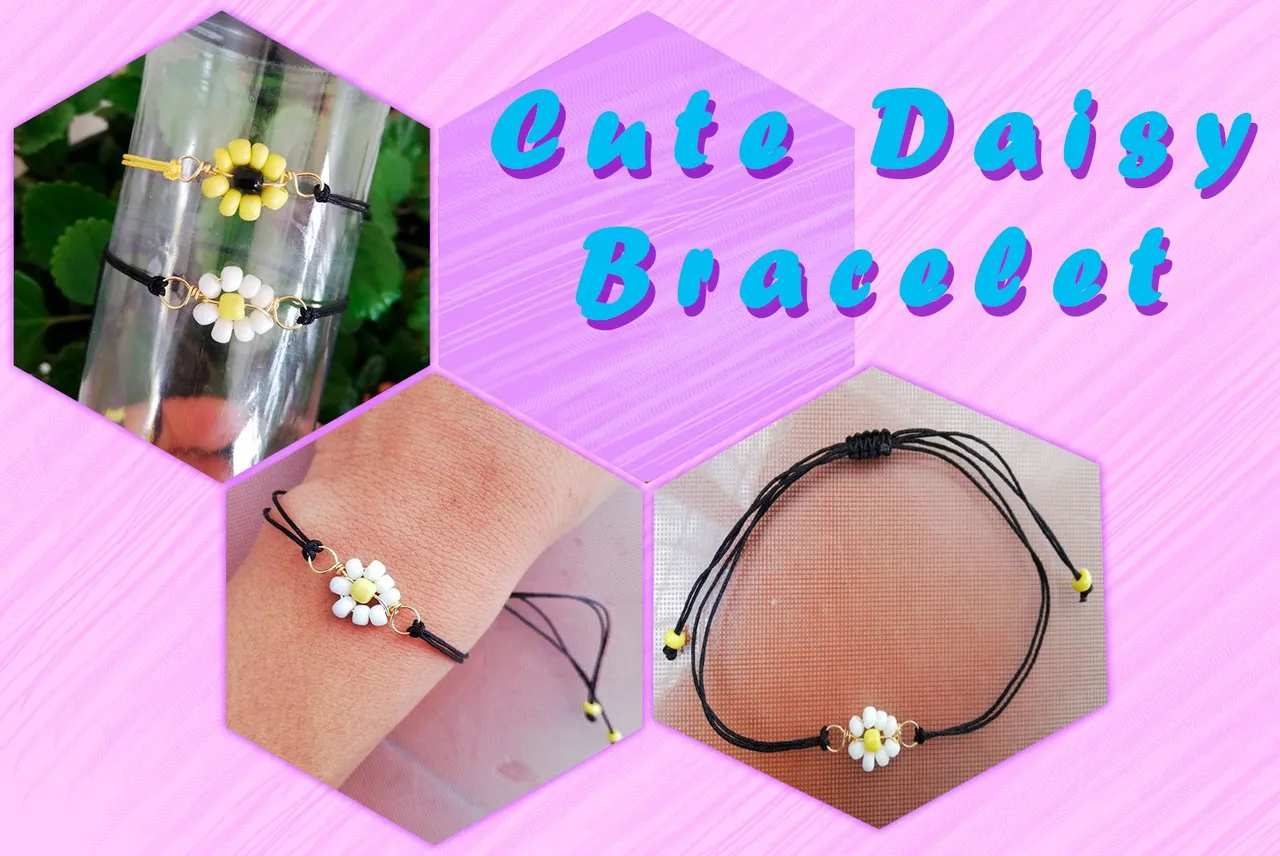
Welcome, this time I want to show you how to make a beautiful daisy bracelet excellent to wear on any occasion or to give as a gift to our loved ones.
It is very simple to make, ideal for those people who are just starting to work with costume jewelry.
Let's get started!
Materials:
- 8 white beads
- 3 yellow beads
- 12 centimeters of #22 caliber jewerly wire
- 1 meter of Chinese thread black
- Round-nose pliers
- Cutting pliers
- Scissors
- Lighter
- Adhesive tape (optional)
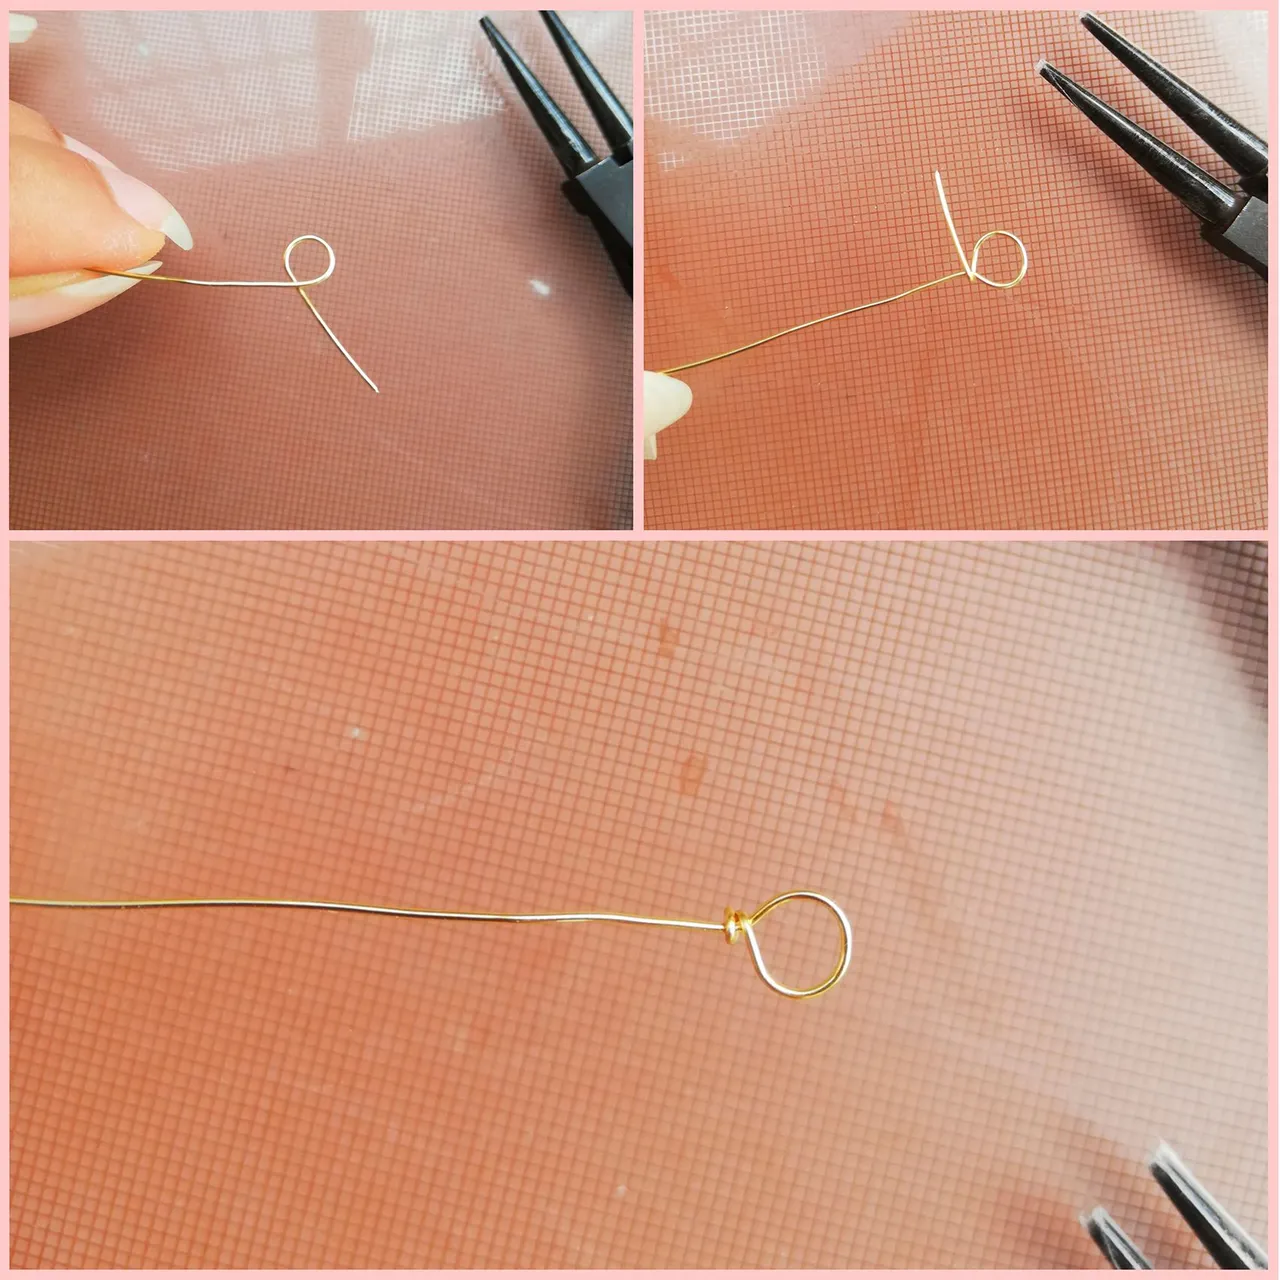
Step 1:
With the round nose pliers, we make a small ring at one end of the wire, leaving about 1 centimeter remaining. With your hands and the support of the round tweezers, we twist the remaining centimeter over the other wire, giving it a complete turn and the remaining wire we cut it.
ESPAÑOL
¡Hola comunidad de Hive!
Bienvenidos, en esta ocasión les quiero enseñar cómo realizar una hermosa pulsera de margaritas excelente para lucir en cualquier ocasión o para regalar a nuestros seres queridos.
Es muy sencilla de elaborar, ideal para aquellas personas que están empezando en la bisutería.¡Comencemos!
Materiales:
- 8 Mostacillas color blanco
- 3 Mostacillas color amarillo
- 12 cm de alambre de bisutería calibre #22
- 1 m de hilo chino negro
- Pinza punta redonda
- Pinza de corte
- Tijeras
- Encendedor
- Cinta adhesiva (opcional)
Paso 1:
Con la pinza punta redonda, hacemos un aro pequeño en un extremo del alambre, dejando aproximadamente 1 cm restante. Luego, ese centímetro lo entorchamos sobre el otro alambre, dándole una vuelta completa. El alambre restante lo cortamos.
ENGLISH
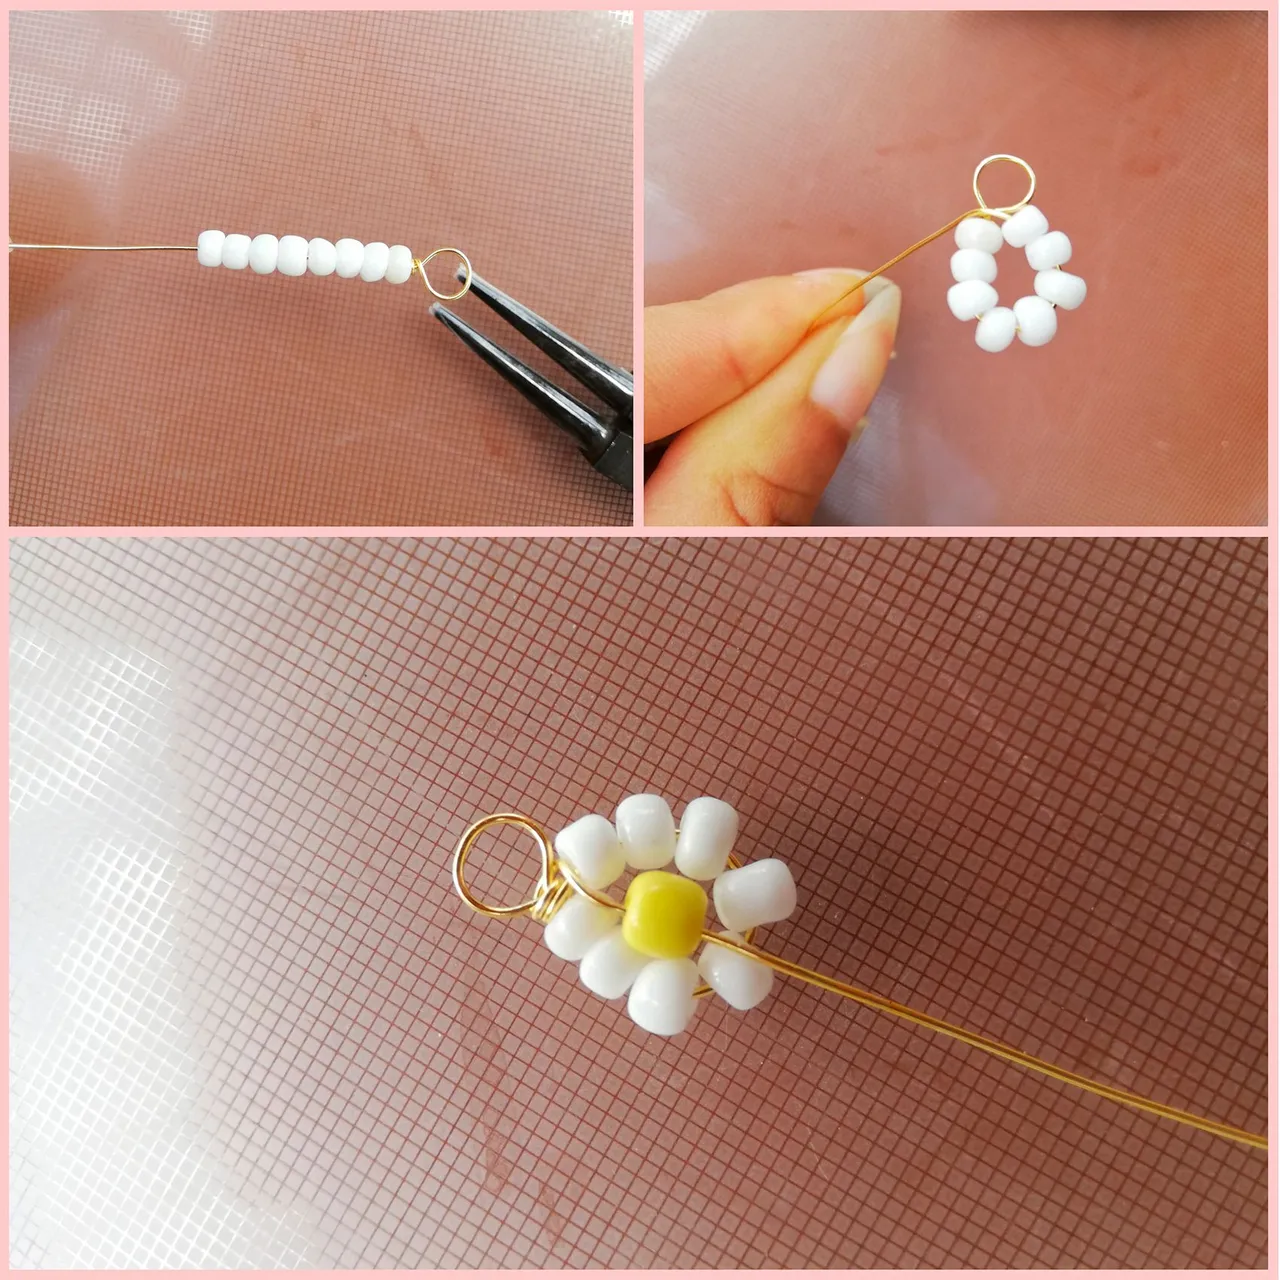
Step 2:
Insert the 8 white beads and make a small circle, bringing the wire towards the hoop we made first. Then we twist the wire with two turns. Then we introduce a yellow bead and center it, this would be the center of the daisy.
ESPAÑOL
Paso 2:
Introducimos 8 mostacillas blancas y hacemos un círculo, llevando el alambre hacia el aro que hicimos primero. Después entorchamos con dos vueltas. Seguidamente insertamos una mostacilla amarilla y la centramos, sería el centro de la margarita.
ENGLISH
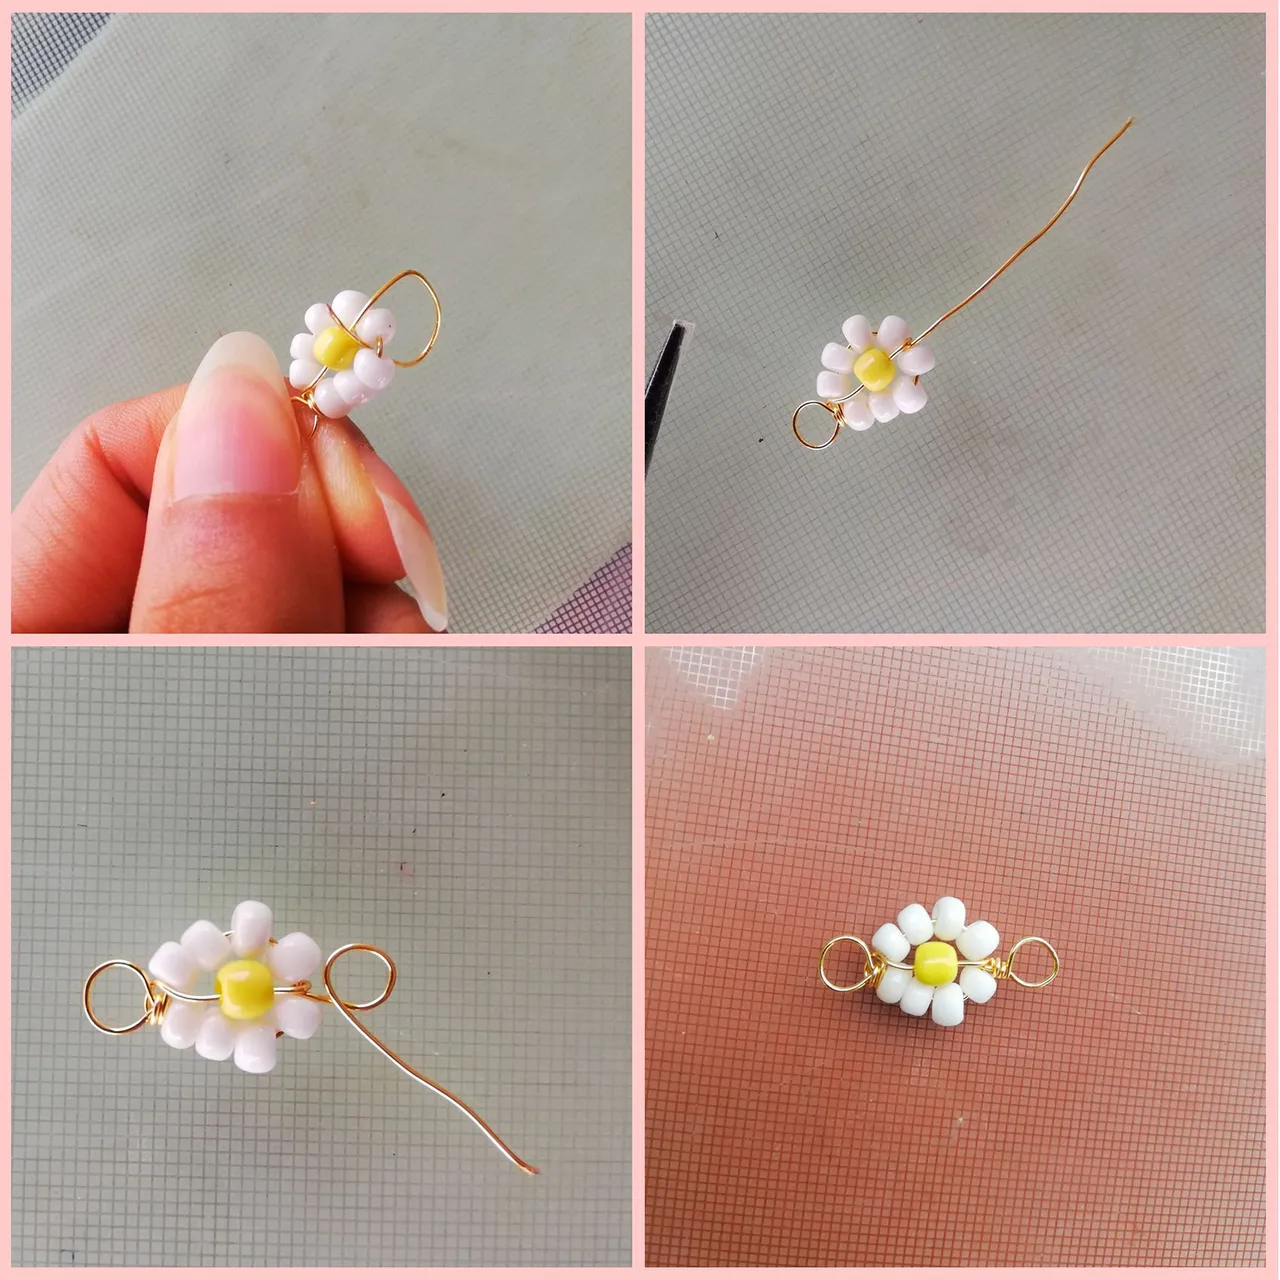
Step 3:
We pass the wire under the flower, we go up and adjust with our hands or with the pliers, as it is more comfortable. Again with the round-nose pliers we make a ring of the same size as the first one, then we twist over the wire and cut.
ESPAÑOL
Paso 3:
Pasamos el alambre por debajo de la flor, subimos y ajustamos con las manos o con la pinza, como se haga más cómodo. Nuevamente con la pinza redonda hacemos un aro del mismo tamaño que el primero, entorchamos sobre el alambre y cortamos.
ENGLISH
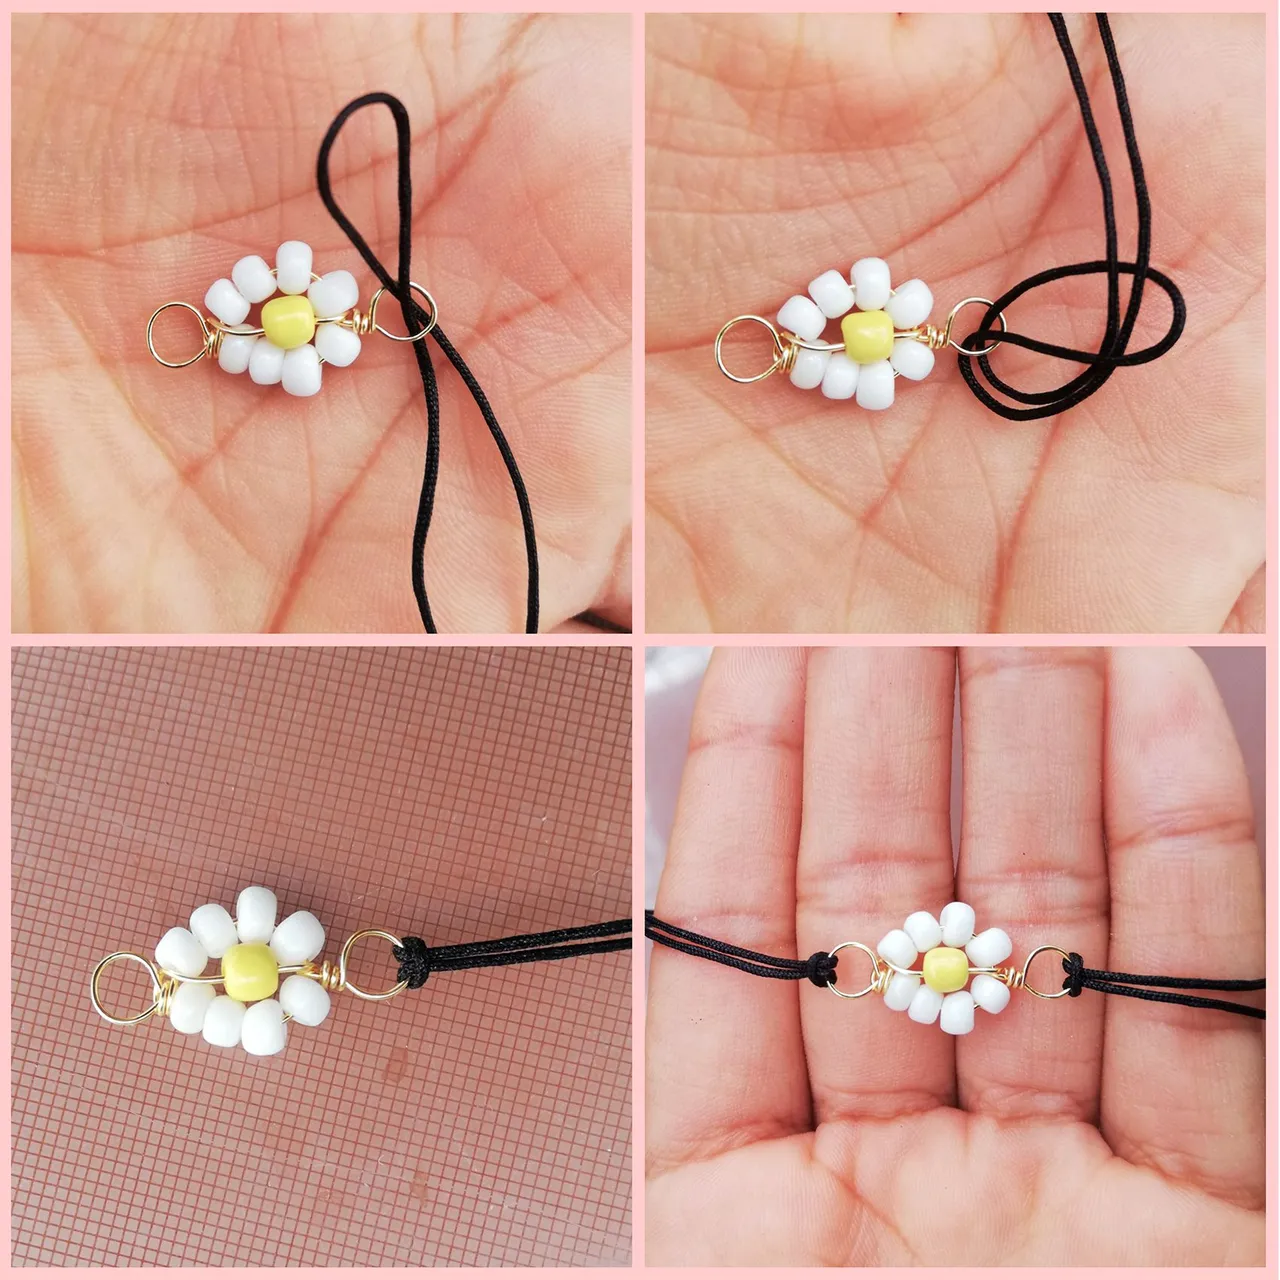
Step 4:
Cut two pieces of Chinese thread of 40 centimeters each (keep the remaining 20 centimeters for later use). We take one of these, fold it in half, introduce it through the ring of the flower forming a loop and adjust it as shown in the photo. Repeat this step on the other side.
ESPAÑOL
Paso 4:
Cortamos dos trozos de hilo chino de 40 cm cada uno (guardamos los 20 cm restantes para utilizar más adelante). Tomamos uno de estos, lo doblamos por la mitad, lo introducimos por el aro de la flor formando una lazada y ajustamos como se muestra en la foto. Repetir este paso del otro lado.
ENGLISH
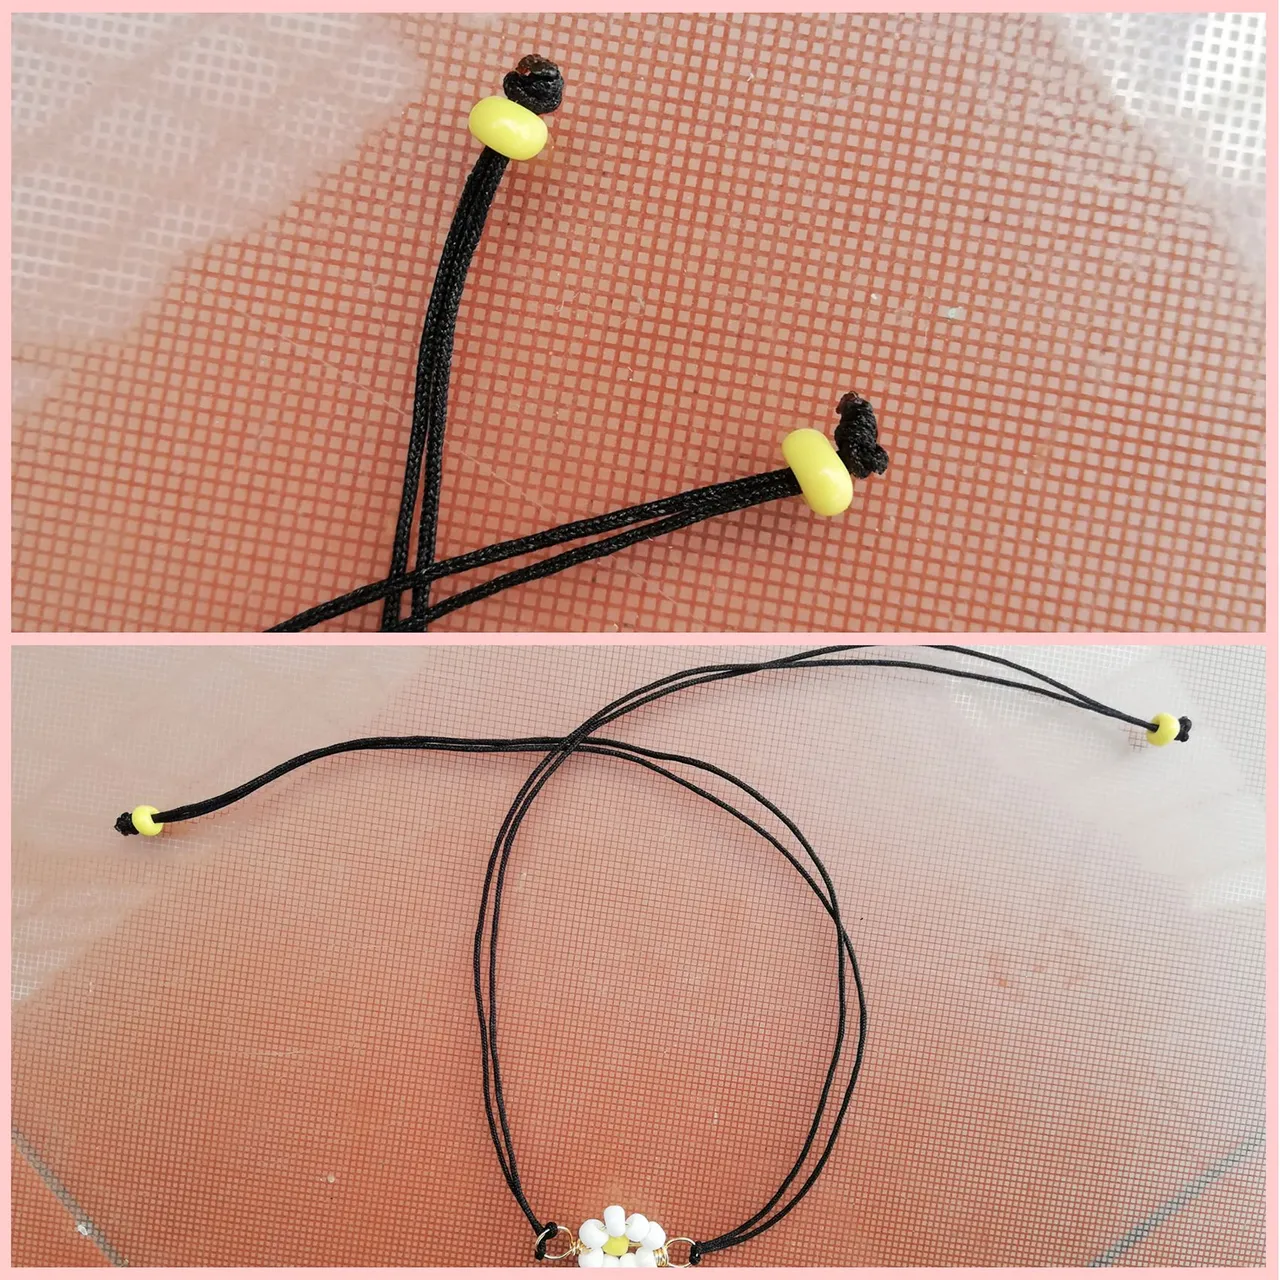
Step 5:
With the help of the lighter we carefully melt the ends of the Chinese thread, joining them together, so that it becomes easier to insert a bead through both threads. Then we make a knot and melt to secure. We do this step on the other side
ESPAÑOL
Paso 5:
Con la ayuda del encendedor derretimos con cuidado las puntas del hilo chino, uniéndolas, para que se haga más fácil introducir una mostacilla por ambos hilos. Luego hacemos un nudo y derretimos para asegurar. Hacemos este paso del otro lado
ENGLISH
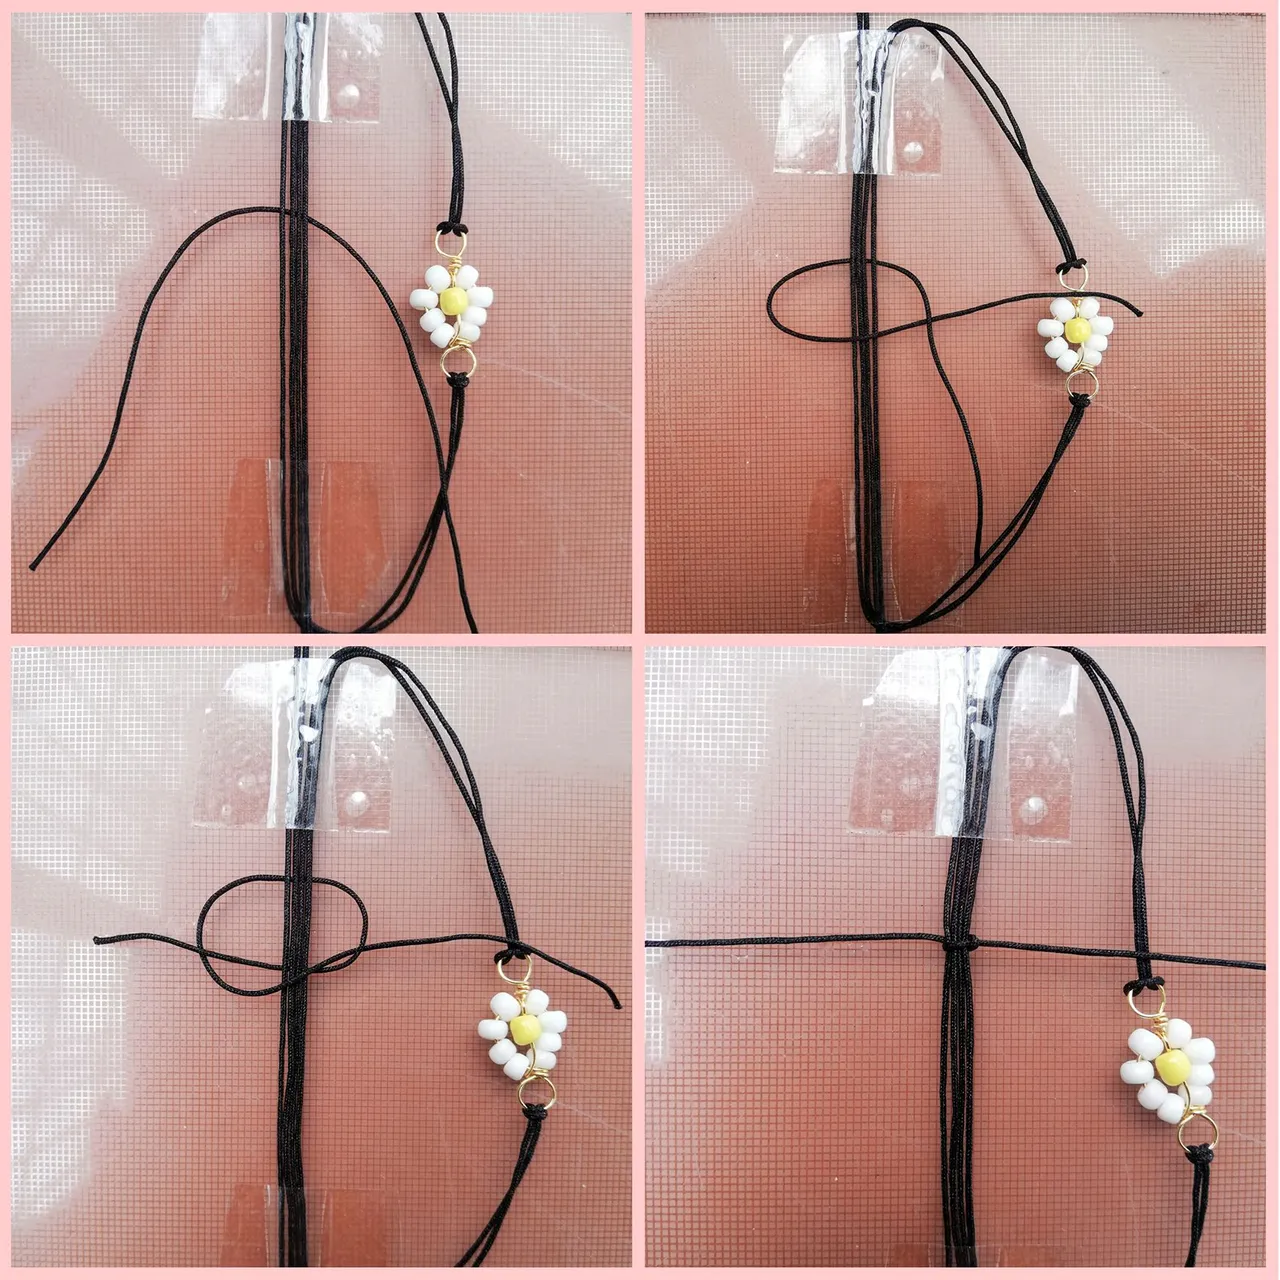
Step 6:
With the 20 centimeters of Chinese thread left over from step #4 we are going to make the adjustable knot of the bracelet.
To make it easier, with the adhesive tape we stick the threads to a notebook or table, making sure that none of them is twisted. Then we place the 20 centimeters of thread under the four strands of the bracelet, as shown in the photo.
We proceed to pass the left thread over the four threads and under the right thread forming a loop (see photo) after that, I pass the right thread under the four threads and take it out through the loop (see photo) and tighten it.
ESPAÑOL
Paso 6:
Con los 20 centímetros de hilo chino que nos sobró en el paso #4 vamos a hacer el nudo ajustable de la pulsera.
Para que sea más sencillo, con la cinta adhesiva pegamos los hilos a una libreta, tabla o mesa, cuidando que ninguno quede torcido. Luego colocamos los 20 centímetros de hilo por debajo de los cuatro hilos de la pulsera, como muestro en la foto.
Procedemos a pasar el hilo izquierdo por encima de los cuatro hilos y por debajo del hilo derecho formando una lazada (ver foto) posterior a eso, el hilo derecho lo paso por debajo de los cuatro hilos y lo saco por la lazada (ver foto) y ajusto.

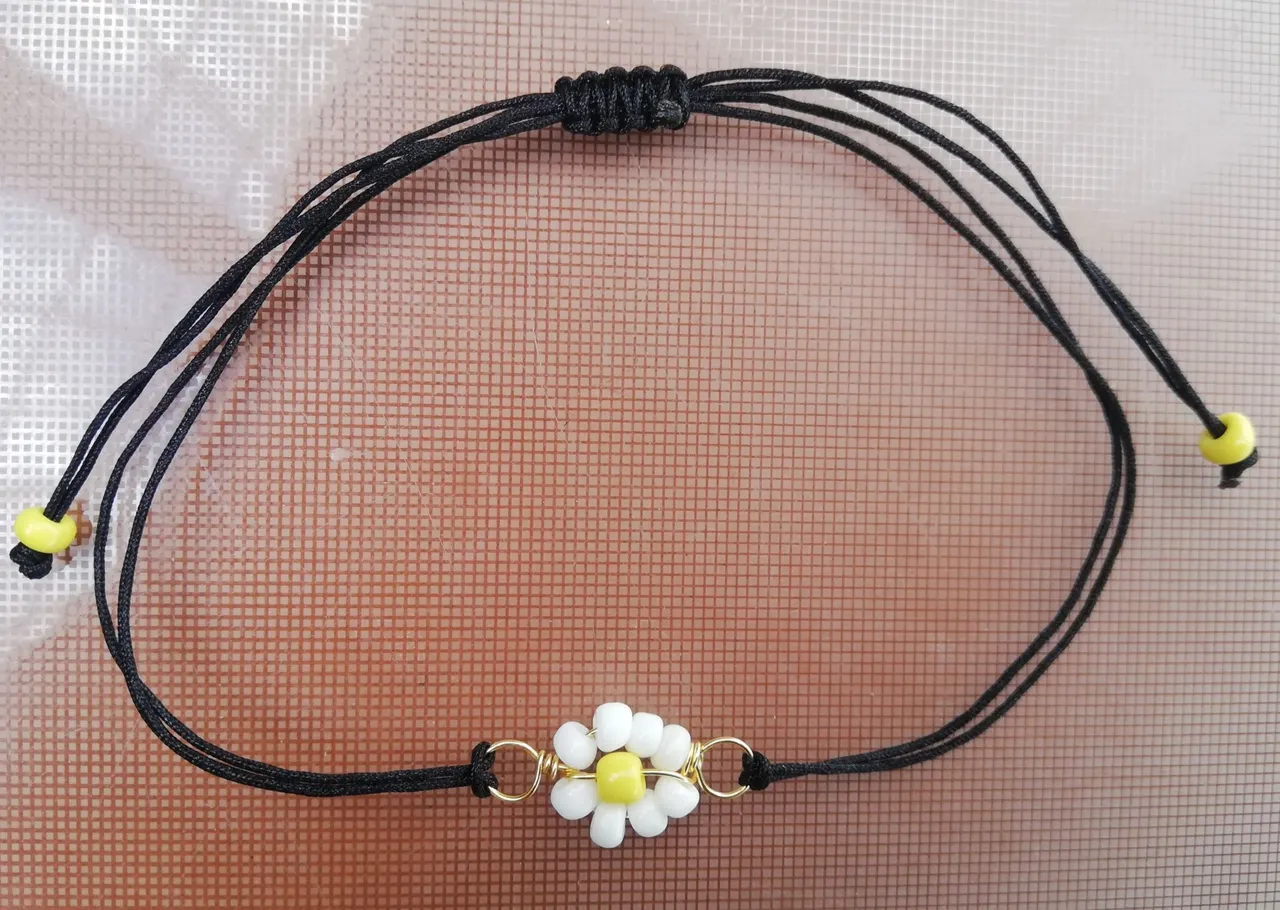
We have our daisy bracelet!
¡Tenemos nuestra pulsera de margaritas!
Creativity is on your side!
Thank you for reading it to the end.
¡La creatividad está de su lado!
Gracias por llegar hasta el final.
El texto fue traducido por DeepL.
All photographs are designed in Picsart and Photoshop.
The text was translated by DeepL.