Hola amigos creadores y visitantes, Cómo están?
Nota: Si deseas hacerlo como centro de Mesa o Adorno para cuarto de niño o fiesta te sugiero lo hagas con icopor.
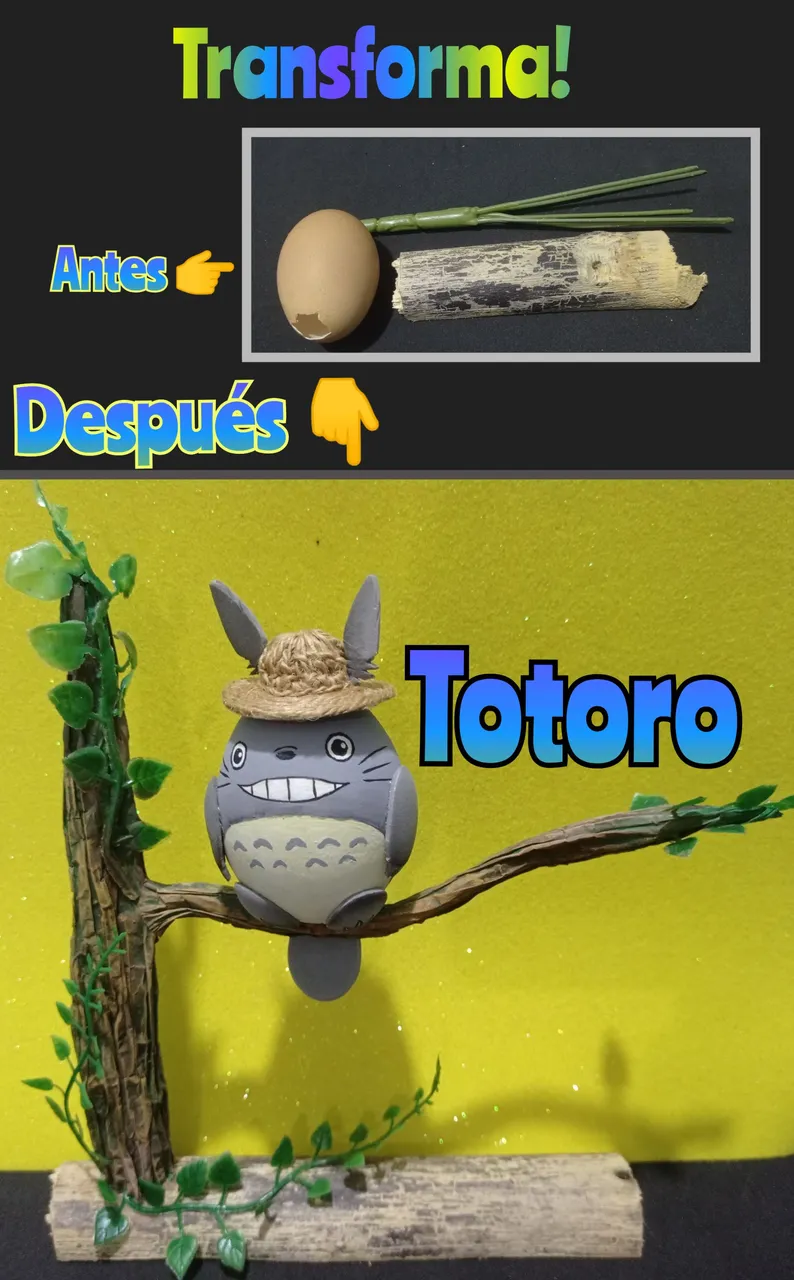
Como lo hice para mostrarles como se pueden usar estas cáscaras. no la rellene, solo apliqué con un pincel un poco de cola blanca por dentro para endurecer, otra opción es hacerlo con una esfera de anime y darle la forma ovoide o comprar una pieza de icopor con esa forma.
También la puedes hacer rellenado la cáscara con yeso.
(En la publicación que hice del dragón de fuego está la explicación de como puedes hacer la forma con una esfera de anime).
Entonces te invito a que me sigas y veas el proceso.
Vas a necesitar:

| Cáscara de huevo | Trozo de madera | Rama de flores de tela |
|---|---|---|
| Cinta de papel | Papel crepé | Silicón |
| Pinturas y pinceles | Foami | Lápiz |
| Mecatillo | Aguja de tejer(opcional) | Tijera |
| Plancha eléctrica | Cartón de caja | Rama de plástico |
PASO 1:
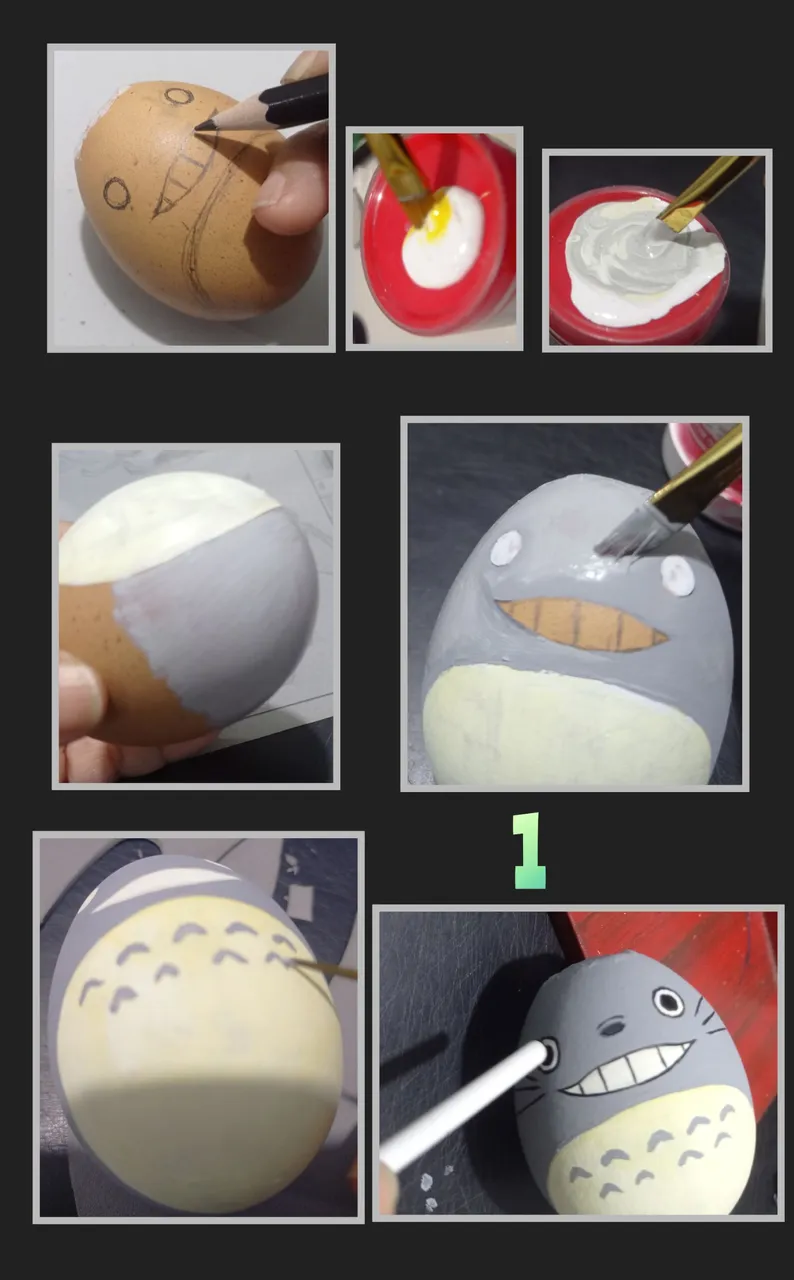
- Dibuja sobre la cáscara de huevo la figura de TOTORO, luego aplica un poco de silicón en la orilla del orificio del huevo y pega unos pedacitos de papel, deja secar y repite con otra capa de papel.
- Si no tienes pintura color amarillo claro hazlo ligando amarillo con blanco y para el tono gris usa blanco con un punto de pintura negra y revuelve hasta conseguir el tono deseado.
- Comienza pintando la barriga aplicando una capa y deja secar, si es necesario aplica otra capa, luego rellena los ojos y aplica la pintura gris y deja secar.
- Luego haz las marcas en la barriga y delínea boca, bigotes y resto de la cara y con la punta del pincel pinta el centro de los ojos.
PASO 2
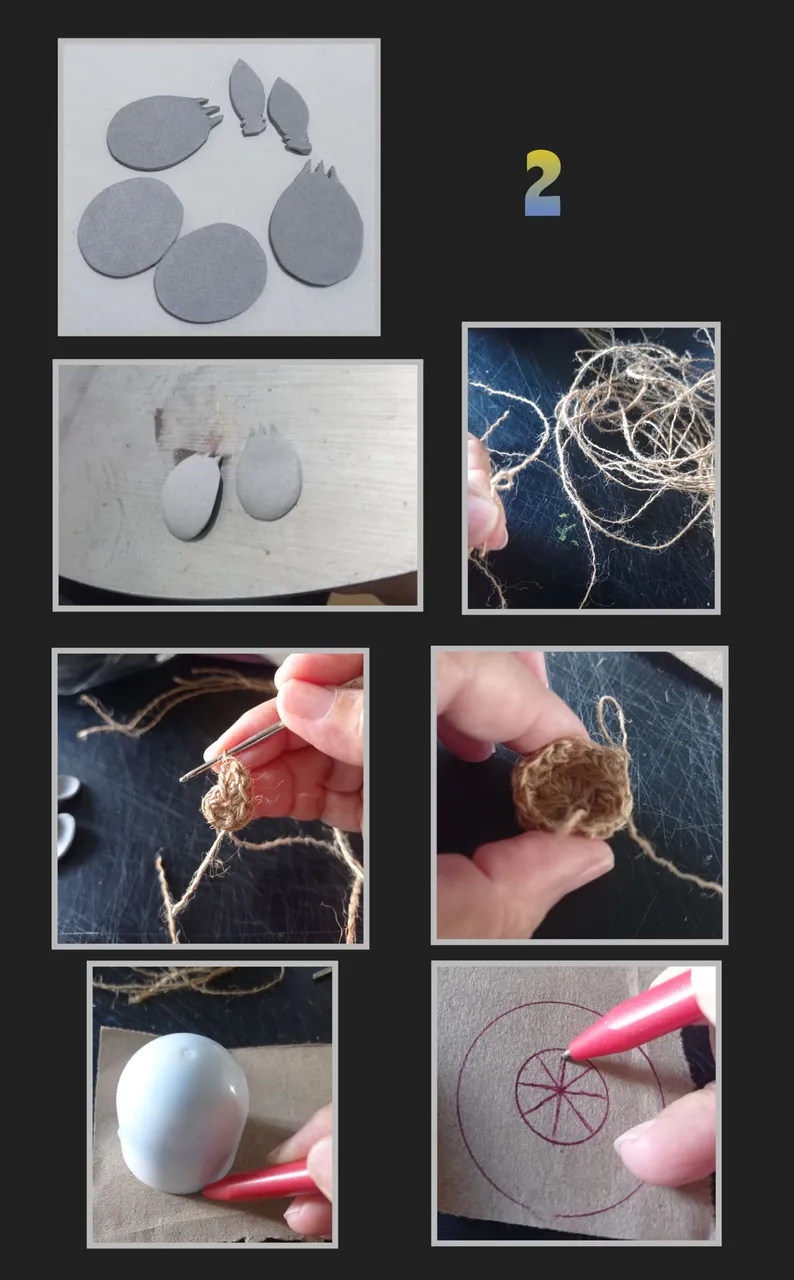
- Recorta las piezas en foami, paticas, orejas y cola y termoforma calentando la plancha y colocándolas un momento hasta que tomen un poco de volumen.
Realizar el Sombrerito:
- Con hilo mecatillo. si sabes tejer, puedes hacer la copa del sombrerito o igual la puedes hacer con foami recortando un círculo y termoformando en la plancha y forrarla con el hilo.
- Para el ala del sombrero utilicé un pedazo de papel de caja, haz una circunferencia y en el centro realiza otra y divide en varias partes (8) que te queden como triángulos.
PASO 3
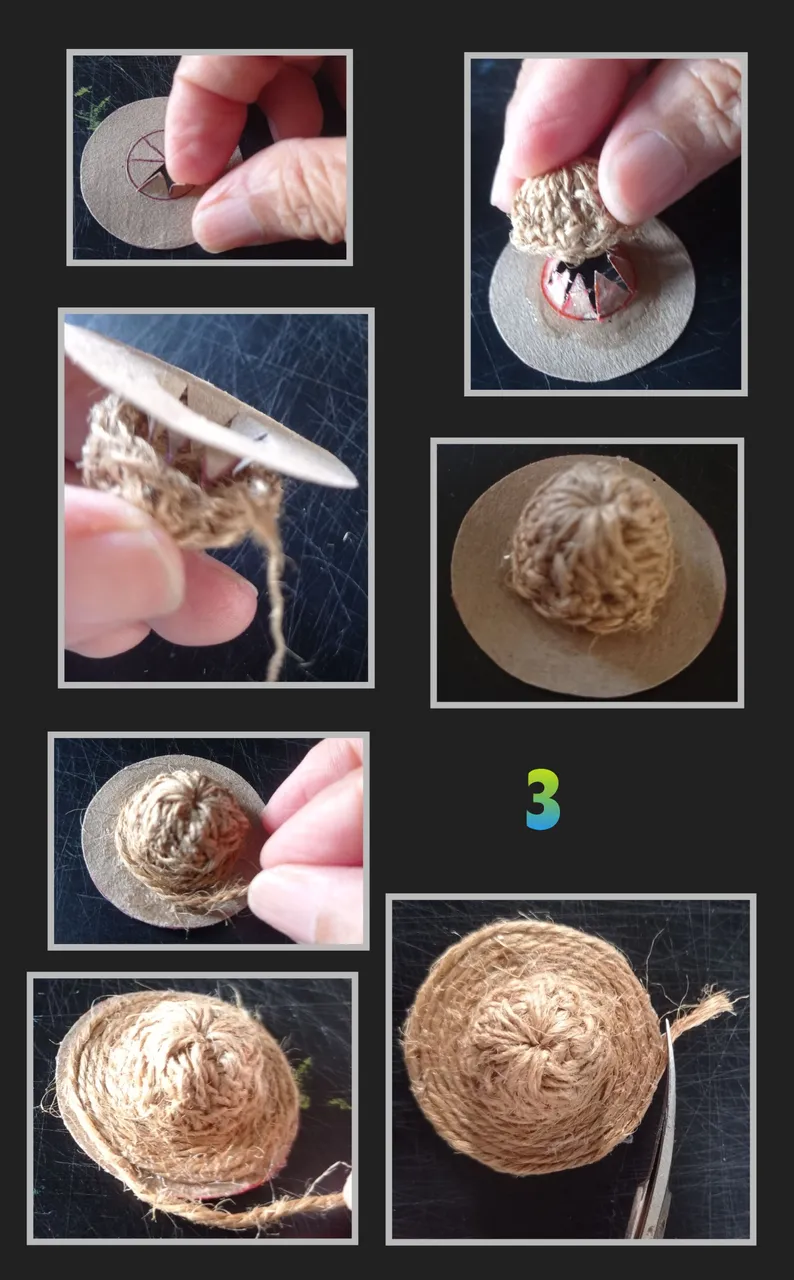
- Recorta el círculo y recorta cada línea del centro, estas pestañas te servirán para unir la copa al ala del sombrero, aplica un poco de silicón e introduce las pestañas hasta que pegue bien, luego aplica silicón en el ala y ve pegando el hilo en forma circular y recorta al cubrir todo el ala, así quedará terminado.
PASO 4:
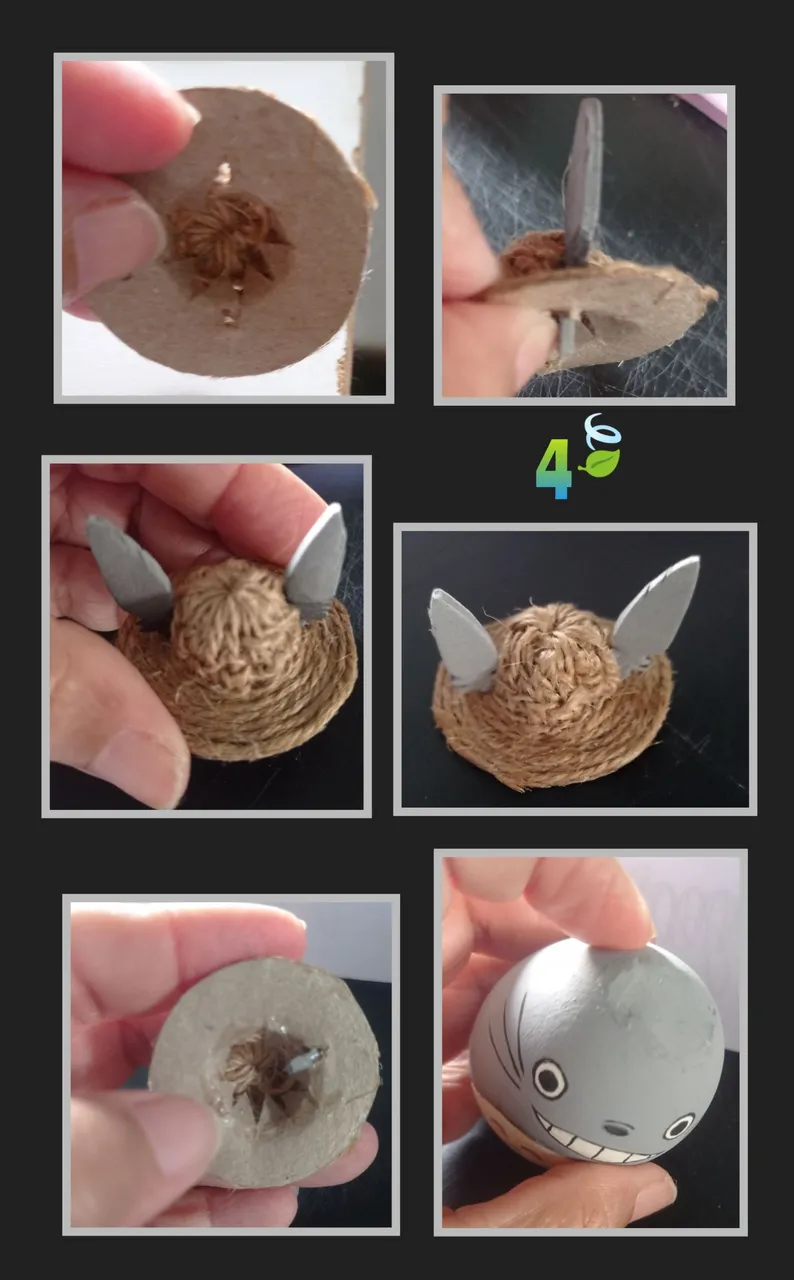
- Abre dos orificio en el sombrerito par insertar las orejitas, aplica un poco de silicón y pega.
- Luego aplica silicón al sombrero y pega en la parte de arriba para tapar la marca del orificio, también puedes colocar una hojita.
PASO 5:

- Haz un poco de presión hasta que pegue bien el sombrero.
- Luego pega los brazos y paticas.
Así va quedando!
PASO 6
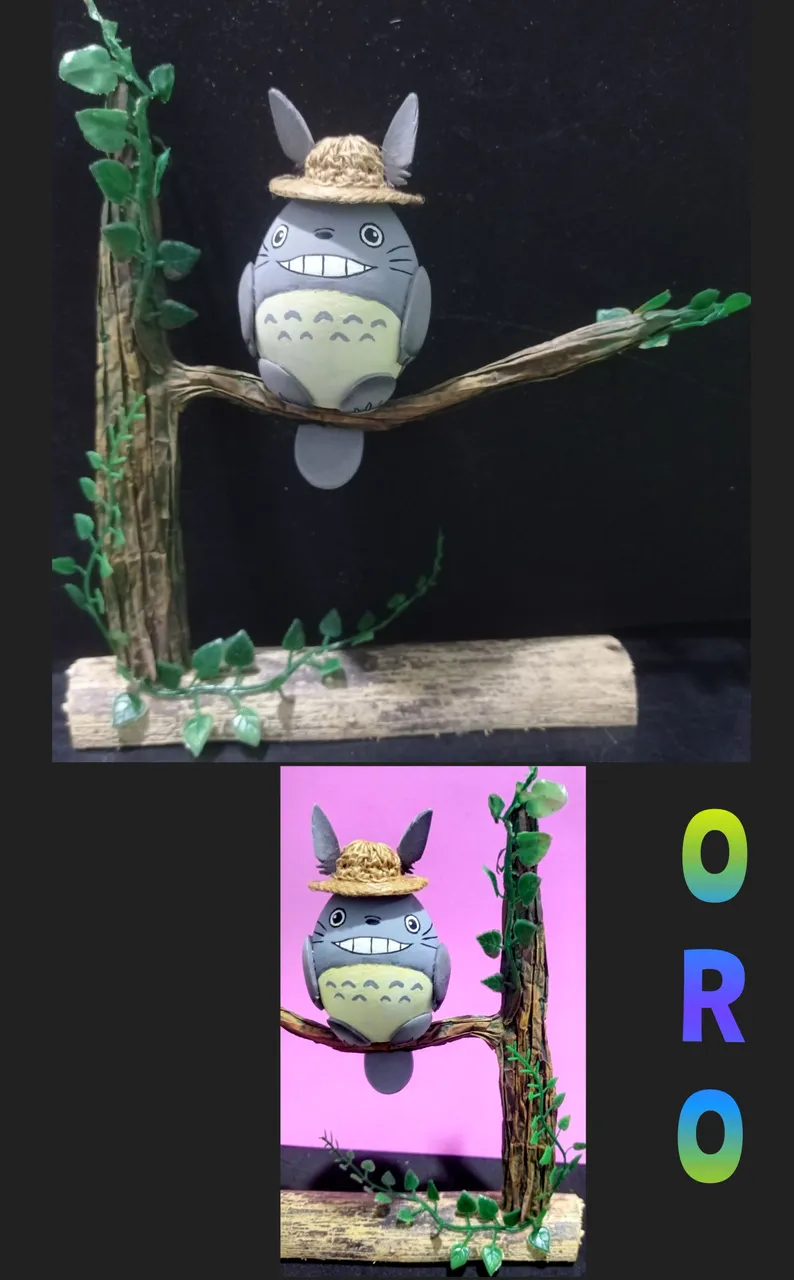
Armar el Árbol
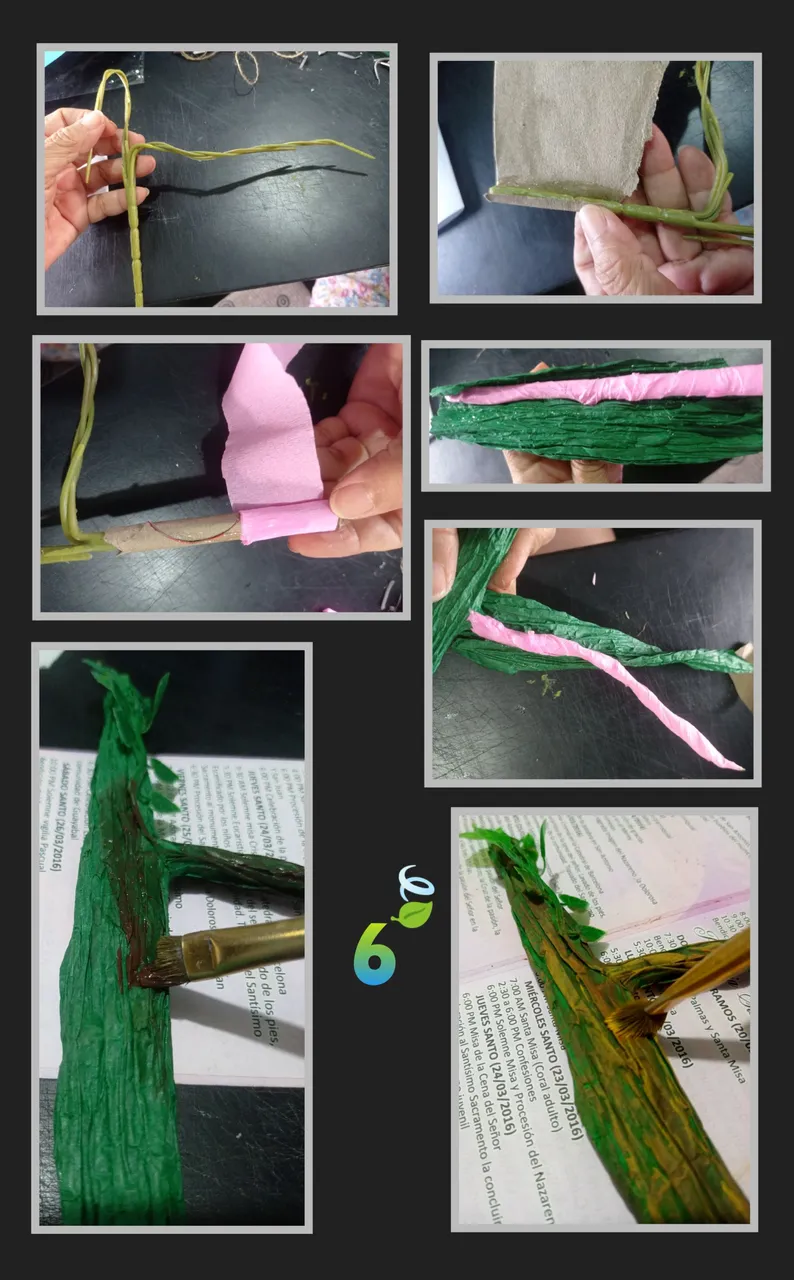
- Divide los alambres del tallo y entorcha haciendo una rama larga donde montaremos a TOTORO y la otra parte la doblas hacia abajo (Ver la foto), luego aplica silicón en el tallo y comienza a forrar con papel o cartón y luego con tiras de papel crepé enrolla hasta darle volumen al tallo y forra con cinta de papel o papel arrugado en forma vertical. y pega unas ramitas de hojas en las puntas de las ramas.
- Luego aplica pintura marrón intenso en varias partes del tronco, liga con marrón claro y amarillo para que semeje la corteza del árbol y deja secar.
PASO 7:
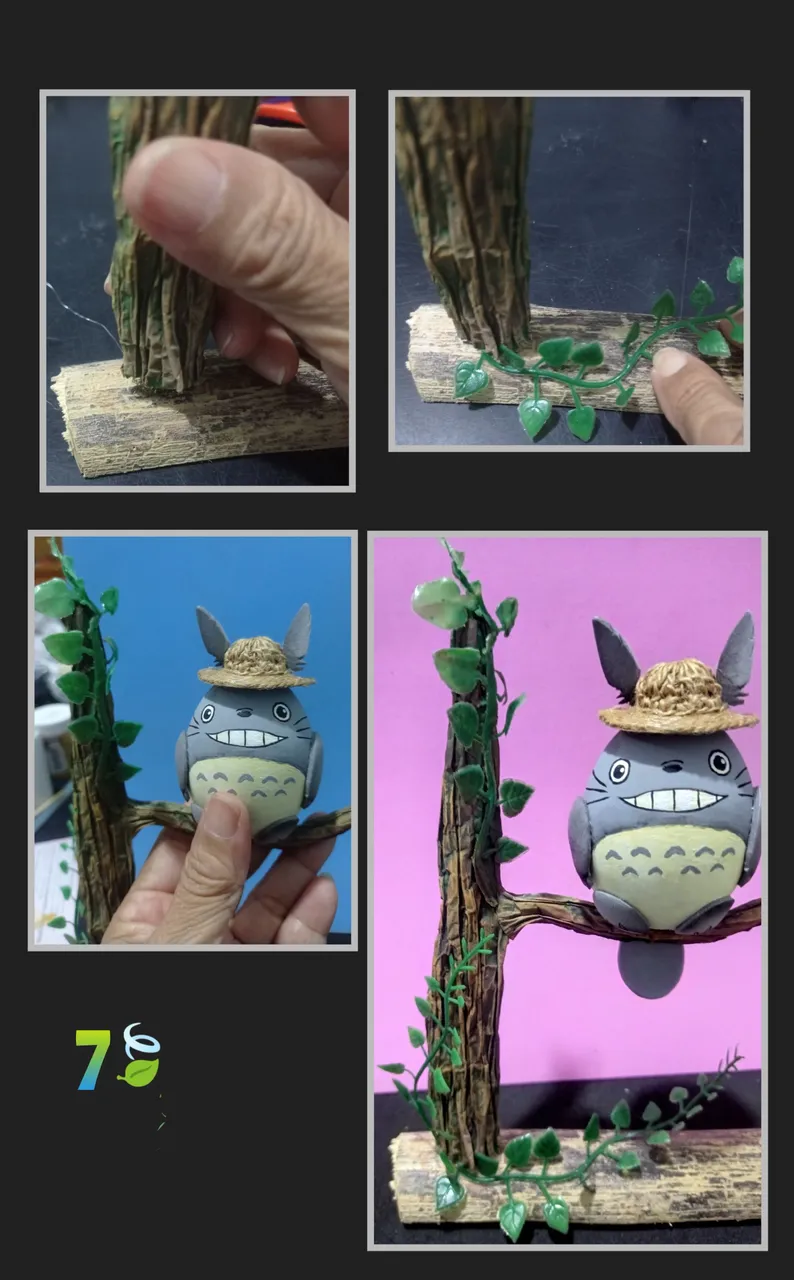
- Aplica silicón al tronco de madera y pega el tronco hecho con la rama, luego puedes adornar con las ramas de hojas.
- Ahora aplica silicón a la rama y pega a TOTORO hasta que pegue y por último pega la cola.
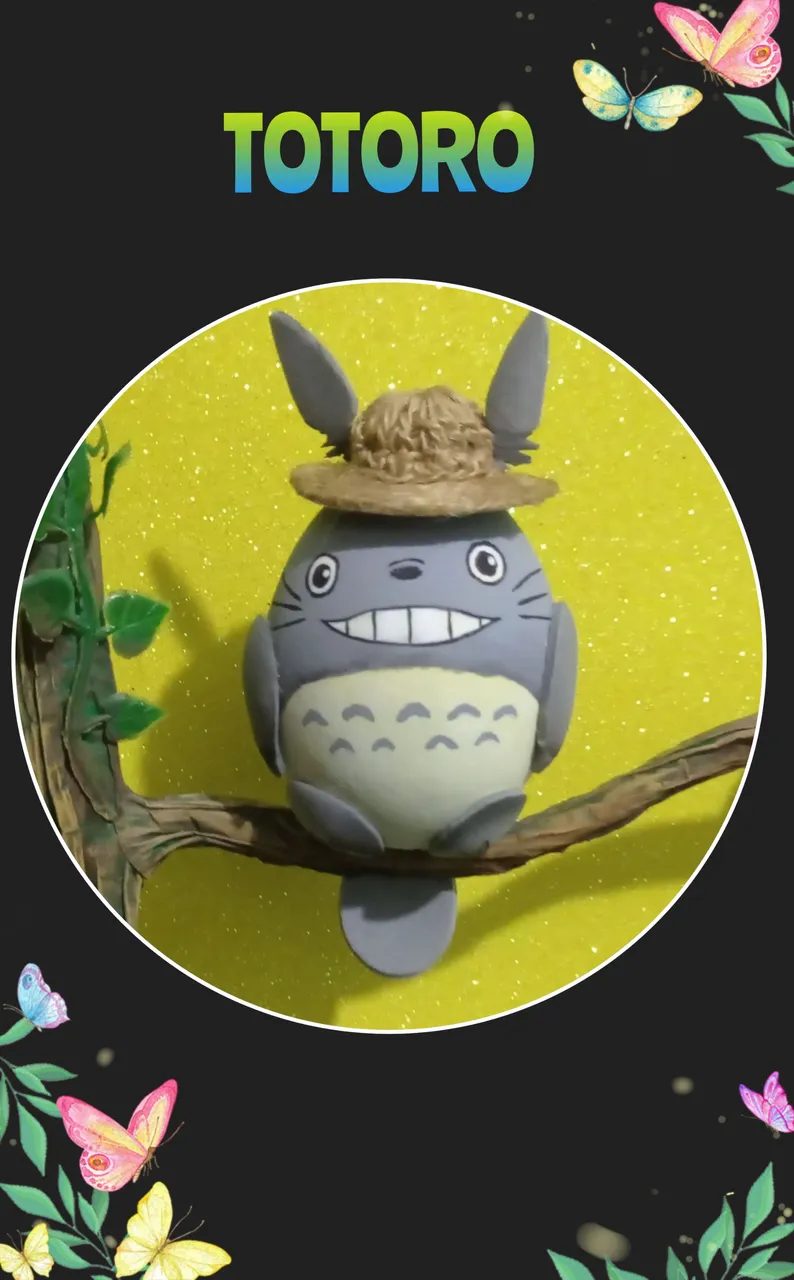
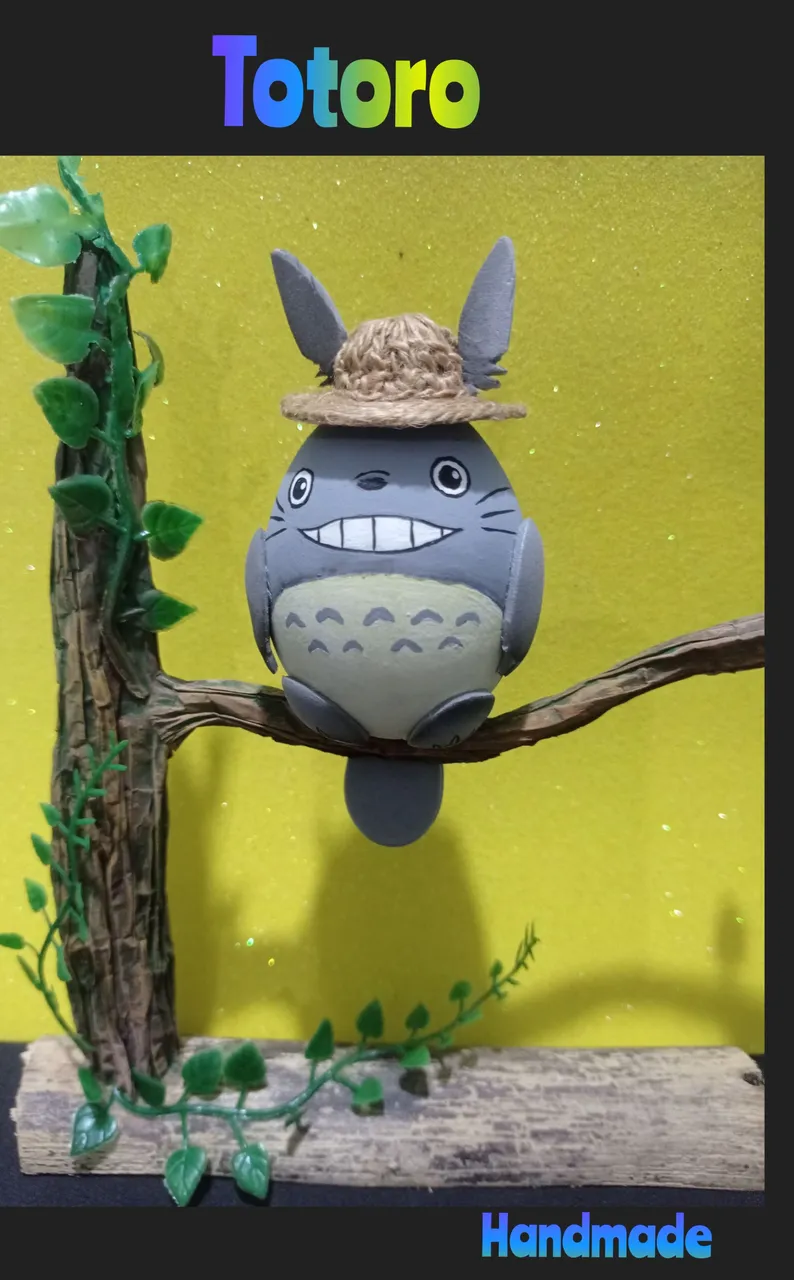
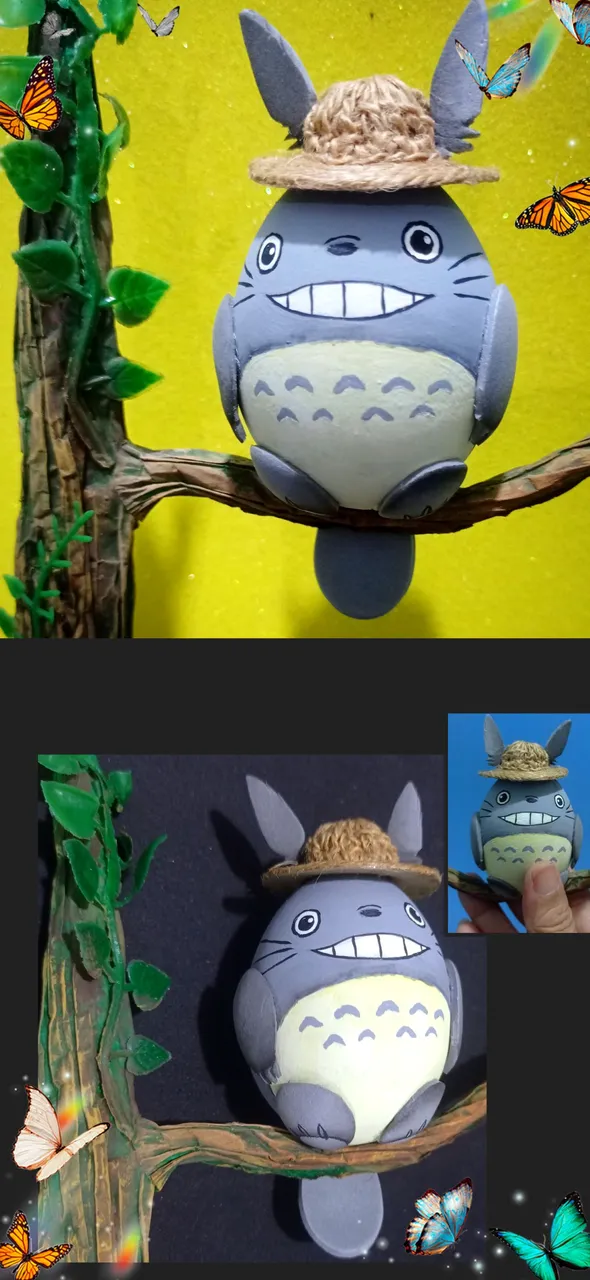
Y aquí te muestro el resultado de esta Linda creación.
Fuente:
https://es.pinterest.com/pin/586664288980178838/
Editada con Etiquetas HTML
Fotos editadas con GridArt
Teléfono Redmi Note 9.
Me despido hasta mi próximo tutorial, espero sea de tu agrado.
Y...muchas gracias por tu visita y apoyo.
Recuerda siempre poner a volar tu imaginación!
Saludos.
Hello friends, creators and visitors, How are you?
Note: If you want to make it as a table centerpiece or ornament for a child's room or party I suggest you do it with icopor.
As I did to show you how you can use these shells, do not fill it, just apply with a brush a little white glue inside to harden, another option is to do it with an anime sphere and give it the ovoid shape or buy a piece of icopor with that shape.
You can also make it by filling the shell with plaster.
(In the publication I made of the fire dragon is the explanation of how you can make the shape with an anime sphere).
Then I invite you to follow me and see the process.
You will need:
| Eggshell | Piece of wood | Branch of cloth flowers |
|---|---|---|
| Paper tape | Crepe paper | Silicone |
| Paints and brushes | Foami | Pencil |
| Knitting needle (optional) | Scissors | Electric iron |
| Carton box | Plastic branch |
STEP 1:
- Draw the TOTORO figure on the eggshell, then apply a little silicone on the edge of the egg hole and glue a few pieces of paper, let dry and repeat with another layer of paper.
- If you don't have light yellow paint do it by mixing yellow with white and for the gray tone use white with a dot of black paint and stir until you get the desired tone.
- Start painting the belly by applying one coat and let it dry, if necessary apply another coat, then fill in the eyes and apply the gray paint and let it dry.
- Then make the marks on the belly and outline the mouth, whiskers and the rest of the face and with the tip of the brush paint the center of the eyes.
STEP 2
- Cut out the foami pieces, paws, ears and tail and thermoform by heating the iron and placing them for a moment until they take a little volume.
To make the little hat:** ** With mecatillo thread.
- With mecatillo thread, if you know how to knit, you can make the top of the hat or you can also make it with foami by cutting out a circle and thermoforming it in the iron and cover it with the thread.
- For the brim of the hat I used a piece of box paper, make a circumference and in the center make another one and divide it into several parts (8) that will look like triangles.
STEP 3
- Cut out the circle and trim each line in the center, these tabs will be used to attach the cup to the brim of the hat, apply a little silicone and insert the tabs until it sticks well, then apply silicone on the brim and go pasting the thread in a circular shape and trim to cover the entire brim, so it will be finished.
STEP 4:**
- Make two holes in the hat to insert the ears, apply some silicone and glue.
- Then apply silicone to the hat and glue on the top to cover the hole mark, you can also place a leaf.
STEP 5:
- Put a little pressure until the hat is well glued.
- Then glue the arms and legs.
**This is how it will look like!
> STEP 6
Assemble the tree
- Divide the wires of the stem and twist making a long branch where we will mount TOTORO and the other part you bend it down (See photo), then apply silicone on the stem and begin to line with paper or cardboard and then with strips of crepe paper roll up to give volume to the stem and line with paper tape or crumpled paper vertically. and glue a few sprigs of leaves at the tips of the branches.
- Then apply deep brown paint on various parts of the trunk, bind with light brown and yellow to resemble the bark of the tree and let dry.
STEP 7:
- Apply silicone to the wooden trunk and glue the trunk made with the branch, then you can decorate with the leafy branches.
- Now apply silicone to the branch and glue TOTORO until it sticks and finally glue the tail.
And here I show you the result of this nice creation.
Source:
https://es.pinterest.com/pin/586664288980178838/
Edited with HTML Tags
Edited photos with GridArt
Redmi Note 9 Phone.
I say goodbye until my next tutorial, I hope it will be to your liking.
And...thank you very much for your visit and support.
Always remember to let your imagination run wild!
Regards.