Buenas noches mis queridos amigos, bienvenidos sean todos a mi lugar preferido.
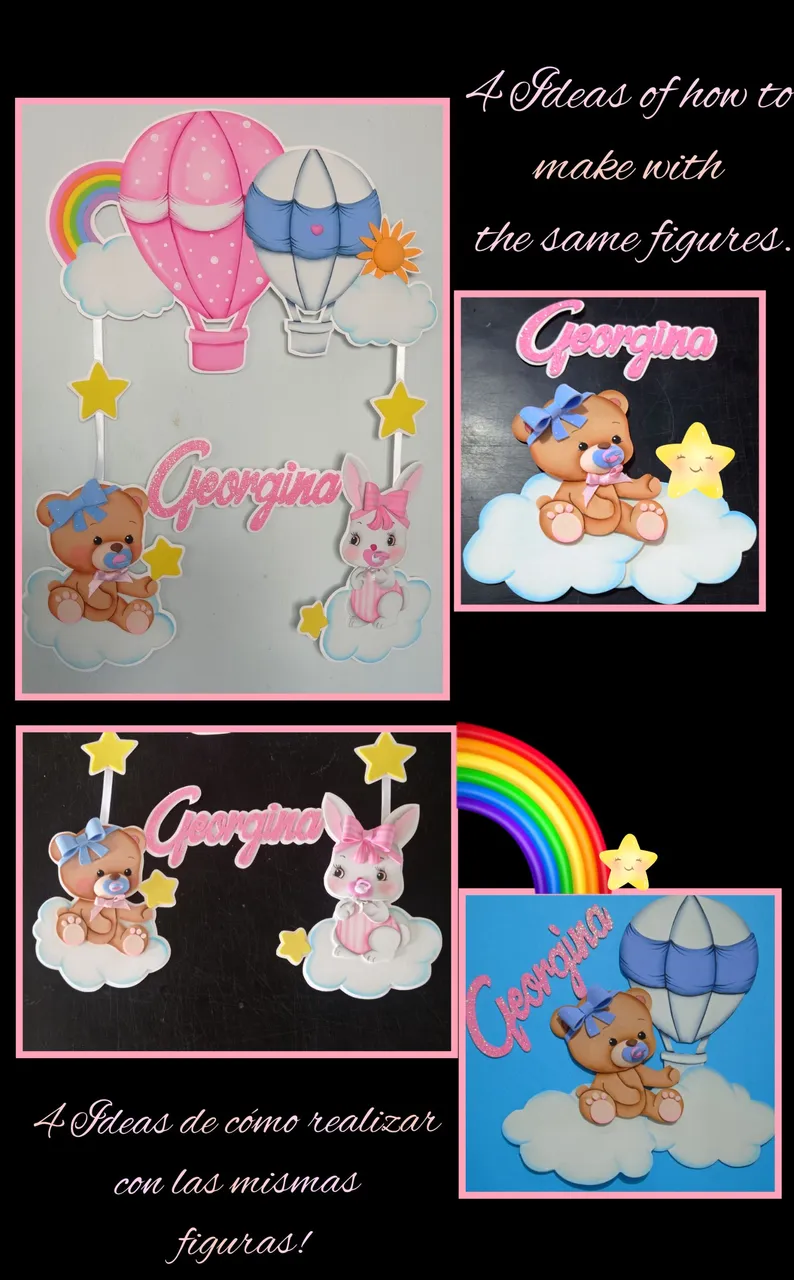
Por eso aquí te dejo varias ideas para que escojas o transformes a tu gusto.
Entonces te invito a que me acompañes.
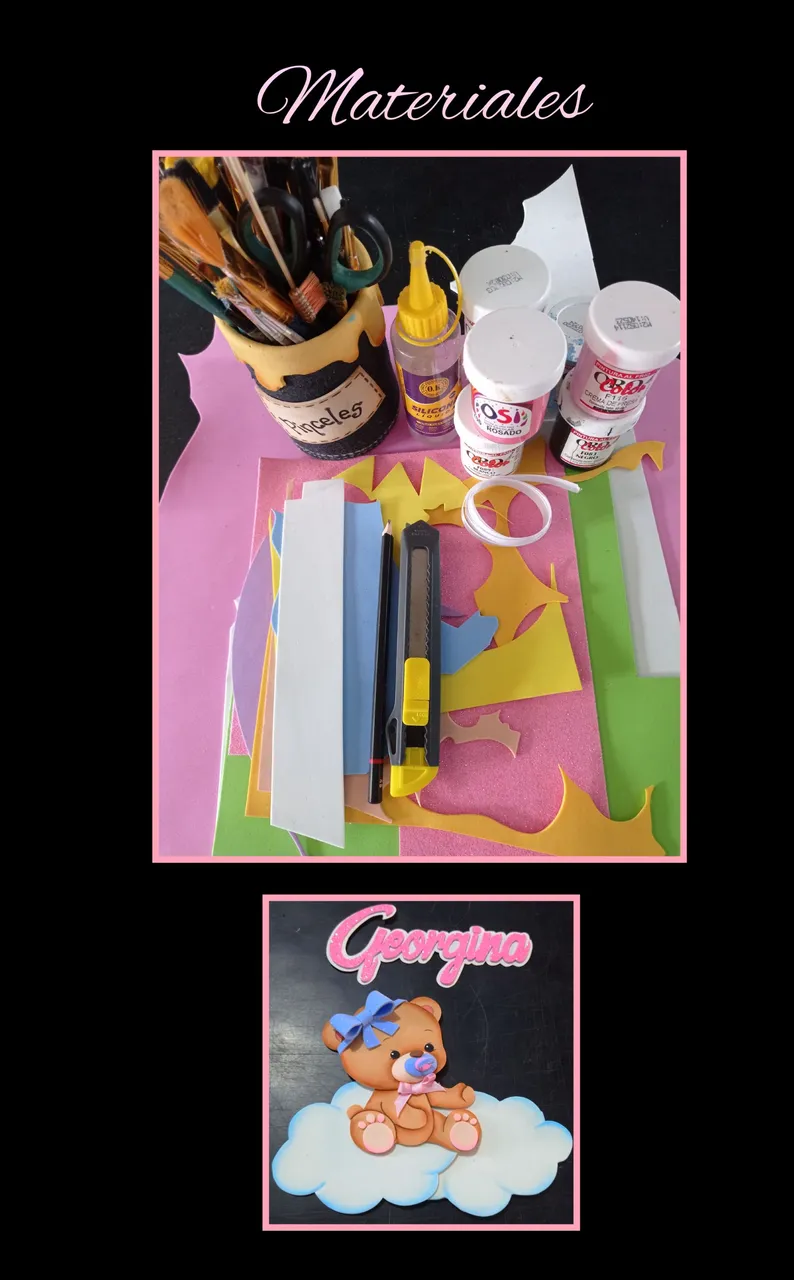
Necesitarás:
| Foami de colores mates y escarchado | Cartulina blanca |
|---|---|
| Pinturas y pinceles | Tijera y cuchilla |
| Lápiz | Cinta de tela |
| Silicón y tiza | Plancha eléctrica |
| Molde o dibujo |
Comencemos:
Paso 1:
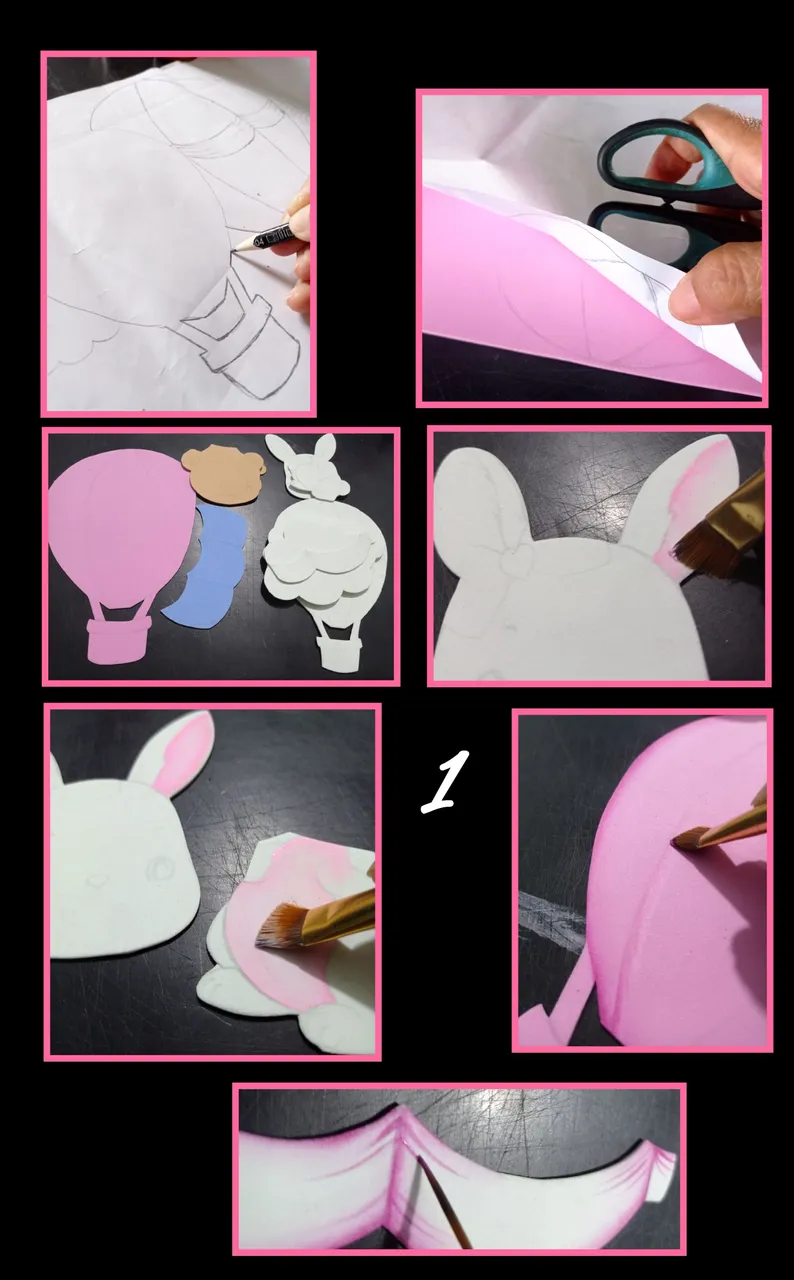
- Remarca el dibujo y transfiere al foami colocando el papel encima y frota haciendo un poco de presión hasta que se marque, esto lo harás con todas las figuras y luego recorta.
- Luego comienza a rellenar con pintura las orejas y partes que quieras. Luego humedece un pincel y moja la punta en pintura rosada y comienza a pasar por todo el contorno y líneas marcadas y delinea con un pincel fino.
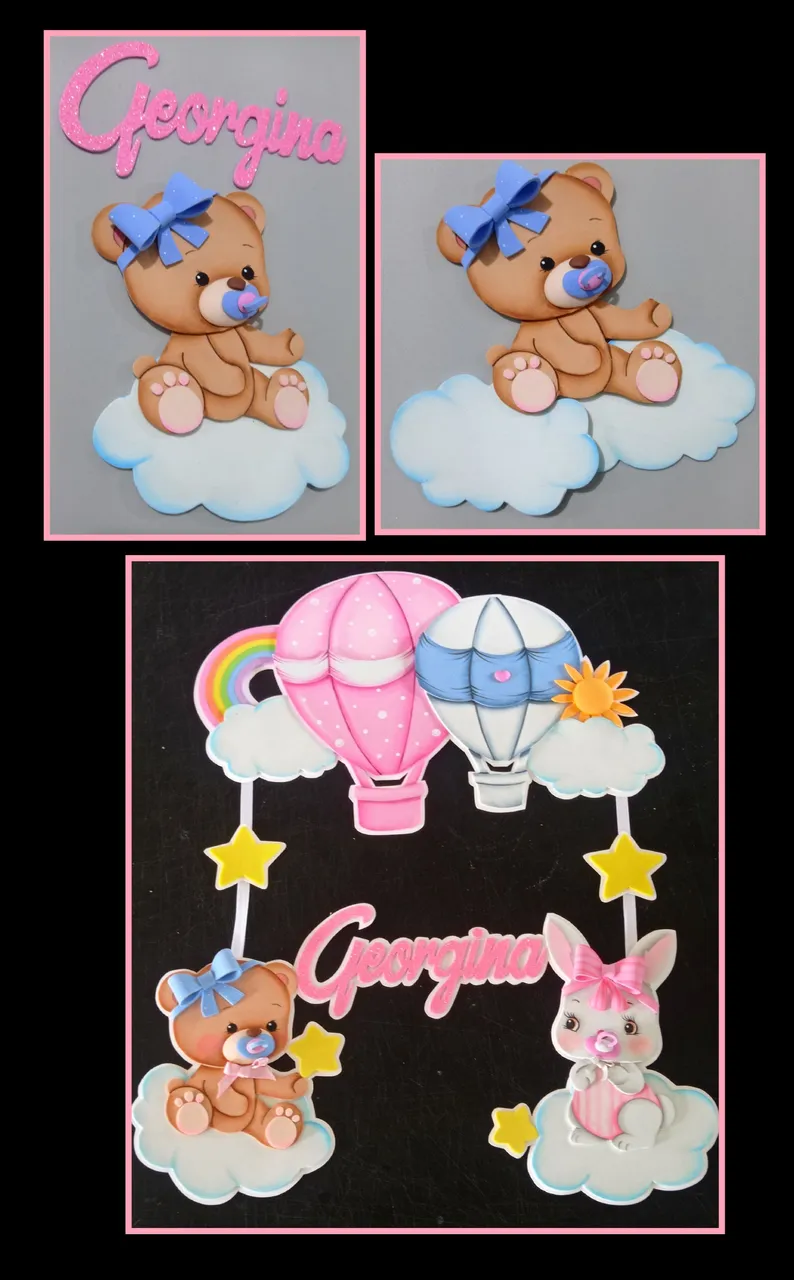
Paso 2:
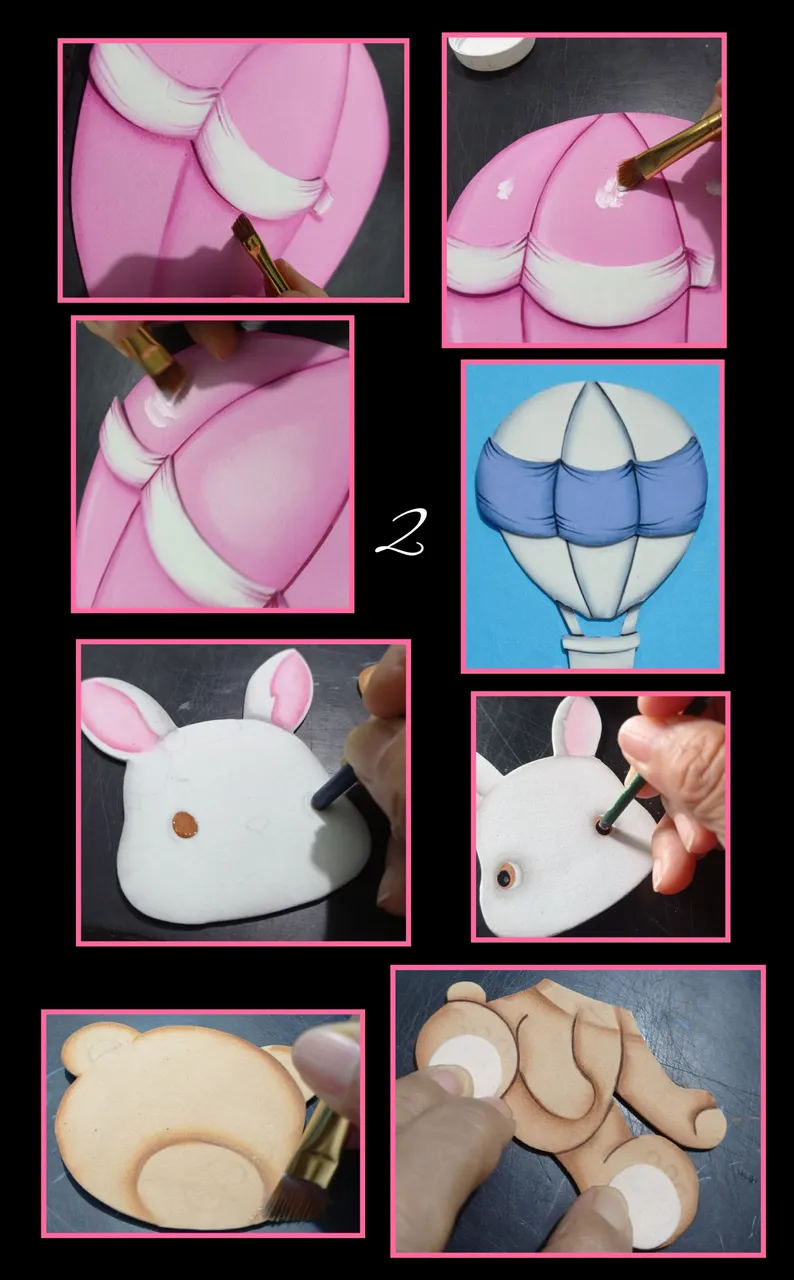
Pega los adornos de globos y luego pinta debajo para dar sombra a la pieza, después con pintura blanca aplica en el centro y difumina con un pincel o con una pañito húmedo que no se note y se vea como brillo o claridad en el globo o en los globos si quieres hacerlo igual a este.
- Ahora con la parte trasera del pincel pinta los ojos al conejo, deja secar y repite con pintura negra. repite los mismos pasos en todas las piezas y comienza a pegar y armar.
Paso 3:
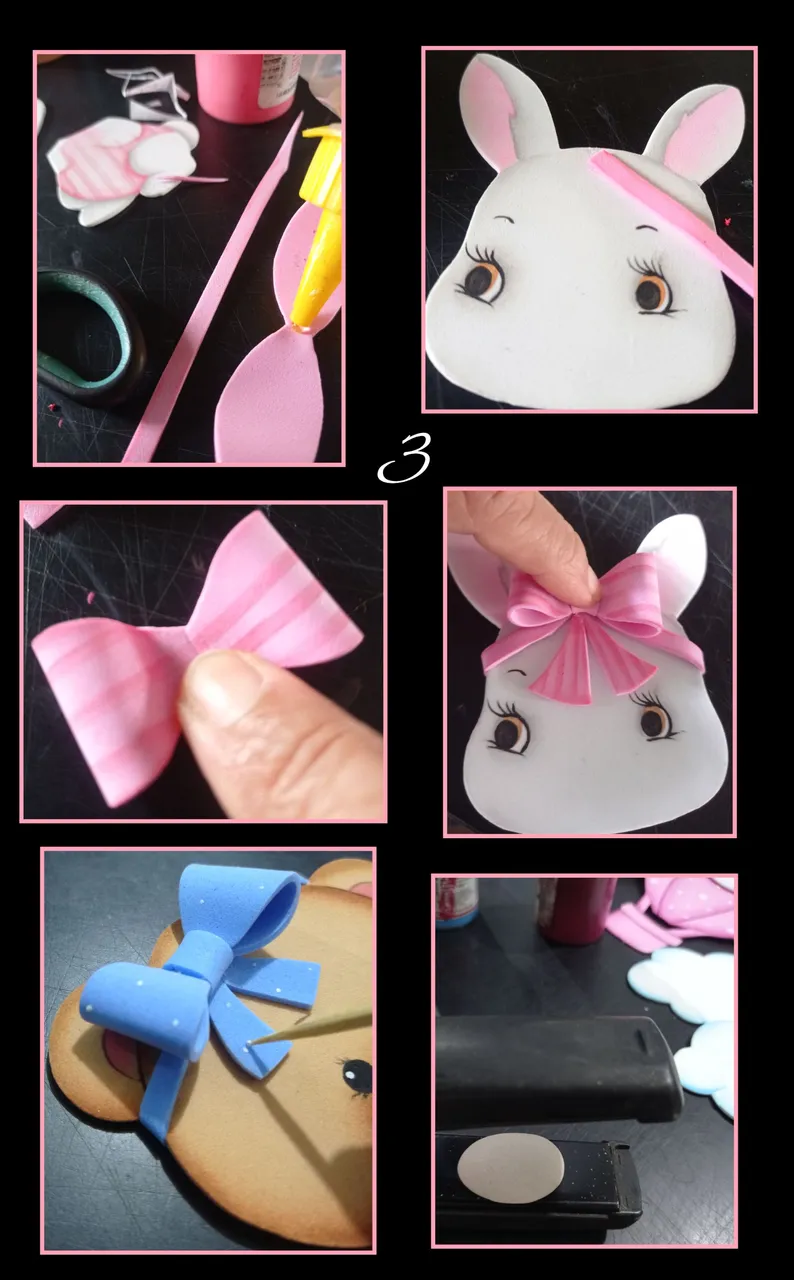
- Arma y pega el lazo a la coneja, y osita. Deja secar y luego calienta la plancha y coloca a termoformar la el hocico.
Paso 4:
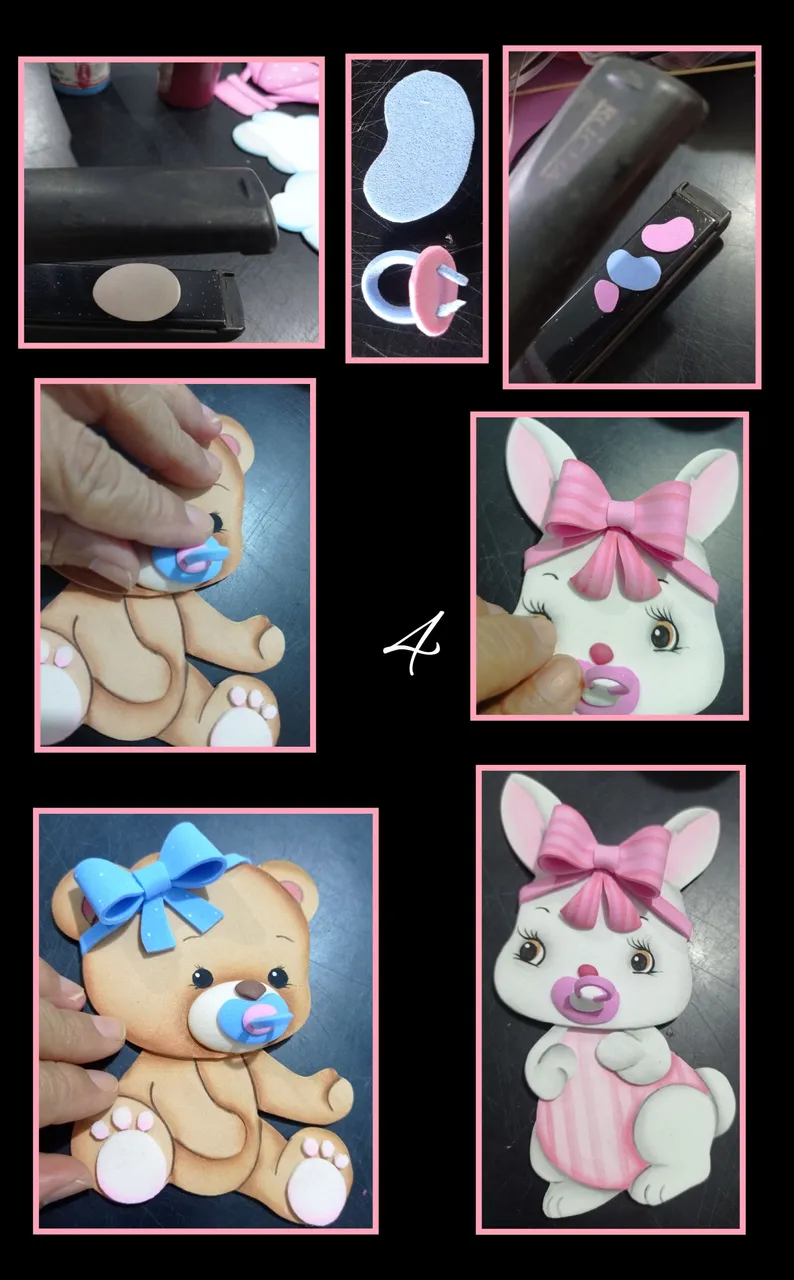
- Después arma los chupones y pega, así quedarán listas la coneja y la osita.
Paso 5:
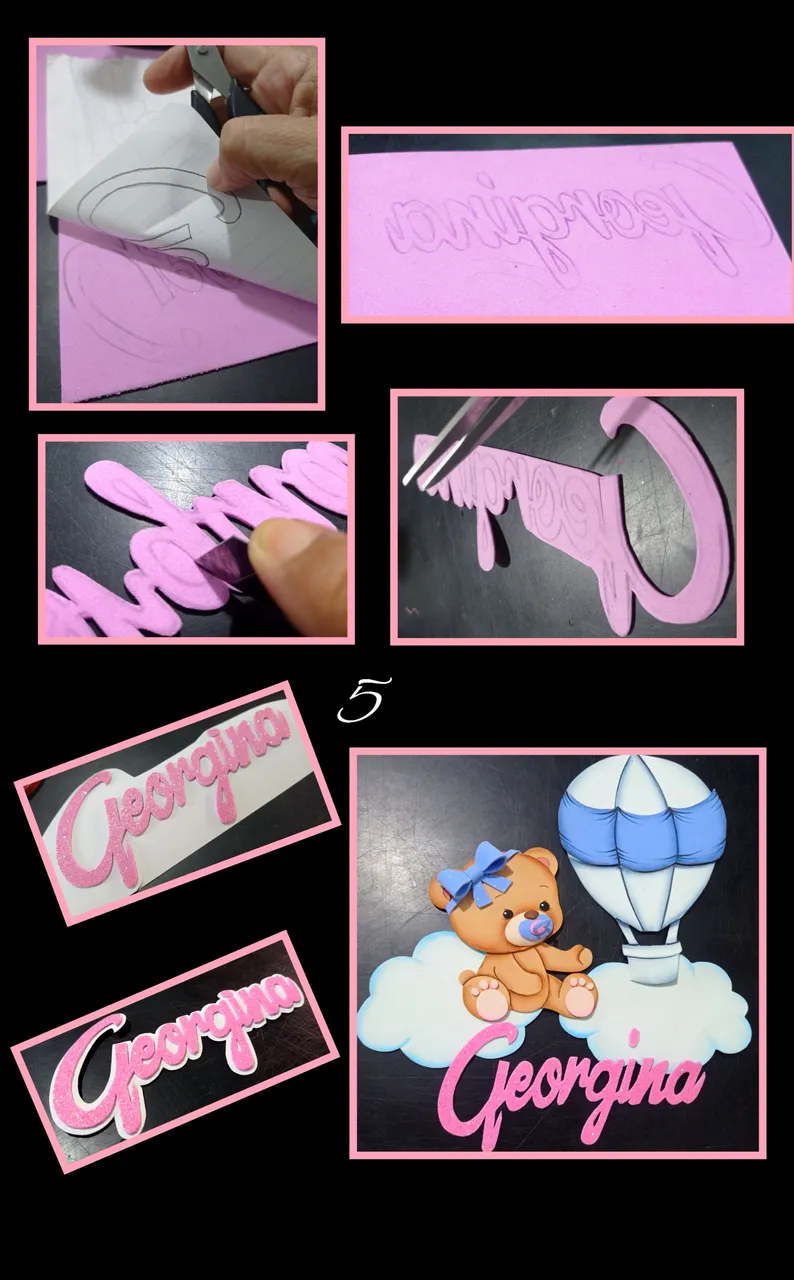
- Para realizar el nombre copia o calca.
- Luego coloca sobre la parte posterior del foami escarchado y frota con la tijera, después recorta por el borde y luego con la cuchilla haz una incisión y saca las formas de las letras.
- Ahora aplica silicón y pega sobre un pedazo de cartulina blanca y recorta.
Aquí te muestro otra forma de como puedes armar el nombre por separado.
Paso 6:
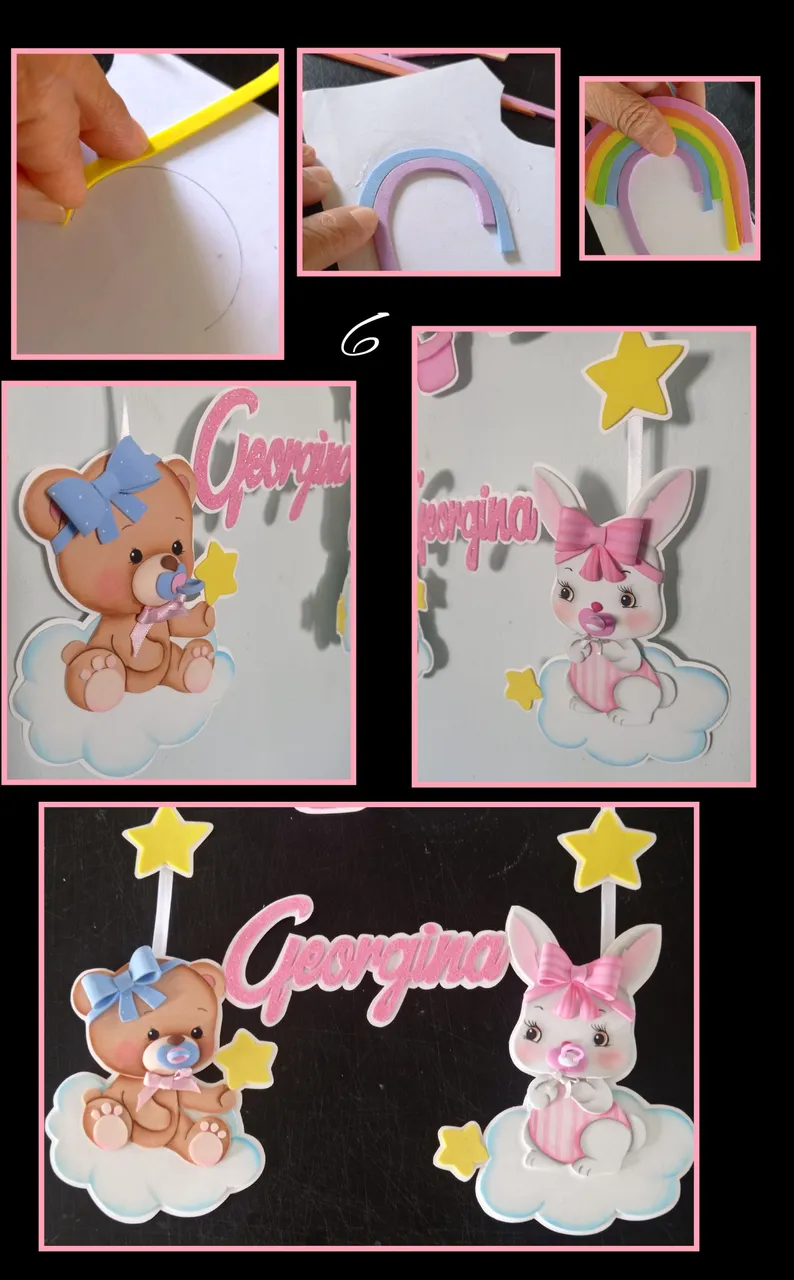
- Arma un arcoiris, para ello, recorta tiras de foami (5 milímetros) de distintos colores), aparte traza una media circunferencia sobre cartulina blanca y comienza a pegar las tiras, una al lado de la otra y deja secar.
Otra idea para armar:
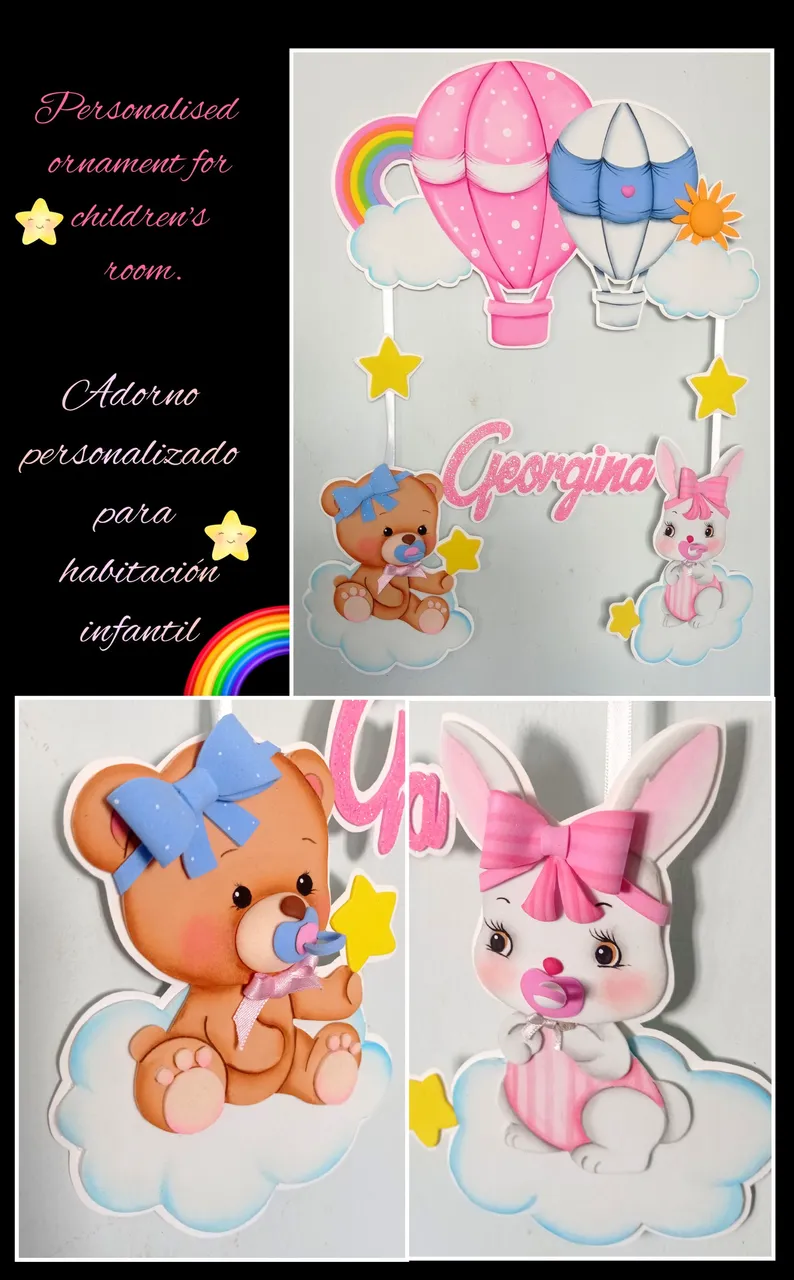
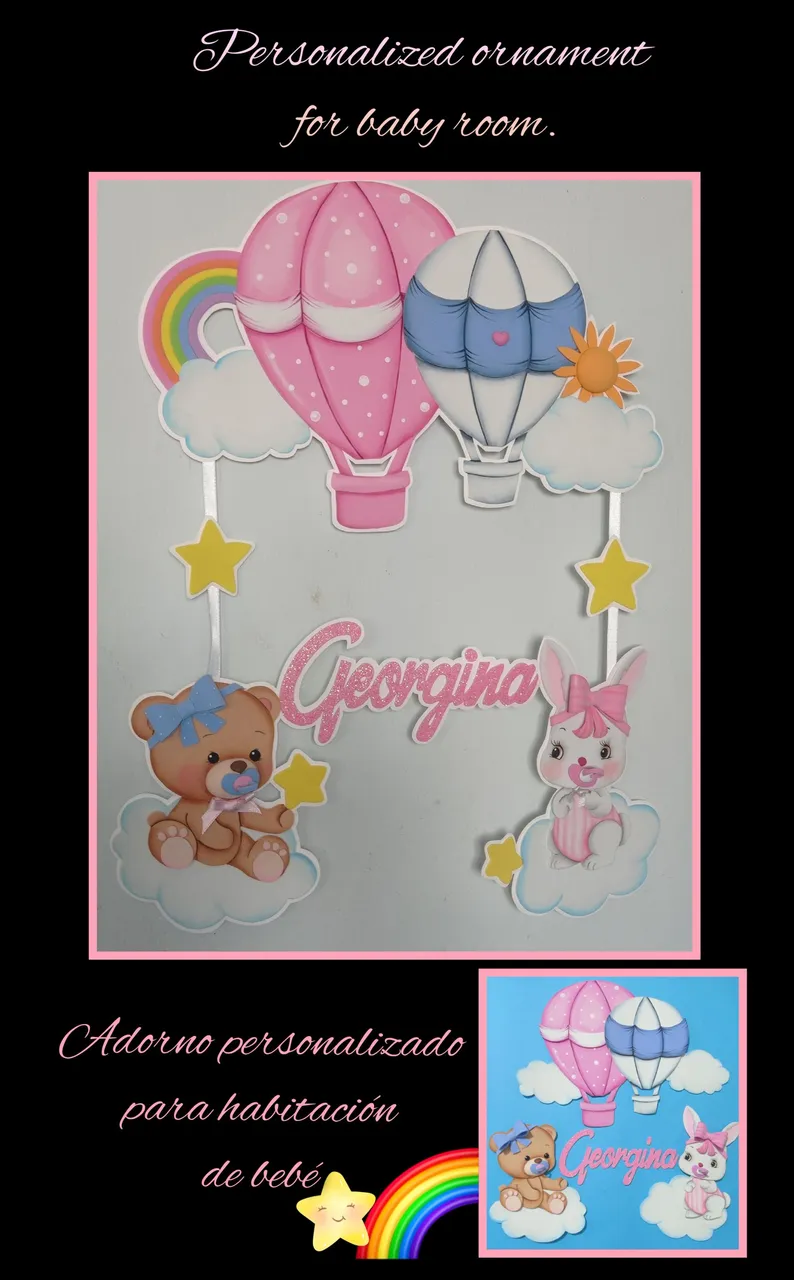
Puedes pegar las figuras sobre las nubes y decorar con estrellas.
- Puedes ver como podemos jugar con las figuras y armar a tu gusto.
Siempre te digo, es cuestión de creatividad y colocar las cosas con armonía.
Fuente:https://www.pinterest.es/pin/476255729361526909/
Y llegó la hora de despedirme, no sin antes decirles que mi publicación esta traducida con DeepL, usando etiquetas HTML, editor de fotos GridArt y mi teléfono Redmi Note 9.
Animate y hazlo conmigo!
Espero te guste mi publicación y si tienes alguna duda, estoy a tu orden para ayudarte.
English:
Good evening my dear friends, welcome everyone to my favourite place.
So here are some ideas for you to choose or transform to your liking.
Then I invite you to join me.
You will need:
| Matte and frosted coloured Foami | White cardboard |
|---|---|
| Paints and brushes | Scissors and razor blade |
| Pencil | Cloth ribbon |
| Silicone and chalk | Electric iron |
| Mould or drawing |
Let's get started:
Step 1:
- Outline the drawing and transfer it to the foami by placing the paper on top and rubbing it with a little pressure until it is marked, you will do this with all the figures and then cut it out.
- Then start to fill in the ears and the parts you want with paint. Then wet a paintbrush and dip the tip in pink paint and start to go all over the contour and marked lines and outline with a fine brush.
Step 2:
Glue the balloon ornaments and then paint underneath to shade the piece, then with white paint apply in the centre and blend with a brush or a damp cloth so that it is not noticeable and looks like glitter or clarity on the balloon or on the balloons if you want to make it the same as this one.
- Now with the back of the brush paint the eyes of the bunny, let dry and repeat with black paint. Repeat the same steps on all the pieces and start gluing and assembling.
Step 3:
- Assemble and glue the ribbon to the rabbit and bear. Leave to dry and then heat the iron and thermoform the muzzle.
Step 4:
- Then assemble the dummies and glue the bunny and the bear.
Step 5:
- To make the name, copy or trace.
- Then place on the back of the frosted foami and rub with the scissors, then cut along the edge and then make an incision with the knife and remove the shapes of the letters.
- Now apply silicone and stick onto a piece of white cardboard and cut out.
Here is another way of how you can assemble the name separately.
Step 6:
- To make a rainbow, cut out strips of foami (5 millimetres) in different colours, then trace a half circle on white cardboard and start gluing the strips side by side and leave to dry.
Another idea for assembly:
You can glue the figures on top of the clouds and decorate with stars.
- You can see how we can play with the figures and put them together as you like.
I always tell you, it's a matter of creativity and placing things in harmony.
Fuente:https://www.pinterest.es/pin/476255729361526909/
And it's time to say goodbye, but not before telling you that my post is translated with DeepL, using HTML tags, GridArt photo editor and my Redmi Note 9 phone.
Cheer up and do it with me!
I hope you like my post and if you have any questions, I'm here to help you.