Saludos mis queridos amigos de esta creativa comunidad 🤗
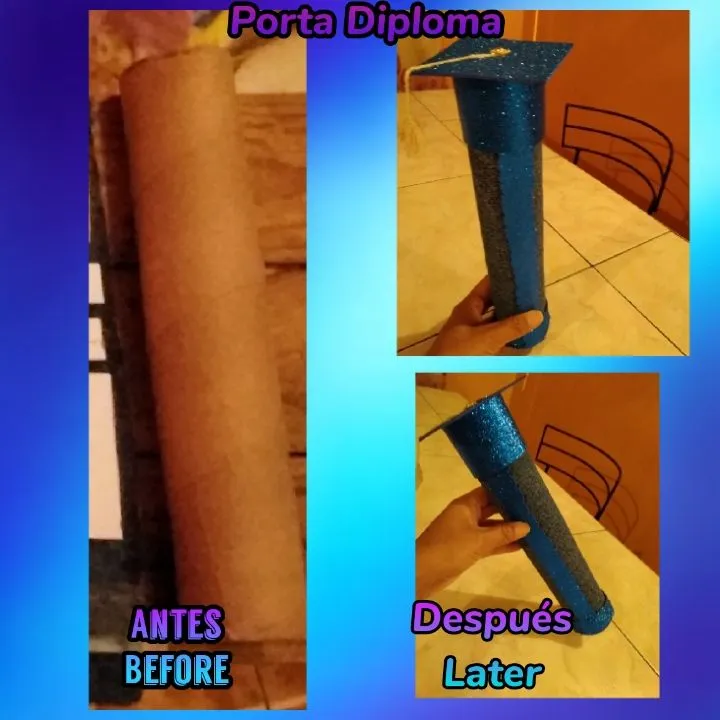
El día de hoy les traigo un proyecto que realice ayer un "Porta Diploma", es un encargo que me hizo una amiga para su niño pues ya pronto pasará a primer grado y en su colegio le realizarán su acto de promoción y como toda mamá anda emocionada porque es la primera meta de su bebé así le dice y quiere ir realizando todos los preparativos con antelación.
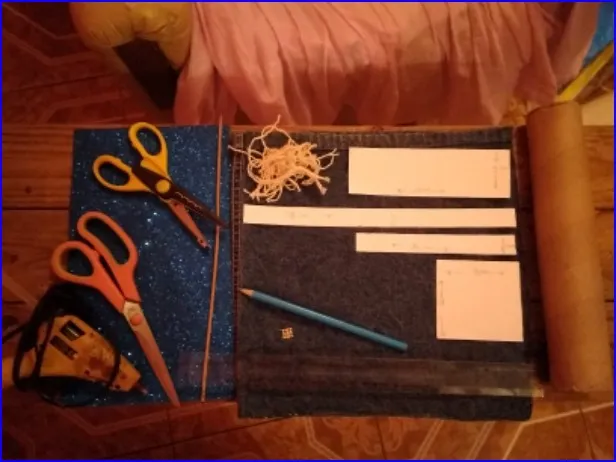
Este Porta Diploma es sencillo, utilice pocos materiales en su mayoría son de reciclaj, bueno tomen lápiz y papel 📝 y vamos al paso a paso.
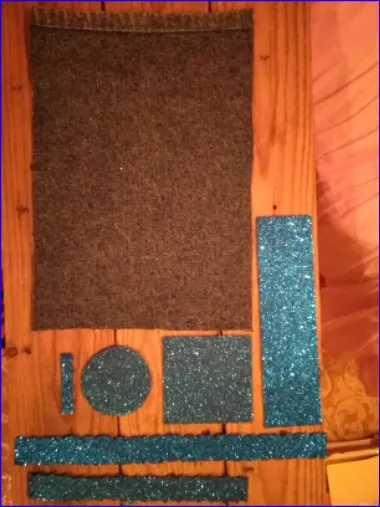
MATERIALES
📌Cílindro del papel aluminio o toallín
📌 Retazo de blue jeans
📌 Foami/goma eva azul escarchado
📌 Pabilo blanco
📌 1 Botón dorado
📌 Pistola de silicón
📌 Tijera, tijera con forma ondulada
📌Lápiz
📌Regla
📌 Palito de altura
📌 Patrones
Today I bring you a project that a "Diploma Holder" made yesterday, it is an order that a friend made me for her child because soon he will go to first grade and in his school they will carry out his promotion act and Like all mothers, she is excited because it is her baby's first goal, so she tells him and wants to make all the preparations in advance.
This Diploma Holder is simple, use few materials, most of them are recycled, well, take a pencil and paper 📝 and let's go step by step.
MATERIALS
📌 Aluminum foil cylinder or towel
📌 Blue Jeans Patchwork
📌 Foami/frosty blue eva rubber
📌 White Wick
📌 1 gold button
📌 Silicon gun
📌 Scissor, wavy scissor
📌pencil
📌Ruler
📌 Height Stick
📌 Patterns
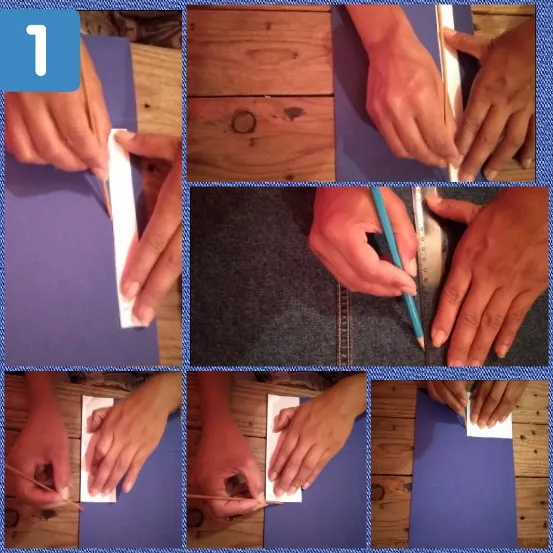
Empezaremos marcando en el foami/goma eva escarchado rectángulos de:
✍️28cm de largo x 2cm de ancho
✍️19cm de largo x 5cm ancho
✍️otro de 20cm de largox 2cm de ancho
✍️un cuadrado de 12cm de largo x 8cm de ancho y un círculo tomando como referencia la base del cílindro de papel, la tela de jeans la cortaremos tomando la medida de nuestro cílindro en cuanto al largo la corte de 19,5cm.
✍️28cm long x 2cm wide
✍️19cm long x 5cm wide
✍️another 20cm long x 2cm wide
✍️a square of 12cm long x 8cm wide and a circle taking as reference the base of the paper cylinder, we will cut the jeans fabric taking the measurement of our cylinder in terms of length, the cut of 19.5cm.
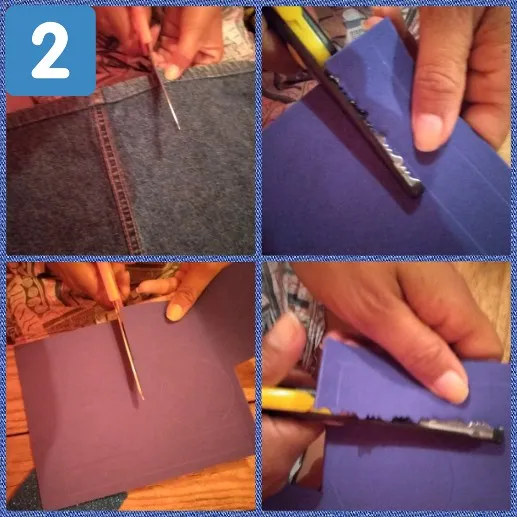
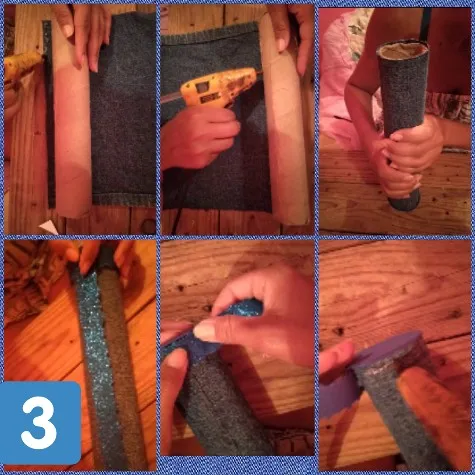
Tomaremos la tijera y cortaremos nuestro patrón que marcamos en el jeans también el cuadrado y el rectángulo de 19cm de largo x 5cm de ancho esta son las piezas para nuestro birrete y el círculo la base de del cílindro.
Con la tijera con forma ondulada cortaremos los rectángulos de 28cm de largo x 2cm de ancho y en de 20cm de largo x 2cm de ancho.
We will take the scissors and cut our pattern that we marked on the jeans also the square and the rectangle of 19cm long x 5cm wide these are the pieces for our cap and the circle the base of the cylinder.
With the wavy-shaped scissors we will cut the rectangles of 28cm long x 2cm wide and 20cm long x 2cm wide.
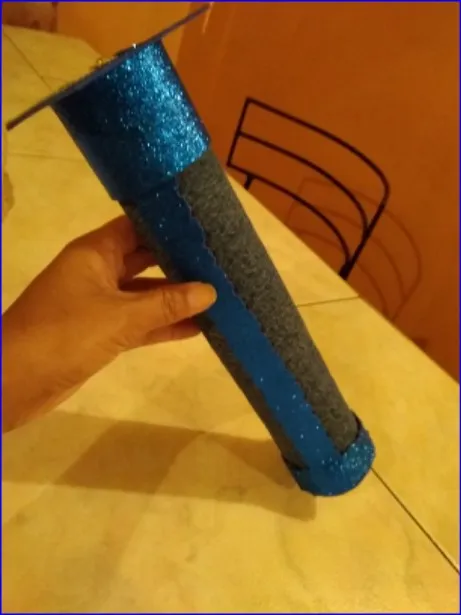
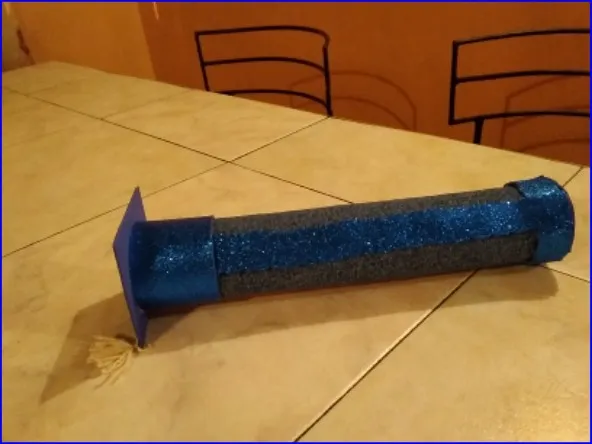
Con ayuda de nuestra pistola de silicón pegaremos el jeans a nuestro cílindro y le daremos vueltas tratando que nos quede bien pegado al terminar cerramos, luego pegamos nuestro círculo en la parte de abajo, también pegaremos nuestros rectángulos que cortamos en foami/goma eva y que quedaron con forma ondulada primero pegamos el de la parte de abajo luego tomamos la tira más larga y la pegaremos para sellar la unión del jeans, así como se observa en la imágen.
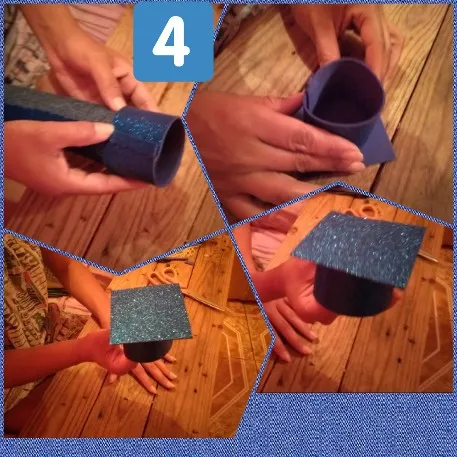
Para armar el birrete que será la tapa del Porta Diploma tomamos el rectángulo que nos queda lo colocamos alrededor de nuestro cílindro ya forrado tomamos la medida referencial del mismo y lo pegamos con silicón, también se le coloca silicón y se le pegará el cuadrado presionamos y listo así nos quedara observa la imágen.
To assemble the mortarboard that will be the cover of the Diploma Holder we take the rectangle that we have left, we place it around our already lined cylinder, we take the referential measure of it and we glue it with silicone, we also put silicone on it and it will be glued We press the square and that's it, we will see the image.
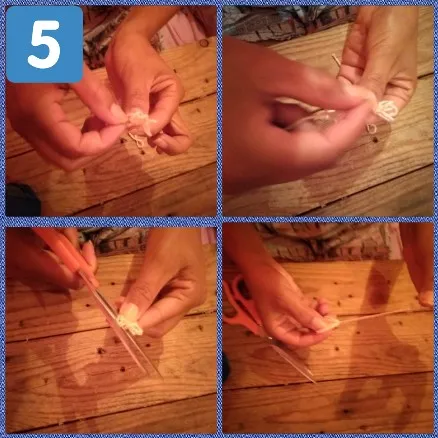
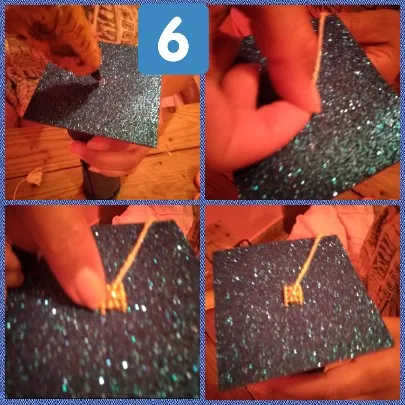
The tassel that we made previously will be glued to our cap, a silicone point is placed in the center of it and the thread is glued, letting it fall downwards, the length will be to our liking, then another silicone point and the golden button will paste in the center to cover the thread
Las fotos fueron tomadas y editadas desde mi teléfono con la aplicación Mirror Collage y Foto Collage.
Use el traductor de google
Será hasta un próximo encuentro que tengan excelente día 🤗!!!.
use google translate
It will be until a next meeting have a great day 🤗!!!.