Hello everyone... ✨
Hello to my dear Hiver and the dear community of artists #HiveDiy, as always very pleased and excited to be here again, showing you my work made with love and especially for you.
For today I bring you a small decorative nativity, made with the technique of painting on wood and quilling technique, also using various other recyclable materials that we have in our homes, in a creative process and a step by step very easy to apply.
This is a nice detail ideal for gifts, or to decorate any corner of our home in this beautiful time as Christmas.
Let's get started:😃

Hola a todos... ✨
Hola a mis queridos Hiver y a la querida comunidad de artistas #HiveDiy, como siempre muy complacida y emocionada de encontrarme por acá nuevamente, mostrándole mi trabajo hecho con mucho amor y especialmente para ustedes.
Para hoy les traigo un pequeño nacimiento decorativo, realizado con la técnica de pintura sobre madera y la técnica de quilling, también utilizando otros diversos materiales reciclables que tenemos en nuestros hogares, en un proceso creativo y un paso a paso muy fácil de aplicar.
Este es un bonito detalle ideal para obsequiar, o para decorar cualquier rinconcito de nuestro hogar en esta época tan linda como es la navidad.
Comencemos:😃

Para elaborar el pequeño establo:
• Una tablita cuadrada de mdf de 3mm de ancho x 7cms x 7cms2, o un trozo de cartón o cualquier material que tengan disponible en casa.
• Cartón que tengan sobrante.
• Envejecedor o pintura al agua, tonalidades marrones.
• Pincel o un trozo de esponja.
• Quilling de 3mm de ancho del color de su preferencia para realizar una estrella.
• Pega blanca extra fuerte.
• Tijera.Para elaborar las figuras decorativas que van en el establo:
• Cintas de quilling de 3 y 6mm de ancho de los colores de su preferencia.
• Cartón fino.
• Regla con medidas de circunferencia.
• Lápiz.
• Envejecedor y pintura al frio del color de tu preferencia.
• Pincel.
• Aguja para quilling.
• Tijera.
• Pega blanca.
To make the small stable:
- A small square mdf board 3mm wide x 7cms x 7cms2, or a piece of cardboard or any material you have available at home.
- Cardboard you have leftover.
- Aging or water-based paint, brown shades.
- Brush or a piece of sponge.
- 3mm wide quilling in the color of your choice to make a star.
- Extra strong white glue.
- Scissors.
To make the decorative figures that go in the stable:
- 3 and 6mm wide quilling ribbons in the colors of your choice.
- Thin cardboard.
- Ruler with circumference measurements.
- Pencil.
- Aging agent and cold paint in the color of your choice.
- Paintbrush.
- Quilling needle.
- Scissors.
- White glue.

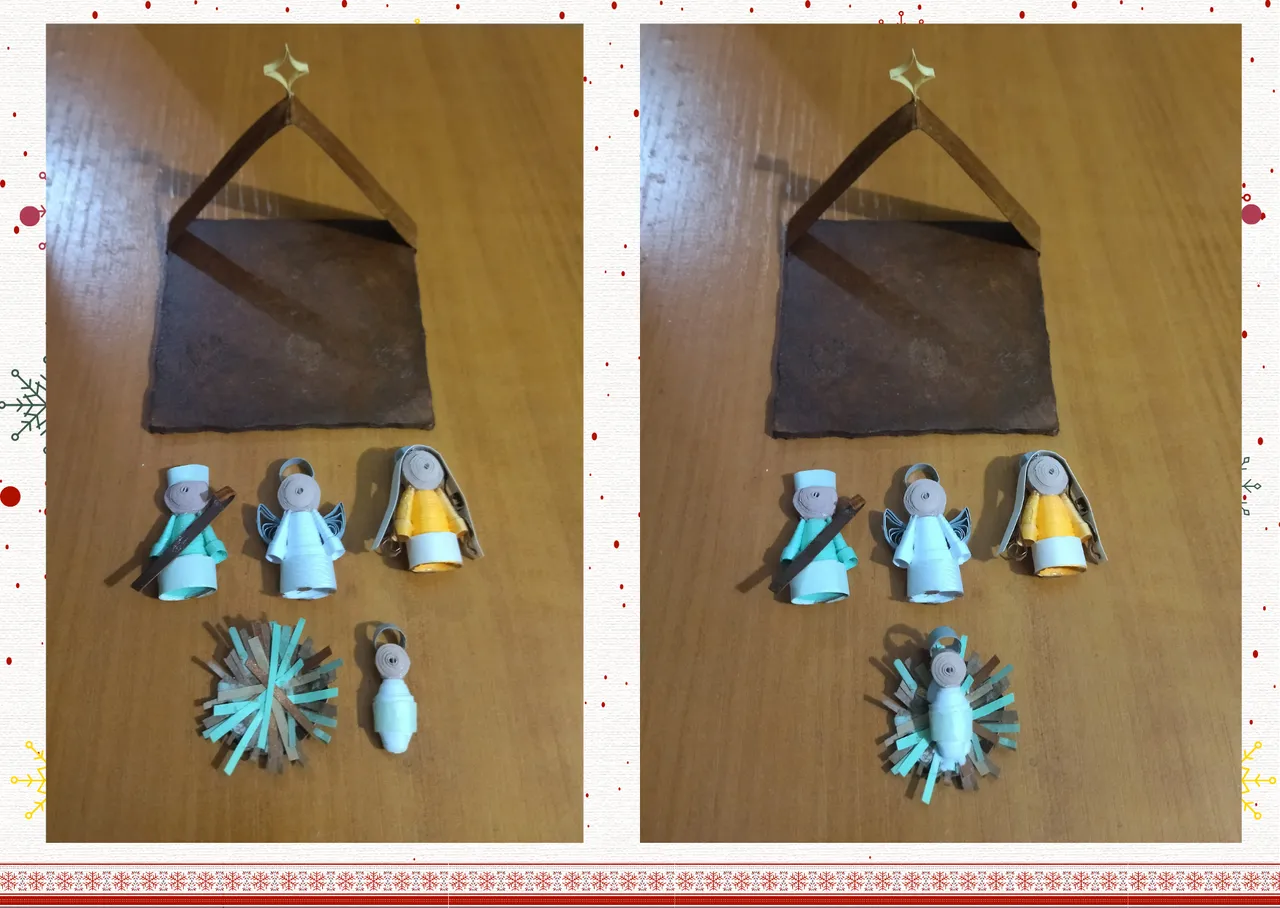
Let's start with the little stable:
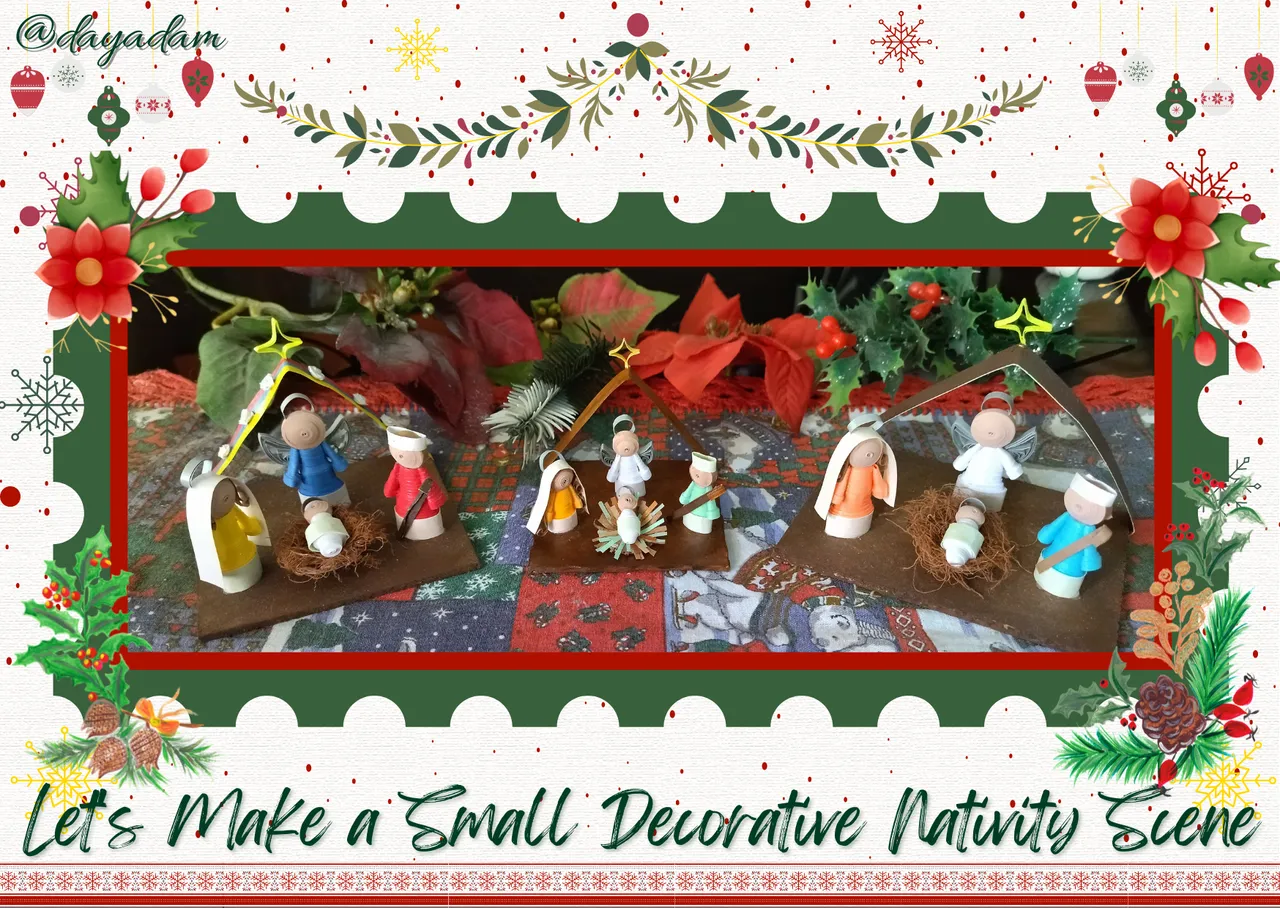
- I started by taking a little square 3mm wide MDF board that I had available at home, and proceeded to paint it all over with cherry antiquing with the help of a piece of sponge, let it dry.
Let's take into account that we can use the materials we have at hand and substitute one for the other, as well as the paints and the measures provided, if you wish you can use markers or colors, cardboard or plastic, everything is in your imagination, so we will do with the whole creative process, I show you the procedure with what I humbly have at my disposal.
- We cut a thin cardboard 1cms wide x 12cms long to which we apply a layer of cherry antiquing paint on all parts, let it dry.
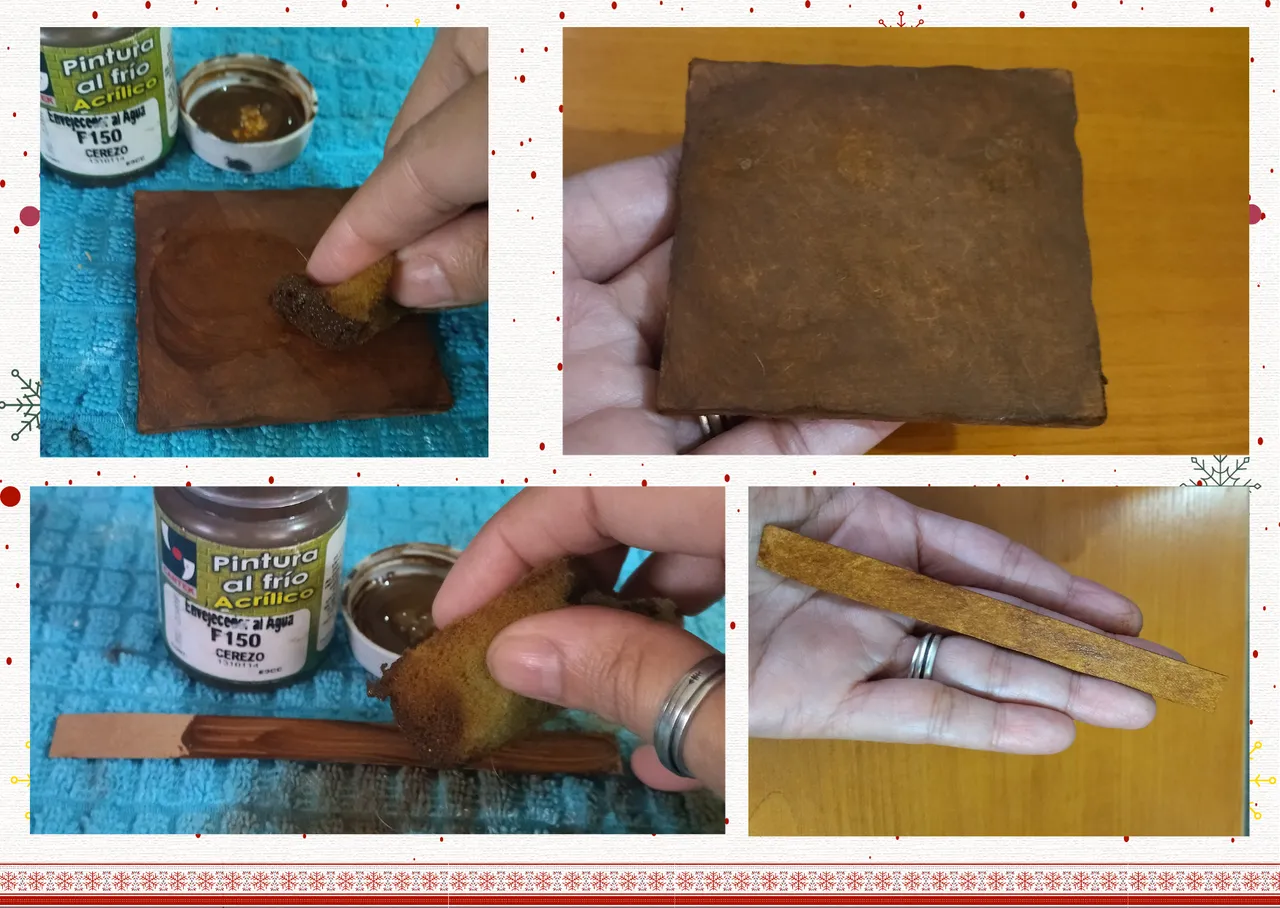
- We continue by taking a piece of gold colored quilling tape 3mm wide X 5 long, we are going to mold it into a star shape, we glue its tips and we are going to make a small cut at the end of the tips, we reserve.
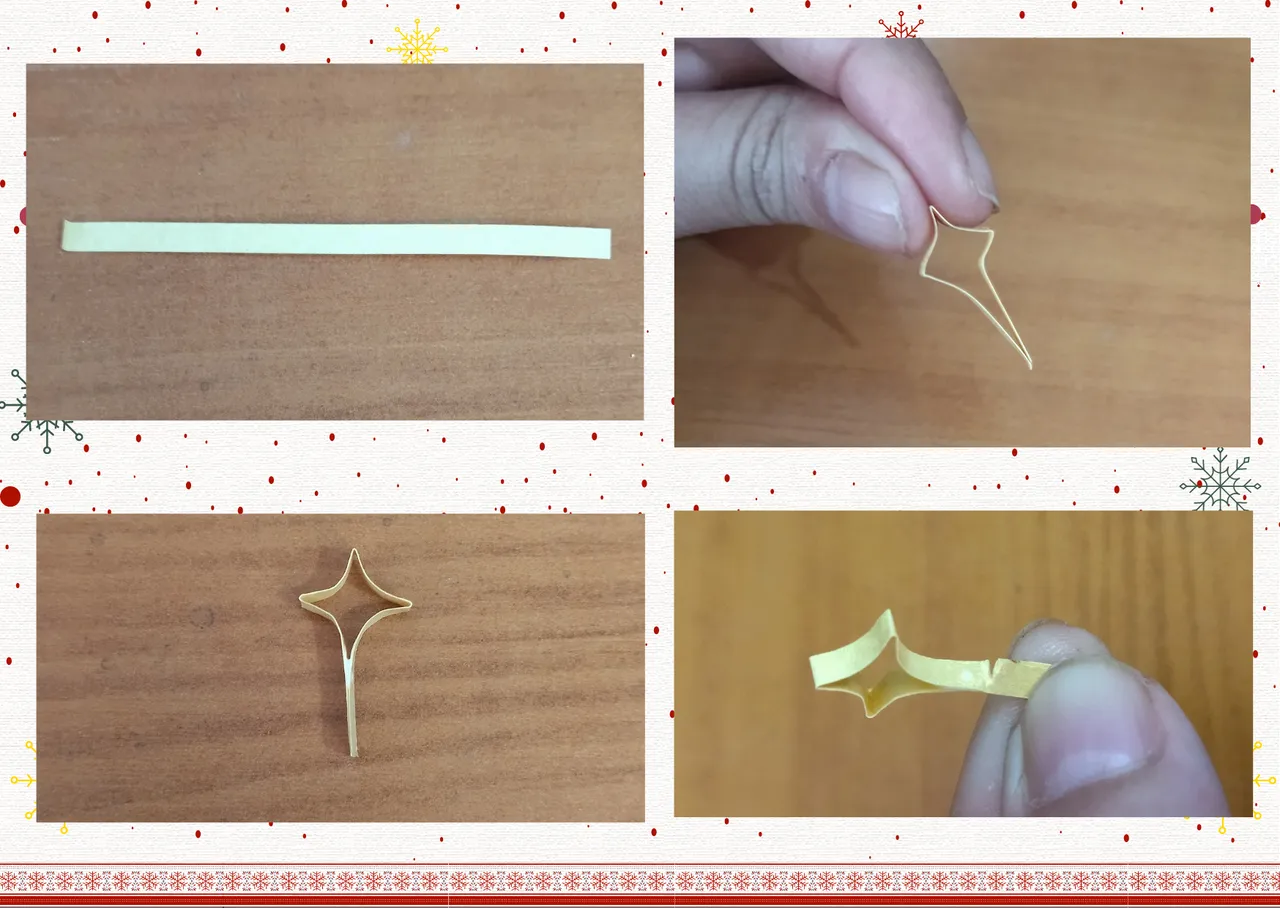
- We are going to assemble our small stage that will be the stable, we fold in half the cardboard that we had already painted, we glue with extra strong white glue in the shape of a roof along the board, and we place the star on its tip introducing it with a touch of glue through the small cut we had made.
To make the cradle of the baby Jesus:
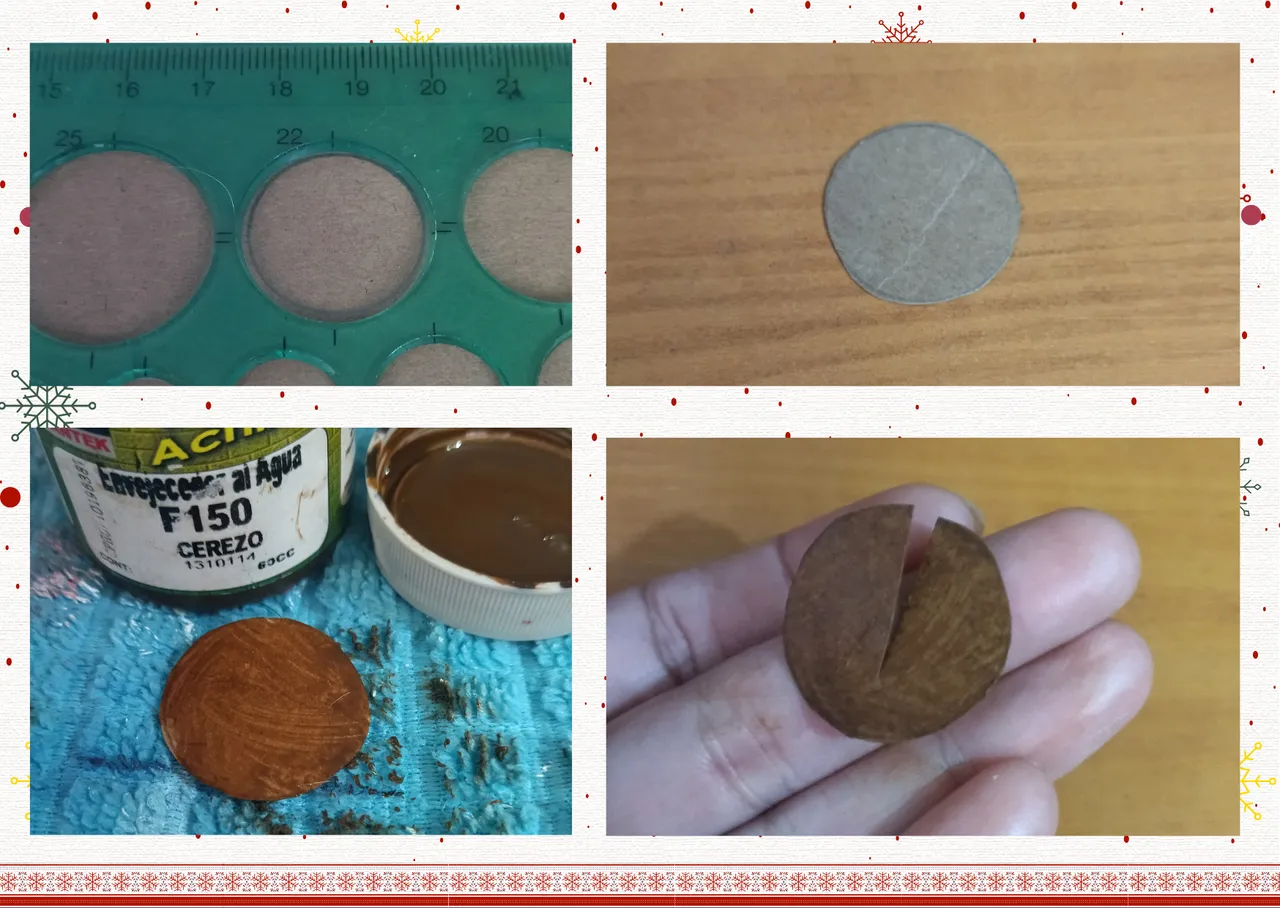
- We took a piece of thin cardboard and with the circumference ruler I guided myself and made a circle in the measure number 22, you can make it by hand or the size you prefer depending on the size of the baby Jesus and his crib. I painted that circle with cherry paint on both sides, let it dry well.
- Once the circle is dry we make a cut in the middle with a scissors and form a kind of cone and seal it with glue, it was an idea that came to my mind to make the crib, then take quilling ribbons in green, brown and copper, cut some pieces and glue inside the crib to recreate the straw, in other cribs I did it with a piece of gauze which I wet with brown paint and it is also a good idea to use.

Vamos a comenzar con el pequeño establo:
• Comencé tomando una tablita cuadrada de MDF de 3mm de ancho que tenía disponible en casa, y procedí a pintarla por todas sus partes con envejecedor cerezo con la ayuda de un trozo de esponja, deje secar.
Tomemos en cuenta que podemos utilizar los materiales que tengamos a la mano y sustituir el uno por el otro, al igual que las pinturas y las medidas suministradas, si lo deseas puedes usar marcadores o colores, cartón o plástico, todo está en tu imaginación, así haremos con todo el proceso creativo, yo les muestro el procedimiento con lo que humildemente tengo a disposición.
• Cortamos un cartón fino de 1cms de ancho x 12cms de largo al cual aplique por todas sus partes una capa de envejecedor cerezo, dejamos secar.
• Seguimos tomando un trozo de cinta para quilling color dorado de 3mm de ancho X 5 de largo vamos a moldear dándole forma de estrella, pegamos sus puntas y vamos a realizar un pequeño corte al finalizar las puntas, reservamos.
• Vamos a armar nuestro pequeño escenario que será el establo, doblamos a la mitad el cartón que ya habíamos pintado, pegamos con pega blanca extra fuerte en forma de techo a lo largo de la tabla, y colocamos la estrella en su punta introduciendo con un toque de pega por el pequeño corte que habíamos realizado.
Para realizar la cuna del niño Jesús:
• Tomamos un trozo de cartón fino y con la regla de circunferencias me guie y realice un circulo en la medida número 22, ustedes pueden hacerla a pulso u de la medida que prefieran según el tamaño del niño Jesús y su pesebre. Ese círculo lo pinte con envejecedor cerezo por ambos lados, se deja secar bien.
• Seco el círculo le hacemos un corte en el medio con una tijera y formamos una especie de cono sellamos con pega, fue una idea que se me ocurrió para hacer la cuna, luego tome cintas de quilling color verde, marrón y cobre, pique alguno trozos y pegue dentro de la cunita para recrear la paja, en otros pesebres lo hice con uno trozo de gasa el cual moje con pintura marrón y también es una buena idea para utilizar.
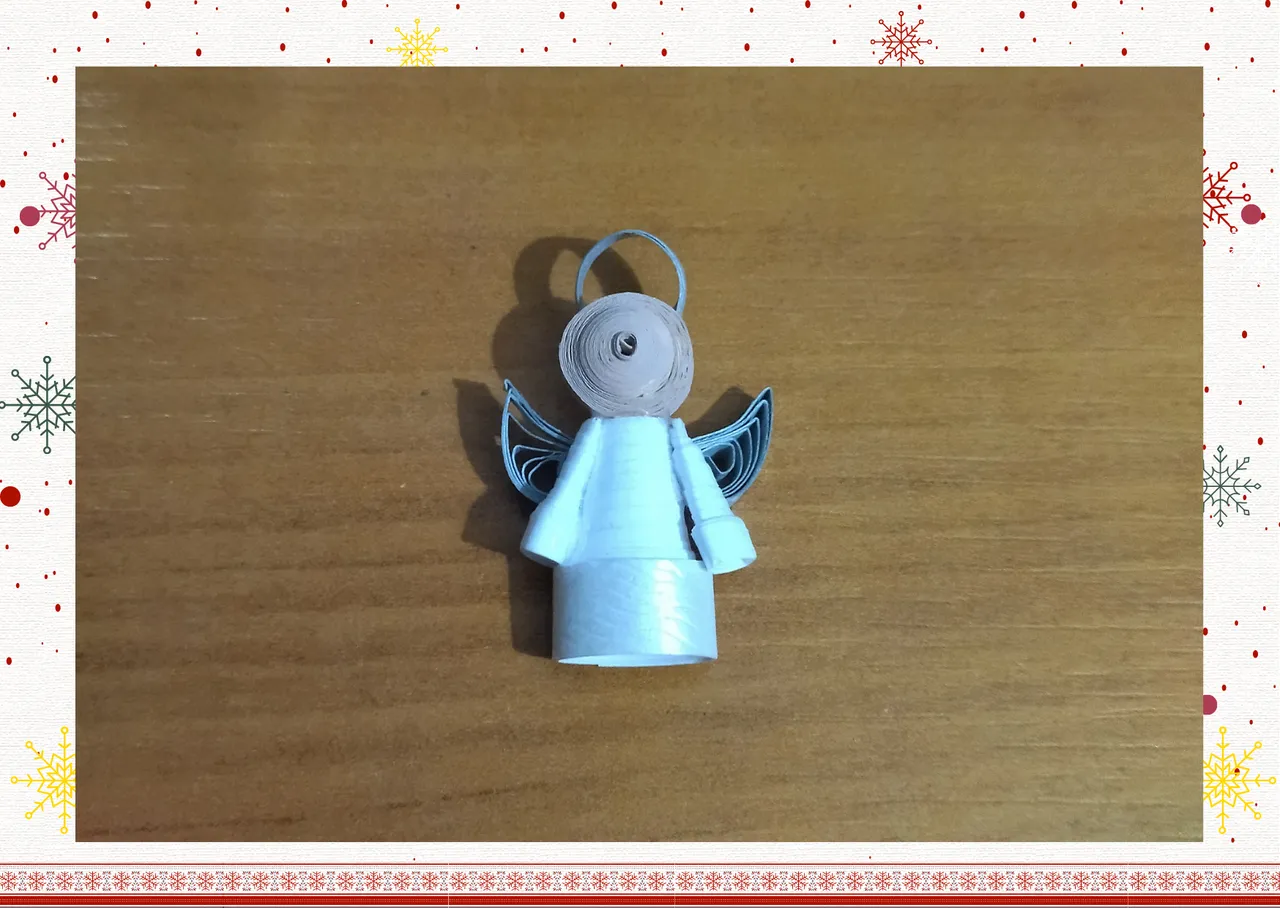
The Virgin Mary, St. Joseph and the Angel Gabriel:
To make these figures we need a more complex process, and as I like to explain everything in detail as I previously carried out the Angel, here is the link to the elaboration of the angel here is the link to the elaboration of the angel, so you can see the detailed process. As always I emphasize you can play with the sizes and colors of the materials according to your creativity and how you want your final result to look like.
As you can see the angel is already made, Mary and Joseph are made under the same parameters, they just have some different and simple details that I will show you here.
The Virgin Mary:
- As you can see the head, body and arms are the same as the angel, the only thing that varies are the colors of the body, we are going to put some hair taking quilling tape 3mm wide brown color, and rolling a little at the ends with the quilling needle, we glue on the head. Then we are going to make the blanket, we take a piece of quilling tape 6mm wide I chose the same color that I placed on the edge of the body or dress, this tape we pass it around the head of the Virgin sealing it with a little extra strong white glue and at the top we add the areola that we are going to make under the procedure that comes out in the post of the angel, in this way we have our Virgin ready.
Saint Joseph:
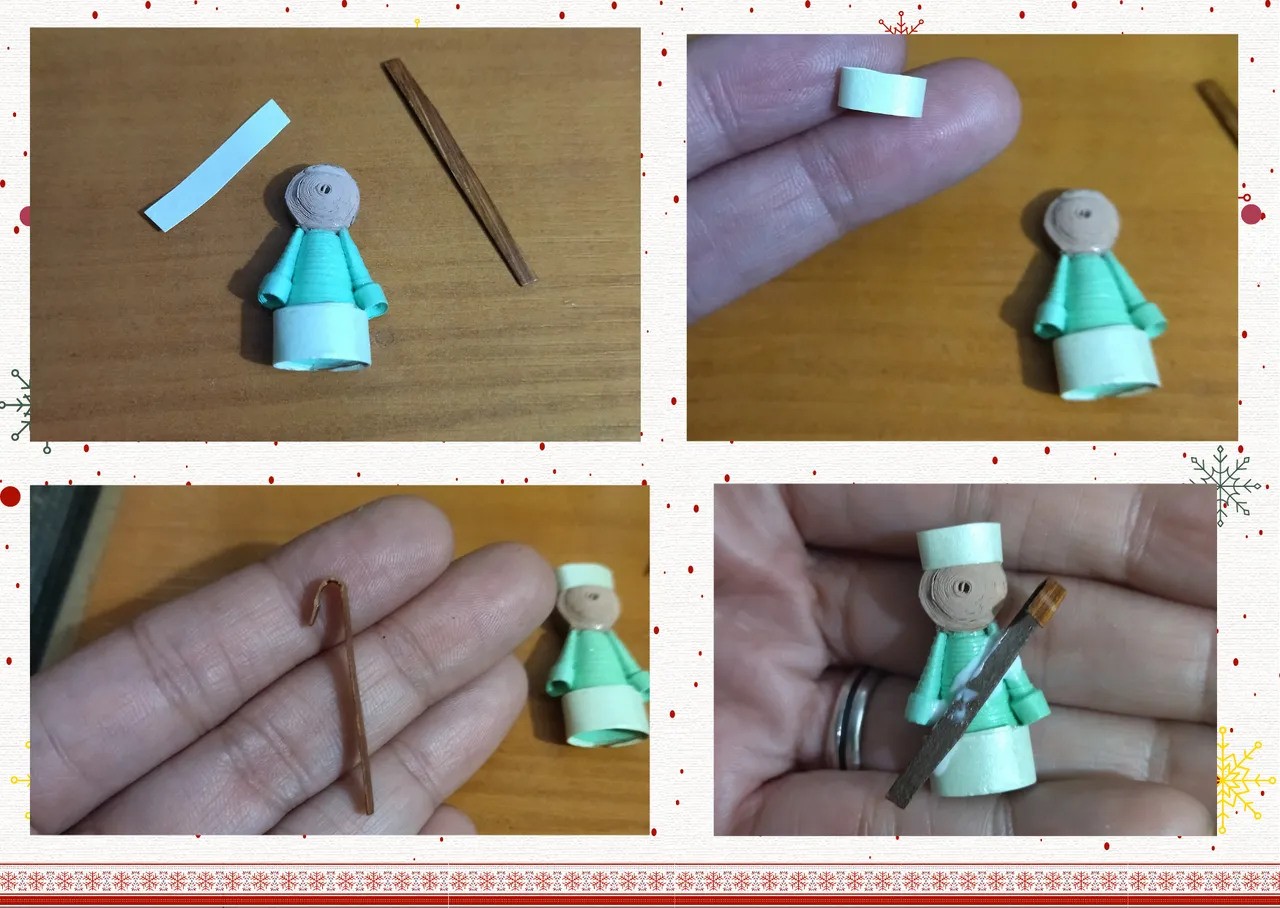
- Like the Virgin Mary most of the pieces with the same as the angel, we will only make two decorative details, I wanted to make a kind of hat so I took a small piece of ribbon of the same color with which I decorated the double body in a circular shape and added to the head, and finally I made a cane with a piece of brown cardboard.
La Virgen María, San José y el Ángel Gabriel:
Para realizar estas figuras necesitamos un proceso más complejo, y como a mí me gusta explicar todo de manera detallada pues con anterioridad lleve a cabo a el Ángel, por acá les dejó el link de la elaboración del ángel por acá les dejó el link de la elaboración del ángel, para que vean el proceso detallado. Como siempre les recalco pueden jugar con las medidas y colores de los materiales según su creatividad y como quieran que luzca su resultado final.
Como podrán ver el ángel ya lo tengo elaborado, María y José se hacen bajo los mismos parámetros simplemente tienen algunos detalles diferentes y sencillos que les mostrare por acá.
La Virgen María:
• Como podrán ver la cabeza cuerpo y brazos son iguales a la del ángel, lo único que varía son los colores del cuerpo, vamos a colocarle un poco de cabello tomando cinta de quilling de 3mm de ancho color marrón, y enrollando un poco en las puntas con la aguja para quilling, pegamos en la cabeza. Luego vamos a realizar la manta, tomamos un trozo de cinta para quilling de 6mm de ancho yo elegí el mismo color que le coloqué al borde del cuerpo o vestido, esta cinta la pasamos alrededor de la cabeza de la Virgen sellando con un poco de pega blanca extra fuerte y en la parte de arriba agregamos la areola que vamos a realizar bajo el procedimiento que sale en el post del ángel, de esta manera tenemos nuestra Virgen lista.
San José:
• Al igual que la Virgen María la mayoría de las piezas con iguales a las del ángel, solo vamos a realizar dos detalles decorativos, quise hacerle una especie de sombrero por lo que tome un trocito de cinta del mismo color con la que decore el cuerpo doble de forma circular y añadí a la cabeza, y por ultimo le realice un bastón con un trozo de cartón marrón.
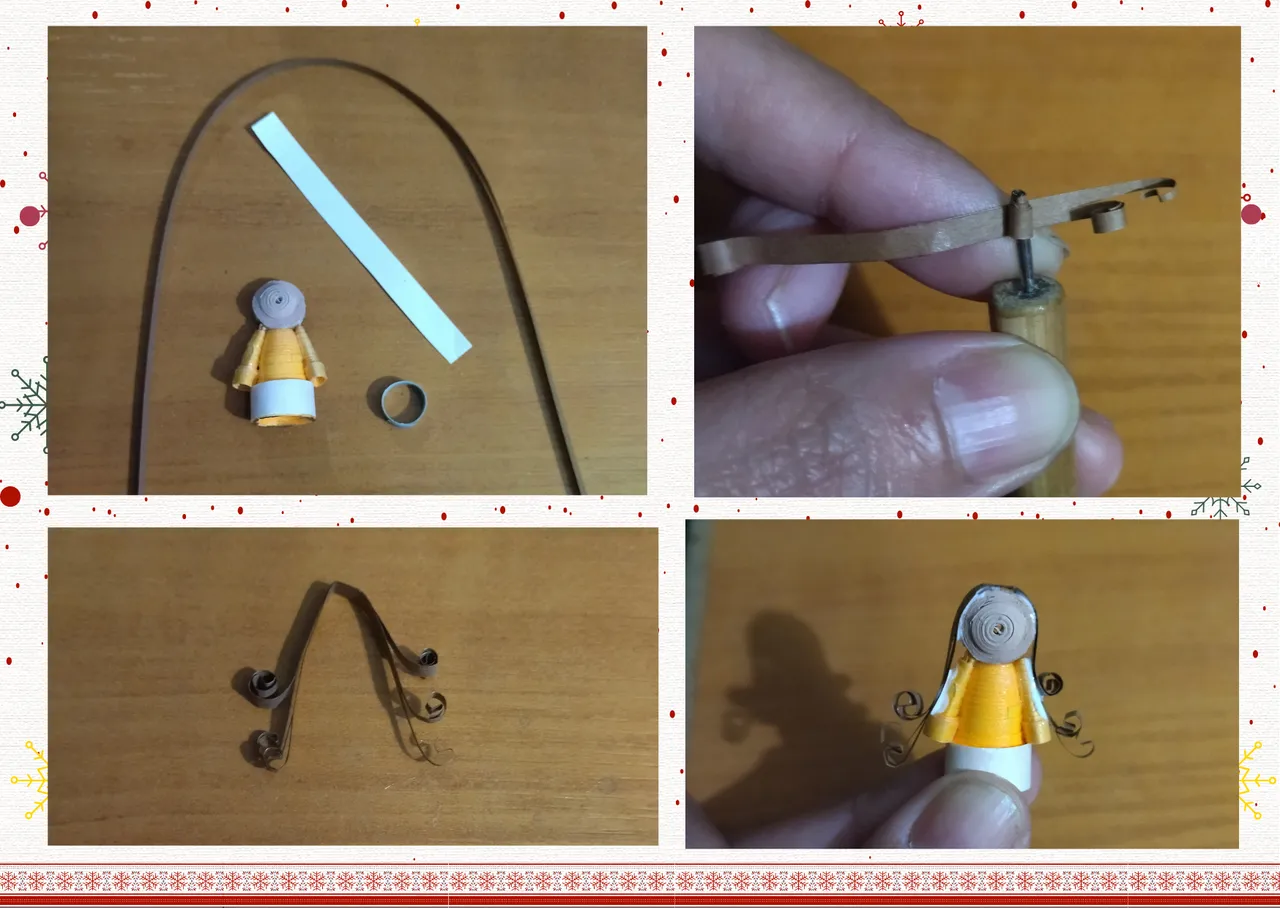
Baby Jesus:
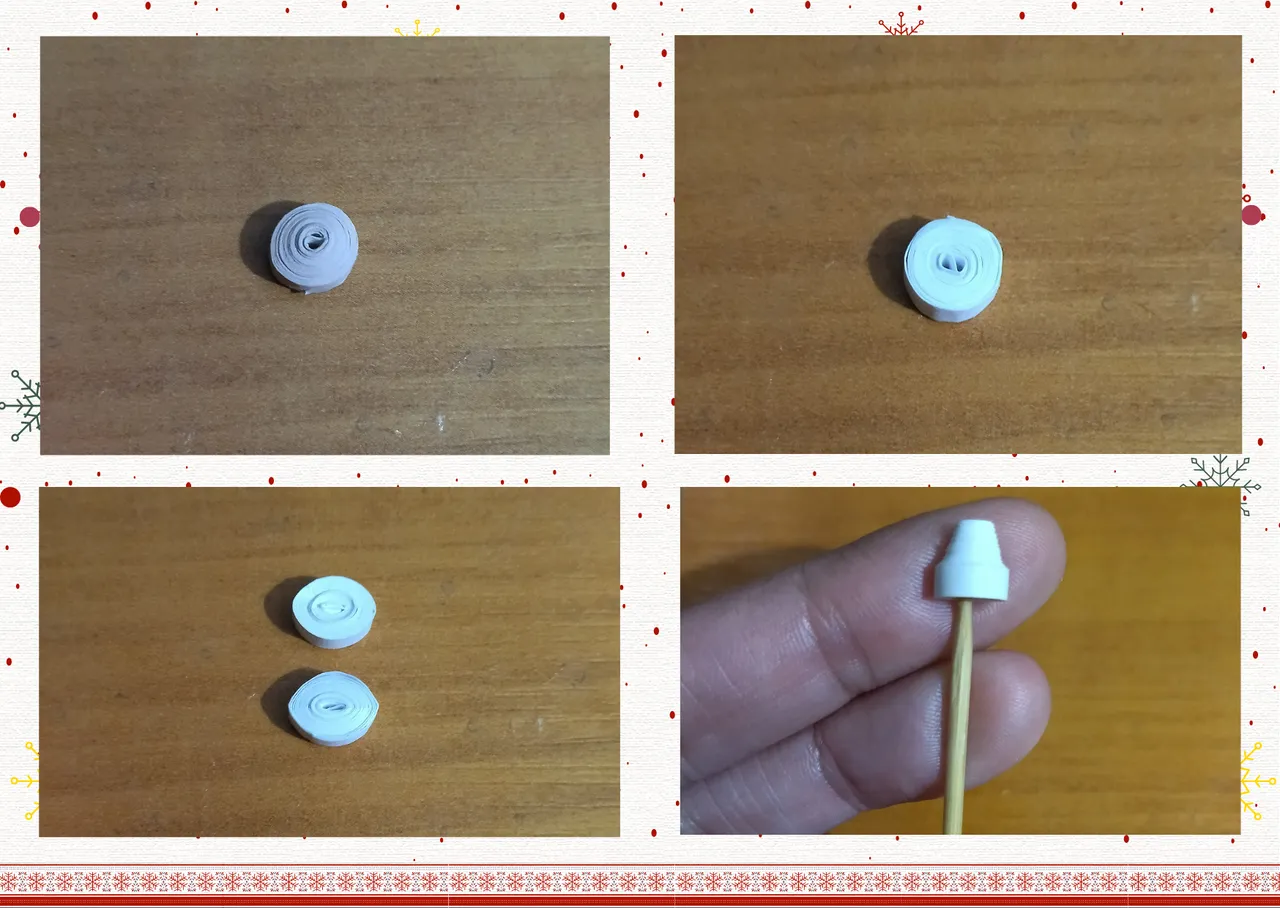
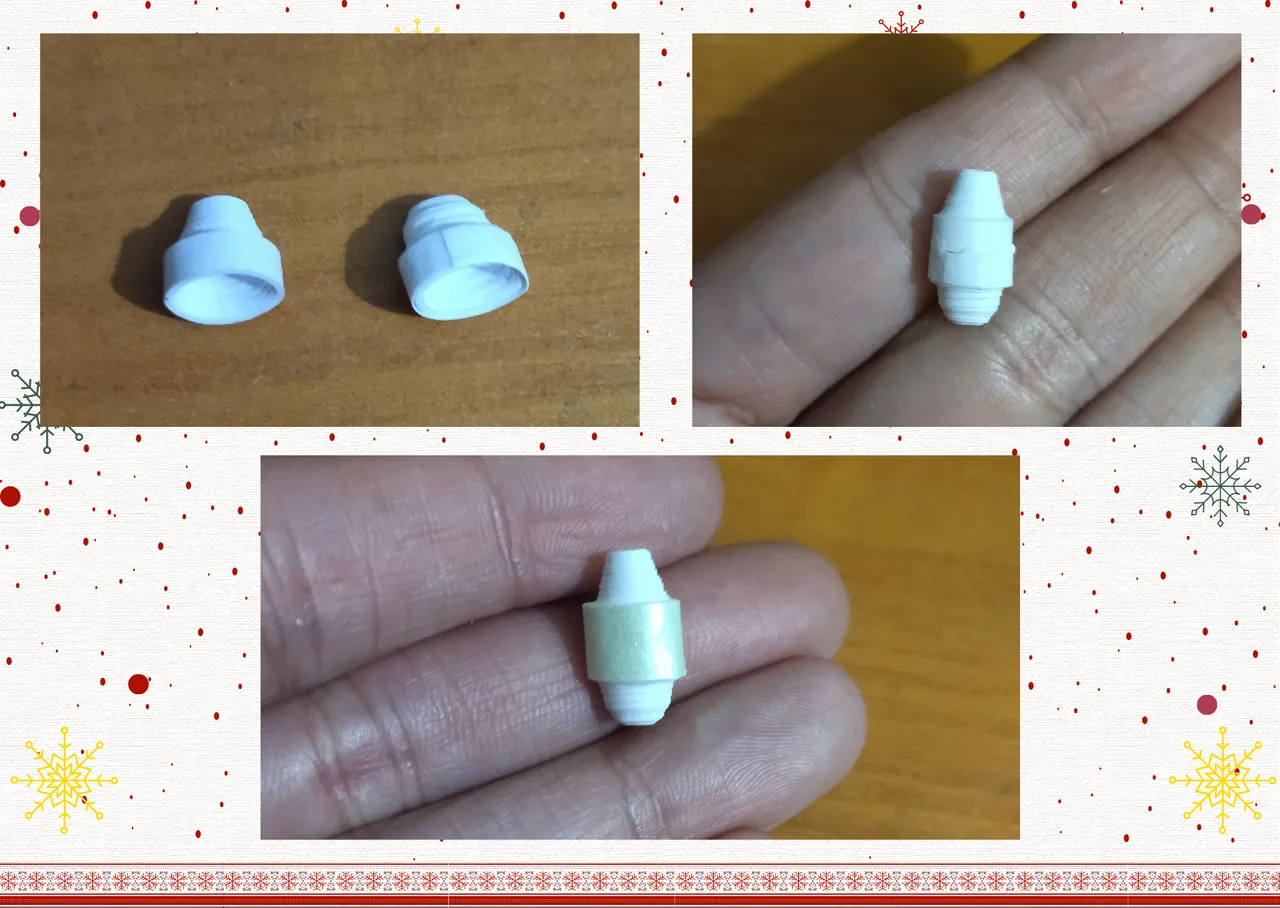
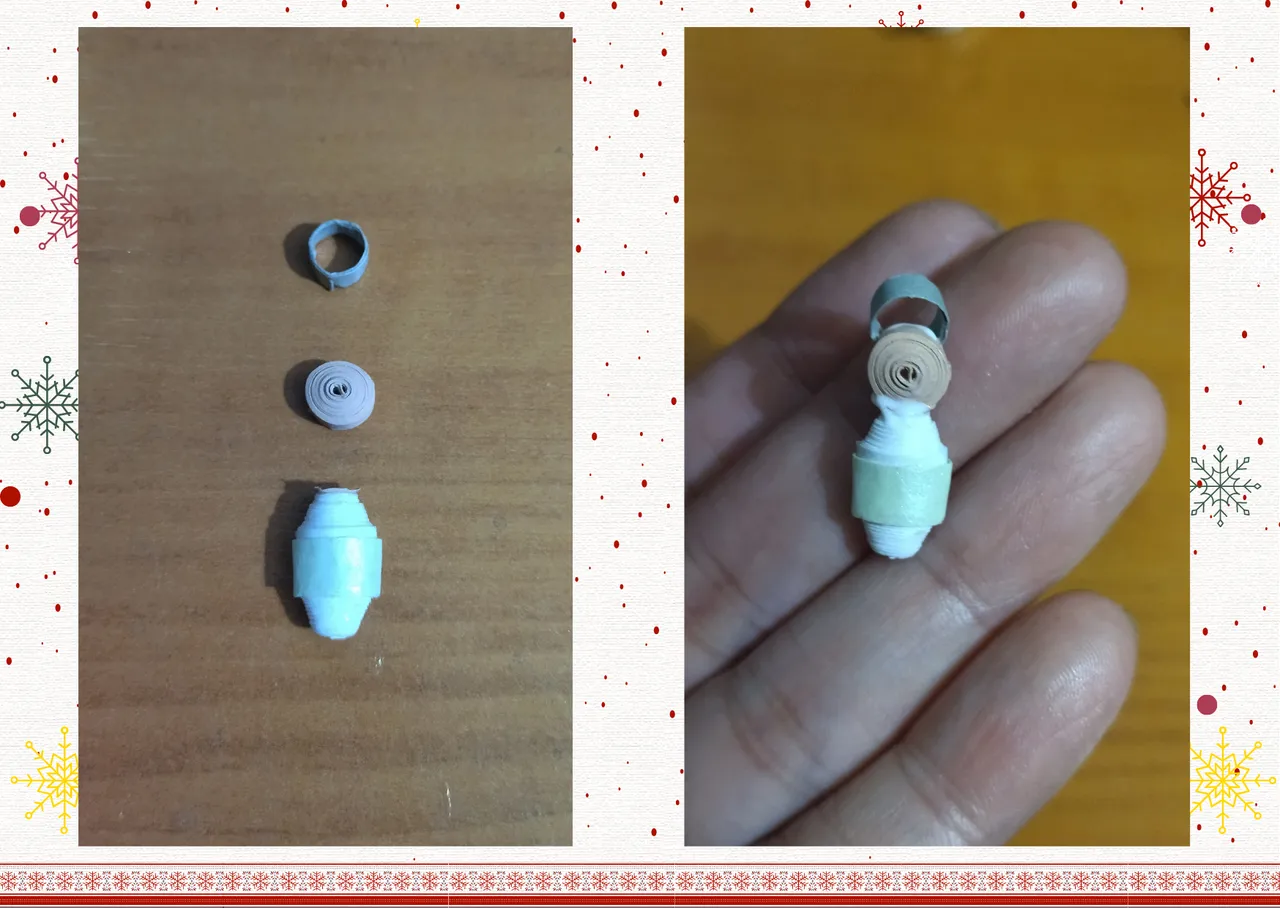
- To make the baby Jesus is basically the same process of the previous figures, but smaller and with other details. We make the head with a smaller tight circle and painted skin color as the previous ones. For the body we are going to take two white ribbons 3mm wide by 25cms long, we roll them with the quilling needle and form a closed circle not so tight, we will need two. Once the circles are ready we are going to flatten a little with our fingers to form a kind of drop, with a height stick we take out a little of the piece to form a cone, we repeat with the other piece, to finish we join both as indicated in the photo, and in the center we place a piece of ribbon to cover the union of the pieces and decorate. To finally assemble the baby Jesus we glue the head and the halo.
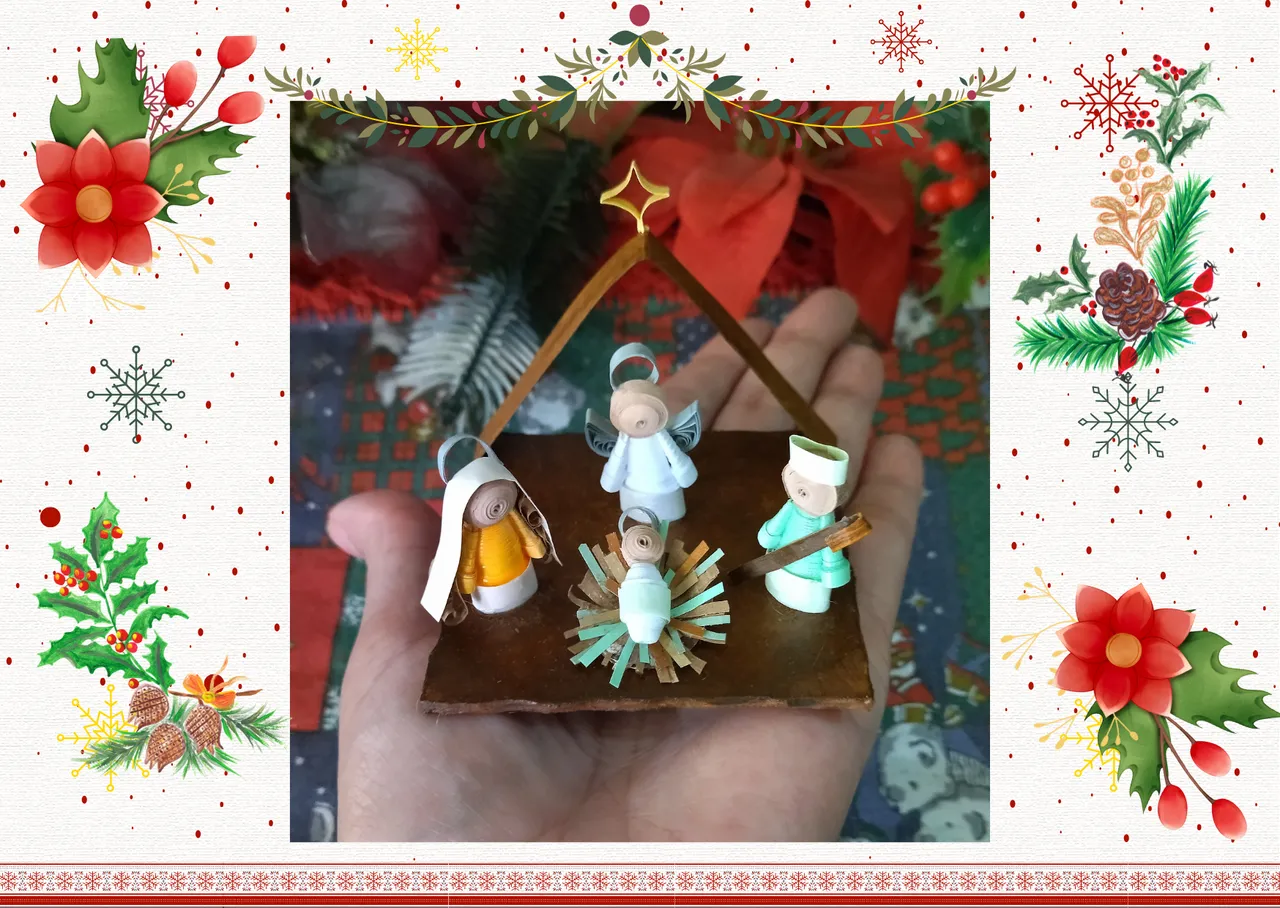
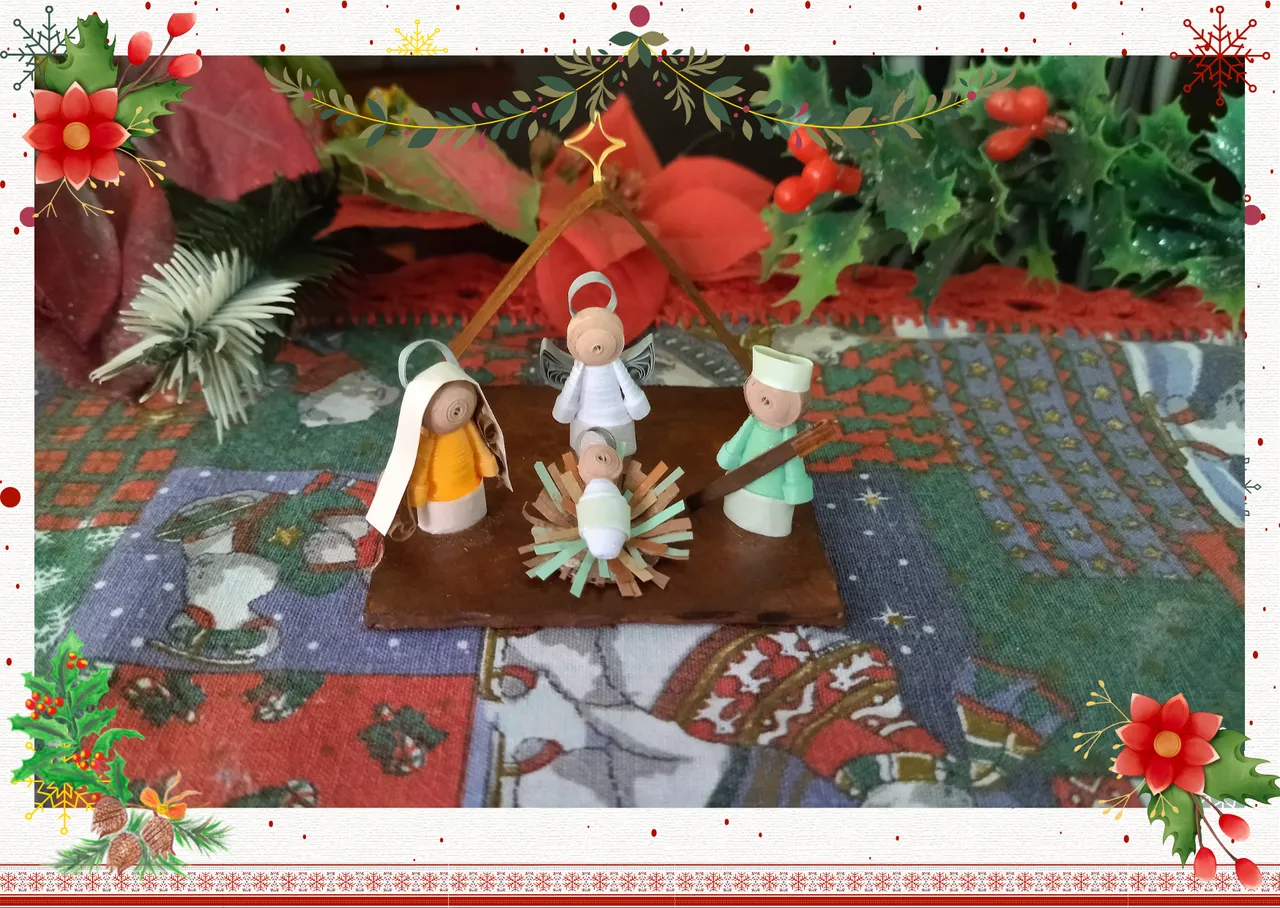
- Now we have all the pieces to assemble our little decorative nativity, we glue the baby Jesus from the crib using extra strong white glue and then we place all the remaining pieces harmoniously in the stable.
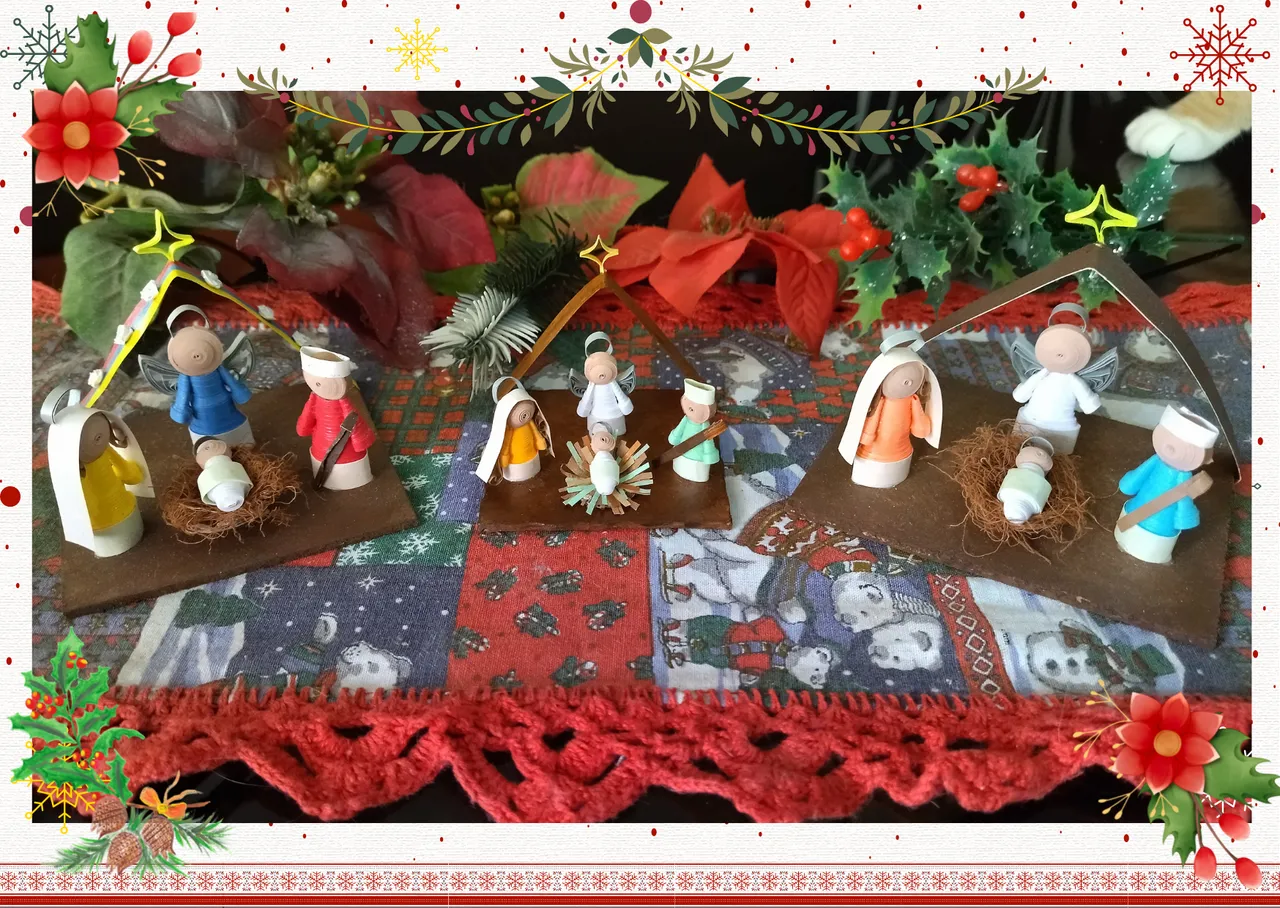
In this way we will have our small decorative nativity ready, to give as a gift to a special person, or to place anywhere in our home.
Niño Jesús:
• Para realizar el niño Jesús básicamente es el mismo proceso de las figuras anteriores, pero más pequeño y con otros detalles. Realizamos la cabeza con un circulo apretado más pequeño y pintado color piel como los anteriores. para el cuerpo vamos a tomar dos cintas color blanco de 3mm de ancho por 25cms de largo, enrollamos con la aguja para quilling y formamos un círculo cerrado no tan apretado, vamos a necesitar dos. Una vez listos los círculos vamos a aplanar un poco con los dedos para formar una especie de gota, con un palito de altura sacamos un poco la pieza para formar un cono, repetimos con la otra pieza, para finalizar unimos ambas como lo indica en la foto, y en el centro colocamos un trozo de cinta para tapar la unión de las piezas y decorar. Para armar finalmente al niño Jesús pegamos la cabeza y la aureola.
• Ya tenemos todas las piezas para armar nuestro pequeño nacimiento decorativo, pegamos al niño Jesús de la cunita usando pega blanca extra fuerte y luego colocamos todas las piezas restantes de manera armónica en el establo.
De esta manera tendremos listo nuestro pequeño pesebre decorativo, para obsequiar a una persona especial, o para colocar en cualquier sitio de nuestro hogar.


What did you think, did you like it?
I hope you did, I hope you liked my explanation, procedure and photos, I made them with love for you.
"Let out that muse that inspires you, and let your imagination fly".
Thank you all, see you next time. 🐾🐱💕
¿Que les pareció, les gustó?
Espero que sí, que les haya gustado mi explicación, procedimiento y fotos, los hice con mucho cariño por y para ustedes.
"Deja salir esa musa que te inspira, y deja volar tu imaginación".
Gracias a todos, nos vemos en la próxima. 🐾🐱💕
Los invito que apoyen a "La Colmena", dale tu voto ✨
 Vote la-colmena for witness By @ylich
Todas las fotos usadas en este post son de mi autoría y han sido sacadas en mi celular personal un Redmi 9T y editadas Canva Banner y separador hecho por mí en Canva Traducido con la ayuda de DeepL
