Hello everyone... ✨
Hello to my dear Hiver and the dear community of artists #Jewelry, as always very pleased and excited to be here again, showing you my work made with love and especially for you.
For today I bring you a pendant for necklace of an angel, made in the technique of quilling, very simple to make, which we can give multiple uses, as decoration or simply an accessory as I usually do in many cases. It is always time to make details to decorate our home, to give to that special person, or also for sale.
Beyond making this publication just a craft and create a nice accessory to wear on any occasion, I wanted to make it based again on an inspiration for the @Talentos initiative today, which refers to "Freedom".
The topic regarding freedom is quite complex and with a lot of fabric to cut, and we can concatenate it with an innumerable amount of situations. In my case, as a Venezuelan and the country's situation, I could have decided to address this topic, but no, I wanted to make this post a beautiful, different and born from my heart, so I'm going to focus on a personal inspiration and perhaps I am adapting it to a very own theme.
At this time of the year, nostalgia is always activated even more and even more if people we have loved with all our heart and soul are missing in our lives, but I don't want to direct it to sadness either, but to something beyond it.
My grandmother was the one who raised me, I loved her with all my soul and I will love her in my memories until the end of my days, from the moment she left this plane I have always had the conviction that wherever she is she will always be with me, and from that day on she became my guardian angel. This post is dedicated to that beautiful and warm soul, who once she left her body, became a free soul, who has the freedom to be with me day by day, in every instant and moment as well as with all the beings who love her.
That's why I wanted to give you this tutorial by making a little angel, which for me is the symbol of freedom because it has wings to fly, and to have her even more present in my day to day. I know that all of you have that beautiful and free angel that will always accompany you because once you leave this plane for me you become "Souls in Freedom".
I don't know if I directed the post well to the topic of freedom, but it was what came from my mind and heart.
That said, here's a gift to you about the creative process of this special charm.✨
Hoping it will be to your liking:
Let's get started:😃

Hola a todos... ✨
Hola a mis queridos Hiver y a la querida comunidad de artistas #Jewelry, como siempre muy complacida y emocionada de encontrarme por acá nuevamente, mostrándole mi trabajo hecho con mucho amor y especialmente para ustedes.
Para el día de hoy les traigo un dije para collar de un angelito, elaborado en la técnica de quilling, de muy sencilla elaboración, el cual podemos darle múltiples usos, como decoración o un simplemente un accesorio como acostumbro en muchos casos hacerlo. Siempre es momento para realizar detalles para adornar nuestro hogar, para obsequiar a esa persona especial, o también para la venta.
Más allá de hacer esta publicación solo una manualidad y crear un lindo accesorio para lucirlo en cualquier ocasión, quise realizarla basada nuevamente en una inspiración para la iniciativa de @Talentos de hoy día, que se refiere a la “Libertad”.
El tema con respecto a la libertad es bastante complejo y con mucha tela que cortar, y lo podemos concatenar con una innumerable cantidad de situaciones. En mi caso como venezolana y la situación país, podía decidir dirigirme hacia ese tema, pero no, quise hacer de este post un tema bonito, diferente y que nació de mi corazón, por eso lo voy a enfocar a una inspiración personal y que quizás lo este adaptando a un tema muy propio.
En estas fechas siempre se activan aún más las nostalgias y más si faltan en nuestras vidas personas que hemos amado con todo nuestra alma y corazón, pero tampoco lo quiero dirigir a las tristezas, si no, a algo más allá de ello.
Mi abuelita fue la que mi crio, la ame con toda mi alma y la amare en mis recuerdos hasta el final de mis días, desde el momento en que ella se fue de este plano siempre he tenido la convicción de que en cualquier lugar en el que este siempre estará conmigo, y a partir de ese día se convirtió en mi ángel de la guarda. Ustedes dirán, ¿a que te refieres con todo esto?, pues este post está dedicado a esa alma hermosa y cálida, que una vez que abandono su cuerpo, se convirtió en un alma libre, que tiene la libertad de estar conmigo día a día, en cada instante y momento al igual que con todos los seres que la amamos.
Por esto les quise regalar este tutorial elaborando un angelito, que para mí es el símbolo de libertad ya que tiene alas para volar, y para tenerla aún más presente en mi día a día. Sé que todos ustedes tienen ese ángel hermoso y libre que los acompañara siempre ya que una vez que se van de este plano para mí se convierten en “Almas en Libertad”.
No se di dirigí bien el post al tema de libertad, pero fue lo que surgió de mi mente y corazón.
Dicho esto, por aquí les regalo el proceso creativo de este dije especial. ✨
Esperando sea de su agrado:
Comencemos:😃

• Cintas de quilling de 3mm de ancho blancas y plateadas.
• Cintas de 6 mm de ancho color blanco y blanco nacarado.
• Cintas de 9 mm de ancho color blanco brillante.
• Aguja para quilling.
• Pega blanca extra fuerte (de carpintería).
• Pintura al frio color piel.
• Tijera.
• Regla con diversas medidas de circunferencia.
• Brillos de bisutería.
• Argolla pequeña de bisutería.
• Pincel.
• Collar o cadena de tu preferencia.
- 3mm wide white and silver quilling ribbons.
- 6 mm wide ribbons in white and pearly white.
- Ribbons of 9 mm wide bright white color.
- Quilling needle.
- Extra strong white glue (carpentry).
- Skin-colored cold paint.
- Scissors.
- Ruler with different circumference measures.
- Jewelry glitter.
- Small costume jewelry ring.
- Paintbrush.
- Necklace or chain of your choice.

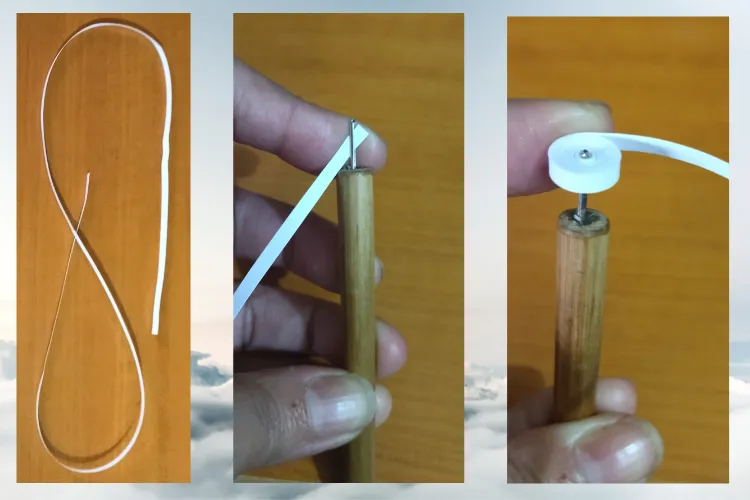
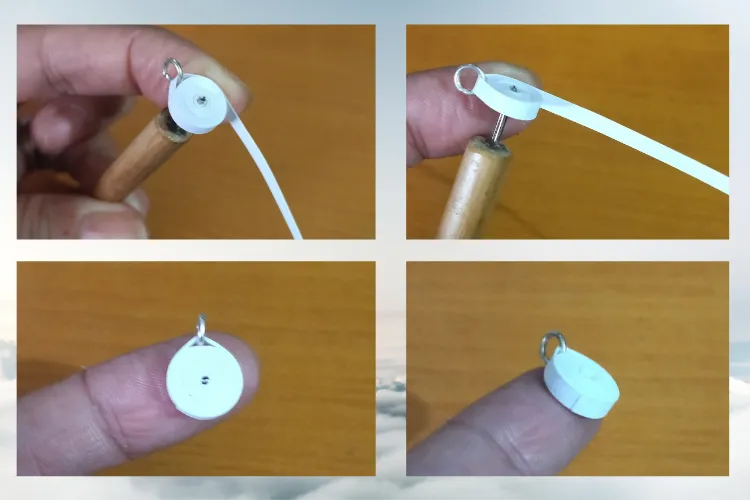
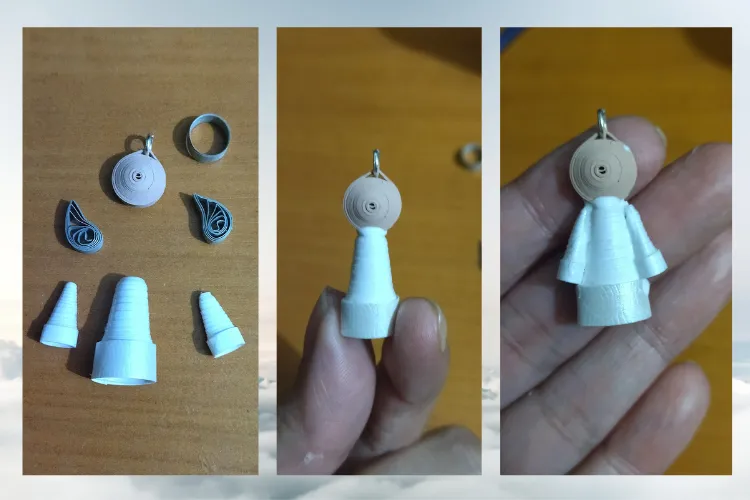
- Let's start making the angel's head: we take a white quilling ribbon 3mm wide x 50cms long, we roll it with the quilling needle until we reach the end of the ribbon, missing about three turns to finish with the ribbon we put a small costume jewelry ring since this will be to hang the pendant once it is finished, we seal the end of the ribbon with extra strong white glue, we will obtain a closed circle with its respective ring.
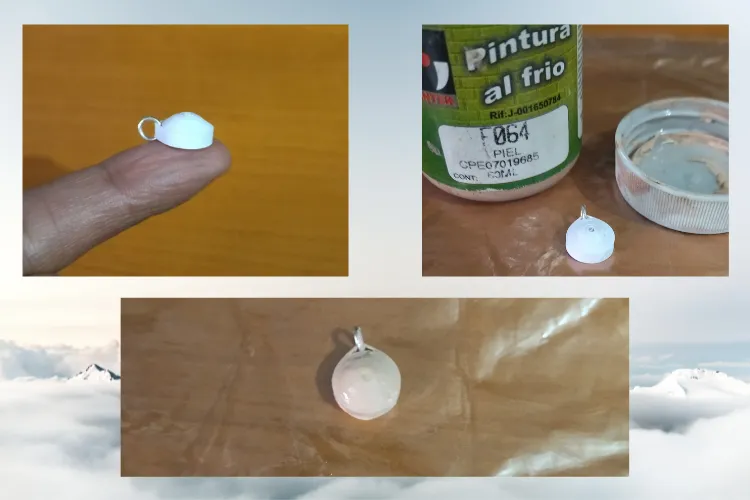
- This piece we will proceed to push it out a little bit to give it a 3D effect. As I didn't have any skin colored quilling tape, I decided to make the piece white and then I applied a coat of cold paint of the color I had available, let it dry. Set aside.

• Comencemos haciendo la cabeza del angelito: tomamos una cinta de quilling color blanca de 3mm de ancho x 50cms de largo, enrollamos con la aguja para quilling hasta llegar al final de la cinta, faltando unas tres vueltas para finalizar con la cinta metemos una argolla pequeña de bisutería ya que esta será para poder guindar el dije una vez finalizado el mismo, sellamos el final de la cinta con pega blanca extra fuerte, vamos a obtener un círculo cerrado con su respectiva argolla.
• Esta pieza vamos a proceder a empujarla un poco hacia afuera para darle un efecto 3D. Como no tenía cinta de quilling color piel, decidí hacer la pieza blanca y luego le apliqué una capa de pintura al frio de ese color de la cual disponía, se deja secar. Reservamos.
- Let's go with the body of the angel: we take a quilling ribbon 6mm wide x 50cms long, with the quilling needle we roll it in its entirety, seal with extra white glue and remove the needle, To form the body, we take a pencil or pen and that closed circle we will push it outward forming a kind of cone, we add a little glue inside the cone to prevent it from moving, and we can take advantage and place it on the outside so it will acquire protection, we flatten a little with our fingers the piece.
- To decorate, we take a piece of 6mm bright white ribbon and place it at the end of the cone to give it more color. Set aside.
- Let's go with the arms: We take two pieces of quilling ribbon 3mm wide x 20cms long, we roll it with the quilling needle, when we reach the end we take it out and seal it with glue. To give shape we will carry out the same process as with the body, but with the difference that this time we will do it with a height stick or toothpick, at the end we apply glue inside and outside of both pieces, so that it does not move and remains firm.
• Vamos con el cuerpo del ángel: tomamos una cinta para quilling de 6mm de ancho x 50cms de largo, con la aguja para quilling enrollamos en su totalidad, sellamos con pega extra blanca y sacamos de la aguja, Para formar el cuerpo, tomamos un lápiz o bolígrafo y ese círculo cerrado lo vamos a empujar hacia afuera formando una especie de cono, agregamos un poco de pega dentro del cono para evitar que se mueva, y podemos aprovechar y le colocamos por fuera para que vaya adquiriendo protección, aplanamos un poco con los dedos la pieza.
• Para decorar tomamos un trozo de cinta de 6mm color blanco brillante y lo colocamos al final del cono para dar mayor vistosidad. Reservamos.
• Vamos con los brazos: Tomamos dos trozos de cinta de quilling de 3mm de ancho x 20cms de largo, enrollamos con la aguja para quilling, al llegar al final sacamos y sellamos con pega. Para darle forma vamos a llevar a cabo el mismo proceso que con el cuerpo, pero con la diferencia que esta vez lo haremos con un palito de altura o mondadientes, al finalizar aplicamos pega por dentro y fuera de ambas piezas, para que la misma no se mueva y quede firme.
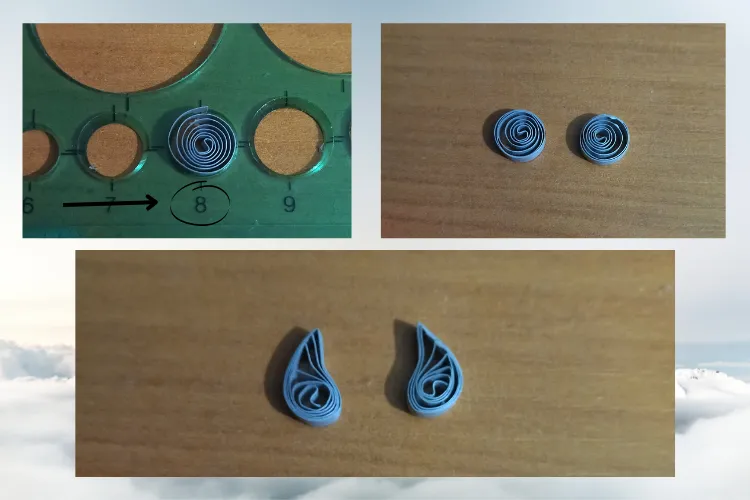
- Let's go with the wings of the Angel: We take two pieces of quilling tape 3mm wide x 12cms long, we roll with the quilling needle, take out and measure in the circumference ruler in the measure number 8, we will obtain an open circle which we will mold in the shape of a shaped drop, pinching one of its tips with your fingers and giving a small inclination to one side. We reserve both wings.
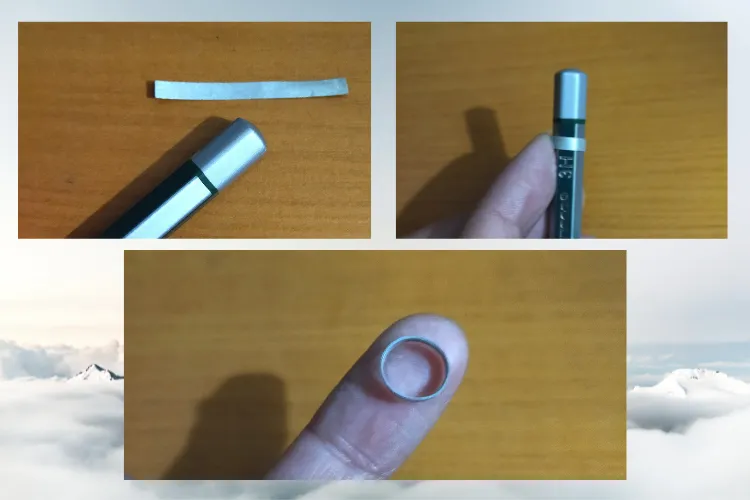
- Finally we are going to make the halo of the Angel: we take a small piece of silver colored quilling tape and we are going to join it forming a circle, this we are going to do it guiding us with the measure of the head that we previously made. To make it easier we can help ourselves by passing the tape around a pencil, but as I said before it all depends on the size of the head.
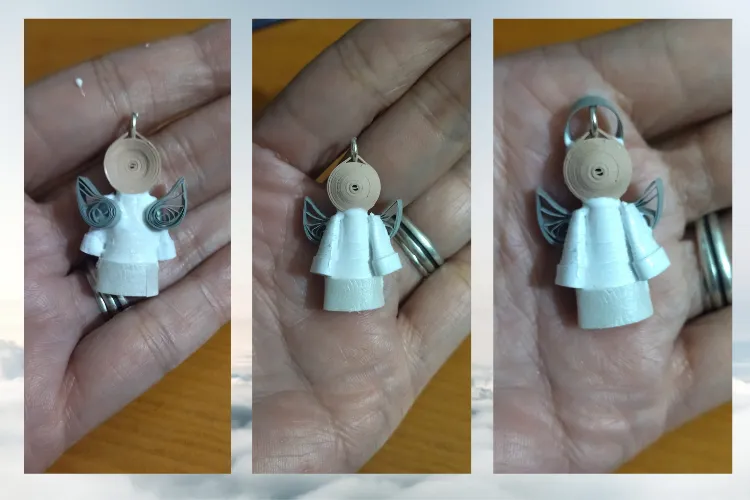
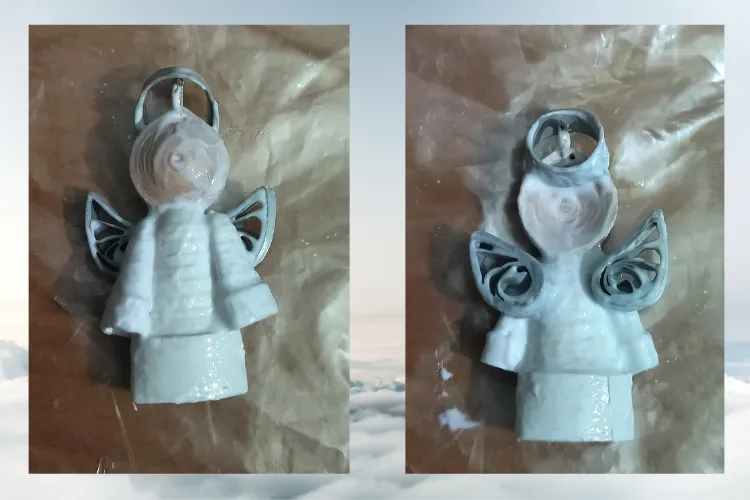
- Ready all the pieces, we are going to form our Angel. We begin by gluing the head to the body with extra strong white glue, then we continue with the arms by gluing them to the sides of the body, on the back of the angel we place its wings, and finally we glue the halo on the head.
- Once united and formed our little angel we place its liquid protection, applying several layers of glue, letting it dry between one layer and another, so that it is well plasticized and resistant, let it dry well and ready we will have our little angel pendant, ready to place on the chain or necklace of our preference and for its use.
• Vamos con las alas del Ángel: Tomamos dos trozos de cinta de quilling de 3mm de ancho x 12cms de largo, enrollamos con la aguja para quilling sacamos y medimos en la regla de circunferencias en la medida número 8, vamos a obtener un circulo abierto el cual vamos a moldear en forma de gota con forma, pellizcando una de sus puntas con los dedos y dando una pequeña inclinación hacia un lado. Reservamos ambas alas.
• Por ultimo vamos a realizar la aureola del Ángel: tomamos un trozo pequeño de cinta para quilling color plateado y vamos a unir formando un circulo, este lo haremos guiándonos con la medida de la cabeza que previamente realizamos. Para mayor facilidad podemos ayudarnos pasando la cinta alrededor de un lápiz, pero como dije anteriormente todo depende del tamaño de la cabeza.
• Listas todas las piezas, vamos a formar nuestro Ángel. Comenzamos uniendo con pega blanca extra fuerte la cabeza del cuerpo, luego seguimos con los brazos pegándolos a los lados del cuerpo, en la parte de atrás del ángel le colocamos sus alas, y para finalizar pegamos la aureola de la cabeza.
• Ya unido y formado nuestro angelito le colocamos su protección liquida, aplicando varias capas de pega, dejando secar entre una capa y otra, para que quede bien plastificado y resistente, dejamos secar bien y listo tendremos nuestro pequeño dije de angelito, listo para colocar en la cadena o collar de nuestra preferencia y para su uso.

What did you think, did you like it?
I hope you did, I hope you liked my explanation, procedure and photos, I made them with love for you.
"Let out that muse that inspires you, and let your imagination fly".
Thank you all, see you next time. 🐾🐱💕
¿Que les pareció, les gustó?
Espero que sí, que les haya gustado mi explicación, procedimiento y fotos, los hice con mucho cariño por y para ustedes.
"Deja salir esa musa que te inspira, y deja volar tu imaginación".
Gracias a todos, nos vemos en la próxima. 🐾🐱💕
Los invito que apoyen a "La Colmena", dale tu voto ✨
 Vote la-colmena for witness By @ylich
Todas las fotos usadas en este post son de mi autoría y han sido sacadas en mi celular personal un Redmi 9T y editadas Canva Banner y separador hecho por mí en Canva Traducido con la ayuda de DeepL
