Hello everyone... ✨
Hello to my dear Hivers and the beloved community of artists HiveDIY, as always very pleased and excited to be here again, showing you my work made with love and especially for you.
Greetings to the Splinterland community, and everyone who lives there, I am pleased to be here to participate in the Splinterlands Art Contest Week 254.
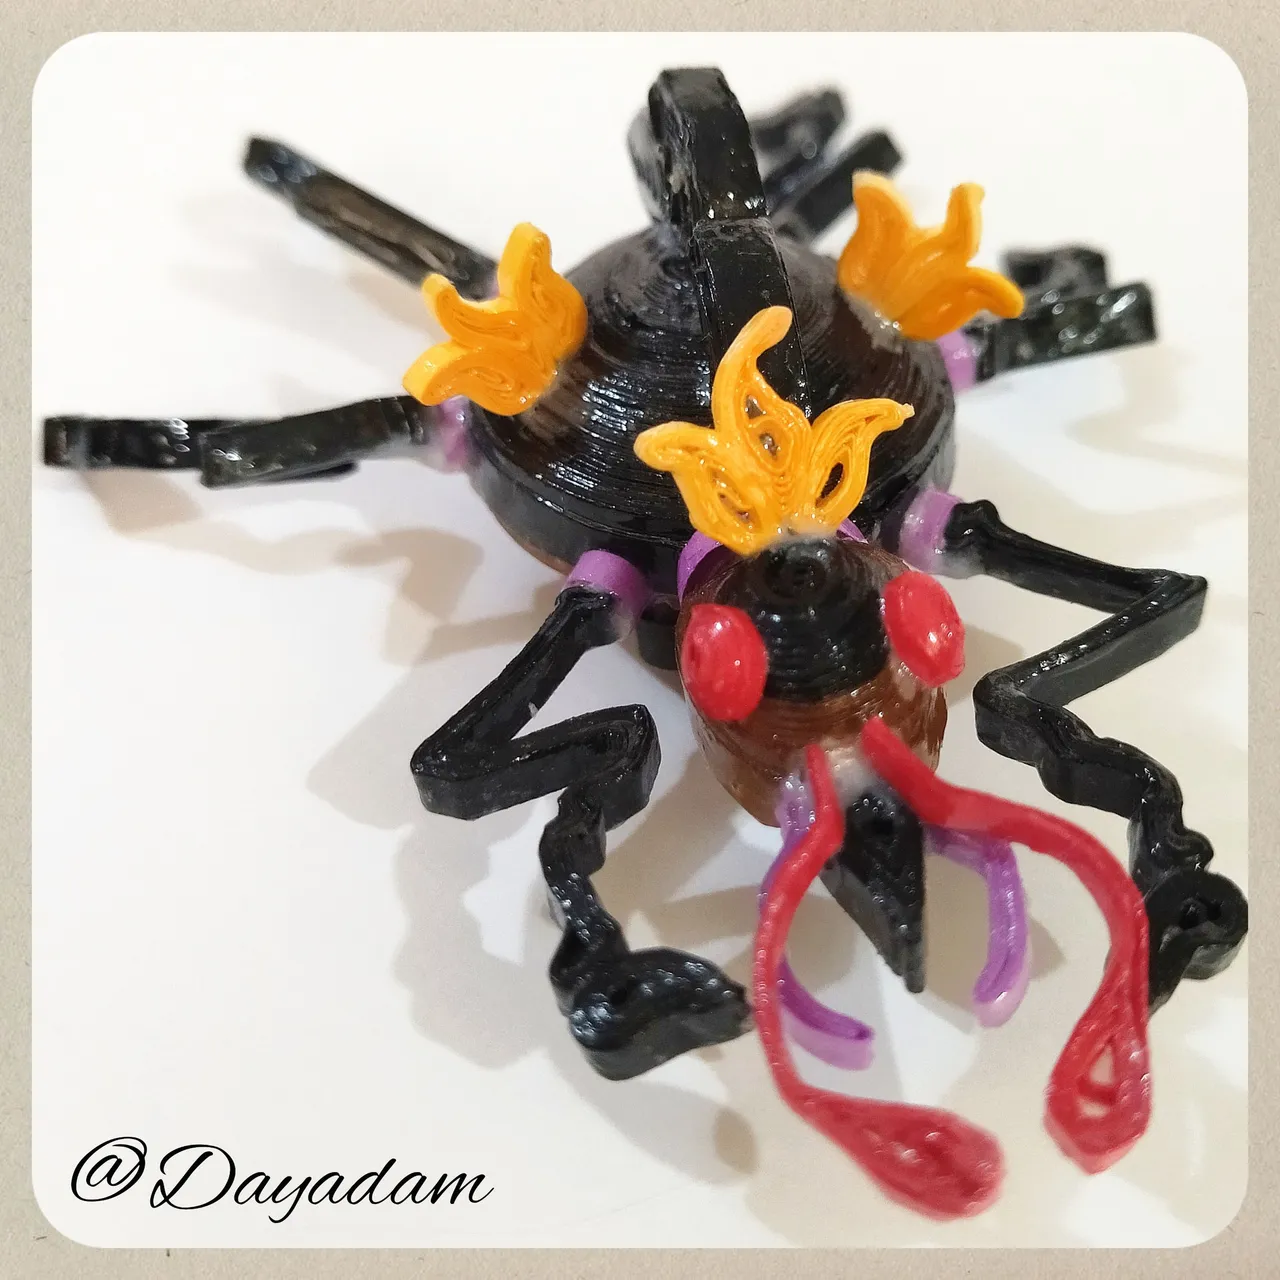
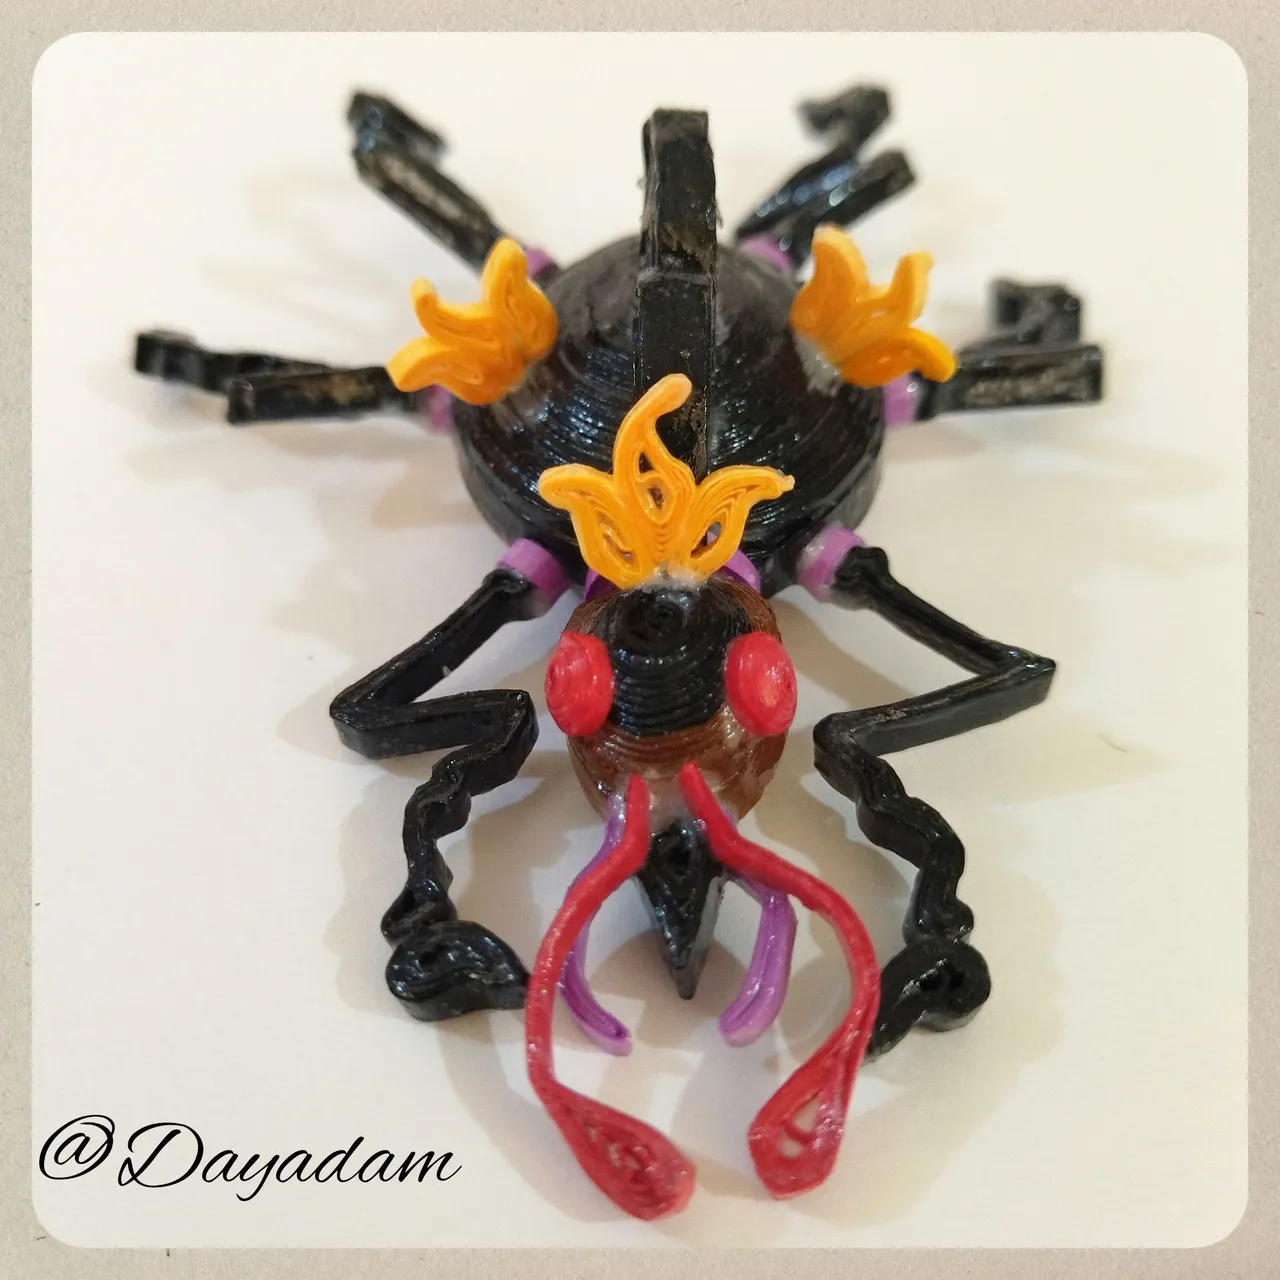
Today I bring you a fan-art, which is inspired by the letter of " Fire Beetle ", with which I challenged myself to do something different from what I usually elaborate, materializing a 3D pendant in the quilling technique, of this beetle that caught my attention for its special shape and details.
Hoping you like my work, without further ado, I leave you my creative process.
Let's get started:😃

Hola a Todos... ✨
Hola a mis queridos Hivers y a la querida comunidad de artistas HiveDIY, como siempre muy complacida y emocionada de encontrarme por acá nuevamente, mostrándole mi trabajo hecho con mucho amor y especialmente para ustedes.
Un saludo para la comunidad de Splinterland, y todos los que hacen vida por allí, me gratifica estar por acá para participar en el Splinterlands Art Contest Week 254.
Hoy les traigo un fan-art, el cual está inspirado en la carta de " Fire Beetle", con la cual me rete a realizar algo diferente a lo que suelo elaborar, materializando un Colgante en 3D en la técnica de quilling, de este escarabajo que me llamo tanto la atención por su especial forma y detalles .
Esperando les guste mi trabajo, sin más preámbulos, les dejo mi proceso creativo.
Comencemos:😃

• Trozos de cartulina de diversos colores.
• Cintas de quilling de diversos colores y medidas de largo y ancho.
• Aguja para quilling.
• Pega blanca extra fuerte (de carpintería).
• Tijera.
• Pincel.
• Argolla mediana de bisutería.
• Tapanudos.
• Hilo chino fino negro.
- Pieces of cardboard of different colors.
- Quilling ribbons of different colors and measures of length and width.
- Quilling needle.
- Extra strong white glue (woodworking glue).
- Scissors.
- Paintbrush.
- Medium size jewelry ring.
- Knot cover.
- Thin black Chinese thread.

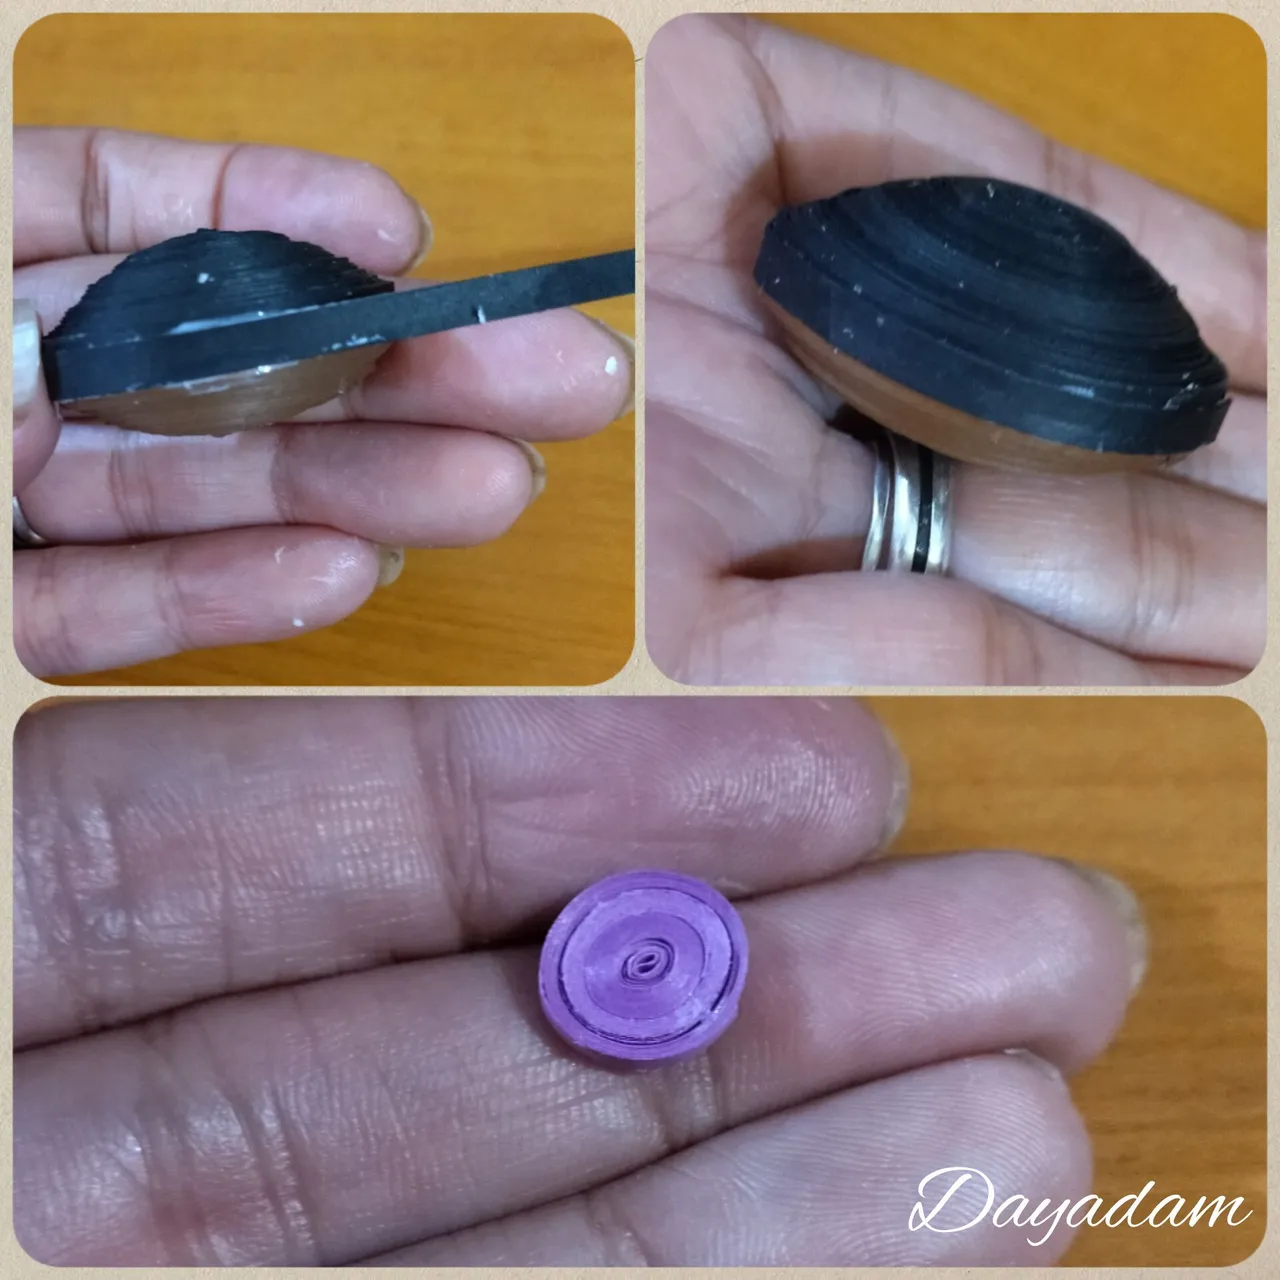
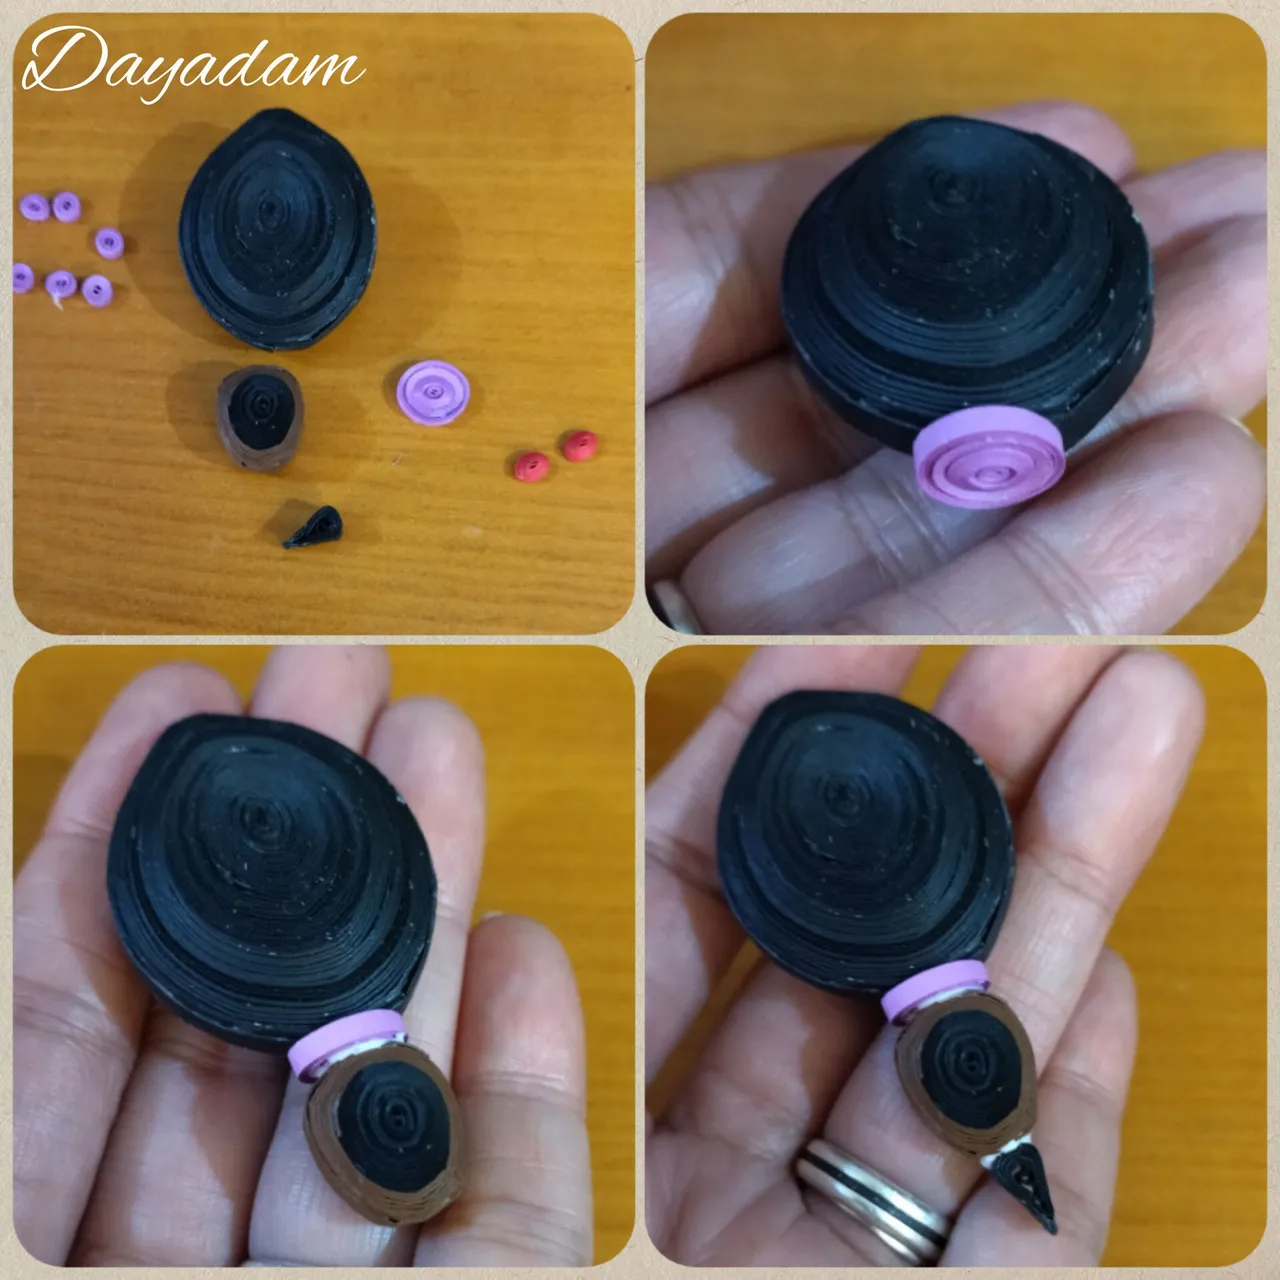
Body of the beetle:
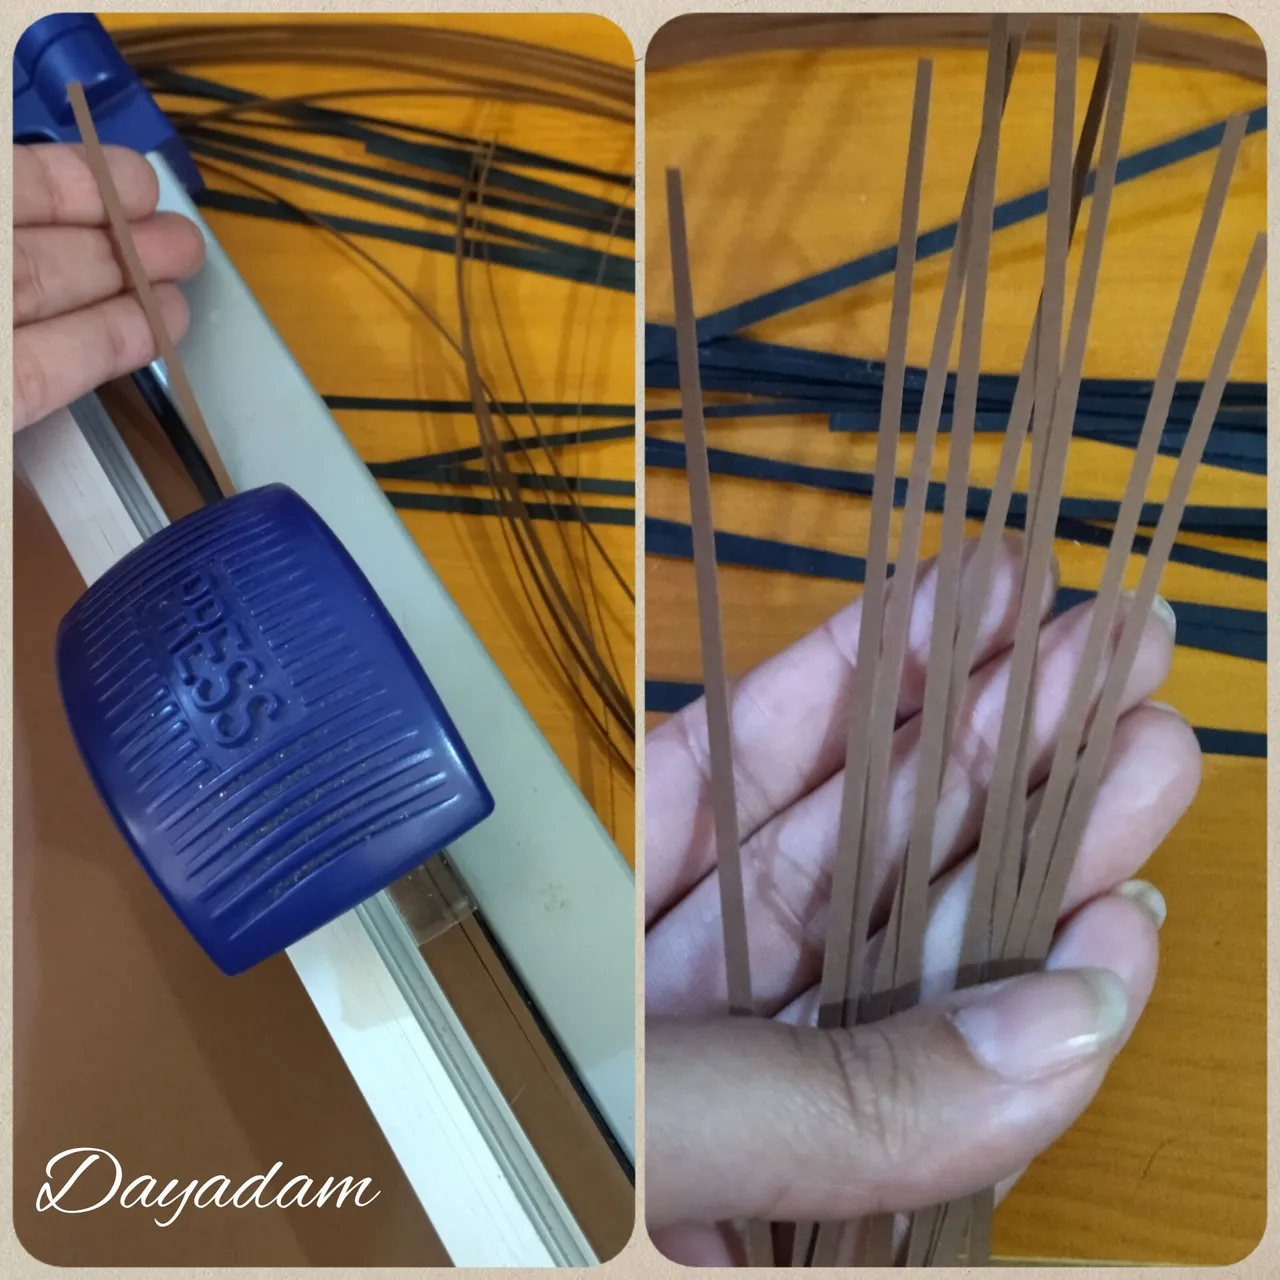
- We will need quilling ribbons of different colors, in my case I had lack of black and brown so I started taking cardboard of those colors and cut ribbons of various lengths and widths with a guillotine, you can also do it with a cutter or scissors.
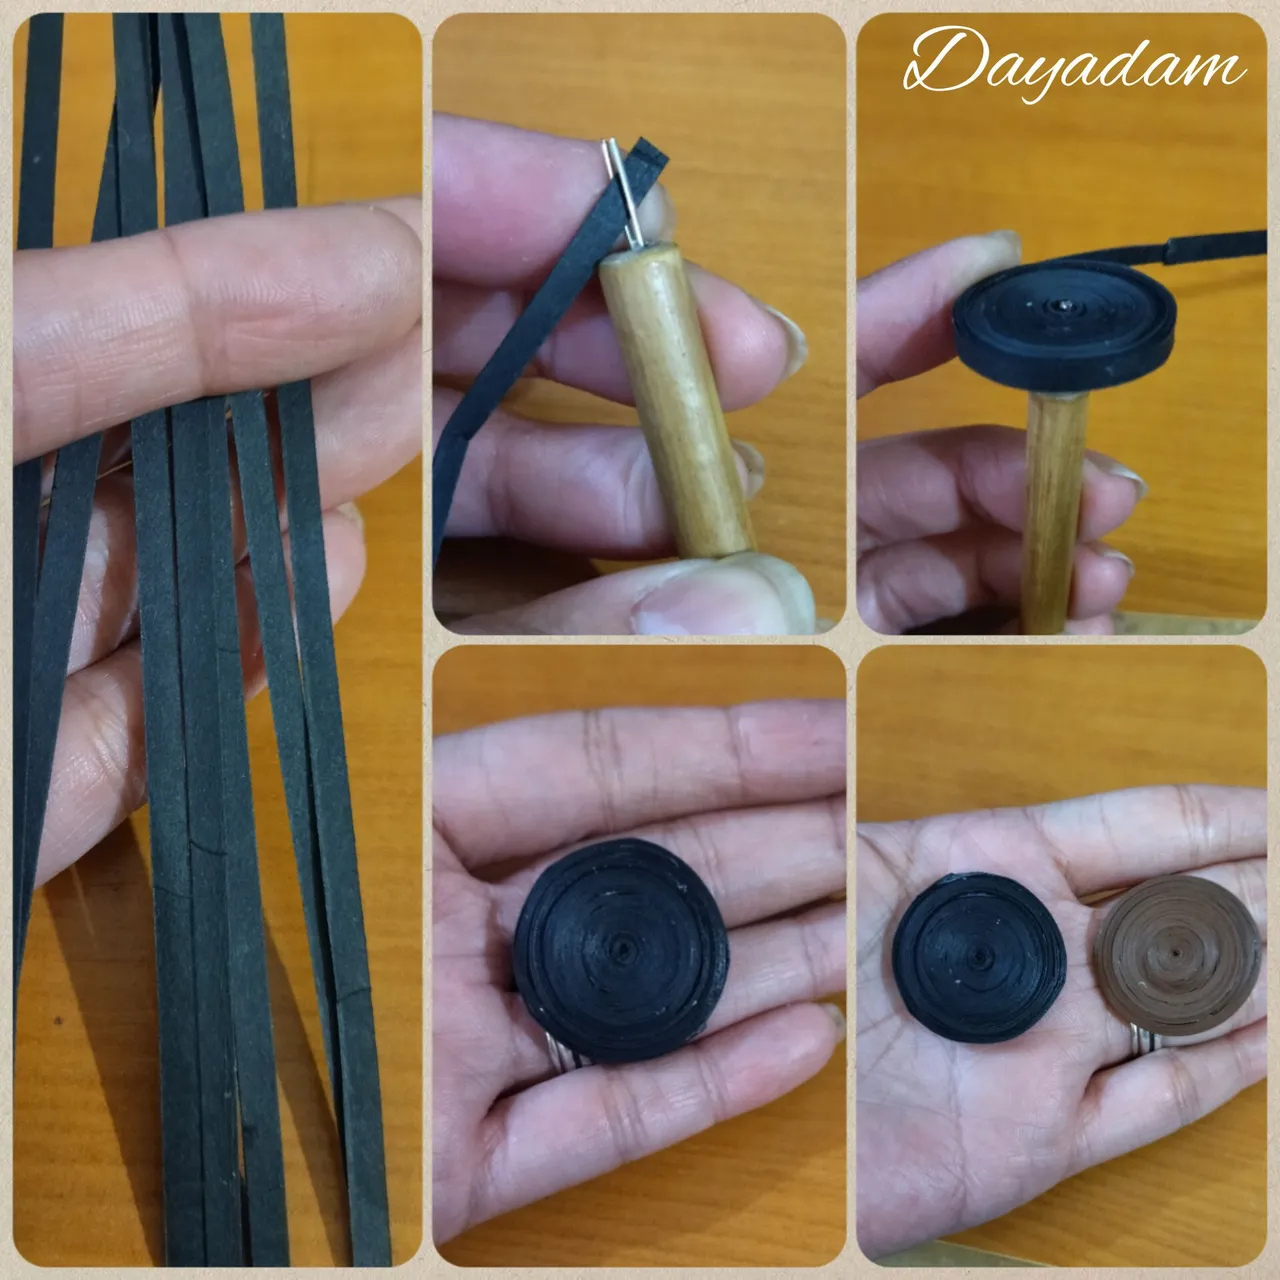
- We take black ribbons and with the help of the quilling needle we will roll and make a closed circle of the size we want the body of the beetle to be. We will need a brown circle of the same size, but we will make it with thinner strips than the black ones.
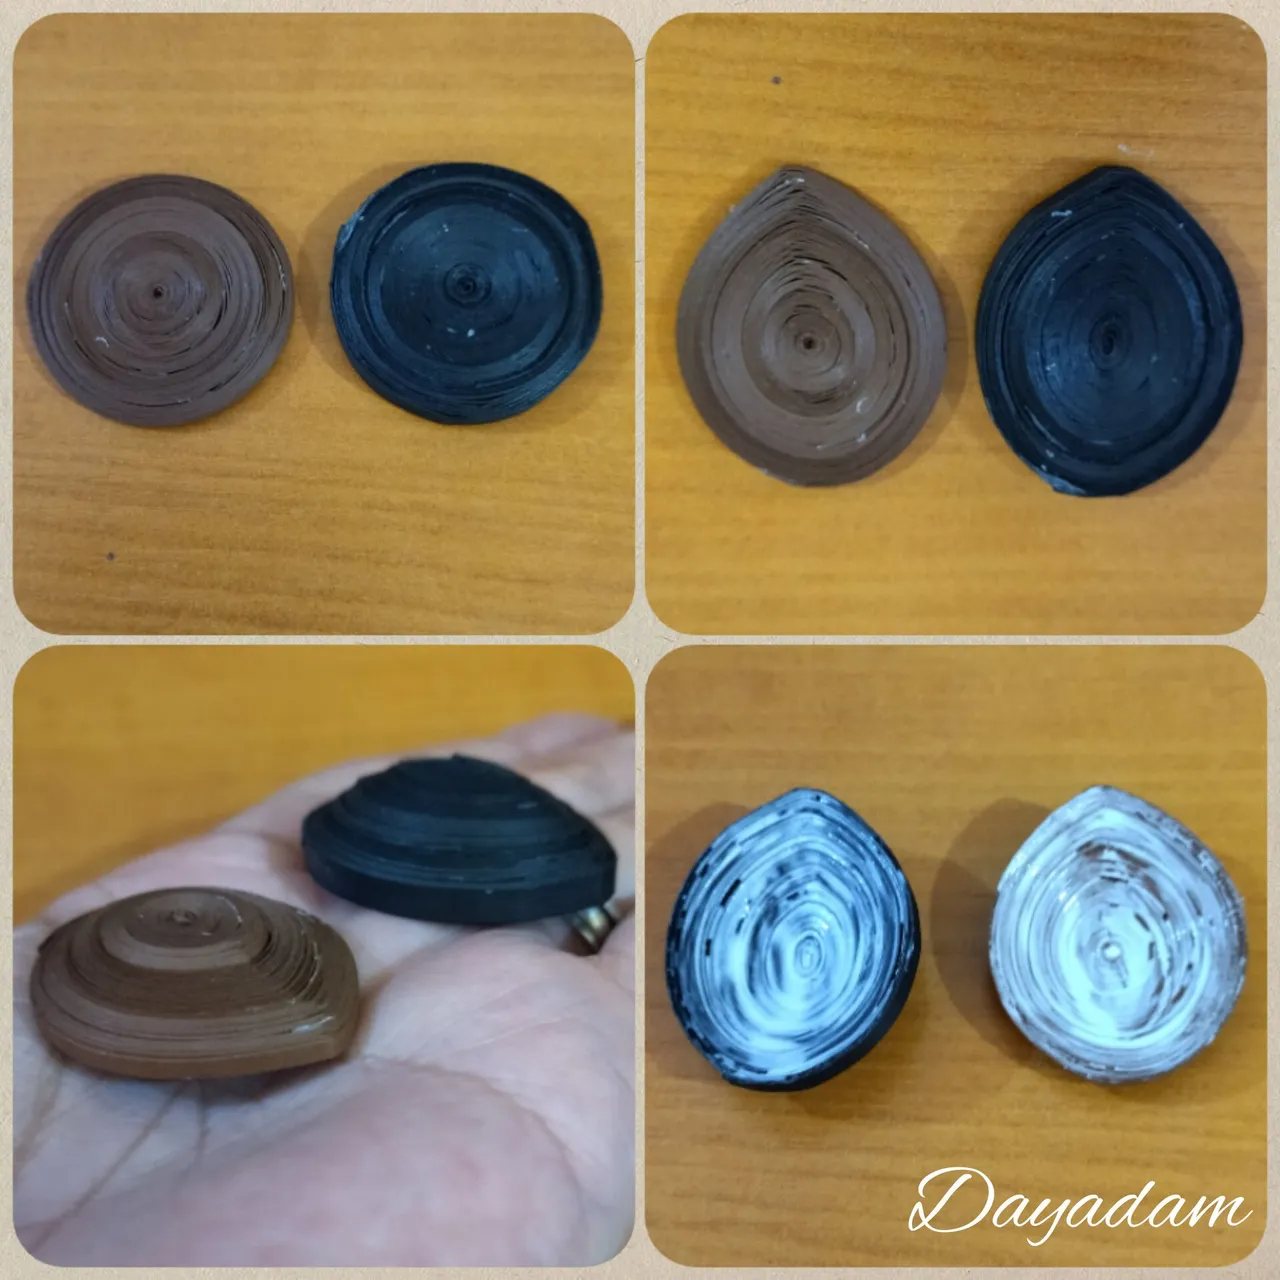
- Once the circles are ready, we are going to mold them a little to give them an oval shape and a little pointed at one of their ends.
- We will proceed to remove a little both pieces, to give it a 3D effect, on the opposite side we will add glue and let it dry to prevent it from deforming or moving.
- Once the pieces are dry we are going to join both and we will put a piece of black tape around them.
- With thin purple tape we will make a closed circle.

Cuerpo del escarabajo:
• Vamos a necesitar cintas de quilling de diversos colores, en mi caso tenia carencia del color negro y marrón por ello comencé tomando cartulina de esos colores y corte cintas de diversas medidas de largo y ancho con una guillotina, también lo puedes hacer con un cúter o una tijera.
• Tomamos cintas de color negro y con la ayuda de la aguja para quilling enrollaremos y realizaremos un círculo cerrado del tamaño que deseamos quede el cuerpo del escarabajo. Vamos a necesitar un círculo del mismo tamaño de color marrón, pero lo realizaremos con unas tiras más finas que las negras.
• Listos los círculos vamos a moldear un poco para darle una forma ovalada y algo puntiaguda en una de sus puntas.
• Vamos a proceder a sacar un poco ambas piezas, para darle u efecto 3D, en la parte opuesta añadiremos pega y dejamos secar para evitar que la misma se deforme o se mueva.
• Secas las piezas vamos a unir ambas y pasaremos un trozo de cinta negra alrededor.
• Con cinta delgada morada vamos a hacer un círculo cerrado.
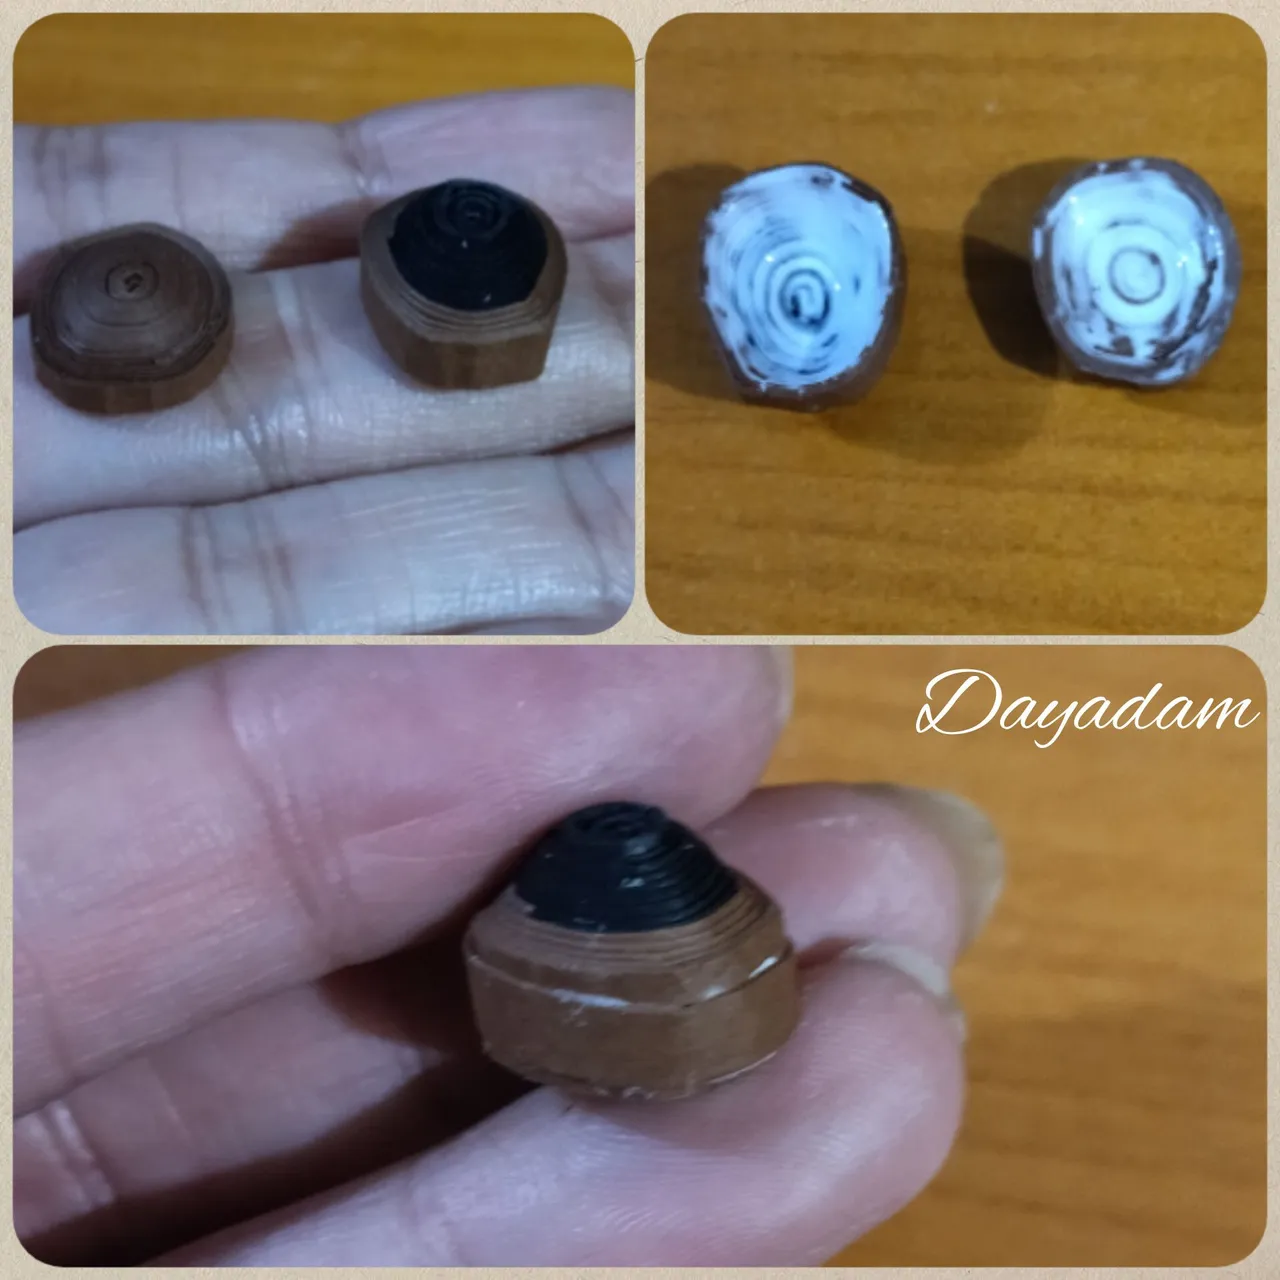
Head of the beetle:
- Now we will need a closed circle of mixed colors, we will make it by rolling black ribbon and then add a brown piece, we will make another one of the same size only brown with thinner ribbon. With these pieces we will follow the same process of the body, we will take out a little bit to give it a 3D effect, we will apply glue on the inner part so that the piece does not move, and we will join both passing this time a brown ribbon around it.
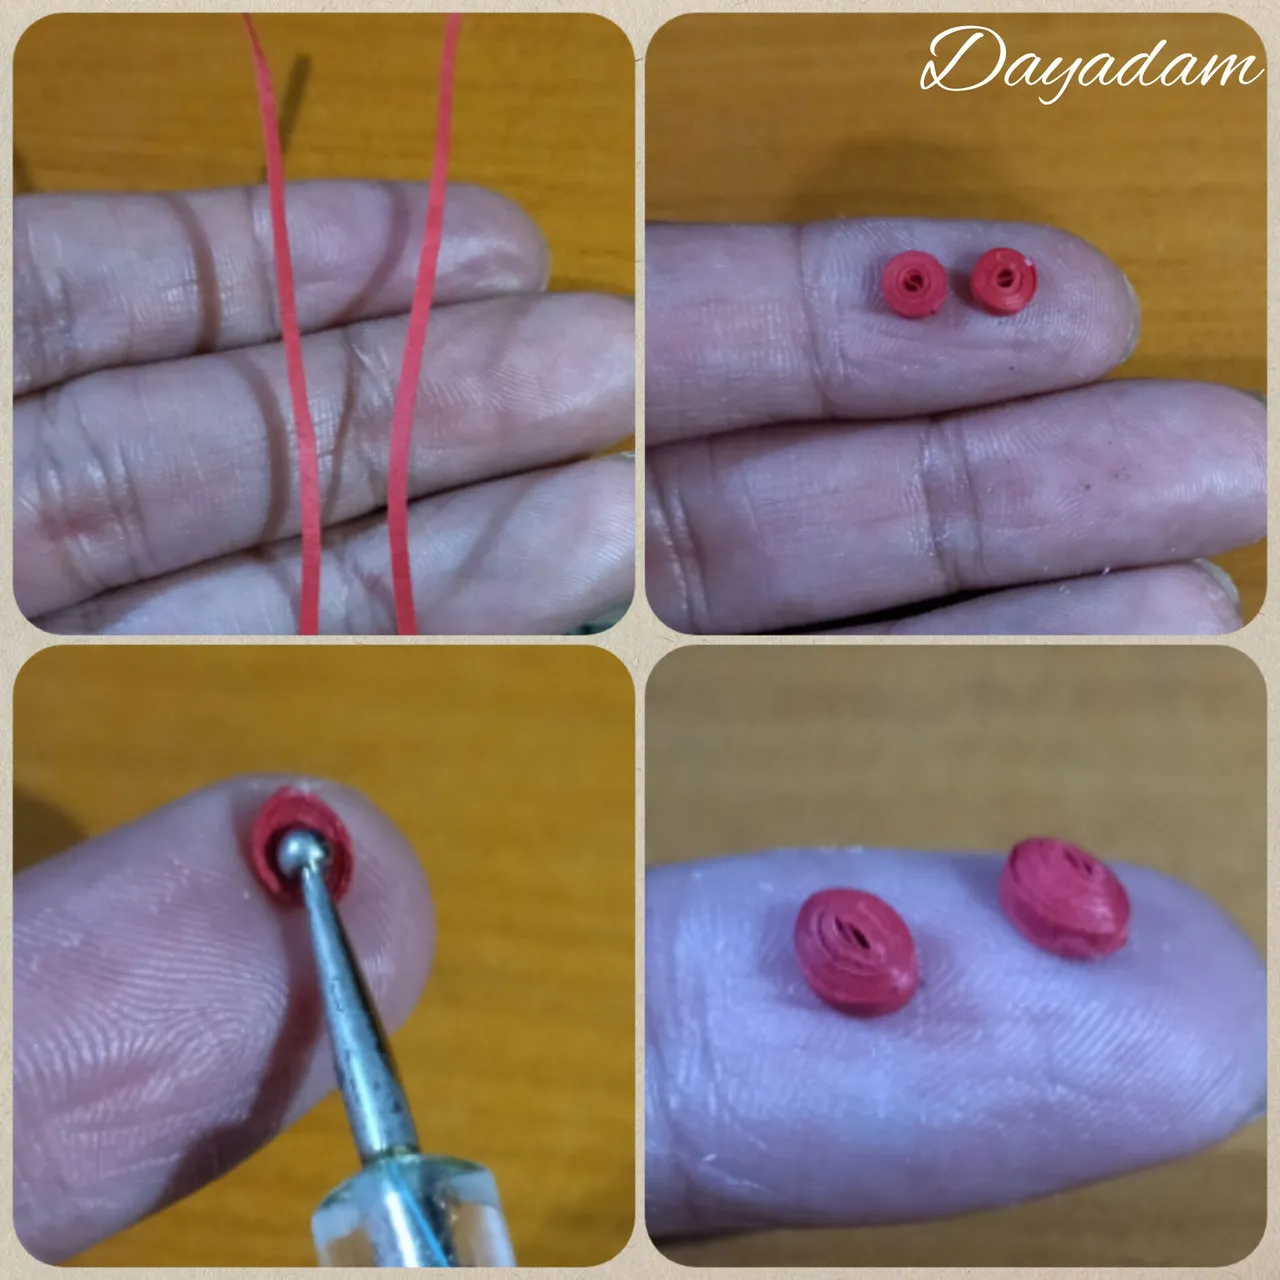
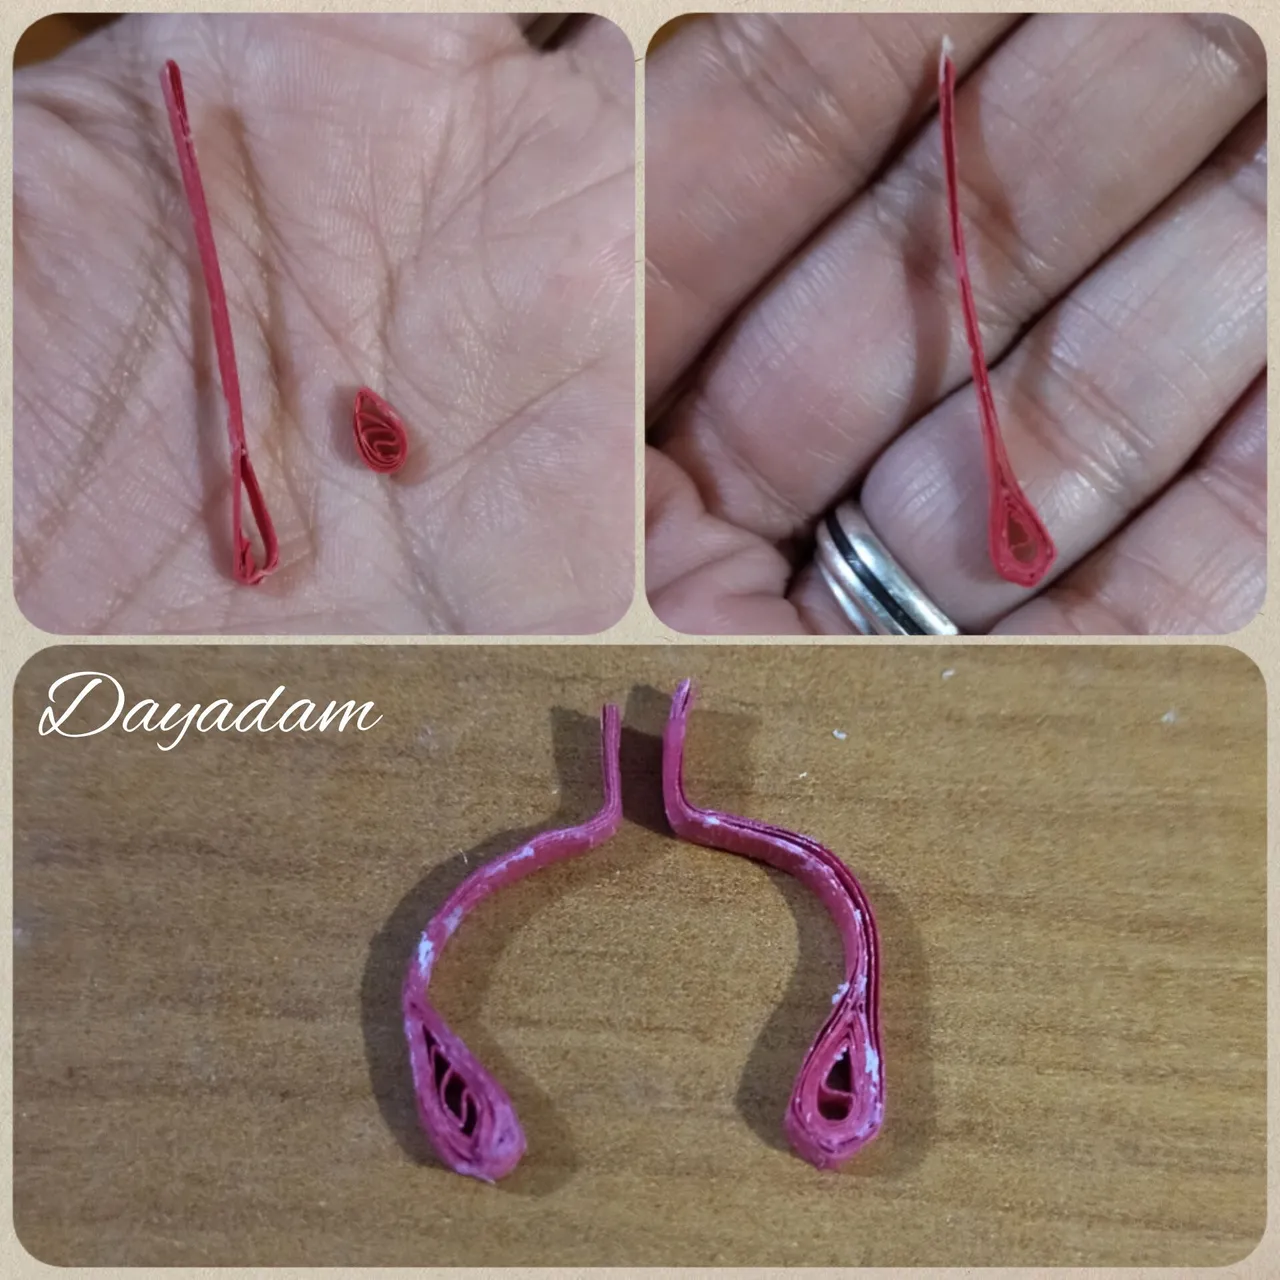
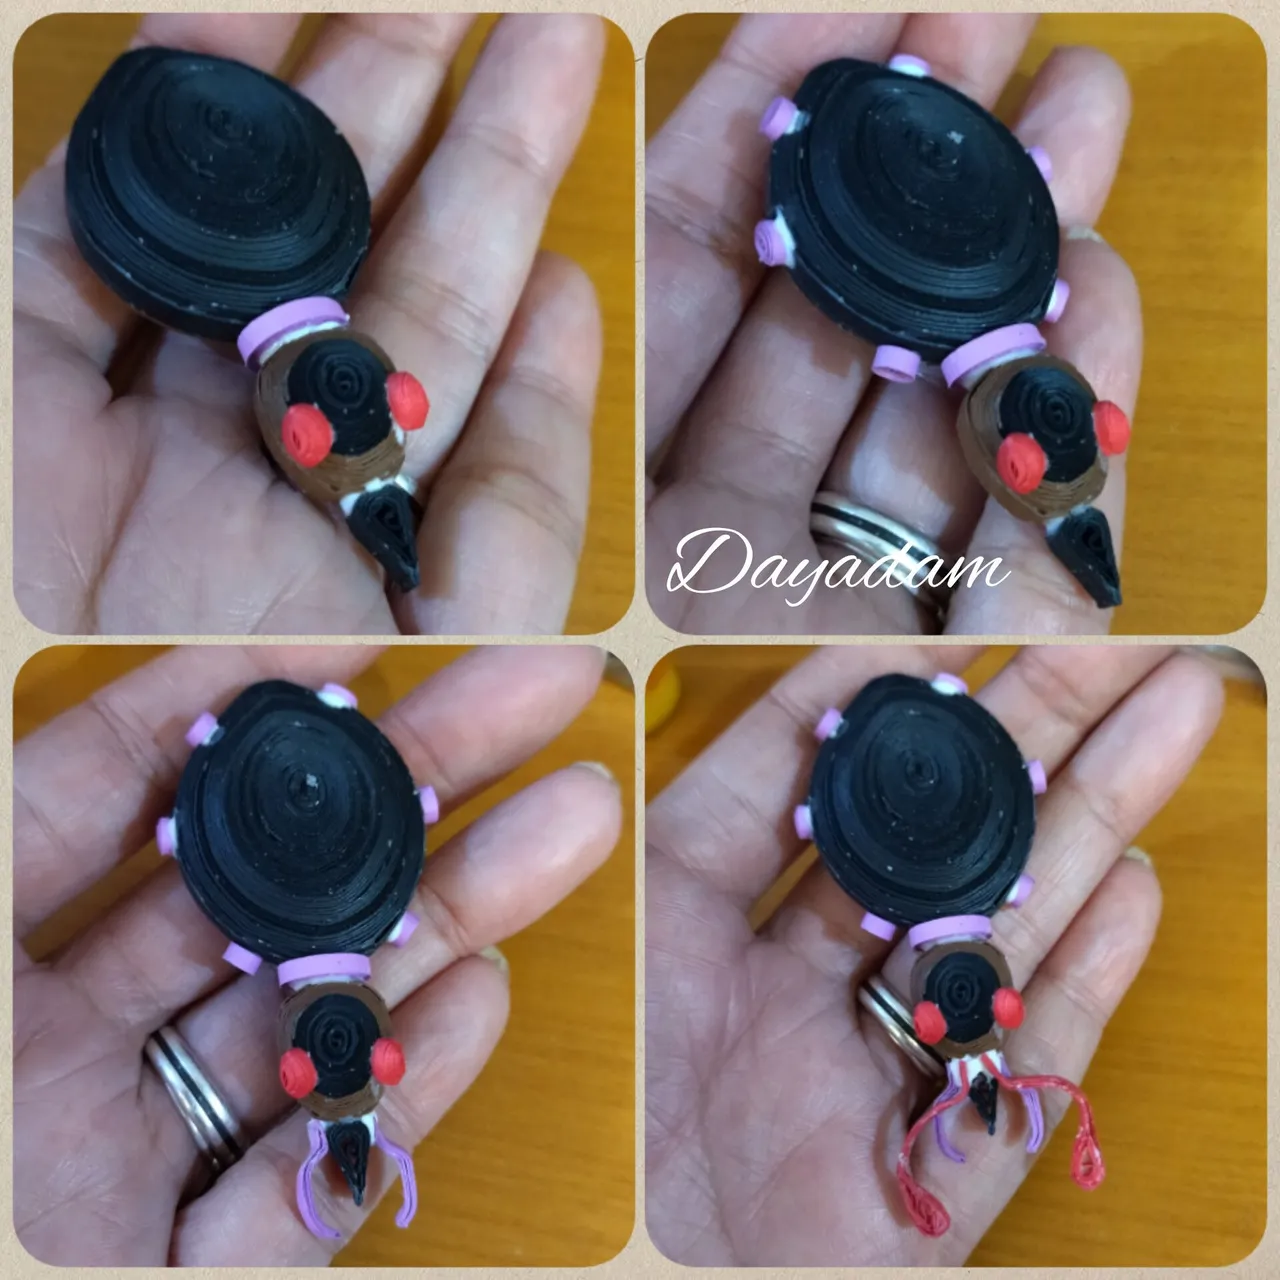
- We will take two pieces of very thin red ribbons and we will make two closed circles, which we will mold in the shape of drops and we will take out a little bit towards the outside.
- Make a small black triangle, which will be part of the mouth.
- With purple ribbons folded in several parts and molded, make the smallest needles of the mouth, and with red ribbons under the same previous process, make the biggest needles with the difference that in their tips we will place a small piece made with red ribbon in the shape of a leaf.
Cabeza del escarabajo:
• Ahora necesitaremos un círculo cerrado de colores mixtos, lo haremos enrollando cinta negra y luego agregaremos un trozo marrón, haremos otro del mismo tamaño solo marrón con cinta más fina. Con estas piezas seguiremos el mismo proceso del cuerpo, sacaremos un poco para darle efecto 3D, aplicaremos pega en la parte interna para que no se mueva la pieza, y uniremos ambas pasando esta vez una cinta marrón alrededor.
• Tomaremos dos trozos de cintas rojas muy finas y realizaremos dos círculos cerrados, los cuales moldearemos en forma de gotas y sacaremos un poco hacia afuera
• Realice un pequeño triangulo de color negro, que será parte de la boca.
• Con cintas moradas dobladas en varias partes y moldeadas, realice los agujones más pequeños de la boca, y con cintas rojas bajo el mismo proceso anterior, realice los aguijones más grandes con la diferencia que en sus puntas le coloque una pequeña pieza realizada con cinta roja en forma de hoja.

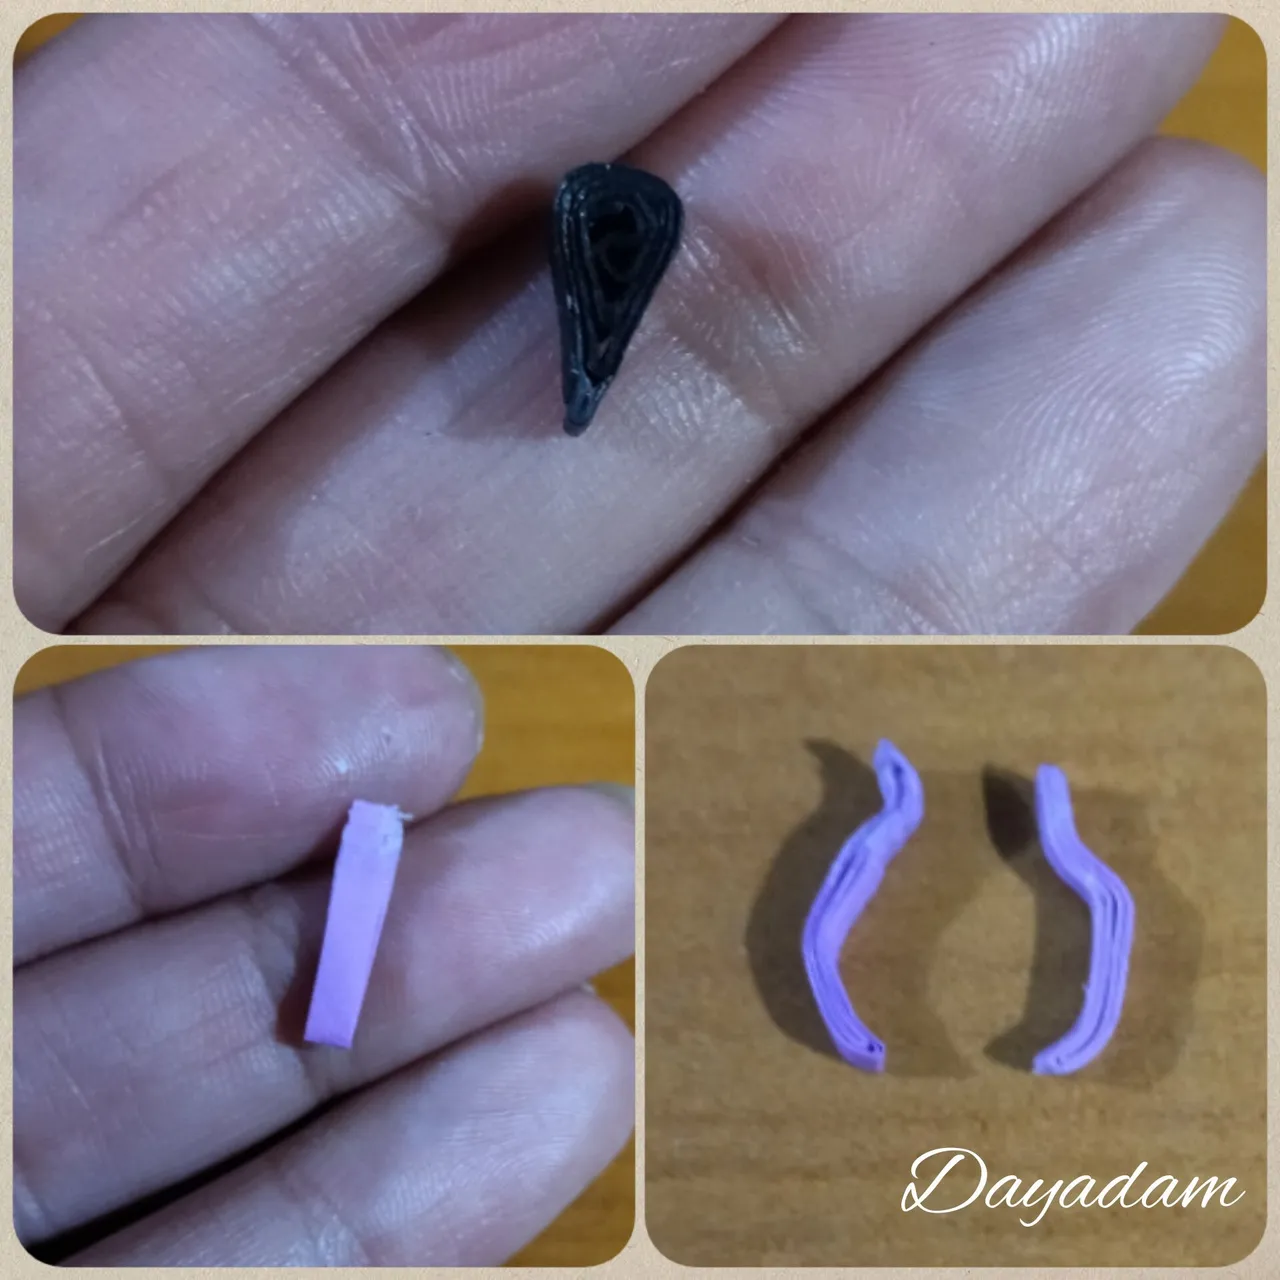
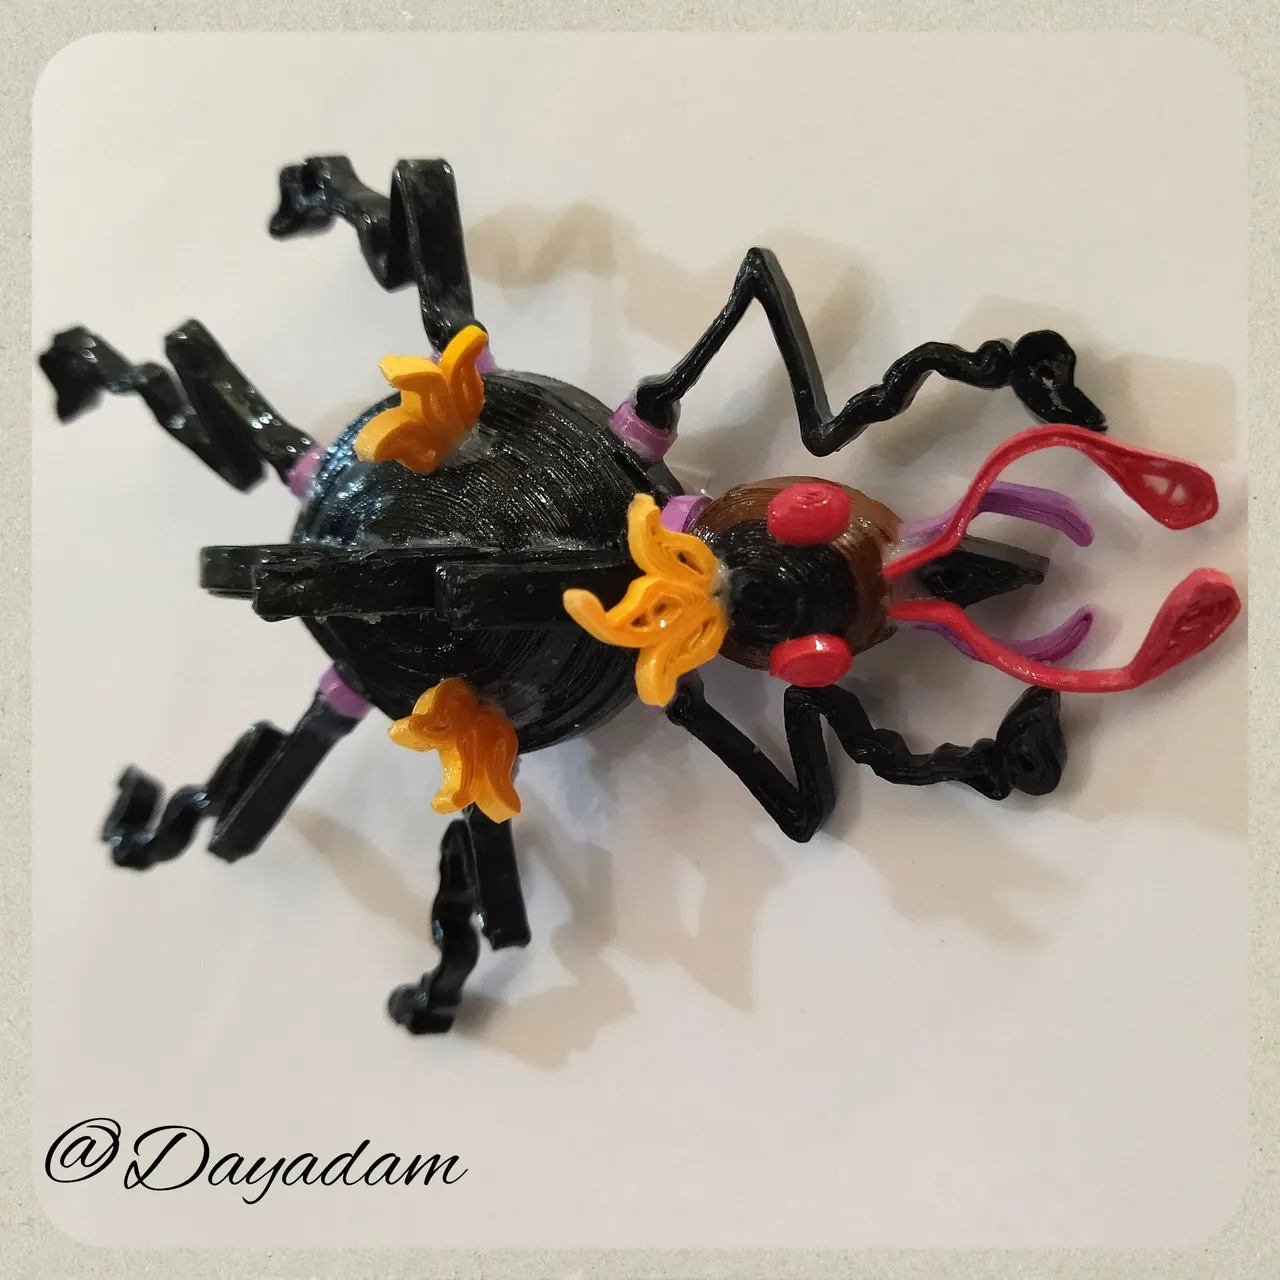
Beetle legs:
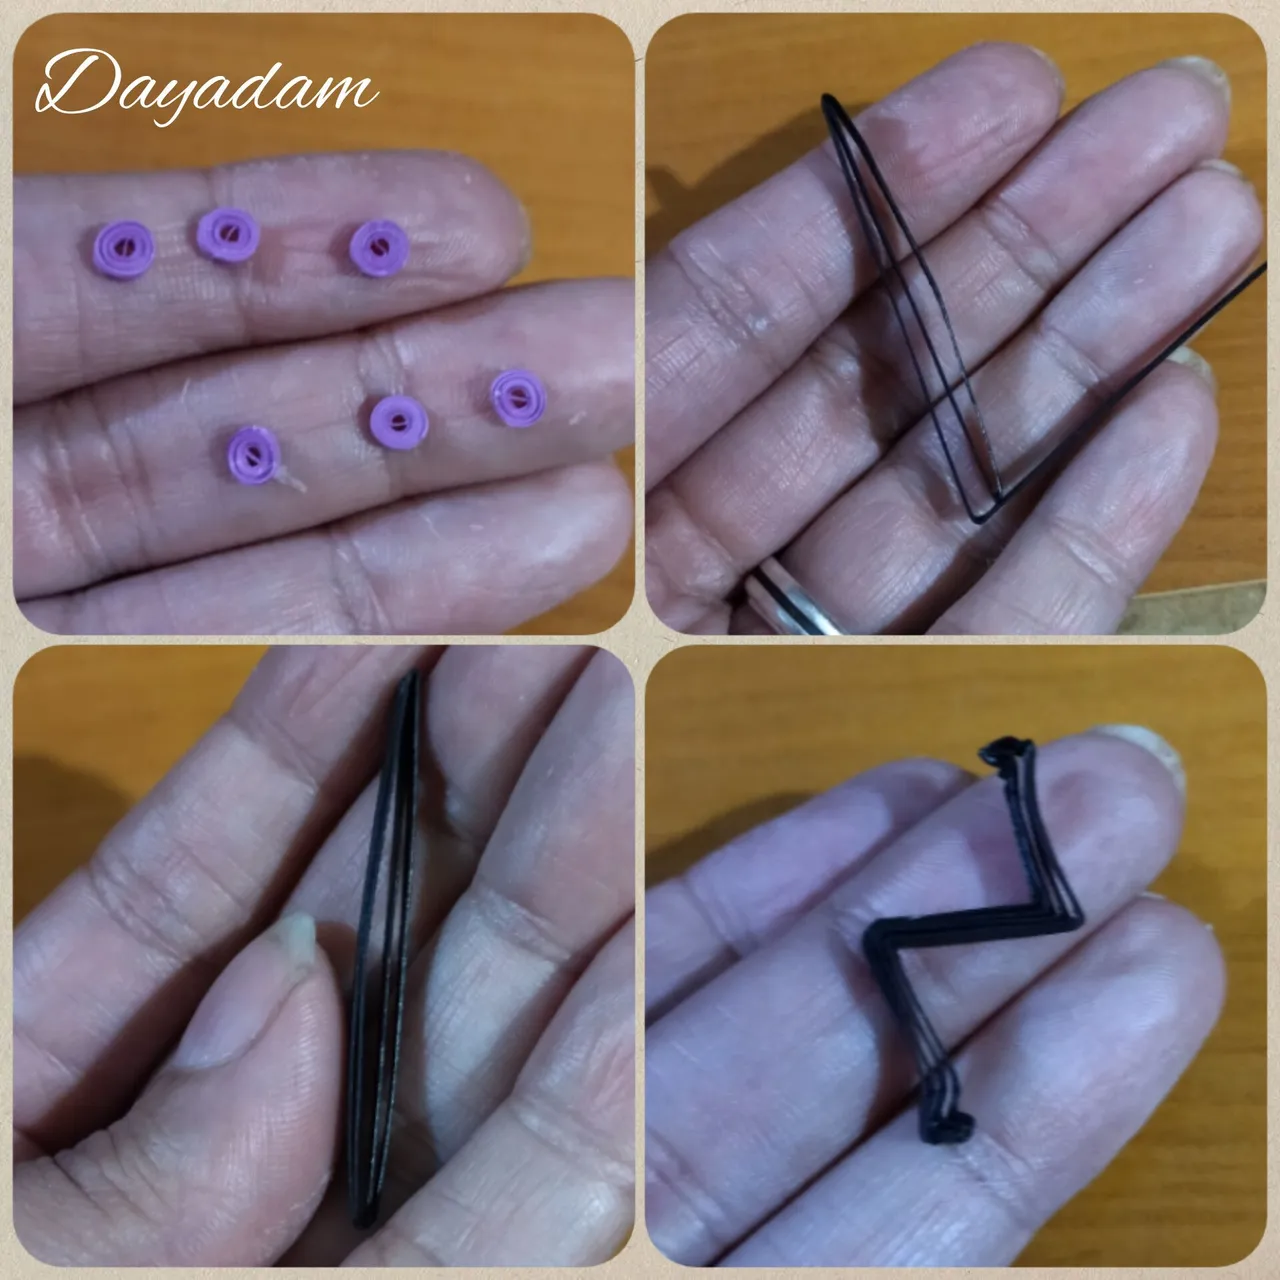
- With thin purple ribbon we will make 6 small closed circles.
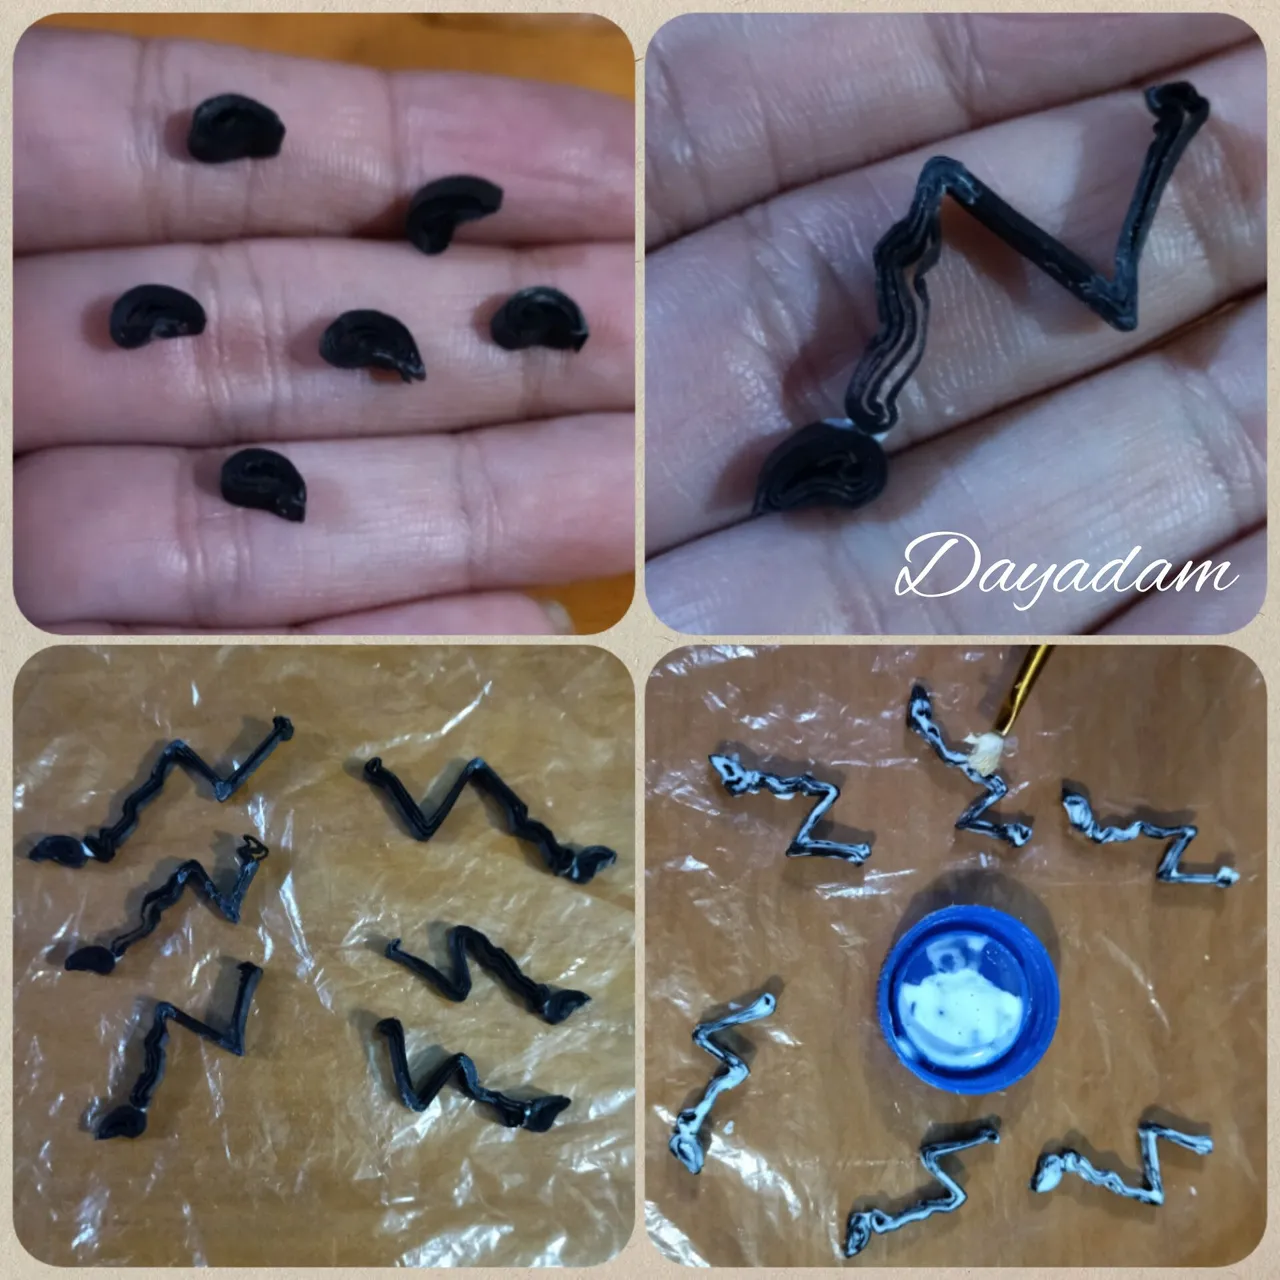
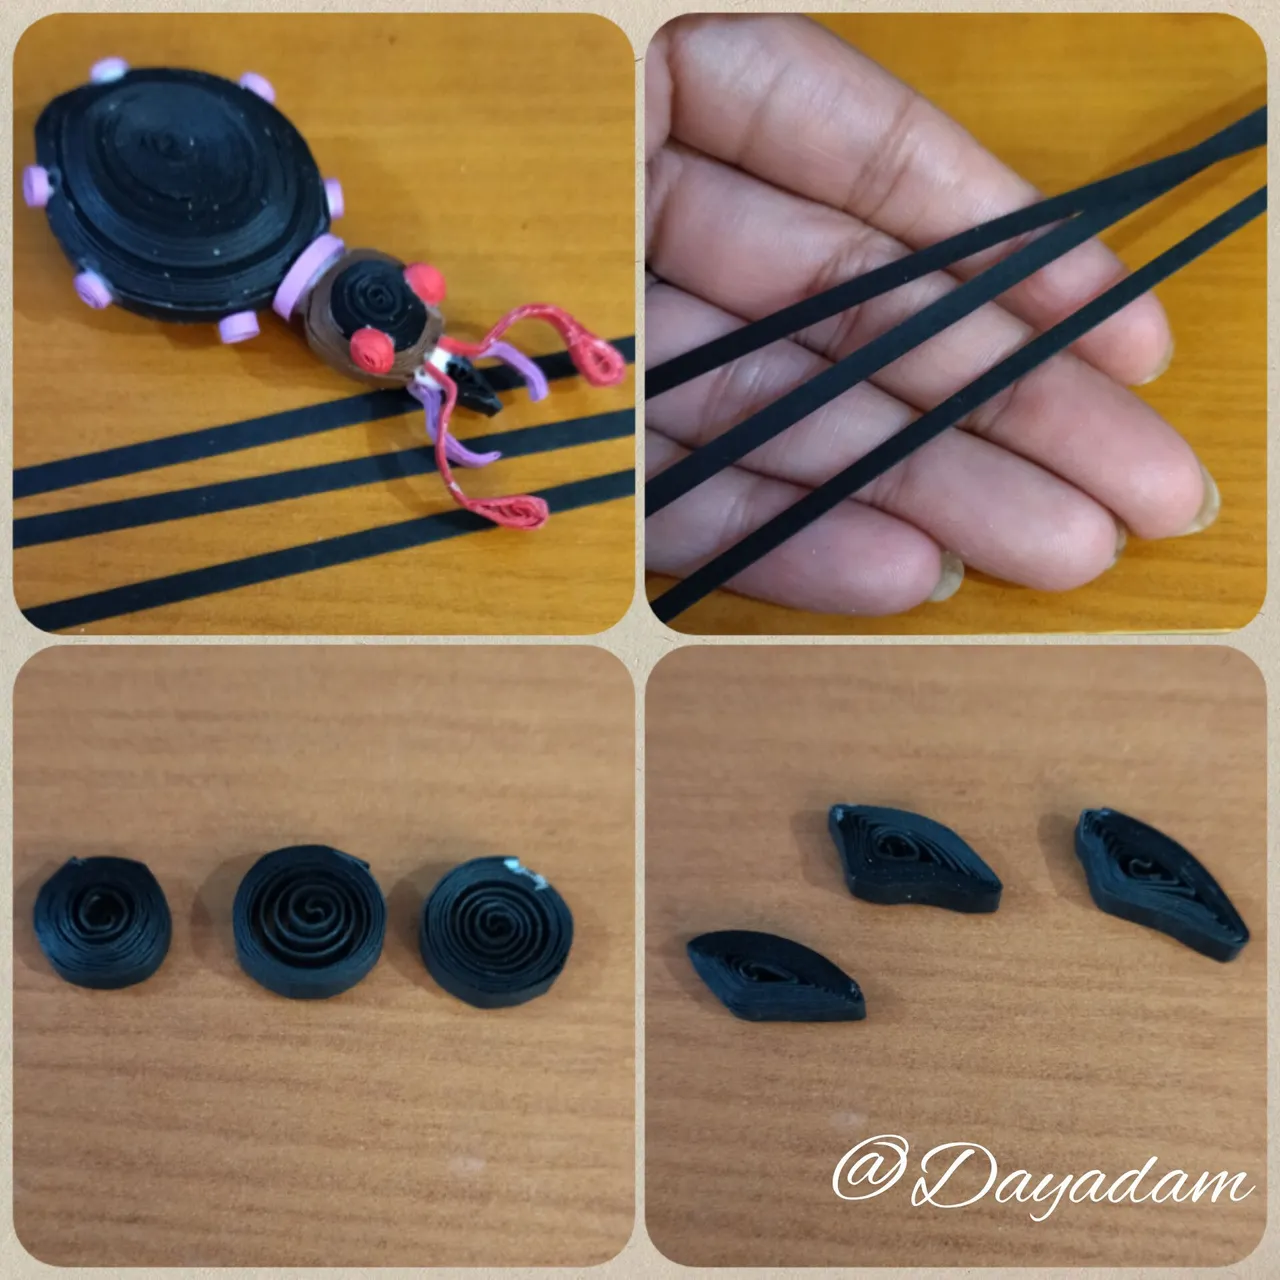
- We will take black tape and fold it in 4 parts, seal with glue and mold the legs to our liking.
- With black tape make 6 closed circles and mold them in the shape of a kind of leaf shape, these molded leaves will be glued to the legs, let them dry a little and then apply a layer of extra strong white glue to the legs, let them dry very well to harden and be able to move them without deforming them.
Patas del escarabajo:
• Con cinta morada fina haremos 6 pequeños círculos cerrados.
• Tomaremos cinta negra la doblaremos en 4 partes sellamos con pega y moldearemos las patas a nuestro gusto.
• Con cinta negra elabore 6 círculos cerrados y los moldee en forma de una especie de hoja con forma, esas hojas moldeadas las pegare a las patas dejamos secar un poco y luego aplique una capa de pega blanca extra fuerte a las patas, deje secar muy bien para que endurezcan y poder moverlas sin que se deformen.

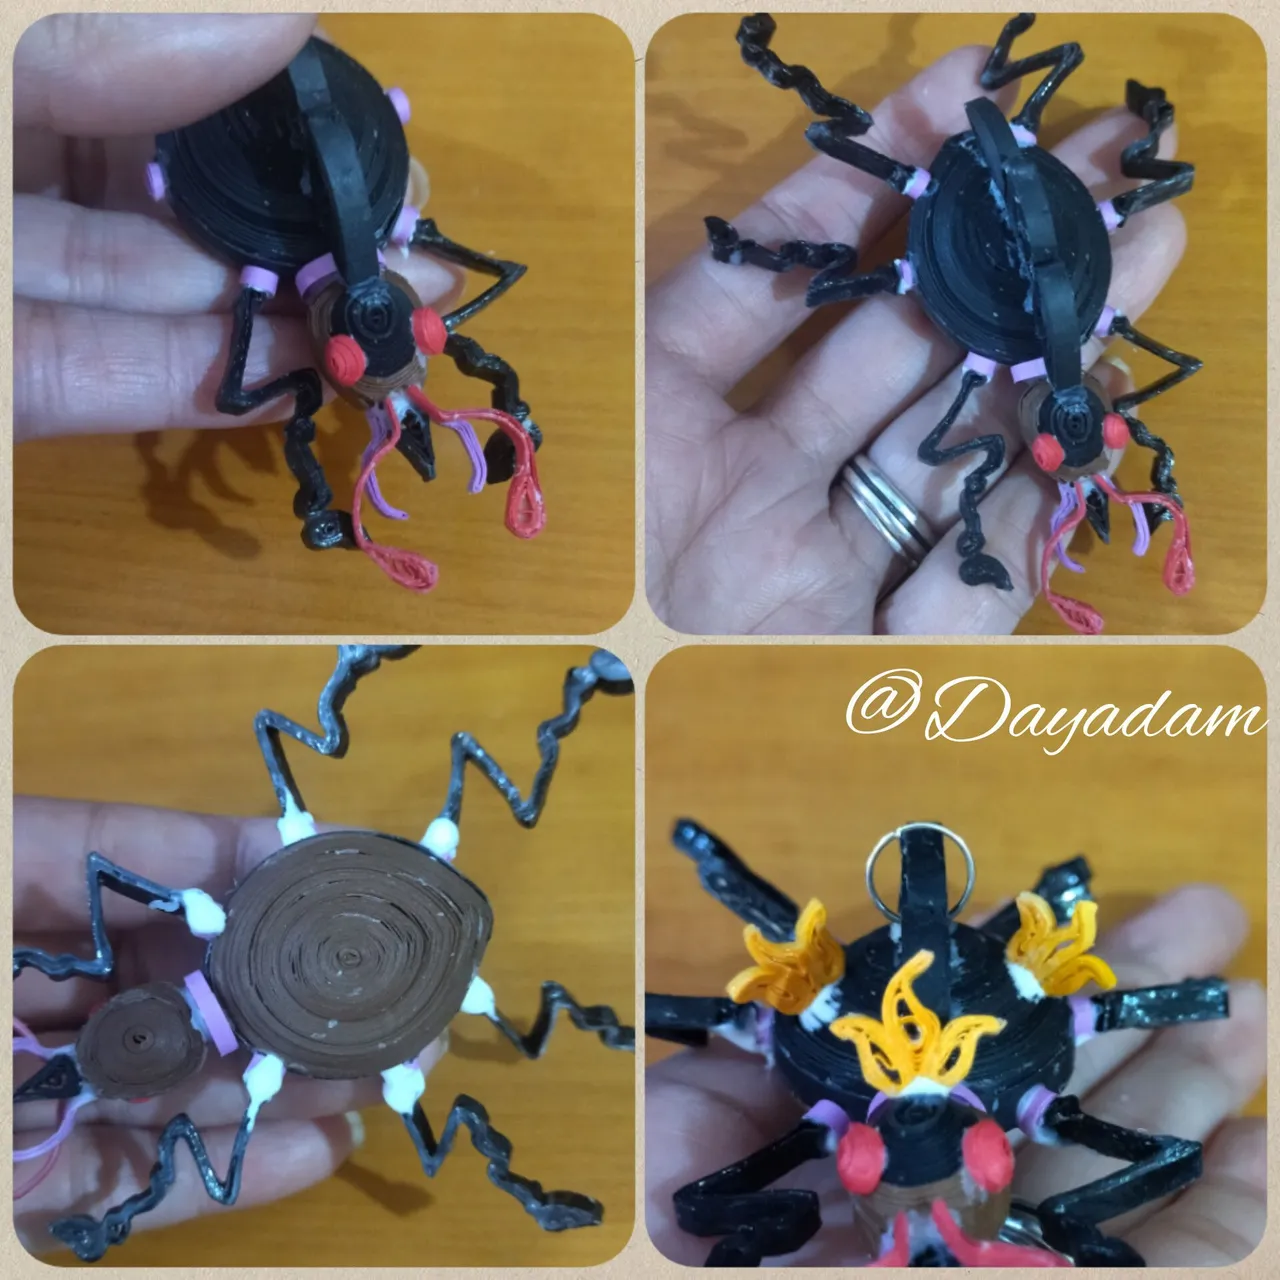
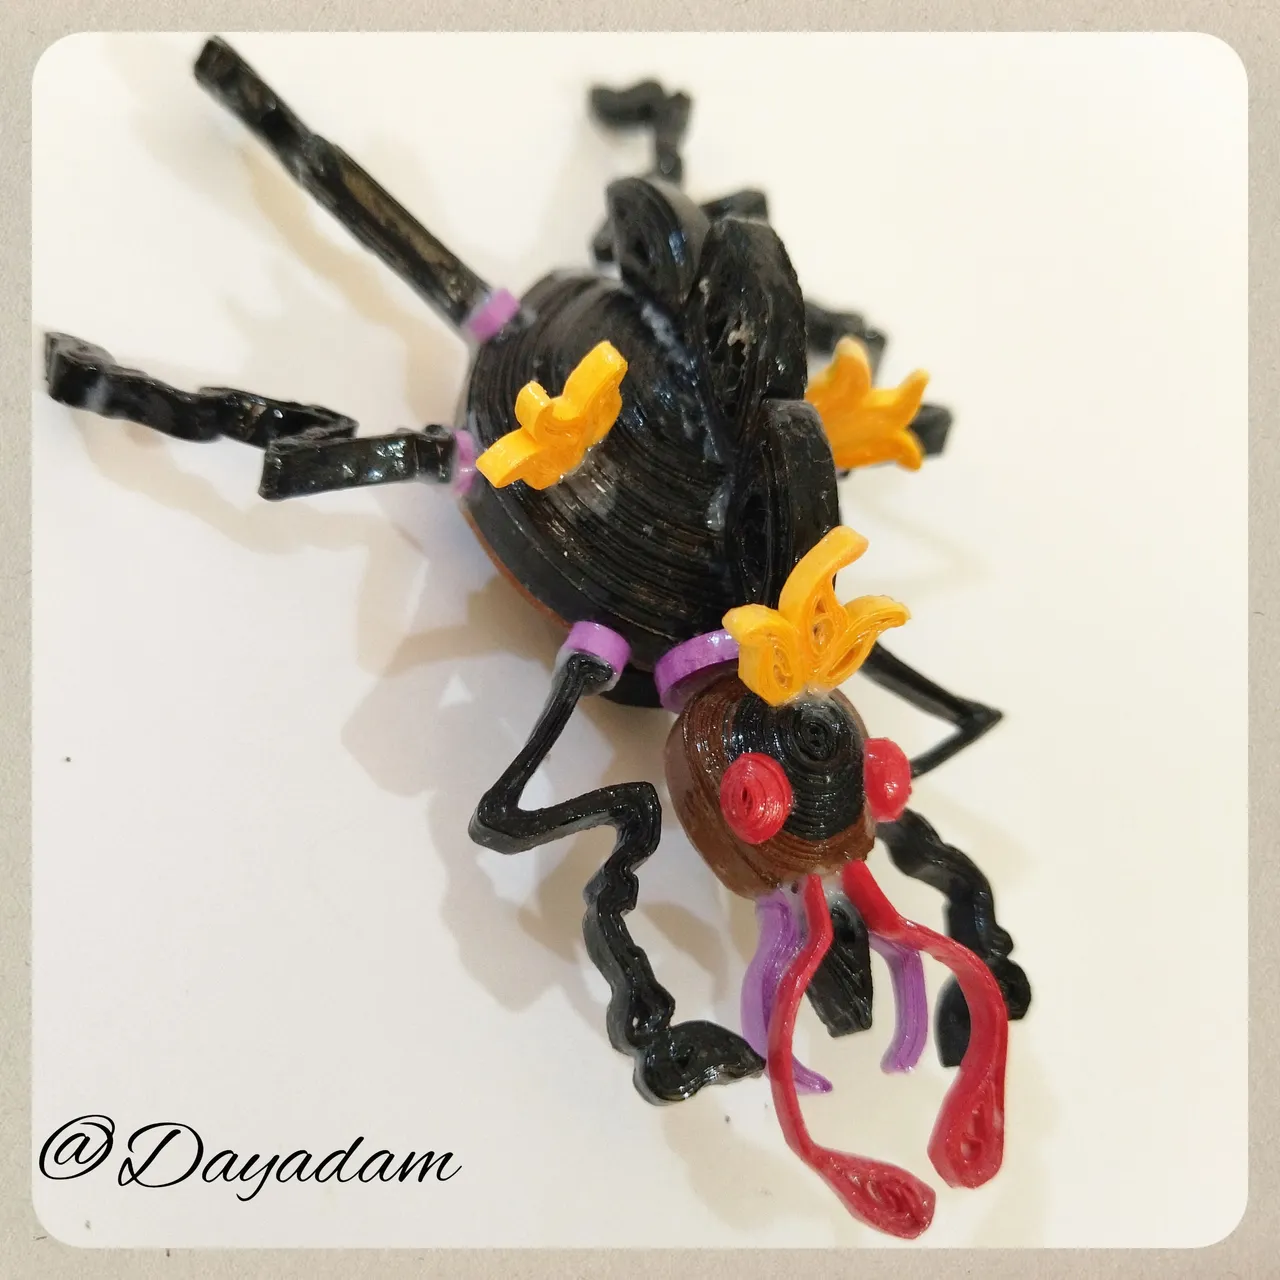
Formation of the Beetle:
- At this point I will be gluing some pieces of the body to make the last details and glue all the final pieces.
- Once I glued some pieces to the body, I proceeded to make 3 closed circles and molded them as a kind of triangle shape, to glue them to the back of the beetle, I placed them on the body at once.
Formación del Escarabajo:
• Llegado a este punto voy a ir pegando algunas piezas del cuerpo para realizar los últimos detalles y pegar todas las piezas finales.
• Pegadas algunas piezas al cuerpo, procedí a elaborar 3 círculos cerrados y los moldee como una especie de triangulo con forma, para pegarlas al lomo del escarabajo, las coloque en el cuerpo de una vez.
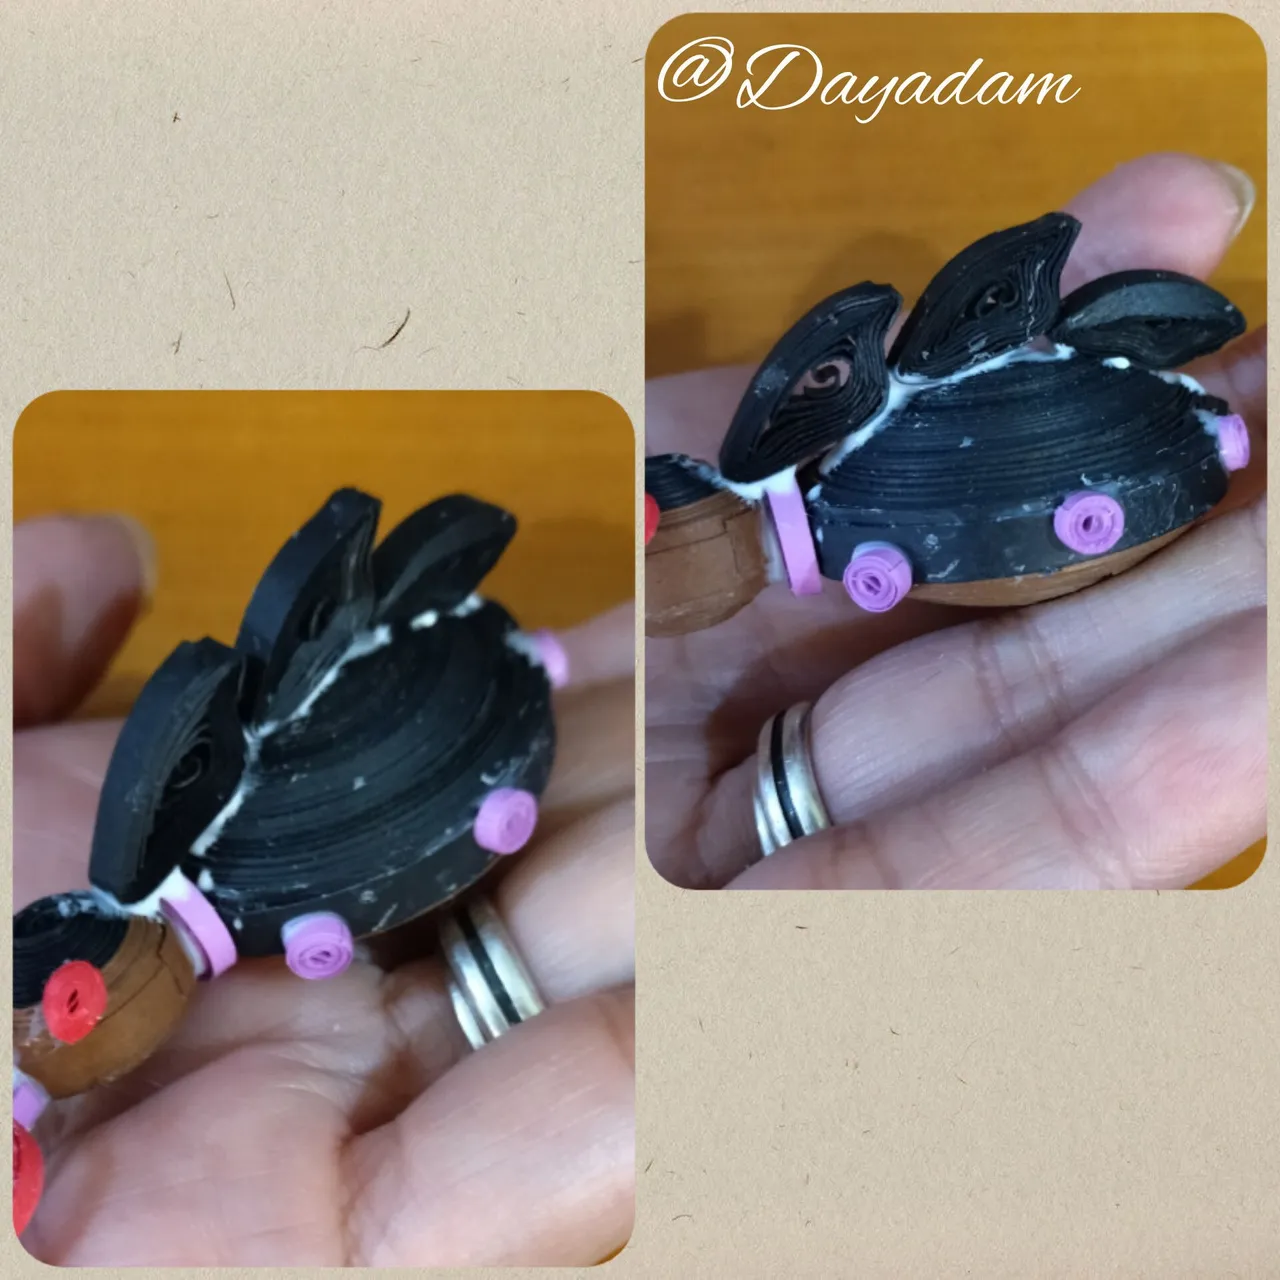
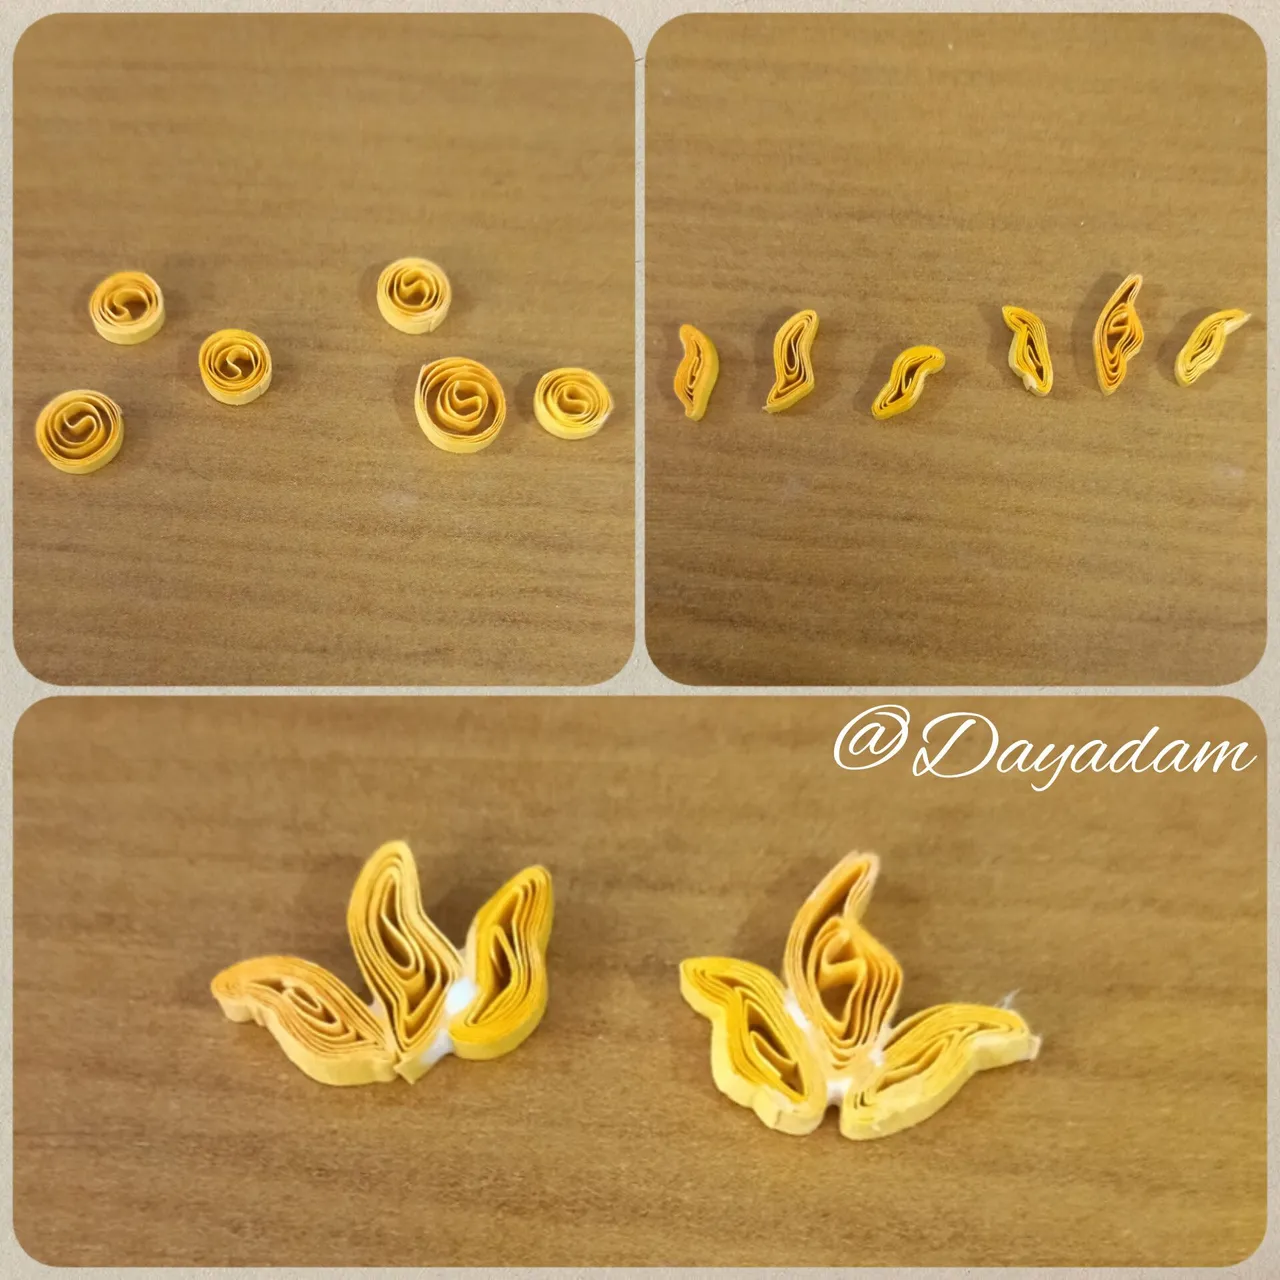
- To finish with the elaboration of the pieces, I took some toasted yellow tape and made several circles which I molded to form small flames and joined them in groups of 3.
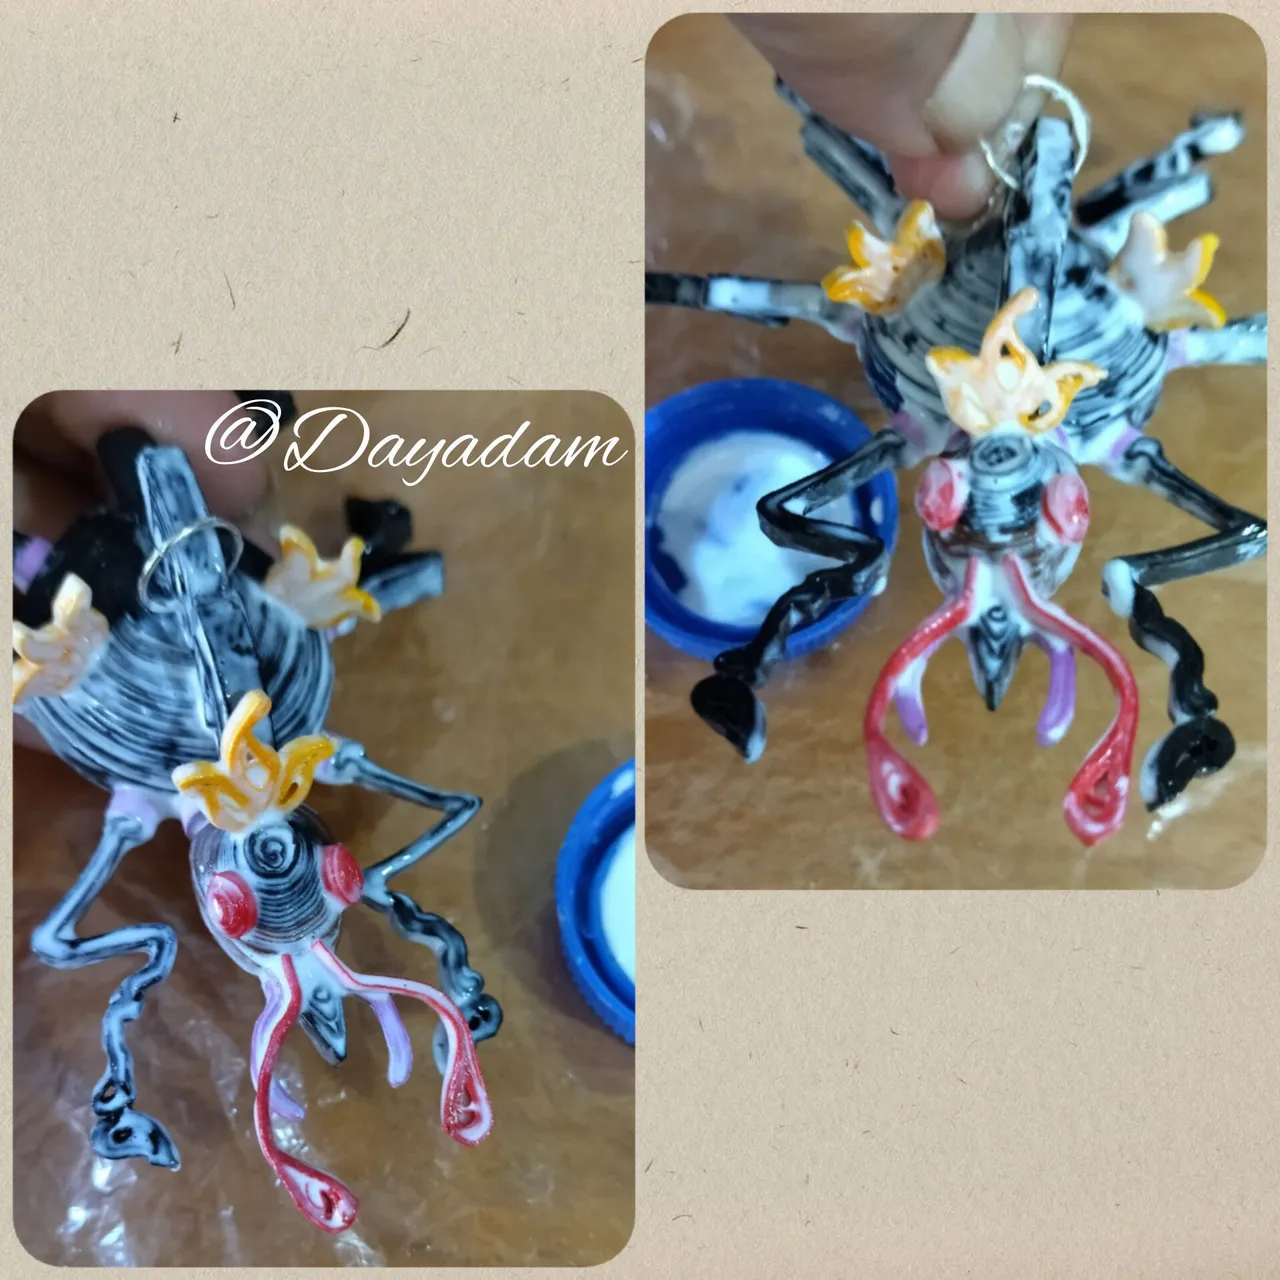
- Finished the last details I will finish gluing the pieces, I left the legs last because you have to glue them very carefully, patience in the back I added a lot of extra strong glue so that they do not peel off (let dry very well), then I added the flames.
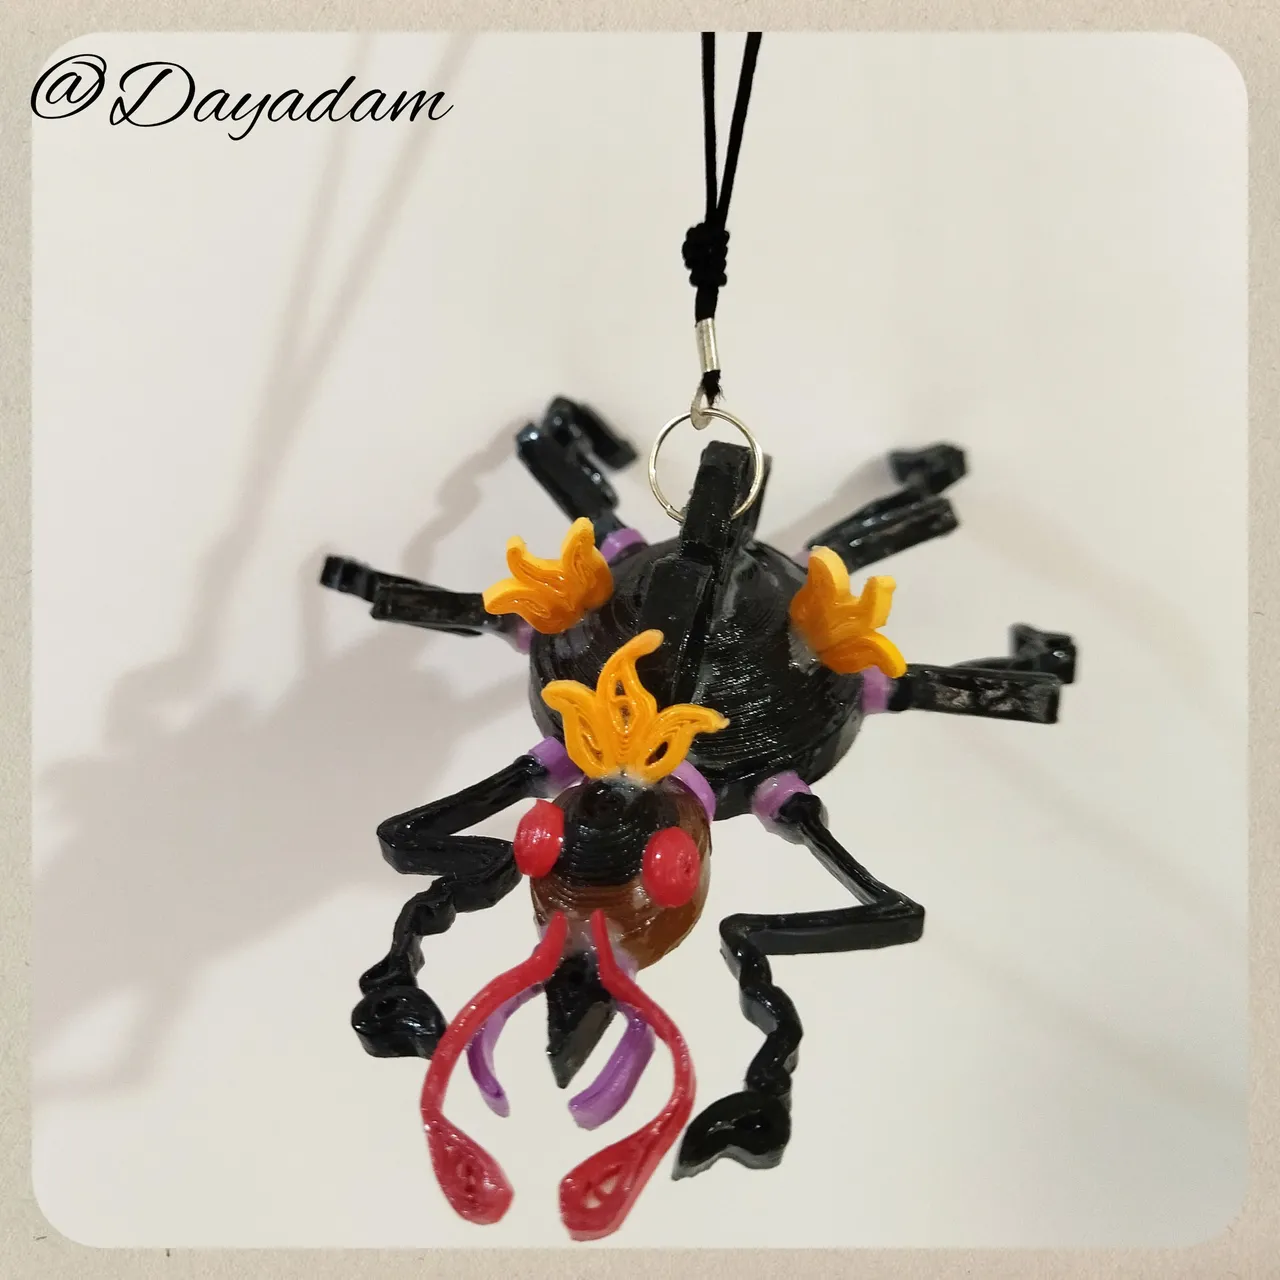
- Once the beetle was ready, I placed a medium size costume jewelry ring on one of the pieces of the back, and applied a layer of extra strong white carpentry glue to give it shine.
- Once the beetle was dry, I placed a piece of Chinese thread with a knot cover and hooked it on the ring to form our "Fire Beetle" pendant in 3D.
• Para finalizar con la elaboración de piezas, tome cinta amarillo tostado e hice varios círculos los cuales moldee para formar una pequeñas llamas y las uní en grupos de 3.
• Terminado los últimos detalles terminare de pegar las piezas, deje las patas de ultimo ya que hay que pegarlas con sumo cuidado, paciencia en la parte de atrás añadí bastante pega extra fuerte para que no se despeguen (dejar secar muy bien), luego añadí las llamas.
• Listo el escarabajo le coloque una argolla mediana de bisutería en una de las piezas del lomo, y aplique una capa de pega blanca extra fuerte de carpintería para darle brillo.
• Una vez seco el escarabajo le coloque un trozo de hilo chino con una tapa nudos lo enganche en la argolla, para formar nuestro colgante “Fire Beetle” en 3D.


What did you think, did you like it?
I hope you did, I hope you liked my explanation, procedure and photos, I made them with love for you.
"Let out that muse that inspires you, and let your imagination fly".
Thank you all, see you next time.
¿Que les pareció, les gustó?
Espero que sí, que les haya gustado mi explicación, procedimiento y fotos, los hice con mucho cariño por y para ustedes.
"Deja salir esa musa que te inspira, y deja volar tu imaginación".
Gracias a todos, nos vemos en la próxima.
Todas las fotos usadas en este post son de mi autoría y han sido sacadas en mi celular personal un Redmi 9T y editadas en Canva y en Inshot Fuente Carta Fire Beetle Banner y separador hecho por mí en Canva Traducido con la ayuda de DeepL
