 Foto propia / Editado en Canva.com

¿Qué sería de mi vida sin Canva? Si hay una herramienta de la que me he enamorado estos últimos años es de Canva.com (y lo menciono así porque no me gusta mucho el modo aplicativo y siempre lo uso online).
What would my life be without Canva? If there's one tool I've fallen in love with over the last few years, it's Canva.com (and I mention it this way because I don't really like the app mode and I always use it online).
Hay decenas de diseños que uno puede editar en Canva, pero hoy te traigo un tutorial sobre PRESENTACIONES, las que comúnmente hacemos en PowerPoint o Prezi, pero aquí preparadas en Canva y exportadas a PowerPoint para su toque final y posterior presentación. También te voy a dejar si llegas hasta el final, unos tips que he aprendido para hacer presentaciones.
There are dozens of designs that you can edit in Canva, but today I bring you a tutorial on PRESENTATIONS, the ones we commonly do in PowerPoint or Prezi, but here prepared in Canva and exported to PowerPoint for final touch and presentation. I will also leave you if you get to the end, some tips I have learned to make presentations.
¿Qué es una presentación? / What is a presentation?
Es un diseño compuesto de las llamadas diapositivas, filminas o slides; que presentadas una detrás de la otra sirven para comunicar ideas, negocios, investigaciones, tesis y tanto más. En simples palabras, una forma gráfica y visual de trasnmitir tu información de un modo más didáctico.
It is a design composed of the so-called slides, films or slides; that presented one after the other serve to communicate ideas, business, research, thesis and much more. In simple words, a graphic and visual way to transmit your information in a more didactic way.
En mi caso, por ejemplo las he usado para presentar una idea de negocios a diferentes personas, también para exámenes de la universidad, y para algunos talleres de entrenamiento por Zoom.
Si bien existen aplicaciones especiales para esta tarea como el mismísimo PowerPoint, Google Slides o Prezi; sigo eligiendo Canva porque además de tener miles de plantillas gratuitas, es más práctica y versátil. ¡Comencemos con el tutorial!
In my case, for example, I have used them to present a business idea to different people, also for university exams, and for some Zoom training workshops.
Although there are special applications for this task such as PowerPoint, Google Slides or Prezi; I still choose Canva because besides having thousands of free templates, it is more practical and versatile. Let's start with the tutorial!
**Aclaro antes de comenzar, que el tutorial requiere de los conceptos básicos de utilización de la herramienta, mi intención es mostrarte las funcionalidades que me parecen más útiles para crear presentaciones, y cómo hacer para usarlas luego en PowerPoint.
**Before I begin, I would like to clarify that the tutorial requires the basic concepts of using the tool, my intention is to show you the features that I find most useful for creating presentations, and how to use them later in PowerPoint.
---------- Choosing the format ----------
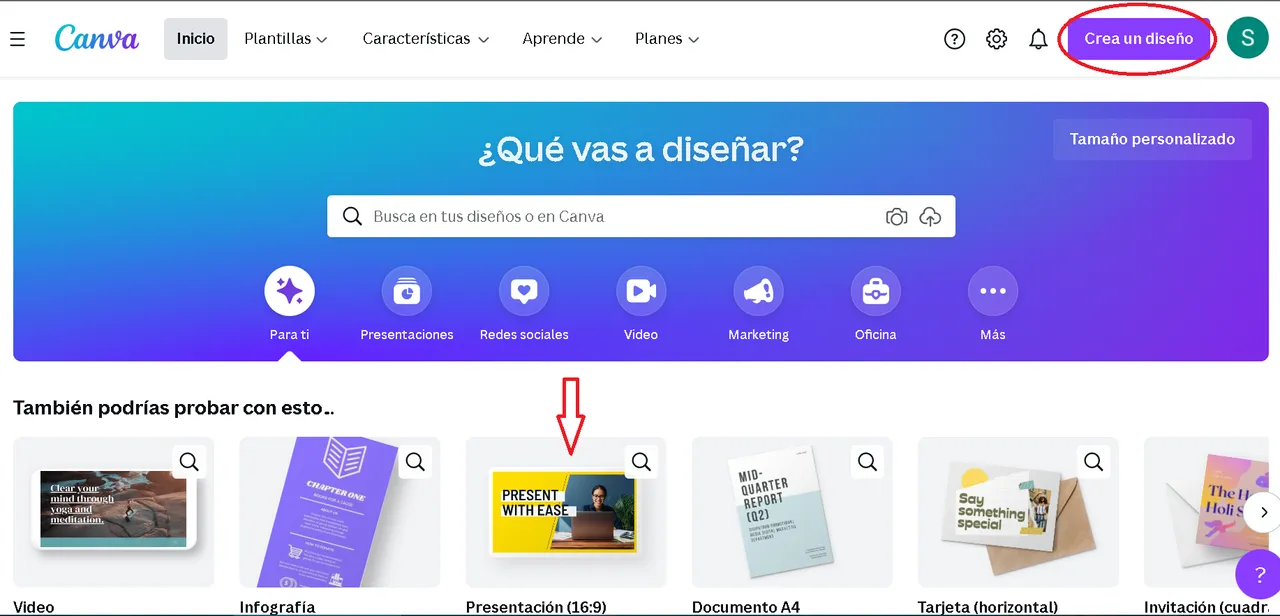
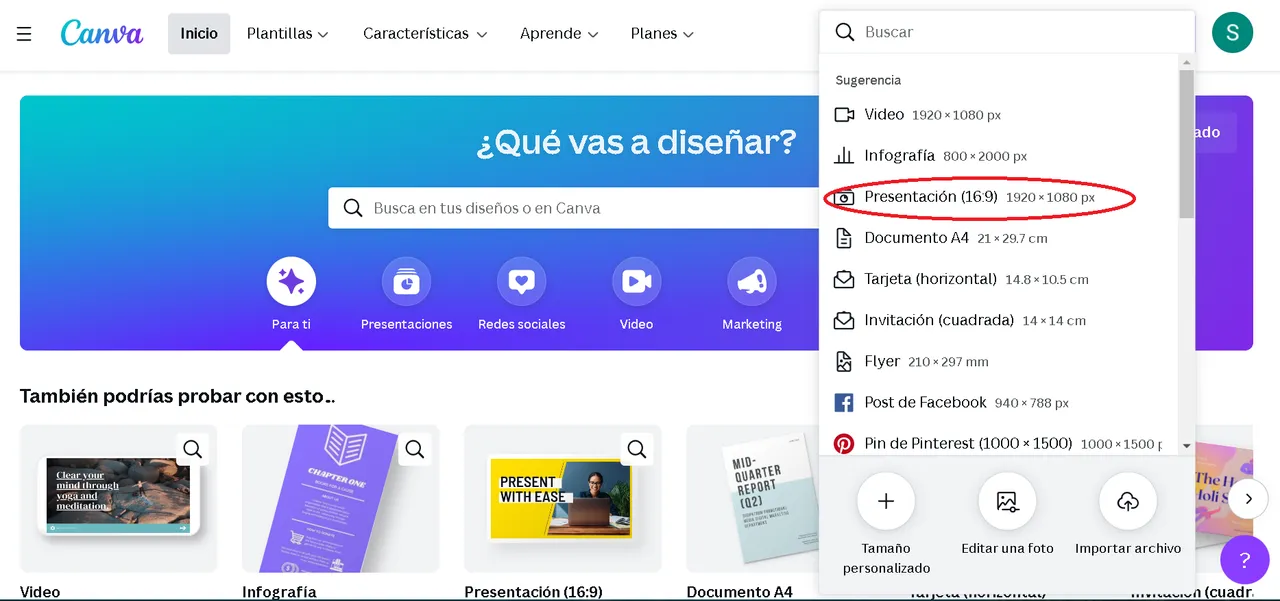
- Puedes ir directamente a Presentación si te aparece como recomendado, o bien puedes ir arriba a Crea un diseño y seleccionar Presentación 16:9 como verás aquí ⬇️.
You can go directly to Presentation if it appears as recommended, or you can go above to Create a design and select Presentation 16:9 as you will see here ⬇️.
---------- Templates or Layouts ----------
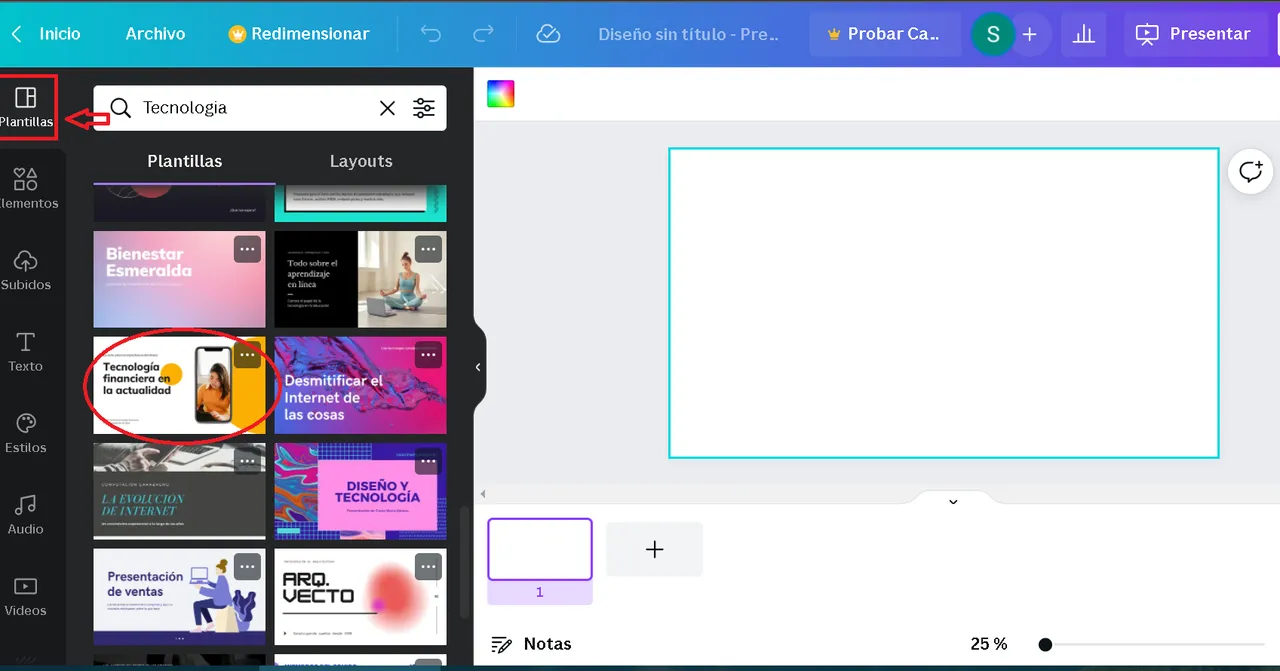
- En el menú izquierdo, vas a seleccionar Plantillas donde encontrarás cientos de diseños agrupados por temas, por ejemplo Marketing. Son totalmente editables y lo bueno es que no nos tenemos que ocupar de que sea visualmente atractivo o que las fuentes combinen, ya que eso está diseñado de antemano.
In the left menu, you will select Templates where you will find hundreds of designs grouped by themes, for example Marketing. They are fully editable and the good thing is that we do not have to take care that it is visually appealing or that the fonts match, since that is designed in advance.
- También tienes la opción de aplicar Layouts que son como textos predefinidos de títulos o gráficos que sirven como modelo para tus diapositivas.
You also have the option to apply Layouts which are like predefined text titles or graphics that serve as a template for your slides.
Acá te muestro un ejemplo de plantilla ⬇️
Here is an example of a template ⬇️
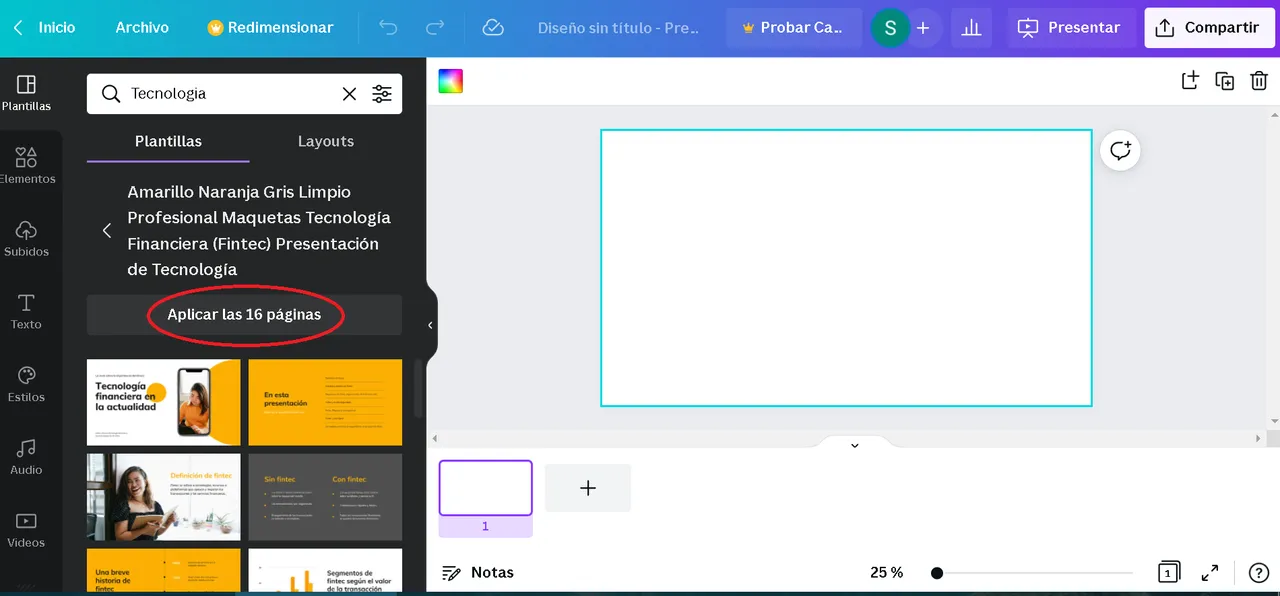
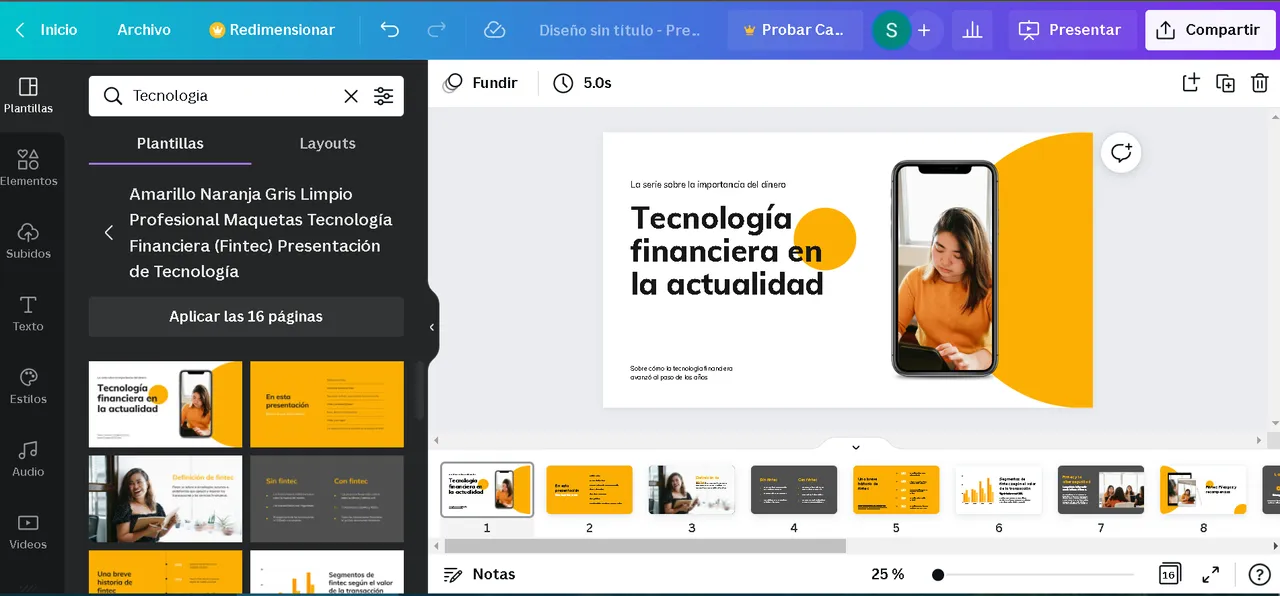
- Puedes seleccionar Aplicar todas las páginas o bien hacer clic en una de ellas si sólo quieres esa.
You can select Apply all pages or click on one of them if you only want that one.
Al aplicar todas te quedaría algo así 👇
When you apply all of them you would be left with something like this 👇
---------- Editing slides ----------
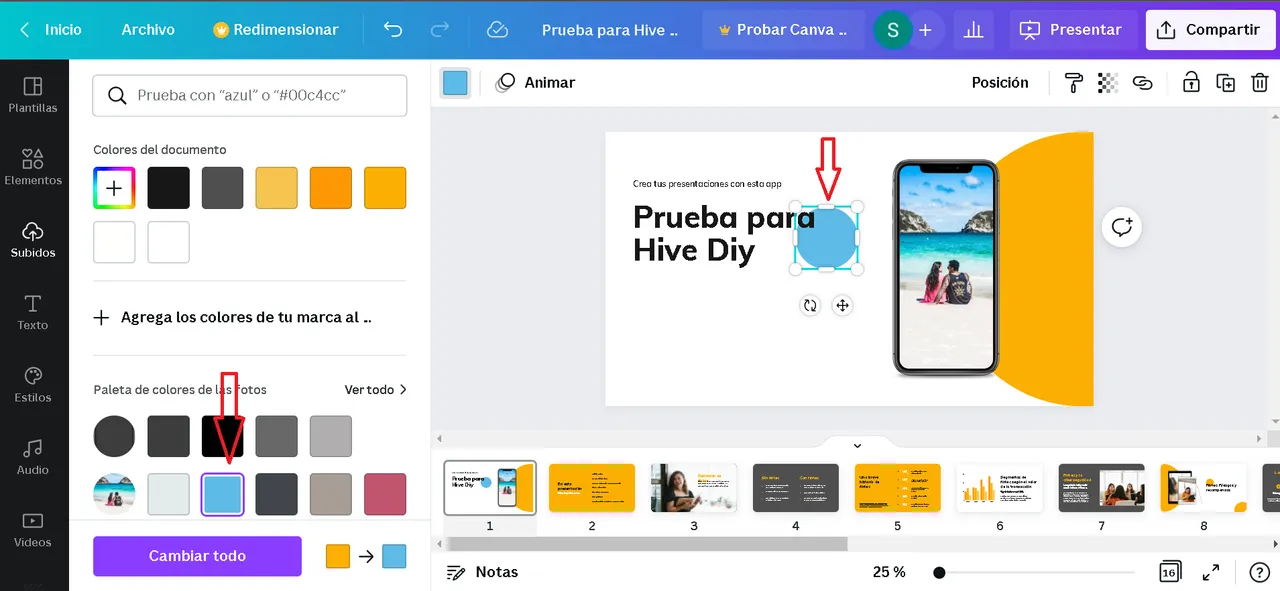
- Ya les conté que se puede editar absolutamente todo, en la imagen que observas arriba se puede ver como modifiqué el texto, los colores y la imagen.
I already told you that you can edit absolutely everything, in the image above you can see how I modified the text, the colors and the image.
- Una funcionalidad que está súper es la que nos ofrece Canva al detectar los colores de nuestras imágenes y ofrecernos la paleta lista para usar (como lo indican las flechas), aunque también lo puedes hacer externamente desde esta web gratuita.
A great feature is the one that Canva offers us by detecting the colors of our images and offering us the palette ready to use (as indicated by the arrows), although you can also do it externally from this free website.
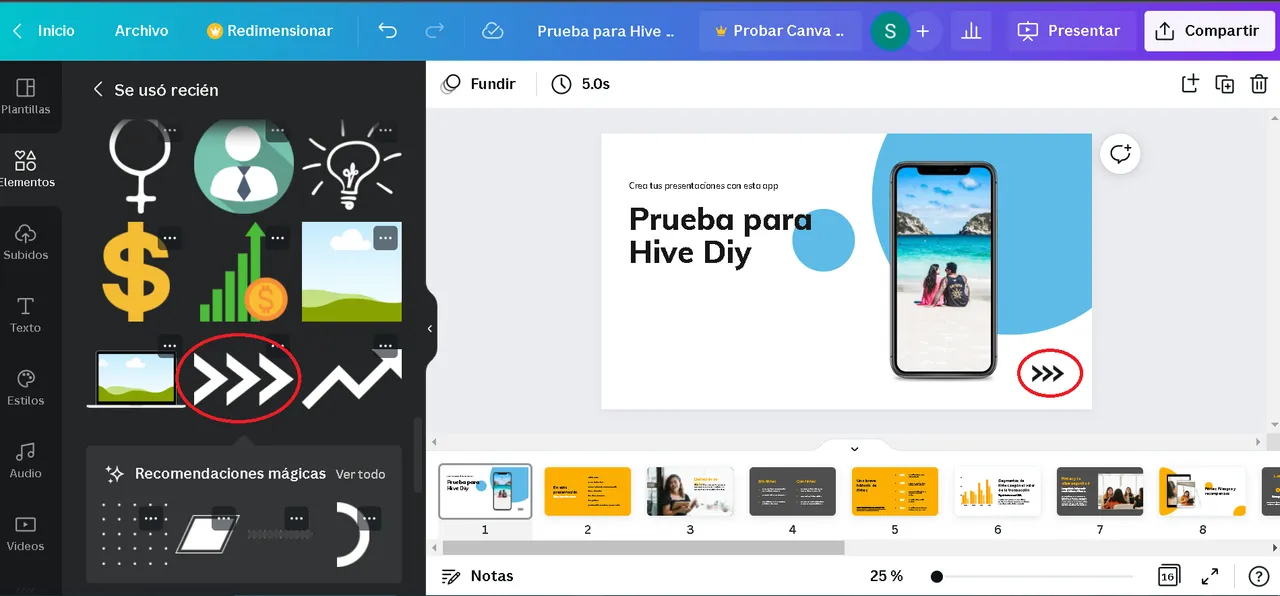
- También podés agregar elementos, desde el menú izquierdo como lo hice aquí.
You can also add elements from the left menu as I did here.
---------- Apply or modify graphics ----------
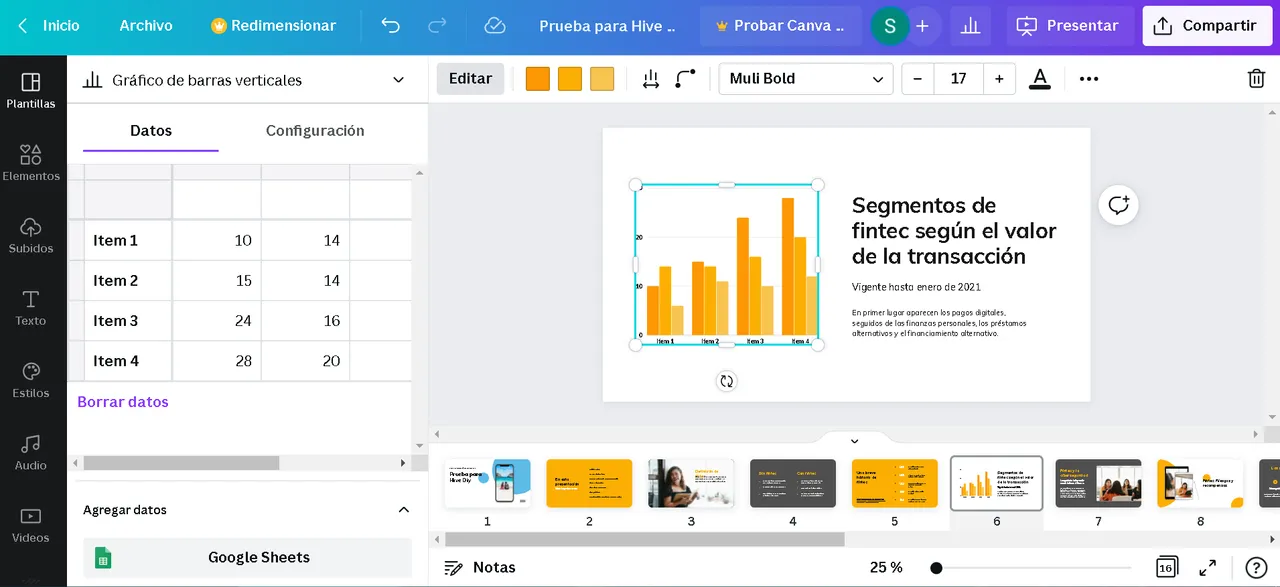
- Si tus presentaciones se tratan de proyectos o negocios, es infaltable mostrar las estadísticas o números con un gráfico. En el menú de la izquierda puedes encontrar unos pocos gráficos. En este punto le doy el pulgar arriba a > PowerPoint que tiene más opciones y de hecho más bonitas.
If your presentations are about projects or business, it is a must to show statistics or numbers with a graph. In the menu on the left you can find a few graphs. At this point I give the thumbs up to PowerPoint which has more options and in fact more beautiful.
- Para modificarlos, haces clic sobre el mismo y a la izquierda te saldrá un cuadro de dos entradas para completarlo con tu información.
To modify them, click on it and on the left you will see a two-entry box to complete it with your information.
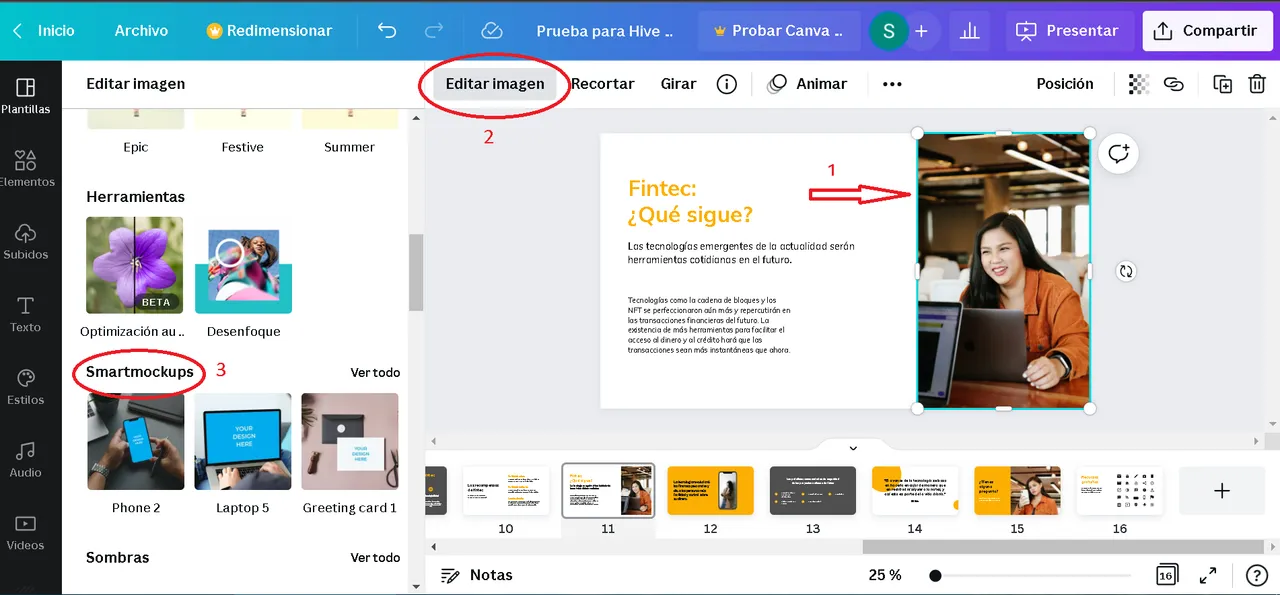
- En un mundo digitalizado, es casi obligatorio usar Mockups en tus presentaciones. Una imagen se verá más real si la presentamos en este formato. Es una nueva forma de transmitir tus ideas. Ni hablar si tienes que mostrar cómo se vería algo en el celular o Pc!
In a digitalized world, it is almost mandatory to use Mockups in your presentations. An image will look more real if presented in this format. It is a new way to transmit your ideas. Not to mention if you have to show how something would look like on a cell phone or PC!
- Para aplicarle un Smartmockup por ejemplo a una imagen, debes ir a seleccionar la imagen, en un paso siguiente Editar imagen y buscar en el menú izquierdo Smartmockups, por último elegir el que más te guste.
To apply a Smartmockup for example to an image, you must go to select the image, in a next step Edit image and search in the left menu Smartmockups, finally choose the one you like the most.

---------- External apps and free images ----------
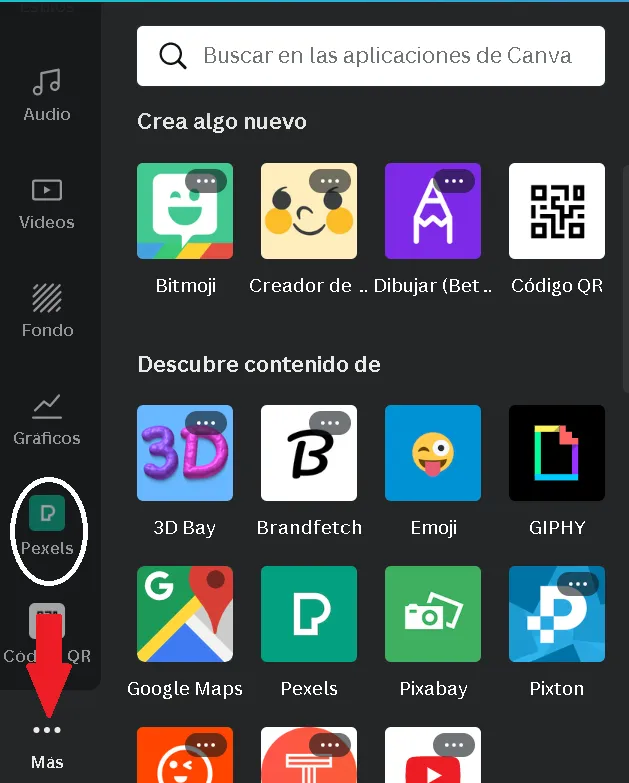
- Si te diriges al menú izquierdo y das clic en Más, te aparecerá un amplio menú de aplicaciones que puedes descargar dentro del mismo Canva para utilizar sin necesidad de abrir una nueva pestaña o aplicación.
If you go to the left menu and click on More, you will see a large menu of applications that you can download within Canva itself to use without having to open a new tab or application.
- Por ejemplo, la que más utilizo es Pexels ya que cuenta con miles de imágenes gratuitas para usar. Una vez descargada te aparecerá en el menú izquierdo.
For example, the one I use the most is Pexels because it has thousands of free images to use. Once downloaded it will appear in the left menu.
---------- Dark background with transparencies ----------
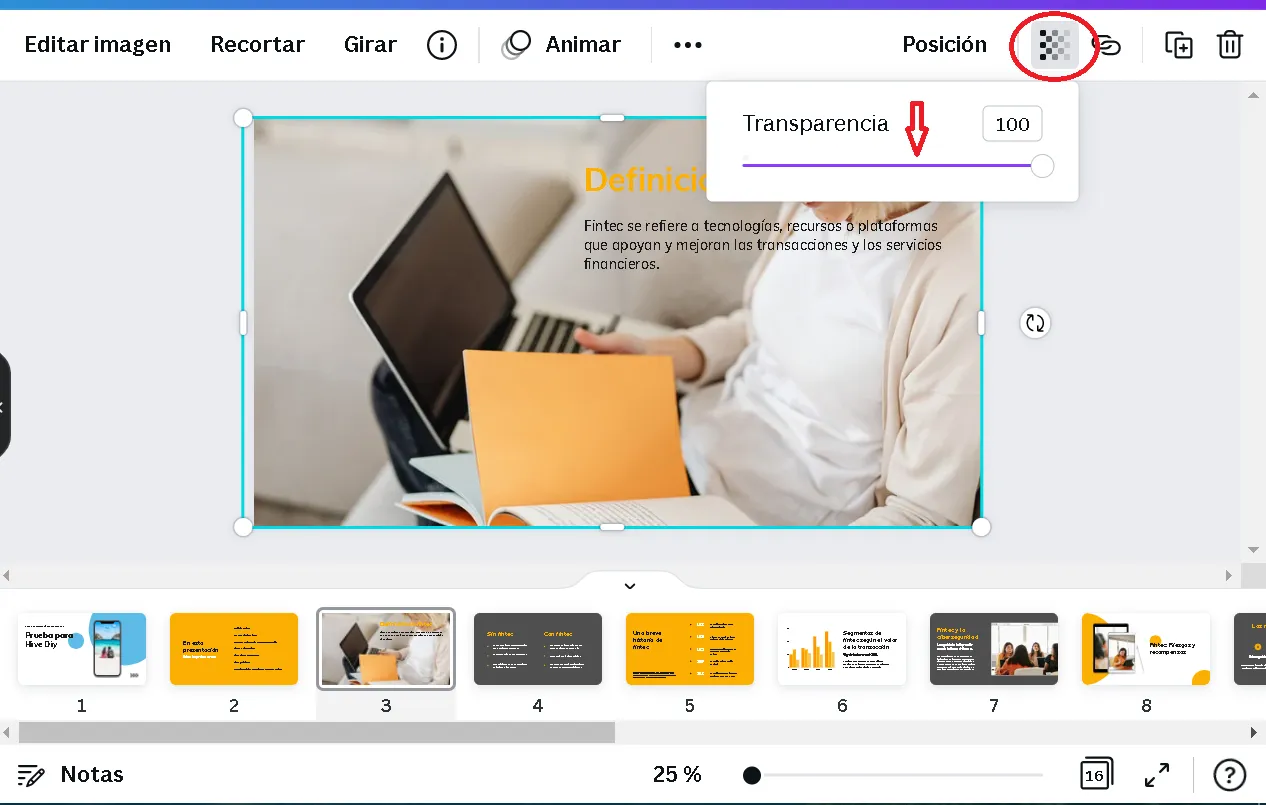
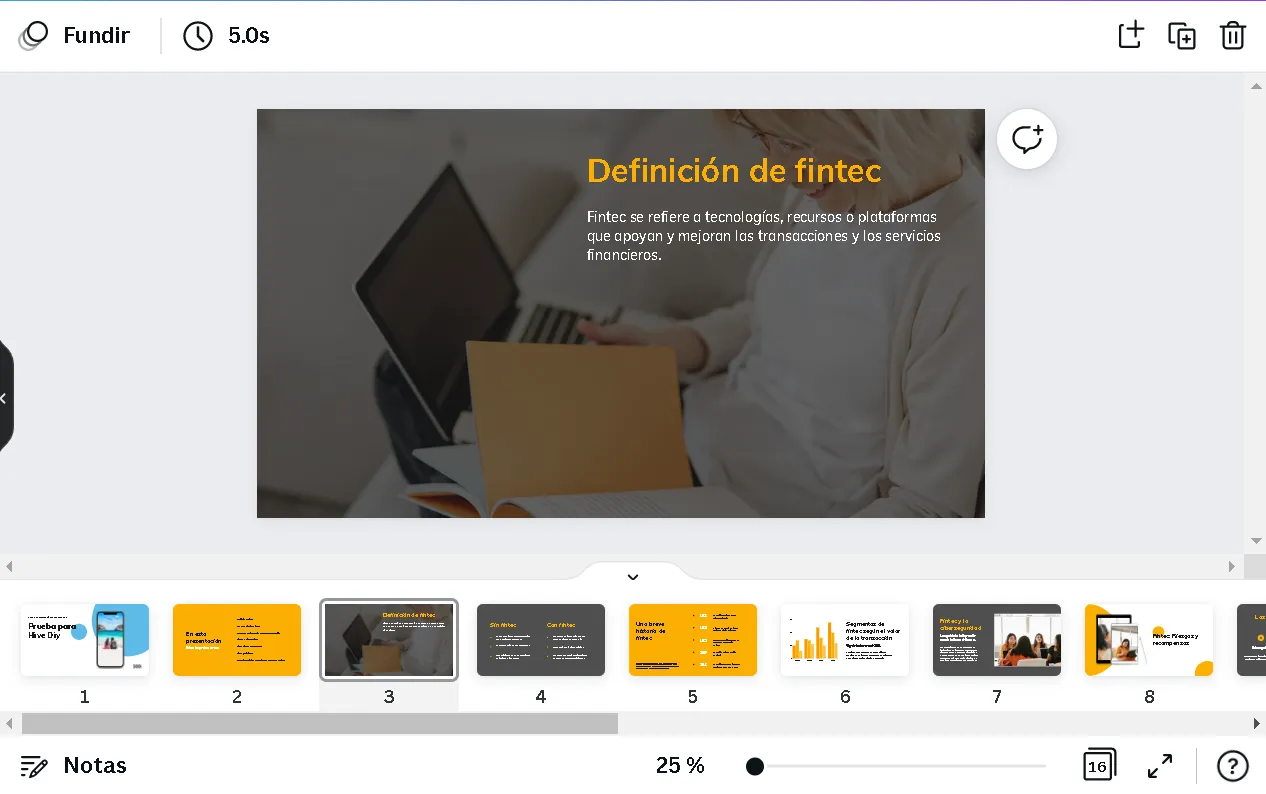
- Si hay algo que me fascina, es crear una diapositiva oscura con una imagen de fondo. Para ello antes que nada debes elegir un fondo oscuro, preferentemente negro; y luego insertar la foto que quieres de fondo.
If there is something that fascinates me, it is to create a dark slide with a background image. To do this first of all you must choose a dark background, preferably black; and then insert the photo you want as a background.
- Luego haces clic en el símbolo que figura arriba con unos cuadraditos y que te permitirá elegir la Transparencia de la foto. Puedes llevarla de 0 a 100, siempre buscando que se vea la imagen pero que a la vez un texto blanco sea legible. Así se vería 😎
Then click on the symbol that appears above with some squares and that will allow you to choose the Transparency of the photo. You can take it from 0 to 100, always looking for the image to be seen but at the same time a white text to be legible. This is how it would look 😎
---------- Download it in PowerPoint ----------
- PowerPoint es el programa de preferencia de la mayoría de las personas, el de uso común digamos. Por eso siempre lo descargo en archivo PPTX.
PowerPoint is the program of choice for most people, the one in common use let's say. That is why I always download it as a PPTX file.
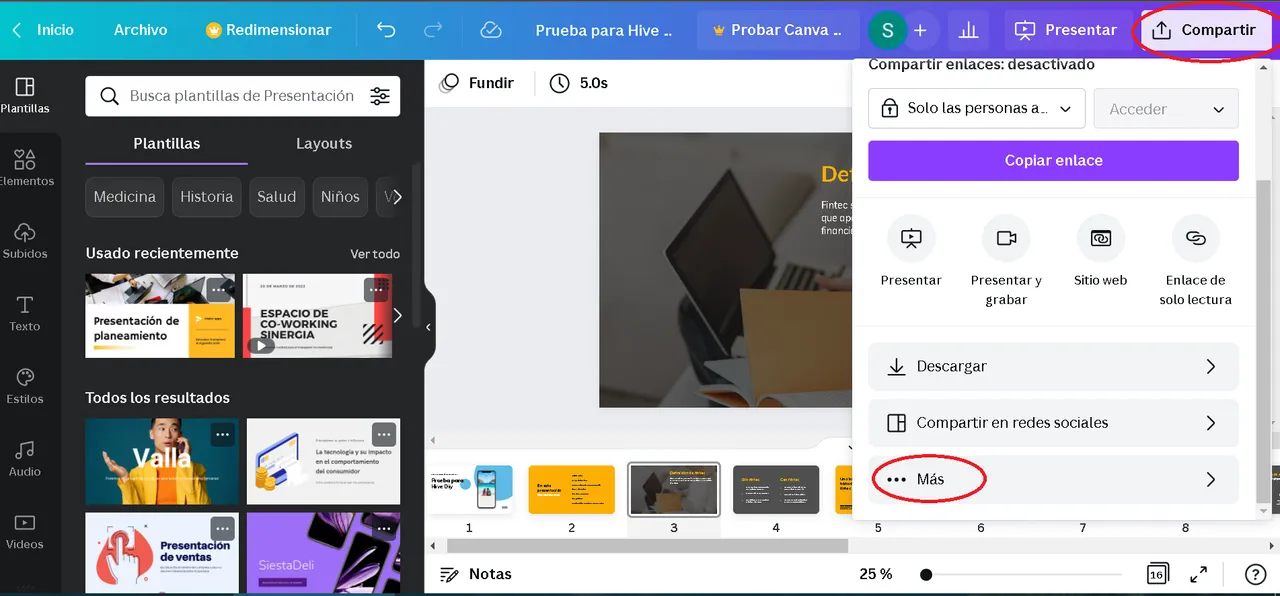
- Iremos arriba a la derecha a Compartir o puede aparecerte como Descargar también. Y en el menú seleccionaremos Más.
We will go to the top right to Share or it may appear as Download as well. And in the menu select More.

- Y por supuesto aquí haremos clic en Microsoft PowerPoint. Nos dará la opción de descargar todas las páginas o bien solo las que seleccionemos.
Claro que si en cambio lo deseas, puedes descargarlo en formato PDF, pero éste será un formato de presentación estático.
And of course here we will click on Microsoft PowerPoint. It will give us the option to download all the pages or just the ones we select. Of course, if you wish, you can download it in PDF format instead, but this will be a static presentation format.
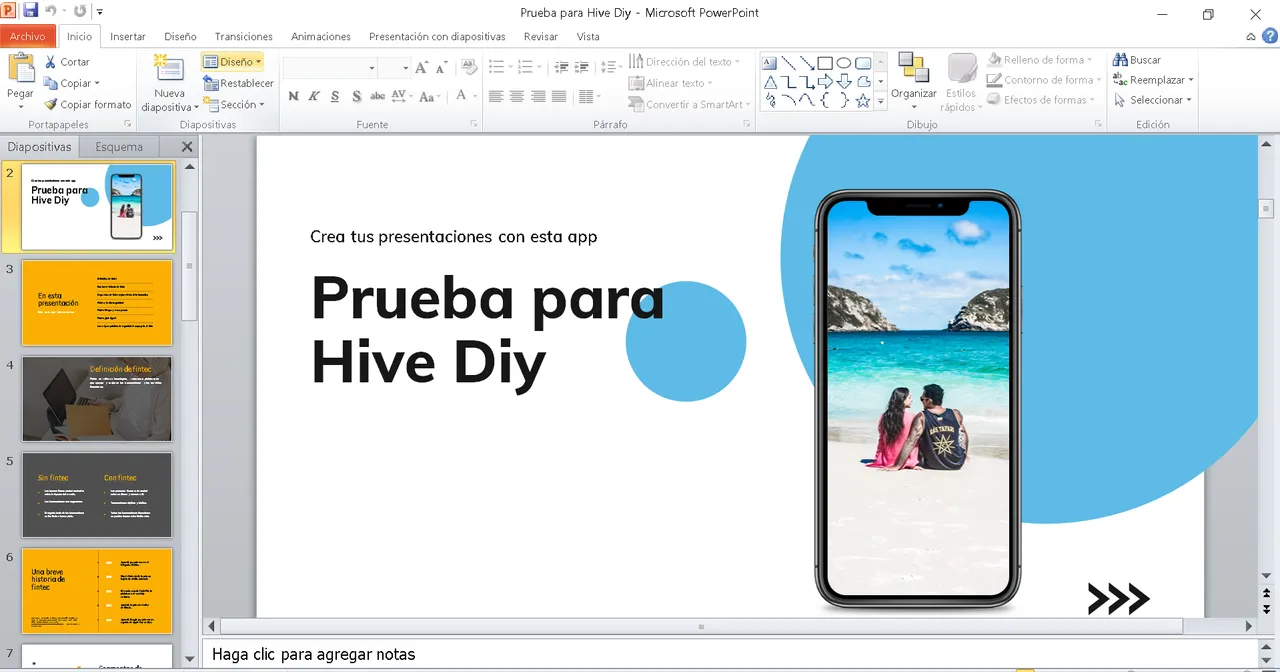
- Con ustedes ¡el resultado final! Aunque eso no es todo, te súper recomiendo que revises el archivo ya que por la conversión puede que haya ocurrido algún error mínimo como las palabras separadas en renglones o bien algún desorden de las diapositivas. A veces pasa.
With you, the final result! Although that's not all, I highly recommend you to review the file because the conversion may have caused some minor errors such as words separated in lines or some disorder of the slides. Sometimes it happens.
- Este es el momento ideal si quieres agregarle transiciones o animaciones a la presentación ya que es una funcionalidad que Canva no arrastra a PowerPoint.
This is the ideal time if you want to add transitions or animations to the presentation as this is a feature that Canva does not carry over to PowerPoint.
💛I hope you liked the tutorial💛
Y ahora sí, lo prometido es deuda, te voy a compartir estos consejos que he aprendido a lo largo del tiempo para crear presentaciones más profesionales y vistosas.
And now, I'm going to share with you these tips that I have learned over time to create more professional and eye-catching presentations.
✅Utiliza fuentes sencillas y legibles, Helvetica es la más recomendable, en Canva puedes encontrar Helveticish. Y si vas a utilizar más tipos que sean tres como máximo. Puedes encontrar aquí las tipografías que combinan.
✅ Por favor las imágenes deben tener buena resolución, de lo contrario restarán.
✅ Recuerda que una presentación es solo un acompañamiento visual, no es atractivo que escribas grandes textos, de hecho la tornarán aburrida.
✅ Cuenta una historia con principio - desenlace - fin, guarda un orden cronológico si lo hay.
✅ Si vas a usar transiciones o animaciones, que sean sutiles, como "aparecer" o "desvanecer", así no distraen al oyente.
✅ He leído por ahí en un curso de neurolinguística, que es un buen truco combinar diapositivas con fondos blancos, negros para descansar la vista, y rojos para volver la atención de las personas a la presentación.
✅Use simple and legible fonts, Helvetica is the most recommended, in Canva you can find Helveticish. And if you are going to use more fonts, use a maximum of three. You can find here the matching typefaces. Ojalá puedas poner en práctica estos consejos, realmente me ha quedado mucho por contarte. Si te gustan estos tutoriales házmelo saber en los comentarios. No soy diseñadora gráfica y jamás desmerecería esa profesión que cuesta años de estudio; sin embargo vine a compartirles algunas cositas que aprendí en el constante uso e investigación de las herramientas.
✅ Please the images must have good resolution, otherwise they will subtract.
✅ Remember that a presentation is only a visual accompaniment, it is not attractive if you write big texts, in fact they will make it boring.
✅ Tell a story with a beginning - ending - end, keep a chronological order if there is one.
✅ If you are going to use transitions or animations, make them subtle, like "appear" or "fade", so they don't distract the listener.
✅ I read somewhere in a neurolinguistics course that it is a good trick to combine slides with white backgrounds, black to rest the eye, and red to bring people's attention back to the presentation.
I hope you can put these tips into practice, I really have a lot left to tell you. If you like these tutorials let me know in the comments. I am not a graphic designer and I would never belittle this profession that takes years of study; however I came to share with you some things I learned in the constant use and research of the tools.
✨See you in the next one and have a nice day or start of a nice day✨
📝Daiana.
Traducido en Deelp / Translated in Deelp
Las capturas de pantalla las tomé con mi Notebook / Screenshots are taken with my Notebook
Collages hechos en Canva y Paint / Collages made in Canva and Paint