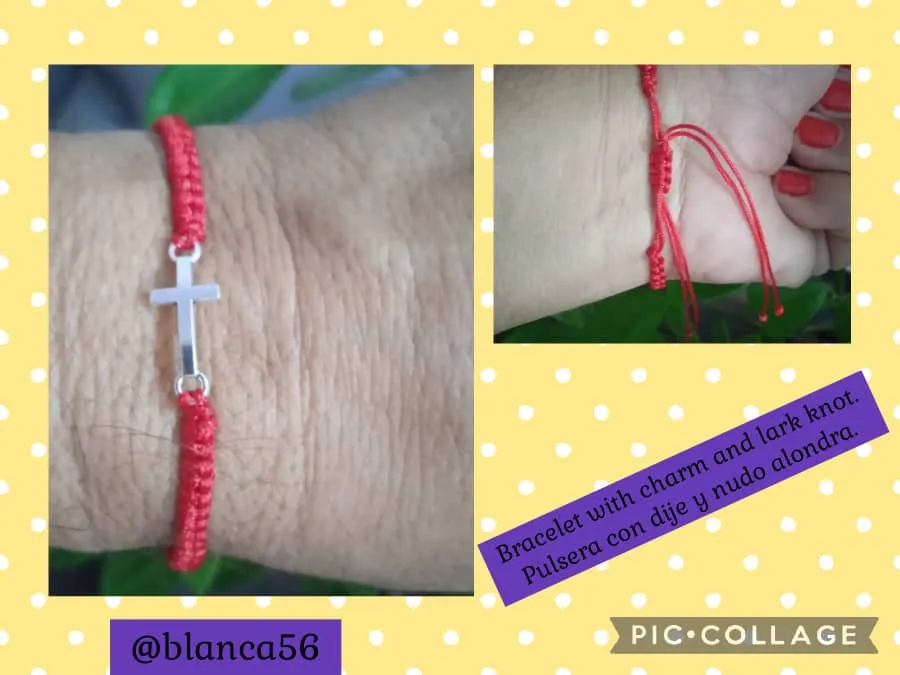
A new project to show in my dear community, this time I wanted to experiment with another macramé technique such as the lark knot for my bracelets, and in the variety is the difference, it is also another weaving option. I also made a change in the color, I chose red because it symbolizes strength, luck, protection. I also complemented it with a cross as I said, symbol of faith. As for the development of the project was quick and uncomplicated, it was a fluid activity that invests little time, be careful when passing the thread under or over, a carelessness ruin the fabric. If you like changes, experiment with the lark knot for bracelets, I invite you to join me in the step by step.

Photos taken with my Xiaomi Redmi 9C. /Fotos tomadas con mi Xiaomi Redmi 9C.
Translated with / Traducido con: DeepL Translator.
Photo collage made with the PicCollage application./Collage de fotos hecha con la aplicación PicCollage.

Un nuevo proyecto para mostrar en mi querida comunidad, en esta ocasión quise experimentar con otra técnica de macramé como es el nudo alondra para mis pulseras, ya en la variedad esta la diferencia, ademas es otra opción de tejido. También hice un cambio en el color, escogí el rojo porque simboliza fortaleza, suerte, protección. Ademas complemento con una cruz como dije, símbolo de fe. En cuanto al desarrollo del proyecto fue rápido y sin complicaciones, fue una actividad fluida que inviertes poco tiempo, estar atento a la hora de pasar el hilo por debajo o por encima, un descuido arruinamos el tejido. Si te gustan los cambios, experimentar con el nudo alondra para las pulseras, te invito a que me acompañes en el paso a paso.
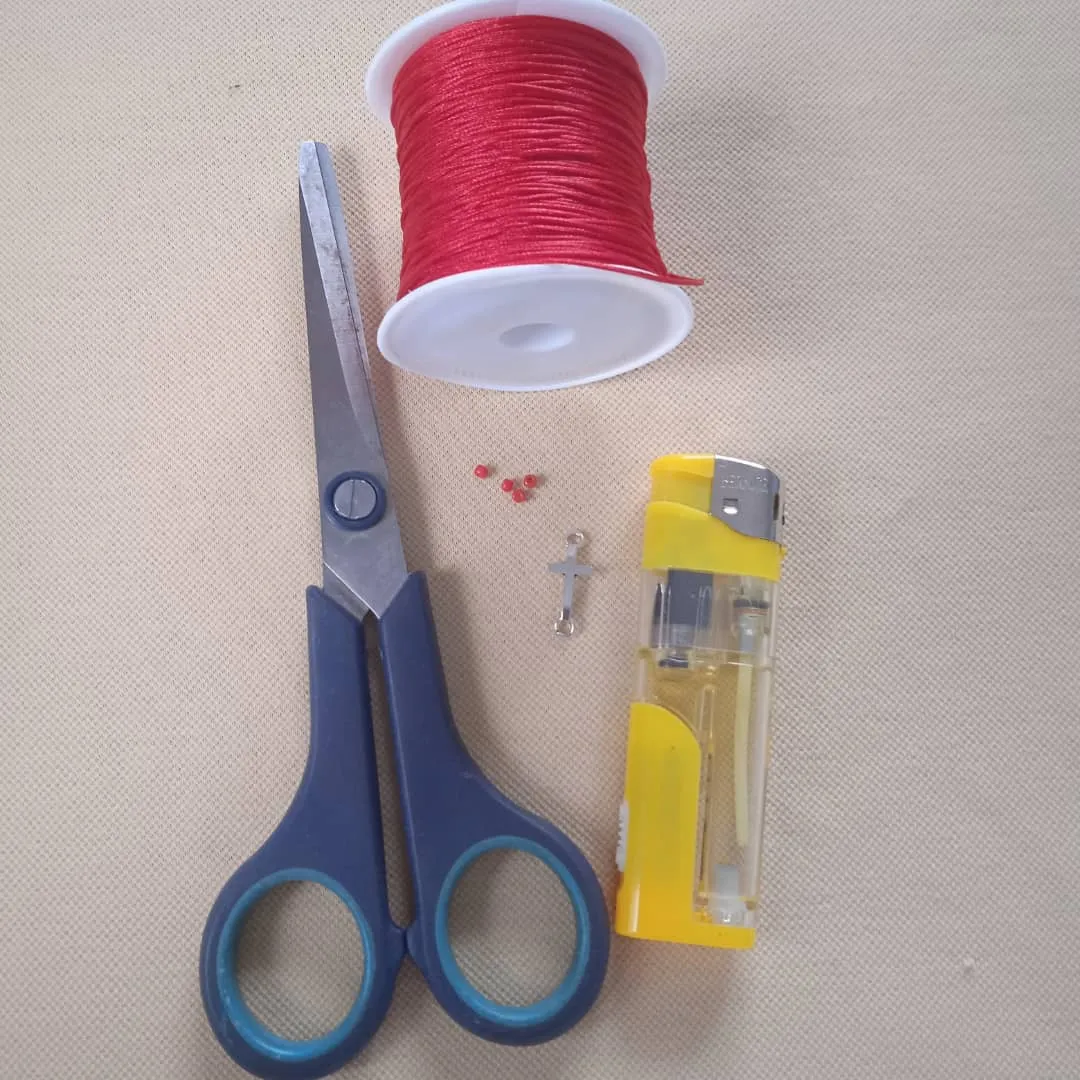
✨MATERIALS//MATERIALES✨
- Red Chinese thread.
- Pendant.
- 4 red beads.
- Scissors.
- Lighter.
- Hilo chino color rojo.
- Dije.
- 4 mostacillas rojas.
- Tijera.
- Encendedor.
✨STEPS//PASOS✨
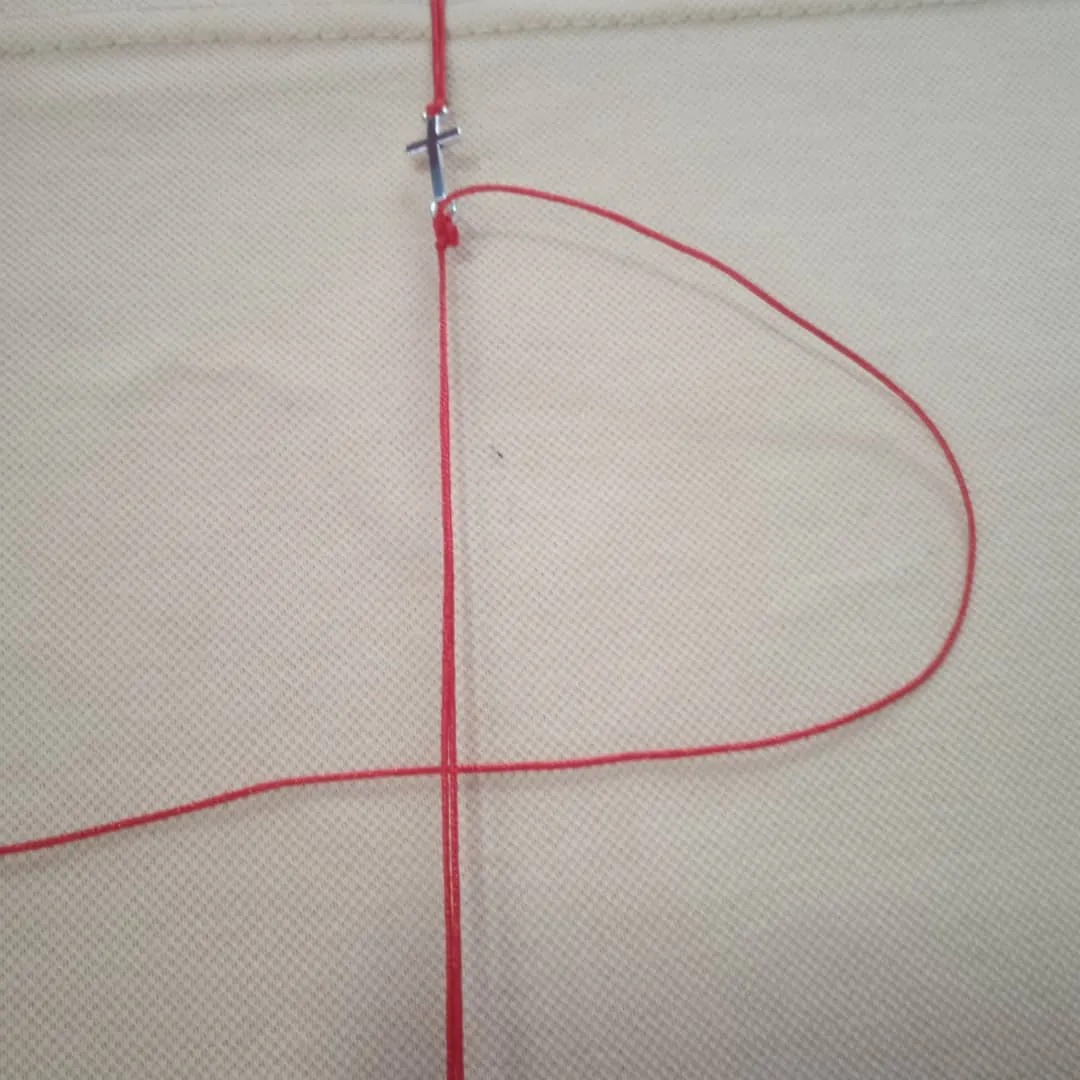
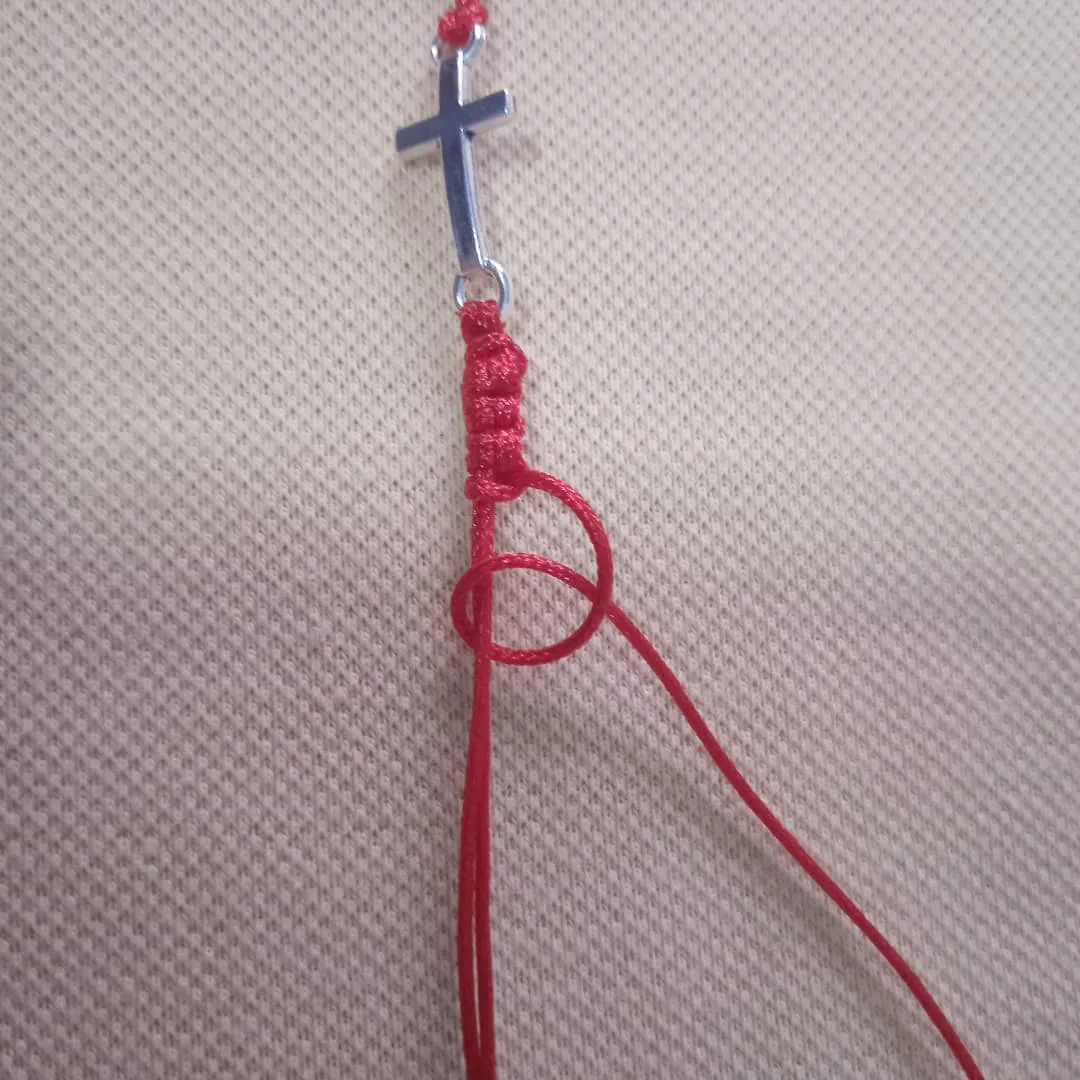
- Cut two Chinese threads of approximately 35 cm each. Introduce through the hole of the pendant, then cut 45 cm more of Chinese thread, make a simple knot at the base of the hole, then hold the two ends with a clamp on the board, the third thread should be free and with this we are going to work, make a P, passing over the guide thread.
- Cortar dos hilos chinos aproximadamente de 35 cm cada hilo. Introducir por el orificio del dije, luego cortar 45 cm mas de hilo chino, hacer un nudo sencillo en la base del orificio, luego sujetar los dos extremos con una pinza en la tabla, debe quedar libre el tercer hilo ya con éste vamos a trabajar, hacer una P, pasando por encima del hilo guía.
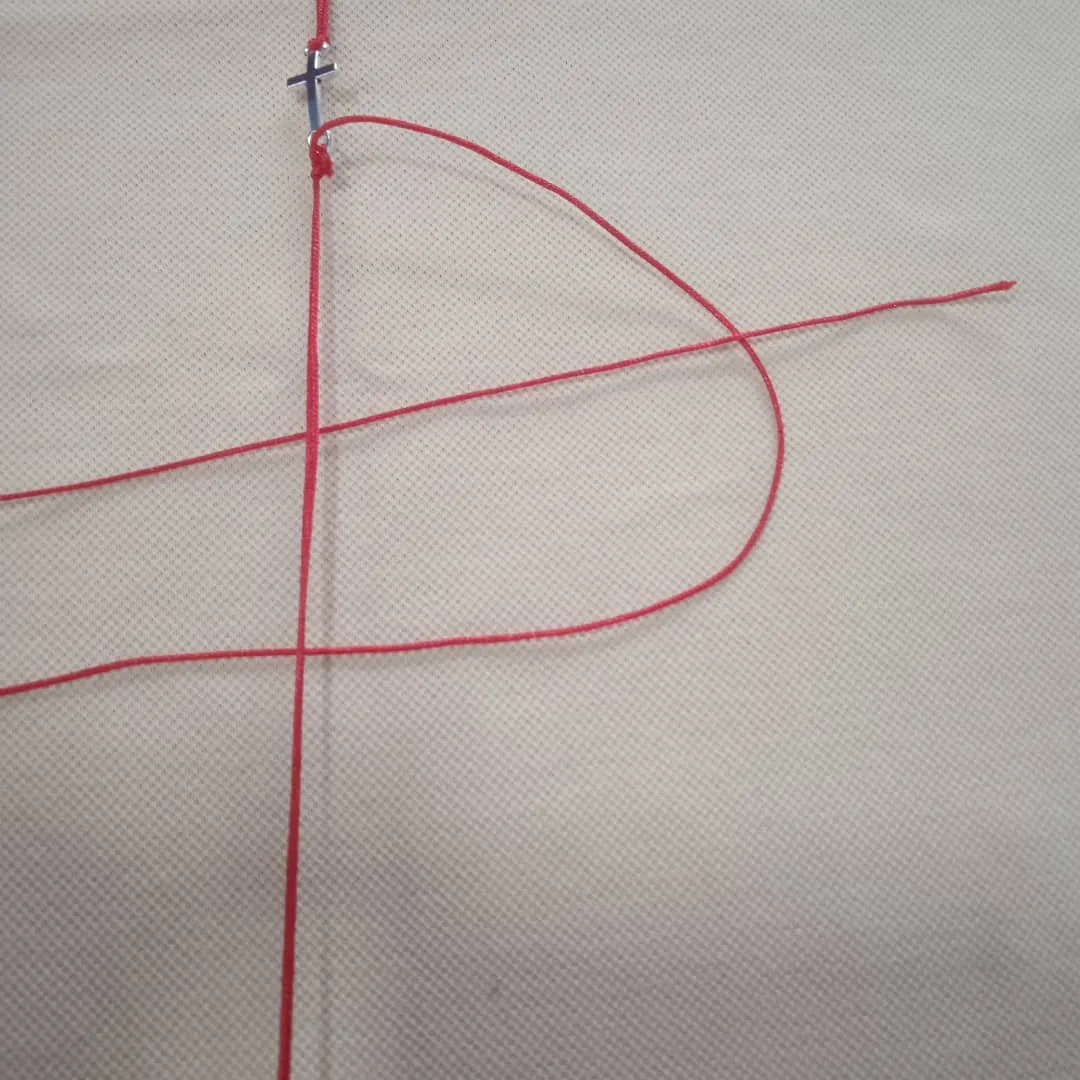
- The end of the yarn is passed under the guide yarn and we take it to form the lark knot. Follow the same process but this time pass the thread under the guide thread and repeat.
- La punta del hilo la pasamos por debajo del hilo guía y vamos llevando hasta formar el nudo alondra. Seguir el mismo proceso pero esta vez pasar el hilo por debajo del hilo guía y repetir.
- So we go with the alonbdra knot.
- Así vamos con el nudo alonbdra.
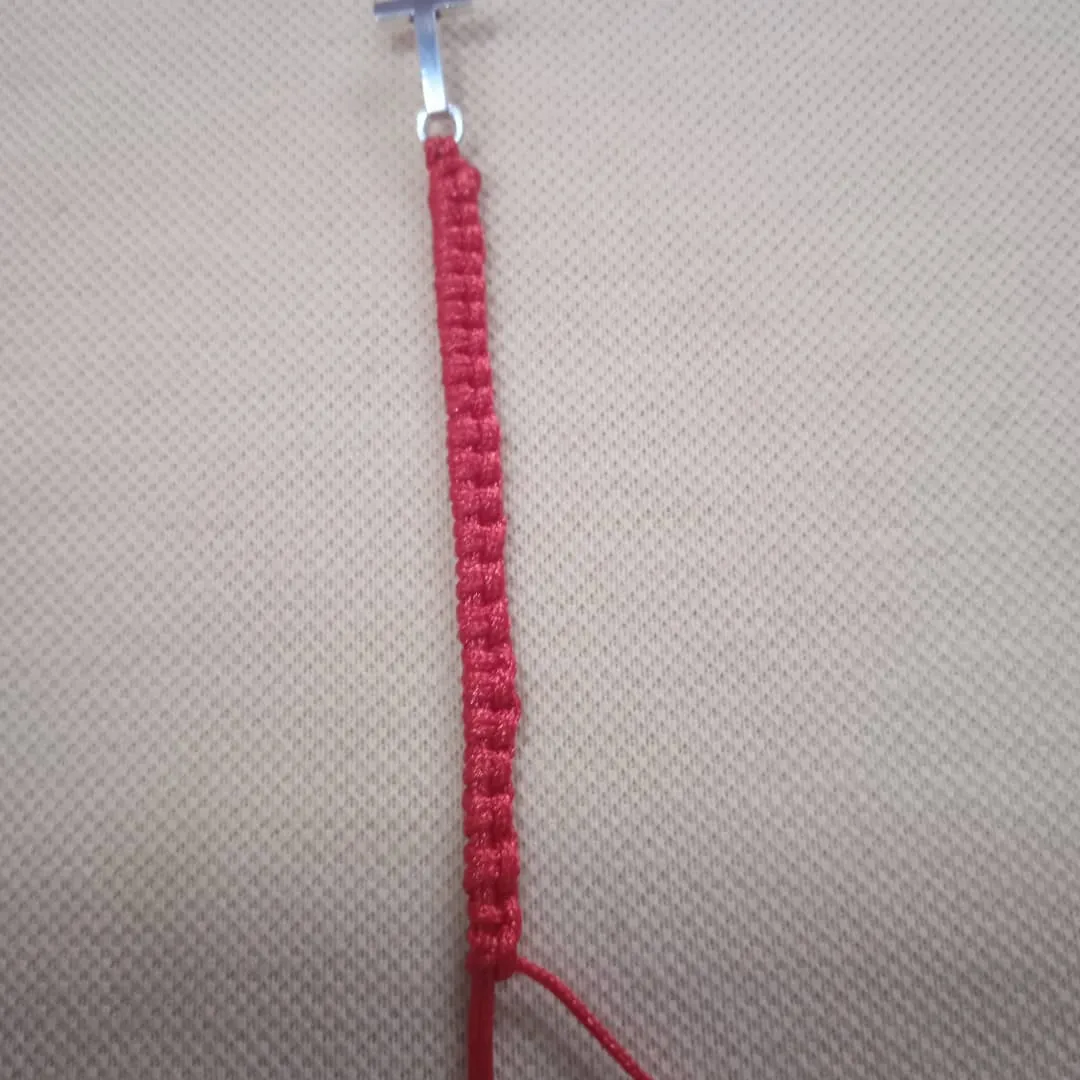
- Repeat until the desired length is reached, in this case 6.5 cm.
- Repetir hasta alcanzar el largo deseado, en este caso 6,5 cm.
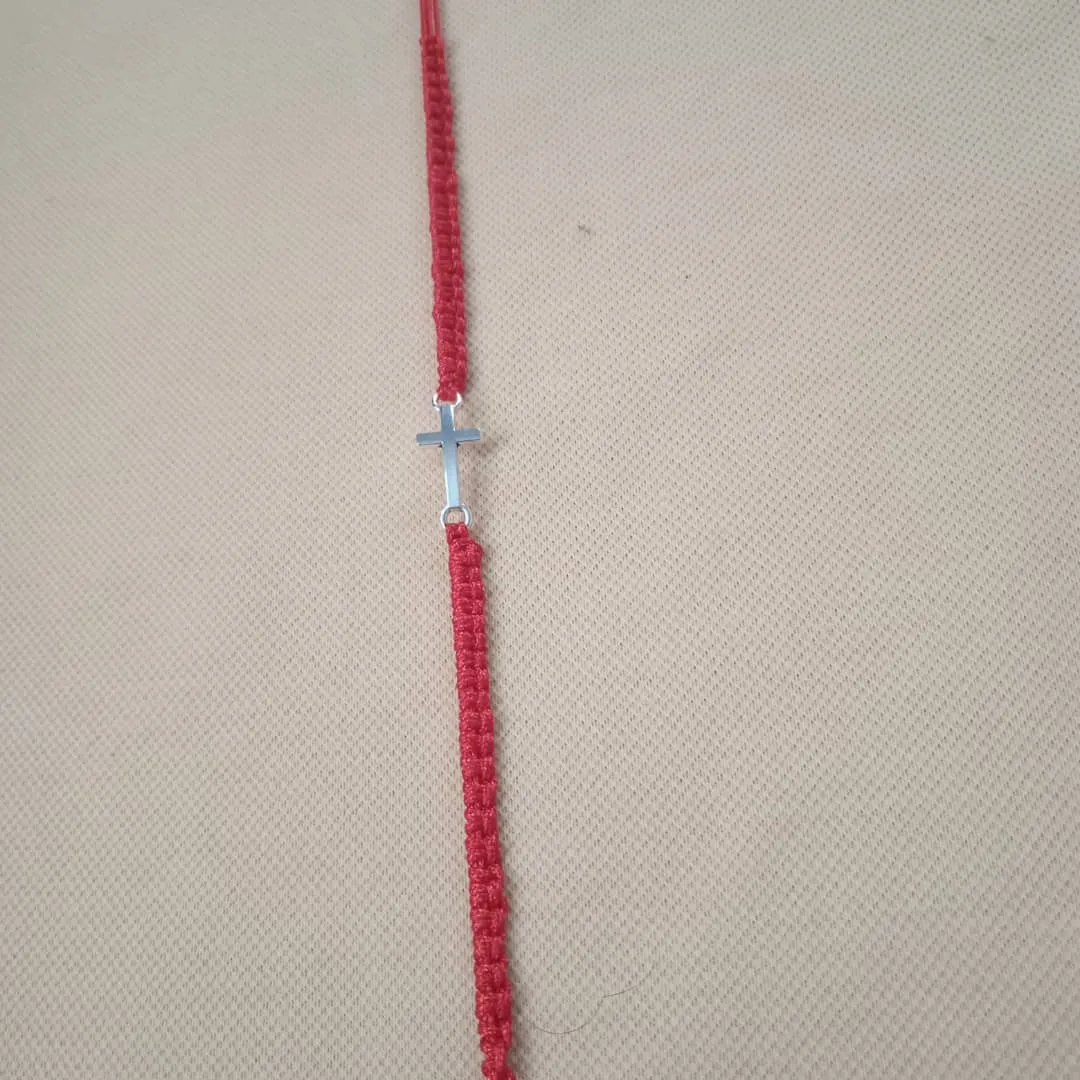
- Repeat the same process on the other side with the lark knot.
- Repetir el mismo proceso en el otro lado con el nudo alondra.
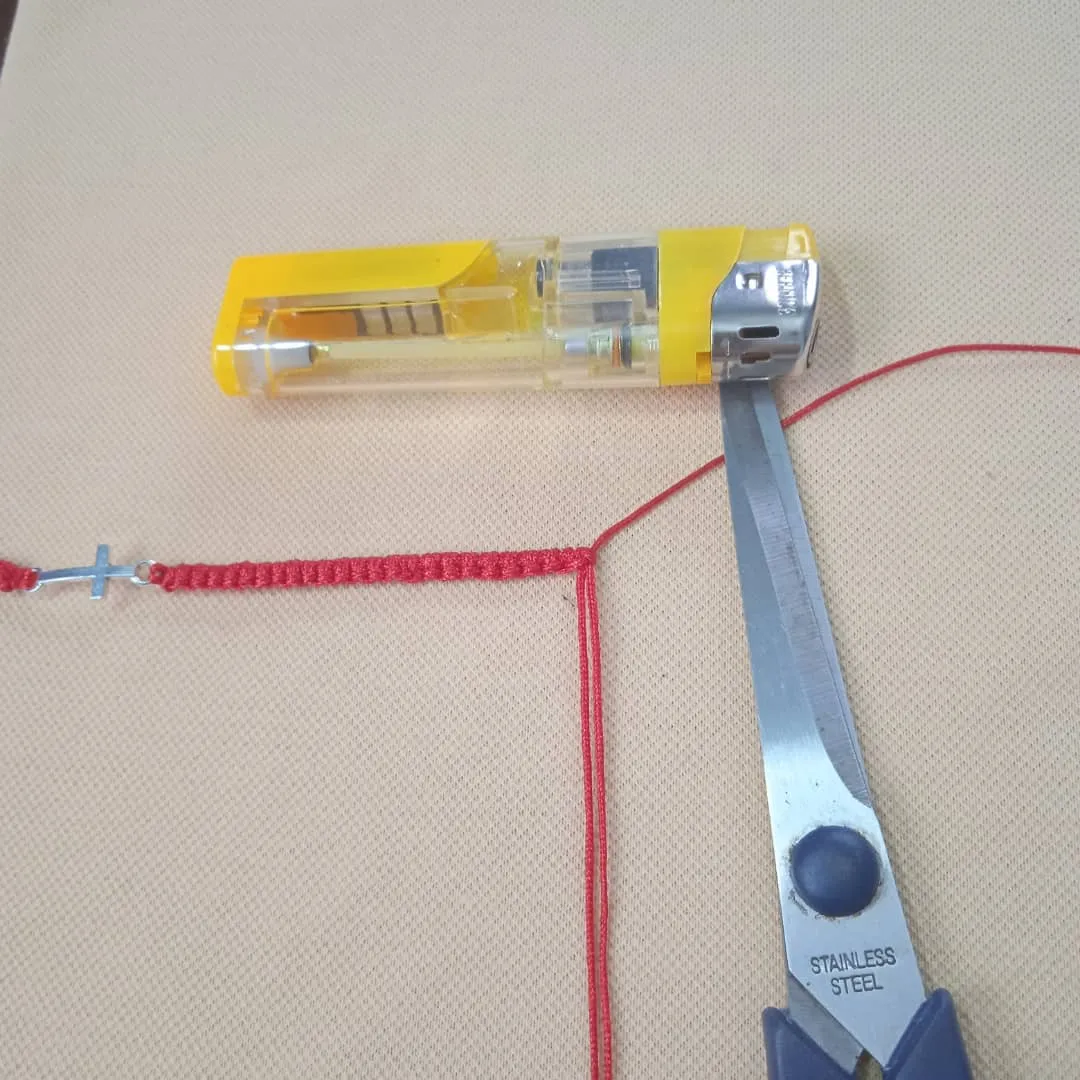
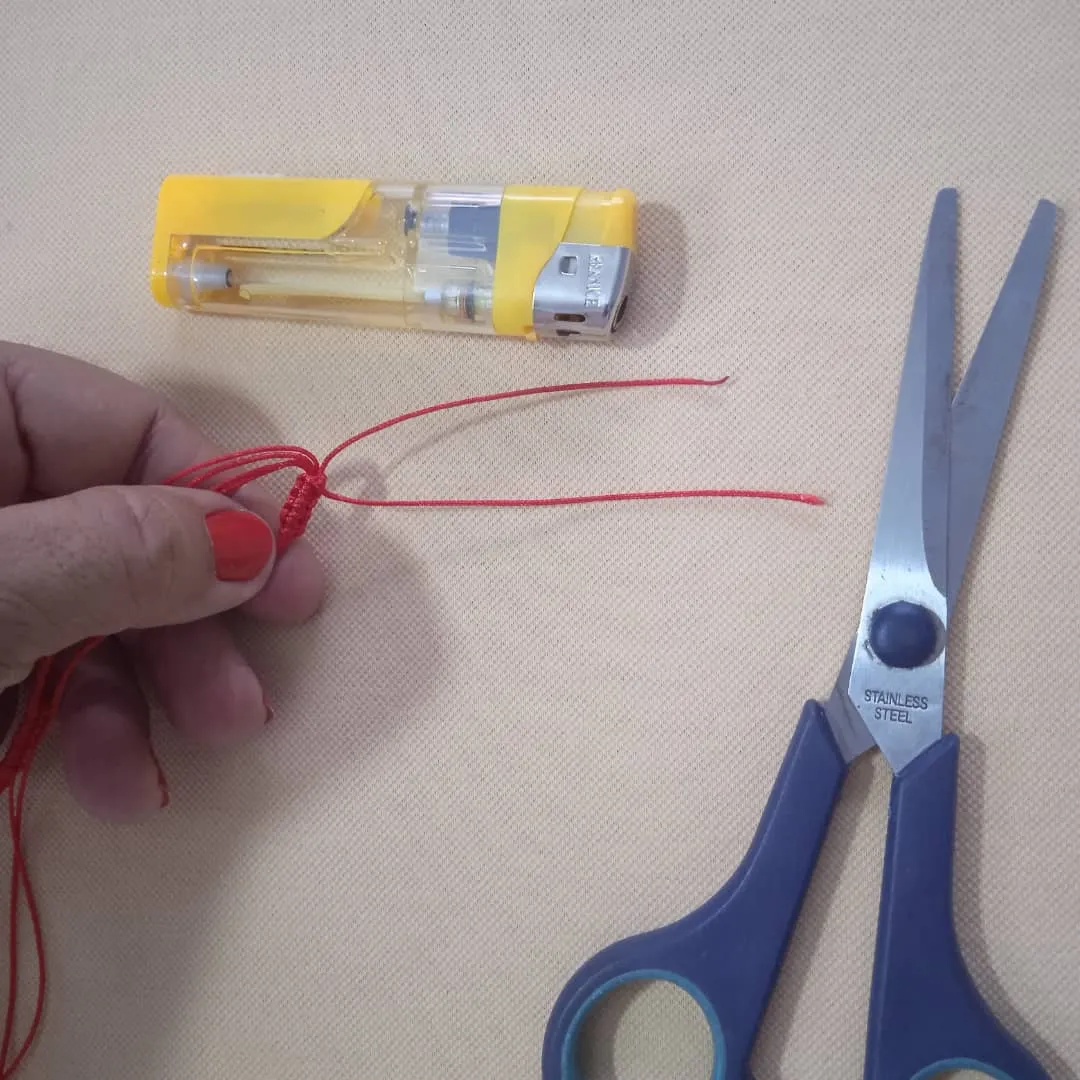
- Tie a knot, cut off the excess and seal the knot with the tinder.
- Hacer un nudo, cortar el sobrante y sellar el nudo con el yesquero.
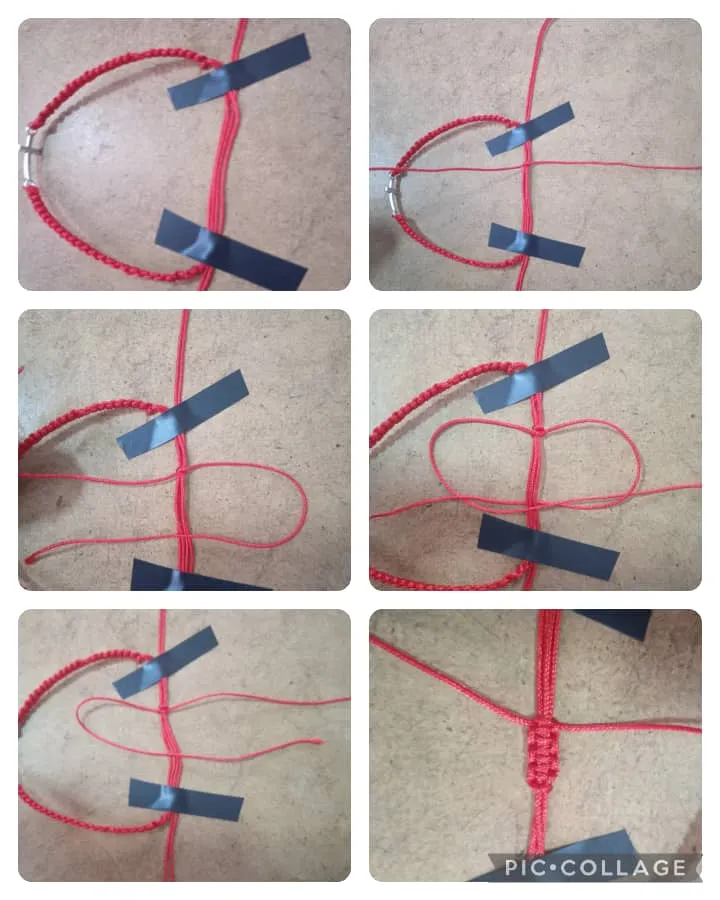
- For this bracelet the slip knot is ideal as it allows to adjust the bracelet to the wrist. After securing the threads with adhesive tape, cut 25 cm of Chinese thread, pass under the guide thread to make a simple knot, then make a P with the thread on the right, pass the end of the thread diagonally, adjust, then do the same process but with the thread on the left. Repeat as many times as necessary to obtain the length of the flat slip knot.
- Para esta pulsera es ideal el nudo corredizo ya que permite ajustar la pulsera a la muñeca. Después de sujetar los hilos con cinta adhesiva, cortar 25 cm de hilo chino, pasar por debajo del hilo guía para hacer un nudo sencillo, luego hacer una P con el hilo de la derecha pasar la punta del hilo en forma diagonal, ajustar, luego hacer el mismo proceso pero con el hilo de la izquierda. Repetir las veces que sean necesarias para obtener el largo del nudo plano corredizo.
- Then make a simple knot, cut the excess, seal with the tinder.
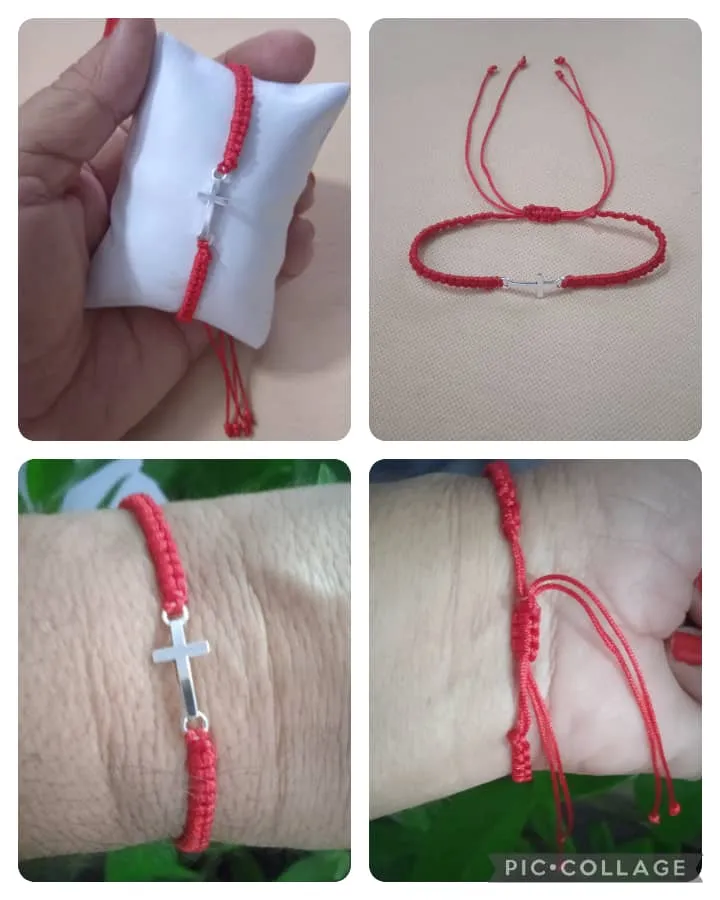
- The hanging threads we place beads to give a decorative touch to the piece.
- Luego hacer un nudo sencillo, cortar el sobrante, sellar con el yesquero.
- Los hilos colgantes le colocamos mostacillas para darle un toque decorativo a la pieza.
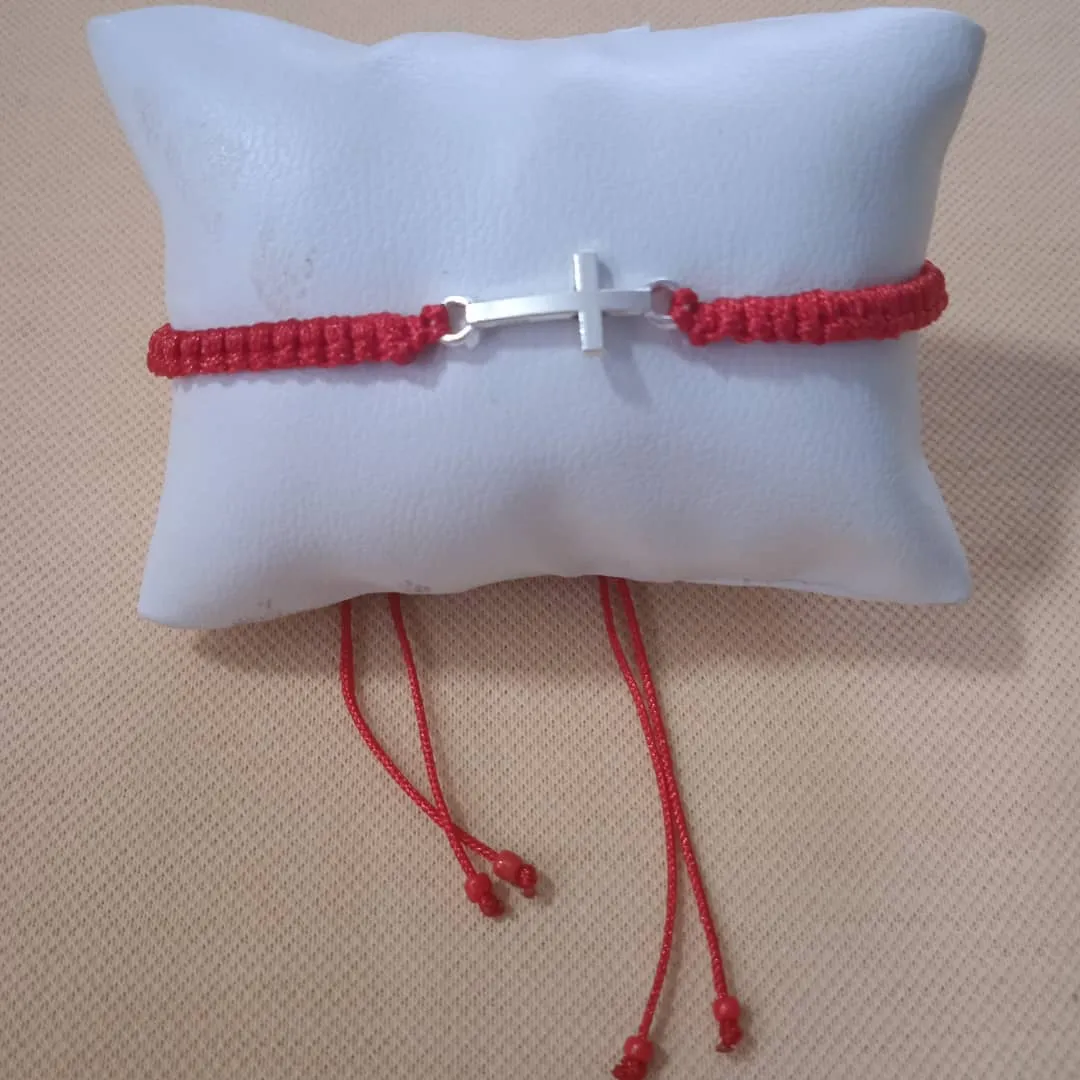
- So we come to the end of the project, a bracelet with a cross as a charm and a lark knot.
- Así llegamos al final del proyecto, de una pulsera con una cruz como dije y nudo alondra.
- Another design that I leave in my dear community # HiveDiy and for my followers of bracelets that this time I used red Chinese thread, as I said a cross, highlighting the lark knot. I say goodbye 🖐️ thanking you for your visit and comments.
- Otro diseño que dejo en mi querida comunidad # HiveDiy y para mis seguidores de pulseras que en esta oportunidad usé hilo chino de color rojo, como dije una cruz, destacándose el nudo alondra. Me despido 🖐️ agradeciéndoles su visita y comentarios.