

Dar un regalo implica muchas cosas, pero todas ellas giran al rededor de la persona a quien queremos dar el presente, siempre es alguien especial para nosotros y por ello no solo la escogencia del regalo es sumamente importante sino también su envoltorio.
¡Hola a toda la bella comunidad deHIVE! Mi nombre es Eashell Baptista y estoy bastante nueva en la plataforma, este es mi 4to post y estoy muy emocionada de compartirlo en esta comunidad, ya que, soy amante de lo Hecho a Mano, hoy quiero compartir con ustedes cómo se realiza esta bella cajita de regalo.
Pero antes no quiero dejar de mencionar que en la escuela donde solía trabajar, acostumbrábamos que en los días especiales donde hacíamos intercambios de regalos la norma era que dichos regalos debían ser regalos hechos por nosotros mismos.
Eso implicaba en primer lugar que generalmente se gastaba menos, ya que, solíamos hacerlo con material que encontrábamos en nuestras casas, podía ser desde un marca libros para los amantes de la lectura, hasta dulcería o incluso comidas saladas para los amantes de la gastronomía.
En segundo lugar el hecho de invertir tiempo y cariño en el obsequio le daba un mayor valor, pues se volvía algo totalmente personalizado y pensado en aquella persona a quien le daríamos el obsequio, era un regalo pensado y totalmente dedicado a esa persona.
Ahora bien, así cómo es importante el regalo, también lo es su envoltorio, siempre queremos algo hermoso que represente lo que lleva dentro, debe ser algo igual de especial. Y qué mas especial si lo hacemos nosotros mismos, obteniendo un resultado de excelente calidad.
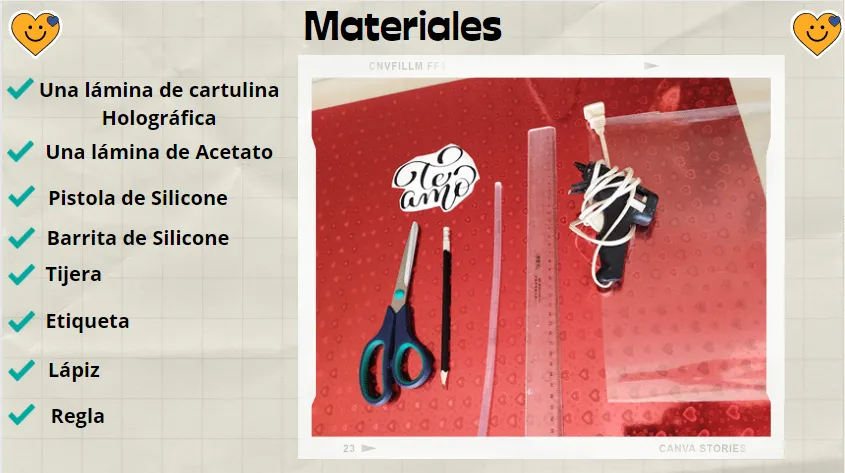
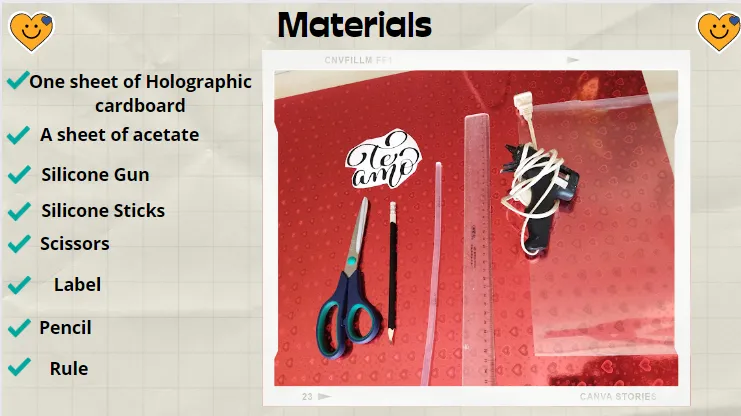
Así que sin más preámbulos acá los materiales:
COMENCEMOS CON LA BASE DE LA CAJA
Lo primero que vamos a trabajar será la parte de abajo de la cajita, es decir comenzaremos haciendo la base, para lo cual haremos lo siguiente:
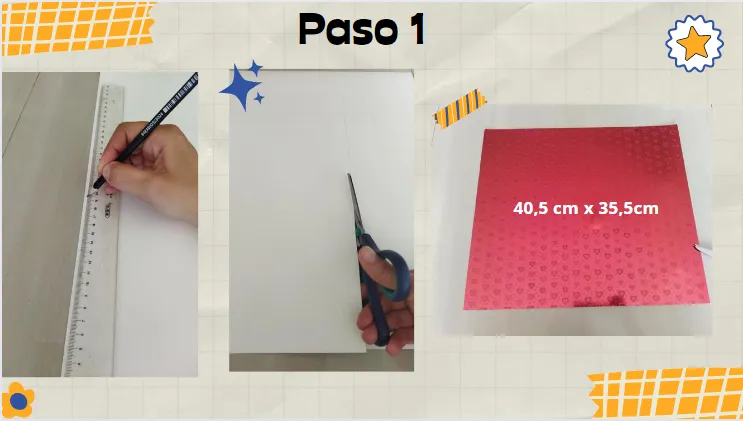
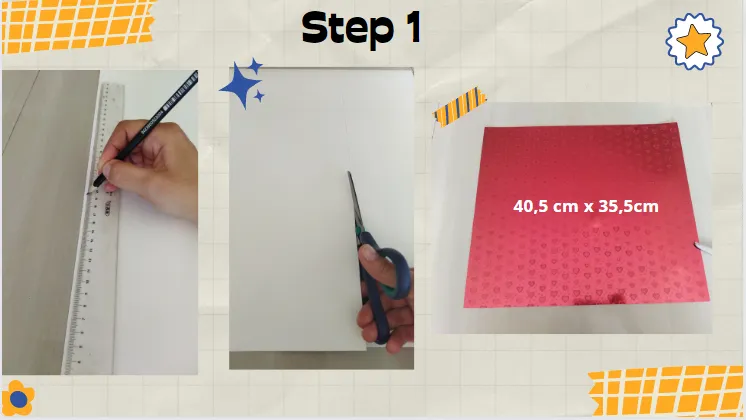
- Tomaremos la cartulina holográfica (o cualquier cartulina de tu preferencia, lo importante es que sea suficientemente gruesa para que sea fuerte) la colocamos por el lado contrario y procedemos a trazar un rectángulo de 40,5cm x 35,5cm.
- Luego haremos un corte de ese rectángulo y nos quedará una pieza correspondiente a la base de 40,5cm x 35,5cm
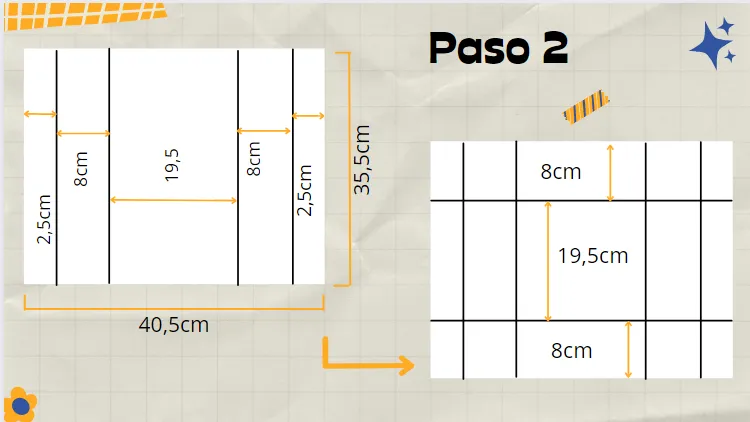
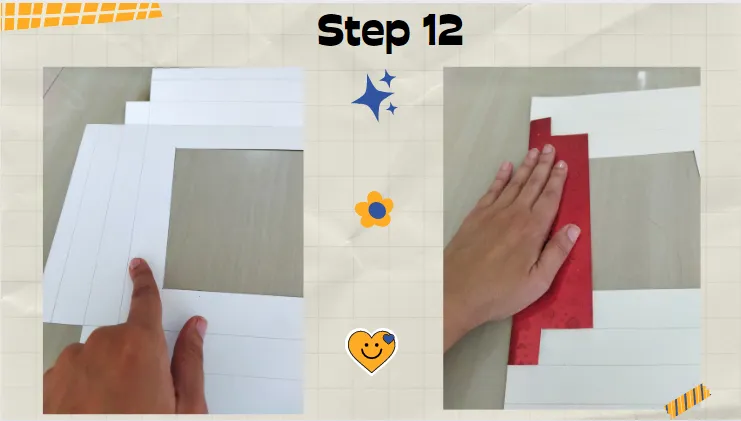
- En ese rectángulo de 40,5cm x35,5cm vamos a trazar las medidas como se indican en el dibujo
- Nos va a quedar una cuadrícula final como la de la foto de la derecha.
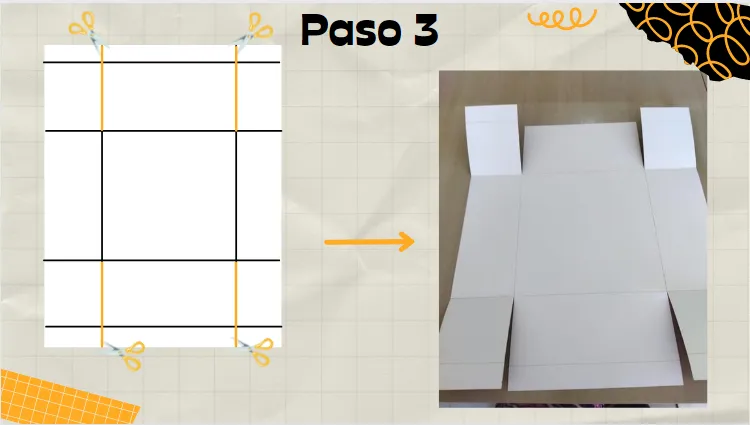
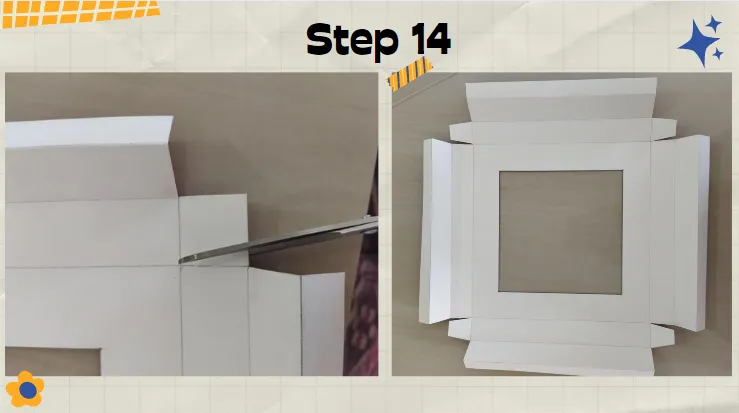
- Vamos a recortar en las líneas tal como se muestra en el dibujo. de la izquierda.
- Y la foto de la derecha nos muestra cómo debe quedar.
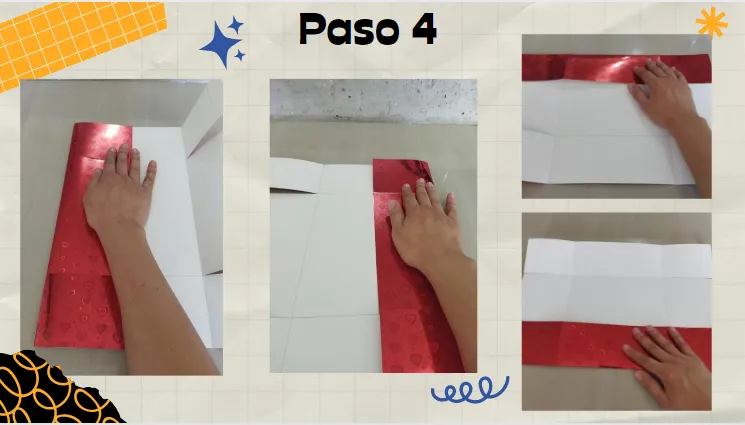
- Procedemos a doblar los bordes al rededor del cuadro central como se muestra en las imágenes.
- En este paso es bien importante borrar ese trazo que nos quedó en la medida de 2,5cm. Así nuestra cajita por dentro se verá bien prolija y con un acabado delicado.
- En este punto debemos cerrar las pestañas como se muestra en las imágenes y trazar una delgada línea para saber exactamente hasta donde llegan esas pestañas con respecto a la del medio.

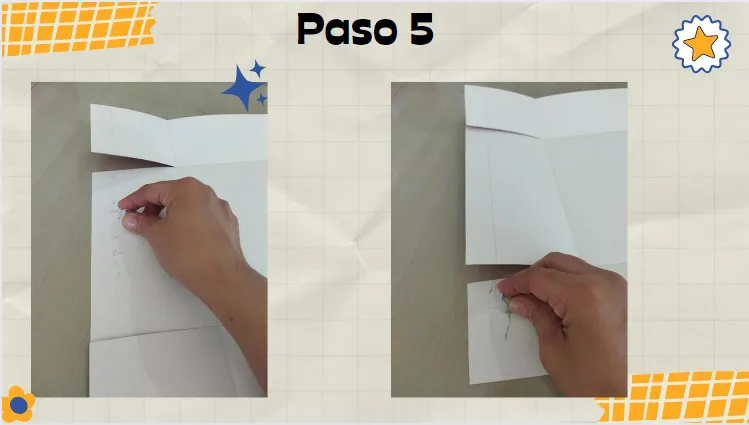
- El paso anterior nos hizo obtener un trazo en la pestaña de el medio, justo por esa línea vamos a hacer un doblez en ambos lados.
- Ahora vamos a pegar con nuestra pistola de silicone las pestañas laterales a la de el medio.

- Doblamos hacia adentro la pestaña y la fijamos con el silicone.
TRABAJEMOS AHORA CON LA TAPA
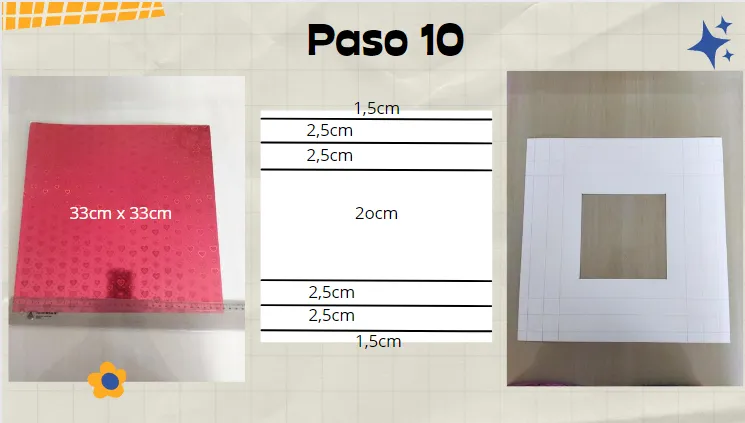
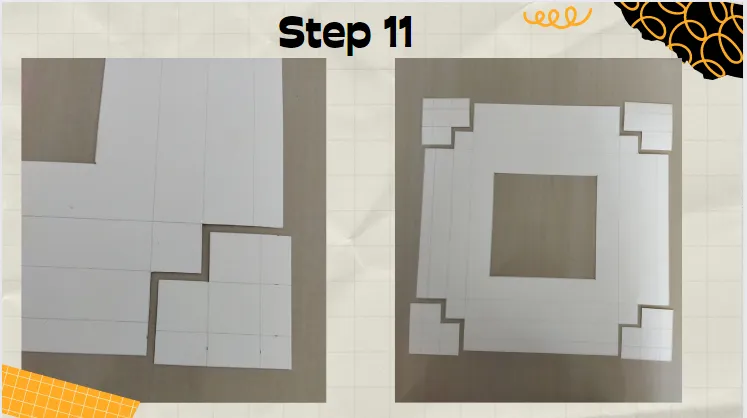
- Tomaremos un cuadrado de la cartulina holográfica de 33cm x 33cm.
- Haremos una cuadrícula con las medidas que se muestran en la imagen del medio.
- Estas medidas las haremos en los 4 lados de nuestra cartulina y quedarán las líneas cruzadas.
- Mediremos 3cm de margen tomando como referencia el cuadro central y lo recortamos.
- El resultado debe ser como lo muestra la última imagen.

- Recortaremos las esquinas tal como se muestra en la primera imagen.
- El resultado final debe ser como se muestra en la última foto.
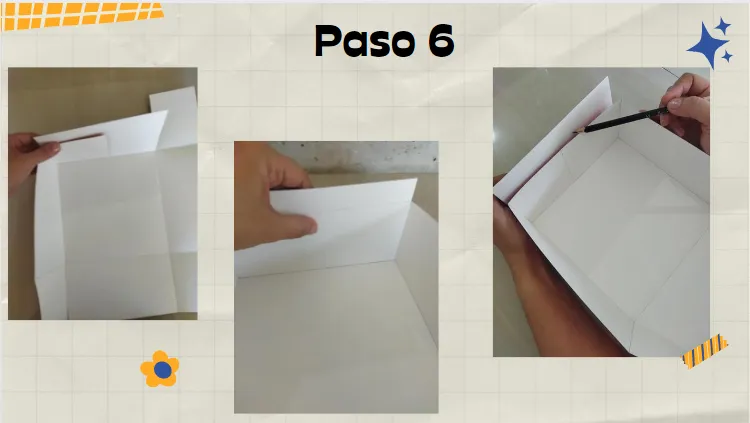
- Procederemos a hacer los respectivos dobleces en cada linea que forma el cuadrado interno.
- Hacer esto en los 4 lados.
- En la segunda línea doblamos hacia adentro.
- Pero la tercera y última línea doblamos en sentido contrario.
- Tal como lo muestra la imagen.
- Procederemos a hacer un corte en las pequeñas solapas de cada esquina interna.
- Luego haremos un corte diagonal en cada una de ellas.
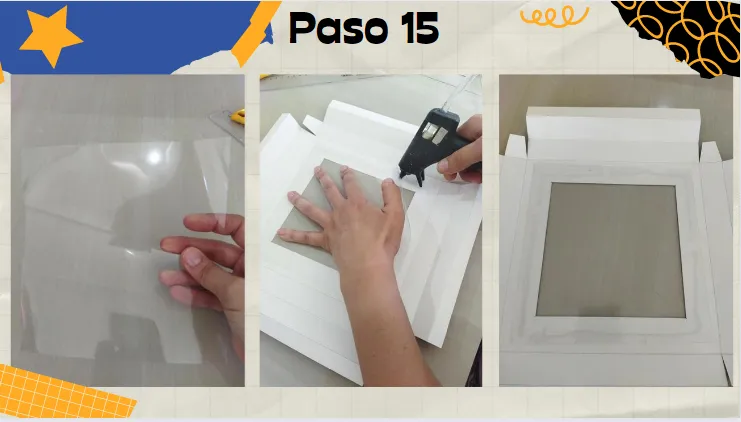
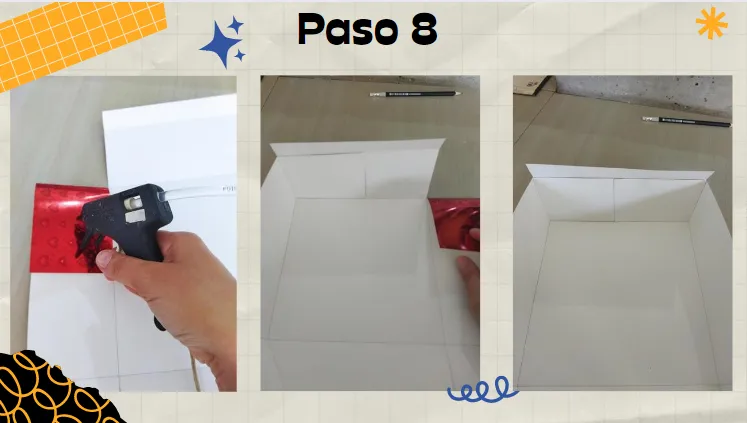
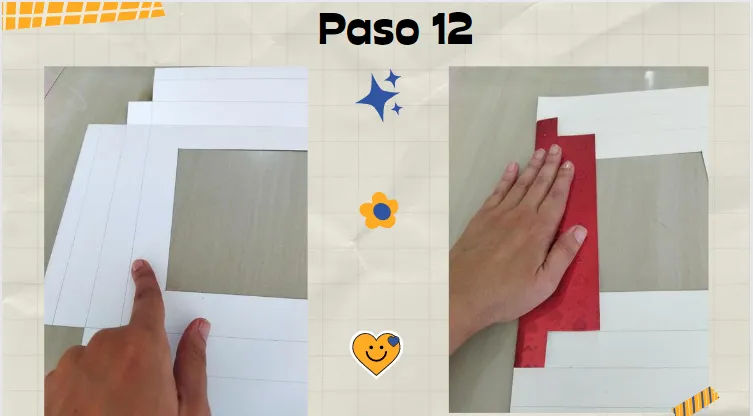
- Tomaremos un cuadro de acetato de 18cm x 18cm y la pegaremos en el centro.
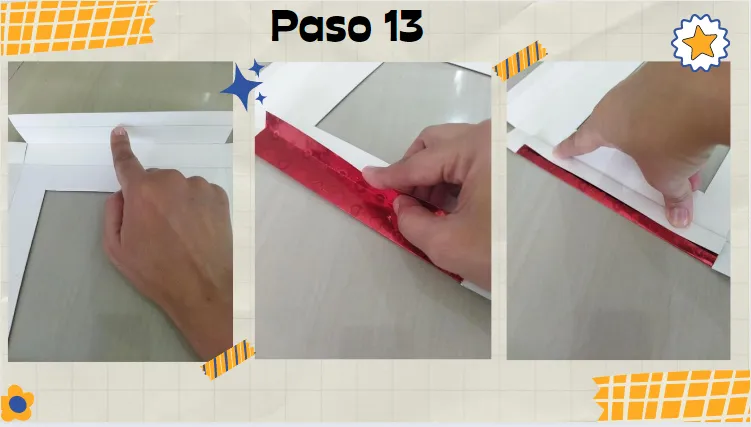
- Fijaremos las 4 pequeñas pestañas. Como lo muestra la primera imagen.
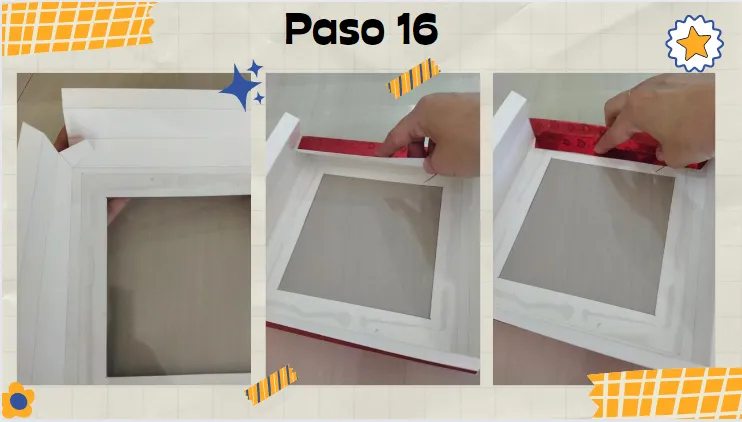
- Luego Traeremos hacia adentro el segundo doblez.
- La última pestaña quedará hacia afuera.
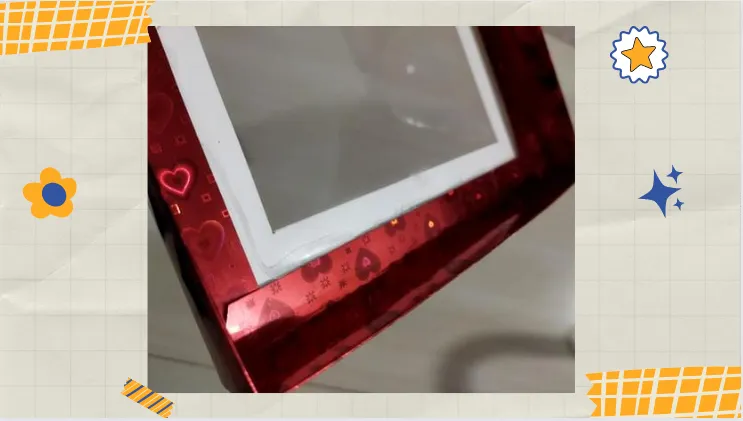
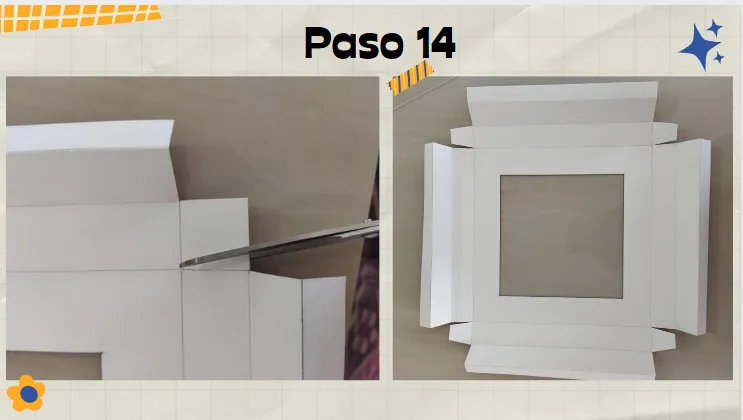
- Así deberá quedar al fijar todos los lados.
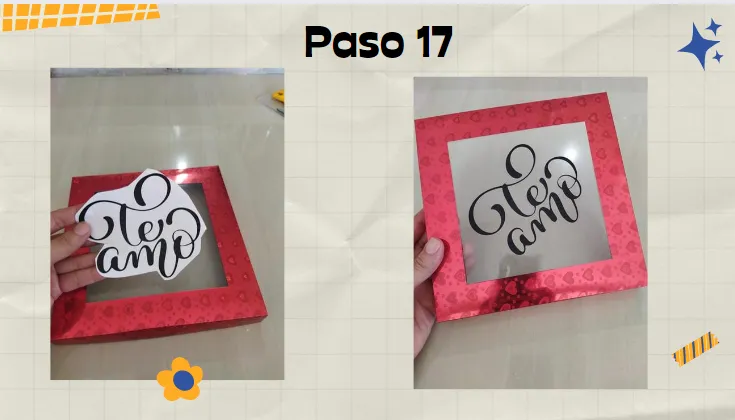
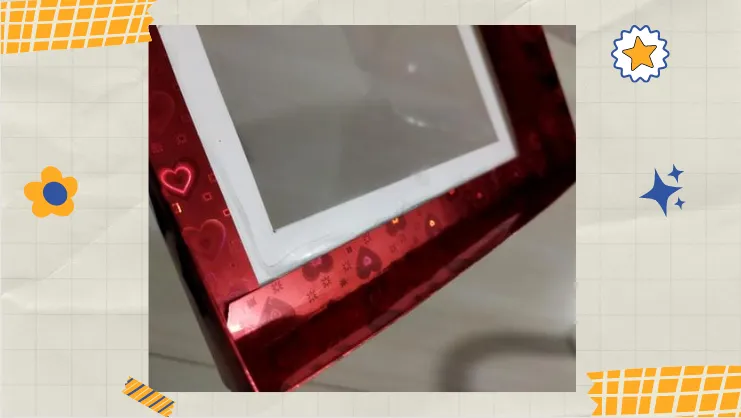
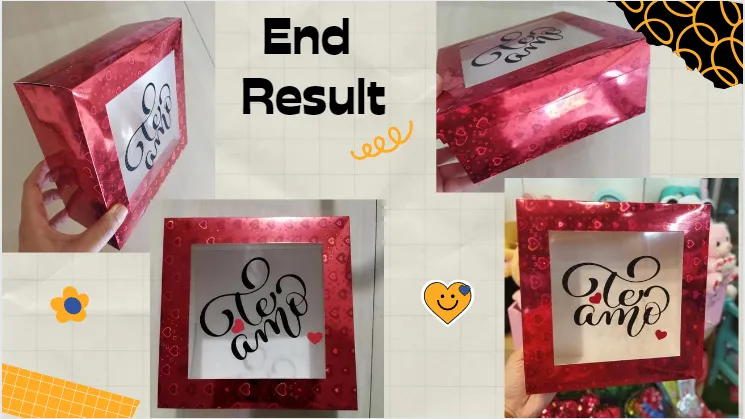
- Para finalizar nuestro trabajo procedemos a colocar la etiqueta de nuestra preferencia.También es válido dejarla sin ninguna decoración y se verá igual de hermosa.
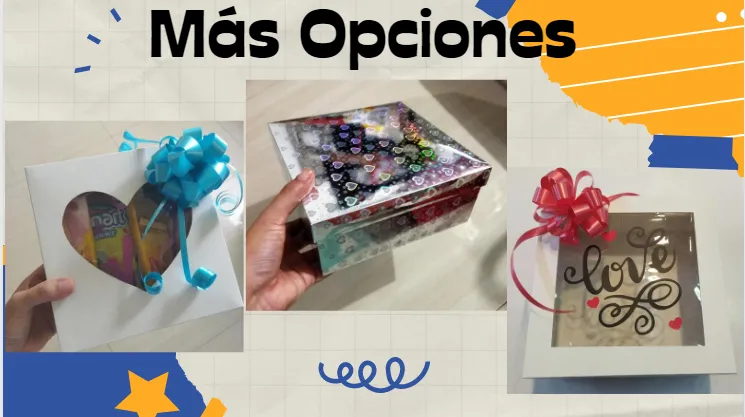
- También podemos hacer corte del centro en forma de corazón y quedará maravilloso.
- La cajita puede ser elaborada con la cartulina de tu preferencia. Importante que sea resistente.
- Cortar el centro también es opcional, la podemos dejar completa sin la ventana transparente.
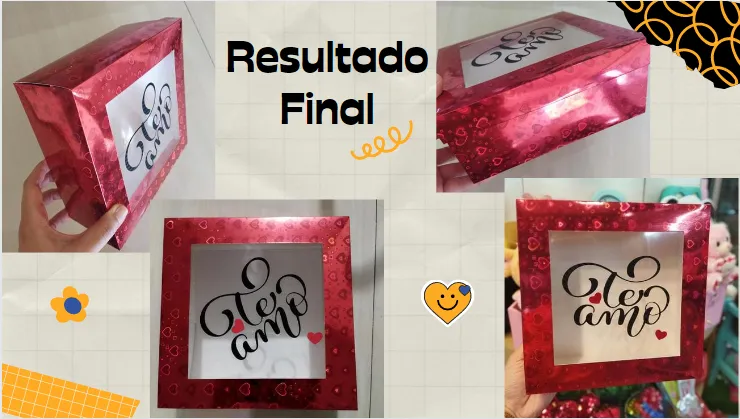
¡Ya sólo queda a tu imaginación y creatividad !
¡Manos a la obra!

Giving a gift involves many things, but all of them revolve around the person to whom we want to give the present, it is always someone special to us and therefore not only the choice of the gift is extremely important but also its wrapping.
Hello to all the beautiful HIVE community! My name is Eashell Baptista and I am quite new to the platform, this is my 4th post and I am very excited to share it in this community, since, I am a lover of Handmade, today I want to share with you how to make this beautiful little gift box.
But first I don't want to fail to mention that in the school where I used to work, we used to make it a rule that on special days where we did gift exchanges, the rule was that the gifts had to be self-made gifts.
This meant, first of all, that we generally spent less, since we used to do it with material we found in our homes, from bookmarks for those who love reading, to sweets or even savory foods for those who love gastronomy.
Secondly, the fact of investing time and affection in the gift gave it a greater value, because it became something totally personalized and thought about the person to whom we would give the gift, it was a gift thought and totally dedicated to that person.
Now, just as the gift is important, so is its wrapping, we always want something beautiful that represents what is inside, it must be something equally special. And what more special if we do it ourselves, obtaining a result of excellent quality.
So without further ado, here are the materials:
LET'S START WITH THE BASE OF THE BOX
The first thing we are going to work on is the bottom of the box, that is to say, we will start by making the base, for which we will do the following:
- We will take the holographic cardboard (or any cardboard of your preference, the important thing is that it is thick enough to be strong) we place it on the opposite side and proceed to draw a rectangle of 40.5cm x 35.5cm.
- Then we will make a cut of that rectangle and we will have a piece corresponding to the base of 40.5cm x 35.5cm.
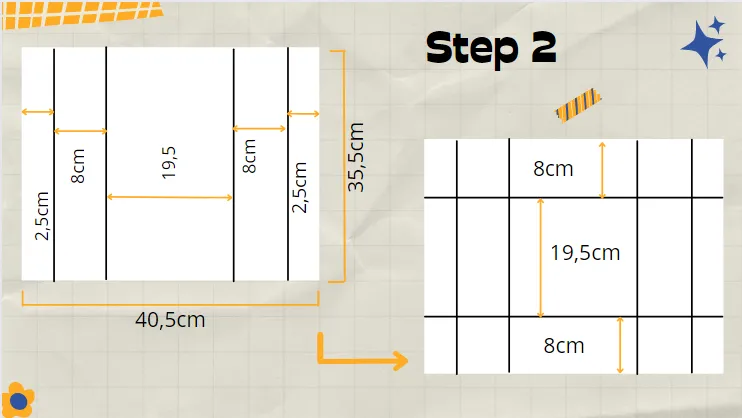
- In this rectangle of 40,5cm x35,5cm we are going to trace the measures as indicated in the drawing.
- We will have a final grid like the one in the photo on the right.
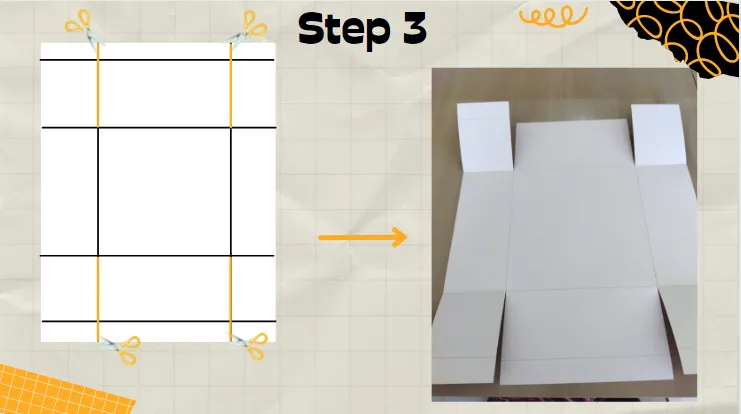
- We will cut on the lines as shown in the picture on the left.
- And the photo on the right shows us how it should look.
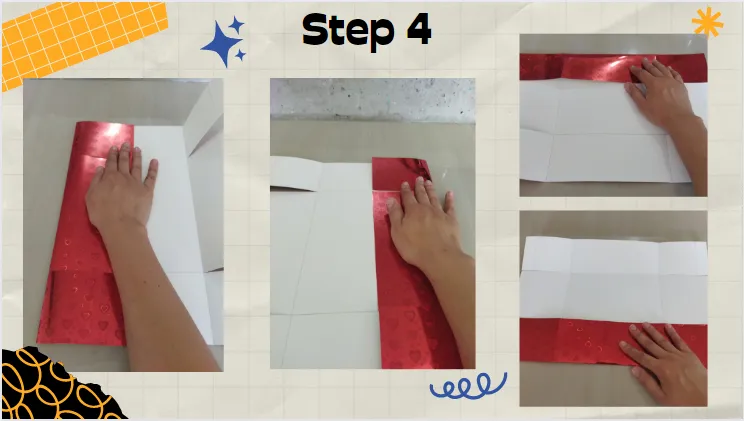
- We proceed to fold the edges around the central square as shown in the images.
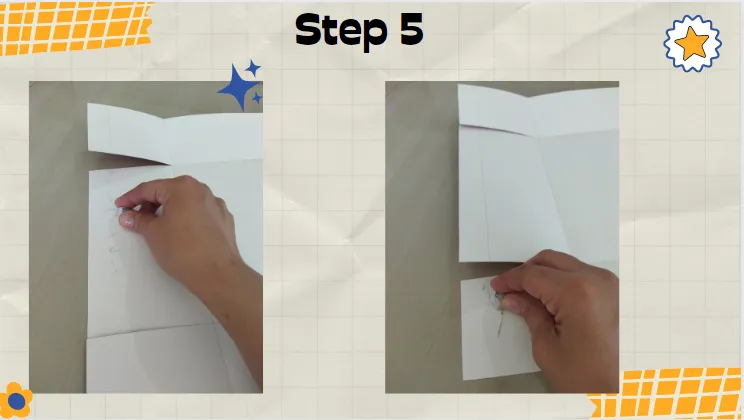
- In this step it is very important to erase the 2.5cm line. This way our box inside will look neat and with a delicate finish.
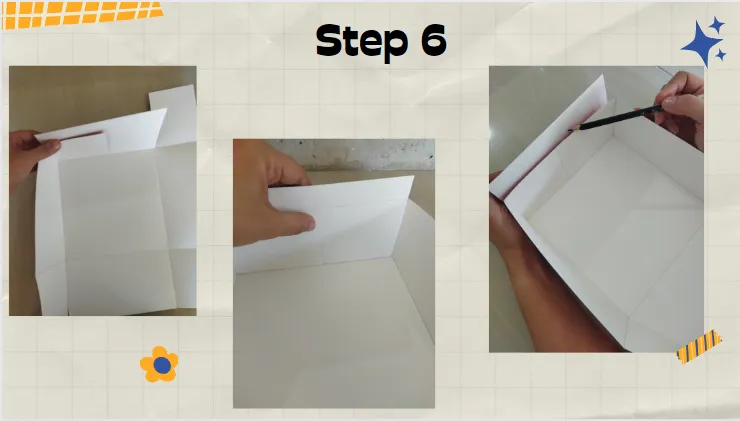
- At this point we must close the tabs as shown in the images and draw a thin line to know exactly how far these tabs reach with respect to the middle one.

- The previous step made us get a line in the middle tab, just along that line we are going to make a fold on both sides.
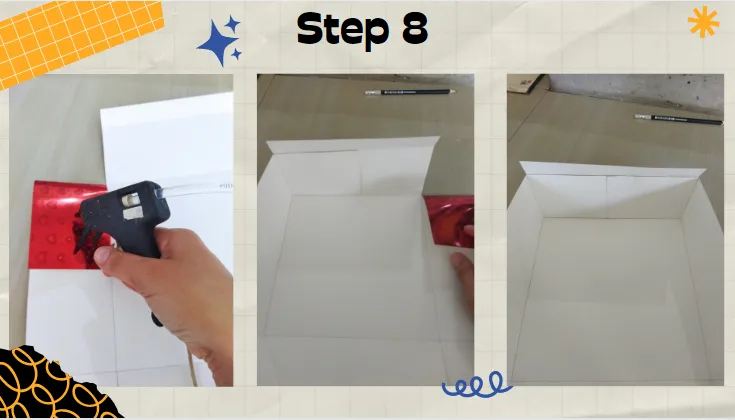
- Now we are going to glue with our silicone gun the side tabs to the middle one.
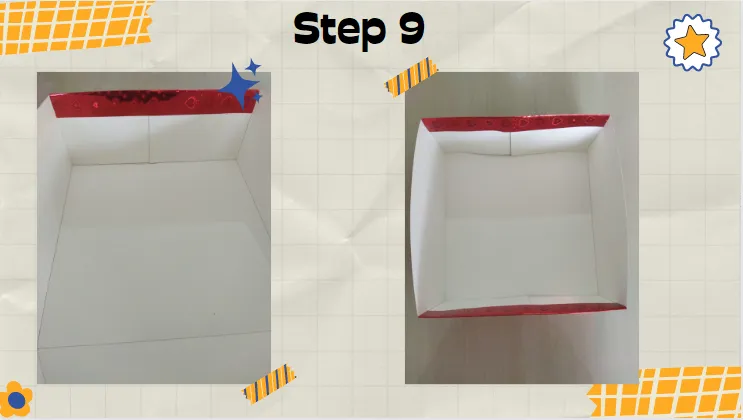
- Fold the tab inwards and fix it with the silicone.
NOW LET'S WORK WITH THE COVER

- We will take a square of the holographic cardboard of 33cm x 33cm.
- We will make a grid with the measures shown in the middle image.
- We will make these measurements on the 4 sides of our cardboard and the lines will be crossed.
*We will measure 3cm of margin taking as a reference the central square and we will cut it out. - The result should be as shown in the last image.
- We will trim the corners as shown in the first picture.
- The final result should be as shown in the last picture.
- We will proceed to make the respective folds in each line that forms the inner square.
- Do this on all 4 sides.

- In the second line we fold inward.
- But the third and last line we fold in the opposite direction.
- As shown in the picture.
- We will proceed to make a cut in the small flaps of each inner corner.
- Then we will make a diagonal cut on each of them.
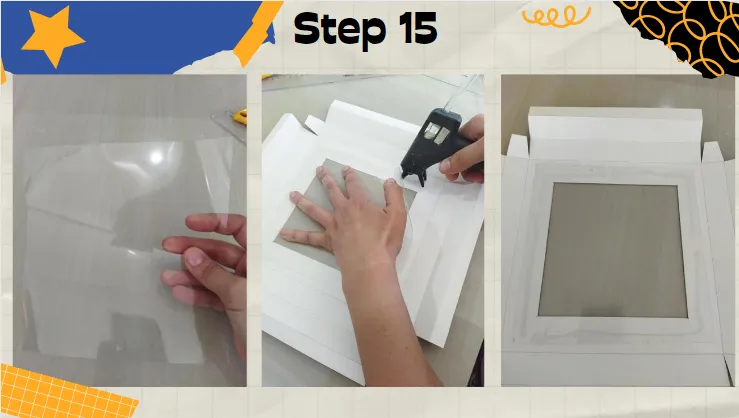
- We will take an 18cm x 18cm acetate square and glue it in the center.

- We fix the 4 small tabs. As shown in the first image.
- Then we will bring the second fold inwards.
- The last tab will face outward.
- This is how it should look when all sides are fixed.
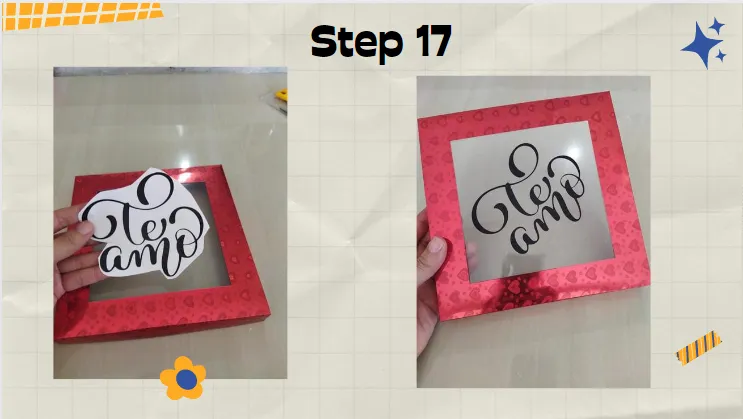
- To finish our work we proceed to place the label of our preference, it is also valid to leave it without any decoration and it will look just as beautiful.
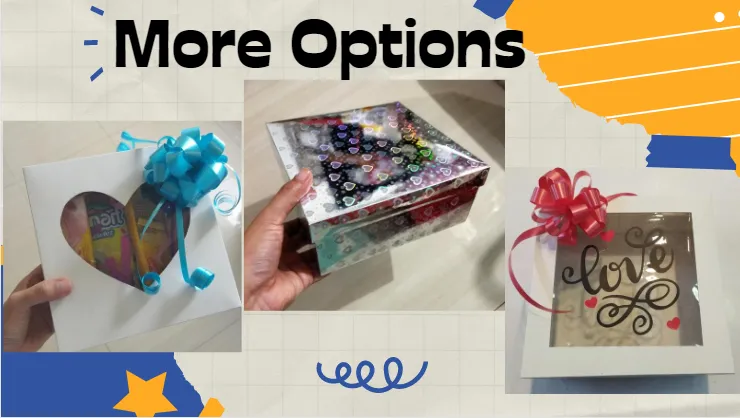
- We can also cut the center in the shape of a heart and it will look wonderful.
- The box can be made with the cardboard of your choice. It is important that it is resistant.
- Cutting the center is also optional, we can leave it complete without the transparent window.
Edición:| Edition by: @baptistaeashell, Canva.
Traducido con:| Translate with: www.Deepl.com/translator (free version)