¡Saludos amigos de Mundo Hive💕! | Greetings friends of Mundo Hive💕!
¡Feliz Miércoles!
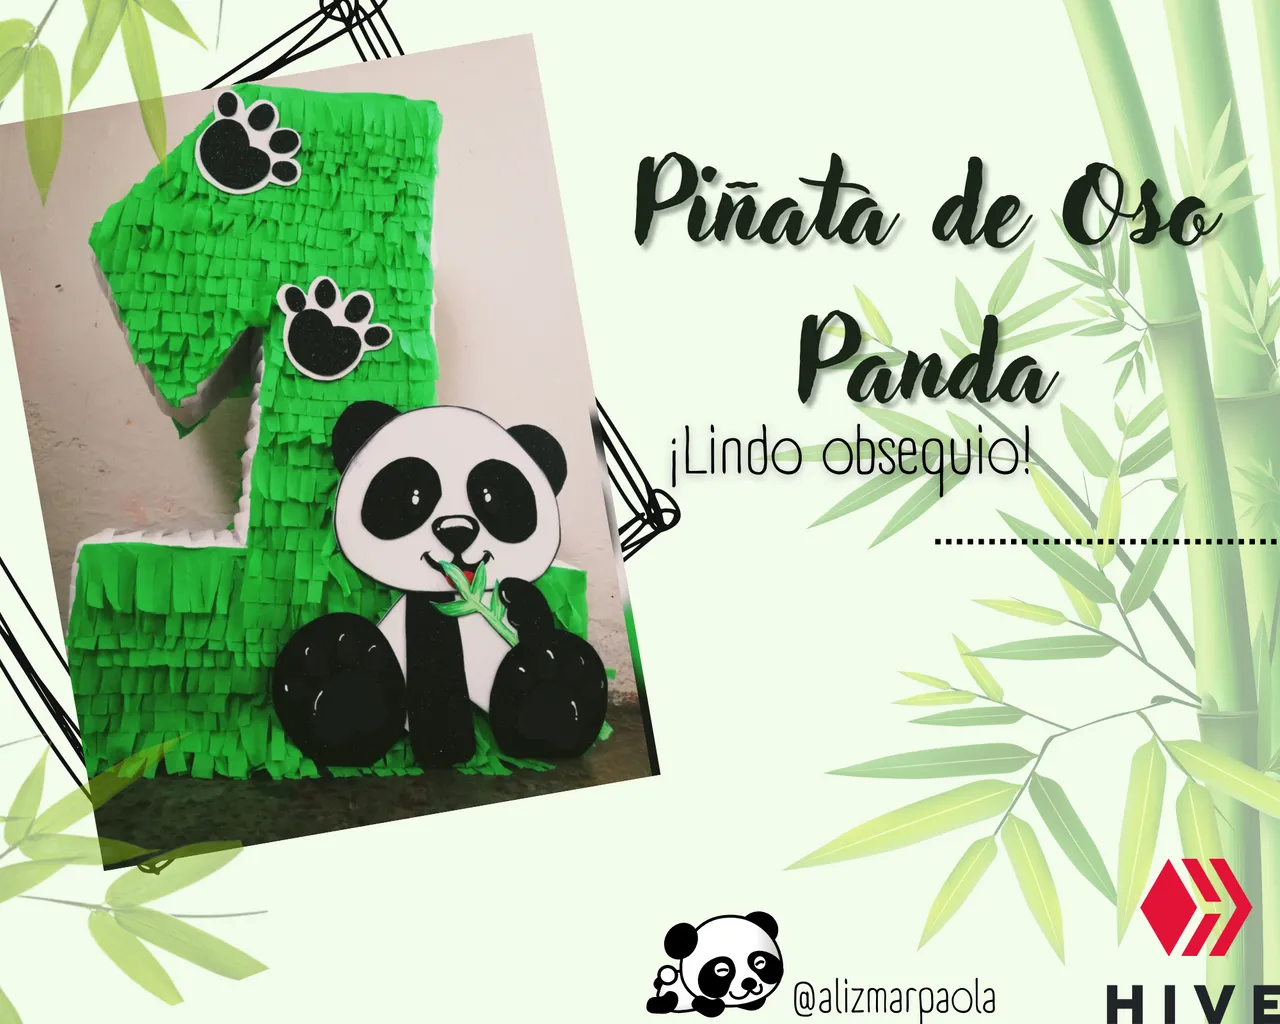
Dentro de pocos días cumple mi ahijado Damián, así que decidí darle de obsequio la piñata y de esta forma colaborarle, además que lo hago con mucho cariño y con lo que mejor se hacer, osea manualidad. La reunión será en temática de Oso Panda, pero es su Primer añito, así que puse manos a la obra para crearla con esta temática resaltando el número 1.
Les muestro el proceso, espero les guste..
Happy Wednesday!
In a few days my godson Damián will have his birthday, so I decided to give him the piñata as a gift and in this way collaborate with him, besides I do it with love and with what I know how to do best, that is, crafts. The meeting will be in Panda Bear theme, but it is his first birthday, so I got to work to create it with this theme highlighting the number 1.
I show you the process, I hope you like it....

Materiales | Materials
- Cartón
- Silicón
- Papel crepe blanco y verde
- Retazos de hoja de papel
- Foami negro escarchado
- Foami blanco
- Cardboard
- Silicone
- White and green crepe paper
- Scraps of paper
- Black frosted Foami
- White Foami
Elaboración | Elaboration
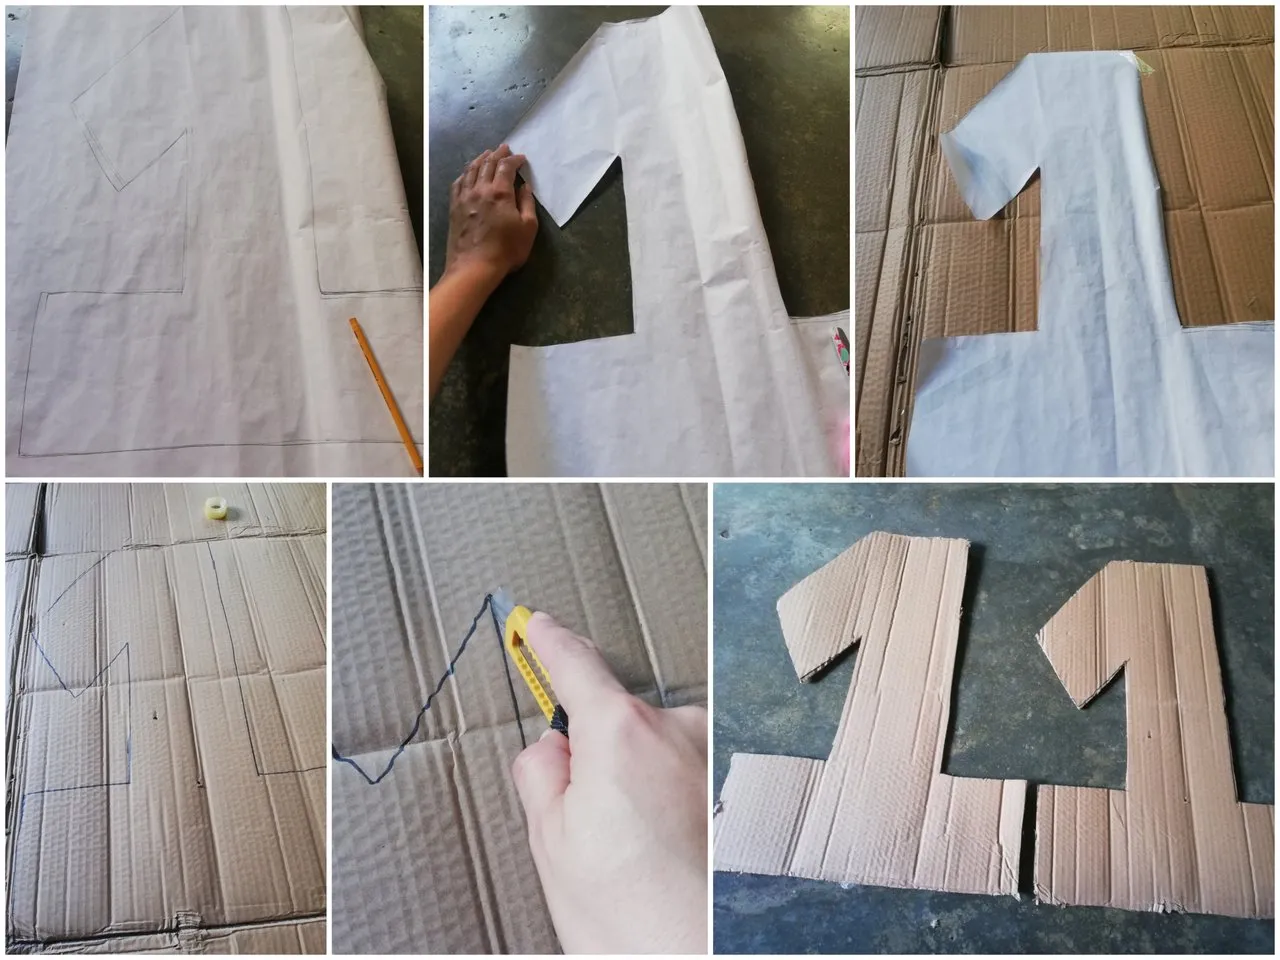
• Lo primero que hice fue hacer el patrón del número a utilizar en este caso el n°1. Lo realicé en la mitad de una hoja de papel bond, utilizando para lo alto del número, lo que sería el ancho de la hoja, luego lo recorté y marque el cartón para proceder a cortar con el exacto, realicé dos números.
• The first thing I did was to make the pattern of the number to be used, in this case number 1. I made it in the middle of a sheet of bond paper, using for the height of the number, what would be the width of the sheet, then I cut it out and mark the cardboard to proceed to cut with the exact one, I made two numbers.
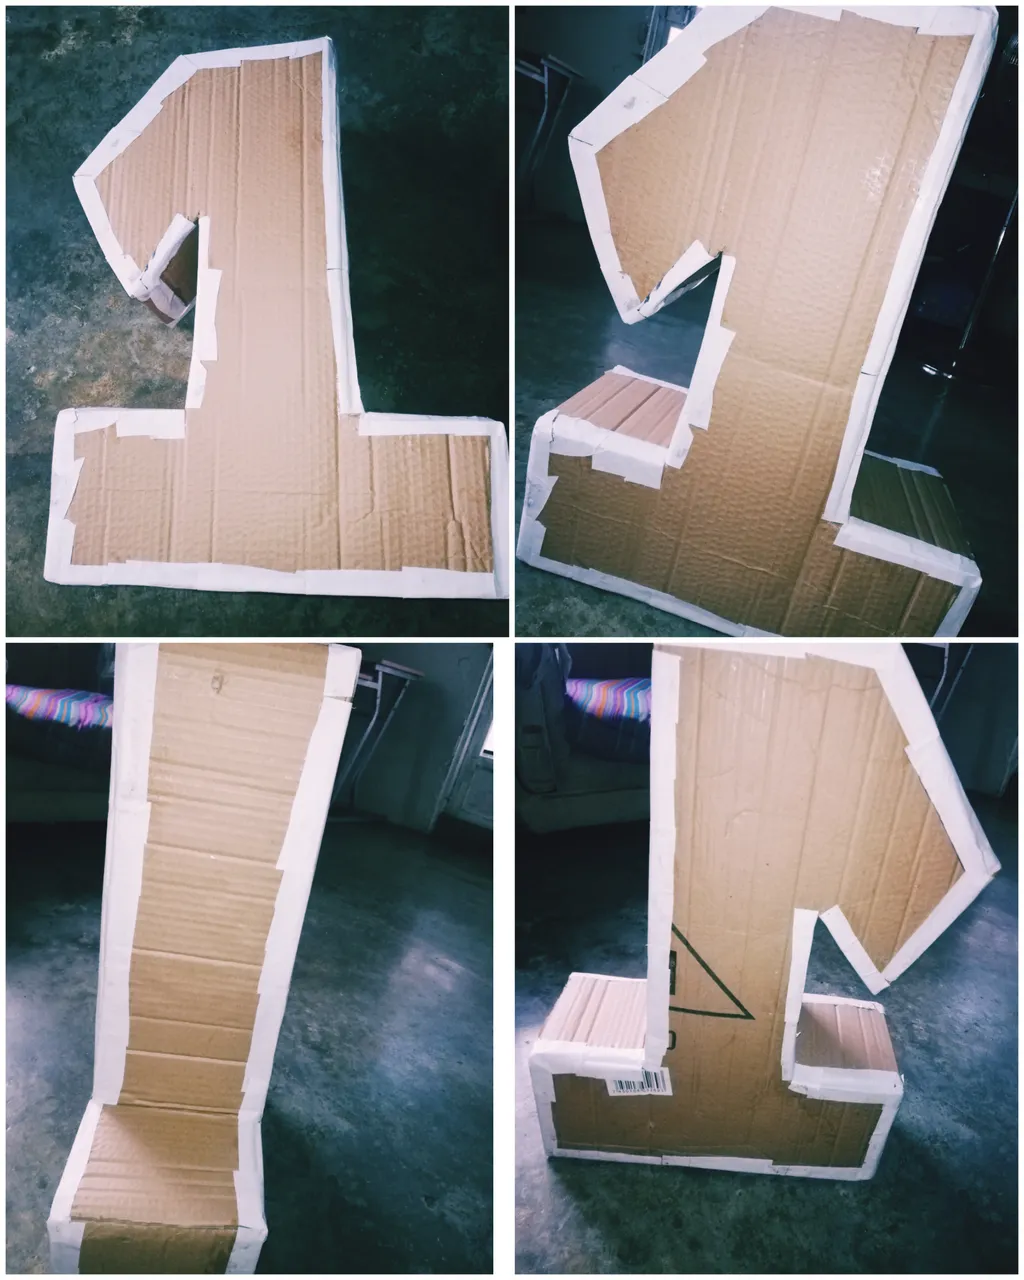
• Pará no desperdiciar nada, utilice las tapas de la caja y medi un ancho de 15cm, dejando unos 3cm por cada lado con la finalidad de hacer pestañas para el mejor manejo del cartón a la hora de pegar los bordes al número. Con mucha paciencia realice todo el ensamblaje de la piñata. (olvide tomar algunas fotografías😪)
• In order not to waste anything, use the lids of the box and measure a width of 15cm, leaving about 3cm on each side in order to make tabs for better handling of the cardboard when gluing the edges to the number. With a lot of patience I made the whole assembly of the piñata. (forget to take some pictures😪).

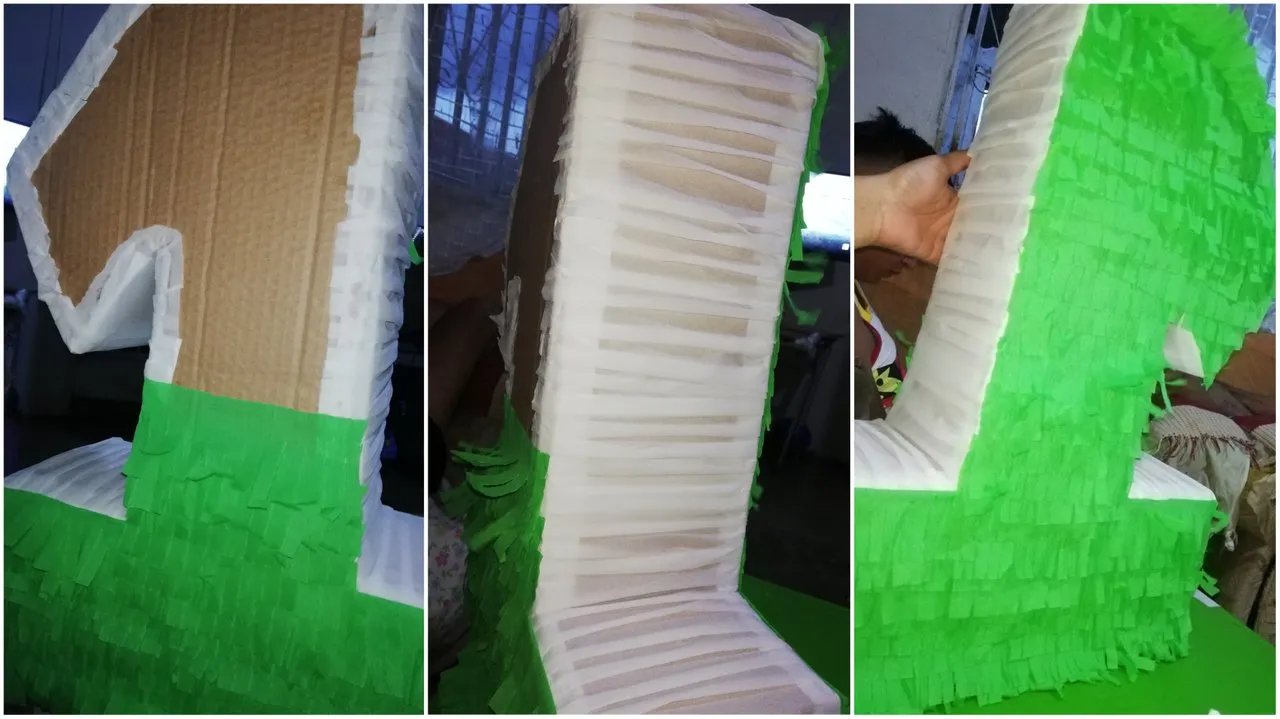
• Pará sellar y reforzar, pegue retazos de papel por todo el borde de la piñata.
• To seal and reinforce, glue scraps of paper all around the edge of the piñata.
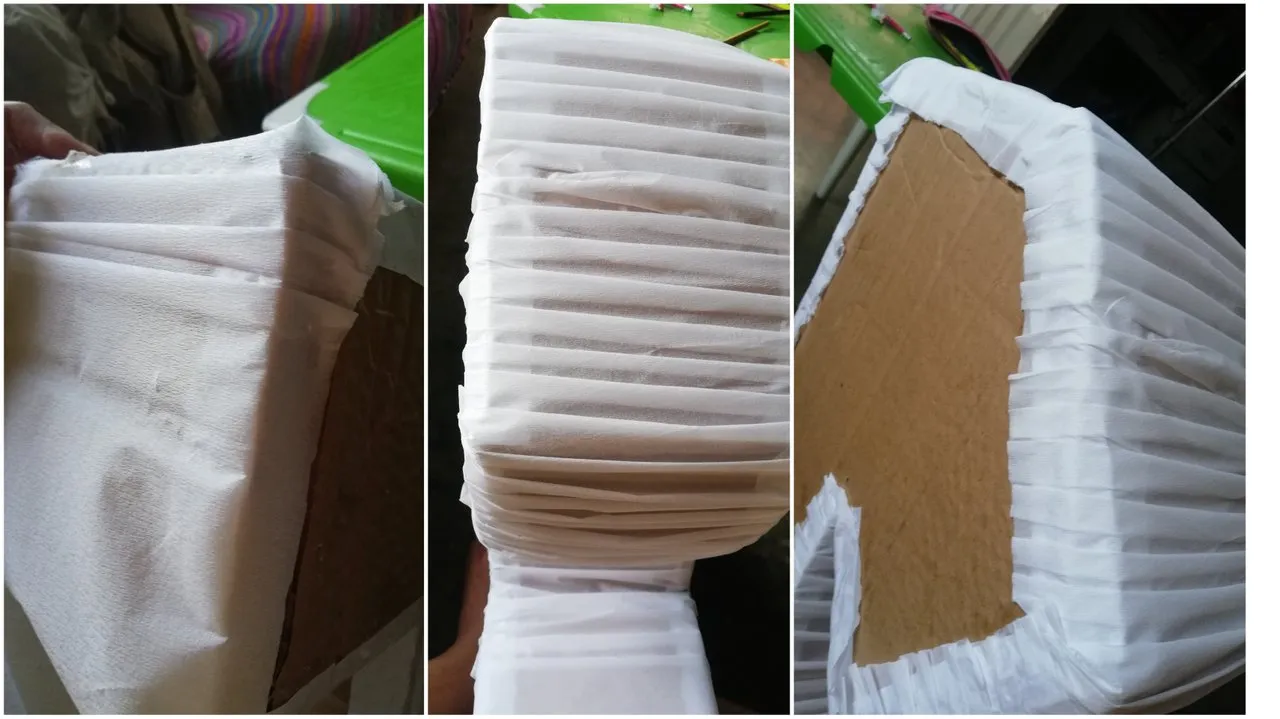
• Me dispuse a forrar, para los lados laterales utilicé el papel crepe blanco, corte un aproximado de 20cm y comencé a cubrir los bordes en forma de dobles tipo abanico.
• I lined the sides with white crepe paper, cut an approximate 20cm and began to cover the edges in the shape of a double fan.
• Para las caras delatera y trasera utilice el papel crepe verde, con semejanza al bamboo. Pará este hice cortes en el papel con un aproximado de 8cm, y luego hice varios cortes verticales, para que al abrir el papel quedase como se ve en la fotografía. Comencé a pegar hast cubrir ambas caras, siempre cuidando los laterales.
• For the front and back sides I used green crepe paper, similar to bamboo. For this I made cuts in the paper with an approximate length of 8cm, and then I made several vertical cuts, so that when I opened the paper it would look as shown in the picture. I began to glue until both sides were covered, always taking care of the sides.
•Pará la decoración | For decoration
• En un retazo de de papel bond dibuje un oso panda, luego de forma individual hice los patrones que utilizaria y los recorté, para luego trazarlos en el foami y recortar también, con marcador negro difumine la parte blanca de la cara del panda y el cuerpo.
Bonuss, en la última fotografía del Collage, mi ayudante 🤭
• On a piece of bond paper I drew a panda bear, then individually I made the patterns I would use and cut them out, then I traced them on the foami and cut them out as well, with black marker I blurred the white part of the panda's face and body.
Bonuss, in the last picture of the collage, my assistant 🤭

• Comencé a armar el panda, pegando de forma cuidadosa todas sus partes. Luego con pintura blanca le di un poco de luz a la nariz y a los ojos.
• I started to assemble the panda, carefully gluing all its parts. Then with white paint I gave some light to the nose and eyes.
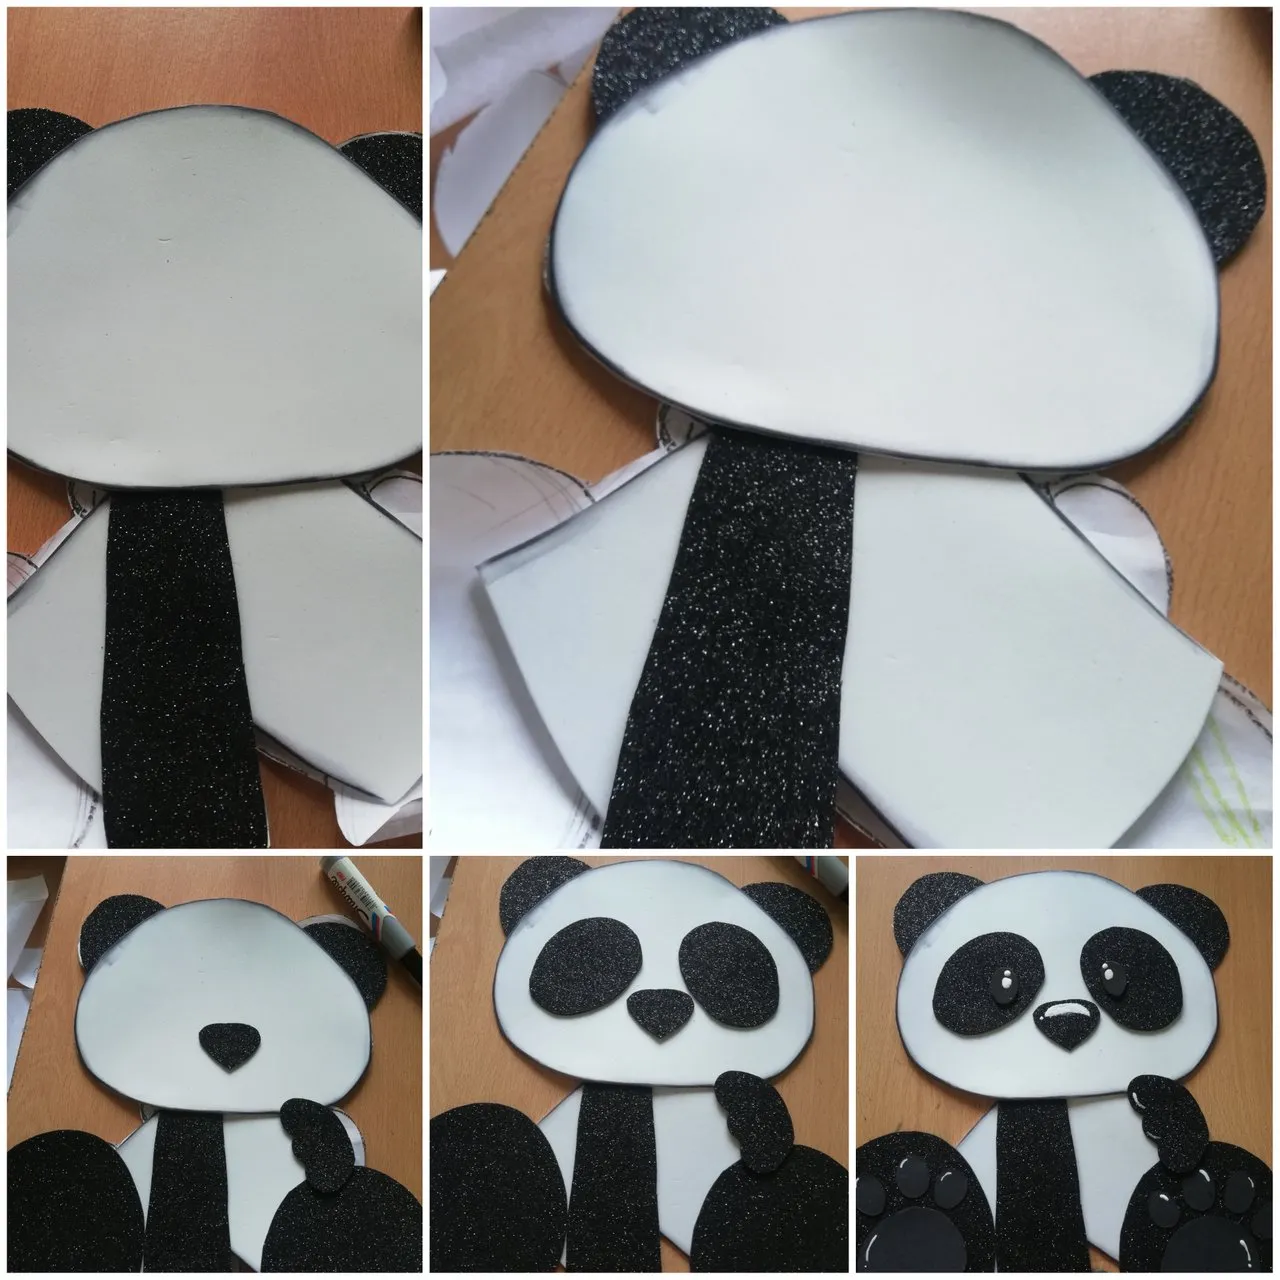
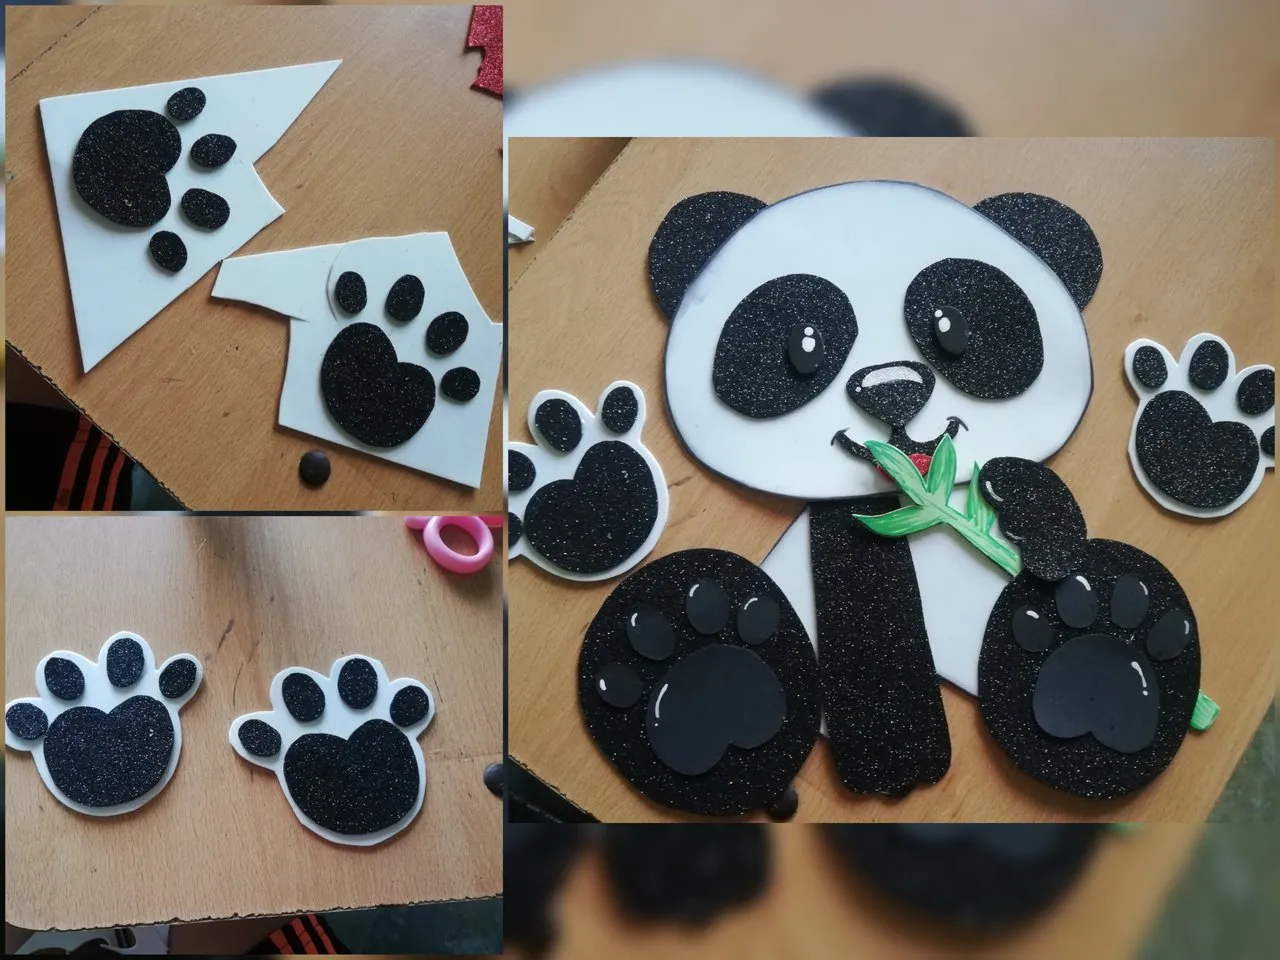
• Le realice la boca, y pegue una especie de rama de bamboo hecha en foami verde. Adicional realice dos huellas y las pegue en el foami blanco, para luego recortar dejando un pequeño borde.
• I made the mouth, and glued a kind of bamboo branch made in green foami. I also made two footprints and glued them on the white foami, and then cut them out leaving a small border.
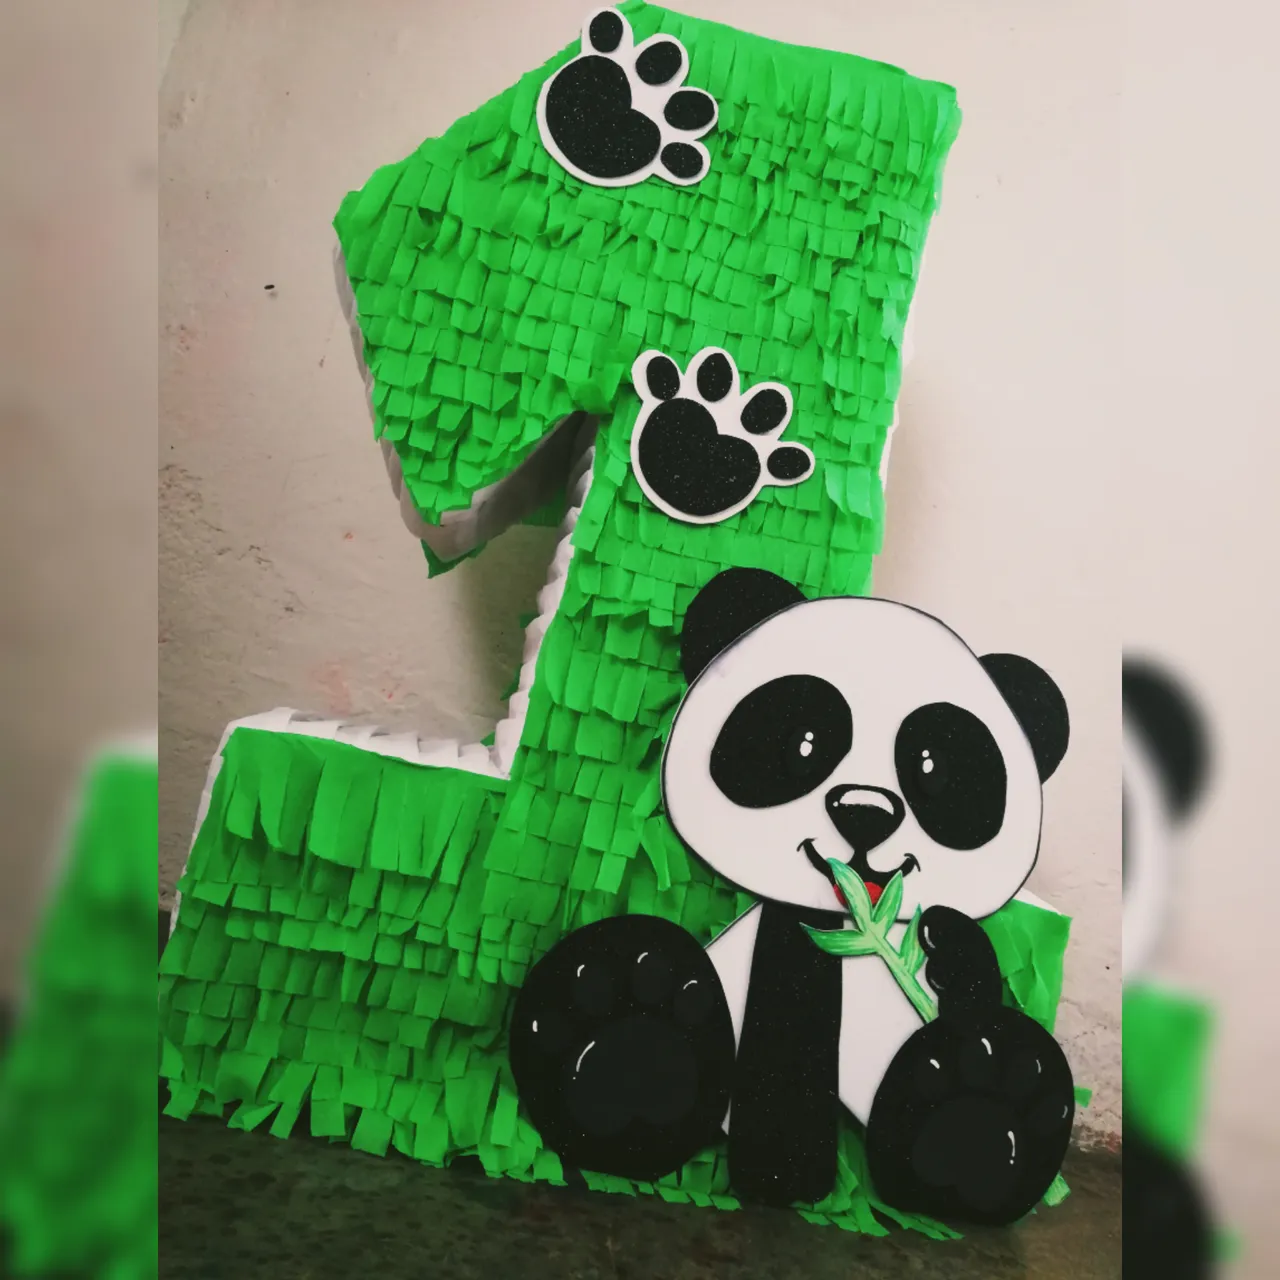
• Una vez hecho todo, pegue a la piñata. Culminando así este hermoso trabajo..
• Once everything is done, glue to the piñata. Thus culminating this beautiful work.
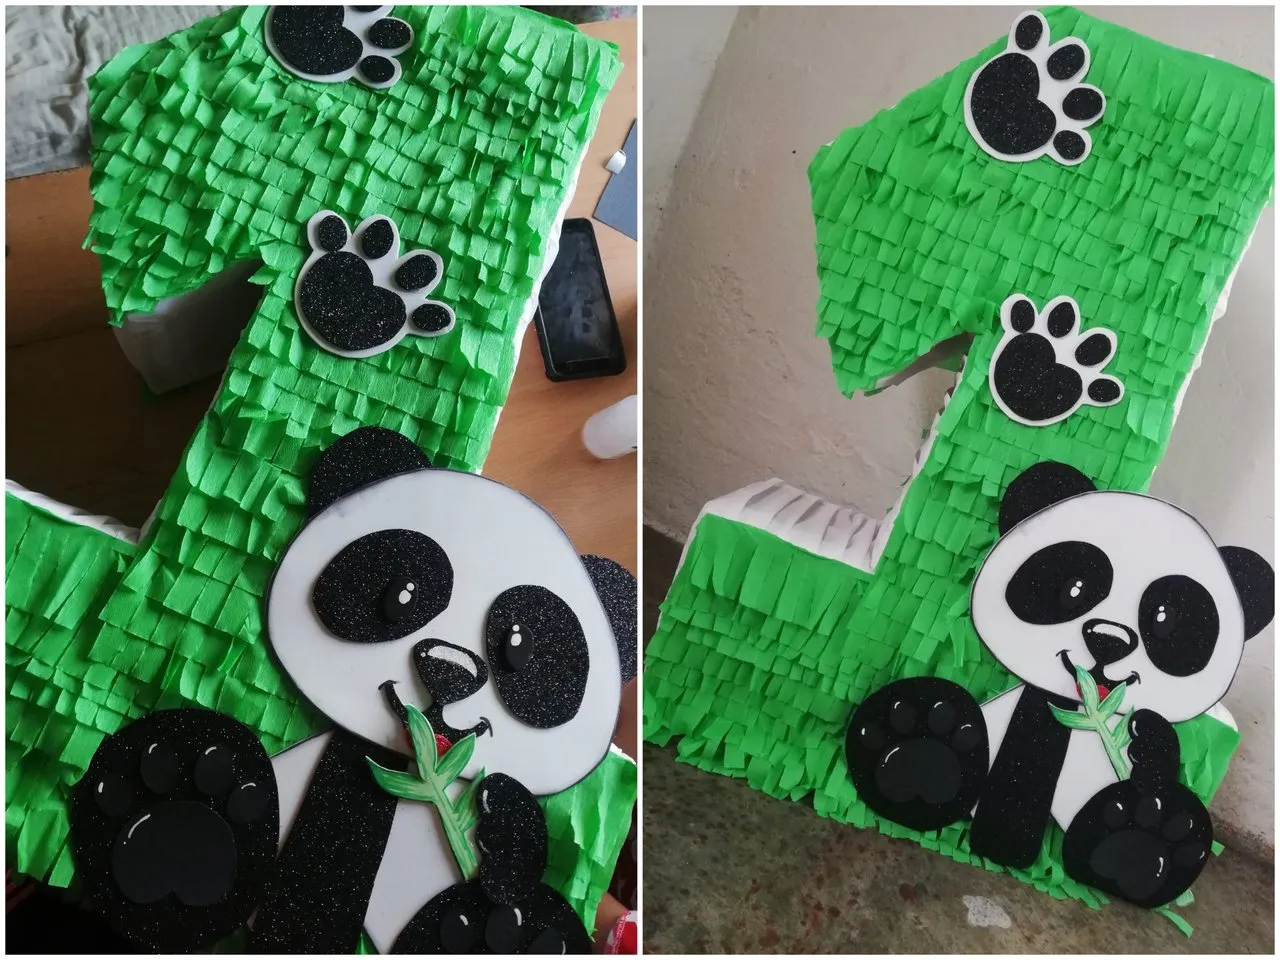
Resultado Final | Final Result

Espero les guste esta publicación amigos.. HASTA PRONTO💜✨
I hope you like this post friends.... SEE YOU SOON💜✨
Ediciones en Canva y Picstar | Editing in Canva and Picstar
Traducciones en Deepl.com | Translations in Deepl.com