ENGLISH CONTENT
Hello to all the members of this community and lovers of sewing! I am very happy to bring you my participation in the contest created to make something cute for our beloved pets. I love sewing contests and I still regret not having been able to participate in the Barbie clothes contest (those days I wasn't feeling very good and I had to stop everything), but in the future, I hope to show you when I resume that project that I had to leave halfway 😅
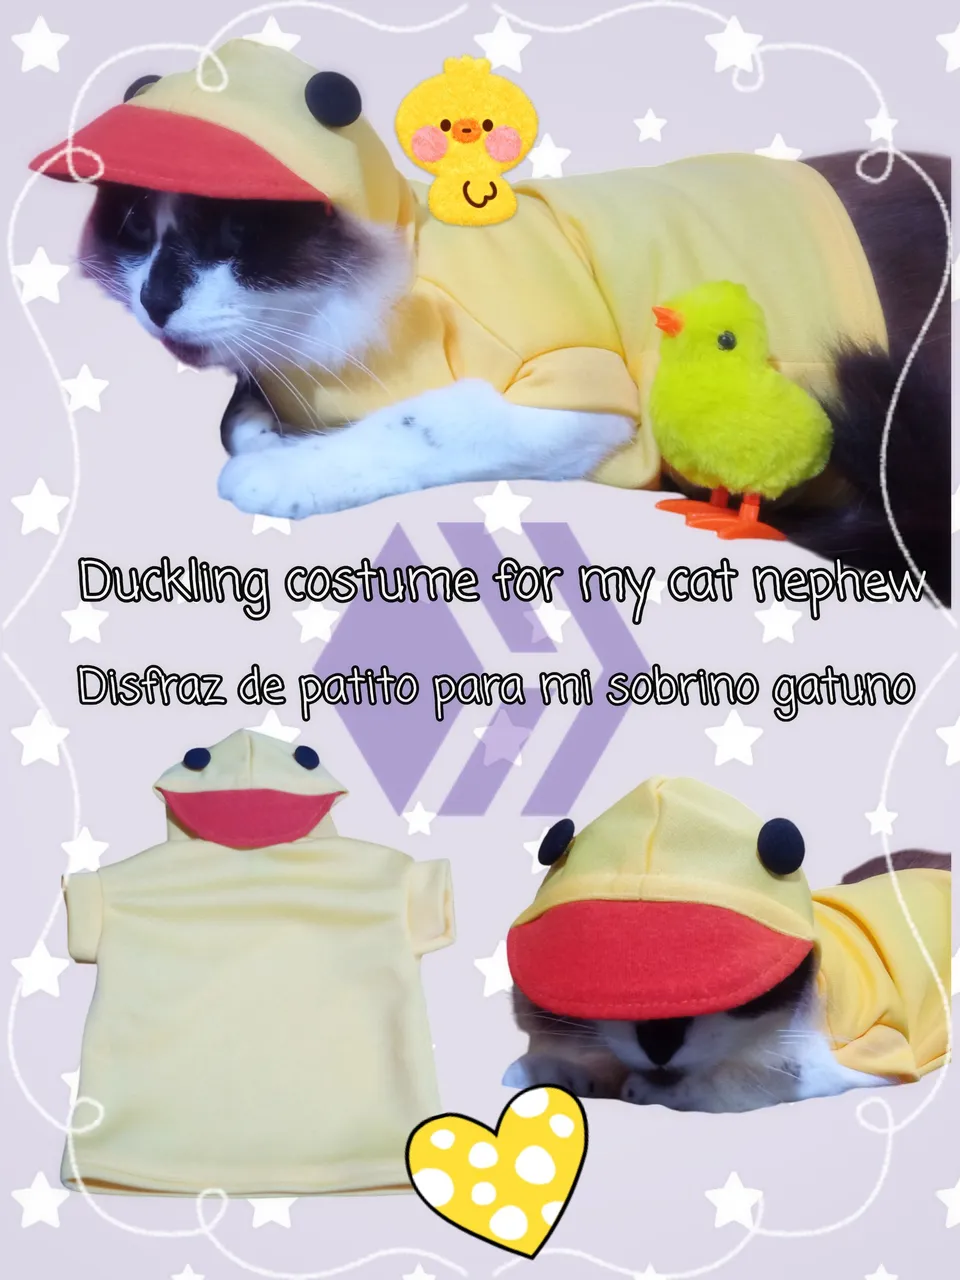
But anyway... I definitely wanted to try to enter this contest to make up for the above, so I asked my sister what she wanted me to make for Ying, her cat and therefore, my feline nephew. In my last year's entry, I made him a cute shark hood, but this time, my sister told me she wanted a duck costume. I thought it was perfect because Ying is such a cute kitty.
Luckily, I had 1/4 m of yellow spandex fabric, as well as a small piece of orange fabric that was from an old sleeve or something, but the color seemed perfect to work with on the project. The first thing I did was take Ying's measurements... a bit of a complicated process because when I started working on the costume, Ying was sleeping, so you could see that he was sleepy when I moved him 😅
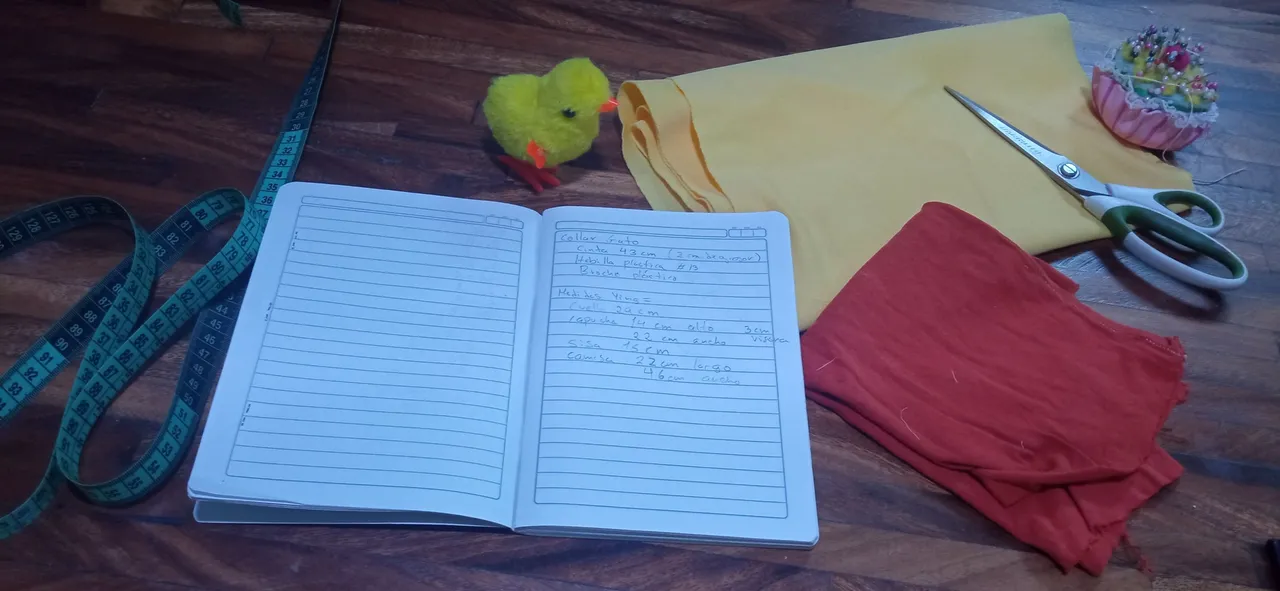
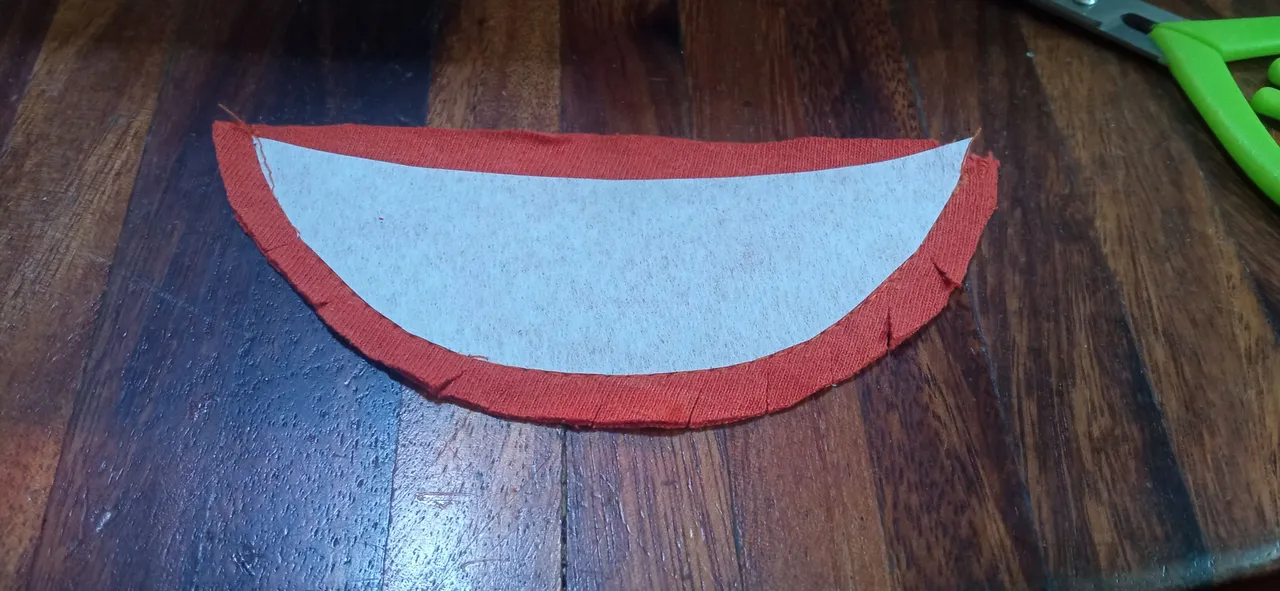
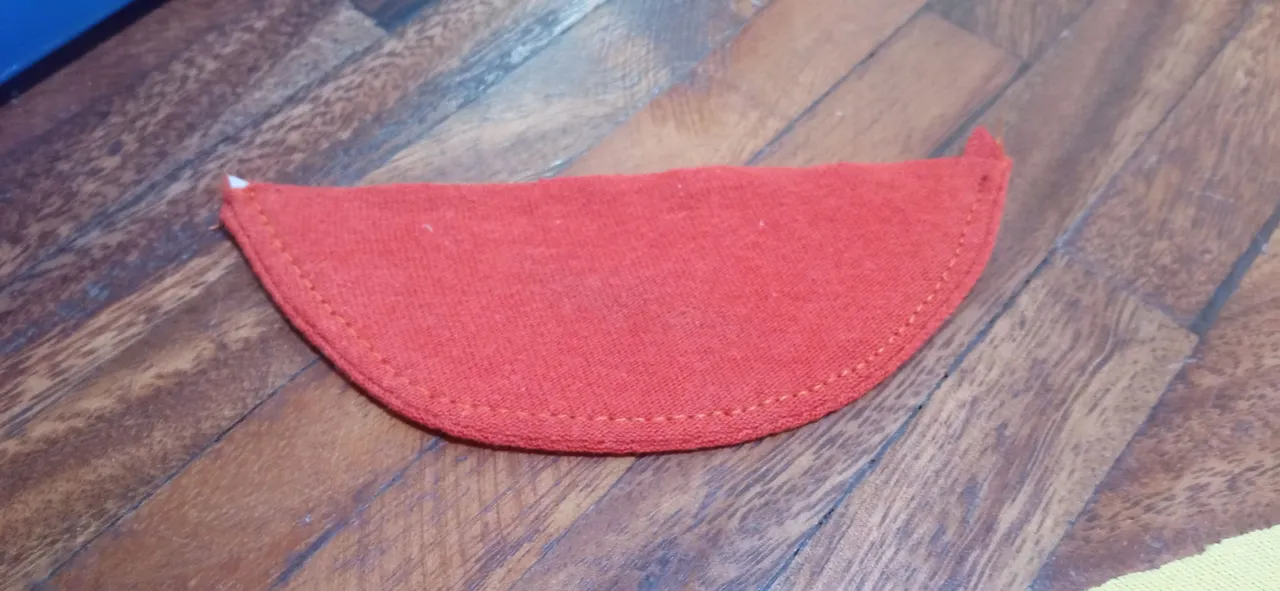
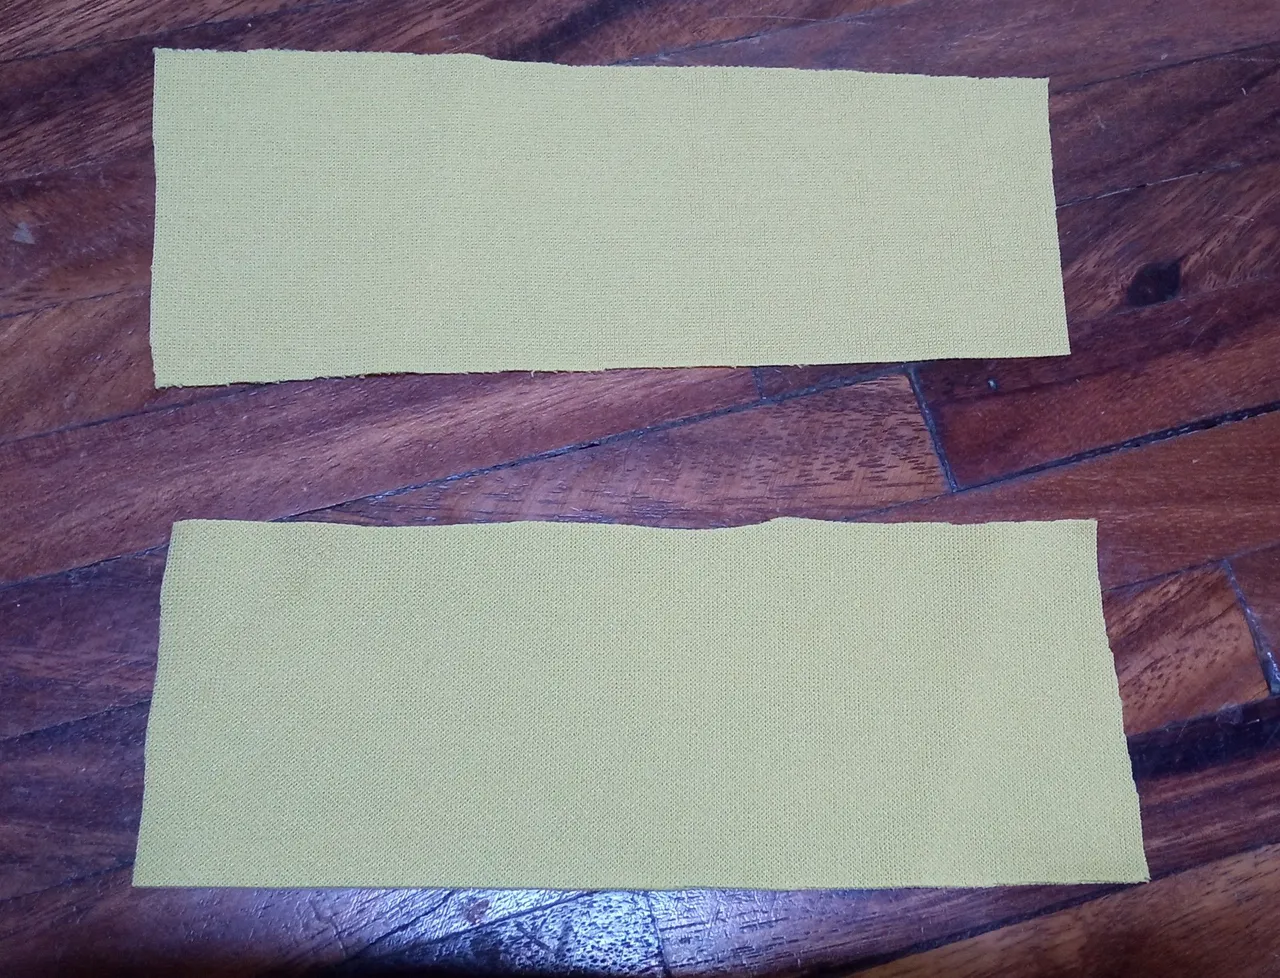
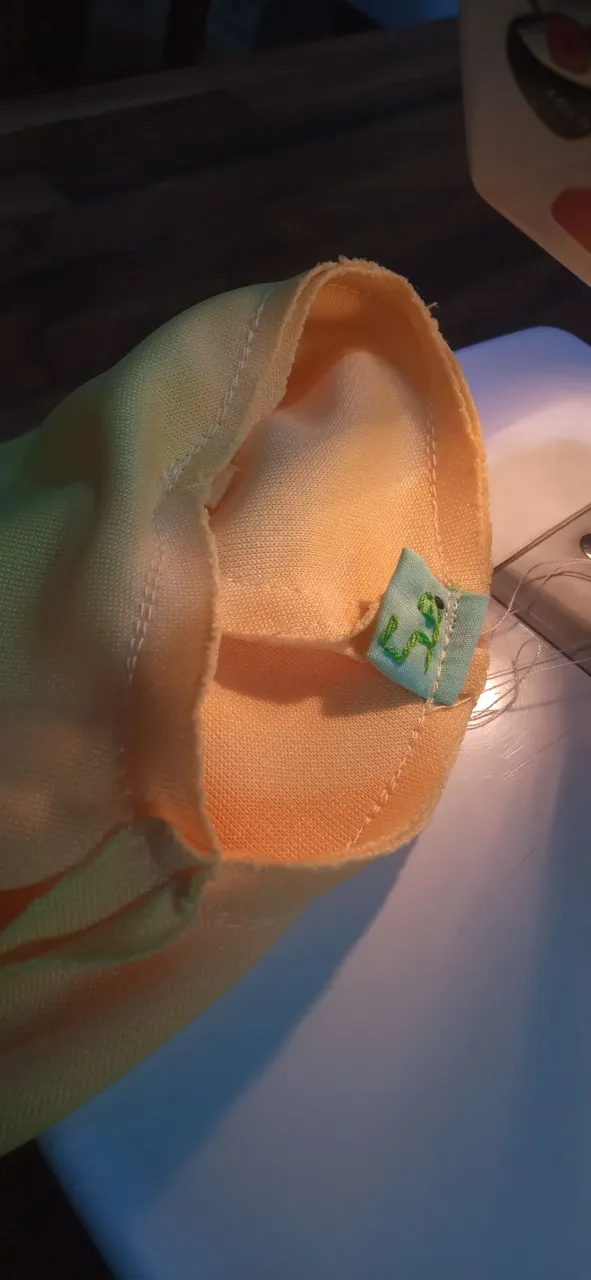
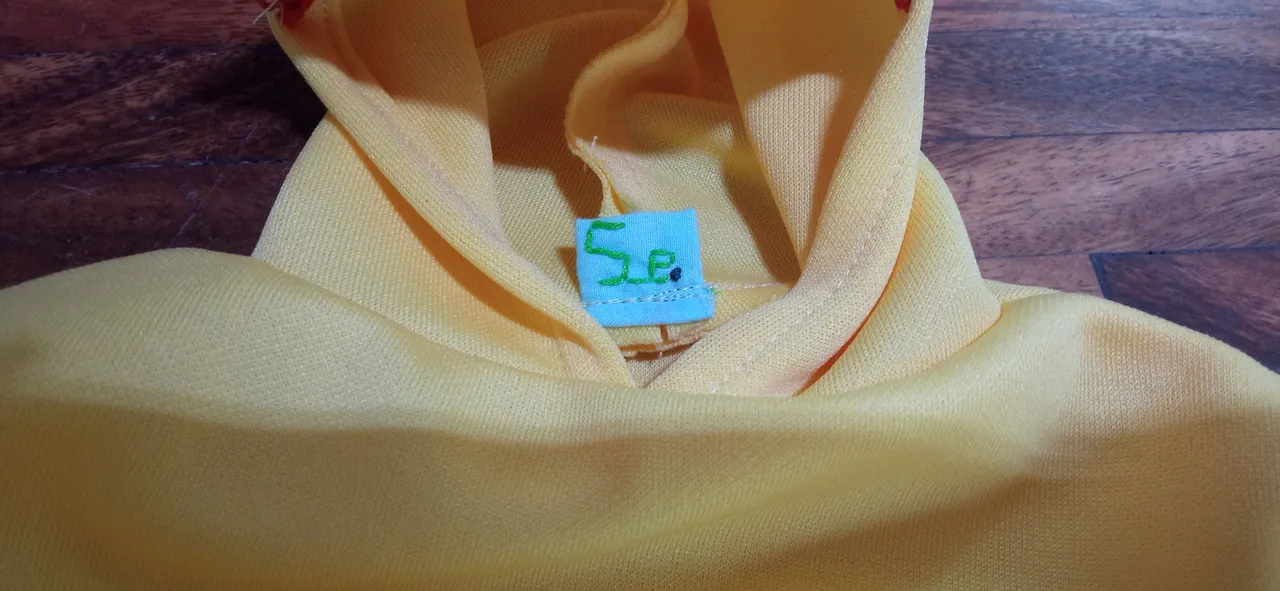
I drew the pieces directly on the fabric (because I don't have any pattern paper at the moment 😅), using the measurements I took. I cut a front piece, a back piece, two for the hood, two pieces for the duck's beak, to which I glued a little piece of interfacing, and luckily I had one of my miniature labels ready, perfect for small projects 😉
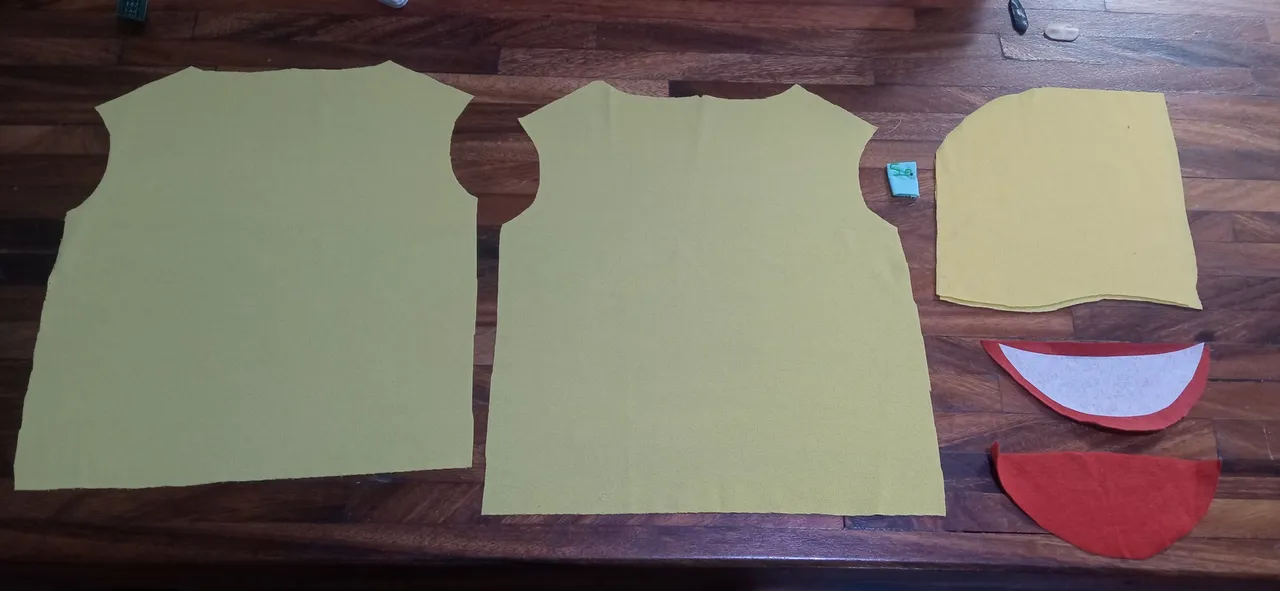
I started by sewing the beak. On one of the pieces, as I mentioned, I ironed on a small piece of interfacing. I sewed, turned the piece over and flattened it with a straight seam. In this way, the duck's beak was ready.
 |  |
|---|
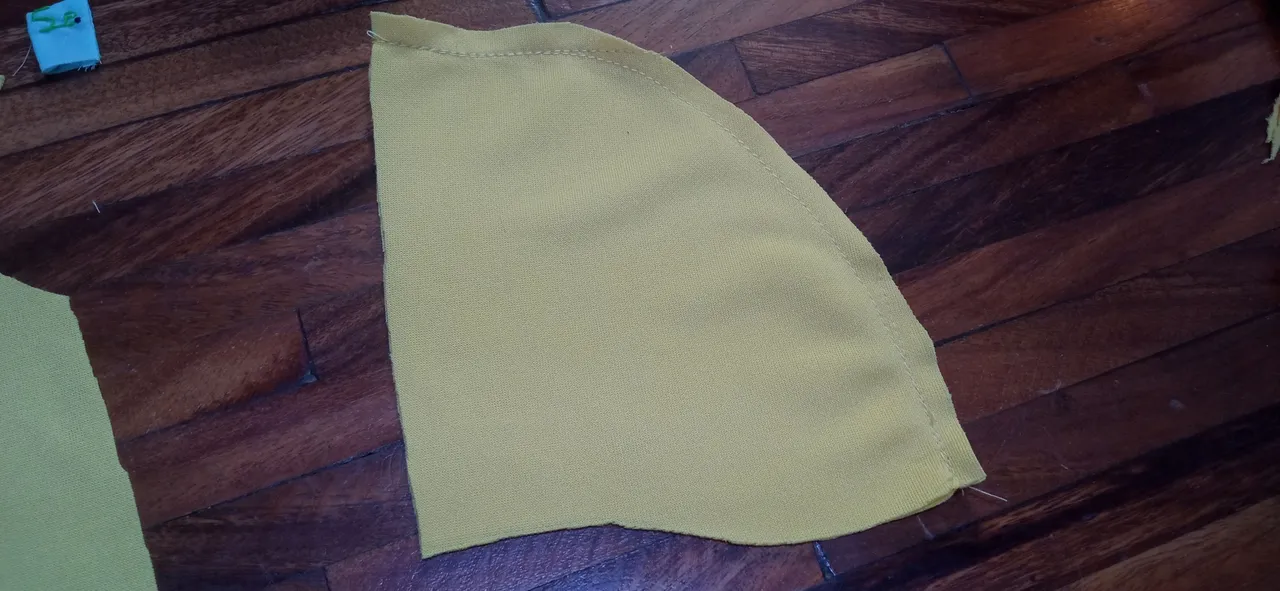
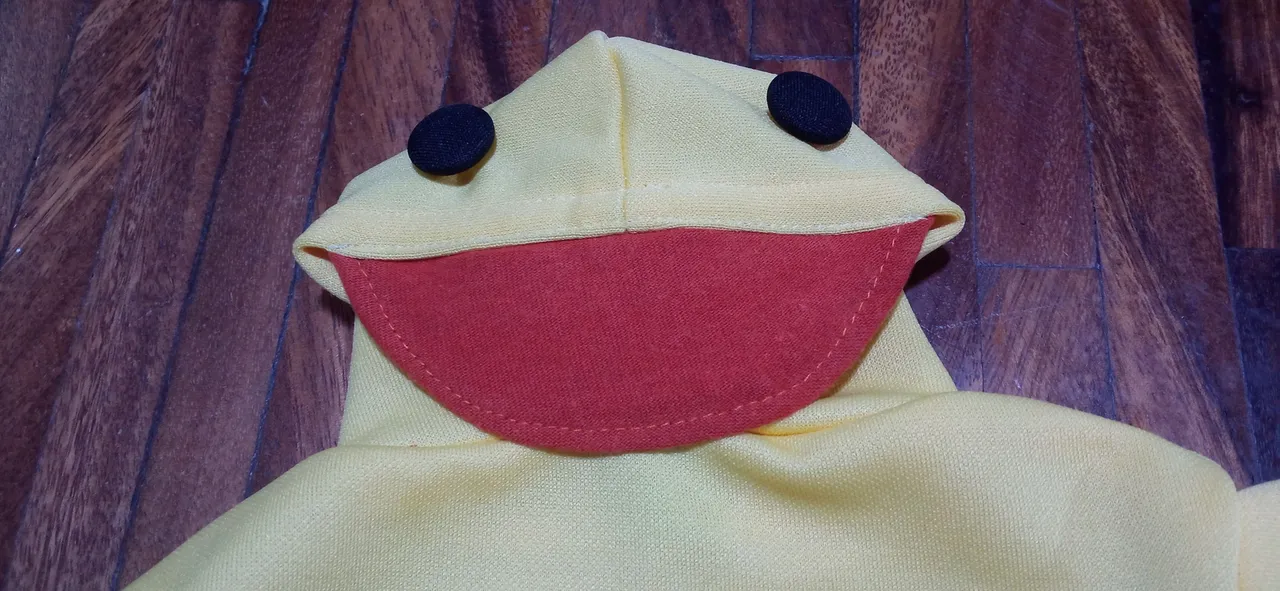
Next, I moved on to the hood. I closed the piece at the wavy part and then proceeded to hem the front of the hood and sew the visor piece (the duck's beak).
 | 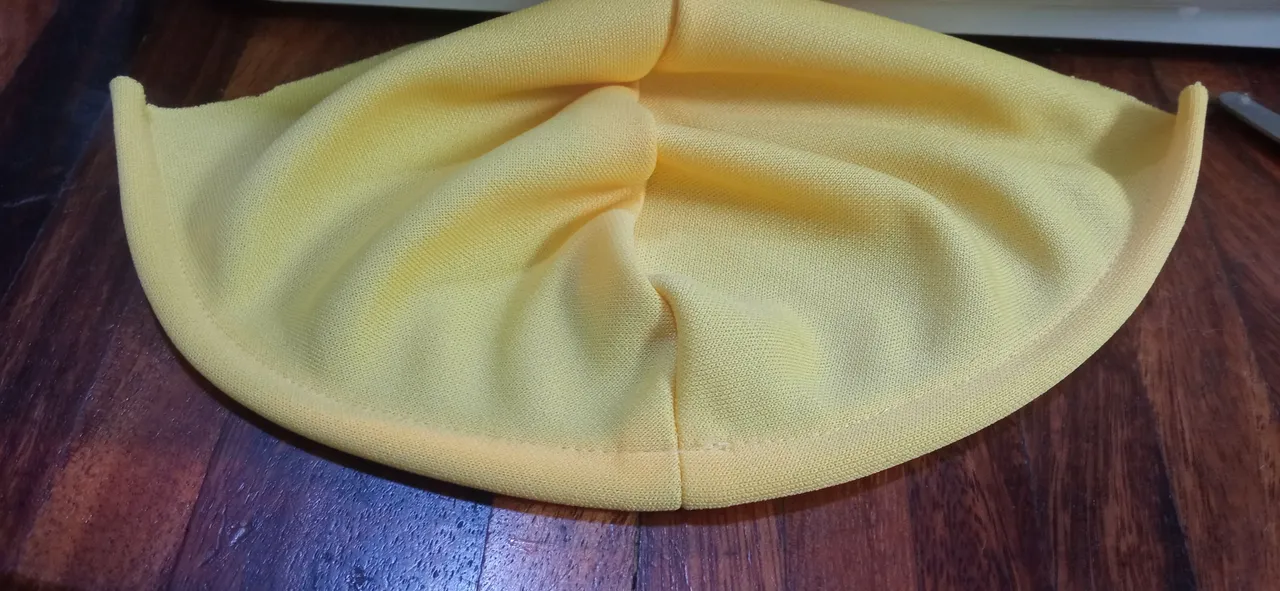 | 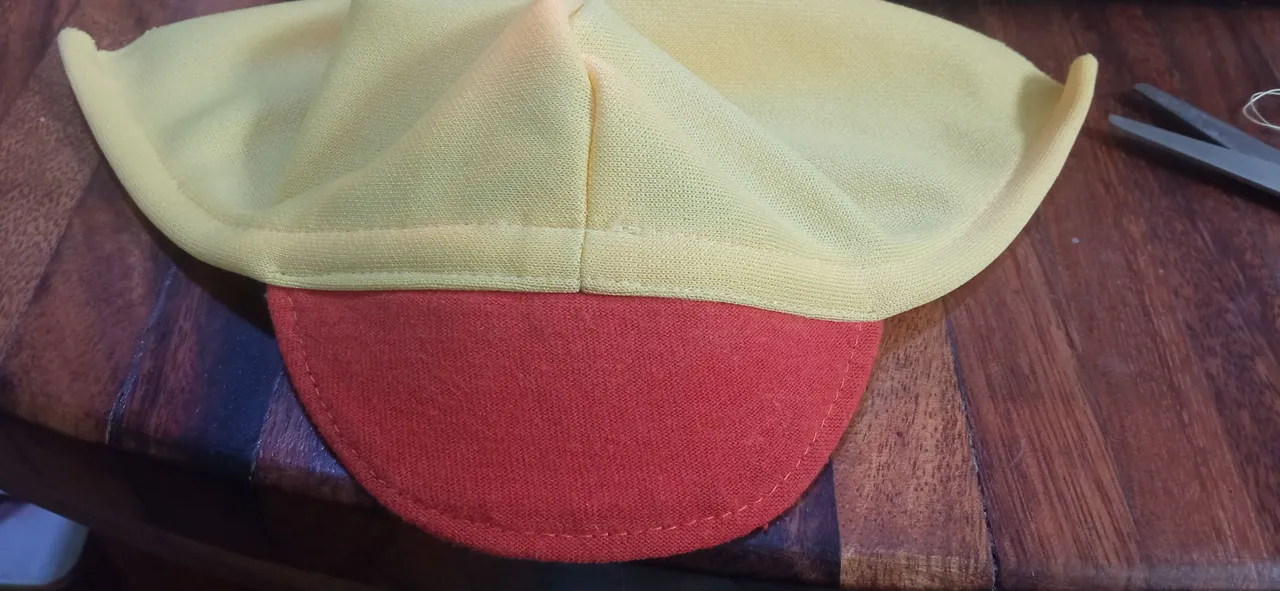 |
|---|
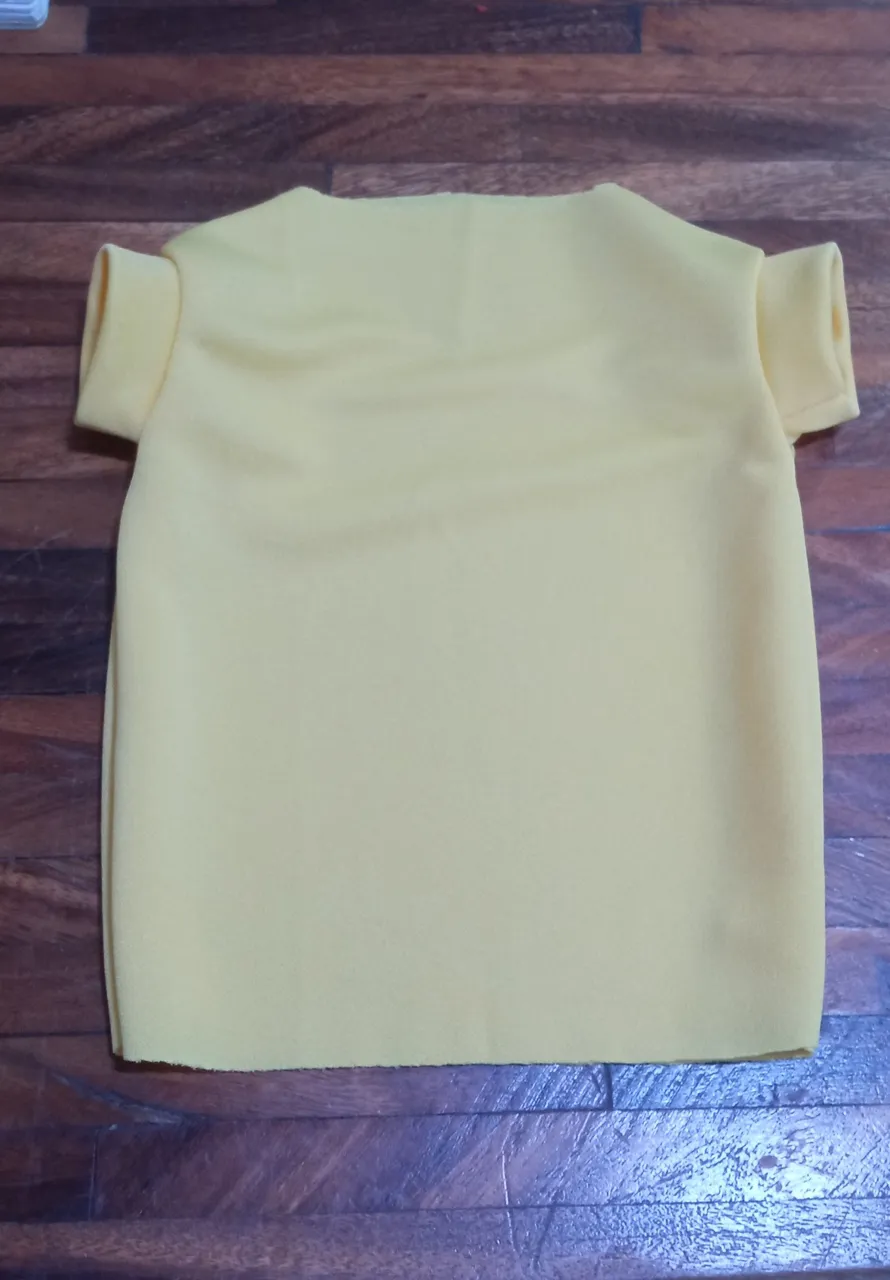
With the hood ready, I joined the front and back pieces from the shoulder area (measuring a cat makes it too cute 😜) and closed the sides as well. It is worth mentioning that I usually add a safety seam to the pieces I make, using the zigzag stitch (since, at the moment, I do not have an overlock), although on this occasion, I opted to just rely on the straight seam.
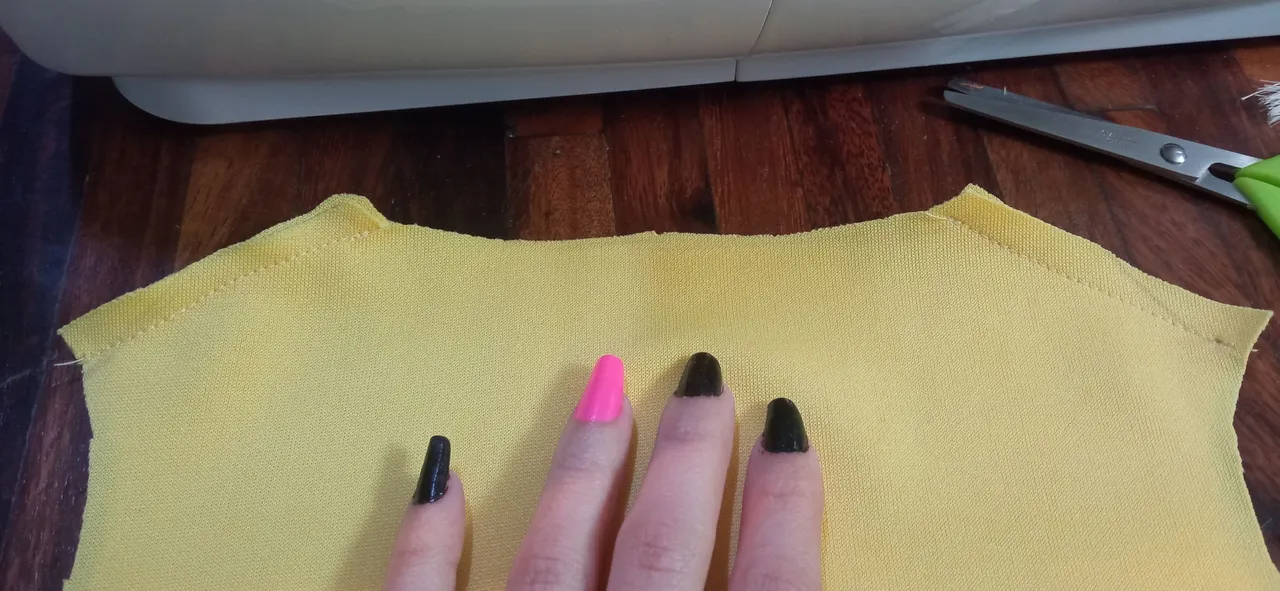 |  |
|---|
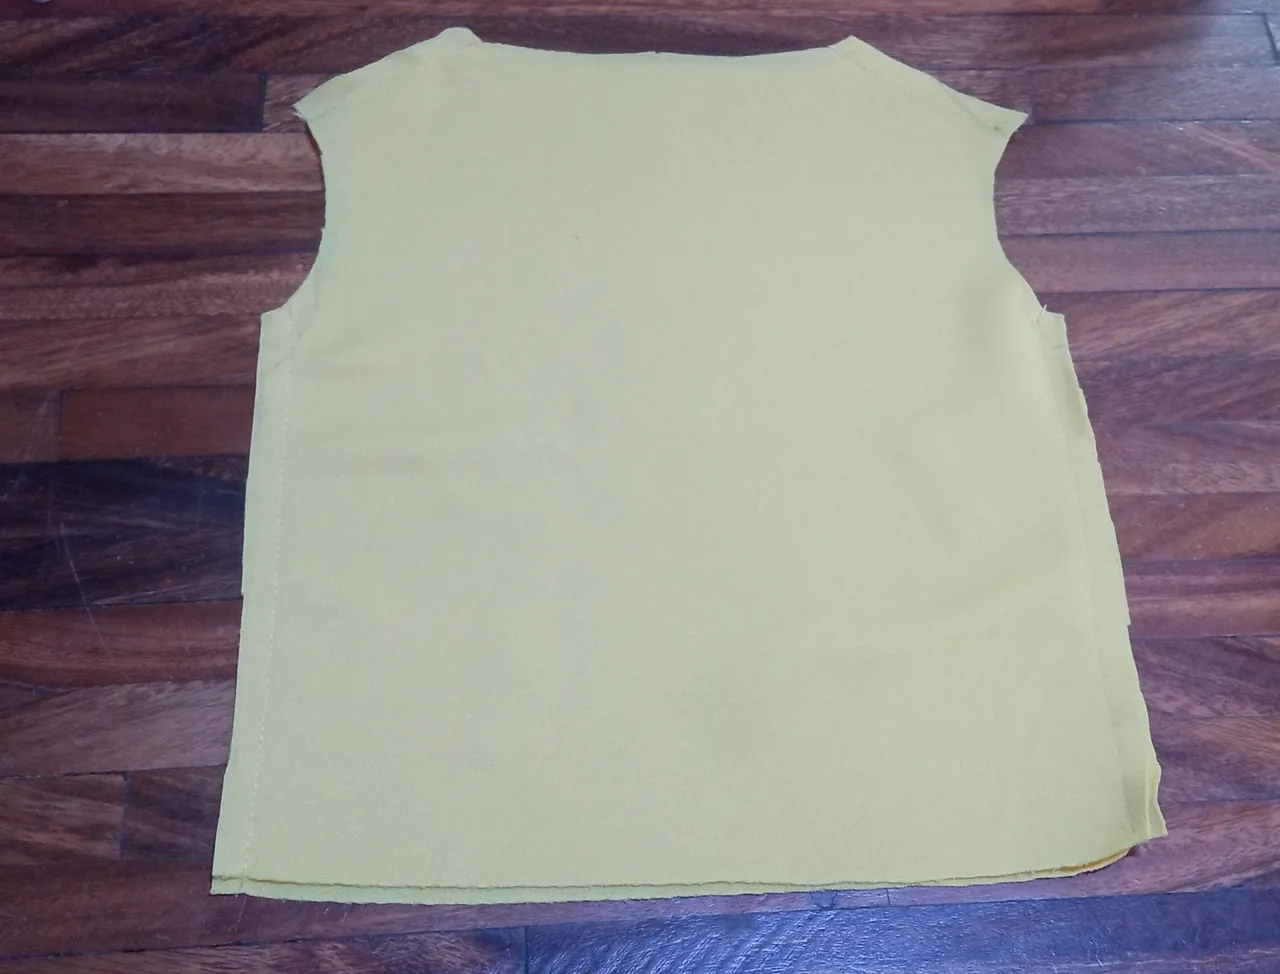
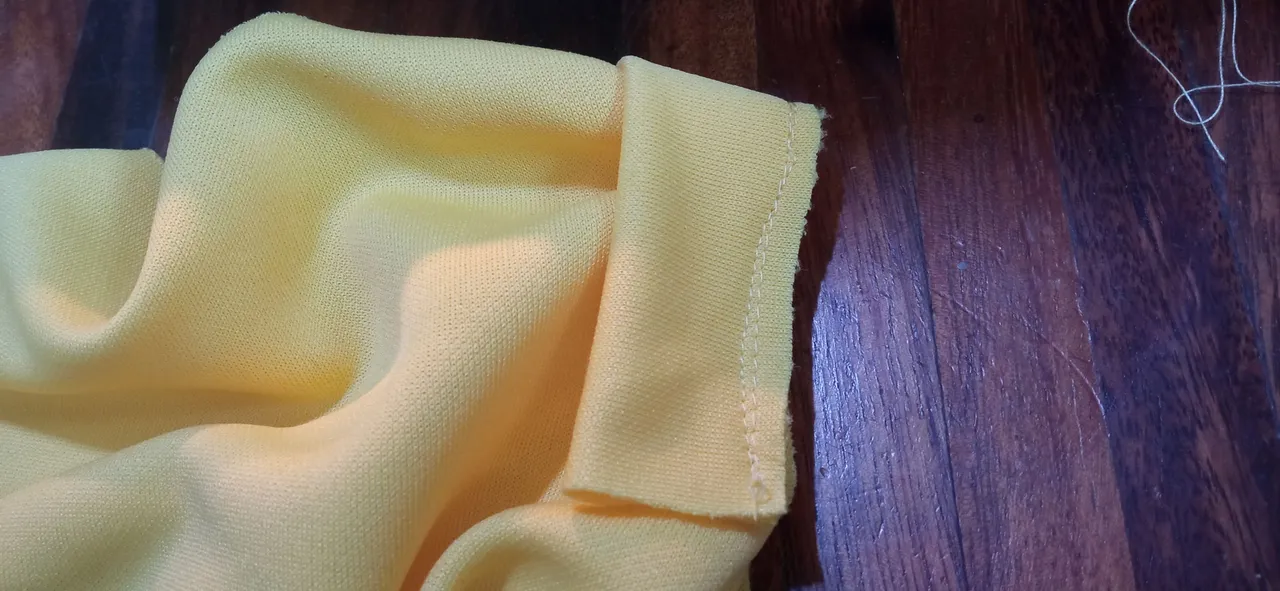
I had thought about leaving it as a kind of T-shirt, that is, not adding sleeves. However, hemming it seemed complicated, so I thought about adding some pieces of fabric that would serve as a kind of small sleeves. I think it was a good decision because it looks more delicate.
 |  |  |
|---|
 |  |
|---|
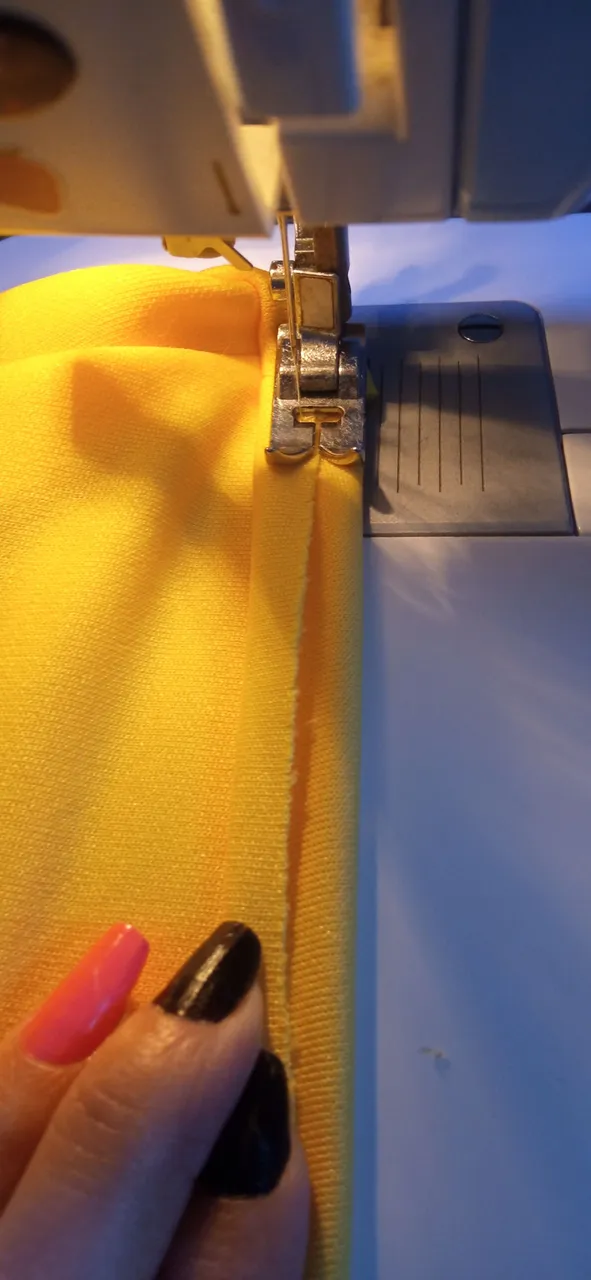
For the hem of the bottom of the costume, I thought about using one of the stitching types that my machine comes with. I'll be honest, I don't know what most of those stitches are for haha (I need to learn that 🙃) so I tried it with figure H.
 |  | 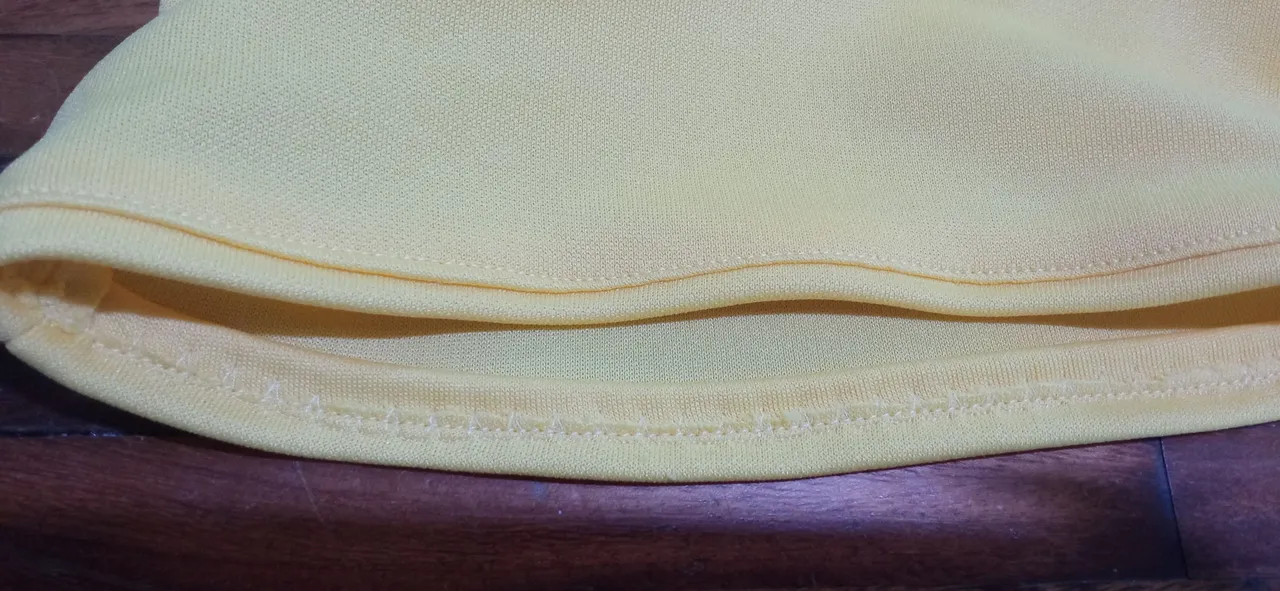 |
|---|
I thought it was the stitch for making invisible seams, but... either I didn't do it right or it's not that stitch. Either way, I liked it because after making a straight seam on the outside of the piece, it looked pretty nice... so, I'm not complaining about the experiment 😅

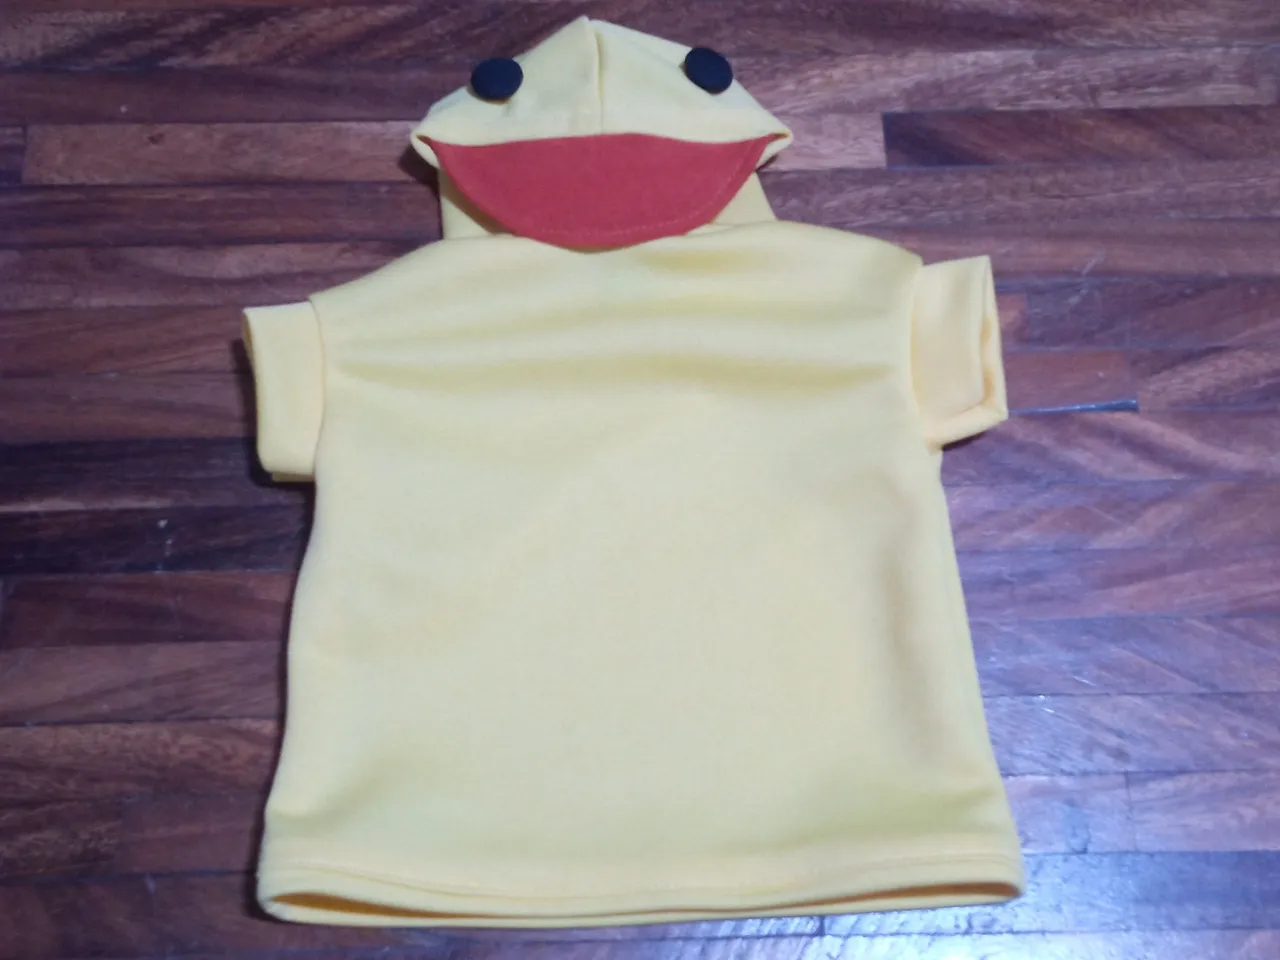
After this, I went on to attach the hood piece to the shirt I had just finished. I also took advantage of sewing the label to make it more stylish 😌
 |  |  |
|---|
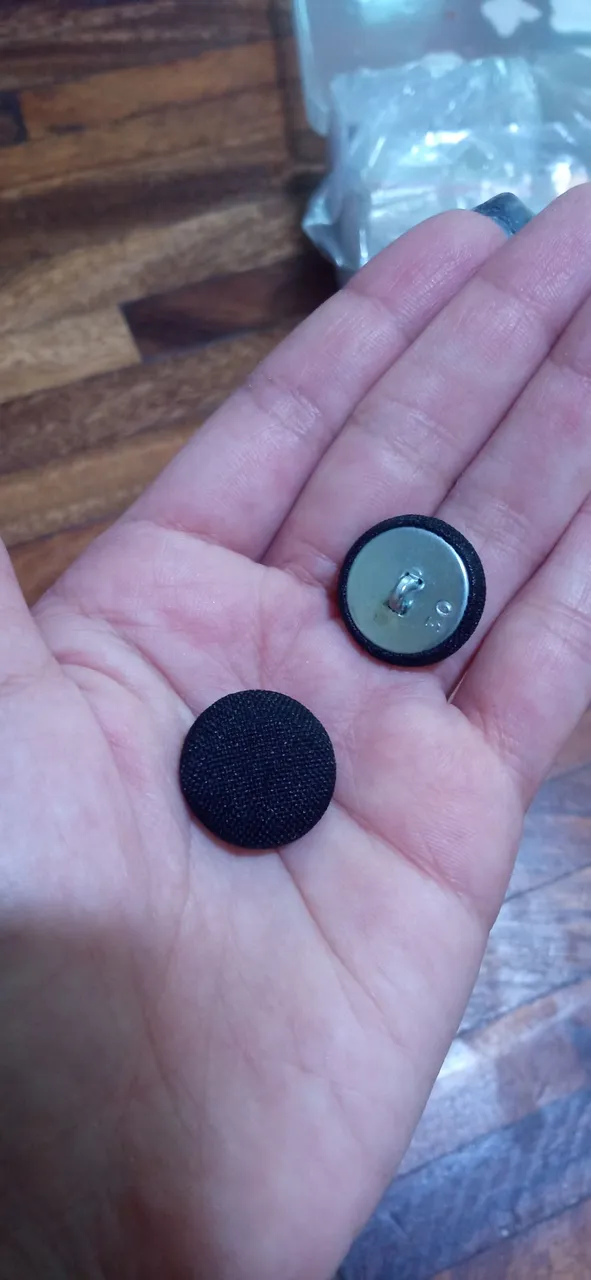
Finally, for the duck's eyes, I used some black covered buttons that I had in my button box, which I sewed on by hand. With this, the duck costume was finished.
 |  |  |
|---|
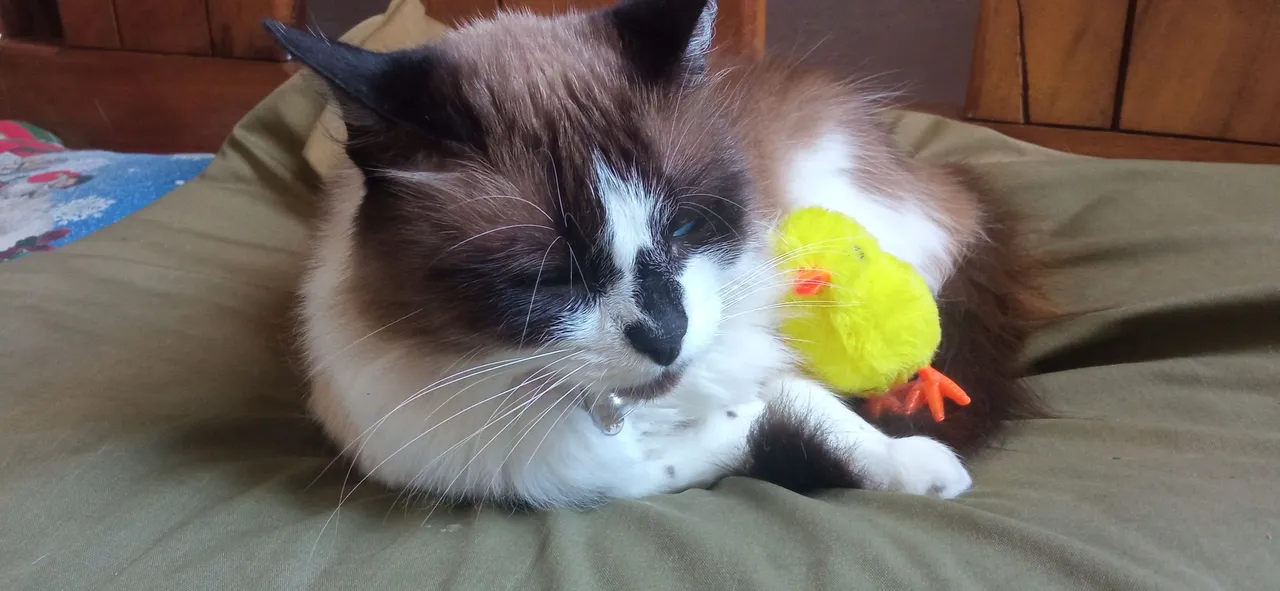
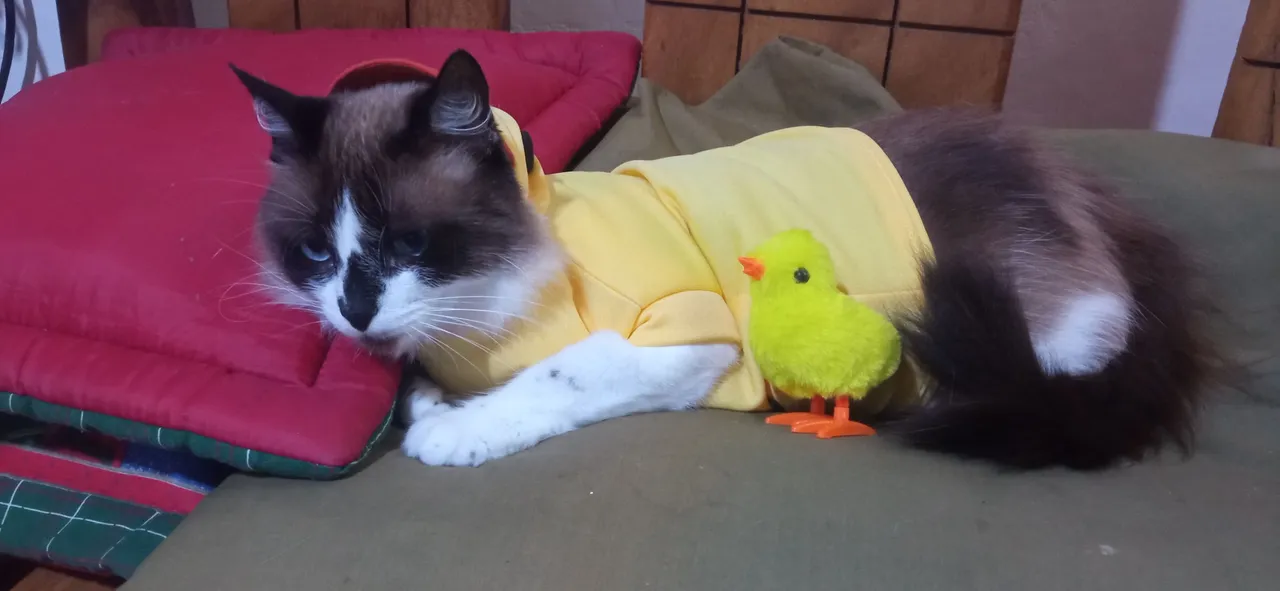
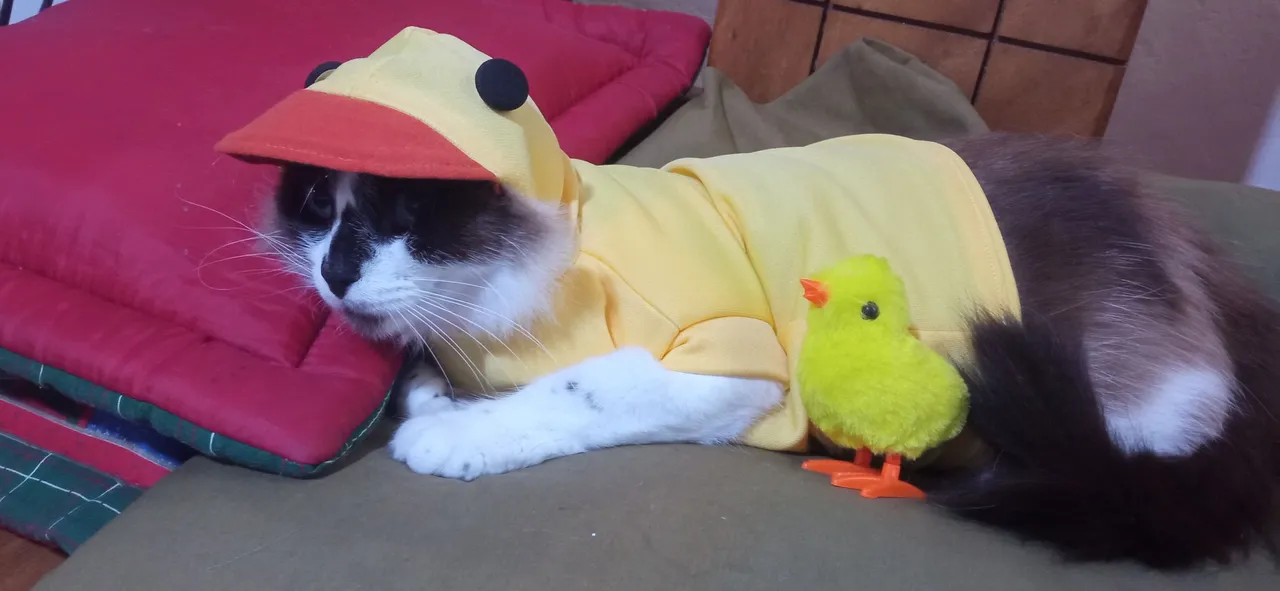
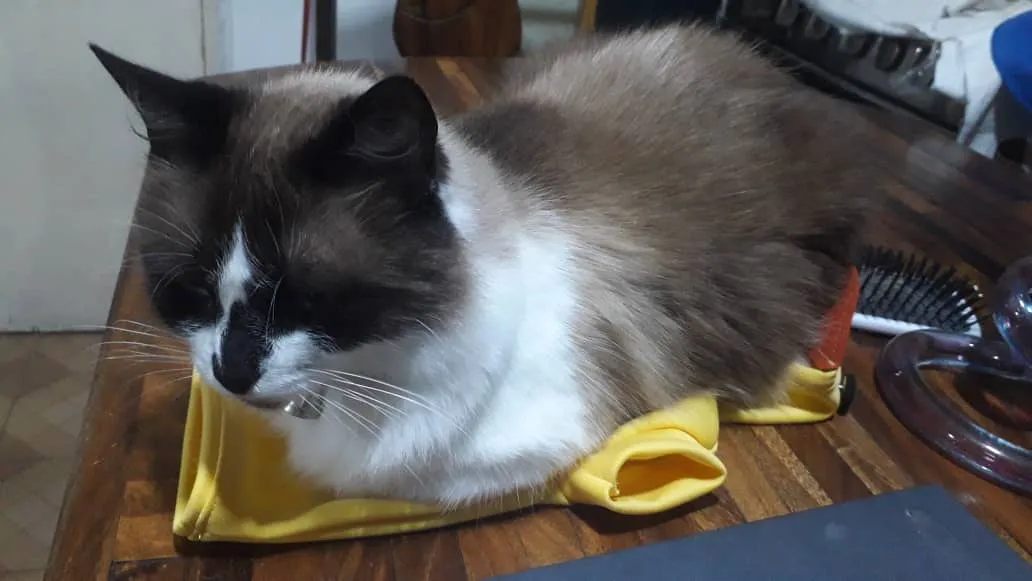
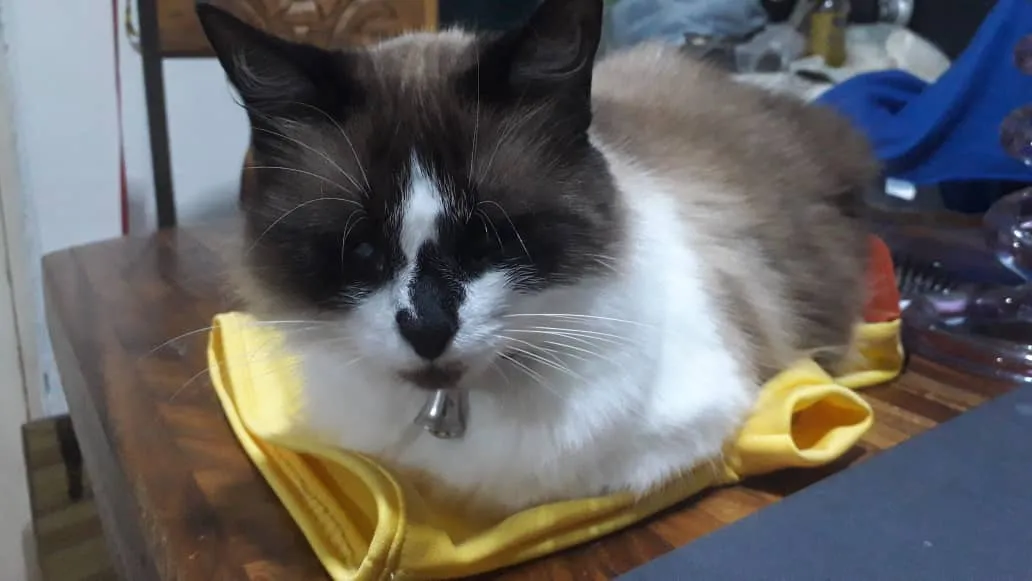
When my sister arrived and saw the costume, she was delighted. After a while, when it got dark, Ying recognized her scent on the costume and used it as a mat to rest for a while. Well, whatever, we know that at least she can use it as a nest to take naps 🤣

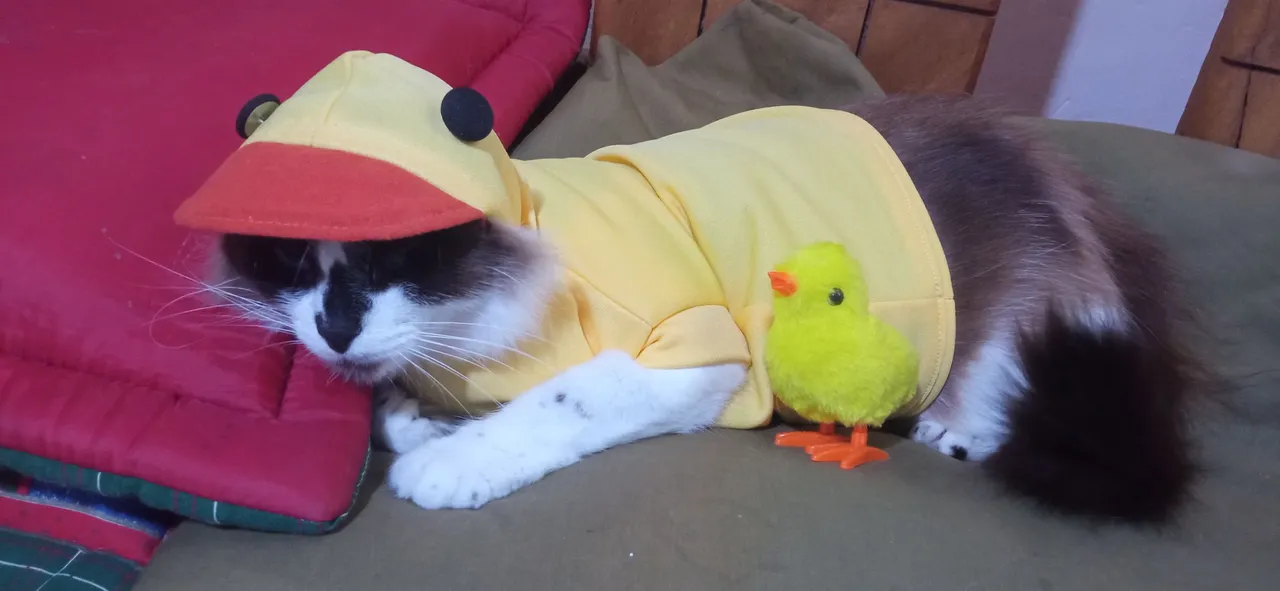
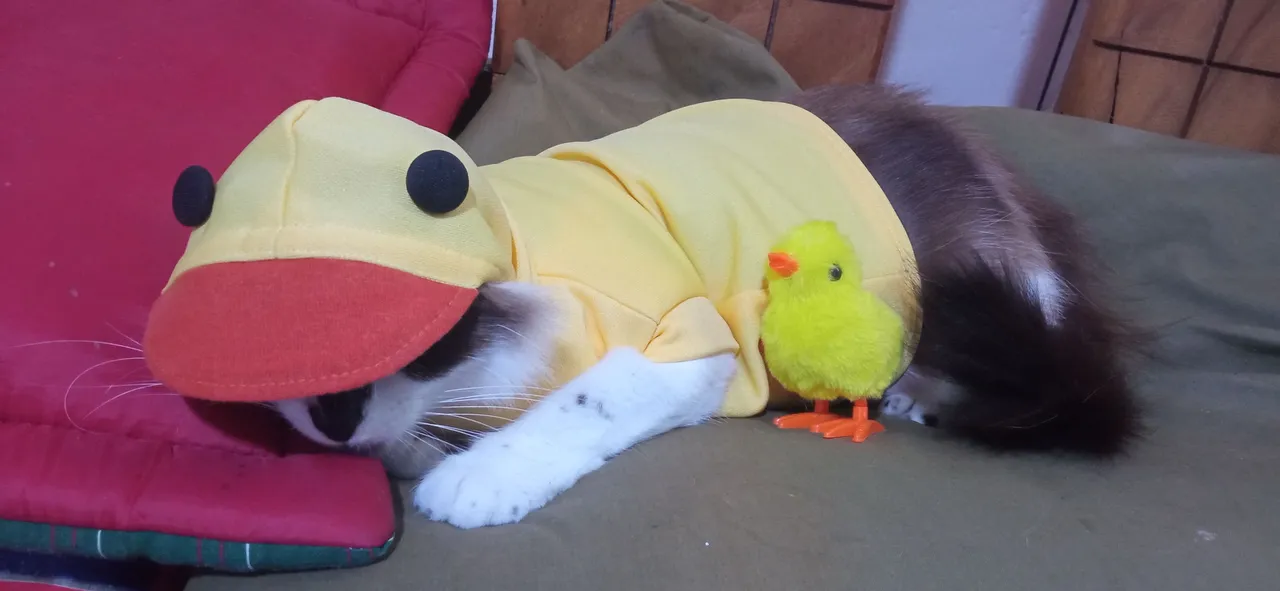
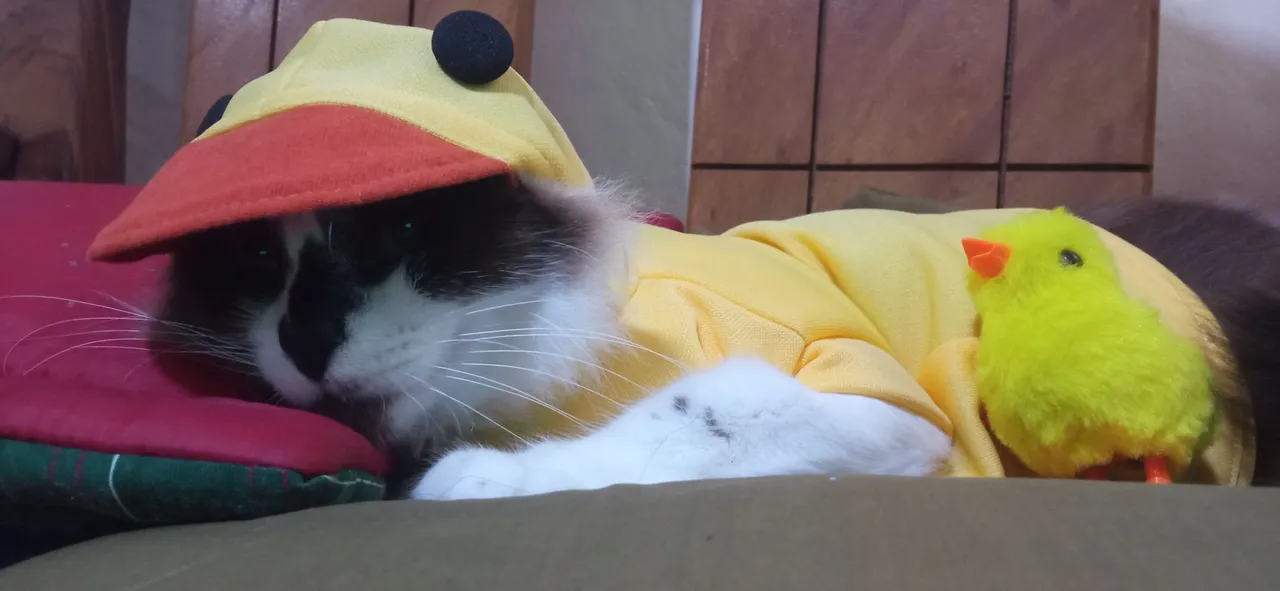
✨🐤 Now, the photo shoot! 🦆✨
 | 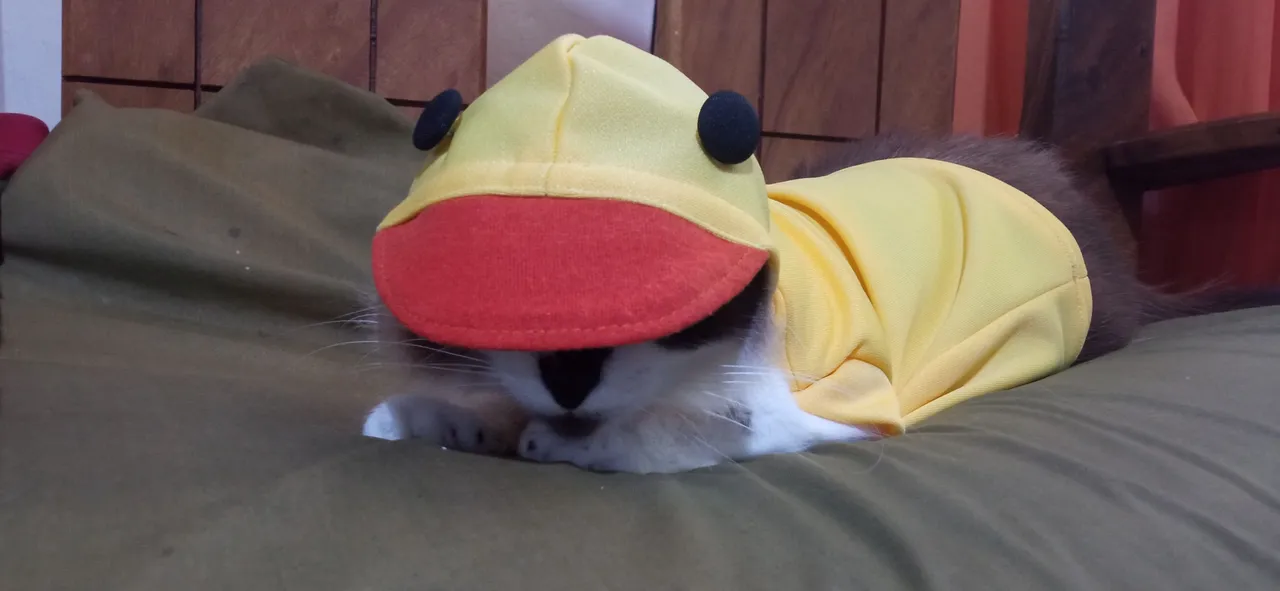 |  |
|---|
It is necessary to clarify that when trying on the costume, Ying was in the mood to sleep... so he doesn't seem very happy that his aunt interrupted his nap to put a strange thing on him 🤣 but hey, Ying is sleeping most of the time, so it was now or never 😅
 |  |  |
|---|
When my sister arrived and saw the costume, she was delighted. After a while, when it got dark, Ying recognized her scent on the costume and used it as a mat to rest for a while. Well, whatever, we know that at least she can use it as a nest to take naps 🤣
 |  |
|---|
Thank you very much for visiting my post. I hope you found it interesting.
Until next time!
CONTENIDO EN ESPAÑOL
¡Hola a todos los integrantes de ésta comunidad y amantes de la costura! Con mucha alegría vengo a traerles mi participación en el concurso creado para fabricarles algo lindo a nuestras queridas mascotas. Me encantan los concursos de costura y todavía lamento no haber podido participar en el de ropa para Barbies (esos días no me sentía muy bien de ánimo y tuve que paralizar todo), pero en un futuro, espero igual mostrarles cuando retome ese proyecto que tuve que dejar a medias 😅
Pero, en fin... definitivamente quería intentar participar en éste concurso para resarcir lo antes mencionado, así que le pregunté a mi hermana qué quería que le hiciera a Ying, su gato y por tanto, mi sobrino gatuno. En mi participación del año pasado, le realicé una linda capucha de tiburón, pero ésta vez, mi hermana me dijo que quería un disfraz de patito. Me pareció perfecto porque Ying, es un gatito muy tierno.
Por suerte, contaba con 1/4 m de tela licrada de color amarillo, así como un pedacito de tela naranja que era de una manga vieja o algo así, pero cuyo color, me pareció perfecto para trabajar en el proyecto. Lo primero que hice, fue tomar las medidas de Ying... proceso algo complicado porque cuando comencé a trabajar en el disfraz, Ying estaba durmiendo, así que se le veía que estaba somnoliento cuando lo movía 😅
Dibujé las piezas directamente sobre la tela (porque no tengo papel para patrón en estos momentos 😅), utilizando las medidas que tomé. Corté una pieza delantera, una trasera, dos para la capucha, dos piezas para el pico del pato a la cual, una le pegué un pedacito de entretela y por suerte tenía lista una de mis etiquetas miniatura, perfecta para proyectos pequeños 😉
Comencé cosiendo el pico. En una de las piezas, como comenté, pegué con la plancha un pedacito de entretela. Cosí, volteé la pieza y la pisé con una costura recta. De ésta forma, el pico del patito, estuvo listo.
| |
|---|
Luego, pasé a la capucha. Cerré la pieza en la parte más ondulada para después, proceder a realizar un dobladillo en la parte delantera de la capucha y coser la pieza de la visera (el pico del pato).
| | |
|---|
Teniendo la capucha lista, uní las piezas delantera y trasera desde la zona de los hombros (medir a un gato da demasiada ternura 😜) y cerré también en los laterales. Cabe mencionar que normalmente le agrego una costura de seguridad a las piezas que realizo, usando la puntada en zig zag (ya que, hasta los momentos, no poseo una overlock), aunque en ésta ocasión, opté por sólo confiarme con la costura recta.
| |
|---|
Había pensado en dejarlo como una especie de camiseta, es decir, no agregarle mangas. Sin embargo, hacerle un dobladillo, lo veía complicado, así que pensé en añadirle unos trocitos de tela que sirvieran como una especie de mangas pequeñas. Pienso que fue una buena decisión porque se ve más delicado.
| | |
|---|
| |
|---|
Para el dobladillo de la parte inferior del disfraz, pensé en utilizar uno de los tipos de costura que trae mi máquina. Voy a serles sincera, no sé para que sirven la mayoría de esas puntadas jaja (tengo que aprender eso 🙃) así que hice la prueba con la figura H.
| | |
|---|
Pensé que era la puntada para hacer costura invisible, pero... o no lo hice bien o no es esa puntada. Sea como sea, me gustó porque luego de hacer una costura recta por la parte externa de la pieza, se vio bastante bonito... así que, no me quejo del experimento 😅
Tras esto, pasé a anexar la pieza de la capucha a la camisita que acababa de terminar. Aprovechando también de coserle la etiqueta para hacerlo más estilizado 😌
| | |
|---|
Finalmente, para los ojitos del patito, utilicé unos botones forrados de color negro que tenía en mi cajita de botones, los cuales, cosí a mano. Ya con esto, el disfraz de patito estuvo terminado.
| | |
|---|
✨🐤 ¡Ahora, la sesión de fotos! 🦆✨
| | |
|---|
Es necesario aclarar que a la hora de probarle el disfraz, Ying andaba con ganas de dormir... así que no se le ve muy contento de que su tía interrumpiese su siesta para ponerle una cosa rara encima 🤣 pero bueno, Ying está durmiendo la mayoría del tiempo, así que, era ahora o nunca 😅
| | |
|---|
Cuando mi hermana llegó y vio el disfraz, quedó encantada. Al rato, cuando anocheció, Ying reconoció su aroma en el disfraz y lo usó de tapete para reposar un rato. Bueno, cualquier cosa, sabemos que al menos puede usarlo como nido para echar las siestas 🤣
| |
|---|
Muchas gracias por haber visitado mi publicación. Espero que les haya parecido interesante.
¡Hasta una próxima oportunidad!