Antes de iniciar, aclaro que estoy publicando desde Ecency y por defecto coloca el nombre de la comunidad como primer tag. Dicho eso, entiendo y dejo claro, que sé que no se puede usar el "needleworkmonday" si no es lunes. Pido disculpas por las molestias ocasionadas.
Before starting, I clarify that I am publishing from Ecency and by default it places the name of the community as the first tag. That said, I understand and make it clear that I know you can't use "needleworkmonday" if it's not Monday. I apologize for the inconvenience caused.

Hola, hoy estoy emocionado, porque voy a realizar mi primer proyecto de preparación para el viaje 😊
A ver, los pongo un poco en contexto, @ginethchira2301 estará de cumpleaños el mes que viene y me gustaría estar presente en su dia de celebración. Asi que, al igual que el año pasado, estoy agarrando un mes para preparar todo lo necesario tanto para mi viaje, como para su regalo.
Hoy, me toca presentarles una pequeña y muy cómoda almohada de viaje y que mejor forma de hacerla, que aprovechando retazos que van quedando de otros proyectos 😊
Hello, today I am excited, because I am going to do my first project to prepare for the trip 😊
Let's see, I'll put them in context a bit, @ginethchira2301 will have his birthday next month and I would like to be present on his day of celebration. So, just like last year, I'm taking a month to prepare everything I need for both my trip and his gift.
Today, I have to present you a small and very comfortable travel pillow and what better way to do it, than taking advantage of leftover pieces from other projects 😊
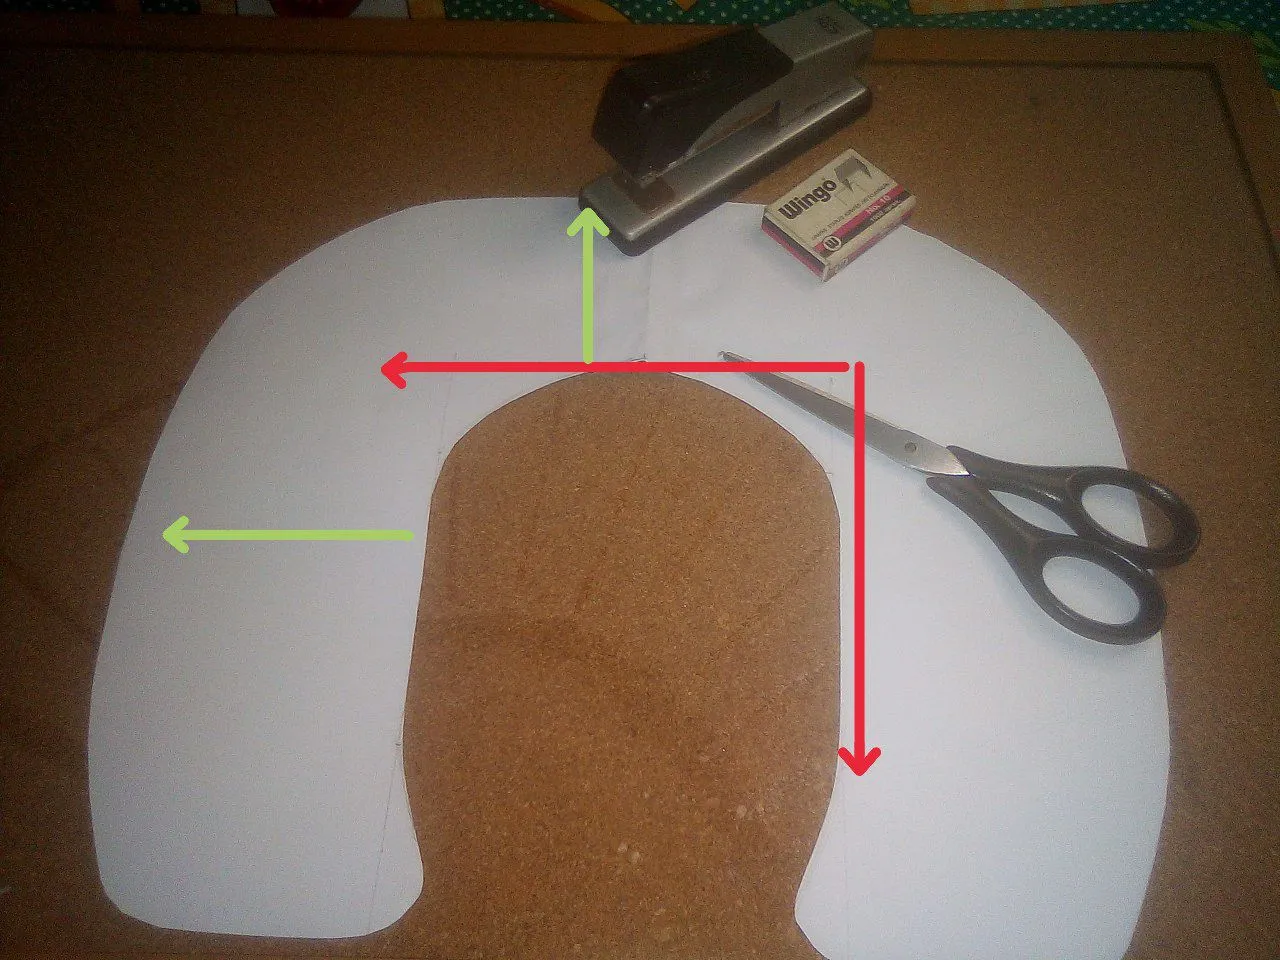
Lo primero es hacer el patrón, lo pueden buscar en internet o como es mi caso, hacerlo a ojo. No dejaré medidas exactas, aunque si explicaré un poco el proceso que utilicé para crear este patrón.
La realidad es que crear patrones personalizados es bastante simple, lo primero que hice fue medir el ancho de mi cuello desde la base de una oreja a la base de la otra oreja. Eso me dió el ancho de la abertura que debía hacer y midiendo desde mi nuca hasta mis clavículas, tuve el largo. Y a partir de ahí, improvisé el espesor que debía tener la almohada en si, la verdad no necesito algo tan grande, asi que 12cm fueron suficientes para mi 😊
The first thing is to make the pattern, you can find it on the internet or, as in my case, do it by eye. I will not leave exact measurements, although I will explain a little the process I used to create this pattern.
The reality is that creating custom patterns is quite simple, the first thing I did was measure the width of my neck from the base of one ear to the base of the other ear. That gave me the width of the opening that I had to make and measuring from my neck to my collarbones, I had the length. And from there, I improvised the thickness that the pillow should have, I really don't need something that big, so 12cm was enough for me 😊
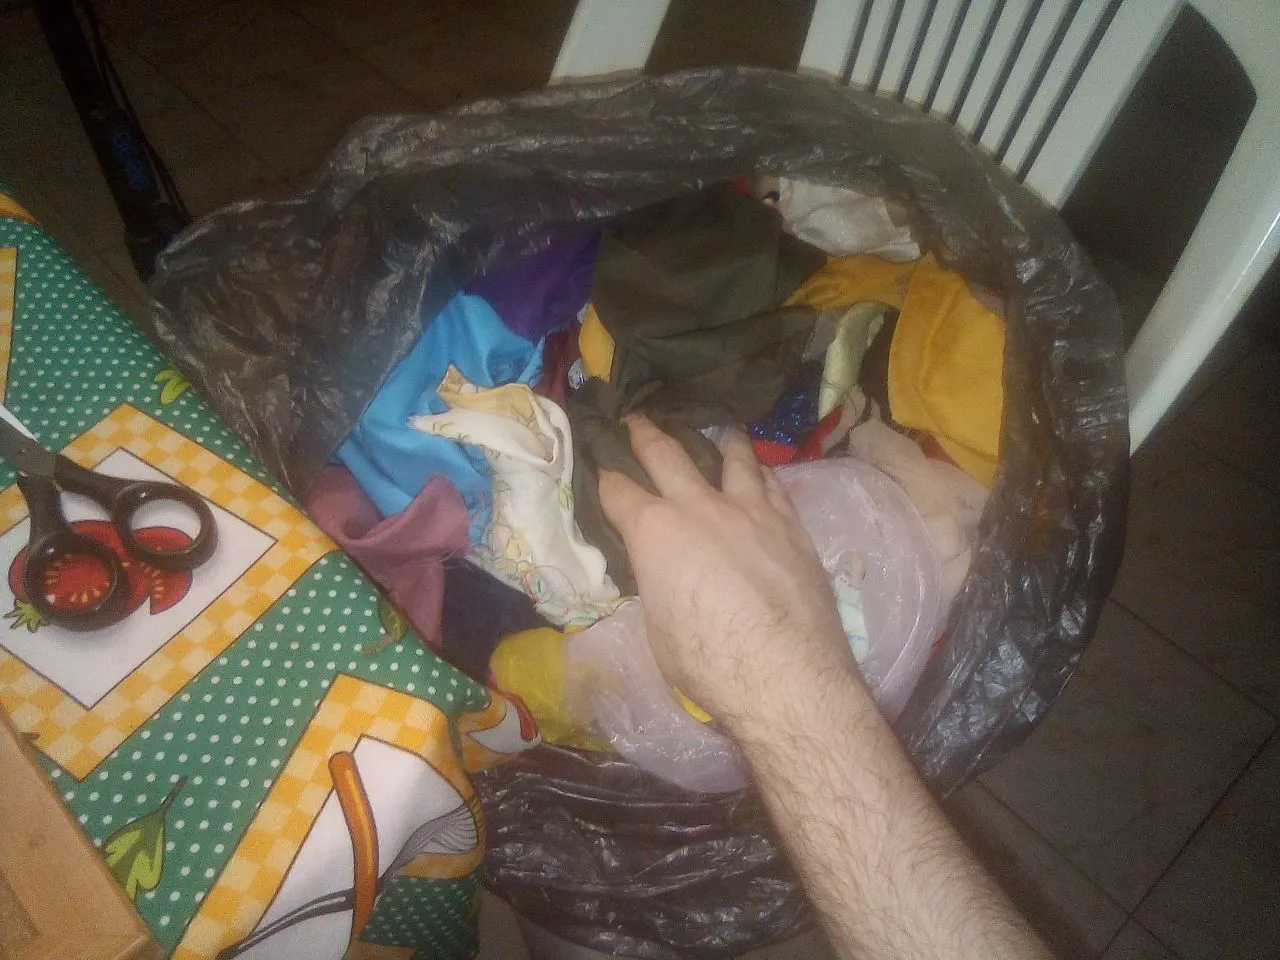
¿Por que utilizar retazos? Pues, es simple, porque tengo.
En casa tenemos una bolsa llena de sobrantes de tela, nada muy elegante o sofisticado, aunque siempre resulta muy útil al momento de hacer experimentos como éste 😊
Why use scraps? Well, it's simple, because I have.
At home we have a bag full of leftover fabric, nothing very elegant or sophisticated, although it is always very useful when doing experiments like this 😊

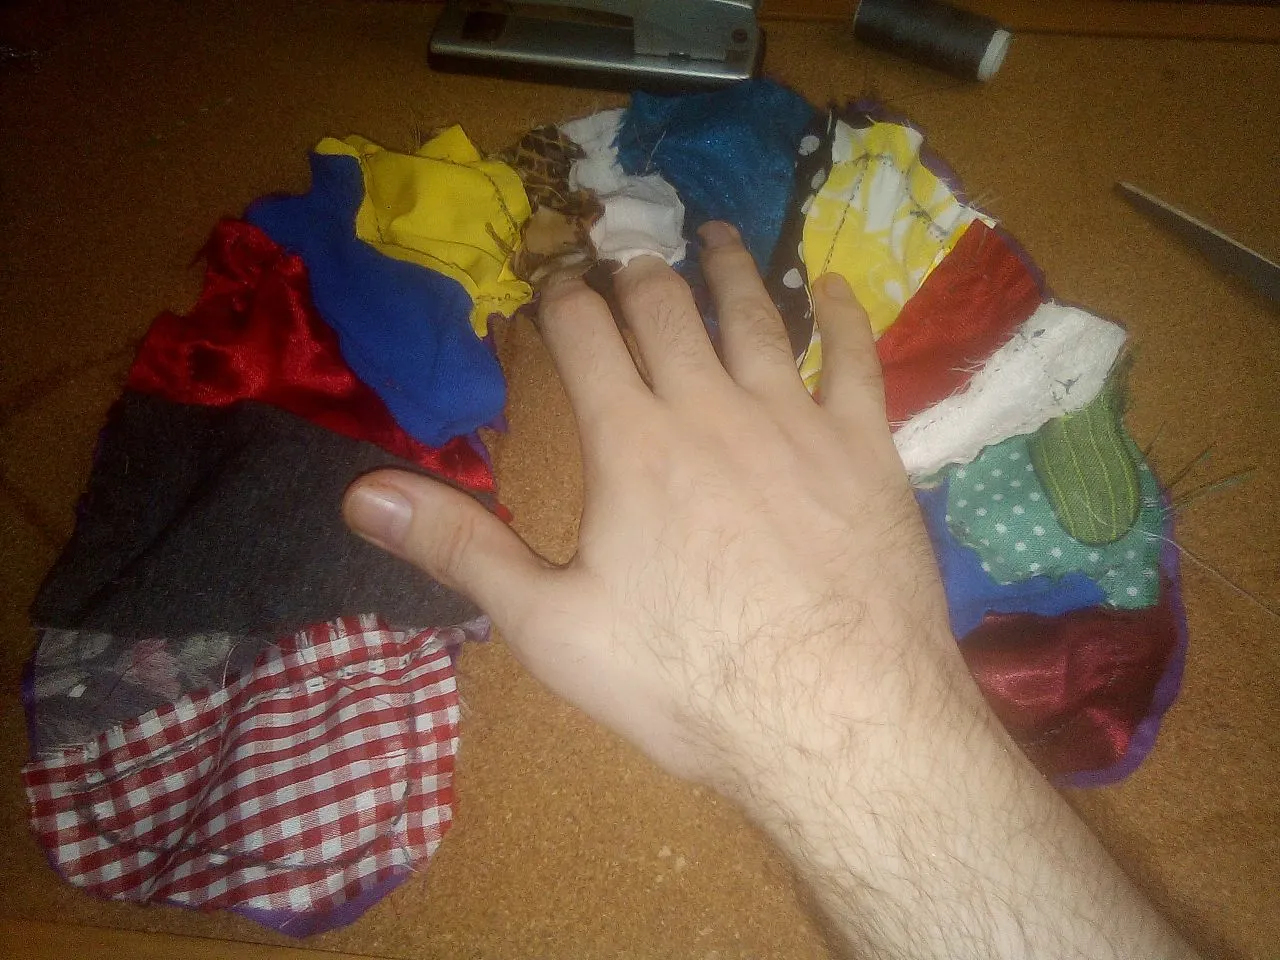
Los trozos de tela que tengo, no son tan grandes, y para no estar haciendo la tarea mas cansada de lo que ya es, decidí cortar el patrón en varios trozos, que pudiera ir cortando de manera individual y luego uniendo entre si 😊
The pieces of fabric I have are not that big, and in order not to be doing the task more tiring than it already is, I decided to cut the pattern into several pieces, which I could cut individually and then join together 😊
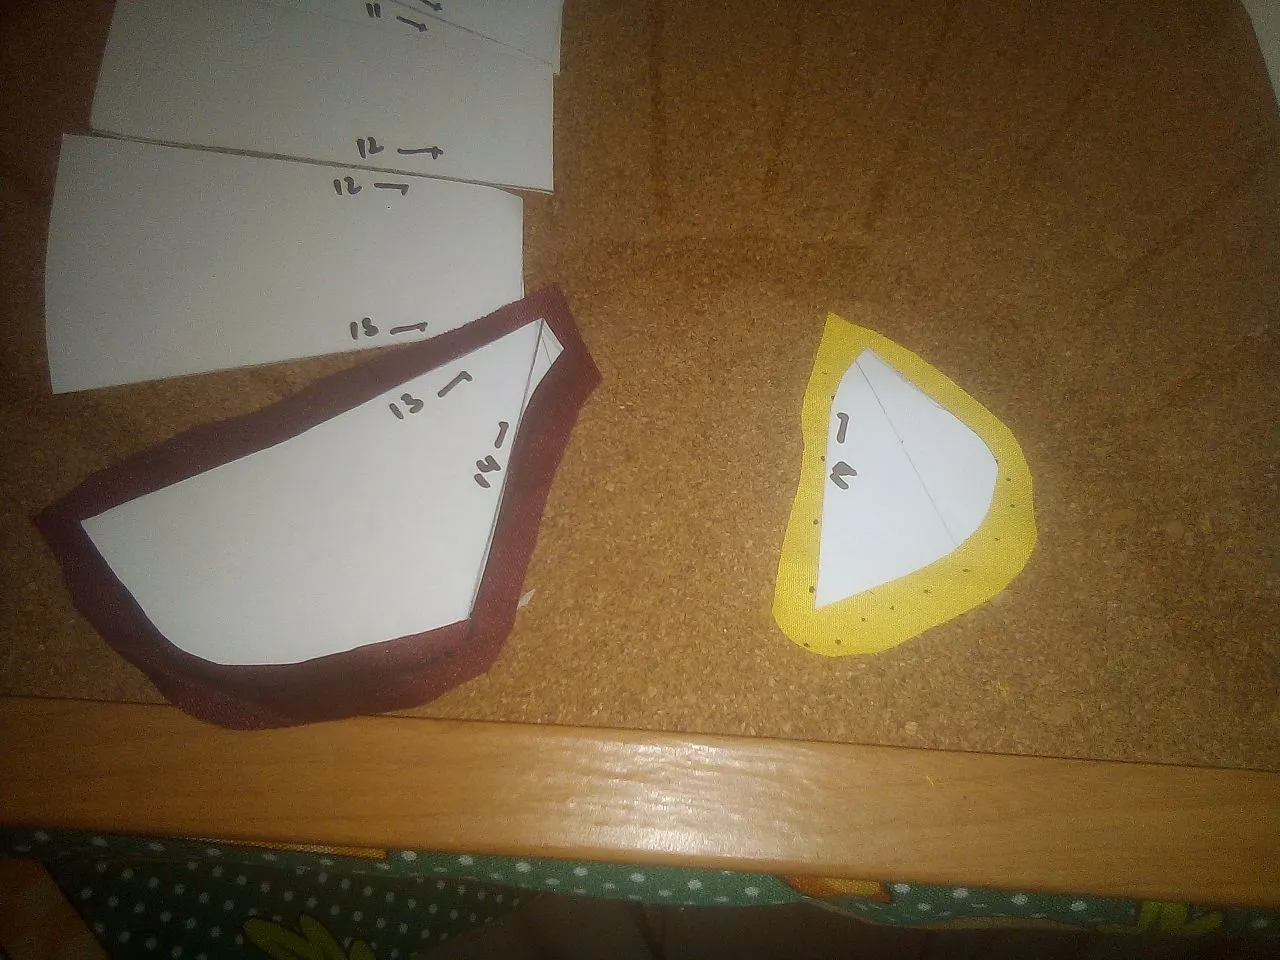
El sistema será el siguiente, voy a ir marcando y cortando trozos de tela diferentes, para luego unirlos entre si en el orden que el patrón indica.
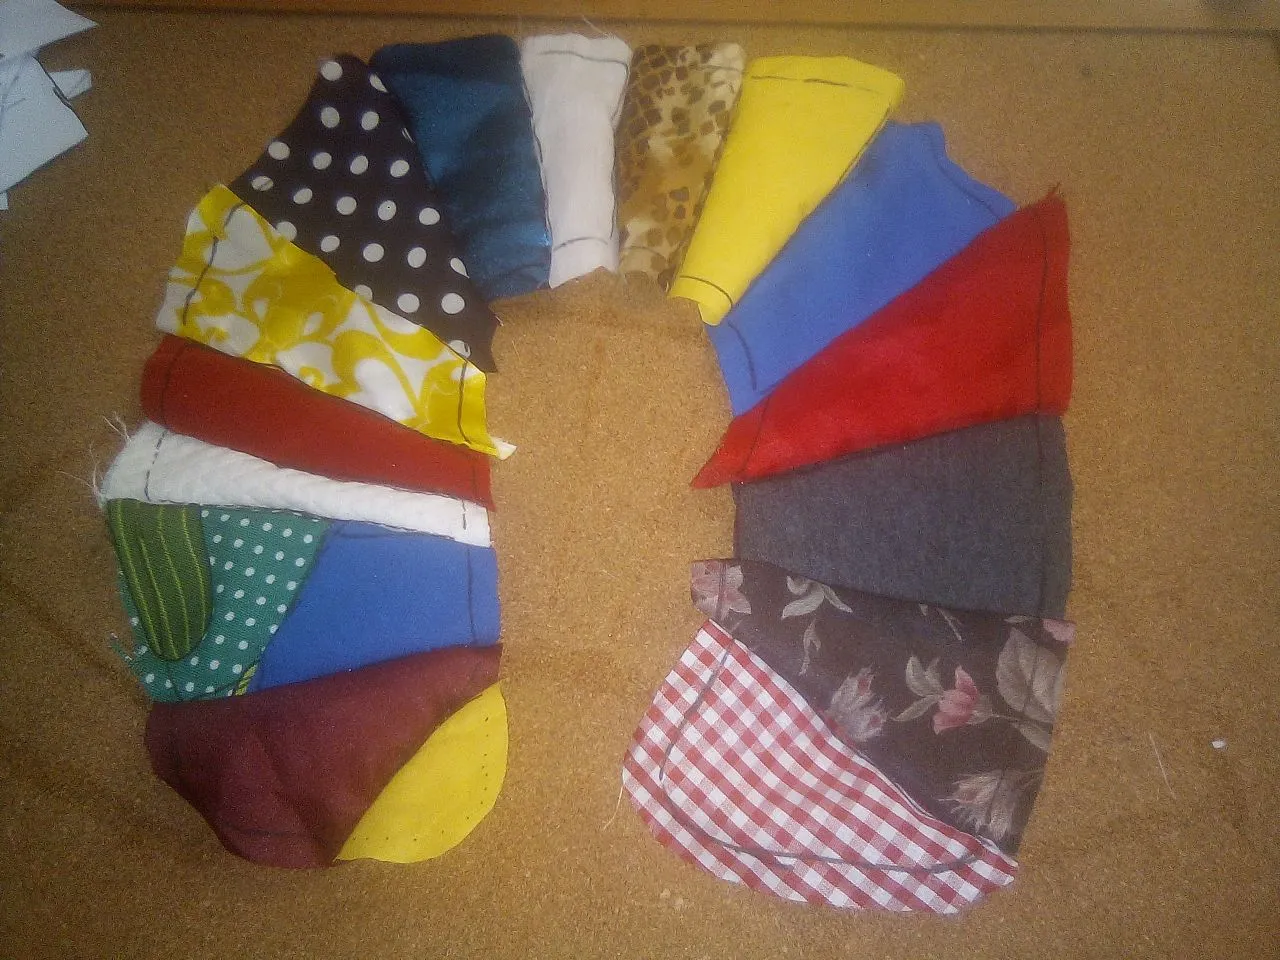
Nada muy difícil realmente, lo que si se vuelve muy complejo es conseguir un patrón de colores que se vea armónico. Si en tu caso vas a una tienda a comprar la tela especialmente para hacer un proyecto de retazos se te hará mas facil, aunque yo creo que eso hace perder un poco el sentido de "proyecto de retazos".
The system will be as follows, I am going to mark and cut different pieces of fabric, and then join them together in the order that the pattern indicates.
Nothing very difficult really, what if it becomes very complex is to get a color pattern that looks harmonious. If in your case you go to a store to buy the fabric especially to make a patchwork project, it will be easier for you, although I think that it makes you lose the meaning of "patchwork project" a bit.

Aclaro, mi idea original era dividir cada segmento en dos y asi conseguir un mosaico mas variado, pero.. da mucho trabajo 😂
Mis respetos para los que trabajan este estilo de diseños, entiendo porque son tan costosos.
I clarify, my original idea was to divide each segment into two and thus get a more varied mosaic, but... it takes a lot of work 😂
My respects to those who work with this style of design, I understand why they are so expensive.
Luego de un buen rato, conseguí esto, están unidos con grapas. A este punto los que han leído mis posts de costura, saben que odio los alfileres y que me apoyo mucho en las grapas para sostener la tela.
Pues, en este punto fue extremadamente útil, ya que si veia que algún trozo no hacia juego con los demás, podría simplemente quitar las grapas y colocar otro trozo.
After a while, I got this, they're stapled together. At this point, those who have read my sewing posts know that I hate pins and that I rely heavily on staples to hold the fabric.
Well, at this point it was extremely useful, because if I saw that some piece did not match the others, I could simply remove the staples and place another piece.

Luego, me tocó hacer la cara inferior, está vez de un solo color, para ello que hice fue unir las piezas del patrón en trozos un poco mas grandes y asi hacer menos costuras 😊
Tal vez debí haber hecho esta parte primero, lo pensé tarde, la verdad 😂
Then, I had to make the lower face, this time in a single color, for what I did was join the pieces of the pattern in slightly larger pieces and thus make fewer seams 😊
Maybe I should have done this part first, I thought about it late, really 😂

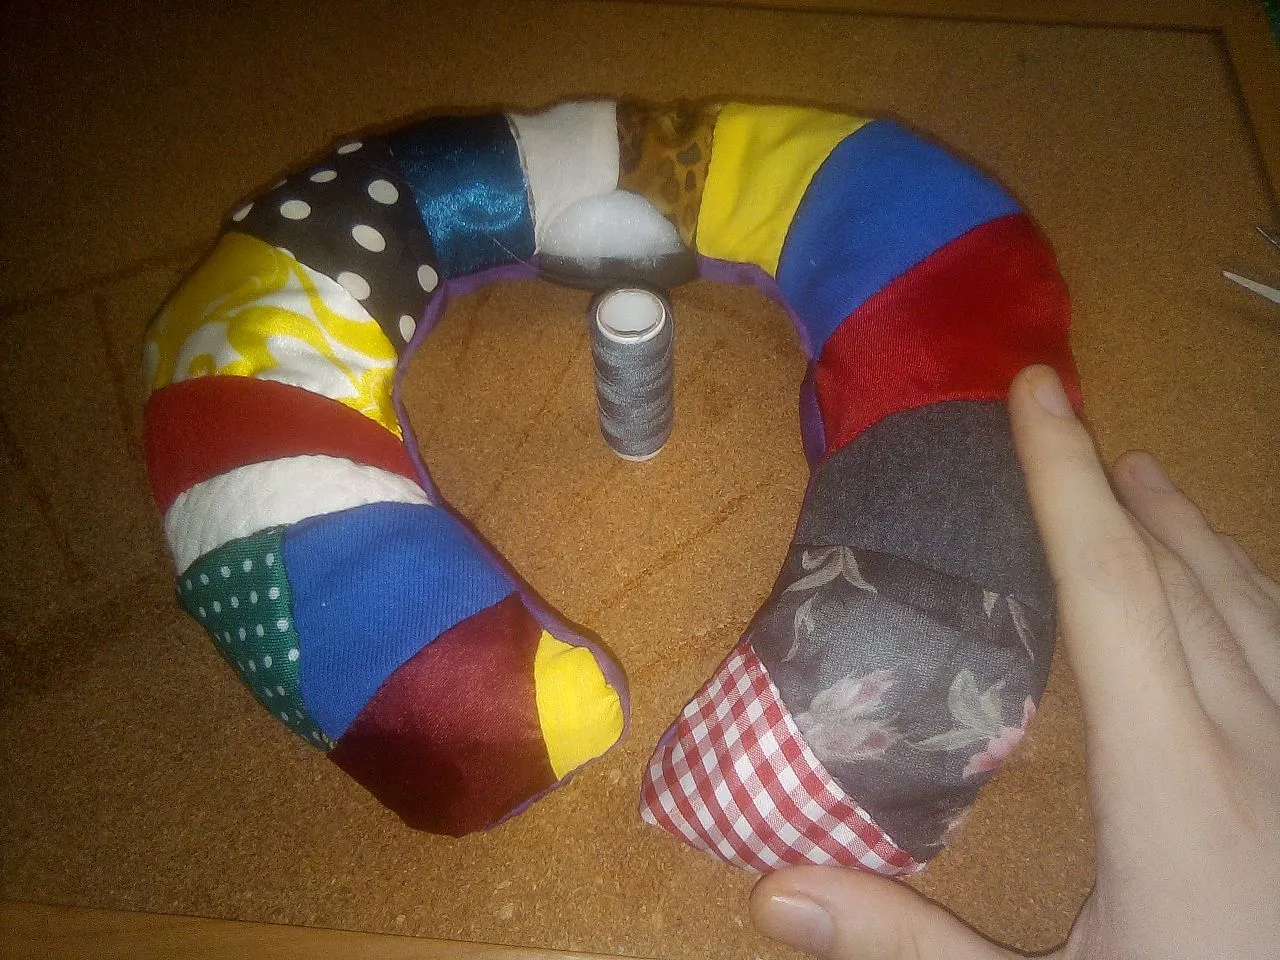
Una vez los tenia los dos armados y aun sujetos con grapas, me llegó el momento de coser. Estoy utilizando un solo hilo de color gris, ya que las costuras no serán visibles y en caso que se vea alguna, el color gris se disimula muy bien con la sombra de las uniones 😊
Once I had them both assembled and still stapled, it was time to sew. I am using a single gray thread, since the seams will not be visible and if any are visible, the gray color is very well hidden with the shadow of the joints 😊

Esto lo voy a mostrar, para que sea vea que si están cosidas las piezas. Aquí lo que se dice, se hace 😎
I am going to show this, so you can see if the pieces are sewn. Here what is said, is done 😎
Una vez todo esta cosido, es momento de unir ambas mitades y aquí quiero hacer varias observaciones importantes. La primera es que yo estoy haciendo un diseño simétrico, entonces no tengo que fijarme en si uní las partes al derecho o al revés, si tu diseño no es simétrico, es algo que debes tener en cuenta.
El otro punto, es que pude haberle puesto un borde en la parte central y asi conseguir mas altura en el cojín y que la cabeza no se tumbe hacia los lados. Eso está bien, aunque en mi caso, necesito únicamente el apoyo cervical, asi que no me importa mucho la altura de los laterales, entonces opté por un diseño mas compacto.
Once everything is sewn, it is time to join both halves and here I want to make several important observations. The first is that I am making a symmetrical design, so I do not have to pay attention to whether I joined the parts forward or backwards, if your design is not symmetrical, it is something that you must take into account.
The other point is that I could have put a border in the central part and thus get more height in the cushion and that the head does not lie down to the sides. That's fine, although in my case, I only need cervical support, so I don't really care about the height of the sides, so I opted for a more compact design.
Llegó el momento de rellenar y como saben, eso significa que estamos por terminar nuestro proyecto. Aunque, hay otro punto importante que aclarar, este relleno está compuesto en parte de algodón y en parte de mas trozos de tela.
Lo que sucede es que no me gusta la idea de colocar una tira o algún tipo de enganche en la parte frontal para mantener el cojín asegurado. Entonces, para que no se me caiga, lo que hice fue colocar trozos de tela en la parte de las puntas, aproximadamente hasta donde está la punta de mi dedo índice y el resto, lo rellené con algodón sintético para almohadas.
Asi todo el peso se irá hacia adelante y no se caerá con facilidad al caminar 😊
It's time to fill in and as you know, that means we're about to finish our project. Although, there is another important point to clarify, this filling is made up of part cotton and part more pieces of fabric.
I just don't like the idea of putting a strap or some kind of hook on the front to keep the cushion secure. So, so that it doesn't fall off, what I did was place pieces of fabric in the part of the tips, approximately up to where the tip of my index finger is and the rest, I stuffed it with synthetic cotton for pillows.
So all the weight will go forward and it will not fall easily when walking 😊

Y como ven, no se cae. Les cuento que su pequeño tamaño es engañoso, es bastante cómoda y ofrece un buen soporte. Repito, yo necesito mas el soporte cervical que los laterales, porque los asientos de los autobuses en los que viajo, ya tienen soporte lateral, pero los cabezales no son ajustables y por ende, la cabeza queda en una posición poco ergonómica para descansar.
And as you can see, it does not fall. I tell you that its small size is deceptive, it is quite comfortable and offers good support. I repeat, I need cervical support more than the lateral ones, because the seats of the buses I travel in already have lateral support, but the headrests are not adjustable and therefore, the head is in a non-ergonomic position to rest.