Good evening dear NeedleWorkMonday community, firstly Weaving Dreams wanted to apologize for the delay in posting, and it is that surely we have been short of time, but well today we are here apologizing and with a new project, small and simple and according to us very nice and functional. It is an amigurumi wallet for your mobile phone. Well, let's stop beating around the bush and get started.
Muy buenas noches querida comunidad de NeedleWorkMonday, primero Tejiendo Sueños queria disculparse por la demora para publicar, y es que ciertamente hemos estado cortos de tiempo, pero bueno hoy estamos aquí pidiendo disculpas y con un nuevo proyecto, pequeño y sencillo y según nosotros muy bonito y funcional. Se trata de una carterita amigurumi para su teléfono movil. Pues vamos dejemos de rodeos y empecemos.
 The images are the authorship of Tejendo Sueños. (OURS)/Las imagenes son de la autoría de Tejendo Sueños.(NUESTRAS)
Materials/Materiales:
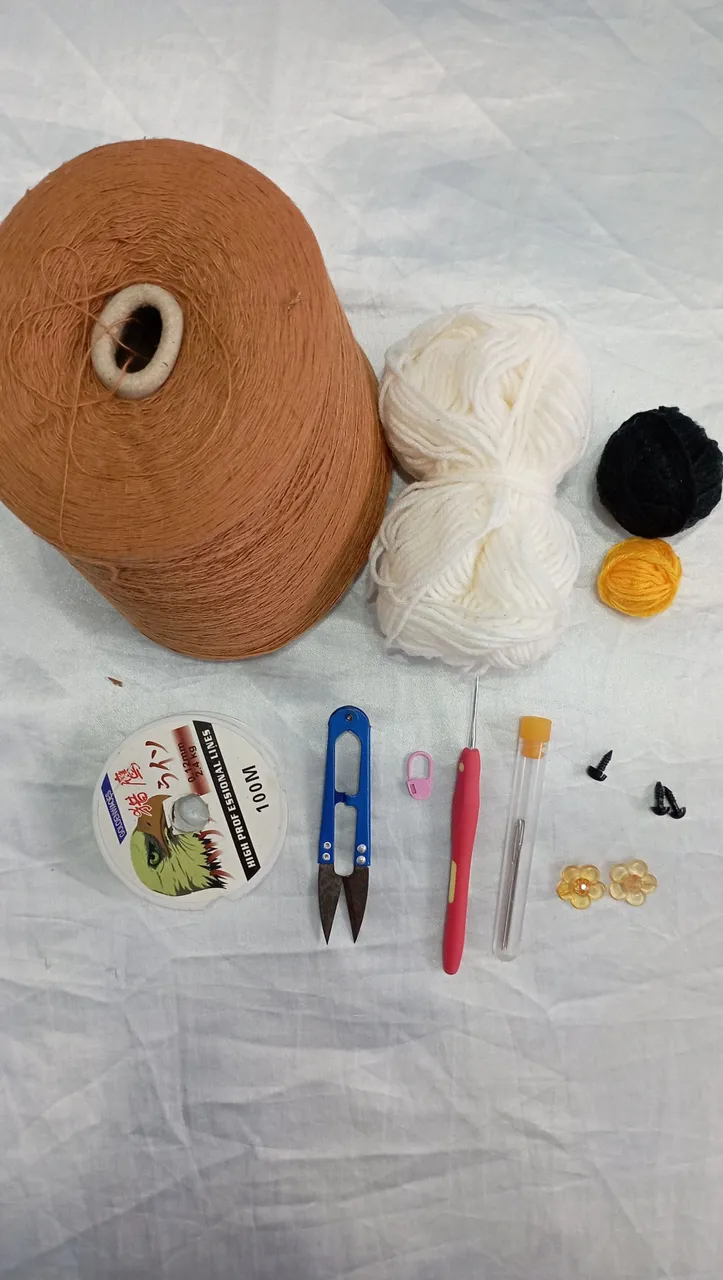
To begin we will share the materials we use: On this occasion we use brown cotton thread, for the body of the bag and, as usual, white, black and yellow yarn to create the amigurumi ornament, which in our case is a cat. . In addition to 8mm safety eyes and a small nose, we also used nylon thread for the cat's whiskers and eyebrows. Little more takes this little project as you can see later.
Para comenzar compartiremos los materiales que utilizamos: En esta ocación utilizamos hilo de algodón color marrón, para el cuerpo de la cartera y como de costumbre hilos de estambre de colores blanco, negro y amarillo para crear el adorno amigurumi que en nuetro caso es una gatica. Además de unos ojos de seguridad de 8mm y una pequeña nariz, usamos también hilo de nylon para los bigotes y las cejas del gato. Poco más lleva este pequeño proyecto como podran ver más adelante.
 The images are the authorship of Tejendo Sueños. (OURS)/Las imagenes son de la autoría de Tejendo Sueños.(NUESTRAS)
Portfolio Body/Cuerpo de la Cartera:
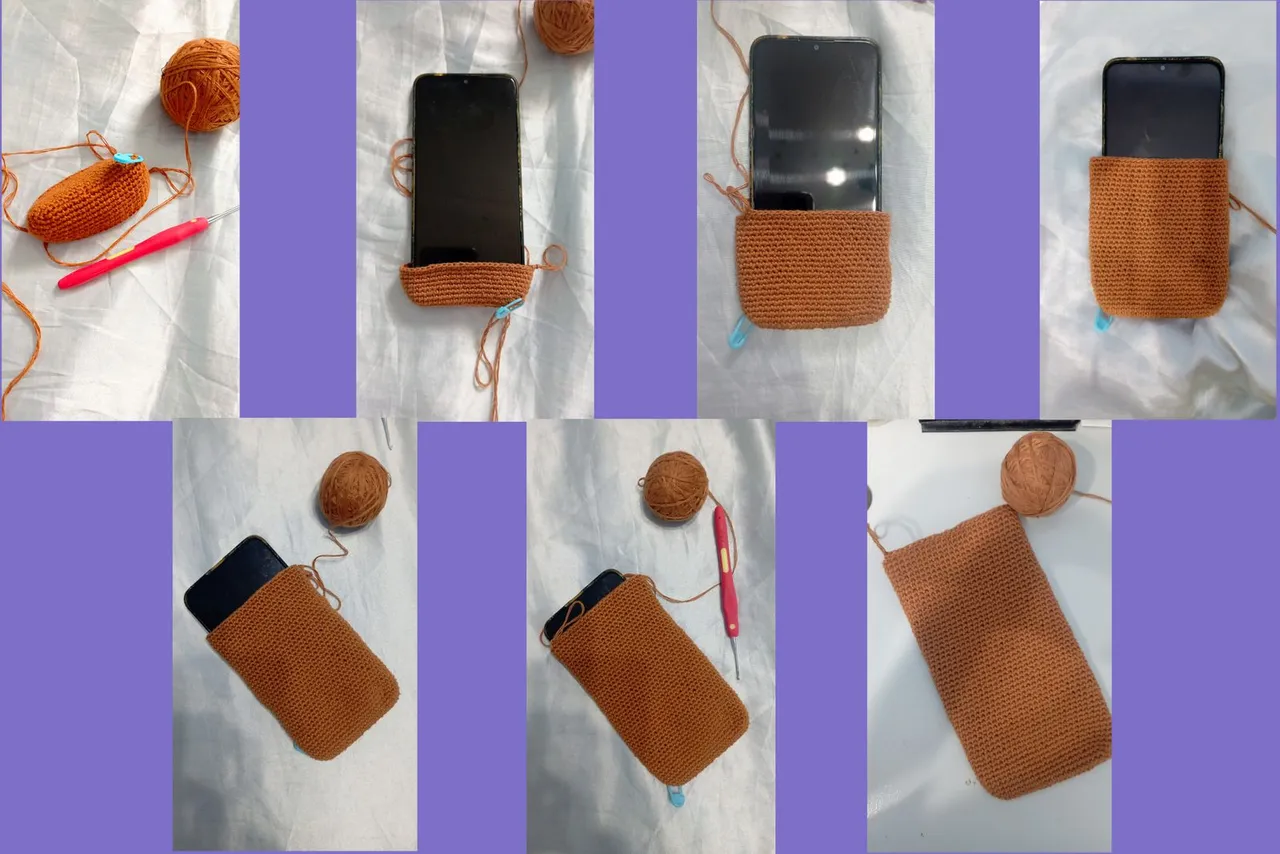
We will start as always with a magic ring, oh no sorry, it's the custom, this time we start with a chain that will depend on the size of the width of the phone for which it is being created, then we will return with single crochet to the beginning where we will make 3 increases in the Same stitch, and we'll go back and do an increase this time at the end. In the second we will do the same low points and an increase in each point with increase that we had given, it would be an increase where we stayed low points until the other extreme and 3 increases. In the next row we will continue with single crochet but we will make a single crochet and an increase in the two extremes three times. From now on we will go up with the same points until we reach the top of the phone. And that's it.
Comenzaremos como siempre con un anillo mágico ah no disculpen es la costumbre, en esta ocación empezamos con una cadena que dependerá su tamaño del ancho del teléfono para el cual esta siendo creada, luego regresaremos con puntos bajos hasta el inicio donde realizaremos 3 aumentos en el mismo punto, y regresaremos y haremos esta vez un aumento en el extremo. En la segunda haremos igual puntos bajos y un aumento en cada punto con aumento que habíamos dado, sería un aumento en donde nos quedamos puntos bajos hasta el otro extremo y 3 aumentos. En la siguiente vuelta seguiremos con puntos bajos pero realizaremos un punto bajo y un aumento en los dos extremos tres veces. A partir de ahora subiremos con los mismos puntos hasta que logremos el alto del teléfono.Y listo.
 The images are the authorship of Tejendo Sueños. (OURS)/Las imagenes son de la autoría de Tejendo Sueños.(NUESTRAS)
The Tapestry/La Tapetica:
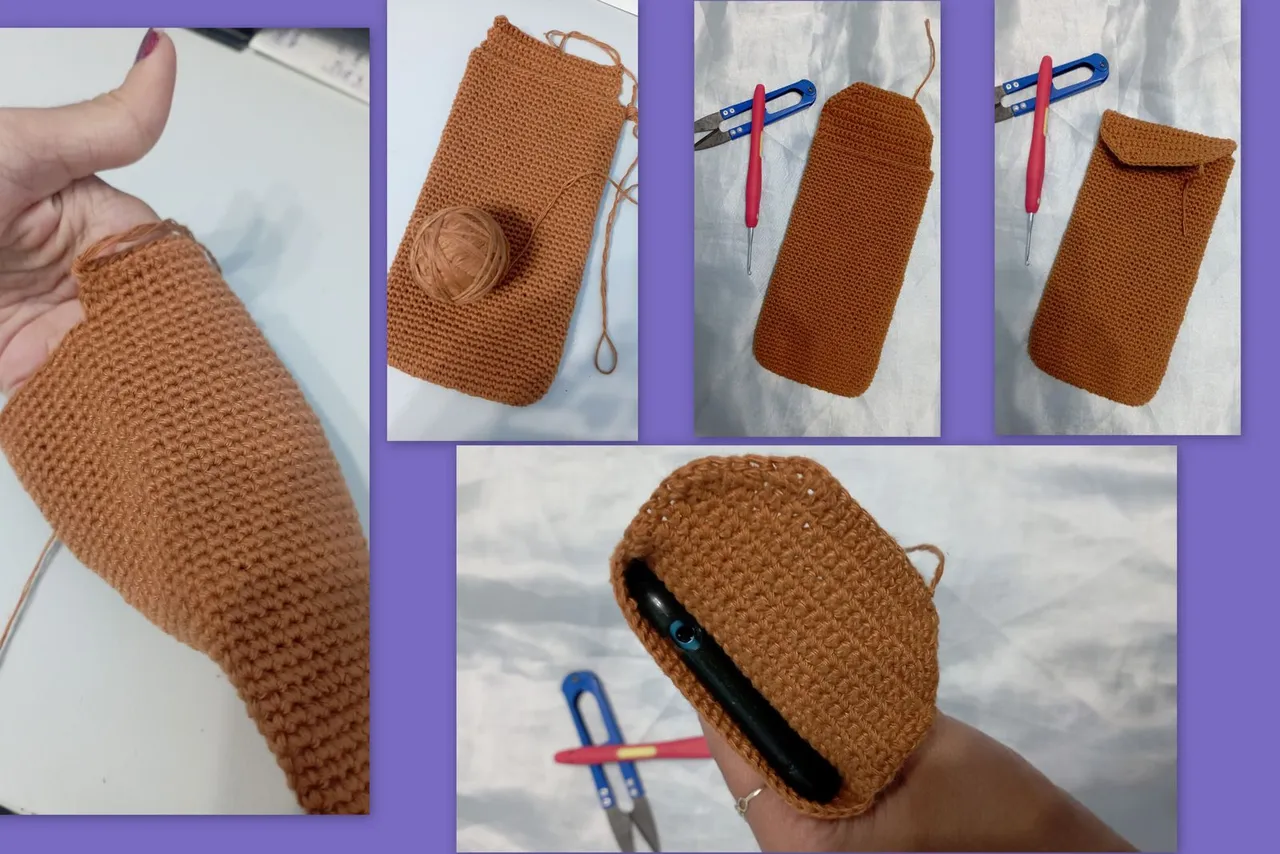
Now we will make the tapestry, which is very simple, we only have to extend the back half of the bag in 6 or 7 turns. Then, to begin with, we start with a slip stitch and then we would start the round with single crochets without reaching the last stitch, but we would leave it at the point before the end, that is to say that each round would have two points less than the previous one, we repeat until we are left. satisfied with the length and ready to move on to the next step.
Ahora haremos la tapetica que es muy sencilla, solo tenemos que extender en 6 o 7 vueltas la mitad de atras de la cartera. Luego para empezar comenzamos con un punto deslizado y después es que comenzariamos la vuelta con puntos bajos sin llegar hasta el último punto sino que lo dejaríamos en el punto antes del final es decir que cada vuelta tendría dos puntos menos que la anterior, repetimos hasta quedar satisfechos con el largo y listos para pasar al siguiente paso.
 The images are the authorship of Tejendo Sueños. (OURS)/Las imagenes son de la autoría de Tejendo Sueños.(NUESTRAS)
The Handle and its supports/El Asa y sus soportes:
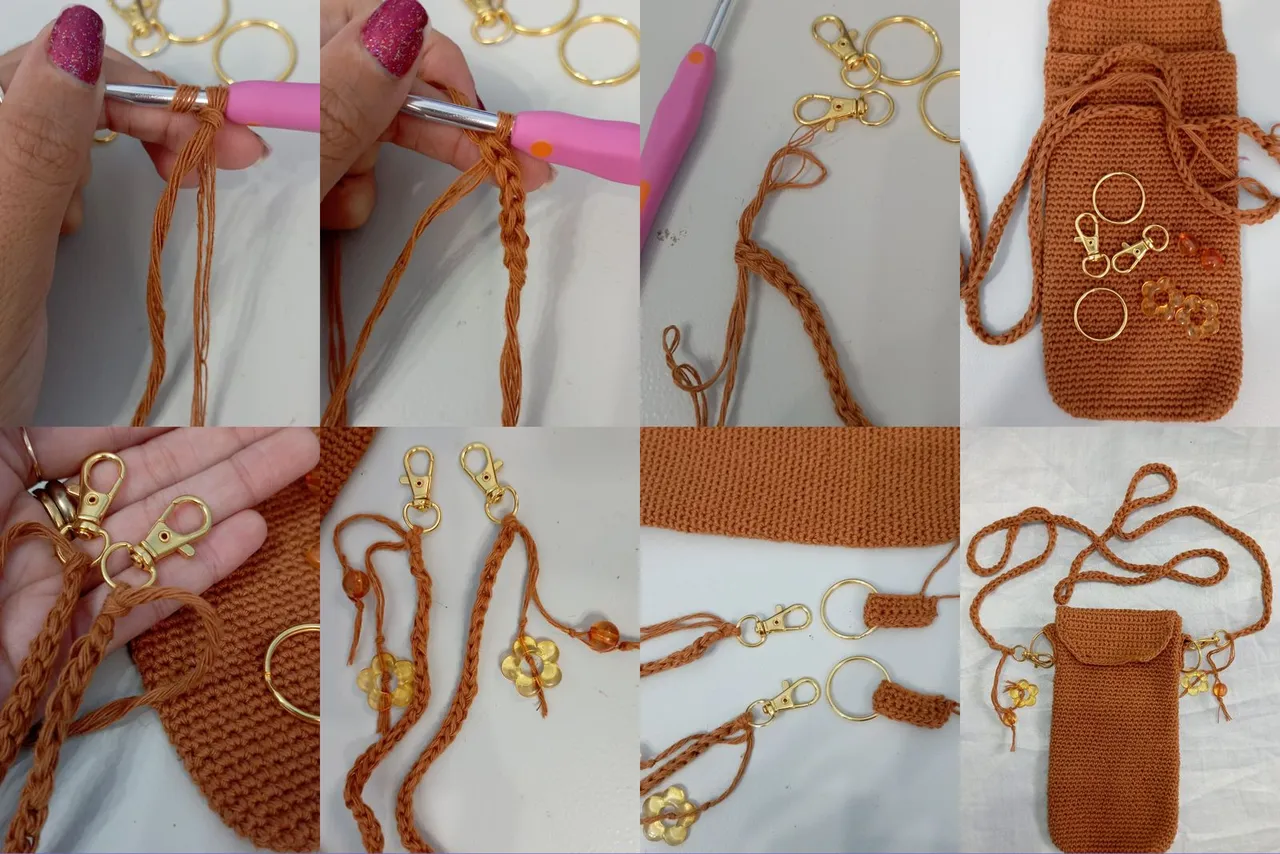
Now it's time to make the handle and its supports in the case of the handle, it's a bit complicated to give an explanation but good for its elaboration we use 2 balls of thread at a time to have two threads and then take a thread in front (surrounding the lace) and remove the other strand through the two stitches formed and there will be a chain with more body than the traditional one. For the supports we make 16 chains and from the second we make a single crochet for each stitch in three rows, then we put the metal ring and we close the 2 ends with single crochet below. It only remains to put the hooks on the handle and a few ornaments on the fringes that we leave to our liking.
Ahora toca elaborar el asa y sus soportes en el caso del asa, es un poco complicado dar la explicación pero bueno para su elaboración utilizamos 2 bolas de hilo a la vez para tener dos hebras y entonces tomar una hebra por delante (rodeando la agujeta) y sacar la otra hebra por los dos puntos formados y quedará una cadeneta con más cuerpo que la tradicional. Para los soportes hacemos 16 cadenas y a partir de la segunda realizamos un punto bajo por cada punto en tres vueltas, luego ponemos la argolla de metal y cerramos abajo los 2 extremos con puntos bajos. Solo queda ponerle los ganchos al asa y unos cuantos adornos en los flecos que dejamos a nuestro gusto.
 The images are the authorship of Tejendo Sueños. (OURS)/Las imagenes son de la autoría de Tejendo Sueños.(NUESTRAS)
Amigurumi head/La cabeza Amigurumi:
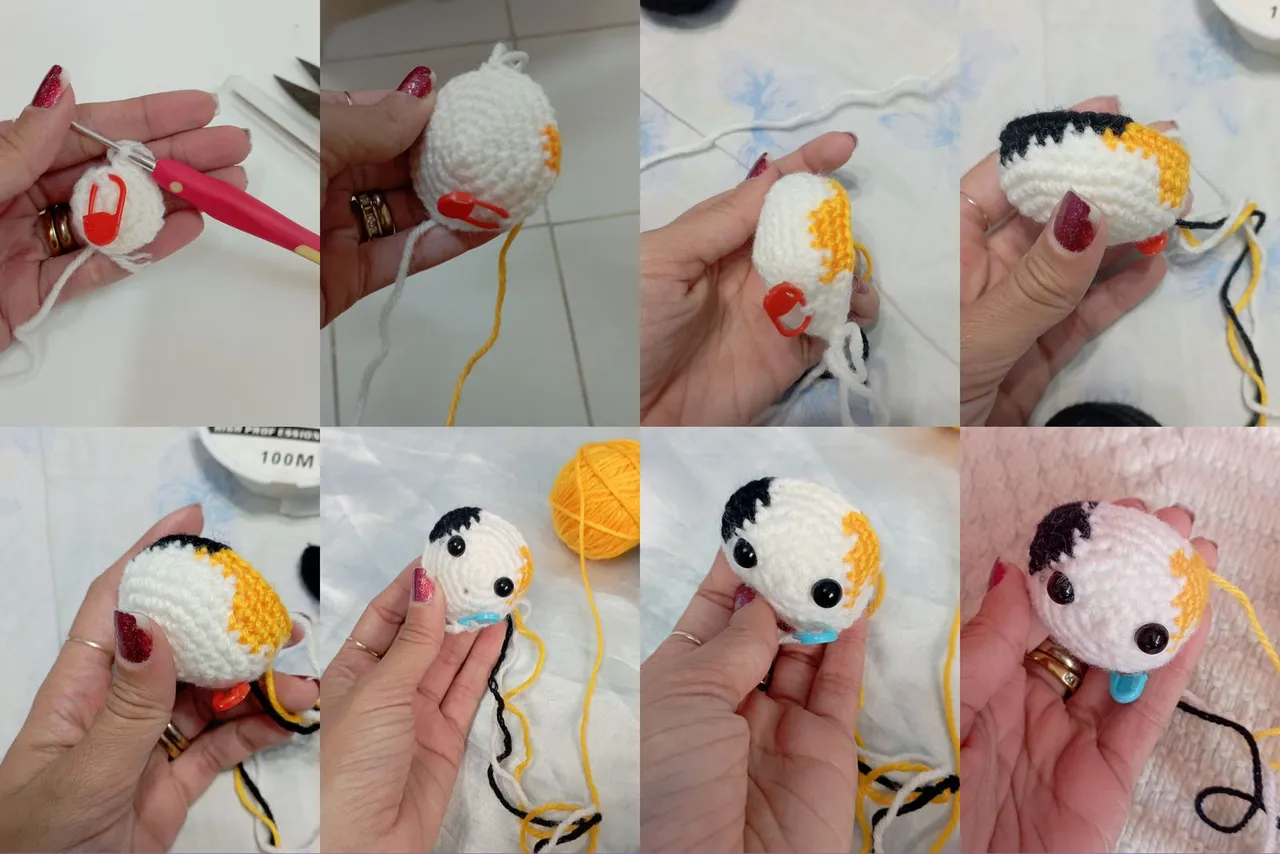
Until now it is a normal process, so the time has come to give it the touch that we were waiting for with the amigurumi ornament that, as you will see, is very simple but gives it a different touch and is as varied as you wish. In this one, we do a kitten, well now we do start with a magic ring of 6 points and we gradually increase to reach 36 points in the sixth round and we stay there for 4 more rounds, then we do a round that decreases to 30 points and it would be the head. In our case we do not close the head to achieve less volume that protrudes from the portfolio. For this head we combine white, black and yellow worsted thread, we put two security eyes to the size that suits us and the head is ready to sew it to the bag.
Hasta ahora es un proceso normal, por lo cual llegó el momento de darle el toque que estabamos esperando el adorno amigurumi que como verán es muy sencillo pero le da un toque diferente y es tan variado como deseen. En este, realizamos una gatica, bueno ahora sí empezamos con un anillo mágico de 6 puntos y vamos aumentando de forma gradual para llegar a 36 puntos en la sexta vuelta y nos mantenemos ahí por 4 vueltas más, seguidamente hacemos una vuelta que disminuye a 30 puntos y ya estaría la cabeza. En nuestro caso no cerramos la cabeza para lograr menor volumen que sobresalga de la cartera. Para esta cabeza combinamos hilo blanco, negro y amarillo de estambre, le ponemos dos ojos de seguridad a la medida que nos acomode y lista la cabeza para coserla a la cartera.
 The images are the authorship of Tejendo Sueños. (OURS)/Las imagenes son de la autoría de Tejendo Sueños.(NUESTRAS)
The snout/El hozico:
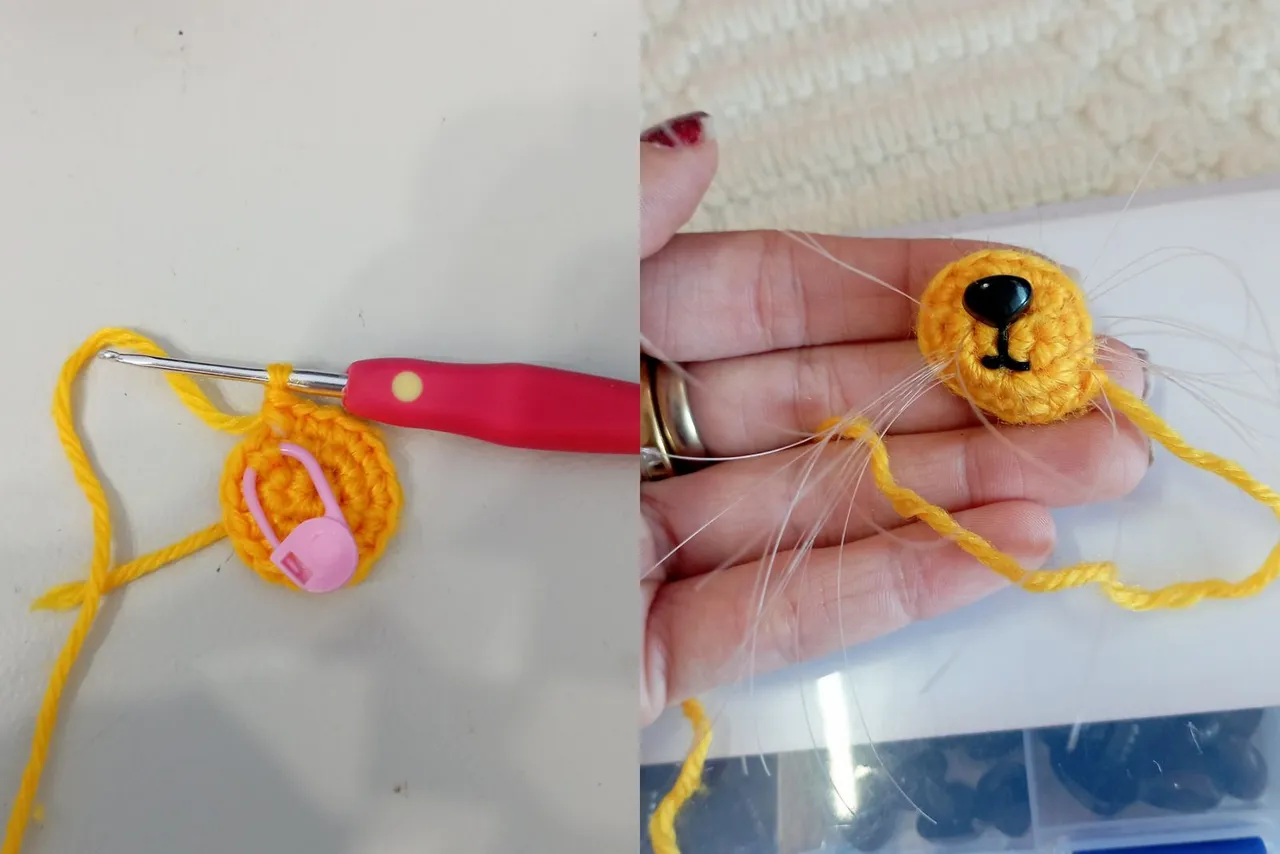
To make the snout we make a magic ring of 6 points in the same way and we increase it until we reach 12 points in the second round and we give it another turn in this amount to give it more depth, we put a small security nose which around its surroundings We will remove the whiskers with the help of a wool needle and with a little hot silicone we will stick them in the center from behind. Then we sew it to the head with some padding.
Para hacer el hozico realizamos de igual manera un anillo mágico de 6 puntos y aumentamos hasta llegar a 12 puntos en la segunda vuelta y le damos otra vuelta en esta cantidad para darle más profundidad, le ponemos una pequeña nariz de seguridad la cual por sus alrededores sacaremos los bigotes con la ayuda de una aguja lanera y con un poco de silicona caliente los pegamos en el centro por detrás. Luego la cosemos a la cabeza con un poco de relleno.
 The images are the authorship of Tejendo Sueños. (OURS)/Las imagenes son de la autoría de Tejendo Sueños.(NUESTRAS)
The legs, the tail and the ears/Las patas, la cola y las orejas:
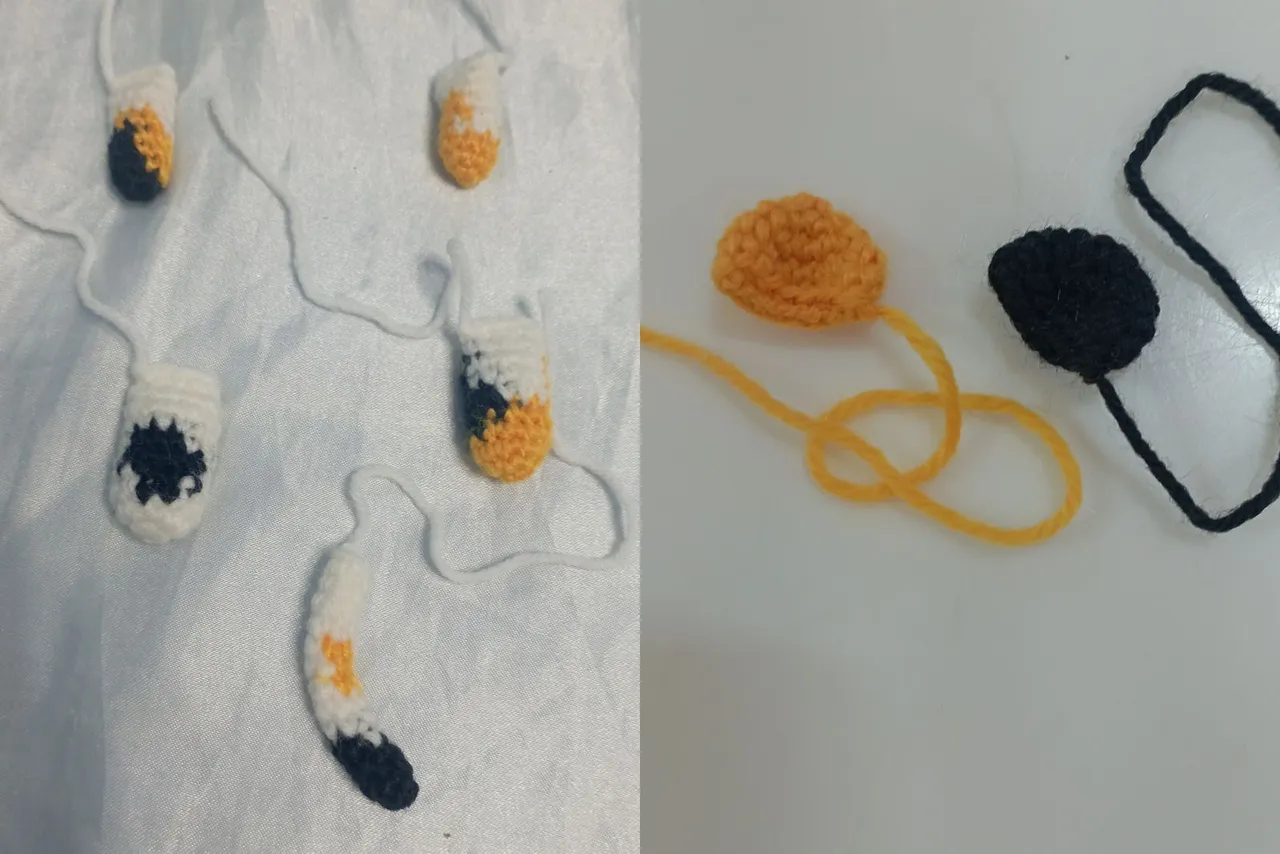
Finally, only the legs, tail and ears remain. For the upper legs we make a magic ring of 6 stitches, we increase to 9 stitches and we do 7 laps in that amount of stitches, we fill them in and close with low stitches. The lower legs are the same but increasing to 12 points and turning 8 times in this quantity. We make the tail with a magic ring of 6 points and we continue with that amount until we like its length, and in the ears we make a magic ring of 5 points so that they are more pointed, we increase to 10 points and then to 15 points and after those three laps we do two more laps in 15 points. In these pieces we can play with the combination of colors according to our taste. Once ready, we sew them into the bag, taking good care of the symmetry of the model and that's it.
Por último solo quedan las patas, la cola y las orejas. Para las patas de arriba hacemos un anillo mágico de 6 puntos aumentamos a 9 puntos y damos 7 vueltas en esa cantidad de puntos las rellenamos y cerramos con puntos bajos. Las patas de abajo son iguales pero aumentando a 12 puntos y dando 8 vueltas en esta cantidad. La cola la hacemos con un anillo mágico de 6 puntos y continuamos con esa cantidad hasta que nos guste su largo, y en las orejas realizamos un anillo mágico de 5 puntos para que queden más puntiagudas, aumentamos a 10 puntos y luego a 15 puntos y después de esas tres vueltas damos dos vueltas más en 15 puntos. En estas piezas podemos jugar con la combinación de colores según nuestro gusto. Una vez listas las cosemos en la cartera cuidando bien la simetría del modelo y listo.
 The images are the authorship of Tejendo Sueños. (OURS)/Las imagenes son de la autoría de Tejendo Sueños.(NUESTRAS)
The end/El Final:
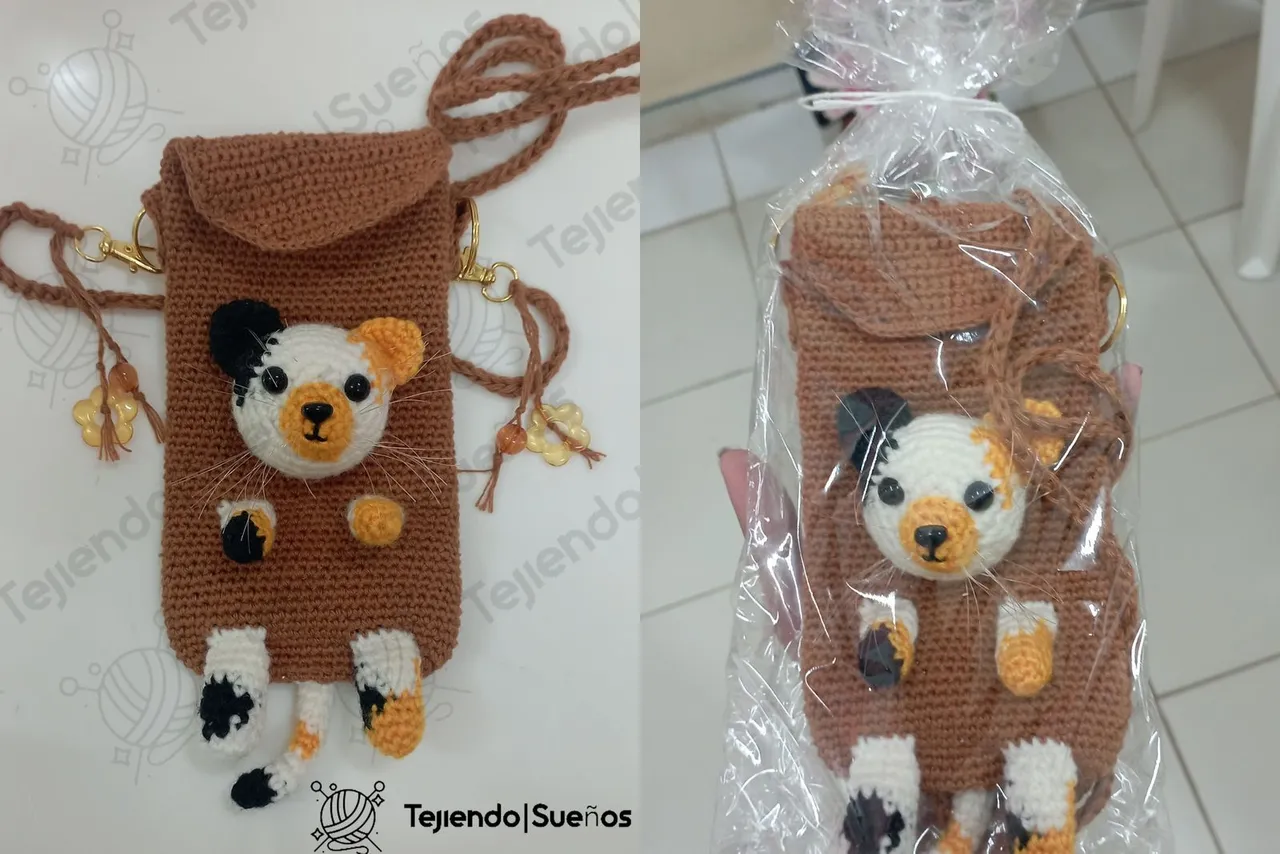
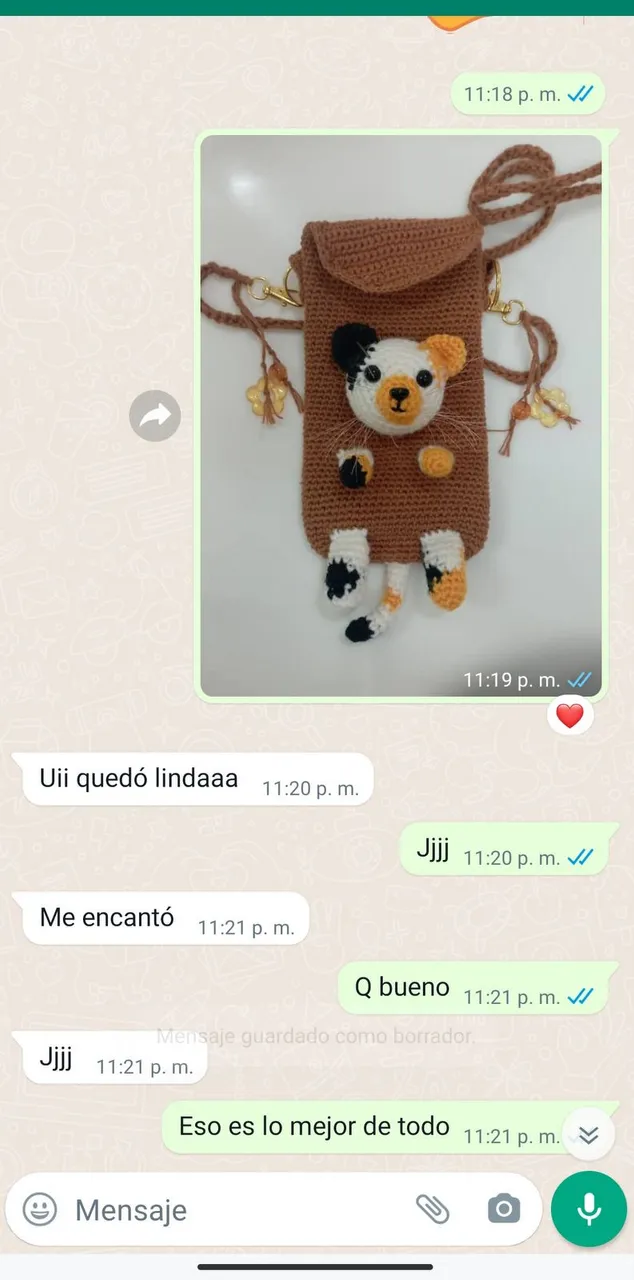
Well, it is finished and ready to deliver to our client and we really hope that you like them as well as our client was very satisfied.
Bueno ya está terminada y lista para entregar a nuestra cliente y la verdad esperamos que les gusten tanto a ustedes como a nuestra cliente, quedó muy satisfecha.
 The images are the authorship of Tejendo Sueños. (OURS)/Las imagenes son de la autoría de Tejendo Sueños.(NUESTRAS)
 The images are the authorship of Tejendo Sueños. (OURS)/Las imagenes son de la autoría de Tejendo Sueños.(NUESTRAS)