Hello very good evening dear NeedleWorkMonday community, Knitting Dreams is back after a long and productive week of hard work. Today we want to share with you one of those works which is a character that many know, we just hope you enjoy it as much as we do. This is our version of Stitch... LET'S BEGIN...
Hola muy buenas noches querida comunidad de NeedleWorkMonday, Tejiendo Sueños está de vuelta después de una larga y productiva semana de mucho trabajo. Hoy queremos compartir con ustedes uno de esos trabajos el cual es un personaje que muchos conocen solo esperamos que lo disfruten tanto como nosotros.Esta es nuestra versión de Stitch... COMENCEMOS...
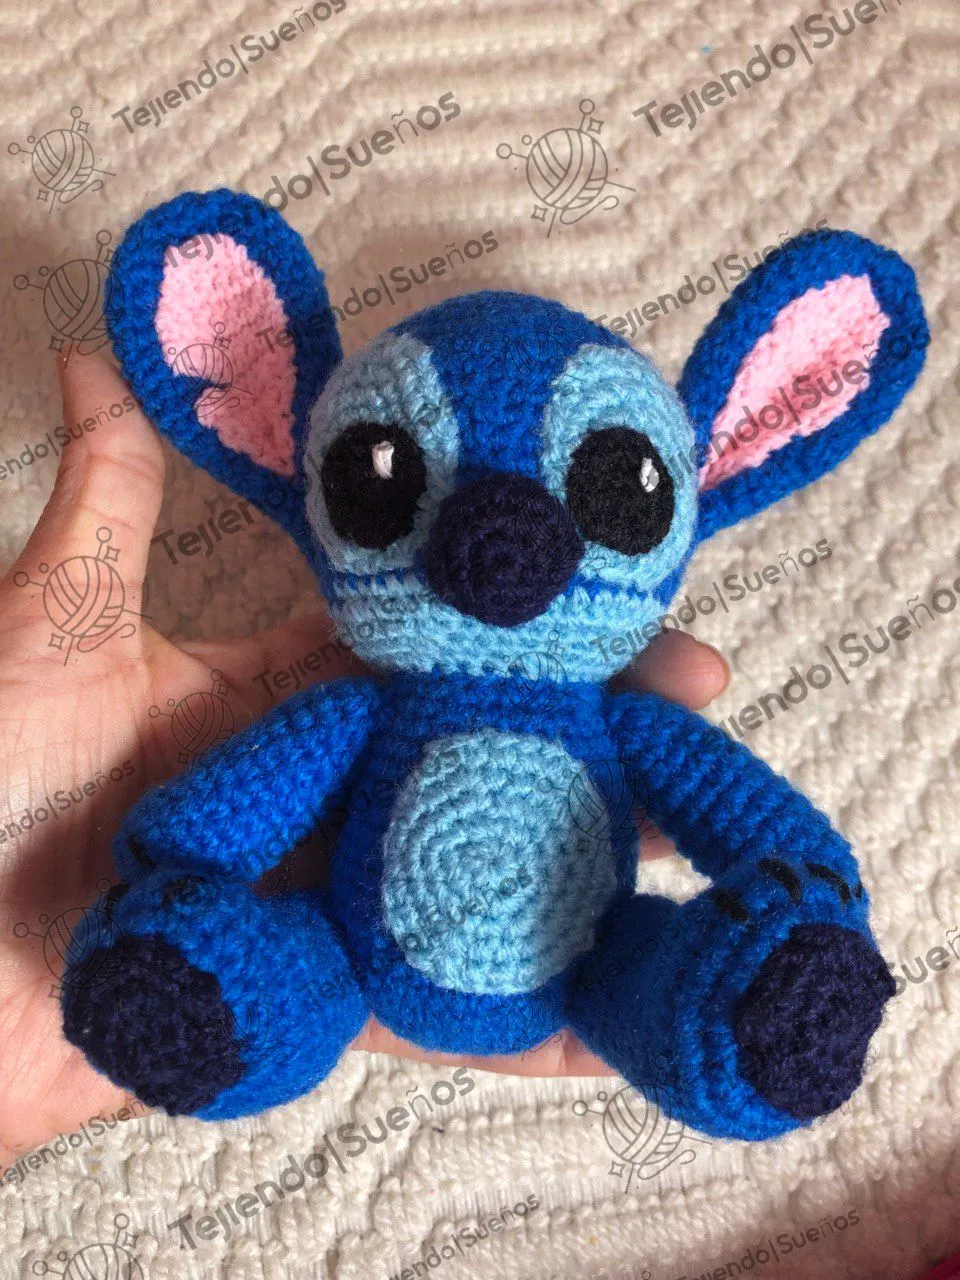 Image authored by Weaving Dreams/Imagen de la autoría de Tejiendo Sueños
The materials to use/Materiales a Utilizar:
Well, as it is a custom, we will start with the materials, you can see that they are very few and simple. We have three shades of blue yarn, a bit of black, pink and white, these would be the threads needed for this project. Then the usual wool needles, lace up the stuffing and a pair of scissors, not much else.
Bien como ya es una costumbre empezaremos por los materiales, pueden apreciar que son muy pocos y sencillos. Tenemos tres tonos de estambre azul un poco de negro, rosado y blanco, estos serían los hilos necesarios para este proyecto. Luego lo de siempre agujas laneras, agujetas el relleno y unas tijeras, poco más.
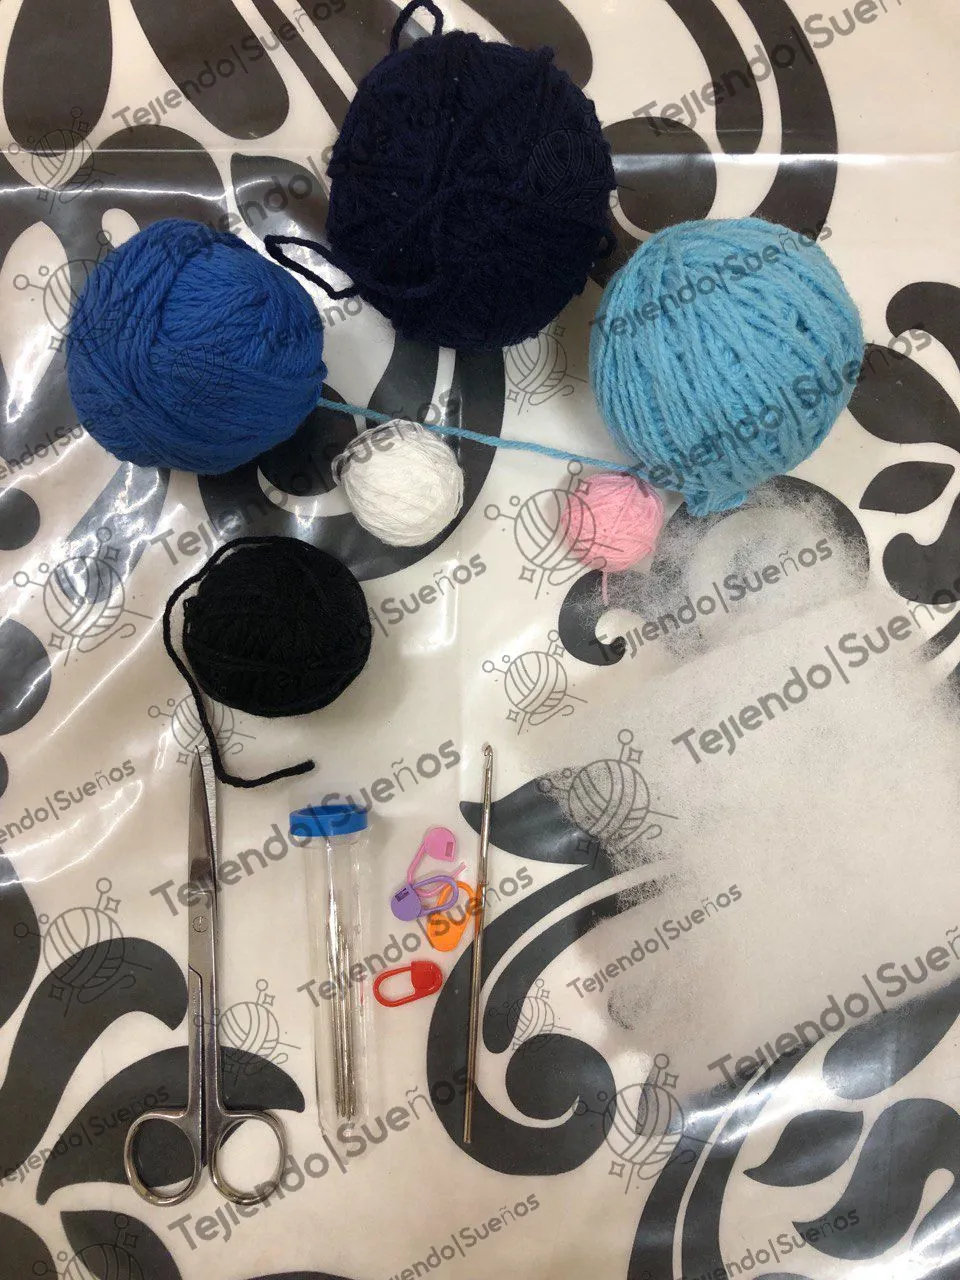 Image authored by Weaving Dreams/Imagen de la autoría de Tejiendo Sueños
The body/El cuerpo:
For the body we use dark blue thread, starting with a magic ring of 6 stitches and we gradually increase to reach 36 stitches in the sixth round, in this amount we do 12 rounds up to 18. Then we decrease to 30 stitches and then to 24 to finish the body at this point.
Para el cuerpo utilizamos hilo azul oscuro, comenzando por un anillo mágico de 6 puntos y vamos aumentado paulatinamente para llegar a 36 puntos en la sexta vueta, en esta cantidad damos 12 vueltas hasta la 18. Luego disminuimos a 30 puntos y después a 24 para terminar el cuerpo en este punto.
Image authored by Weaving Dreams/Imagen de la autoría de Tejiendo Sueños
Head/La Cabeza:
It begins with a magic ring of 6 stitches also with the dark blue thread, it is increased to reach 48 stitches in round 8, now we will do 9 rounds in this quantity with this color and a tenth in this same quantity but with blue thread lighter, then we will gradually decrease to end in 24 stitches the same as in the body so that they coincide and be able to join them later.
Se comienza con un anillo mágico de 6 puntos tambien con el hilo azul oscuro, se va aumentando para llegar a 48 puntos en la vuelta 8,ahora haremos 9 vueltas en esta cantidad con este color y una décima en esta misma cantidad pero con hilo azul más claro, luego iremos disminuyendo gradualmente para terminar en 24 puntos igual que en el cuerpo para que coincidan y poderlos unir más adelante.
Image authored by Weaving Dreams/Imagen de la autoría de Tejiendo Sueños
The hind and front legs/Las patas traceras y delanteras:
For the hind legs we will make a magic ring of 6 stitches and we will increase until we reach 30 stitches, we make two rounds in this quantity. After making 8 decreases and in the remaining 14 stitches, one single crochet for each stitch, the next row is 5 decreases and the next 12 stitches, one single crochet for each one, these 2 rows are done like this to form the leg. Next we will do 5 laps in the 17 stitches that remained and to finish we will do 2 laps, decreasing 3 stitches in each one. The front legs are easier: we make a magic ring of 7 points, increasing each point to reach 14 and we repeat for 12 rounds and that's it. Make two pieces of each.
Para las patas traceras haremos un anillo mágico de 6 puntos y aumentaremos hasta llegar a 30 puntos, hacemos dos vueltas en esta cantidad. Después hacemos 8 disminuciones y en los restantes 14 puntos un punto bajo por cada punto, la siguiente vuelta son 5 disminuciones y los siguiente 12 puntos un punto bajo por cada uno, estas 2 vueltas se realizan así para conformar la pata. Seguidamente daremos 5 vueltas en los 17 puntos que quedaron y para terminar se hacen 2 vueltas disminuyendo 3 puntos en cada una. Las patas delanteras son más sencillas hacemos un anillo mágico de 7 puntos un aumento en cada punto para llegar a 14 y repetimos por 12 vueltas y listo. Hacer dos piezas de cada una.
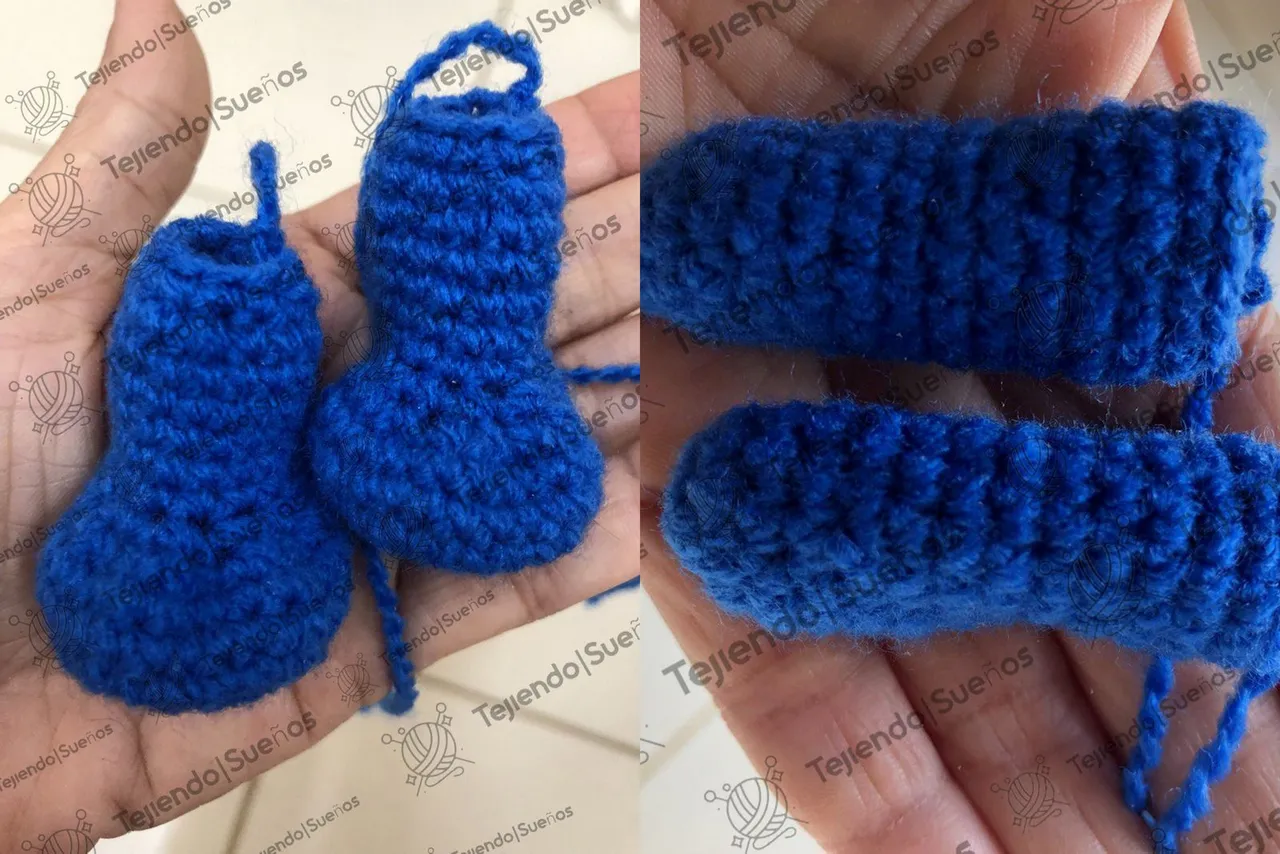 Image authored by Weaving Dreams/Imagen de la autoría de Tejiendo Sueños
Ears/Las Orejas:
For the ears we are going to start in dark blue, we are going to start it with a magic ring of six single crochet points and we are going to increase until we reach round 4 with 24 single crochet points. We are going to repeat these 24 points for eight rounds and from from there we are going to gradually decrease so that the decrease is not so abrupt we are going to decrease to 18 and there we will repeat four more laps in 18 points then we decrease to 12 and in that same amount of laps we repeat three laps that same amount of points we repeat three laps. Now we are going to move on to the inside of the ears, which is going to be done in a pink color. For the first ear we start with a chain of five stitches and from the second chain we make four single crochets, the second round we are going to start with a chain to go up and we make four single crochets, in the third round the same then we make an increase and three single crochet, the next round would be an increase and four single crochet to reach 6 points for the next three rounds we will do that same number of stitches, that is, 6. Then in the next round we will make an increase and five single crochet and the other an increase and six single crochets to reach eight points, then we will do three rounds with that same amount, that is to say, 8 and then we will go up and skip the first stitch to gradually decrease and then there would be 7 single crochets and so on until we reach 4 low points. We are going to do this only once and to make the second ear we are going to do the same until the eleventh round, then we are going to go to round 12 in which we will make four single crochets and a chain of four points. In the next row we are going to knit four single crochets over those chain stitches that we made and the remaining four stitches, from row 14 to 17, the same as in the previous piece.
Para las orejas vamos a empezar en color azul oscuro lo vamos a empezar con un anillo mágico de seis puntos bajos y vamos a ir aumentando hasta llegar a la vuelta 4 con 24 puntos bajos esos 24 puntos los vamos a ir repitiendo por ocho vueltas y a partir de ahí vamos a ir disminuyendo gradualmente para para que no quede tan brusco la disminución vamos a disminuir a 18 y ahí van a repetirse cuatro vueltas más en 18 puntos luego disminuimos a 12 y en esa misma cantidad de vueltas repetimos tres vueltas que esa misma cantidad de puntos repetimos tres vueltas. Vamos a pasar ahora a la parte de adentro de las orejas, que se va a hacer en un color rosado. Para la primera oreja comenzamos con una cadena de cinco puntos y a partir de la segunda cadeneta hacemos cuatro puntos bajos, la segunda vuelta vamos a empezar con una cadeneta para subir y hacemos cuatro puntos bajos, en la tercera vuelta igual luego hacemos un aumento y tres puntos bajos, la siguiente vuelta sería un aumento y cuatro puntos bajos para llegar a 6 puntos por las siguientes tres vueltas vamos a hacer esa misma cantidad de puntos es decir 6. Luego en la siguiente vuelta vamos a hacer un aumento y cinco puntos bajos y la otra un aumento y seis puntos bajos para llegar a ocho puntos, después haremos tres vueltas con esa misma cantidad es decir 8 y luego vamos a subir y saltar el primer punto para ir disminuyendo progresivamente y entonces quedarían 7 puntos bajos y así hasta llegar a 4 puntos bajos. Esto lo vamos a hacer una sola vez y para hacer la segunda oreja vamos a hacerlo igual hasta la oncena vuelta, vamos entonces a pasar a la vuelta 12 en la que haremos cuatro puntos bajos y una cadena de cuatro puntos. En la siguiente vuelta vamos a tejer cuatro puntos bajos sobre esas cadenetas que hicimos y los restantes cuatro puntos, de la vuelta 14 a las 17 igual que en la pieza anterior.
Image authored by Weaving Dreams/Imagen de la autoría de Tejiendo Sueños
The little details/Los pequeños detalles:
We are going to do the stain for the eyes and the belly in light blue, both have a very similar start, with magic rings of six points. We are going to take the one for the eyes up to 24 points and the belly is going to be up to 30 points in the case of the eyes and the black part, that is, the pupil is going to be a magic ring of six points and we are going to take it up to 12 points. The nose in a darker blue than the body, we are going to make a magic ring of six points and we are going to increase it up to 18 points and there we will make two more turns in that same amount. The spot on the legs will also be with a magic ring of six single crochet stitches and we will take it to 12 stitches and we will do one more round in this quantity and the tail will be the same as the spot on the legs but instead of one it would be two equal laps in 12 points.
La mancha de los ojos y la barriga la vamos a hacer en color azul claro ambos tienen una un empezar muy similar, con anillos mágicos de seis puntos. La de los ojos la vamos a llevar hasta 24 puntos y la barriga va a ser hasta 30 puntos en el caso de los ojos ya la parte negra es decir la pupila va a ser un anillo mágico de seis puntos y lo vamos a llevar hasta 12 puntos. La nariz en un azul más oscuro que el del cuerpo vamos a hacer un anillo mágico de seis puntos y lo vamos a ir aumentando hasta 18 puntos y ahí haremos dos vueltas más en esa misma cantidad. La mancha de las patas va a ser también con un con un anillo mágico de seis puntos bajos y vamos a llevarlo hasta 12 puntos y haremos una vuelta más en esta cantidad y la cola igual que la mancha de las patas pero en vez de una serían dos vueltas igual en 12 puntos.
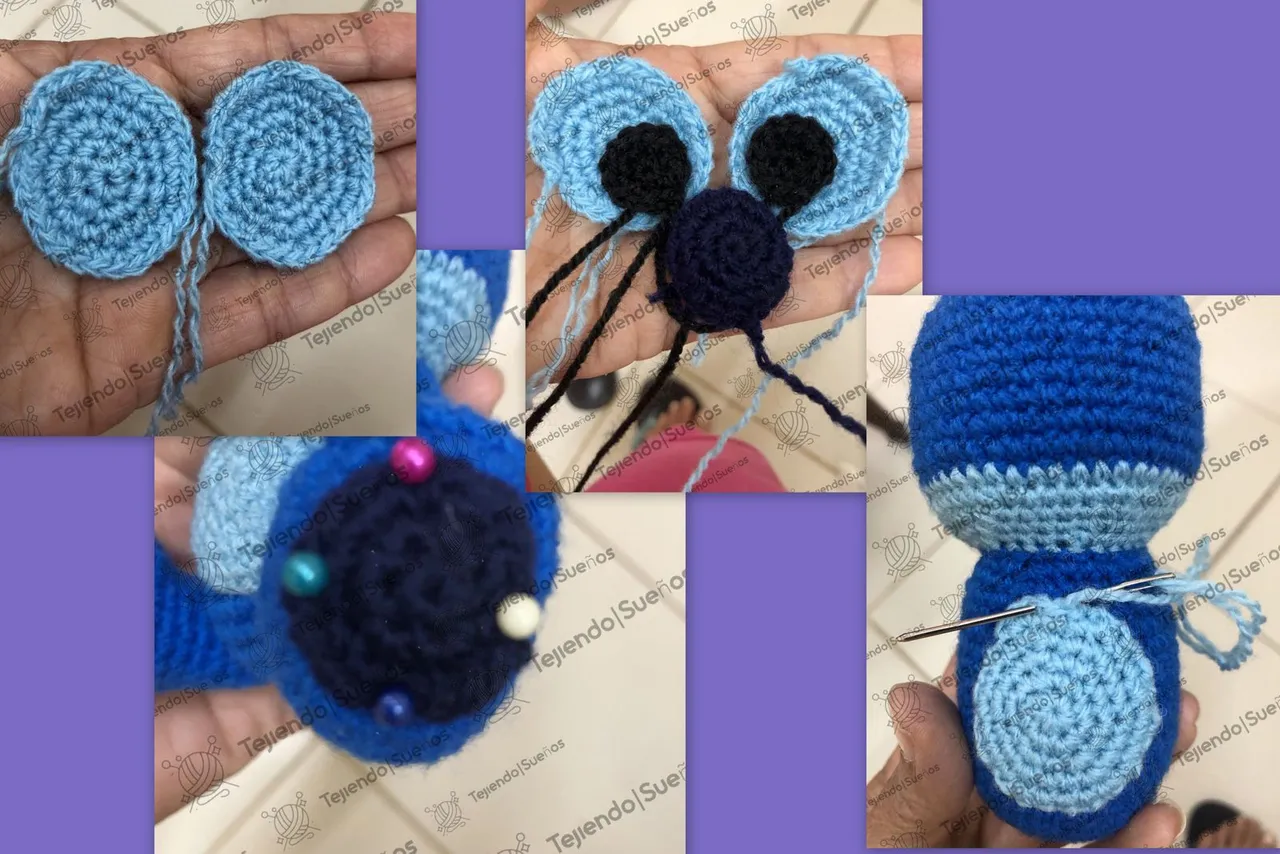 Image authored by Weaving Dreams/Imagen de la autoría de Tejiendo Sueños
Assembly and finishes/Ensamblaje y terminaciones:
Well, for the assembly, we don't have much to tell you other than taking care of the details, in this case we first assembled the extremities, that is, the legs and hands, then we put the spots for the eyes, the belly, we put the eyes on the part of the pupil of the eye and then finally the ears since we had previously put the pink part in the blue part and then we mounted them together on the doll as you can see there in the images. We always put the tail fixing first with pins to determine the position of the pieces and that they are well aligned and finally the small details as well as the nails of the feet that were made with black thread and the shine of the eyes and well this is We hope you like the end result.
Bueno para el montaje no tenemos mucho que decirle más que cuidar bien de los detalles, en este caso nosotros montamos primero las extremidades es decir las patas y las manos, luego pusimos las manchas de los ojos, la barriga, le pusimos los los ojos la parte de la pupila del ojo y luego por último las orejas ya que previamente le habíamos puesto la parte rosada en la parte azul y luego las montamos juntas en el muñeco como pueden ver ahí en las imágenes. Pusimos la cola siempre fijando primero con alfileres para determinar bien la posición de las piezas y que queden bien alineadas y por último los pequeños detalles así como las uñas de las patas que se hicieron con hilo negro y el brillo de los ojos y bueno este es el resultado final esperamos que les guste.
Image authored by Weaving Dreams/Imagen de la autoría de Tejiendo Sueños
Image authored by Weaving Dreams/Imagen de la autoría de Tejiendo Sueños
 Image authored by Weaving Dreams/Imagen de la autoría de Tejiendo Sueños