Español
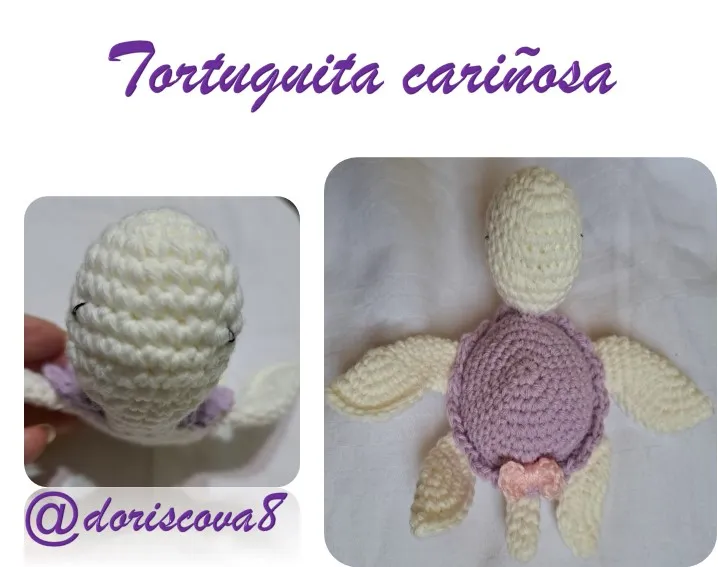
Saludos estimada comunidad hoy les traigo una hermosa tortuguita muy especial para los bebes, realizada con lana exclusiva para tejer prendas de bebe, en este caso la realice pensando en mi nietecita, que le encanta jugar con animalitos, la verdad que es muy tierna.
La verdad que este tipo de animalitos la mejor forma de tenerlos es de esta forma ya que con ello no le cambiamos su habitad, y la verdad soy de las que no les gusta tener ningún tipo de estos animalitos que llaman exóticos secuestrados en una casa, porque la verdad que no es común que las personas tengan como mascota de uno de ellos, pue he conocido personas que tienen inclusive animales que pueden representar hasta un peligro para ellos mismos, en fin pero como dicen entre gustos y colores no han nacido los autores, pero repito lo mejor es verlos libres en su habitad natural, y otros que no me gusta de verlos, jajaja, como las serpientes.
Materiales
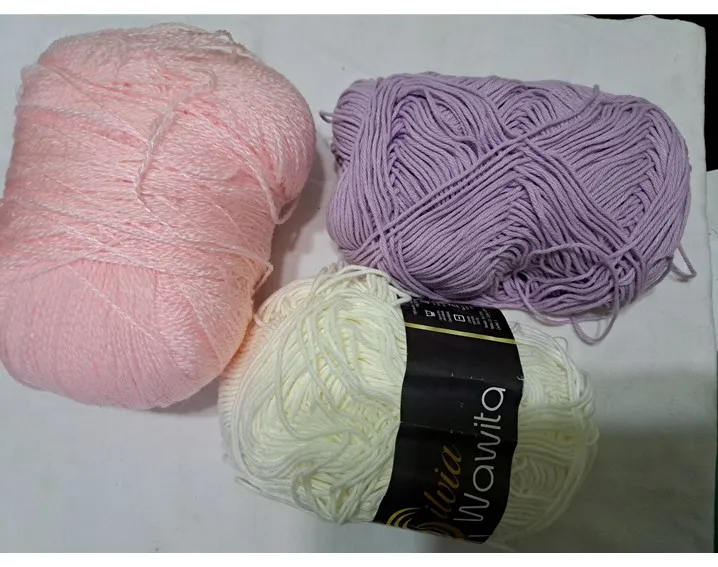
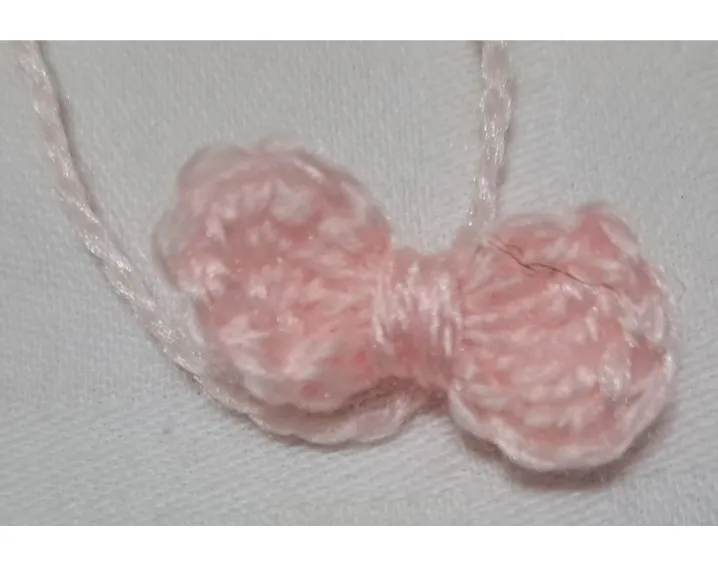
Los materiales que utilice fue lana para bebe de la marca wawita en los tonos arena y lila, una lana de bebe rosada para el lacito, relleno sintético y ganchillo de 2,5 mm. No les digo cantidades porque es poco lo que se gasta de cada una de las lanas.
Procedimiento
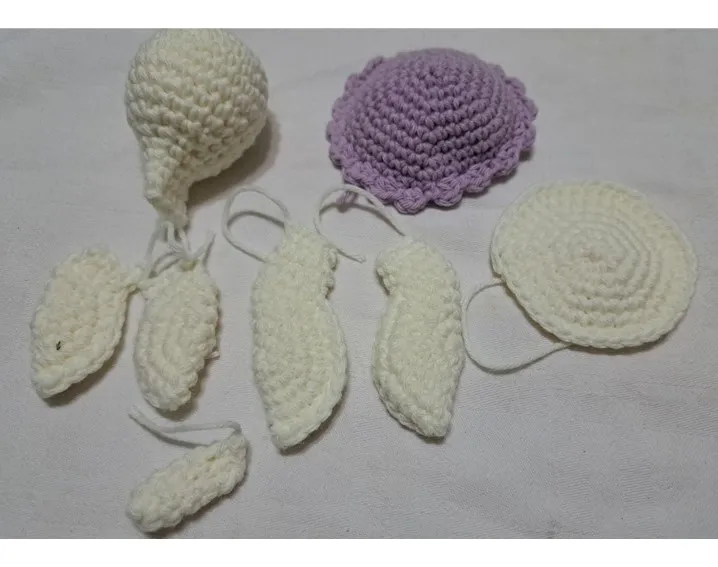
Para todas las piezas se empieza con un anillo mágico con 6 puntos bajos, ya les indico el procedimiento para cada pieza, las aleticas, la colita y la base en color arena y el caparazón en color lila.
Aletas delanteras
1V: 1 anillo mágico (AM) de 6 puntos bajos (pb)
2V: 6 aumentos (aum) de pb.
3V: (1 pb – 1 aum) x 6.
4V: (2 pb – 1 aum) x 6
5V: (3 pb – 1 aum) x 6
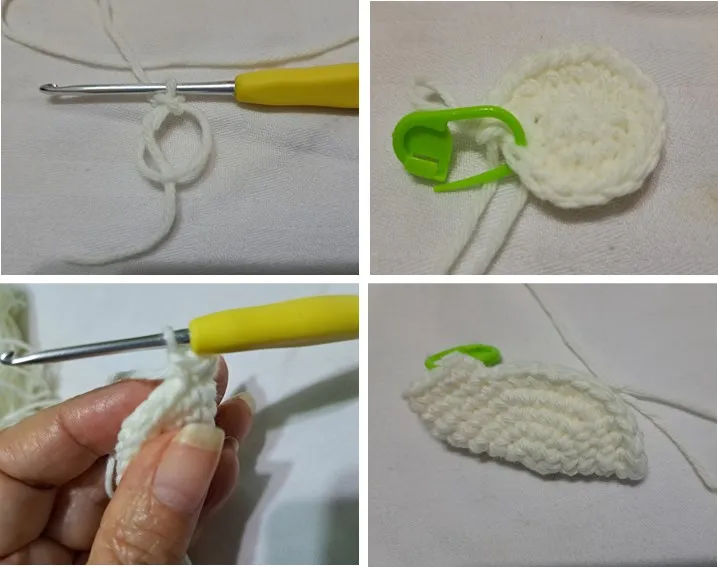
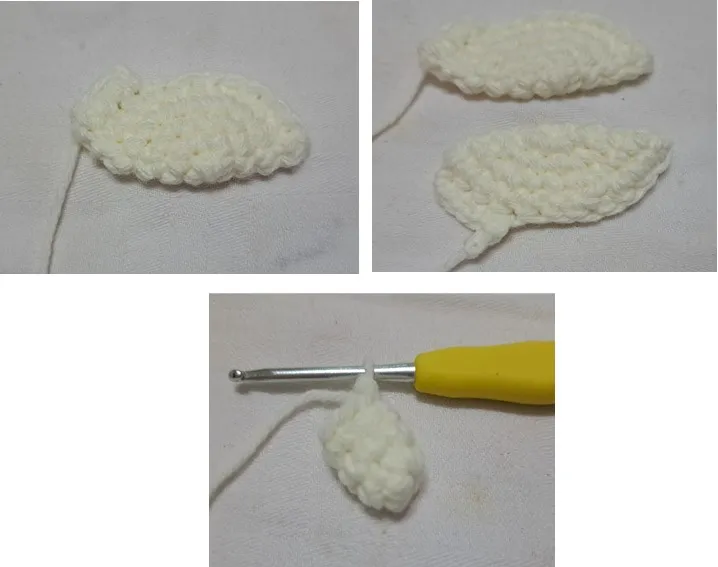
Se dobla la pieza a la mitad dejando el derecho hacia afuera y se unen con 10 pb, luego en ese pequeño orificio que queda realizamos 3 vueltas de puntos bajos y cerramos luego esa parte con puntos bajos. culminamos.
Aletas traseras
1V: 1AM de 6 pb
2V: 6 aum de pb
3V: (1 pb – 1 aum) x 6
4V: 2 pb – 1 aum) x 6
Se dobla la pieza a la mitad y se unen realizando 11 pb, giramos el tejido y realizamos 4 pb, y culminamos.
Colita
1V: 1 AM con 6 pb
2V a 5V: 6 pb en cada vuelta, culminamos.
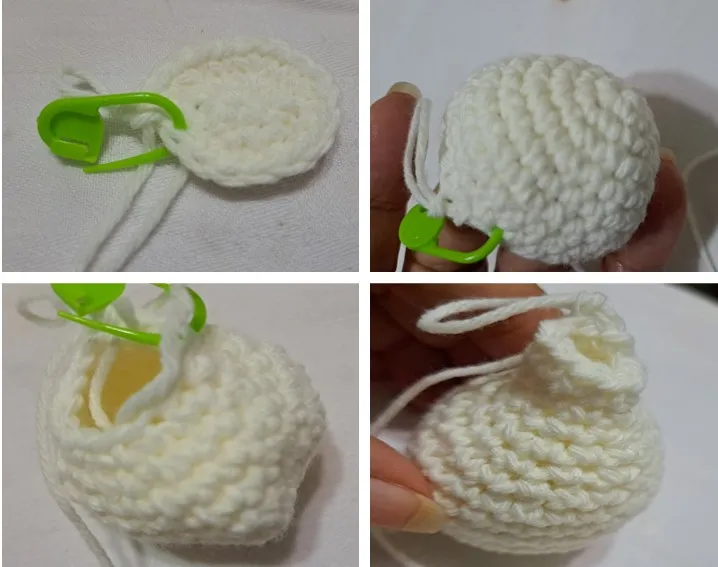
Cabeza
1V: 1AM de 6 pb
2V: 6 aum de pb
3V: (1 pb – 1 aum) x 6
4V: (2 pb – 1 aum) x 6
5V: 24 pb
6V: (3 pb – 1 aum) x 6
7V: 30 pb
8V: (3 pb – 1 disminución, dis) x 6
9V: 24 pb
10V: (2 pb – 1 dis) x 6
11V: (1 pb – 1 dis) x 6
Al realizar esta vuelta se puede rellenar lo que se pueda o bien esperar hasta culminar la vuelta 15, ya que es una pieza pequeña.
12V: 12 pb
13V – 15V: 12 pb
Se culmina uniendo la pieza con 5 pb.
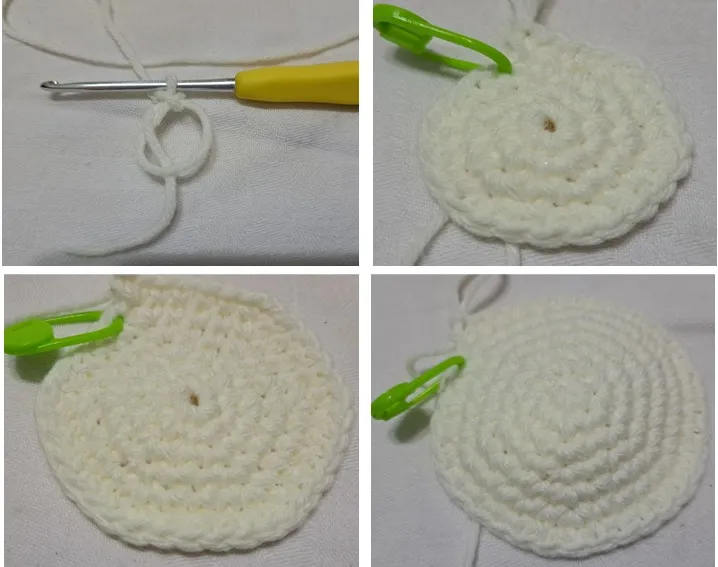
Base
1V. 1 AM de 6 pb
2V: 6 aum de pb
3V: (1 pb – 1 aum) x 6
4V: (2 pb - 1 aum) x 6
5V: (3 pb – 1 aum) x 6
6V: (4 pb .1 aum) x 6
7V: 36 pb
Culminamos
Caparazón en color lila
1V: 1 AM de 6 pb
2V: 6 aumentos de pb
3V: (1 pb – 1 aum) x 6
4V: (2 pb – 1 aum) x 6
5V: (3 pb - 1 aum) x 6
6V: 30 pb
7V: (4 pb - 1 aum) x 6
8V y 9V: 36 pb
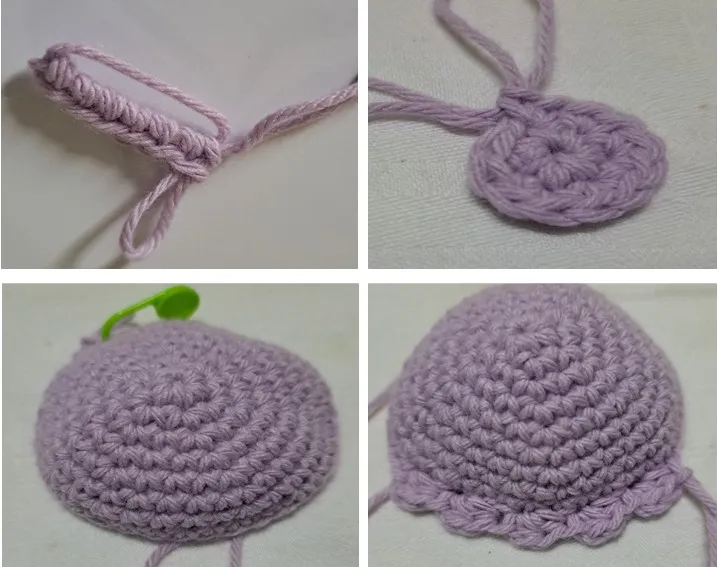
10V: Se realizan una especie de conchitas con medio punto alto y punto alto, y se culmina de esta forma.
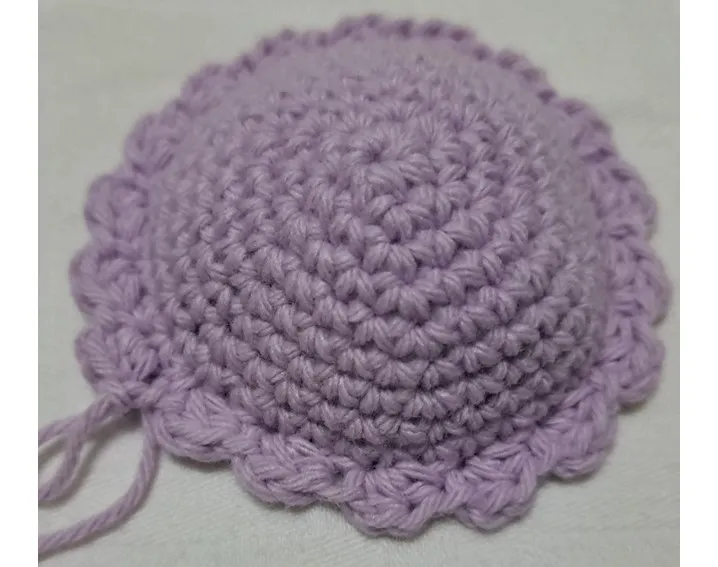
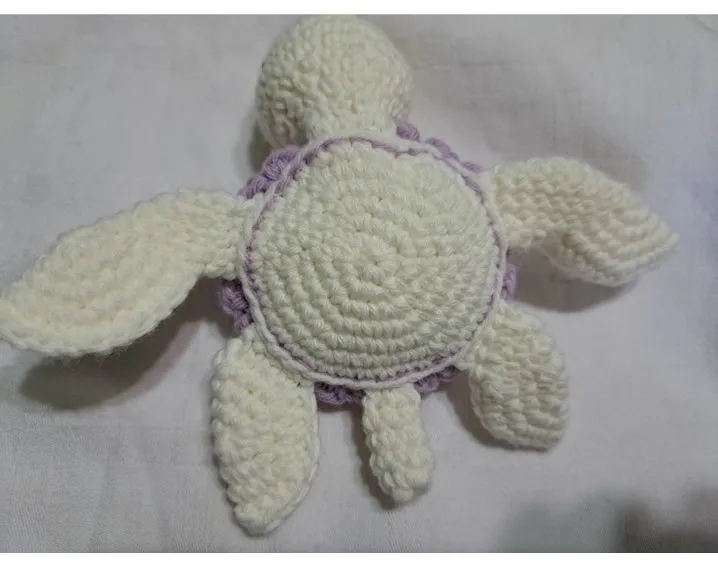
Seguidamente con todas las piezas culminadas se procede a unir cada una de las piezas con el caparazón y la base, empezando por la cabeza, de tal forma que al unir se valla tomando un punto del caparazón y uno de la base, intercalando las piezas cuando se corresponda, cuando falte la ultima aletica se rellena el cuerpo de la tortuguita, colocamos la última aletica y terminamos de cerrar el cuerpo.

English
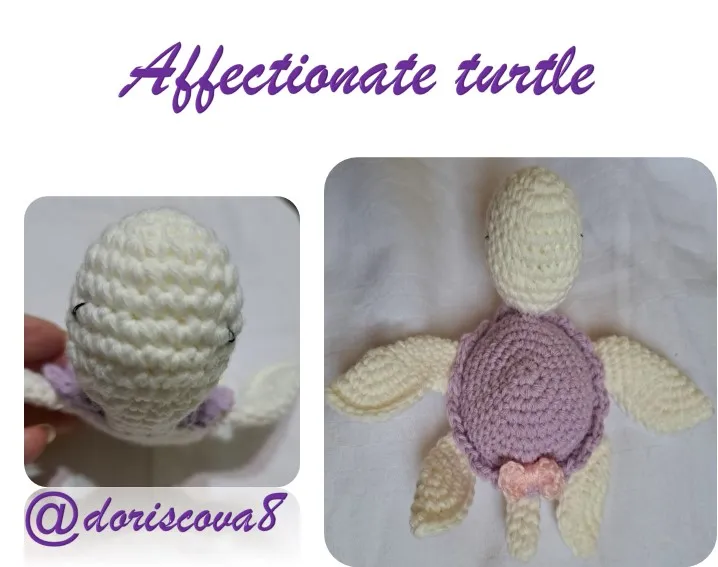
Greetings dear community today I bring you a beautiful turtle very special for babies, made with exclusive wool for knitting baby clothes, in this case I made it thinking of my granddaughter, who loves to play with animals, the truth is that it is very tender.
The truth is that this type of animals the best way to have them is this way because with it we do not change their habitat, and the truth is that I am one of those who do not like to have any type of these animals that call exotic kidnapped in a house, because the truth is that it is not common for people to have as a pet one of them, I have known people who even have animals that can represent a danger to themselves, but as they say between tastes and colors are not born the authors, but I repeat the best thing is to see them free in their natural habitat, and others that I do not like to see them, hahaha, like snakes.
Materials
The materials I used were baby wool of the brand wawita in sand and lilac tones, a pink baby wool for the bow, synthetic stuffing and crochet of 2.5 mm. I don't tell you the quantities because the amount of each wool is very little.
Procedure
For all the pieces start with a magic ring with 6 low stitches, I will show you the procedure for each piece, the fins, the tail and the base in sand color and the shell in lilac color.
Front fins
1V: 1 magic ring (AM) of 6 single crochet stitches (pb)
2V: 6 increases (increases) of bp.
3V: (1 bp - 1 increase) x 6.
4V: (2 bp - 1 increase) x 6.
5V: (3 bp - 1 increase) x 6
Fold the piece in half leaving the right side out and join with 10 stitches, then in that small hole that remains we make 3 rows of single crochet and close that part with single crochet.
Back flaps
1V: 1AM of 6 sts
2V: 6 increases of sts
3V: (1 sts - 1 increases) x 6
4V: (2 sts - 1 increase) x 6
Fold the piece in half and join it making 11 stitches, turn the fabric and make 4 stitches, and finish.
Purl
1V: 1 AM with 6 sts
2V to 5V: 6 sts in each row, finish.
Head
1V: 1AM of 6 sts
2V: 6 increases of bp
3V: (1 sc - 1 increase) x 6
4V: (2 bp - 1 increase) x 6
5V: 24 bp
6V: (3 bp - 1 bp - 1 gain) x 6
7V: 30 bp
8V: (3 bp - 1 decrease, dis) x 6
9V: 24 bp
10V: (2 bp - 1 dis) x 6
11V: (1 bp - 1 dis) x 6
When making this row you can either fill in as much as you can or wait until the end of row 15, as it is a small piece.
12V: 12 bp
13V - 15V: 12 sts
Finish by joining the piece with 5 sts.
Base
1V. 1 AM of 6 bp
2V: 6 bp increase
3V: (1 sc - 1 st - 1 st increase) x 6
4V: (2 bp - 1 aum) x 6
5V: (3 bp - 1 aum) x 6
6V: (4 bp .1 aum) x 6
7V: 36 bp
We finish
Shell in lilac color
1V: 1 AM of 6 bp
2V: 6 bp increments
3V: (1 bp - 1 bp increase) x 6
4V: (2 bp - 1 increase) x 6
5V: (3 bp - 1 bp - 1 bp increments) x 6
6V: 30 bp
7V: (4 bp - 1 aum) x 6
8V and 9V: 36 bp
10V: A kind of shells are made with half double crochet and double crochet, and finished in this way.
Next, with all the pieces completed, we proceed to join each of the pieces with the shell and the base, starting with the head, in such a way that when joining, we take one stitch from the shell and one from the base, intercalating the pieces when it corresponds, when the last allote is missing, we fill the body of the turtle, we place the last allote and we finish closing the body.
Translated with www.DeepL.com/Translator (free version)
Fuente de imágenes: Archivo Personal.


MIS REDES SOCIALES