Este post também foi escrito em Inglês
This post was also written in English
Olá Comunidade, Boas Vibes!! 🙏
Gostaria de explicar como funciona o HiveVote, pois, acredito ser uma ferramenta ótima para quem tem a vida muito agitada e às vezes não têm tempo para acompanhar as postagens dos amigos e fica sem conseguir votar.
Login e Registro
Vamos ao início:
- Acesse o seguinte site: https://hive.vote/.

- Na parte superior, na direita clique em “Login / Register”:

- Irá abrir a seguinte página:
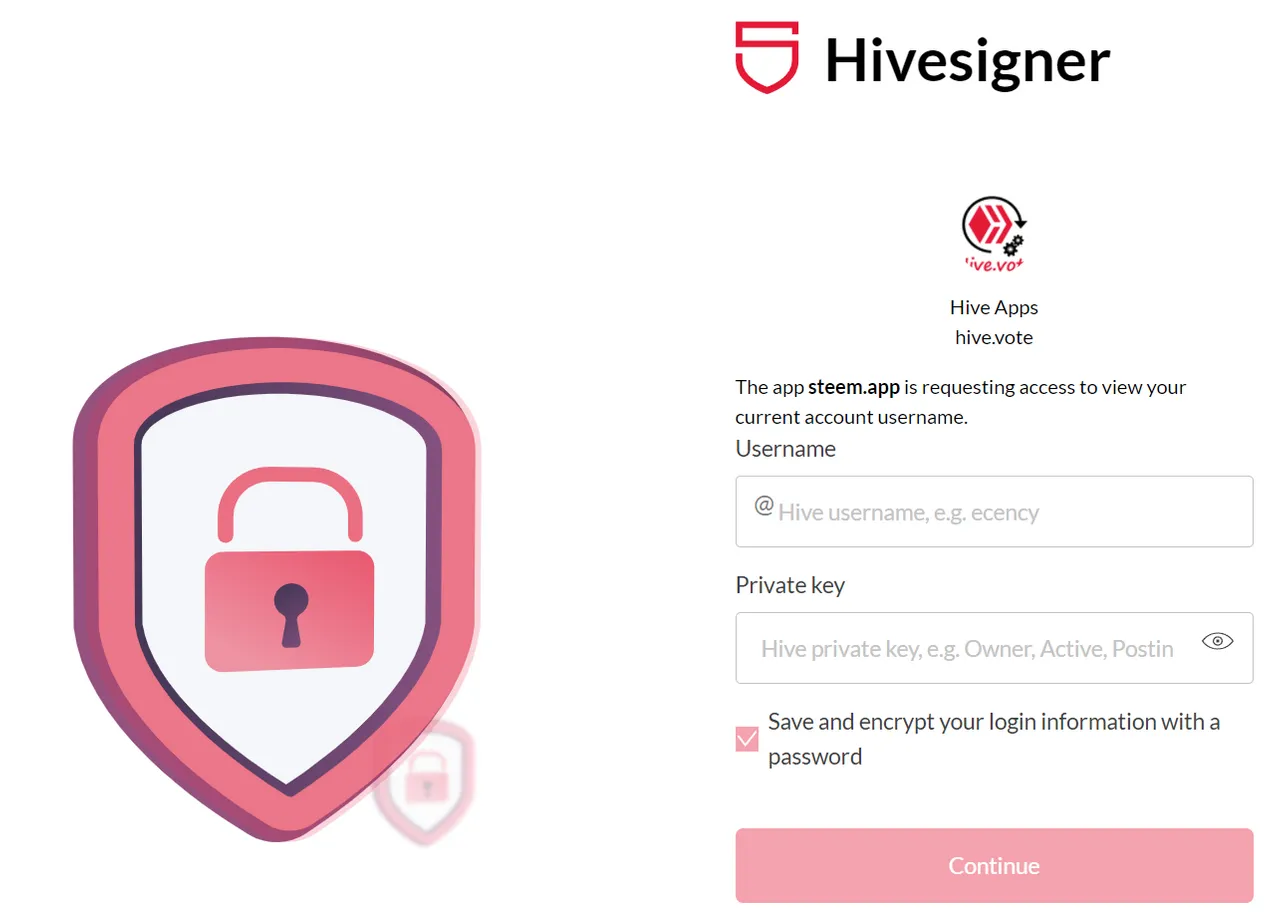
- Coloque o seu nome de usuário da Hive, o mesmo que usa para logar no Splinterlands, Rising Star, etc. Você precisa colocar sua chave privada para poder realizar o login e aproveitando, já deixa a opção “Save and encrypt...” marcada, pois com isso você vai poder criar uma senha mais amigável para entrar toda vez.
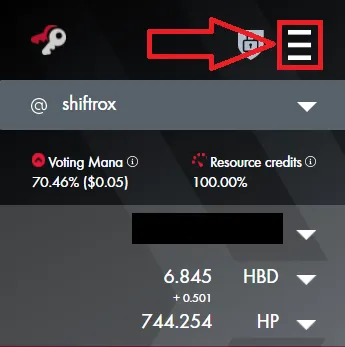
Caso não saiba como pegar a sua chave, provavelmente você já utiliza a extensão Hive Keychain, você pode pegar lá:
Clique nesses 3 traços brancos:
- Vá em “Manage Accounts”:
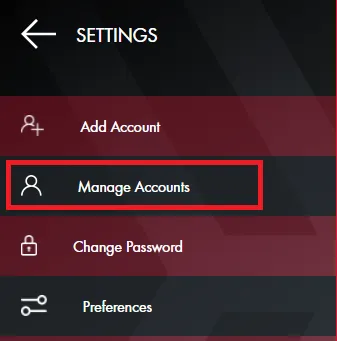
- Onde está marcado com a seta em vermelho, clique para que sua chave privada apareça, clique novamente para copiar automaticamente e com isso, volte para a tela de login onde estava solicitando a chave privada.

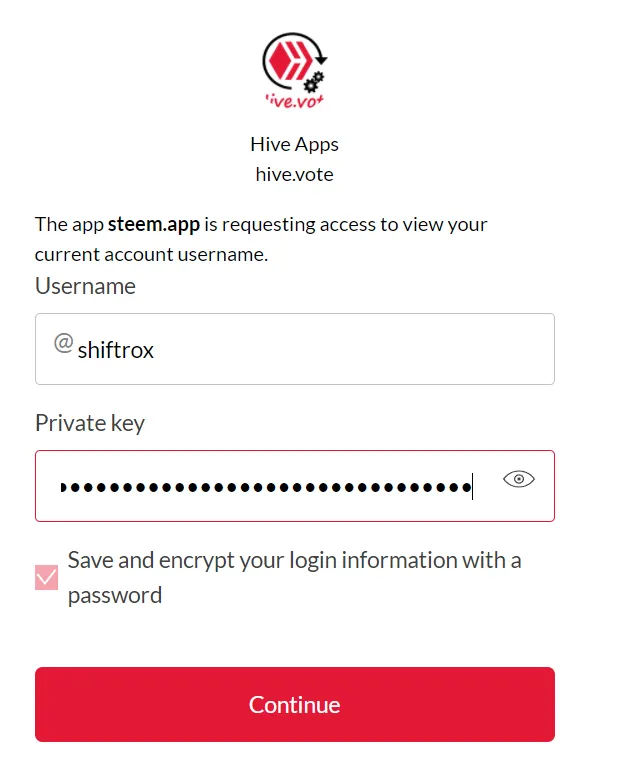
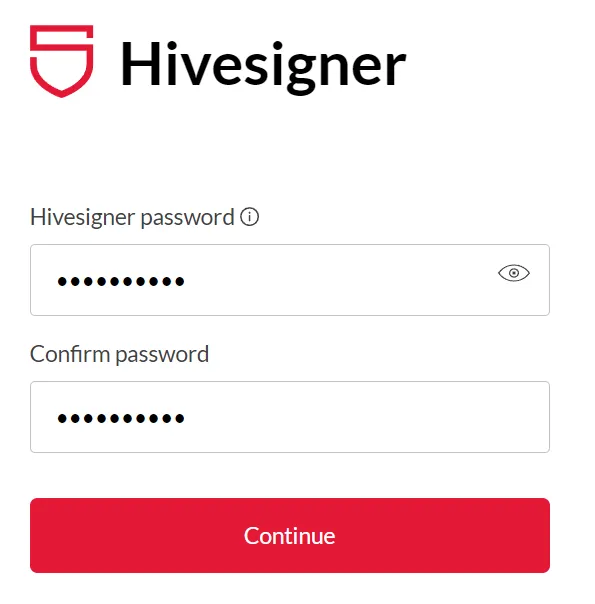
Após todo esse processo, de pegar o seu usuário hive e sua chave privada, clique em “Continue”, a seguinte página será carregada. Nesta página, podemos criar uma senha mais amigável e pessoal, por exemplo: “hive123a”, “admin123” ou “frangovoador”.
Agora estamos logados com toda segurança no HiveVote!
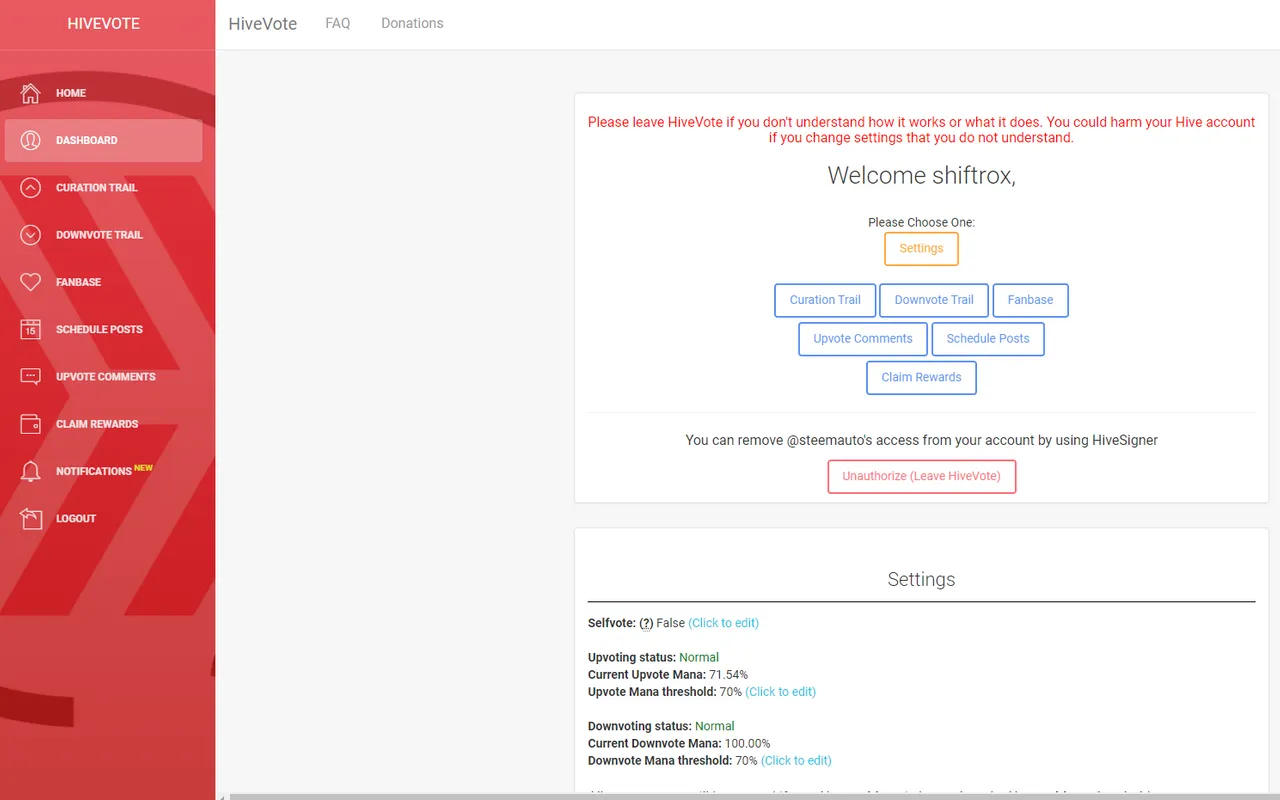
Primeiras Configurações
Nesta primeira página, temos algumas configurações para realizar. Aqui no print estão as minhas, mas fica claro que você pode realizar do jeito que preferir, vou apenas indicar e explicar o que cada uma faz:
Trilha de Curação
Vamos para a configuração de uma trilha de curação. Nesta opção você configura para seguir alguém nos votos desta pessoa, então aonde ela realiza um voto, seu perfil, de forma automática, vota nesta pessoa também.
Aqui é um exemplo para o Selfvote, pois caso essa pessoa vote em você e a opção estiver ativa, você irá votar em você mesmo, caso desabilitado, isso não irá acontecer.
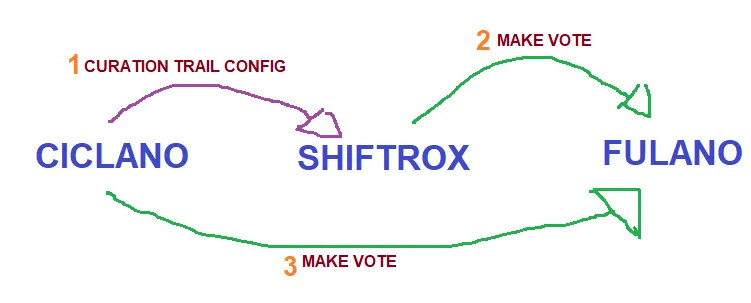
Veja essa obra de arte criada no paint, mostrando o processo de trilha de curação.
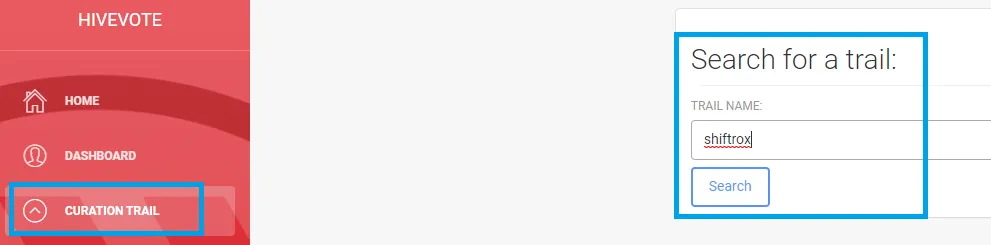
- Para configurar clique em “Curation Trail”, desça um pouco a página e depois coloque o nome da pessoa e clique em “Search”:
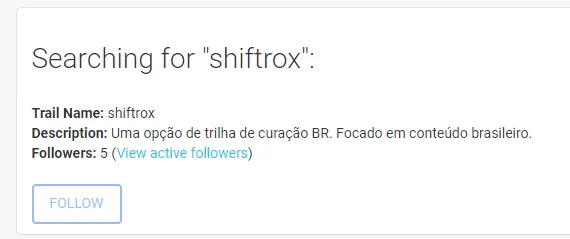
- A página irá carregar da forma mostrada abaixo. Clique no botão “Follow” para começar a seguir está pessoa:
Essa foi a primeira parte do guia, agora vamos para a parte de configuração propriamente dita, sobre como você quer que funcione os seus votos quando seguindo uma trilha.
Abaixo podemos observar as trilhas de curação que estou seguindo, no momento estão todas paradas, pois estou realizando mais votos manuais. Para configurar, clique na engrenagem azul do perfil desejado.
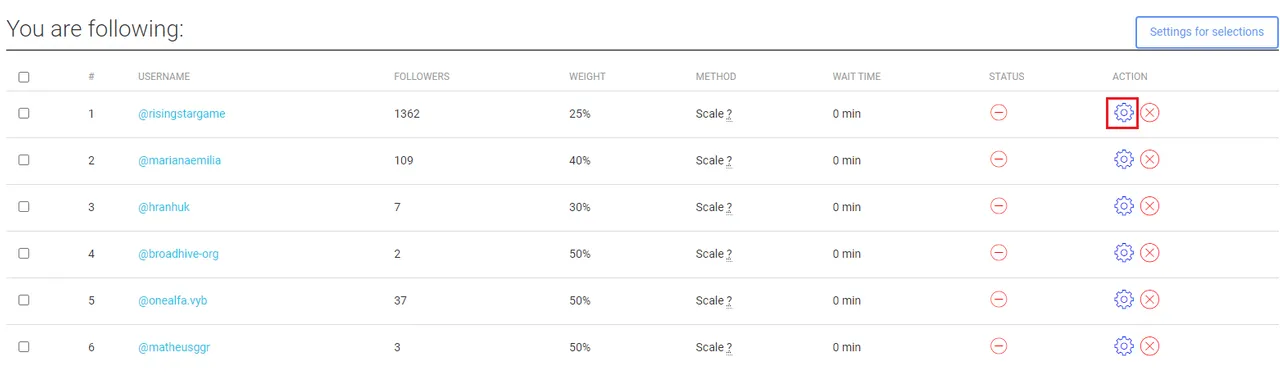
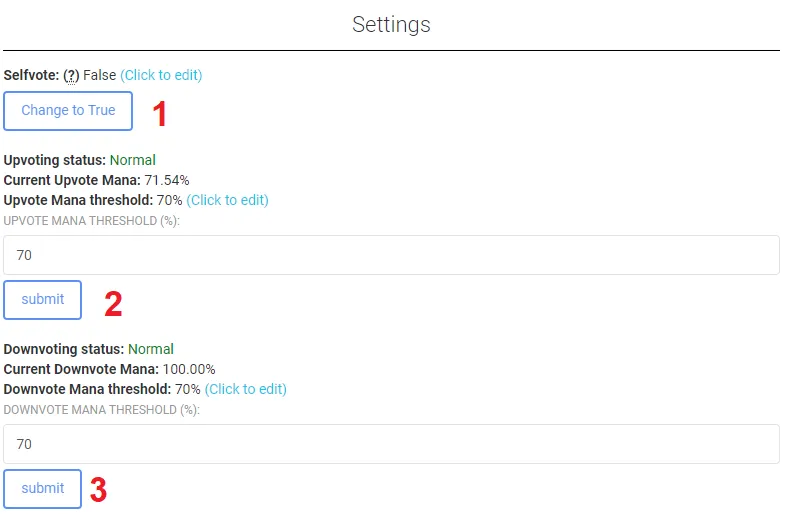
Basicamente você irá mexer em 3 opções, as que estão com as setas:

- Enable: se marcado está ativa, se desmarcada, desativada. É apenas um liga e desliga bem fácil.
- Voting weight (Scale): este é o peso do voto, por padrão ele vem como escala e 50% e o que isso quer dizer? A escala, como o nome diz, você vota em uma proporção conforme o voto da pessoa que está seguindo. Então se você deixa 50% em escala, e a pessoa vota 100%, você entra com 50% no post da pessoa votada. Se o perfil votou 80%, você irá votar com 40% e assim segue a escala / proporção.
- Voting weight (Fixed): esse modo, como o nome diz é fixo, então quando a pessoa votar, você sempre irá entrar com o valor do voto configurado aqui, fixamente. Então se o curador votou 100% ou 10%, não importa, você votará sempre com o valor configurado aqui.
- Save Settings: esse botão confirma qualquer alteração que você realizar, dei um destaque para ele, pois já vi muito as pessoas configurarem o voto, mas não funcionar, por justamente não clicar nele. Então qualquer alteração que fizer, clique no botão para salvar.
Com isso, o check verde indica que a trilha está operante, para desativar, basta apenas repetir o processo descrito acima, desmarcando a opção “Enable” e confirmando.

Fanbase
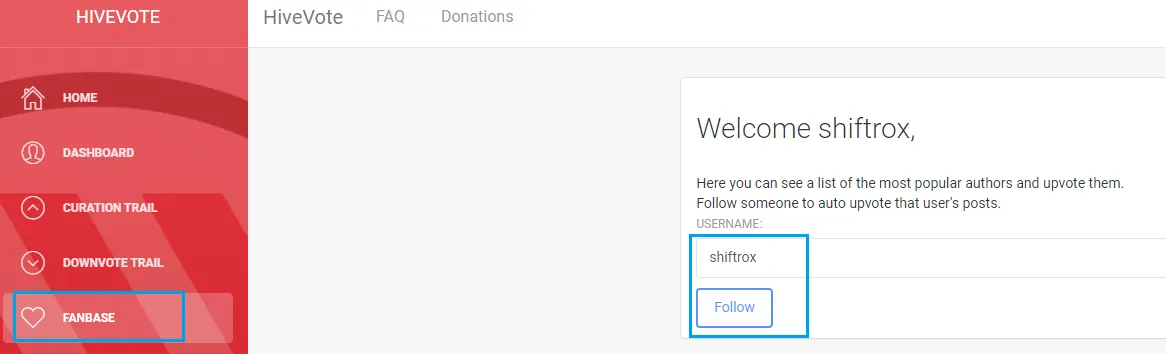
Por último agora, a fanbase. Neste modelo de configuração, você faz os ajustes para o processo de voto automático nas postagens de uma única pessoa. Então, quando você configura essa parte para um determinado perfil e este perfil efetua uma postagem, seu usuário dará o voto configurado nessa postagem.
O processo é bem parecido com o anterior, você clica em fanbase na esquerda, pesquisa o nome da pessoa e clica em “Follow”.
Para não alongar muito, o processo de configuração é bem simples, você terá novamente uma lista e então procure pelo perfil desejado e clique na engrenagem azul para fazer a configuração.
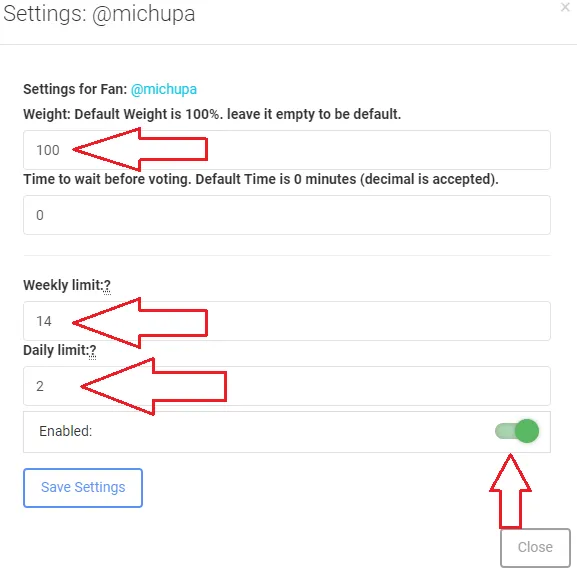
- Weight: Aqui é o peso do voto, neste caso não tem escala, apenas o valor fixo que por padrão é 100%. Configure com o valor que você deseja votar para a pessoa.
- Weekly limit: O limite de votos semanal, ou seja, qual a quantidade máxima de votos você quer realizar por semana nas postagens da pessoa.
- Daily limit: O limite de votos diário, ou seja, qual a quantidade máxima de votos você quer realizar por dia nas postagens da pessoa.
- Enabled: Essa opção é um liga / desliga rápido, para que você realize ou não os votos automáticos.
Por fim, novamente clique em “Save Settings” para confirmar e pronto!
Finalizando
Então é isso pessoal, esse é o básico das configurações. O Hive Vote ajuda demais quem tem uma vida corrida e às vezes não conseguem realizar os votos para ajudar seus amigos ou nos perfis de quem gosta.
Caso por algum motivo também você fique sem conseguir interagir na Hive, com a configuração automática você não deixa de ajudar as pessoas.
Melhor que isso, apenas a verdadeira interação: vote, reblogue, deixe um comentário, compartilhe no Twitter ou o qualquer outra forma de interação, tenho certeza que isso deixa as pessoas mais motivas a continuar com suas postagens!

Hello Community, Good Vibes!! 🙏
I would like to explain how HiveVote works, because I believe it is a great tool for those who have a very busy life and sometimes don't have time to follow their friends' posts and are unable to vote.
Login and Registration
Let's go to the beginning:
- Access the following website: https://hive.vote/.
- At the top right click on “Login / Register”:
- The following page will open:
- Enter your Hive username, the same one you use to log in to Splinterlands, Rising Star, etc. You need to put your private key to be able to login and, taking advantage, leave the option “Save and encrypt...” checked, because with that you will be able to create a more friendly password to enter every time.
If you don't know how to get your key, you probably already use the Hive Keychain extension, you can get it there:
Click on these 3 white dashes:
- Go to “Manage Accounts”:
- Where it is marked with the red arrow, click for your private key to appear, click again to automatically copy and with that, go back to the login screen where you were requesting the private key.
After all this process, to get your hive username and your private key, click on “Continue”, the following page will be loaded. On this page, we can create a more friendly and personal password, for example: “hive123a”, “admin123” or “frangoflying”.
We are now securely logged into HiveVote!
First Settings
On this first page, we have some settings to perform. Here in the print are mine, but it is clear that you can do it the way you prefer, I will just indicate and explain what each one does:
Curation Trail
Let's move on to setting up a curation trail. In this option you configure to follow someone in this person's votes, so where he performs a vote, his profile, automatically, votes for this person too.
Here is an example for Selfvote, because if that person votes for you and the option is active, you will vote for yourself, if disabled, this will not happen.
See this artwork created in paint, showing the curation trail process.
- To configure click on “Curation Trail”, scroll down a little and then enter the name of the person and click on “Search”:
- The page will load as shown below. Click the “Follow” button to start following this person:
That was the first part of the guide, now let's get to the configuration part itself, about how you want your votes to work when following a trail.
Below we can see the curation trails I am following, at the moment they are all stopped, as I am performing more manual vows. To configure, click on the blue gear of the desired profile.
Basically you will move in 3 options, the ones with the arrows:
- Enable: if checked, it is active, if unchecked, it is deactivated. It's just an easy turn on and off.
- Voting weight (Scale): this is the weight of the vote, by default it comes as scale and 50% and what does that mean? The scale, as the name says, you vote in a proportion according to the vote of the person you are following. So if you leave 50% in scale, and the person votes 100%, you enter 50% in the person's post. If the profile voted 80%, you will vote with 40% and so follows the scale / proportion.
- Voting weight (Fixed): this mode, as the name says, is fixed, so when the person votes, you will always enter the value of the vote set here, fixedly. So if the curator voted 100% or 10%, it doesn't matter, you will always vote with the value configured here.
- Save Settings: this button confirms any changes you make, I highlighted it, because I've seen a lot of people configure the vote, but it doesn't work, for not clicking on it. So any changes you make, click the save button.
With that, the green check indicates that the track is working, to disable it, just repeat the process described above, unchecking the “Enable” option and confirming.
Fanbase
Lastly now, the fanbase. In this configuration template, you make adjustments for the automatic voting process on posts by a single person. So when you configure this part for a certain profile and this profile makes a post, your user will cast the vote configured on that post.
The process is very similar to the previous one, you click on fanbase on the left, search for the person's name and click on “Follow”.
In order not to take too long, the configuration process is very simple, you will again have a list and then search for the desired profile and click on the blue gear to configure it.
- Weight: Here is the weight of the vote, in this case there is no scale, just the fixed value which by default is 100%. Set it to the value you want to vote for the person.
- Weekly limit: The weekly vote limit, that is, the maximum amount of votes you want to cast per week on the person's posts.
- Daily limit: The daily vote limit, that is, the maximum number of votes you want to cast per day on the person's posts.
- Enabled: This option is a quick on/off, so you can do automatic votes or not.
Finally, again click on “Save Settings” to confirm and that's it!
Finishing
So that's it folks, this is the basics of the settings. Hive Vote helps a lot those who have a busy life and sometimes they can't perform the votes to help their friends or on the profiles of those they like.
If for some reason you are also unable to interact on Hive, with the automatic configuration you will not stop helping people.
Better than that, just the real interaction: vote, reblog, leave a comment, share on Twitter or any other form of interaction, I'm sure it makes people more motivated to continue with your posts!
If you want to meet, give it a chance and let's play together!