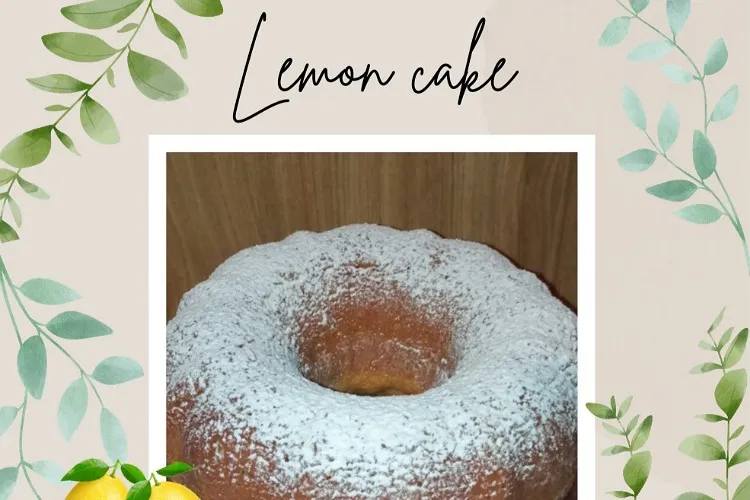
Super refreshing, fluffy and delicious lemon cake ideal to kill the anxiety of those hot days where you do not know what to snack.
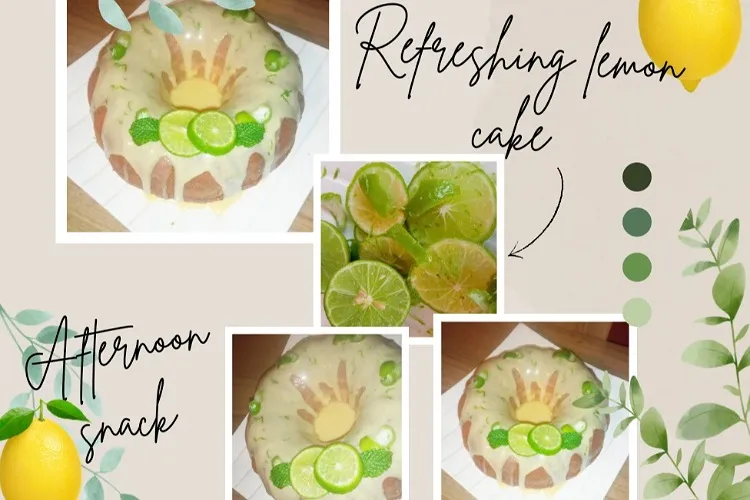
Hello friends, how are you today? I hope you are enjoying this beautiful Sunday! Today I bring you a delicious and very simple lemon cake recipe to share a snack with our family.
If you are like me and you are "hanging around " in the kitchen looking for something tasty to eat but you don't want to spend hours cooking this recipe you will love it! It is very easy to prepare and with ingredients that we always have at home. Besides, it can last you several days in the fridge, so you will have a few snacks guaranteed unless you are like me and it only lasts for an afternoon hahaha!
I tell you that since we started our baking business there is always something sweet at home for the afternoons and I confess that not only for the kids haha but for me! I love deserts, as soon as 3 o'clock in the afternoon comes and I want to eat something so I try to look for simple recipes that do not spend a lot of money to prepare. And lemon is one of my favorite ingredients.
In fact I love citrus fruits in general and in desserts for me it gives them a very special touch because they are not cloying desserts. The acidity of the fruit together with the sugar in the dessert creates a perfect balance. A really delicious combination of flavors. If you have eaten lemon pie, parchita mouse or strawberry tartlets, you will agree that they are perfect! And above all they are usually very refreshing, uffff already provoked me hahaha. Let's move on to the recipe.
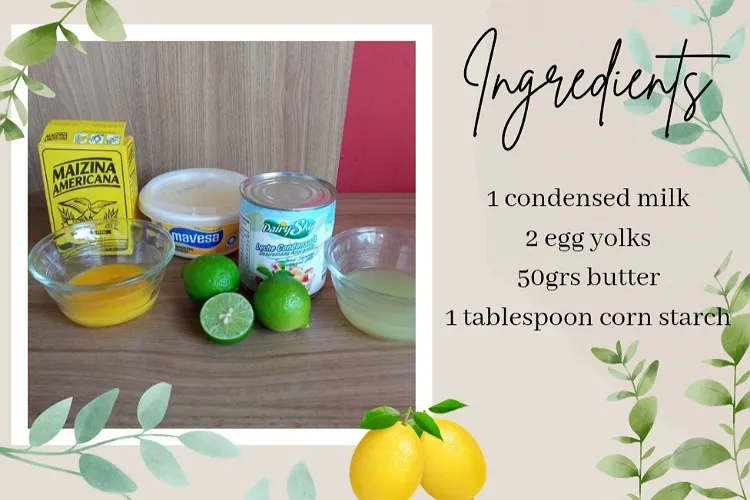
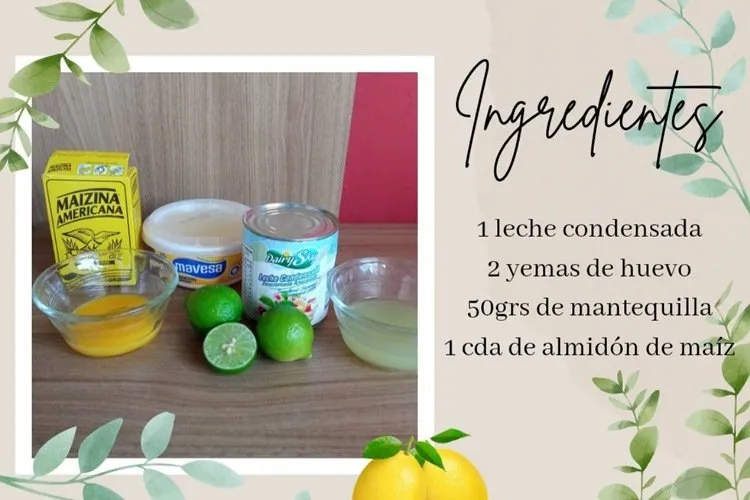
Let's take note of the ingredients that as I mentioned are things that we usually have at home and this makes it an excellent recipe! Sometimes we see some recipes that you almost have to buy half a supermarket to be able to make it, but with this one it won't happen.
I like to work in a very orderly way so I weigh and measure all the ingredients beforehand to make it easier to work with, plus we finish much faster if we already have everything ready.

As you can see, the ingredients are very simple and in small quantities. If you want to make a bigger cake double the amount of each ingredient and that's it!
Okay, if we already have everything, let's start with the preparation of our cake.

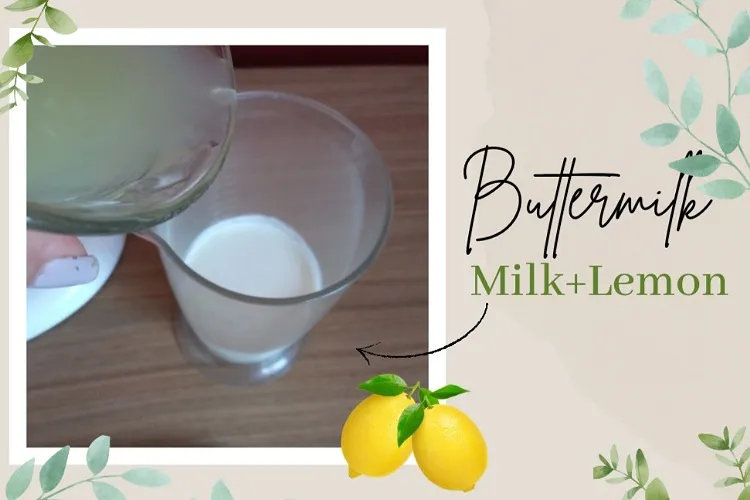
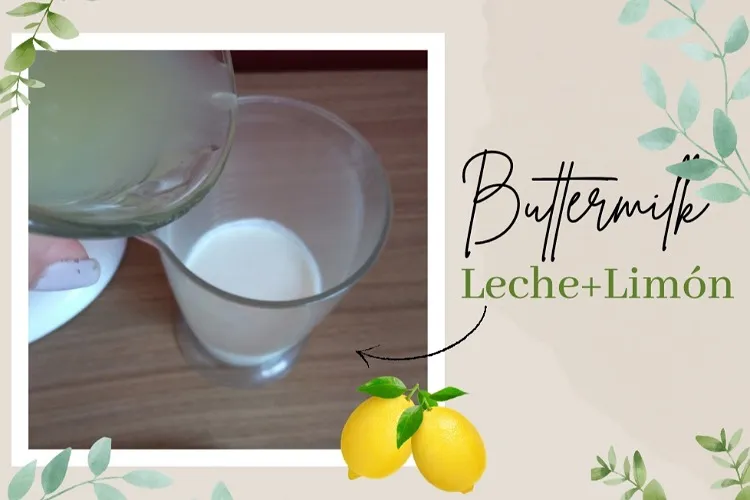
The first thing to do is to add the lemon to the milk, we do this to cut the milk and create a butter milk, which will help our cake to be softer and fluffier. We reserve it until it is time to use it.
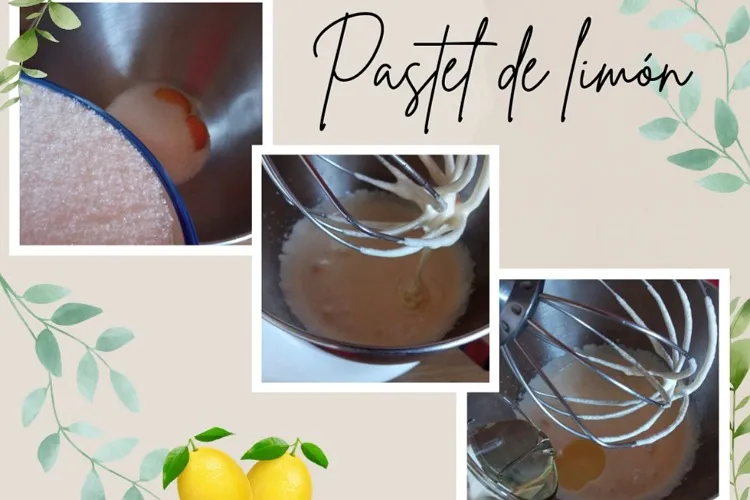
We proceed to separate the eggs and in the bowl of the mixer we place the 3 yolks together with the sugar and beat at medium speed until we obtain a cream to which we are going to add the oil and the vanilla until all the ingredients are completely incorporated.
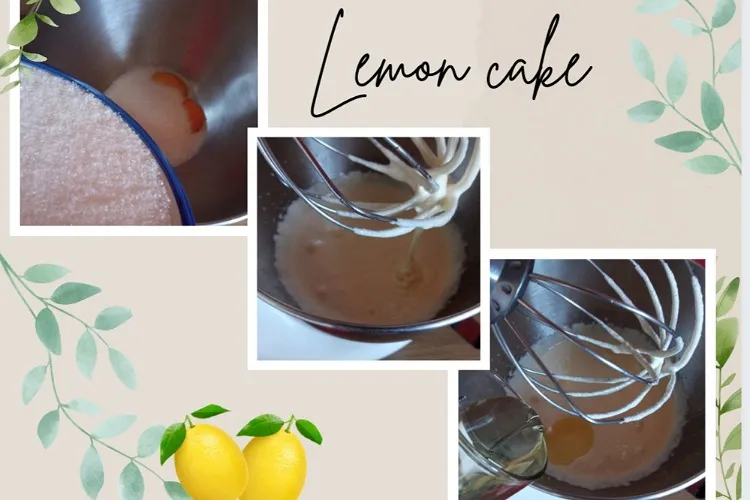
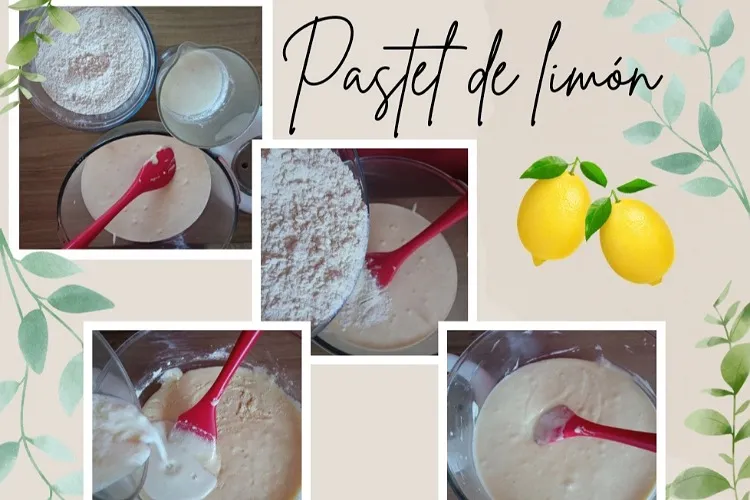
We continue incorporating the flour and our buttermilk alternately, starting and ending with the flour. This step will be done manually with a paddle using encircling movements.

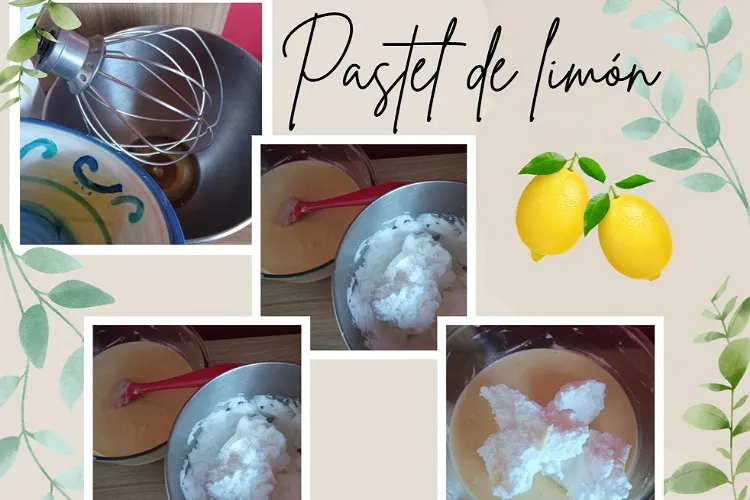
While we do this step we will beat our egg whites until stiff, which we must add to the mixture, trying as much as possible that they lose as little air as possible, since they are precisely the ones that allow our cake to be super fluffy, so we will do it very carefully.

So far so easy, right?
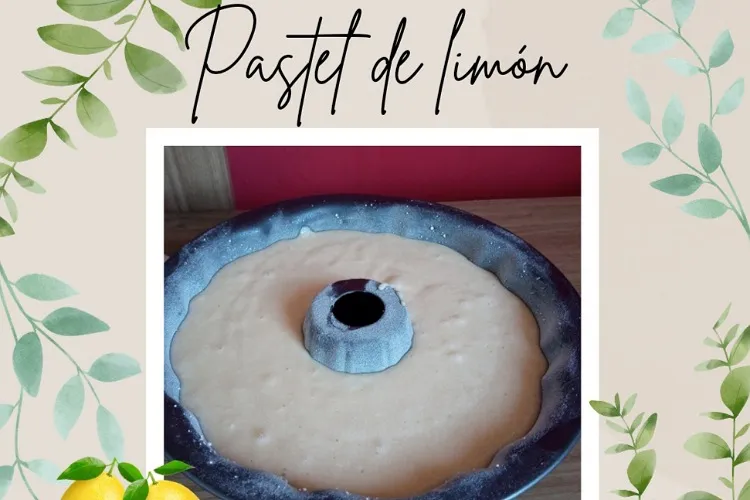
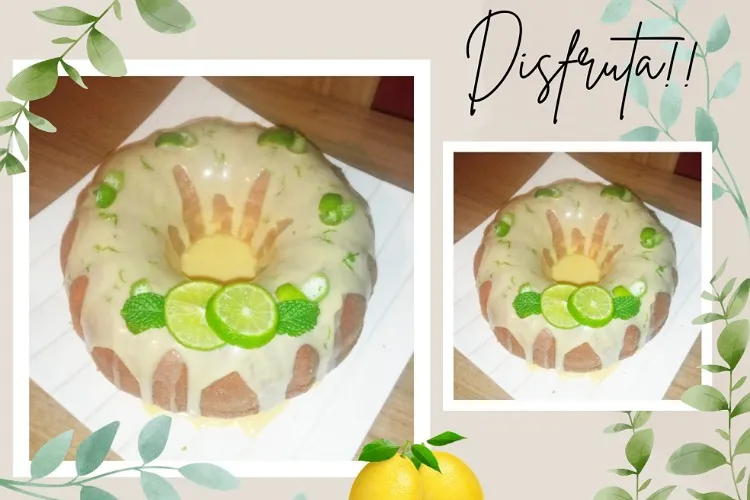
Very good! We continue our process taking the mixture to a mold of your choice previously buttered and floured. I chose a crown mold that I really like for this type of cake but you can use any mold you have at home.
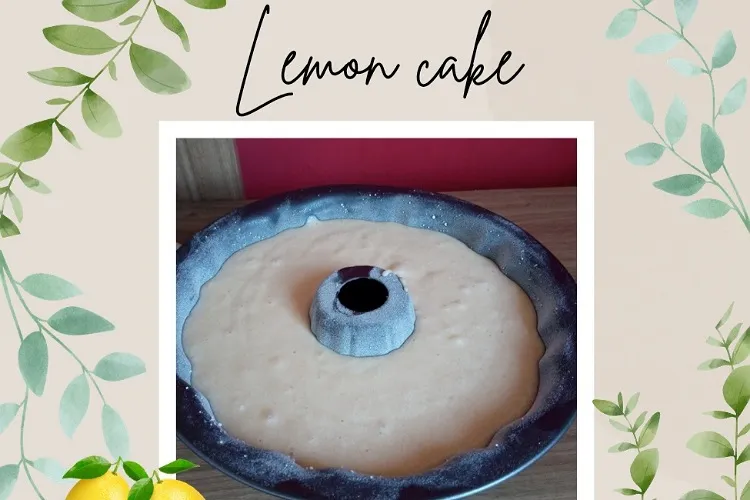
We are going to take the mixture to the oven previously preheated at 180° for half an hour or until it is golden brown. We test with a skewer stick to verify the cooking and if it is ready we remove it from the oven. The aroma while baking is delicious I guarantee it and it tells us when our cake is ready. If you have baked before you will notice that it just smells richer when the dessert we baked is ready.

Then we are going to let it rest on a rack and unmold when it is cool.
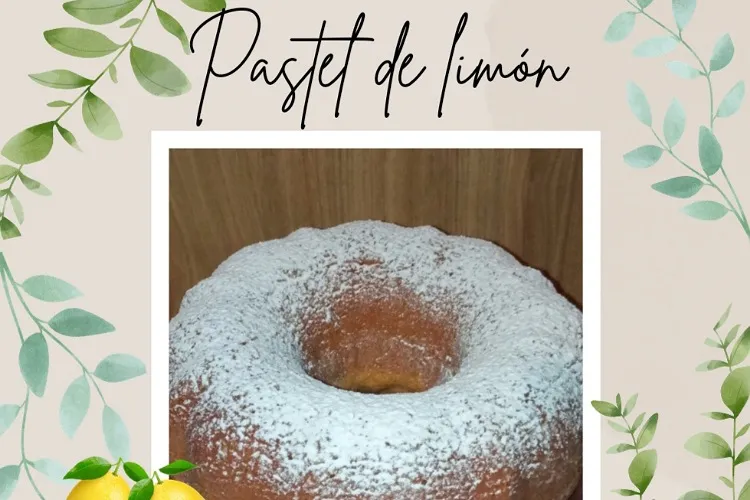
At this point you can stop if you wish since it is very tasty without the frosting. What you can do is sprinkle with powdered sugar if you have it at home and that's it. Just to make it look pretty.
But if you have a sweet tooth like me (hahaha) you will want to make the frosting that definitely adds the special touch and elevates the level of this simple cake. We don't need much to make it and it is very easy to do. In fact we can prepare it while our cake is cooling.
To prepare our frosting we just need to put all the ingredients together and cook them over medium heat stirring constantly and turn off just when it starts to boil. Remove from the stove and cover the cream with plastic wrap so that it touches the surface of the cream. This is to prevent the cream from forming. Once it is cold, refrigerate it so that it finishes thickening.
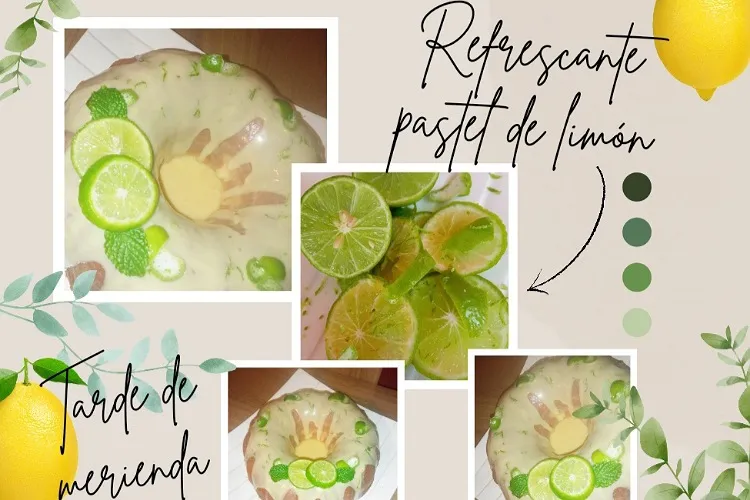
When our frosting has the desired consistency we give our cake a nice bath with it hehehe. We drizzle it all over the cake and if you are one of those who eat with your eyes, get creative and decorate it. I used lemon slices, lemon zest and bigger pieces of lemon peel! As you can see, I love lemon hehehe.

So now we have our cake ready for a delicious snack.
I hope you can prepare it at home because it is a really delicious dessert to accompany our afternoons and as a special tip if we leave it overnight in the fridge is much richer because it absorbs some of the icing!
Don't leave me alone and let's get fat together hahaha. It's a guilty pleasure but one you definitely won't want to miss! But in case one of your new year's resolutions is to lose weight or improve your diet you can do without the frosting!
Thank you so much for joining me once again!
Kisses and blessings!

Súper refrescante, esponjoso y delicioso pastel de limón ideal para matar la ansiedad de esas calurosas dónde no sabes qué merendar.
Hola amigos cómo se encuentran hoy? Espero que disfrutando de éste hermoso domingo! Hoy les traigo una deliciosa y muy sencilla receta de pastel de limón para compartir la merienda con nuestra familia.
Si son como yo que al llegar la tarde están "rondando" la cocina en busca de algo rico para comer pero no quieren pasar horas cocinando ésta receta les va a encantar! Es muy sencilla de preparar y con ingredientes que siempre tenemos en casa. Además les puede durar varios días en la nevera, así que tendrán unas cuantas meriendas garantizadas a menos que sean como yo y sólo les dure una tarde jajaja!
Les cuento que desde que comenzamos nuestro emprendimiento de repostería siempre hay algún dulce en casa para las tardes y les confieso que no sólo por los niños jaja sino por mi!! Soy muy chuchera, apenas llegan las 3 de la tarde y ya me provoca comer algo así que trato de buscar recetas sencillas y en las que no se gaste muchísimo para preparar. Y el limón es uno de mis ingredientes favoritos.
De hecho amo las frutas cítricas en general y en los postres la verdad para mí les da un toque muy especial porque no son postres empalagosos. La acidez de la fruta junto con el azúcar del postre crean un equilibrio perfecto. Una combinación de sabores realmente deliciosa. Si han comido pie de limón, mouse de parchita o tartaletas de fresa, me darán la razón en que son perfectos! Y sobre todo suelen ser muy refrescantes, uffff ya me provocó jajaja. Mejor pasemos a la receta.
Vamos a tomar nota de los ingredientes que como les comenté son cosas que generalmente tenemos en casita y esto hace de ella una excelente receta! A veces vemos algunas recetas que casi debes comprar medio súper para poder realizarla, pero con ésta no te sucederá.
A mí me gusta trabajar muy ordenadamente así que peso y mido todos los ingredientes previamente para trabajar con mayor facilidad además que terminamos mucho más rápido si ya tenemos todo listo.
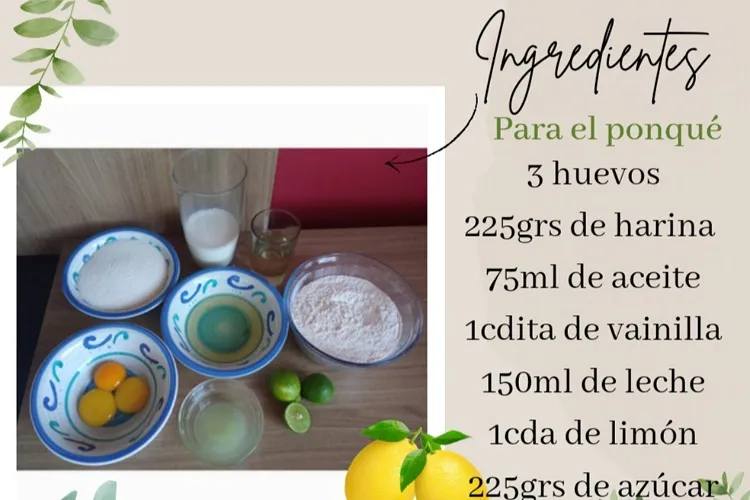
Como ven son ingredientes súper sencillos y poca cantidad. Si desean hacer un pastel más grande doblan la cantidad de cada ingredientes y listo!
Muy bien, si ya tenemos todo comencemos con la preparación de nuestro pastel.

Lo primero que debemos hacer es incorporar el limón a la leche, ésto lo hacemos para cortar la leche y crear una butter milk, lo cual ayudará a que nuestro pastel sea más suave y esponjoso. La reservamos hasta que sea el momento de usarla.
Procedemos a separar los huevos y en el bol de la batidora colocamos las 3 yemas junto con el azúcar y batimos a velocidad media hasta obtener una crema a la que vamos a agregar el aceite y la vainilla hasta que estén completamente incorporados todos los ingredientes.
Continuamos incorporando la harina y nuestra buttermilk de forma alternada, comenzando y terminando con la harina. Éste paso lo haremos de forma manual con una paleta realizando movimientos envolventes.
Mientras realizamos ése paso llevaremos a punto de nieve nuestras claras las cuáles debemos unir a la mezcla, tratando en lo posible que pierdan la menor cantidad de aire ya que son justamente ellas las que permiten que nuestro pastel quedé súper esponjoso, así que lo haremos con mucho cuidado.
Hasta aquí todo súper fácil verdad??
Muy bien! Continuamos nuestro proceso llevando la mezcla a un molde de su elección previamente enmantequillado y enharinado. Yo escogí un molde de corona que me gusta muchísimo para éste tipo de pastel pero pueden usar cualquiera que tengan en casa.
Vamos a llevar la mezcla al horno previamente precalentado a 180° por media hora o hasta que esté doradito. Probamos con un palito de brocheta para verificar la cocción y si está listo retiramos del horno. El aroma mientras se hornea es delicioso se los garantizo y él nos avisa cuando nuestro pastel está listo. Si han horneado antes se darán cuenta que justo huele más rico cuando ya está listo el postre que horneamos.
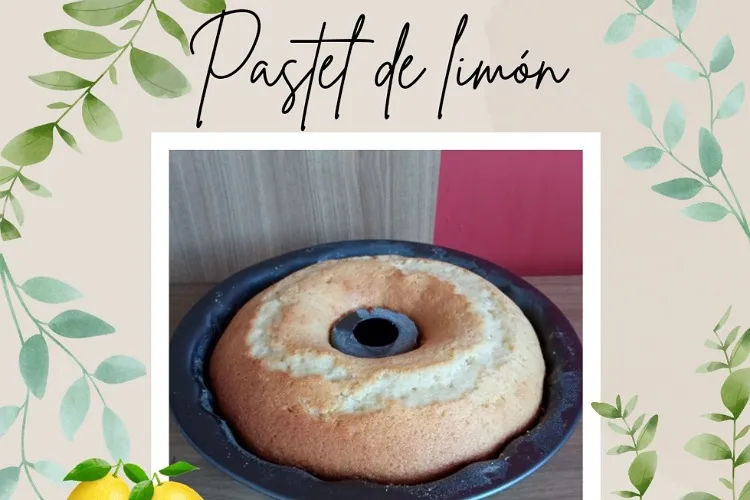
Seguidamente lo vamos a dejar reposar sobre una rejilla y desmoldamos cuando esté frío.
En éste punto pudiesen parar si lo desean ya que de por sí es muy rico así sin el glaseado. Lo que pueden hacer es espolvorear con azúcar glass si tienen en casa y listo. Sólo para que se vea lindo.
Peeeero si son golosos como yo (jajaja) van a querer realizar el glaseado que definitivamente le aporta el toque especial y eleva el nivel de éste sencillo pastel. No necesitamos gran cosa para realizarlo y es muy fácil de hacer. De hecho lo podemos preparar mientras nuestro pastel se enfría.
Para preparar nuestro glaseado sólo debemos juntar todos los ingredientes y cocinarlos a fuego medio sin dejar de remover y apagar justo cuando veamos que comience a hervir. Retiramos de la cocina y cubrimos la crema con papel film de manera que toque la superficie de la crema. Esto para evitar que se forme la nata. Una vez que esté fría refrigeramos para que termine de espesar.
Cuando nuestro glaseado tenga la consistencia deseada le damos un rico baño a nuestro pastel con el jejeje. Lo dejamos caer por todo el pastel y si son de los que comen con los ojos pues pónganse creativos y decórenlo. Yo usé rodajas de limón, ralladura de limón y trocitos más grandes de la cáscara de limón! Cómo ven, me encanta el limón jejeje.
Así ya tenemos listo nuestro pastel para una deliciosa merienda.
Espero puedan prepararlo en casa porque es un postre realmente delicioso para acompañar nuestras tardes y como un dato especial si lo dejamos de un día para otro en la nevera es mucho más rico ya que absorbe parte del glaseado!
No me dejen sola y engordemos juntos jajaja. Es un placer culposo pero que definitivamente no se querrán perder! Pero en caso de que uno de sus propósitos de año nuevo sea bajar de peso o mejorar su alimentación pueden hacerlo sin el glaseado!
Muchas gracias por acompañarme una vez más!
Besitos y bendiciones!


Fotografía por:| Photography by:
@rlathulerie, Redmi 9 AI QUAD CAMERA
Edición por:| Edtion by:
@rlathulerie, Picsart, Canva
Traducido con:| Translated with www.DeepL.com/Translator (free version)