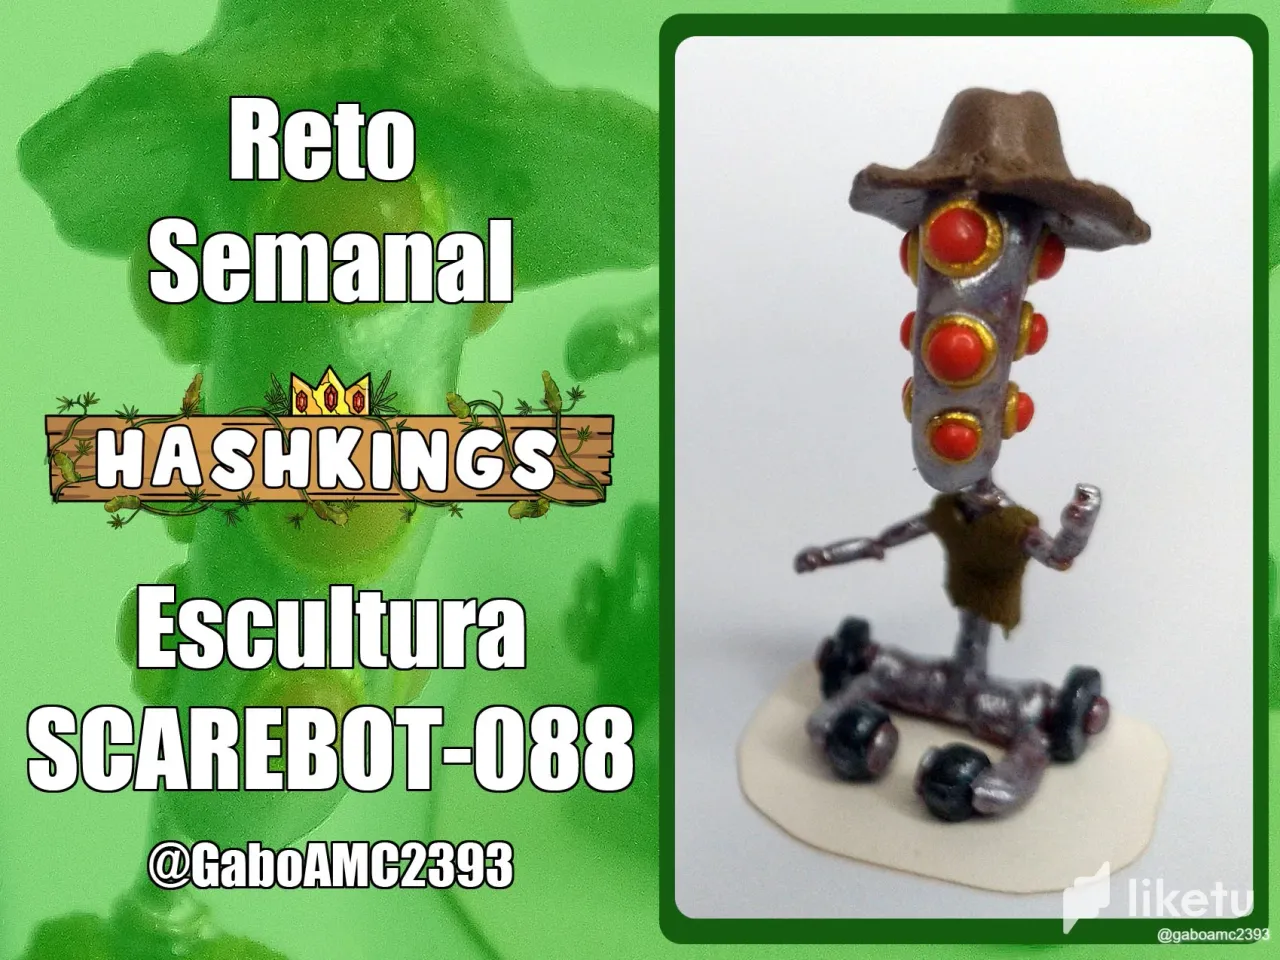

Saludos amigos de la comunidad. Me complace presentar esta semana mi participación en el "Reto semanal Hashkings", una escultura inspiraa en SCAREBOT-088.
Puedes leer más sobre el reto siguiendo este enlace:
@hivenftgamela/reto-semanal-hashkings-comparte-tu-arte-scarebot-088-100000-buds-esen
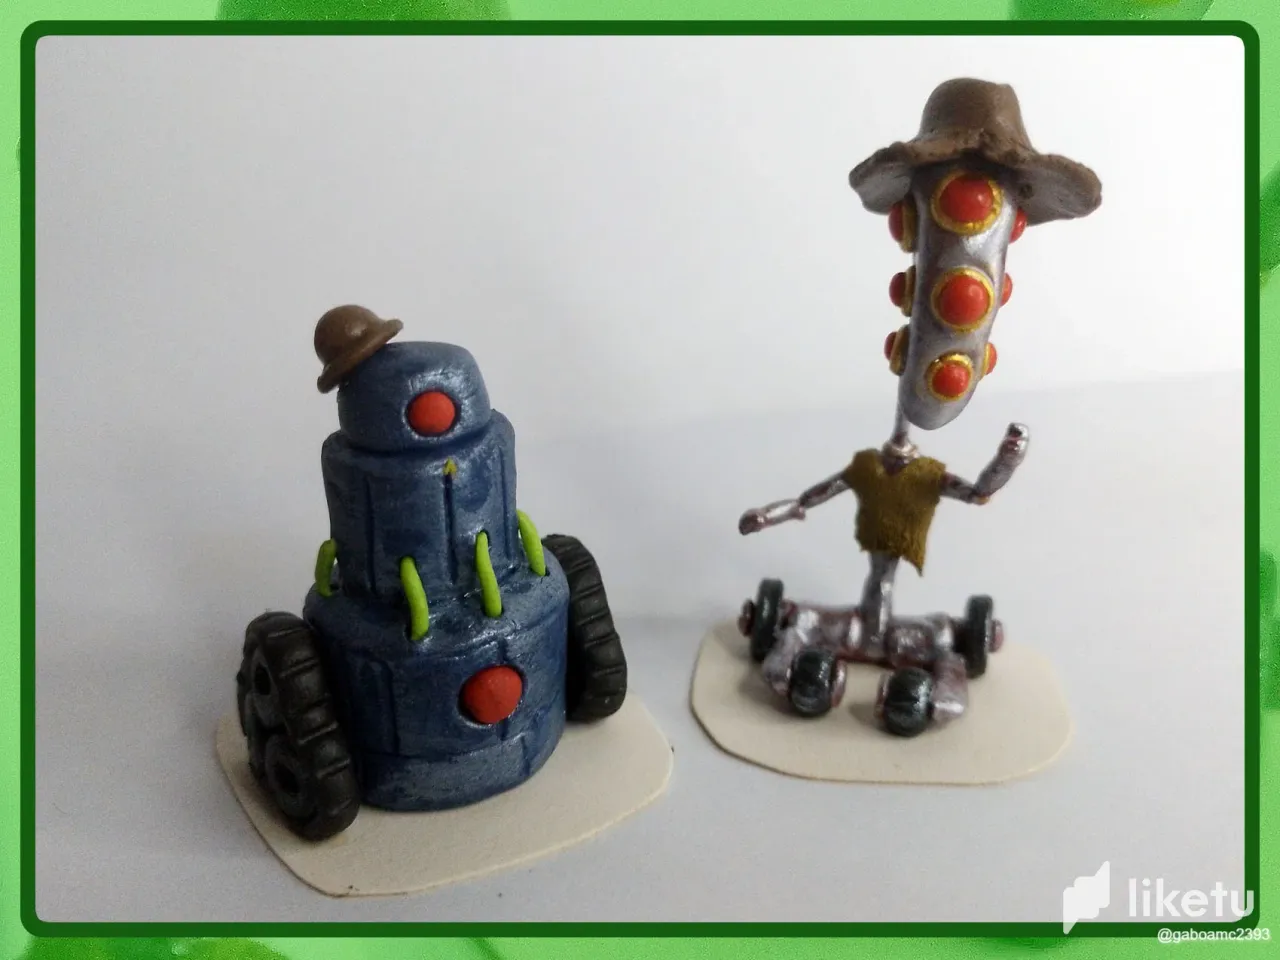
Sé que el reto es un dibujo, pero considerando que ya he hecho una escultura para el reto anterior, quise continuar con mi nicho (esculturas) para tener una mini colección de estos simpáticos personajes.
Como es costumbre, comparto el paso a paso, el cual pueden seguir con las fotos que acompañan la publicación.
English
Greetings friends of the community. I am pleased to present you this week my participation in the "Hashkings Weekly Challenge", a sculpture inspired by SCAREBOT-088.
You can read more about the challenge by following this link:
@hivenftgamela/reto-semanal-hashkings-comparte-tu-arte-scarebot-088-100000-buds-esen
I know the challenge is a drawing, but considering that I have already made a sculpture for the previous challenge, I wanted to continue with my niche (sculptures) to have a mini collection of these cute characters.
As usual, I share the step by step, which you can follow with the photos accompanying the post.

Paso a paso
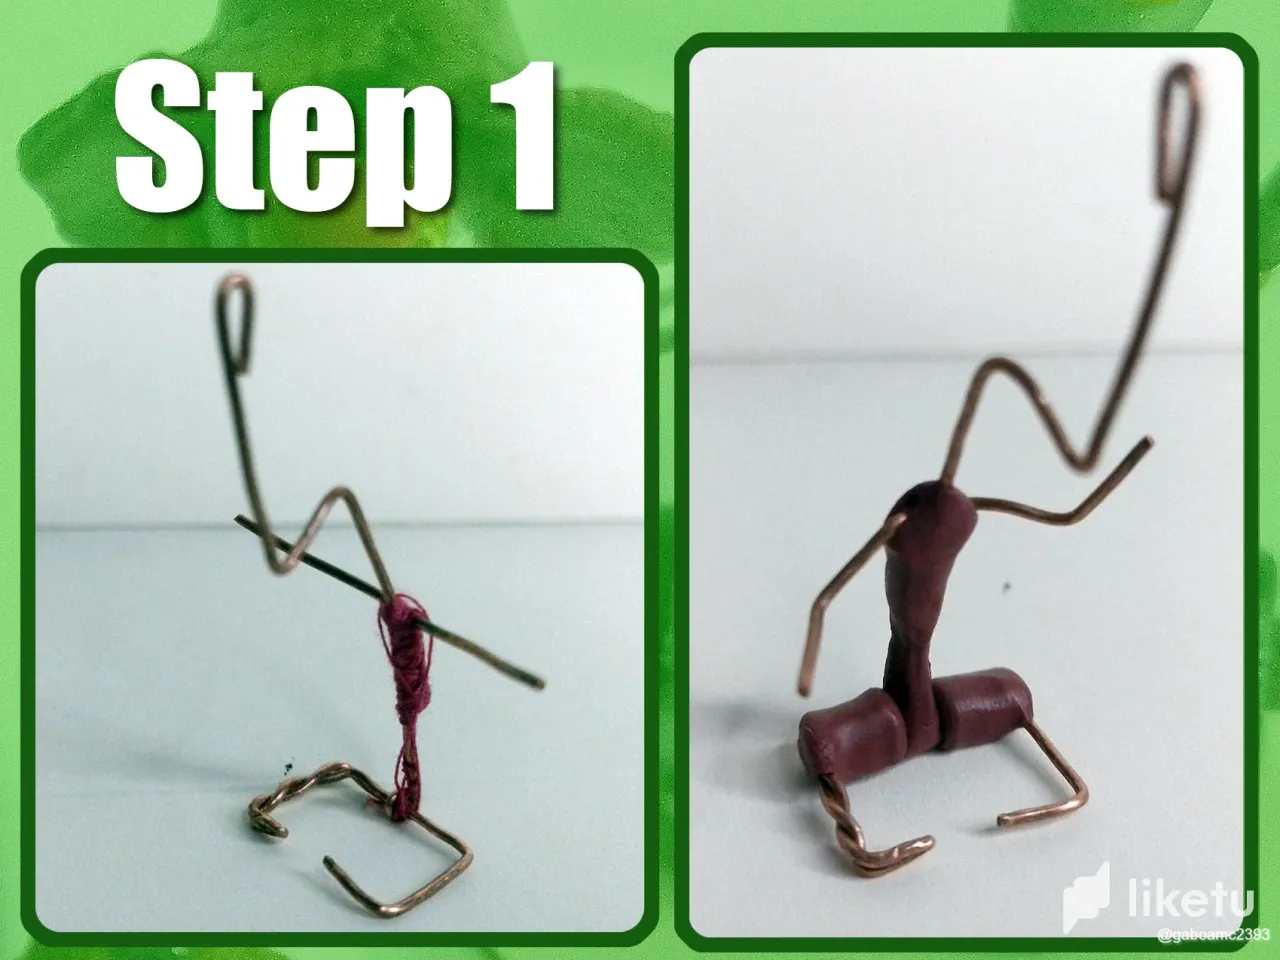
Paso 1: Lo primero que hice para esta escultura fue el armazón o esqueleto con el que se mantendrá su forma, a pesar de ser una pieza bastante delgada. Lo hice con alambre y uní algunas partes con hilo y pegamento.
Una vez que el armazón estuvo seco, comencé a cubrir algunas áreas con plastilina marrón. Cubrí el torso del personaje y el área inferior. Este lo imaginé como un pequeño robot con ruedas y de cuerpo delgado; de hecho, me inspiré en Crank Casey (Película Robots, 2005) para crear la parte inferior del cuerpo de la escultura.
Paso 2: Precisamente, teniendo en cuenta el otro personaje en el que me inspiré (Crank Casey), le hice dos pares de ruedas para que este personaje pudiese movilizarse; dos ruedas delanteras, y un par de ruedas traseras un poco más grandes.
Fíjense que en la imagen de este paso también comencé a colocar más plastilina en los brazos. No coloqué demasiada, pues era una escultura delgada.
Step by step
Step 1: The first thing I made for this sculpture was the frame or skeleton that will hold its shape, even though it is a rather thin piece. I made it with wire and joined some parts with thread and glue.
Once the frame was dry, I started to cover some areas with brown plasticine. I covered the torso of the character and the lower area. This one I imagined as a small robot with wheels and a thin body; in fact, I was inspired by Crank Casey (Robots Movie, 2005) to create the lower body of the sculpture.
Step 2: Precisely, taking into account the other character I was inspired by (Crank Casey), I made two pairs of wheels so that this character could move around; two front wheels, and a pair of slightly larger rear wheels.
Notice that in the image of this step I also started to put more plasticine on the arms. I didn't put too much, because it was a thin sculpture.
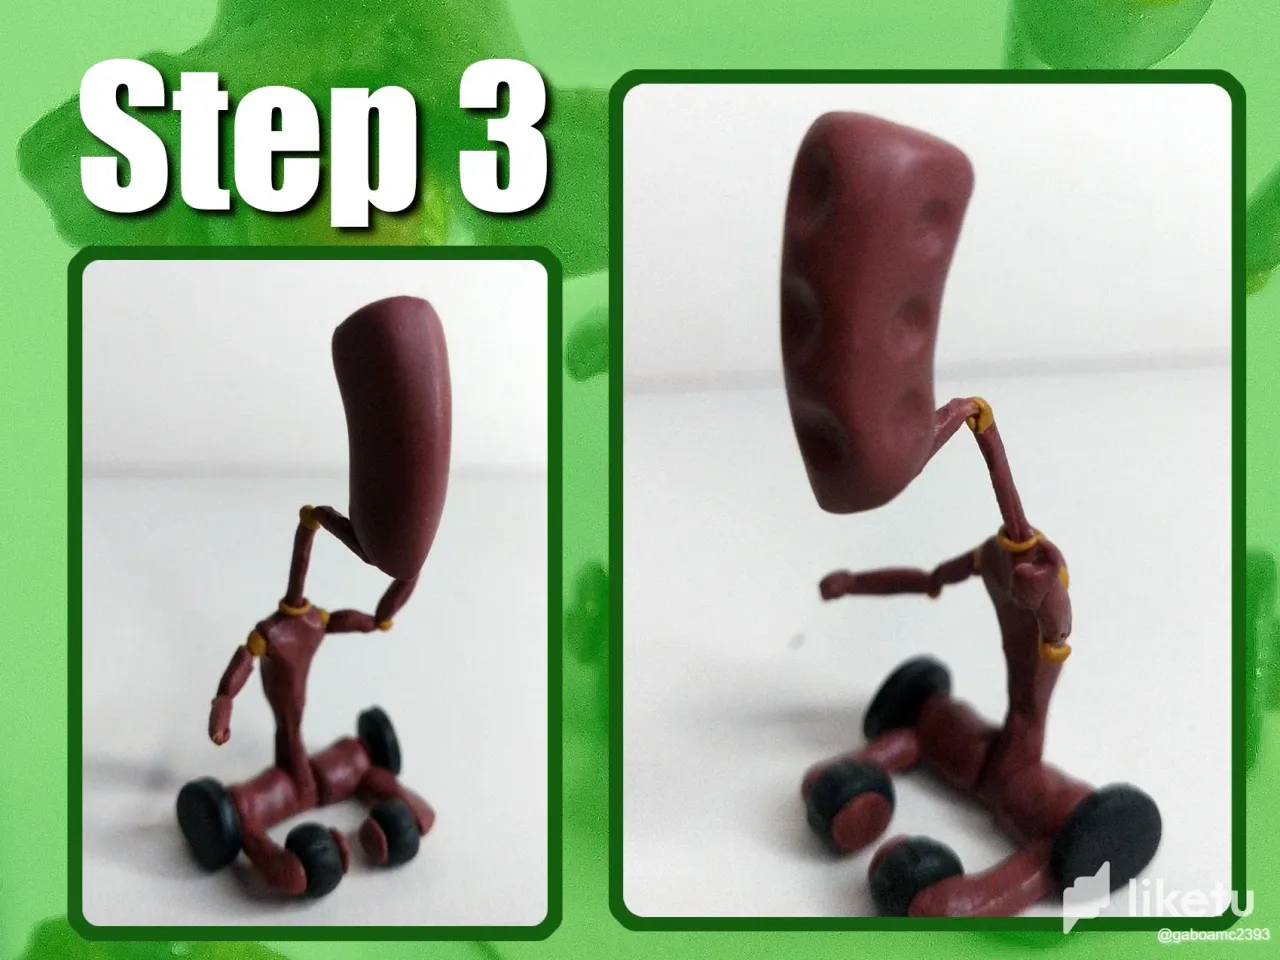
Paso 3: Una vez que hice el cuerpo y las manos, continué con la cabeza. Como paréntesis, fíjense que una de las manos las hice con un pequeño pulgar levantado.
Volviendo al tema, le hice una cabeza alargada y mucho más grande que el propio cuerpo del personaje, donde también hice enormes orificios o cuencas en donde pueda colocar los visores del personaje, que vendrían a ser sus ojos.
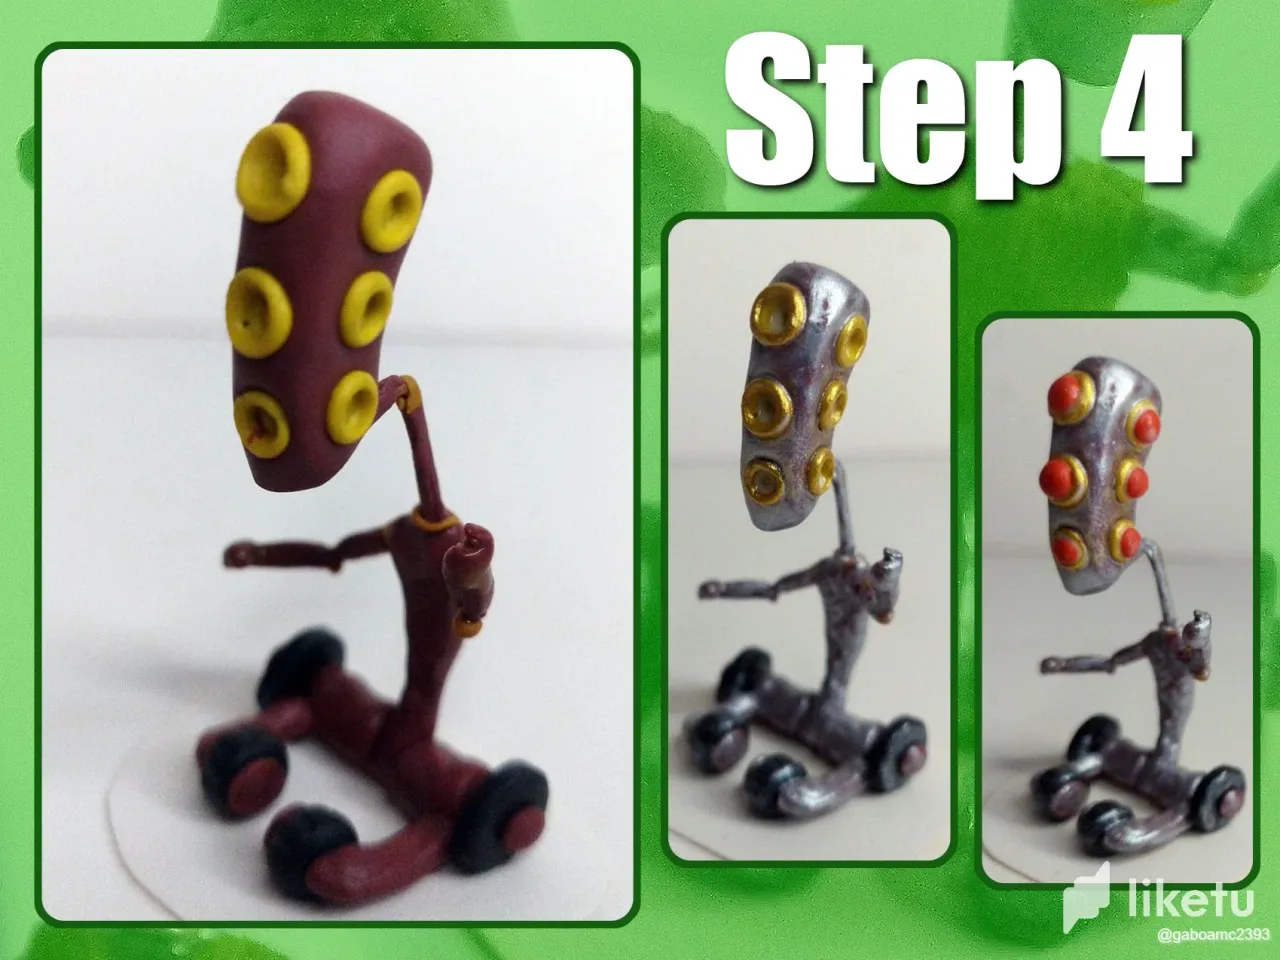
Paso 4: Colocar estos visores llevó su proceso, pues primero hice unas cuencas de color amarillo dentro de las cuencas iniciales, las pinte de dorado y entonces coloqué las pequeñas esferas de color rojo que serían sus ojos.
El cuerpo, por otra parte, lo pinté de color dorado, aunque no por completo, para conservar parte del color inicial que tenía la figura; sin embargo, sí le apliqué dos capas para que el dorado se mantuviese prominente, sirviendo el color base de la escultura unas manchas en el cuerpo, como si estuviese oxidado.
Step 3: Once I made the body and hands, I continued with the head. As a parenthesis, note that I made one of the hands with a little thumbs up.
Returning to the subject, I made an elongated head much larger than the character's body, where I also made huge holes or sockets where I can place the character's visors, which would become his eyes.
Step 4: Placing these visors took its own process, because first I made some yellow basins inside the initial basins, painted them gold and then I placed the small red spheres that would be his eyes.
The body, on the other hand, I painted it gold, although not completely, to preserve part of the initial color of the figure; however, I did apply two coats so that the gold would remain prominent, serving the base color of the sculpture some spots on the body, as if it were rusty.
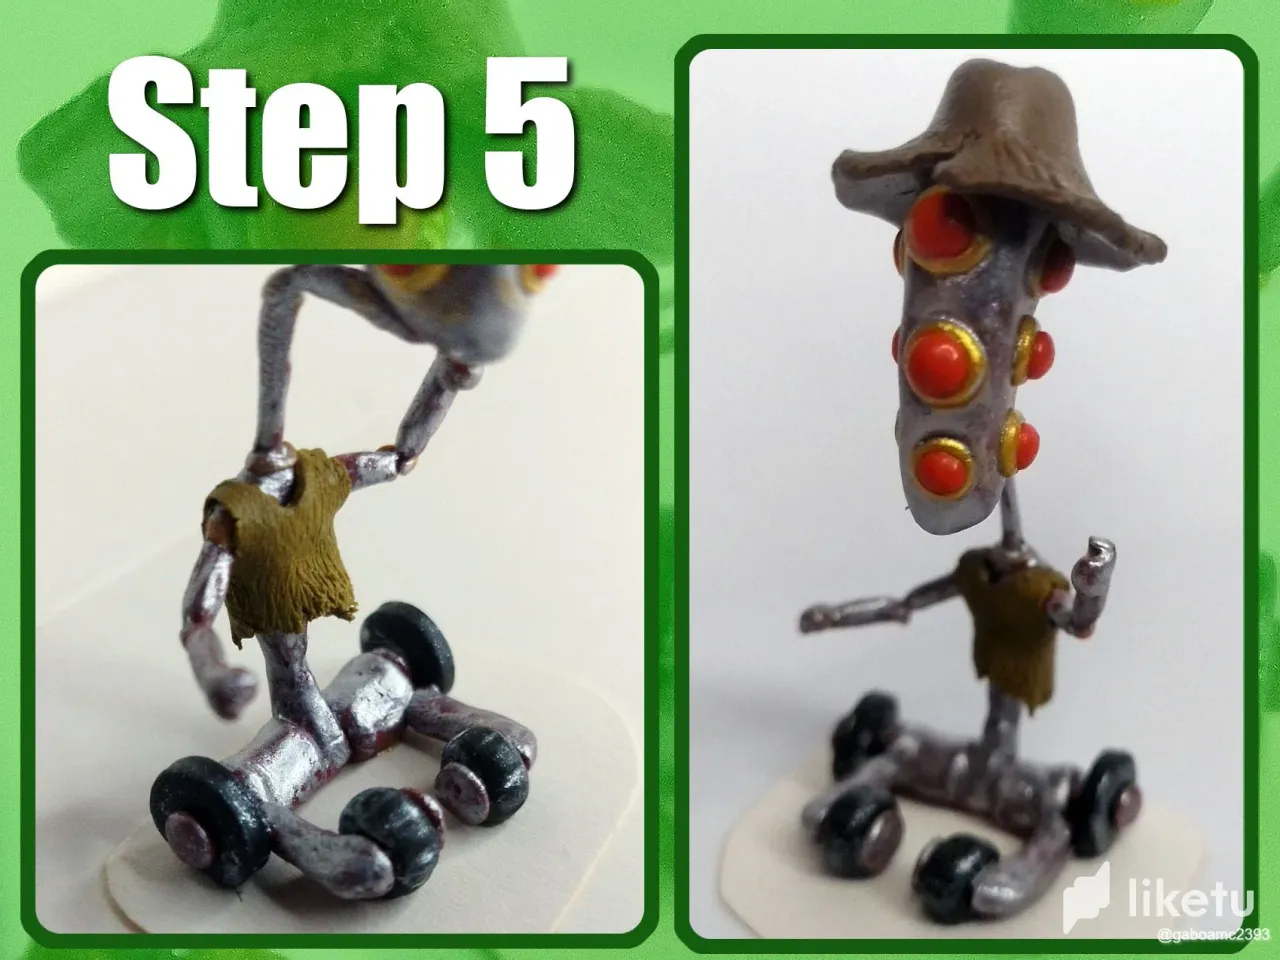
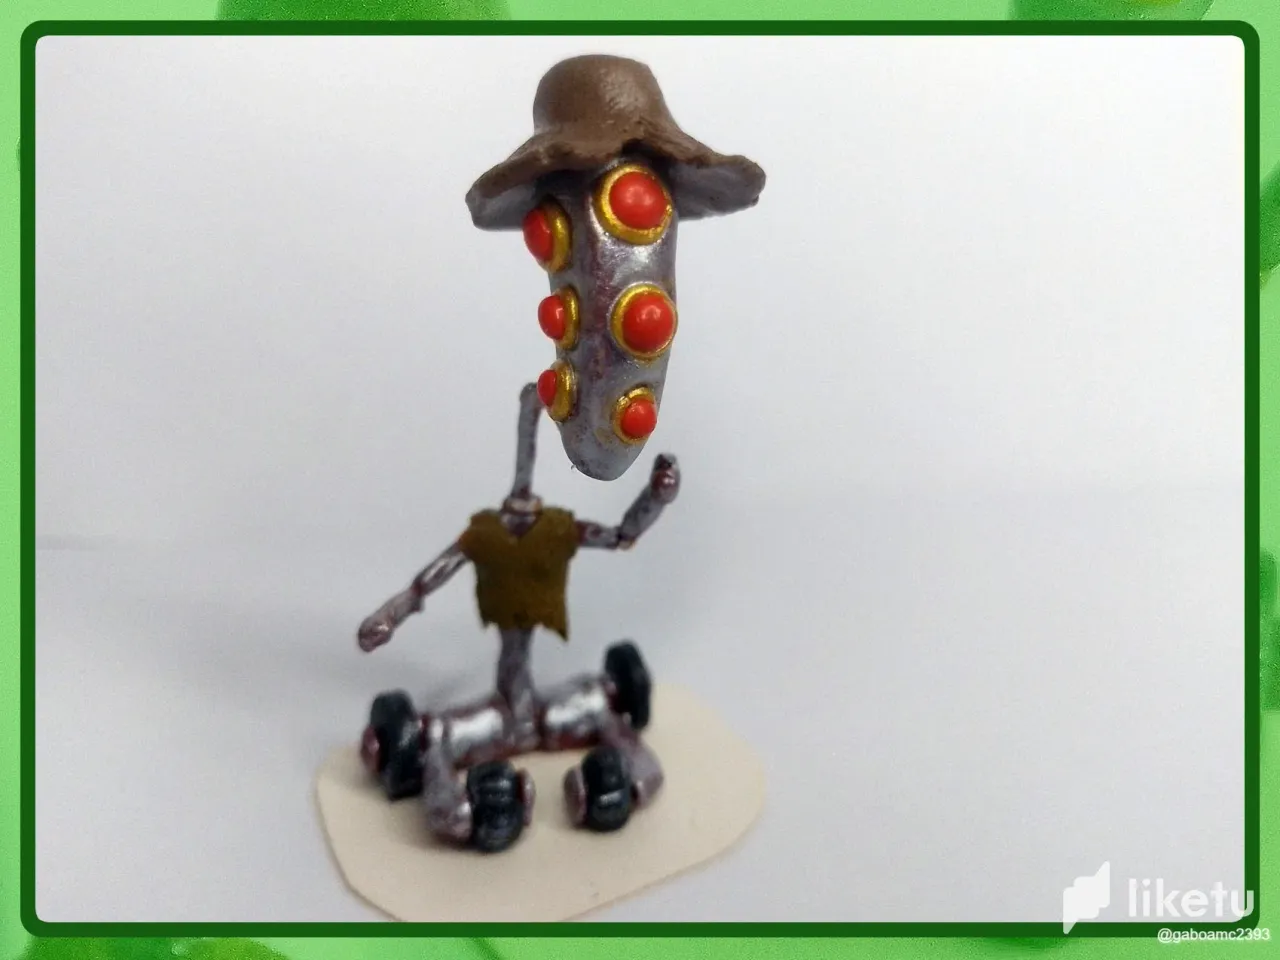
Paso 5: Ya los últimos pasos que hice para la escultura fue colocarles detalles como la franelilla con la que cubre su pecho, una de apariencia gastada y hasta rasgada.
Encima de la cabeza también le coloqué un sombrero muy parecido al que tiene el avatar del personaje, siendo estos rasgos muy característicos del mismo.
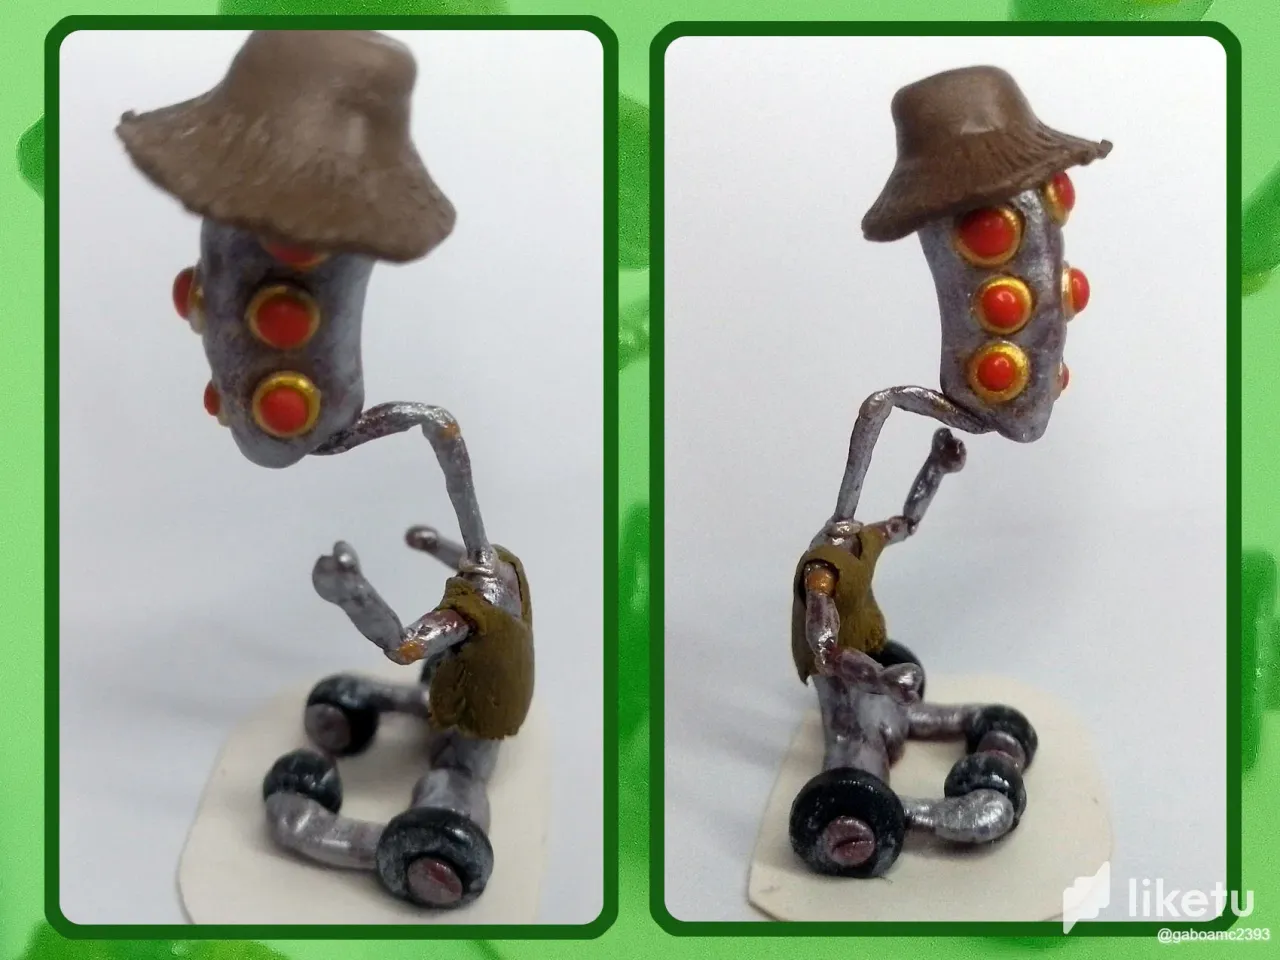
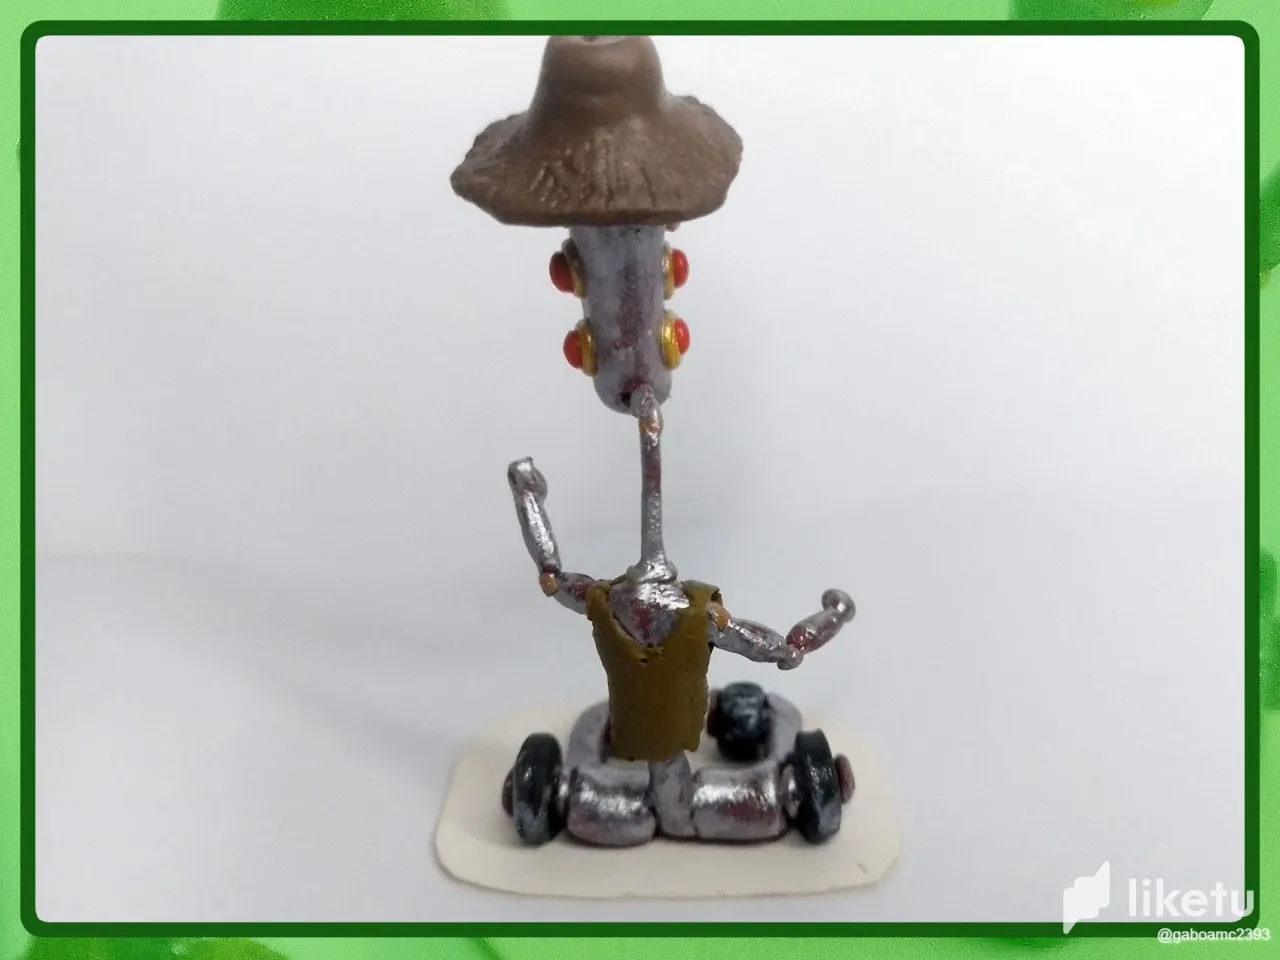
Así quedó terminada la figurita, pueden ver en las fotografías el resultado final.
Y esto fue todo. Espero que mi publicación sobre el reto semanal haya sido de su agrado. Los invito a dejar sus opiniones abajo en los comentarios, como siempre estaré encantado de leerlos.
Agradezco que se tomaran el tiempo de visitar mi post, sin más que agregar me despido entonces...
¡Hasta la próxima!
Step 5: The last steps I did for the sculpture was to place details such as the flannel that covers his chest, a worn and even torn appearance.
On top of the head I also placed a hat very similar to the one that has the avatar of the character, being these features very characteristic of it.
This is how the figurine was finished, you can see in the pictures the final result.
And that was all. I hope you liked my publication about the weekly challenge. I invite you to leave your opinions below in the comments, as always I will be happy to read them.
I appreciate that you took the time to visit my post, without more to add I say goodbye then...
See you next time!