Hola, ¿cómo están?, yo hoy les estaré compartiendo mi arte para este gran reto de arte sobre personajes de #Hashkings, el personaje que dibujaré hoy será el robot Trunkset, así que les deseo suerte a los demás participantes.
Hi, how are you, today I will be sharing with you my art for this great art challenge about #Hashkings characters, the character I will be drawing today will be the robot Trunkset, so I wish luck to the other participants.
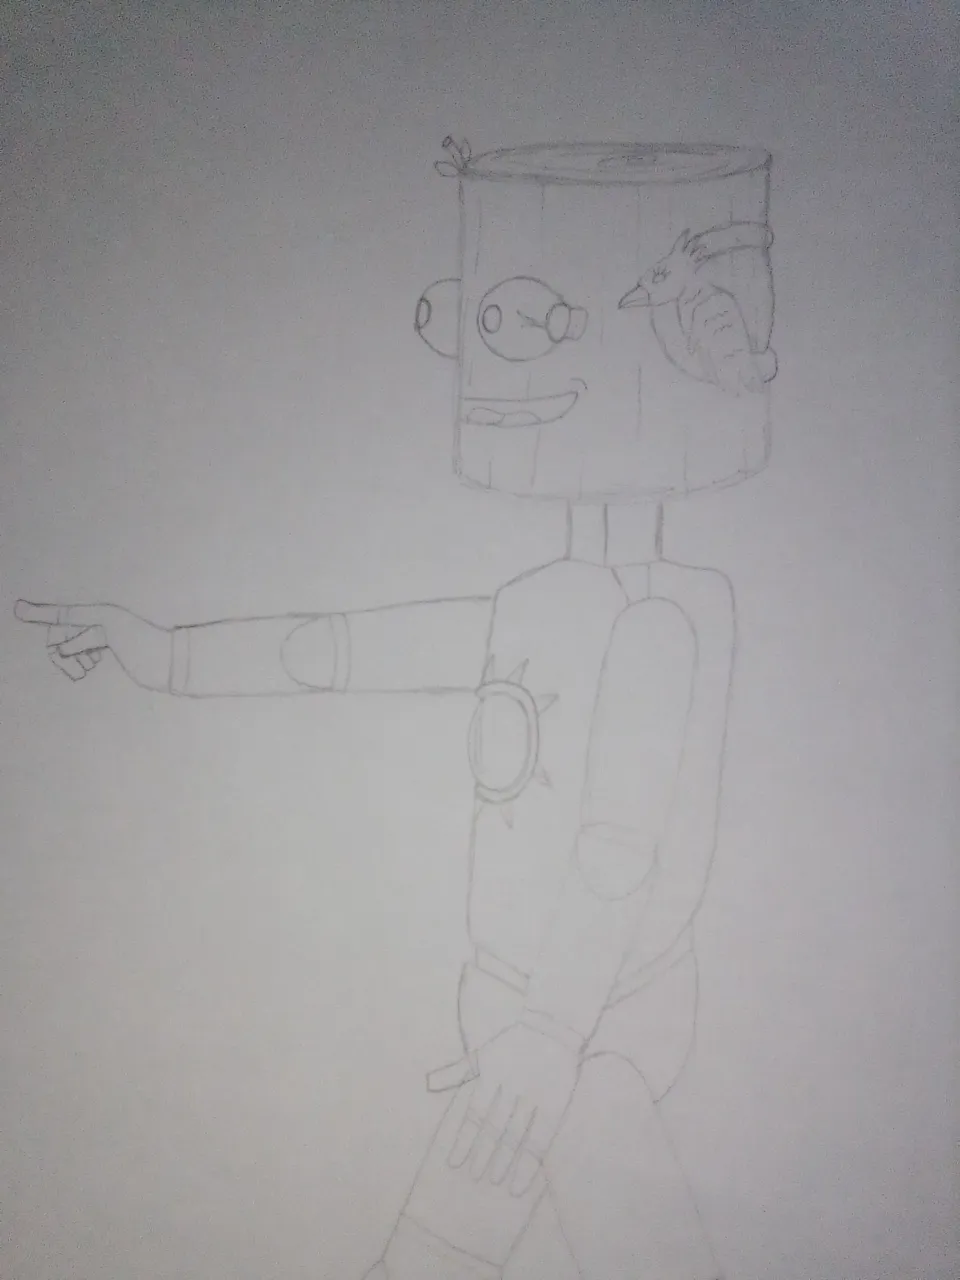
Procedimiento:
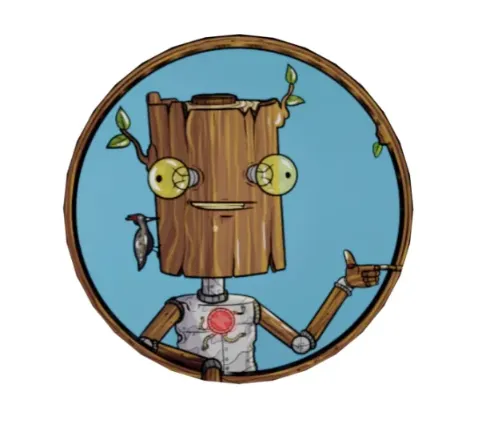
Paso 1: hice el boceto de este personaje cambié su pose original, pero mantuve la esencia del personaje con cabeza de tronco y cuerpo robótico, esta pose es como si este estuviera señalando un lugar específico y en este caso en su cabeza de tronco está la casa de un carpintero que a la vez es como si fuera la conciencia de Trunkset, este carpintero lo guía y es su mejor amigo en este mundo desolado.
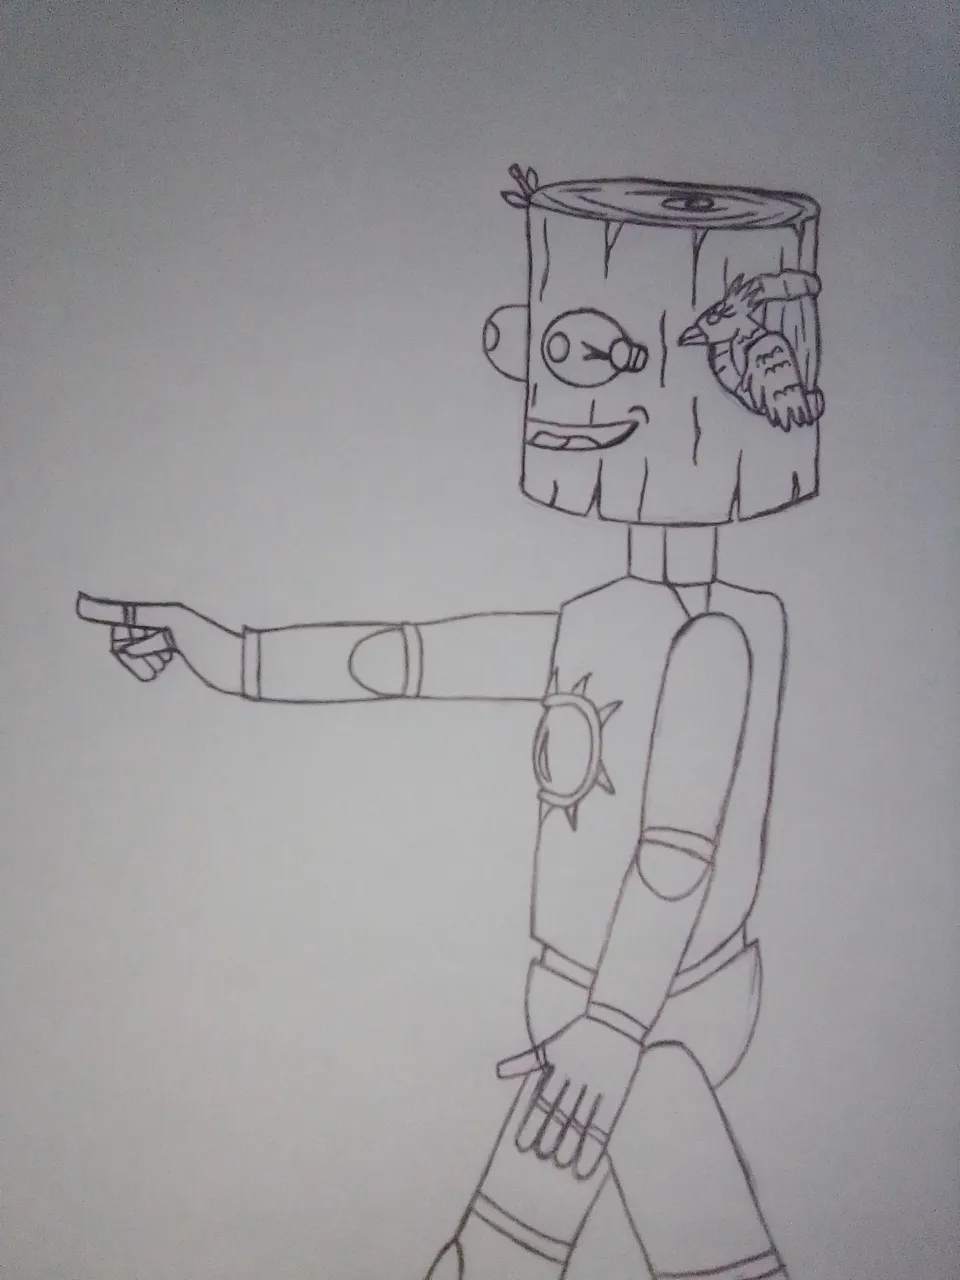
También remarqué todas las líneas con un bolígrafo para que se vean mucho mejor, así que pasemos al siguiente paso y démosle vida a este robot...
Procedure:
Step 1: I made the sketch of this character I changed his original pose, but I kept the essence of the character with a trunk head and robotic body, this pose is as if this is pointing to a specific place and in this case in his trunk head is the house of a carpenter that at the same time is as if it were Trunkset's conscience, this carpenter guides him and is his best friend in this desolate world.
I also highlighted all the lines with a pen to make them look much better, so let's go to the next step and give life to this robot...
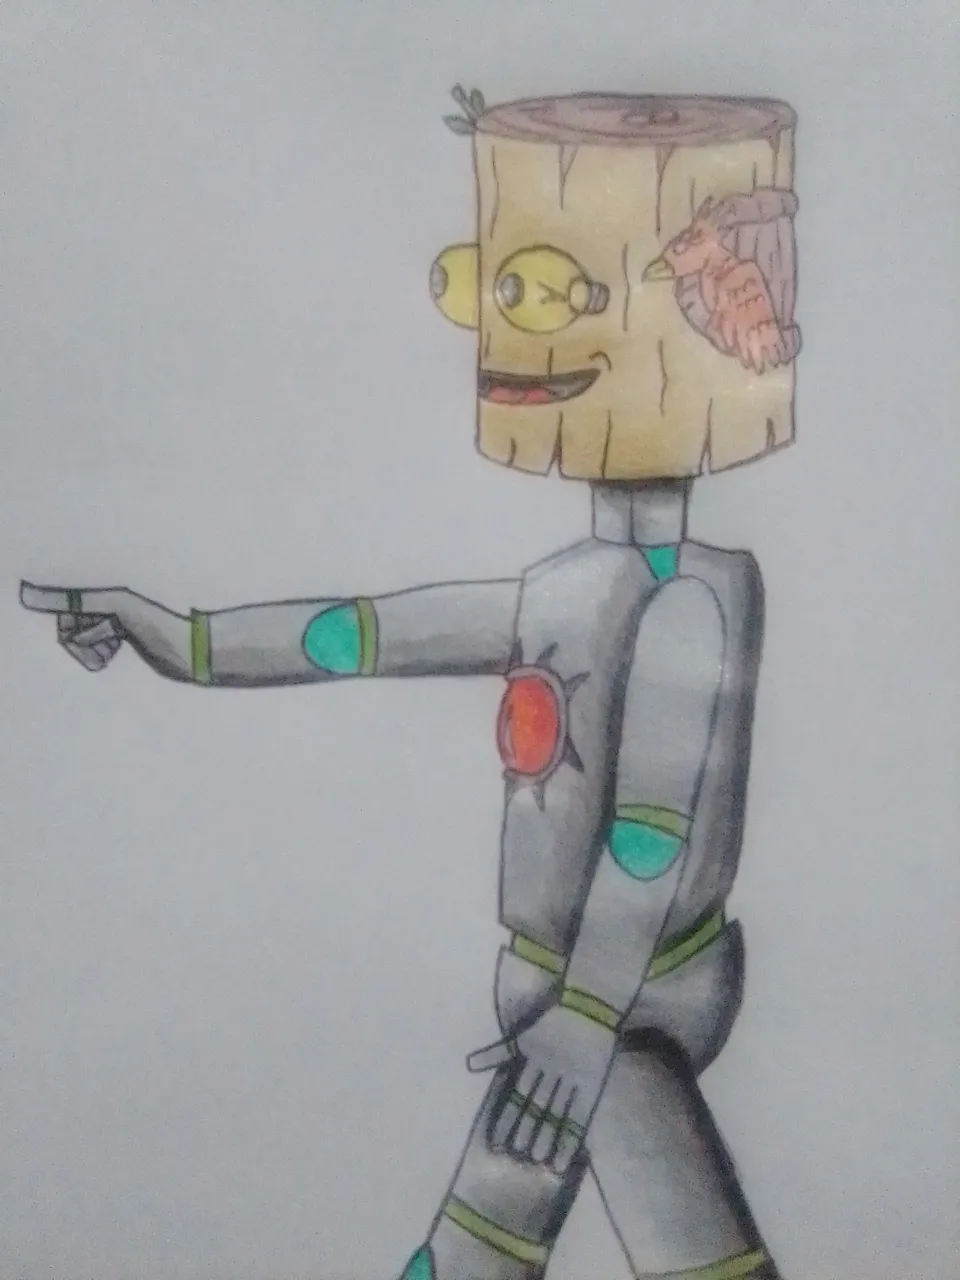
Paso 2: aquí coloree el botón rojo que tiene en el pecho, el cual parece que fuera su corazón o fuente de poder, pinte las líneas que están por sus extremidades haciendo referencia las venas o algún suero de BUDS por ello las pinte de color verde.
También di el primer relleno por toda la armadura metálica con un color plateado, sus ojos de bombillas obviamente los pinté de amarillo y a su amigo carpintero de rojo, solo quedaba empezar a dar los primeros detalles.
Step 2: here color the red button on his chest, which looks like his heart or power source, paint the lines that are by his extremities making reference to veins or some BUDS serum so paint them green.
I also gave the first filler for all the metallic armor with a silver color, his eyes of bulbs obviously I painted them yellow and his carpenter friend red, it only remained to begin to give the first details.
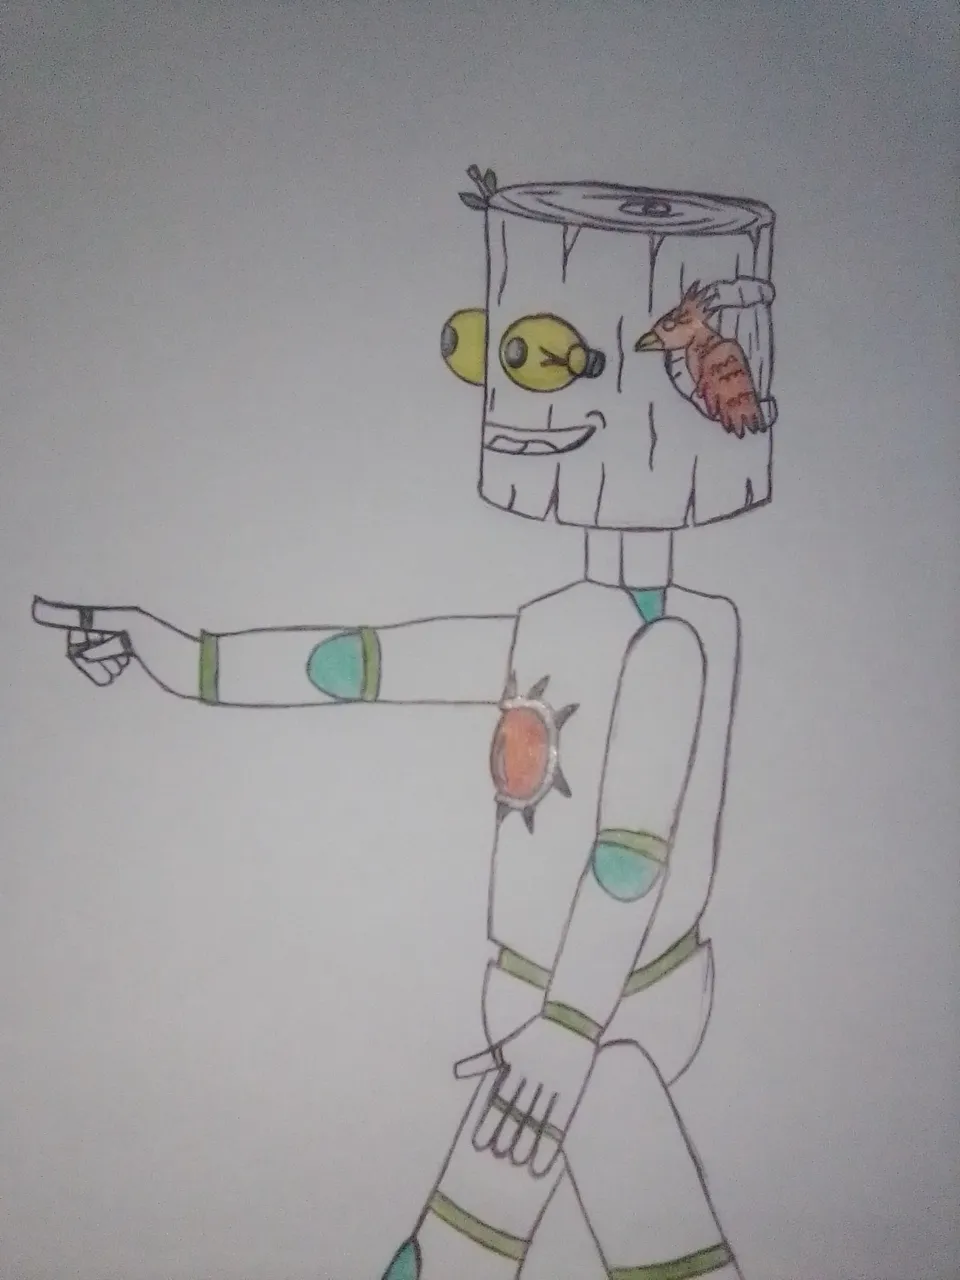
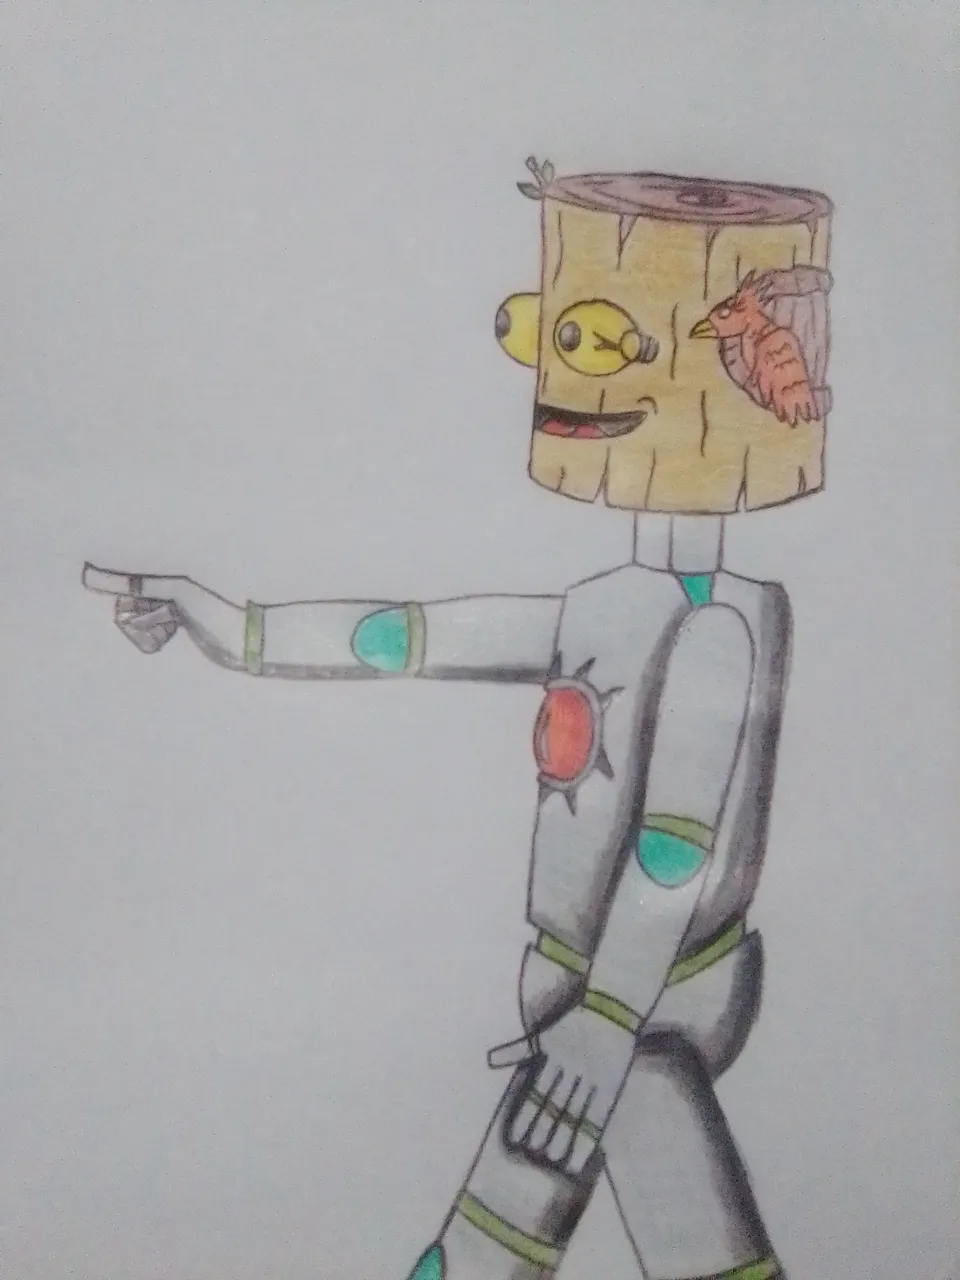
Paso 3: ya era hora de dar forma y detalle a la armadura metálica de este robot, por lo que con colores grises y oscuros como el negro coloree capa sobre capa hasta dar un estilo genial al cuerpo, simplemente quedaba dar color a su cabeza, así que continuemos
Step 3: it was time to give shape and detail to the metallic armor of this robot, so with gray and dark colors like black I colored layer upon layer to give a cool style to the body, it only remained to give color to his head, so let's continue
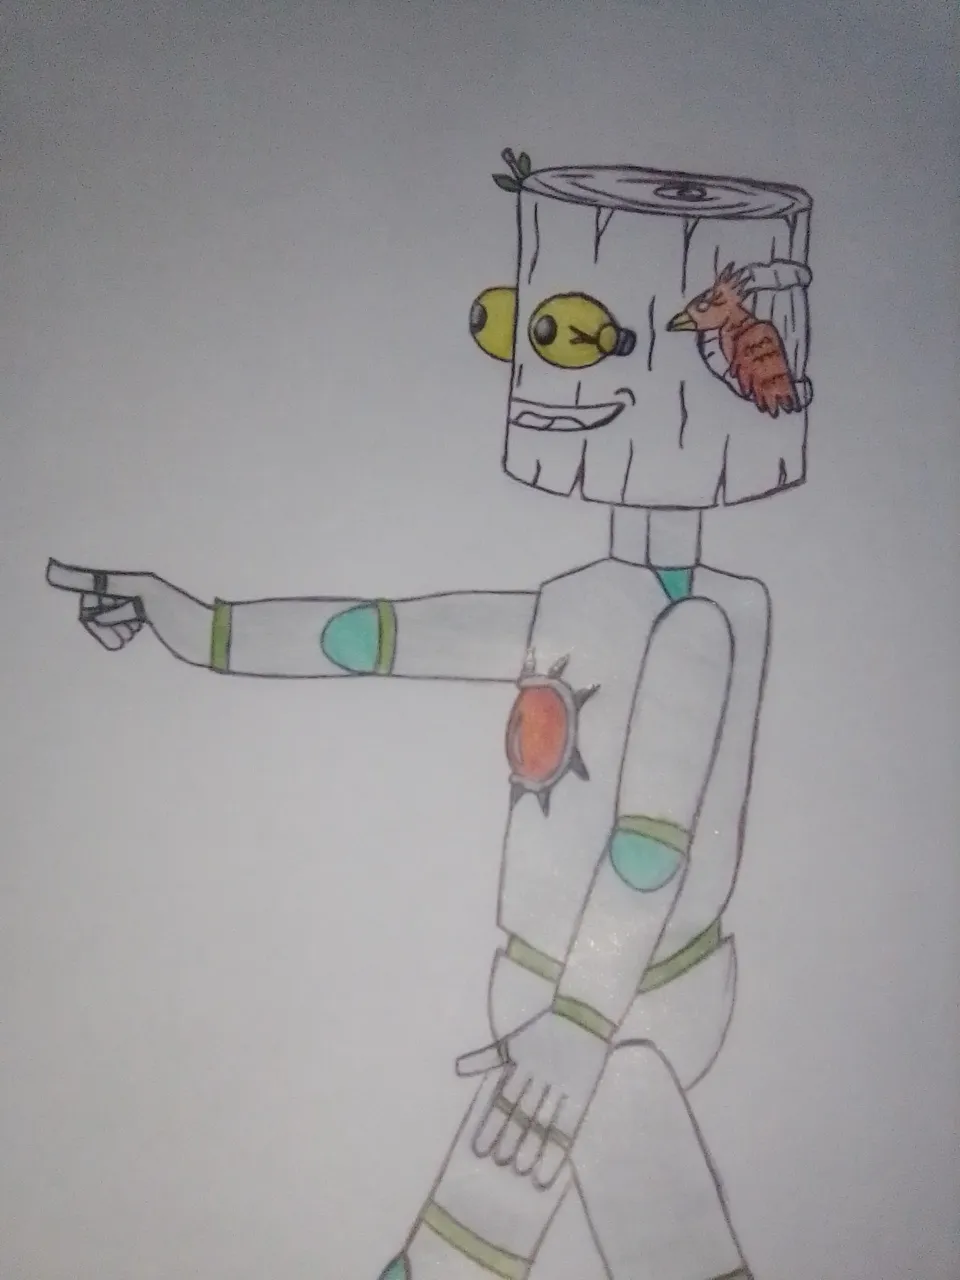
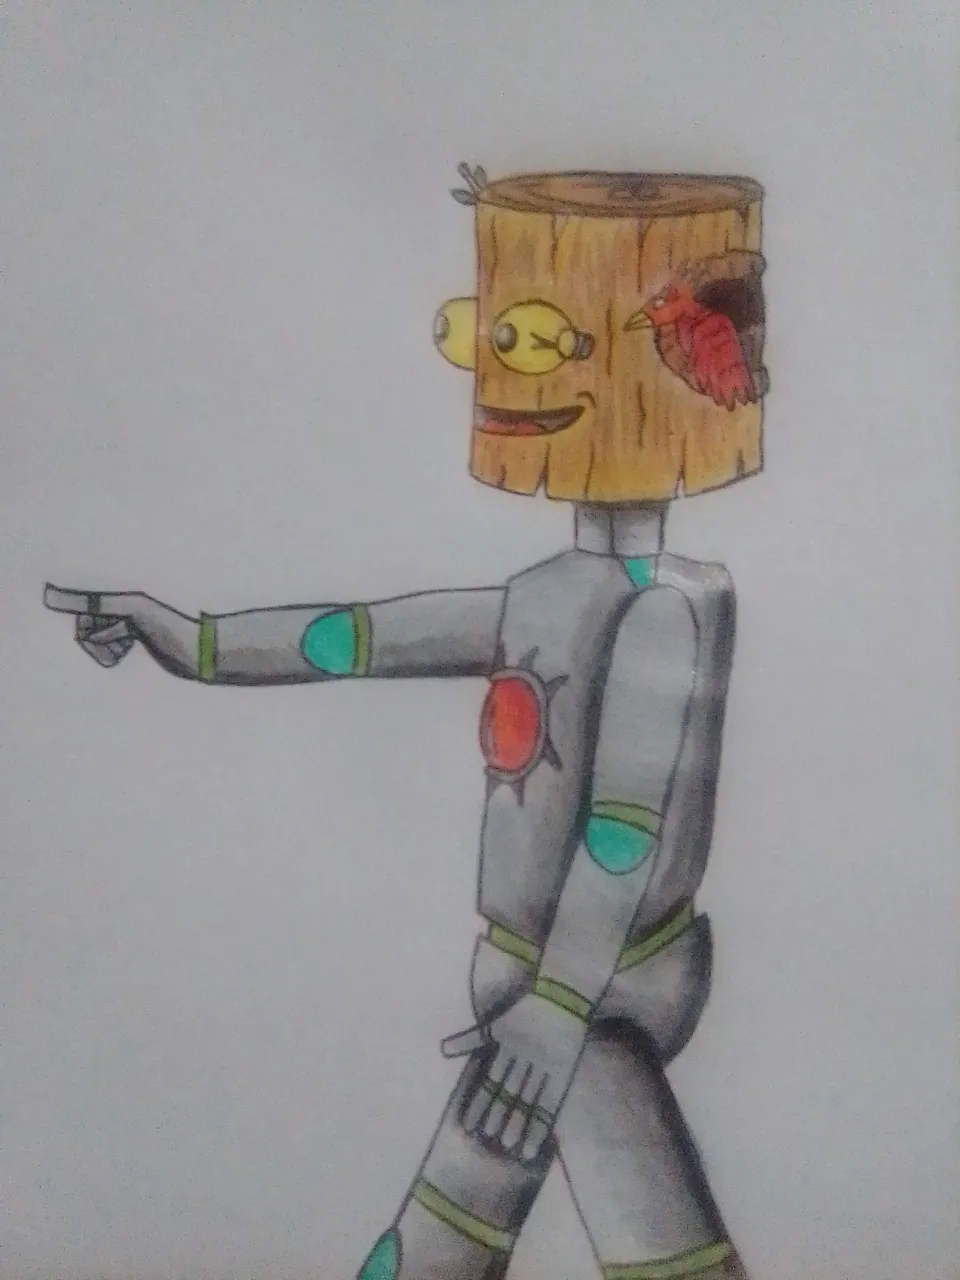
Paso 4: su cabeza de tronco estaba sumamente pálida, necesita más color marrón amarillo y dorado para hacer varios detalles como un estilo de corteza, es decir, con rayas y líneas uniformes que rodean el tronco. Por su puesto que su amigo, el carpintero, no se iba a quedar sin color, por lo que rápidamente con color negro y marrones di un poco de profundidad adentro de su casa con un poco de sombras, para terminar agregue unas gotas azules en un lado de su cabeza como si este estuviese sorprendido por algo que ha visto, espero que allá visto alguna cura o máquina que traiga de vuelta vida humana al planeta tierra.
Luego me dirigí a mi editor favorito (Photoshop) para agregar un fondo adecuado a este robot, así que mira el resultado.
Step 4: your trunk head was extremely pale, you need more yellow and golden brown to make various details like a bark style, that is, with uniform stripes and lines surrounding the trunk. Of course his friend, the carpenter, was not going to run out of color, so quickly with black and browns I gave some depth inside his house with some shadows, to finish I added some blue drops on the side of his head as if he was surprised by something he has seen, I hope he has seen some cure or machine that brings back human life to planet earth.
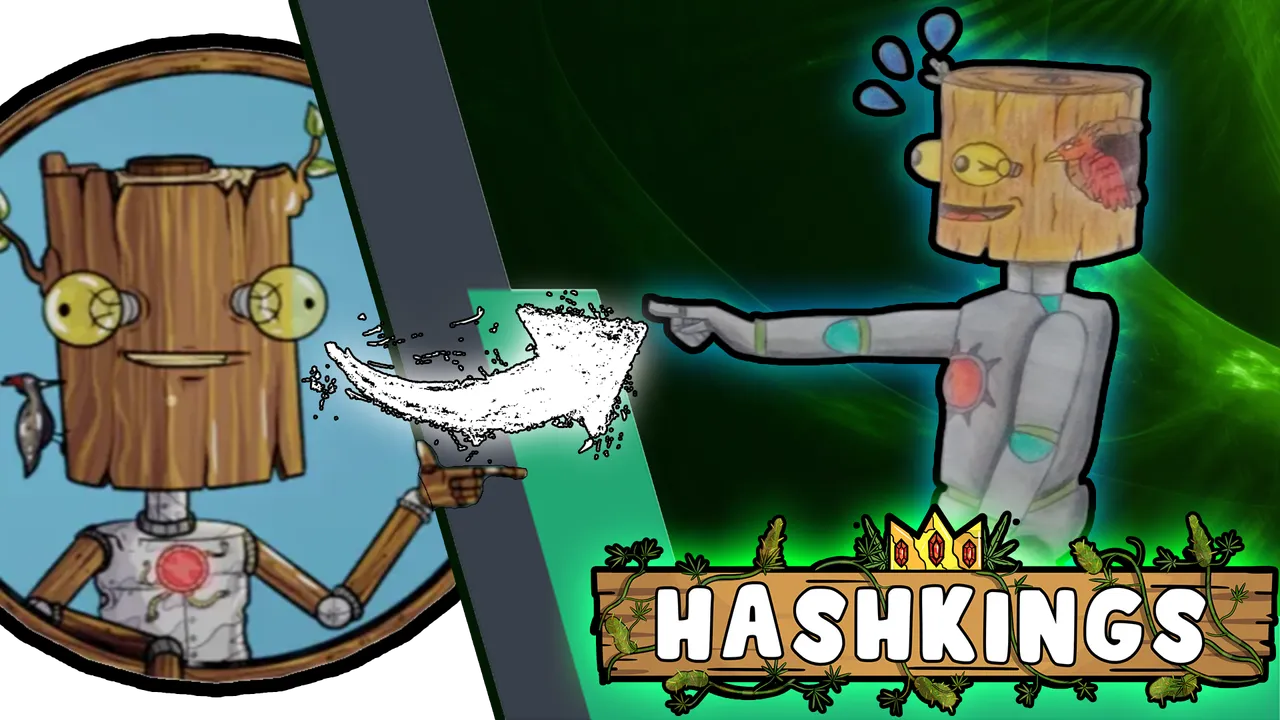
I then turned to my favorite editor (Photoshop) to add a suitable background to this robot, so check out the result.
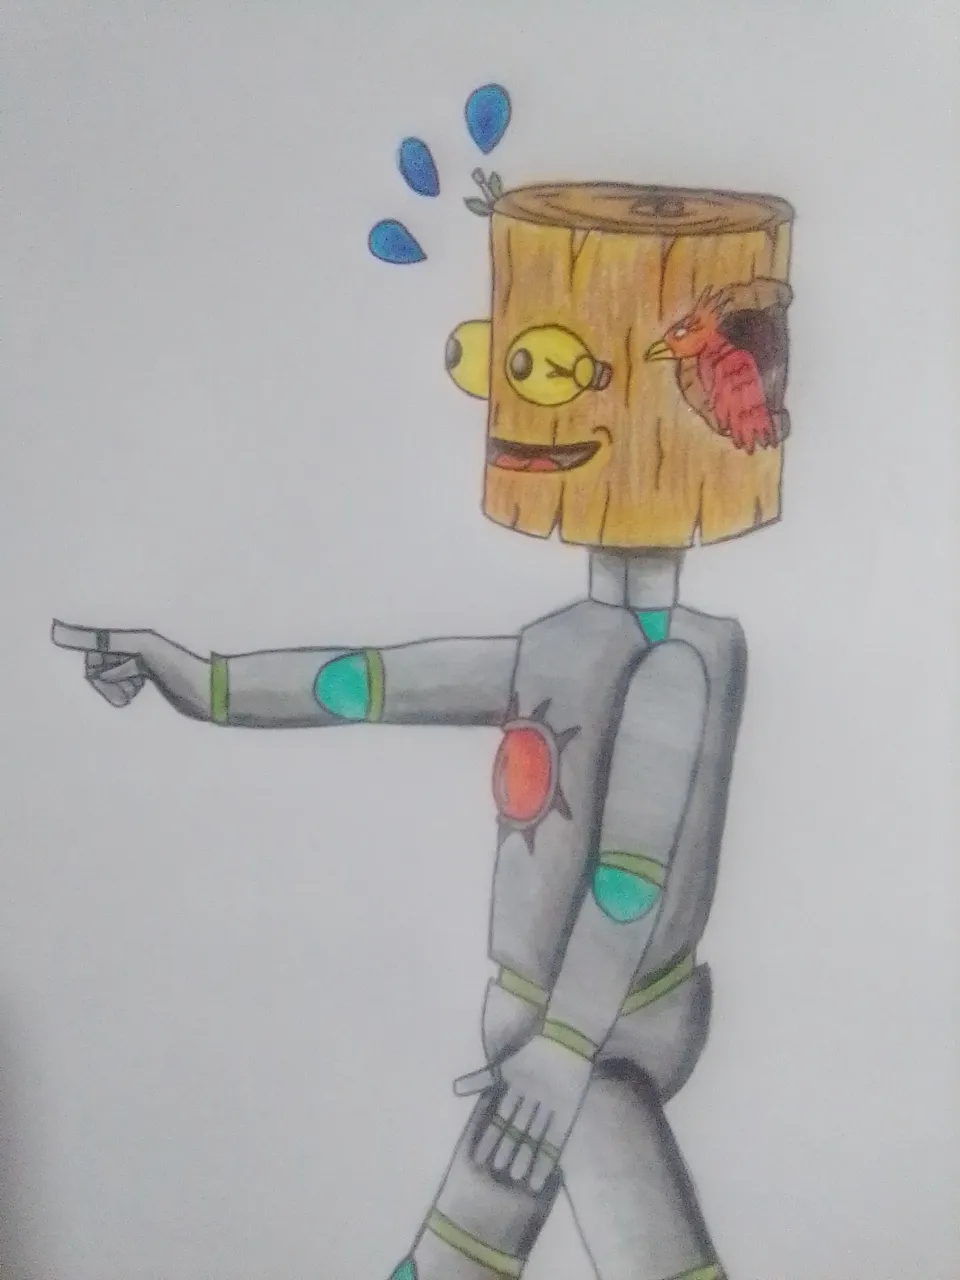
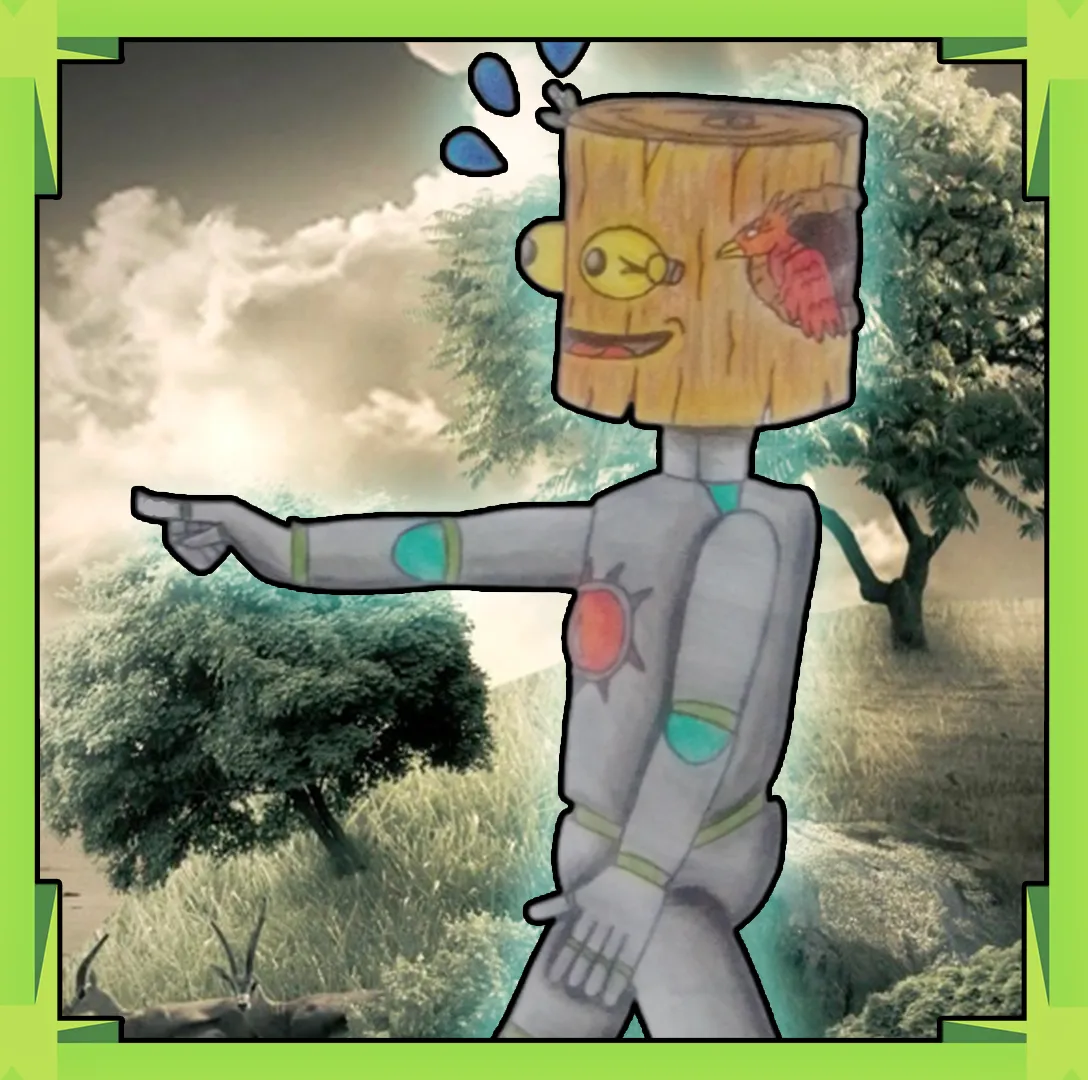
Y si te preguntas que fue lo que vio este robot, pues a día de hoy seguirá siendo un completo misterio, supongo que se llevara el secreto a la tumba Trunkset y su amigo, el pájaro carpintero.
Ok, si llegaste al final de este post me gustaría que me dejaras un comentario, muchas gracias por leer, pronto estaré de vuelta con otro dibujo, suerte a todos, espero sobre todo que hayas entendido mi dibujo al igual que las expresiones que deseaba transmitir con él...
And if you wonder what this robot saw, it will remain a complete mystery to this day, I guess Trunkset and his friend, the woodpecker, will take the secret to the grave.
Ok, if you got to the end of this post I would like you to leave me a comment, thank you very much for reading, soon I will be back with another drawing, good luck to all, I hope above all that you have understood my drawing as well as the expressions I wanted to convey with it...