Hola amigos de esta increíble comunidad Glow Up Art🤍
El día de hoy vengo a enseñarles este maquillaje artístico con temática de Zombie Pop Art para participar en la iniciativa.
Les muestro el paso a paso👇🏻
Hello friends of this amazing Glow Up Art community🤍
Today I come to show you this Zombie Pop Art themed makeup art to participate in the initiative.
I'm showing you the step by step👇🏻
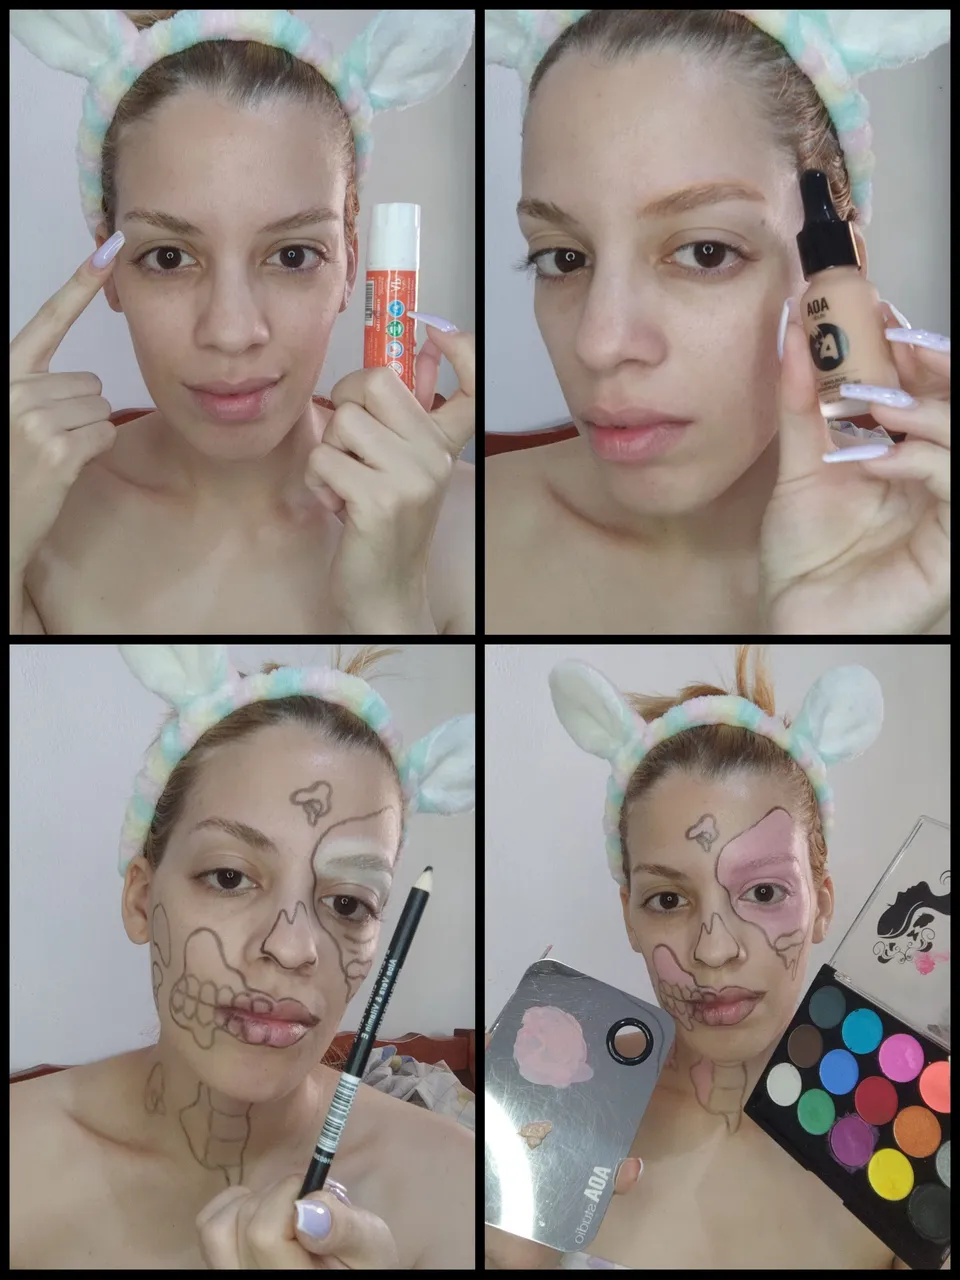
Para empezar este maquillaje utilicé pega en barra escolar encima de mis cejas para dejarlas fijas y poder trabajar mejor sobre ellas, apliqué 2 capas y peiné con ayuda de un spoolie, luego apliqué un poco de base con subtonalidad naranja para cancelar un poco el tono oscuro de mis cejas, y luego sellé con corrector blanco.
Con ayuda de un lápiz delineador de ojos negro empecé a diseñar todo el maquillaje para tener una guía en mi piel de dónde iría cada cosa y color.
Teniendo todo marcado con el lápiz mezclé en mi paleta de aluminio, un poco de base clara con pintura corporal y con ayuda de una brocha plana empecé a rellenar los espacios rosados y todo el lienzo y cuerpo del zombie en morado.
To start this makeup I used school glue stick on top of my eyebrows to fix them and to be able to work better on them, I applied 2 layers and combed with the help of a spoolie, then I applied some orange undertone foundation to cancel a little the dark tone of my eyebrows, and then I sealed with white concealer.
With the help of a black eyeliner pencil I started to design all the makeup to have a guide on my skin of where each thing and color would go.
Having everything marked with the pencil I mixed in my aluminum palette, some light base with body paint and with the help of a flat brush I started to fill in the pink spaces and all the canvas and body of the zombie in purple.
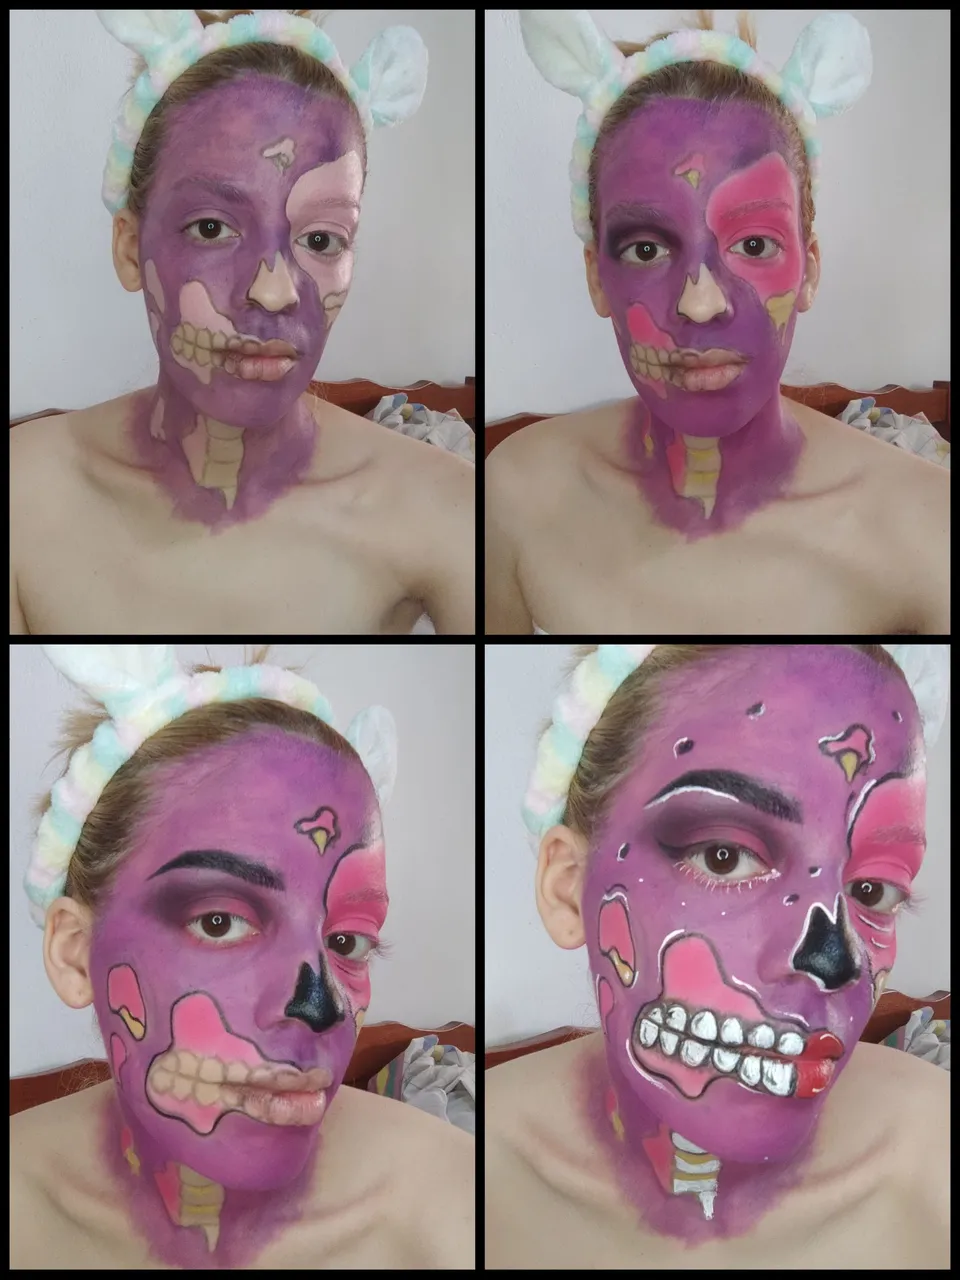
Al rellenar todo con los tonos y colores correspondientes empecé a sellar todo con sombra dependiendo del color.
En el ojo que va con estilo glam hice un poco de profundidad con sombra negra y fucsia para resaltar.
Luego, empecé a rellenar los detalles en negro con la nariz y las líneas previamente marcadas, las resalté aún más.
After filling everything with the corresponding shades and colors I started to seal everything with shadow depending on the color.
On the glam eye I did a little bit of depth with black and fuchsia shadow to highlight.
Then, I started to fill in the details in black with the nose and the previously marked lines, I highlighted them even more.
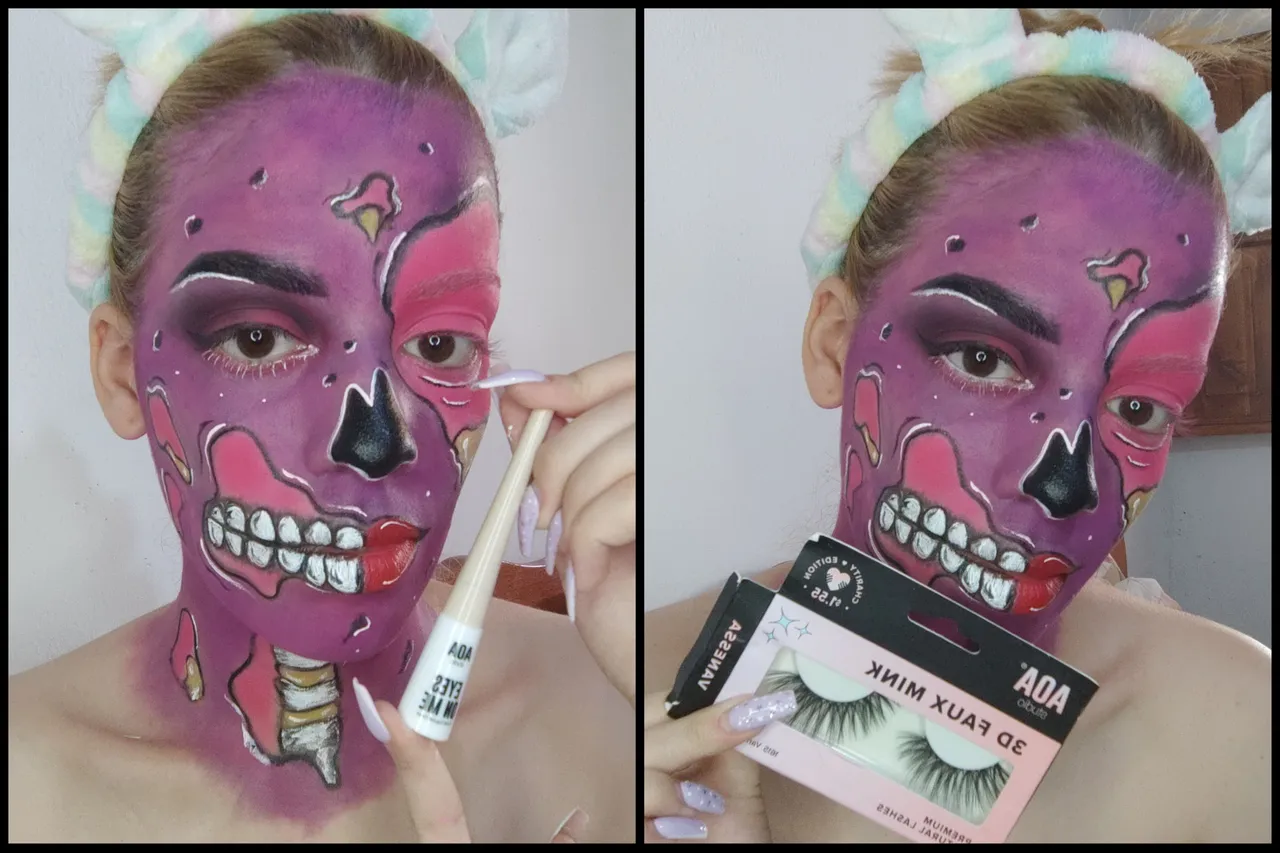
Finalicé, maquillando la mitad de mis labios con rojo, y con delineador blanco todos los detalles de los dientes y huesos, a los que luego les dí algo de sombra con negro y un poco de difuminación.
Y agregué una pestaña postiza 3D en mi ojo glam.
I finished by painting half of my lips with red, and with white eyeliner all the details of the teeth and bones, which I then shaded with black and a little bit of blending.
And I added a 3D false eyelash on my glam eye.
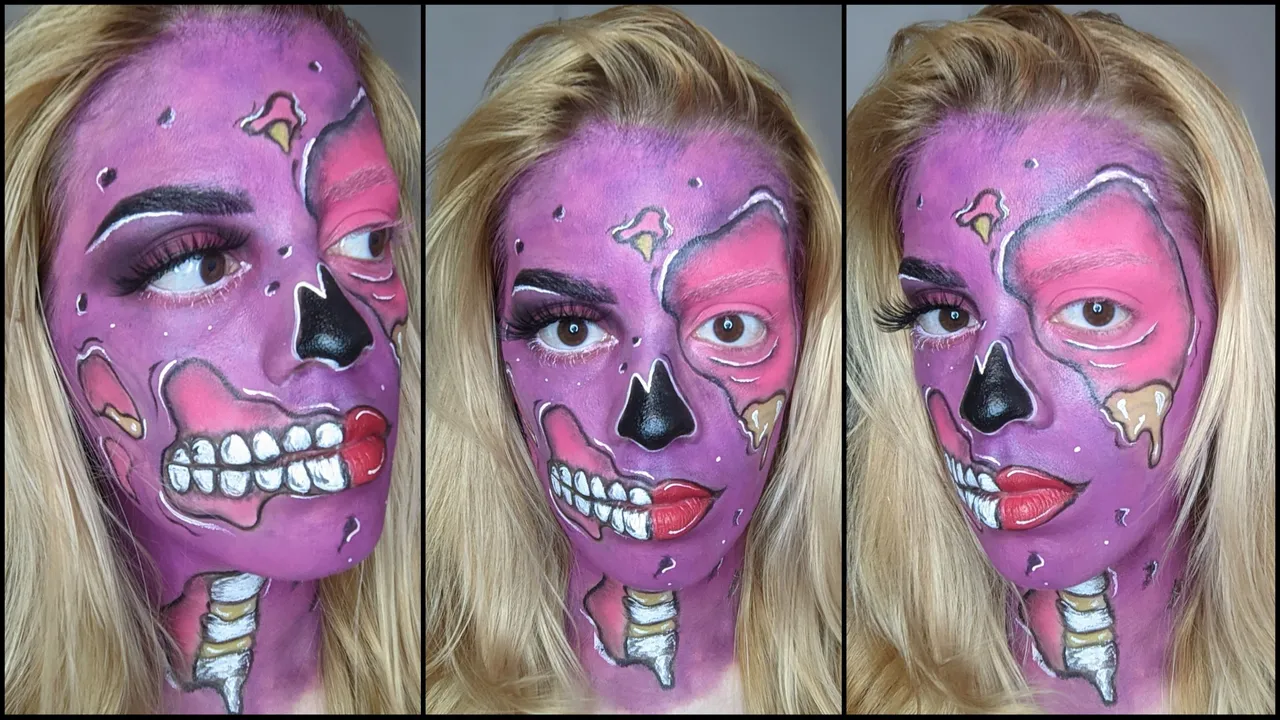
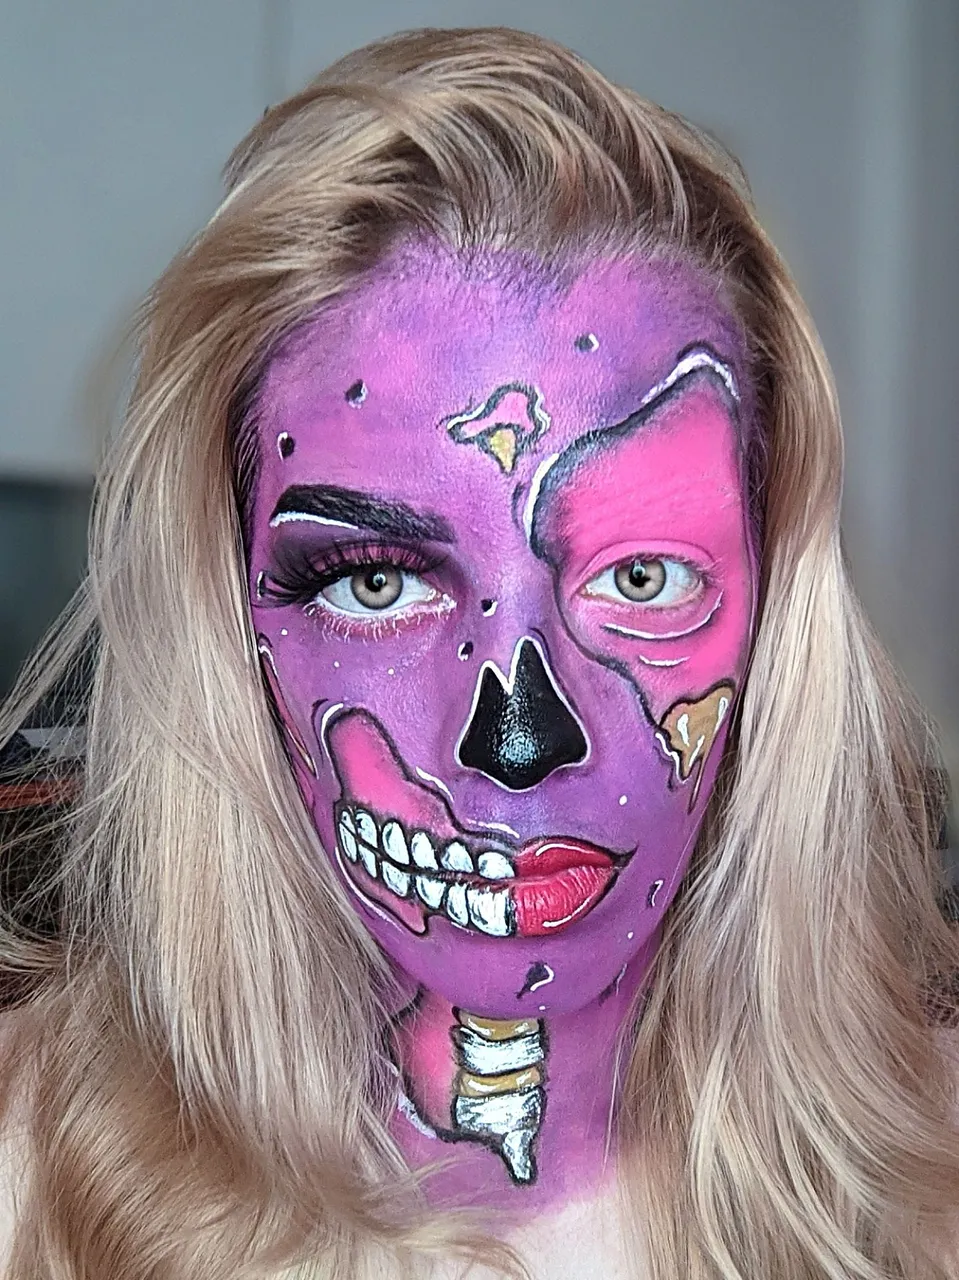
Este fue el resultado espero les guste!!🧟♀️🤍
Me gustaría invitar a @merlylop y @alexa.art a participar!!✌🏻
This was the result I hope you like it!!!🧟♀️🤍
I would like to invite @merlylop and @alexa.art to participate!!✌🏻

Todas las fotografías son de mi autoría tomadas con mi celular POCO X3 Pro
Ediciones elaboradas con PicsArt
Traducido en DeepL
All photographs are my own, taken with my POCO X3 Pro cell phone
Editions made with PicsArt
Translated at DeepL