Colorear la buttercream puede parecer muy fácil, pero la verdad no lo es tanto, sobre todo si queremos obtener tonos fuertes como el rojo, negro, azul oscuro, etc., ya que trabajamos con una base blanca, y obtendremos tonos pasteles, que no siempre son los que necesitamos, lo que termina siendo todo un dolor de cabeza.
Y les hablo por experiencia propia, pues he sufrido incluso crisis de ansiedad por pensar que mágicamente al agregar el colorante, en cuestión de segundos todo estaría listo, pero después de un tiempo de práctica cada vez es menor la preocupación a la hora de darle color a la buttercream, y hoy les cuento cómo lo hago.

Y haciendo un poco de memoria vamos a mi primer fracaso coloreando buttercream, que de hecho fue la primera torta que decoraba en mi vida, y la pidieron de color NEGRO, pero básicamente era una torta bastante sencilla, y yo en mi inocencia pensaba que todo estaría bien.
Busqué algo de información (no la suficiente, ni la mejor), y con eso me dispuse a teñir la buttercream de negro. Tomé mi crema blanca leche y le agregué colorante en polvo negro, y claro que, no obtuve negro, sino gris, pero yo continué agregando como loca más y más polvo, solo mirando el color sin detenerme a probar, y resulta que el colorante en polvo tiene un sabor horrible, y la crema estaba incomible.
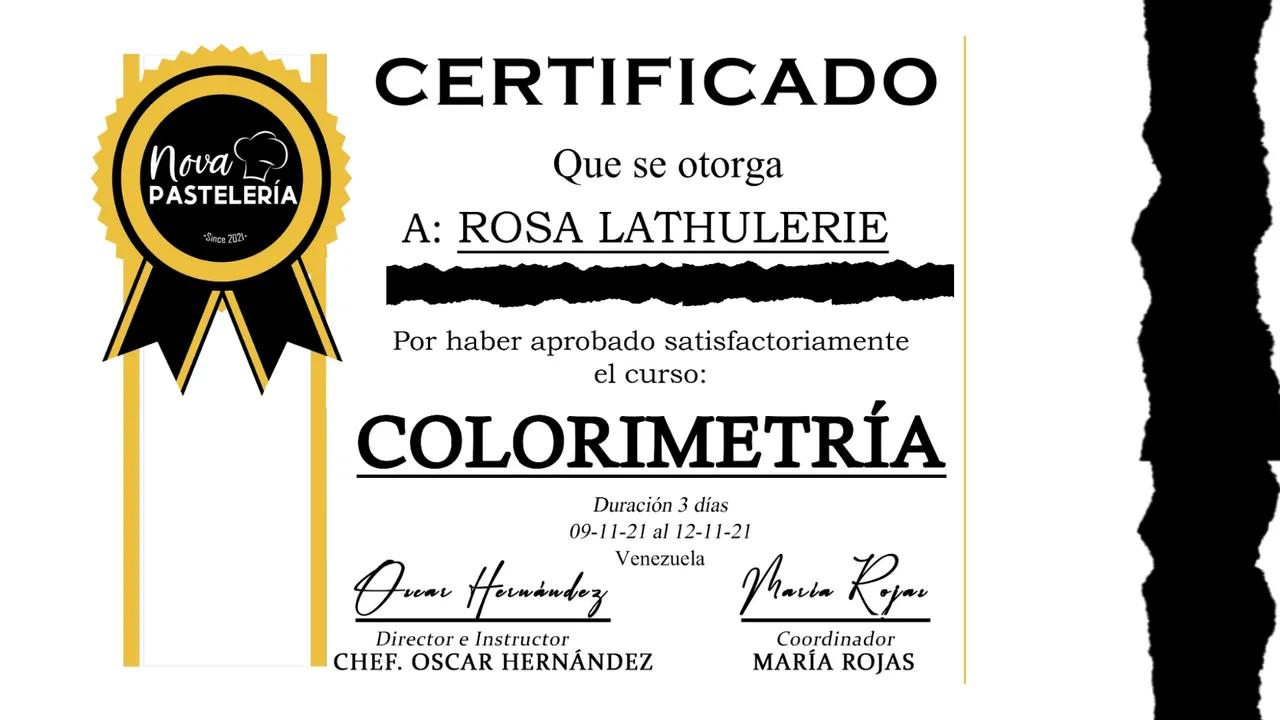
En ese momento comenzó la crisis, pero por suerte la torta era para un familiar y la convencí de cambiar el color, y usar el negro solo para pequeños detalles. Gracias a Dios aceptó y salí del apuro, pero esto me sirvió para estudiar y leer mucho más sobre cómo podía obtener tonos oscuros sin morir en el intento, de hecho hice un curso de colorimetría de estos que se realizan vía WhatsApp, porque eso no me volvería a pasar.
Y después del curso, y de leer mucho mucho, ver tutoriales, pedir consejos, y pare de contar, hay algunas cosas que tomo en cuenta a la hora de preparar colores oscuros, y que hoy compartiré con ustedes.
Para el color negro, lo más importante es iniciar con una base oscura, que perfectamente puede ser de chocolate, así que haremos una buttercream de chocolate, no demasiado oscura y comenzaremos a teñir a partir de ahí.
Para trabajar la buttercream los colorantes en gel son los más recomendados, y si alguna vez, necesitan usar en polvo porque no tienen a la mano en gel, yo lo que he hecho para solucionar es mezclar el colorante en polvo con una pequeña cantidad de esencia (de la que he usado para dar sabor a la crema) hasta disolver por completo. Eso sí, hay que agregar poco a poco, e ir probando.
Otro truco, que descubrí después de un tiempo, gracias a una amiga, es que para los colores intensos, el "reposo" de la crema en la nevera, es nuestro mejor aliado, y si es de un día para el otro, mucho mejor. Les aseguro que parece casi un milagro. Dejas una crema amarillo claro y al día siguiente te encuentras con un tono totalmente vibrante.
Si estás apurada puedes darle una hora en el freezer y eso te ayudará muchísimo. Esto lo hago cuando es una cantidad pequeña de crema.
Nunca, pero nunca, pretendas colorear la buttercream el mismo día en que vas a decorar, a menos que seas todo un experto, por lo que un día antes como mínimo asegúrate de dejar tu crema con el tono que desees. De esta manera evitarás estar a las carreras, y créeme, no querrás eso, sobre todo, si es un pastel para la venta.

Por tu salud mental, si son personas ansiosas como yo, y necesitan mucha cantidad de crema, sepárenla en varias tandas, así lograrán el color más rápido y no sentirán que mueren de angustia lentamente porque el color "no aparece". Ya luego lo mezclan todo, y listo.
Y por último, les dejo la más importante de todas las recomendaciones... lee mucho antes de aventurarte a lo desconocido. Si es para casa no pasa nada, que al final quede como quede, lo comemos todo, pero si no lo es, se ahorrarán un buen de preocupaciones y material.
En mi próximo post para la comunidad les estaré contando cómo obtener las tres tonalidades de azul que utilicé para decorar el pastel Estrella Marina del cual les he estado hablando últimamente.

Coloring the buttercream may seem very easy, but the truth is not so easy, especially if we want to obtain strong tones such as red, black, dark blue, etc., since we work with a white base, and we will obtain pastel tones, which are not always the ones we need, which ends up being quite a headache.
And I speak from my own experience, because I have even suffered anxiety crises for thinking that magically when adding the coloring, in a matter of seconds everything would be ready, but after some time of practice, the concern is less and less when it comes to color the buttercream, and today I tell you how I do it.
And doing a little memory let's go to my first failure coloring buttercream, which in fact was the first cake I decorated in my life, and they asked for BLACK color, but basically it was a fairly simple cake, and I in my innocence thought that everything would be fine.
I looked up some information (not enough, not the best), and with that I set out to dye the buttercream black. I took my white milk cream and added black powder coloring, and of course, I didn't get black, but gray, but I kept adding like crazy more and more powder, just looking at the color without stopping to taste, and it turns out that the powder coloring tastes horrible, and the cream was inedible.
At that moment the crisis began, but luckily the cake was for a relative and I convinced her to change the color, and use black only for small details. Thank God she accepted and I got out of the trouble, but this helped me to study and read a lot more about how I could get dark tones without dying in the attempt, in fact I took a colorimetry course of those that are done via WhatsApp, because that would not happen to me again.
And after the course, and after reading a lot, watching tutorials, asking for advice, and stop counting, there are some things that I take into account when preparing dark colors, and that today I will share with you.
For the black color, the most important thing is to start with a dark base, which can perfectly be chocolate, so we will make a chocolate buttercream, not too dark and start dyeing from there.
To work the buttercream, gel colorants are the most recommended, and if you ever need to use powder because you don't have gel colorants at hand, what I have done to solve this is to mix the powder colorant with a small amount of essence (the one I have used to flavor the cream) until it is completely dissolved. Of course, you have to add it little by little, and keep tasting.
Another trick that I discovered after a while, thanks to a friend, is that for intense colors, the "resting " of the cream in the refrigerator is our best ally, and if it is overnight, so much the better. I assure you that it seems almost a miracle. You leave a light yellow cream and the next day you find yourself with a totally vibrant tone.
If you are in a hurry you can give it an hour in the freezer and that will help you a lot. I do this when it's a small amount of cream.
Never, but never, pretend to color the buttercream the same day you are going to decorate, unless you are an expert, so at least one day before make sure you leave your cream with the shade you want. This way you'll avoid being on the run, and believe me, you don't want that, especially if it's a cake for sale.
For your mental health, if you are anxious people like me, and you need a lot of cream, separate it into several batches, so you will achieve the color faster and you will not feel like you are dying of anguish slowly because the color "does not appear ". Then mix it all together, and that's it.
And finally, I leave you with the most important of all recommendations... read a lot before venturing into the unknown. If it's for home, it's okay, in the end we'll eat it all, but if it's not, you'll save a lot of worries and material.
In my next post for the community I will be telling you how to get the three shades of blue that I used to decorate the Sea Star cake which I've been telling you about lately.