Hey Steemians! How about a little food discovery today?!

Believe it or not, 'fig newtons' are not available here in Chile. So, my sister was reminiscing the other day about how she missed fig newtons so, hello, inspiration!

They're actually fun to make and way healthier than anything you would buy in the store. Had you ever thought about how they make fig newtons? I never did until I got the inspiration to bring back some memories.

I hope you enjoy the photos. Side Note: I have never had a successful cookie post. Every post of mine that was cookies has done very poorly. It's a mystery to me, because no matter what the gathering, the cookies are always the first to go on the desert tray, always.

Well, maybe we can change things with my fig newton experiment?

RECIPE
Ingredients
1 1/2 cups whole wheat flour
1 cup (2 sticks butter)
1/2 cup sugar in the raw (turbinado sugar)
1 egg, beaten
zest from 1 orange
1 teaspoon vanilla extract
1/2 teaspoon salt
**Filling:
1 1/3 cups dried figs, stems cut off
1 3/4 cups water
2/3 cup applesauce (unsweetened)
1/4 cup sugar in the raw (turbinado sugar)
3 tablspoons honey
zest from 1 orange
Instructions
Filling:
In a blender or food processor combine all ingredients for filling and blend until smooth. You'll probably need to scrape the sides down at least once between pulsing to get all the chunks.
Dough:
Beat butter and raw sugar until creamed. Add egg, vanilla, salt, and zest. Mix in flour until combined.
Assembly:
- Preheat oven to 350 degrees F (180 C) and line a baking tray with parchment or silicone pads.
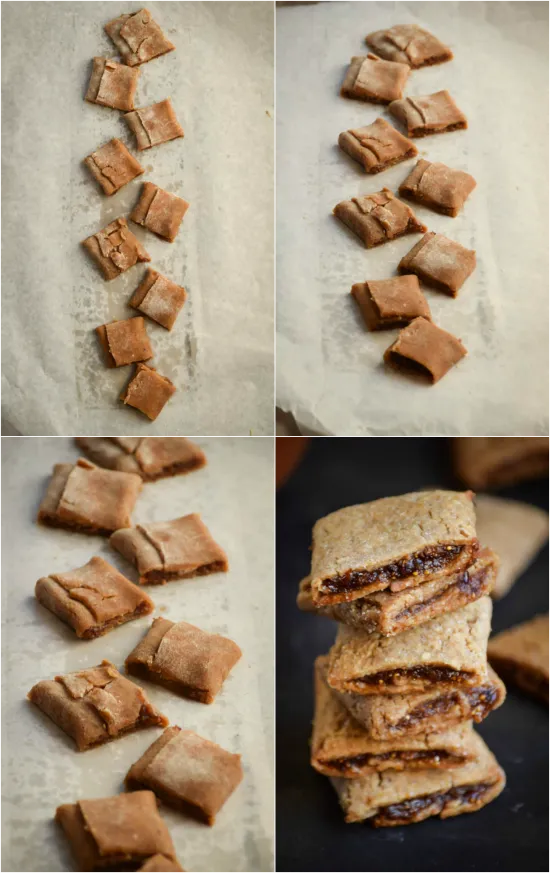
On lightly floured surface, roll out half of dough into a rectangle roughly 1/8 inch thick. cut into strips about 3 1/2 inches wide and use a pastry bag fitted with large tip (or just a spoon) to spread filling in a straight, 1 inch wide line down center of strips. Fold sides over filling and press down gently to seal. Cut strips into squares and place (fold side down) on baking tray.
- Bake for 10 - 12 minutes or until edges are golden.
- Remove from oven and cool before serving.


ALL CONTENT IS MINE AND ORIGINAL! All of these food photos were taken with my Nikon D5300 and my favorite Lens, the Nikon AF-S FX NIKKOR 50mm f/1.8G. You can find out more in my INTRO POST.


AND A HUGE MASSIVE SHOUT OUT TO@rigaronib for designing my logo!!!!


I am always open to feedback, and would love to know how you feel I could do better and please do not forget to UPVOTE AND FOLLOW ME
PAY ME 100% STEEM POWER - BADGES Courtesy of @elyaque
Believe it or not, 'fig newtons' are not available here in Chile. So, my sister was reminiscing the other day about how she missed fig newtons so, hello, inspiration!
They're actually fun to make and way healthier than anything you would buy in the store. Had you ever thought about how they make fig newtons? I never did until I got the inspiration to bring back some memories.
I hope you enjoy the photos. Side Note: I have never had a successful cookie post. Every post of mine that was cookies has done very poorly. It's a mystery to me, because no matter what the gathering, the cookies are always the first to go on the desert tray, always.
RECIPE
Ingredients
1 1/2 cups whole wheat flour
1 cup (2 sticks butter)
1/2 cup sugar in the raw (turbinado sugar)
1 egg, beaten
zest from 1 orange
1 teaspoon vanilla extract
1/2 teaspoon salt
**Filling:
1 1/3 cups dried figs, stems cut off
1 3/4 cups water
2/3 cup applesauce (unsweetened)
1/4 cup sugar in the raw (turbinado sugar)
3 tablspoons honey
zest from 1 orange
Instructions
Filling:
In a blender or food processor combine all ingredients for filling and blend until smooth. You'll probably need to scrape the sides down at least once between pulsing to get all the chunks.
Dough:
Beat butter and raw sugar until creamed. Add egg, vanilla, salt, and zest. Mix in flour until combined.
Assembly:
- Preheat oven to 350 degrees F (180 C) and line a baking tray with parchment or silicone pads.
On lightly floured surface, roll out half of dough into a rectangle roughly 1/8 inch thick. cut into strips about 3 1/2 inches wide and use a pastry bag fitted with large tip (or just a spoon) to spread filling in a straight, 1 inch wide line down center of strips. Fold sides over filling and press down gently to seal. Cut strips into squares and place (fold side down) on baking tray. - Bake for 10 - 12 minutes or until edges are golden.
- Remove from oven and cool before serving.
ALL CONTENT IS MINE AND ORIGINAL! All of these food photos were taken with my Nikon D5300 and my favorite Lens, the Nikon AF-S FX NIKKOR 50mm f/1.8G. You can find out more in my INTRO POST.
UPVOTE AND FOLLOW ME